steering JAGUAR XJ6 1994 2.G Workshop Manual
[x] Cancel search | Manufacturer: JAGUAR, Model Year: 1994, Model line: XJ6, Model: JAGUAR XJ6 1994 2.GPages: 521, PDF Size: 17.35 MB
Page 10 of 521
Introduction i
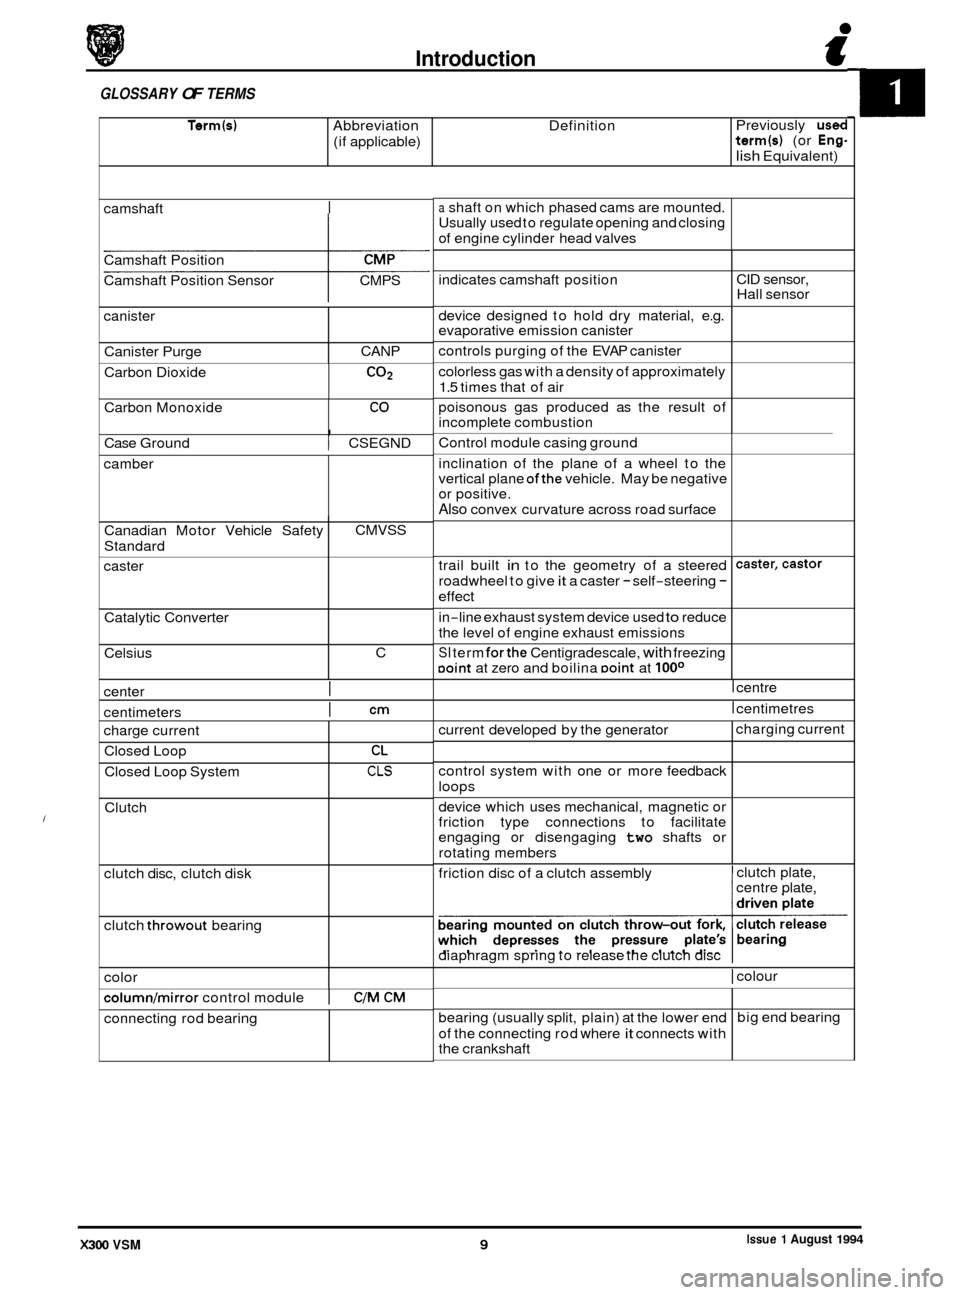
Term(s) Abbreviation Definition
(if applicable)
GLOSSARY OF TERMS
Previously used term(s) (or Eng-
lish Equivalent)
indicates camshaft position
device designed to hold dry material, e.g.
evaporative emission canister
controls purging of the EVAP canister
colorless gas with a density of approximately
1.5 times that of air
poisonous gas produced as the result of
incomplete combustion
camshaft
I
CID
sensor,
Hall sensor
Camshaft
Position
Camshaft Position Sensor CMPS
canister
Canister Purge CANP
Carbon Dioxide
CO2
I Case Ground I CSEGND
Carbon
Monoxide
camber
CO
Canadian Motor Vehicle Safety
Standard
caster
Catalytic Converter
Celsius
center
I
CMVSS
C
centimeters
I cm
trail built in to the geometry of a steered
roadwheel to give
it a caster - self-steering -
effect
caster,castor
color
columnlmirror control module I C/M CM
charge current
Closed Loop
Closed Loop System
Clutch
clutch disc, clutch disk
clutch
throwout bearing
connecting rod bearing
CL
CLS
a shaft on which phased cams are mounted.
Usually used to regulate opening and closing
of engine cylinder head valves
current developed by the generator
control system with one or more feedback
loops
device which uses mechanical, magnetic or
friction type connections to facilitate
engaging or disengaging
two shafts or
rotating members charging
current
Control
module casing ground
inclination of the plane of a wheel to the
vertical plane
ofthe vehicle. May be negative
or positive.
Also convex curvature across road surface
bearing (usually split, plain) at the lower end
of the connecting rod where
it connects with
the crankshaft big
end bearing
in
-line exhaust
system device used to reduce
the level of engine exhaust emissions
SI term forthe Centigradescale, with freezing Doint at zero and boilina Doint at looo
I centre
I centimetres
friction disc of a clutch assembly clutch
plate,
centre plate,
diaphragm spring to release the clutch disc
I colour
Issue 1 August 1994 X300 VSM 9
Page 22 of 521
(if applicable) term(s) (or Eng-
lish Equivalent)
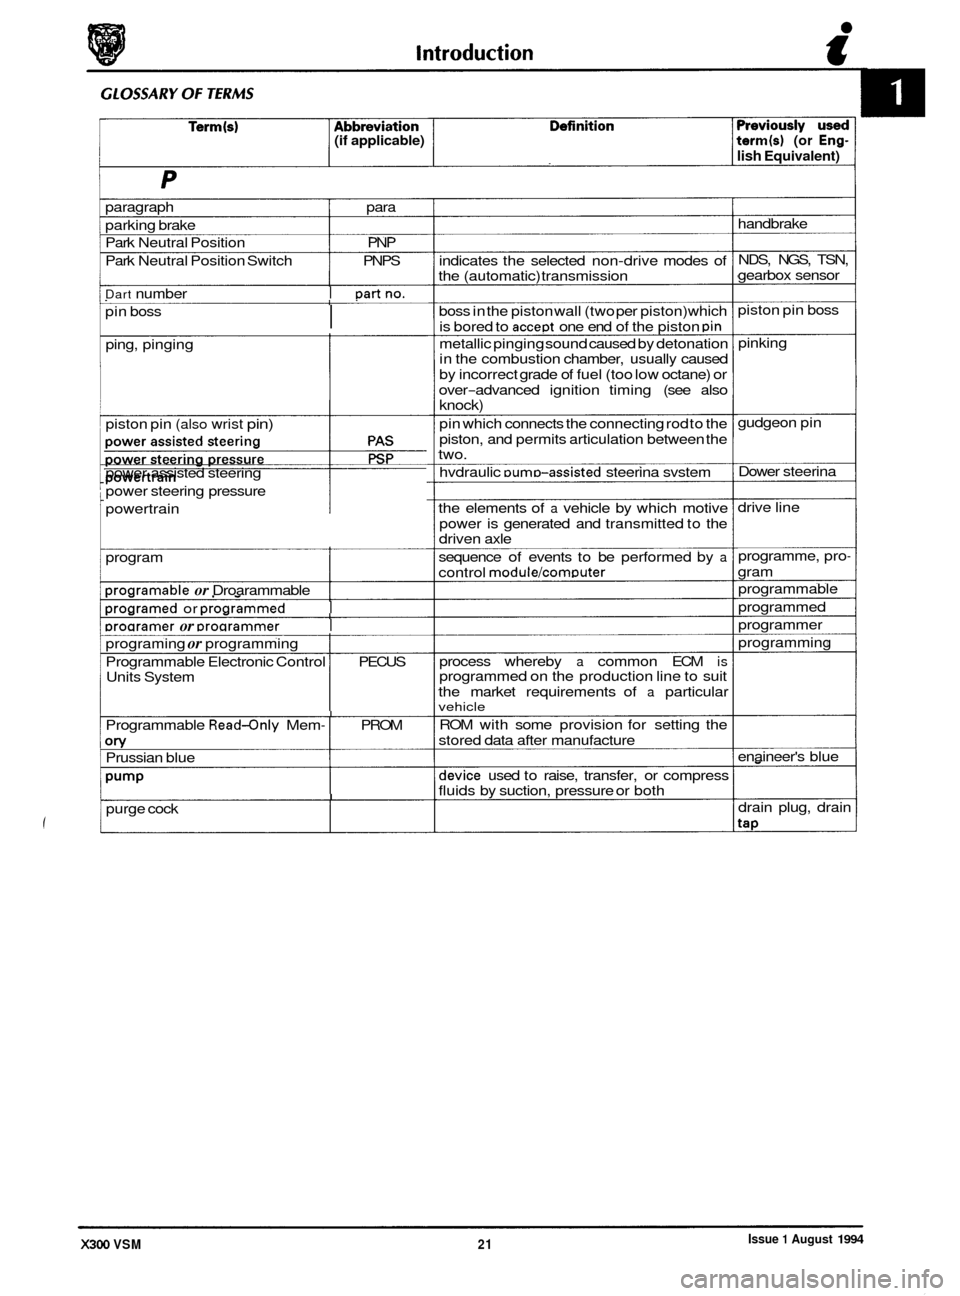
paragraph para
parking brake
Park Neutral Position PNP
Park Neutral Position Switch PNPS
Dart number I Dartno.
I pin boss
ping, pinging
piston pin
(also wrist pin)
power assisted steering
power steering pressure
. powertrain
program
Droaramable or Droarammable I
Droaramed or Droarammed I
Droaramer or Droarammer I
programing or programming
Programmable Electronic Control
I PECUS
Units System
I Programmable Read-only Mem- I PROM
on/ Prussian blue
Pump
purge cock I
indicates the selected non-drive modes of
the (automatic) transmission
boss in the piston wall (two per piston) which
is bored to
accept one end of the piston pin
metallic pinging sound caused by detonation
in the combustion chamber, usually caused
by incorrect grade of fuel (too low octane) or
over
-advanced ignition timing (see also knock)
pin which connects the connecting rod to the
piston, and permits articulation between the
two.
hvdraulic
DumD-assisted steerina svstem
the elements of
a vehicle by which motive
power is generated and transmitted to the
driven axle
sequence of events to be performed by
a
control module/comDuter
process whereby a common ECM is programmed on the production line to suit
the market requirements of
a particular vehicle
ROM with some provision for setting the
stored data after manufacture
device used to raise, transfer, or compress
fluids by suction, pressure or both handbrake
NDS, NGS, TSN,
gearbox sensor
piston pin boss
pinking
gudgeon pin
Dower steerina
drive line
programme, pro
-
gram
programmable
programmed
programmer
programming
enaineer's blue
drain plug, drain
tap
Issue 1 August 1994 X300 VSM 21
Page 27 of 521
Term(s) Abbreviation Definition Previously used
(if applicable) term(s) (or Eng-
lish Equivalent)
T
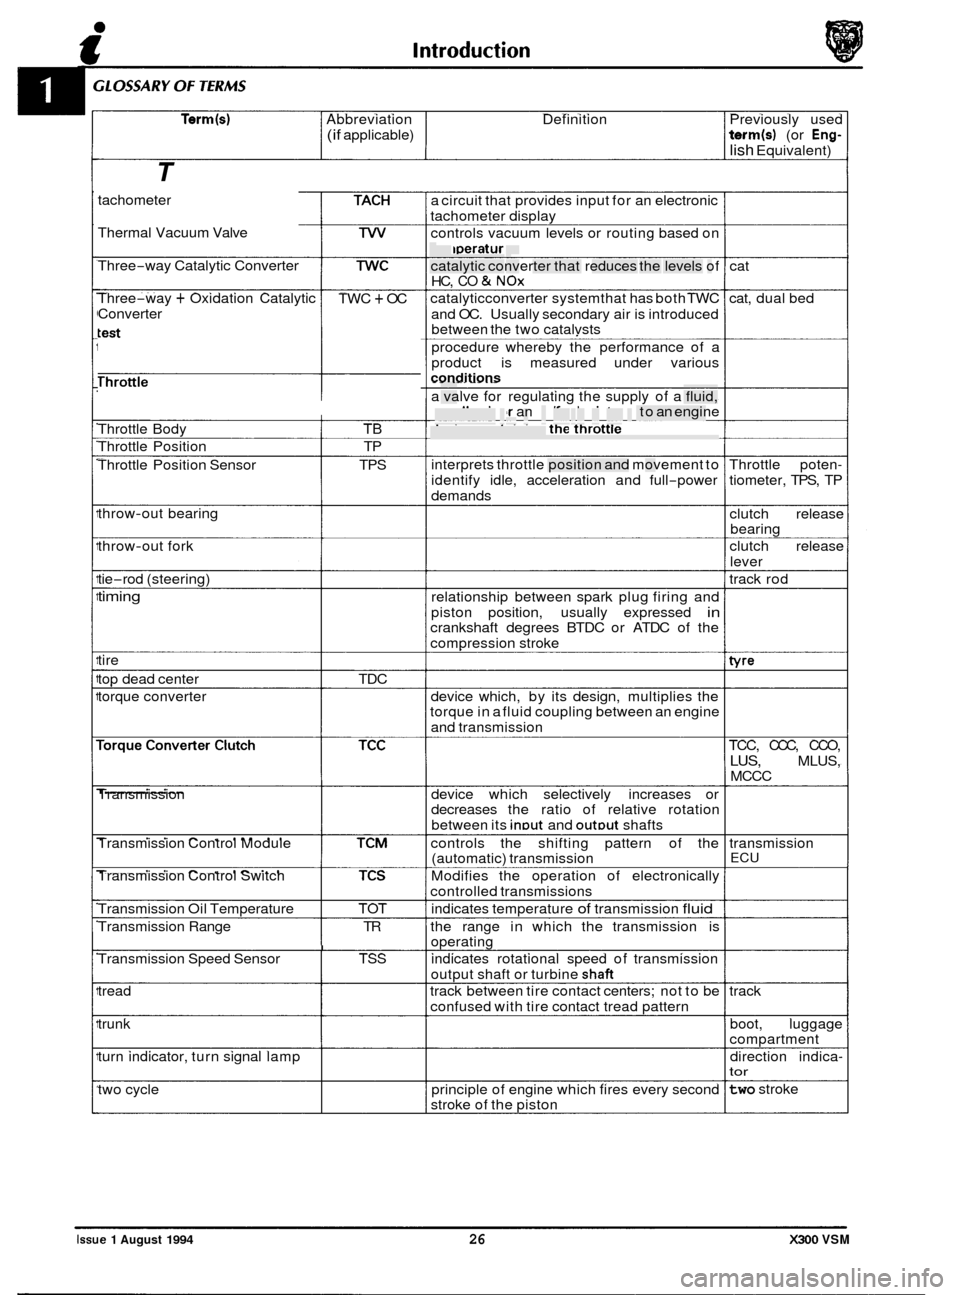
tachometer
Thermal Vacuum Valve
Three
-way Catalytic Converter
Three
-way + Oxidation Catalytic
Converter TWC + OC
Throttle
------I
Throttle Body TB
Throttle Position TP
Throttle Position Sensor TPS
throw
-out bearing
throw
-out fork
tie
-rod (steering)
timing
tire
top dead center TDC
torque converter
Transmission
Transmission Control Module
Transmission Control Switch
Transmission Oil Temperature TOT
Transmission Range TR
I Transmission Speed Sensor TSS
tread
trunk
turn indicator, turn signal lamp
two cycle a
circuit that provides input for an electronic
tachometer display
controls vacuum levels or routing based on
temperature
catalytic converter that reduces the levels of
HC,
CO & NOx
catalyticconverter systemthat has both TWC
and OC. Usually secondary air is introduced
between the two catalvsts
procedure whereby the performance of a
product is measured under various
conditions - - . -. . . - . . -
a valve for regulating the supply of a fluid,
usually air or an aidfuel mixture, to an engine
device containing the throttle
interprets throttle position and movement to
identify idle, acceleration and full
-power
demands
relationship between spark plug firing and
piston position, usually expressed
in crankshaft degrees BTDC or ATDC of the
compression stroke
device which, by its design, multiplies the
torque in a fluid coupling between an engine
and transmission
device which selectively increases or
decreases the ratio of relative rotation
between its
inDut and outDut shafts
controls the shifting pattern of the
(automatic) transmission
Modifies the operation of electronically
controlled transmissions
indicates temperature
of transmission fluid
the range in which the transmission is
operating
indicates rotational speed of transmission
output shaft or turbine
shaft
track between tire contact centers; not to be
confused with tire contact tread pattern
principle of engine which fires every second
stroke of the piston cat
cat, dual bed
Throttle poten
-
tiometer, TPS, TP
clutch release
bearing
clutch release
lever
track rod
tvre
TCC, CCC, CCO,
LUS, MLUS,
MCCC
transmission
ECU
track boot, luggage
compartment
direction indica
- tor
two stroke
Issue 1 August 1994 26 X300 VSM
Page 34 of 521
2.2 VEHICLE RECOVERY
8 2.2.1 General
m: Prior to vehicle recovery, always ensure the vehicle
keys are available and the vehicle security system is
'OFF'.
The safest and preferred method of vehicle recovery is by
flat bed transporter, although a rear suspended tow may
also be used.
The front and rear towing eyes are provided for use only in
an emergency to move the vehicle
if it is causing an
obstruction, on police instructions, or, when winching the
vehicle onto a recovery transporter.
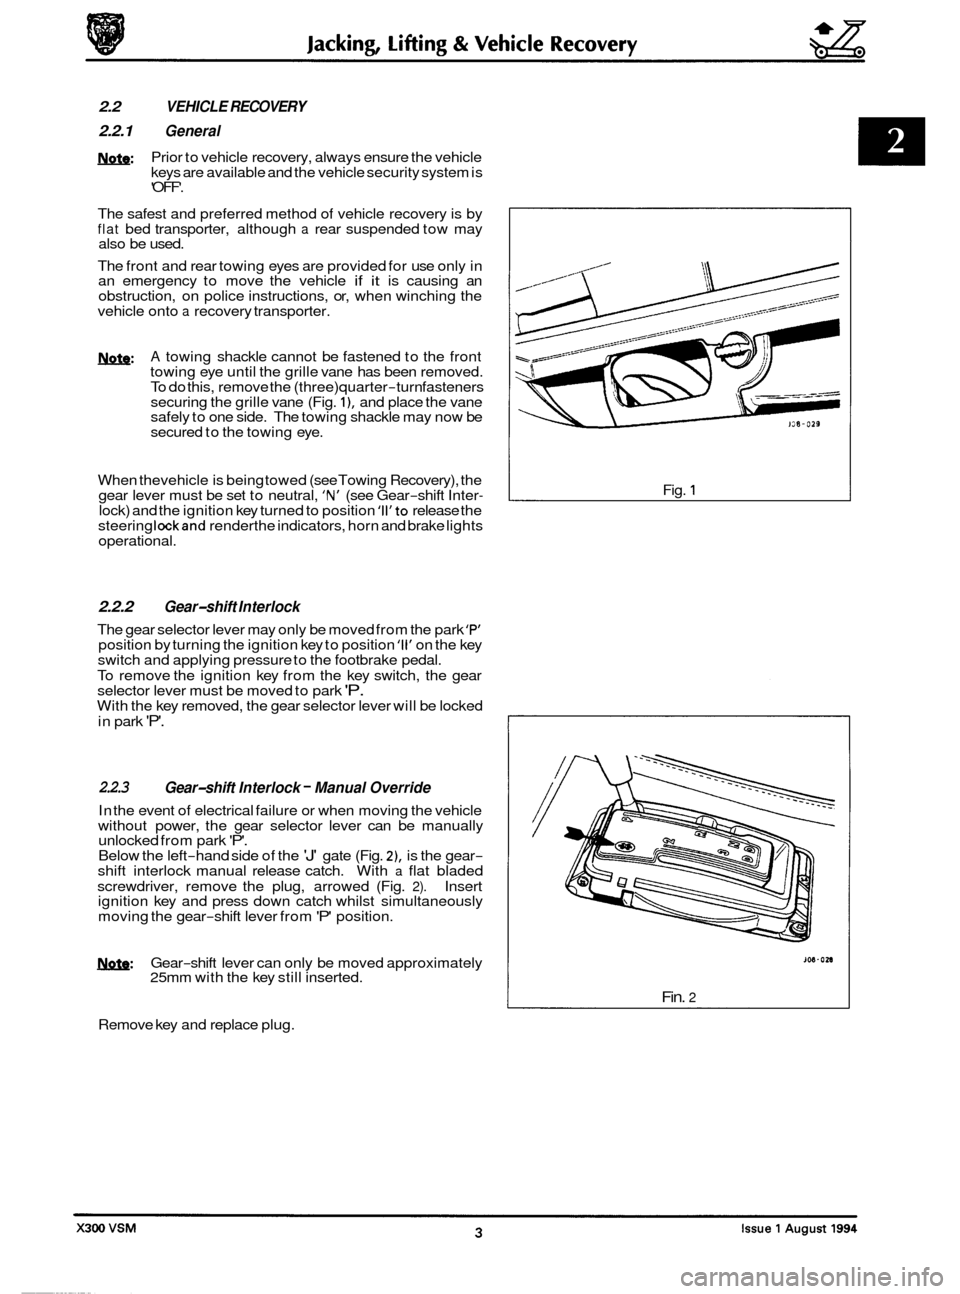
m: A towing shackle cannot be fastened to the front
towing eye until the grille vane has been removed.
To do this, remove the (three) quarter
-turn fasteners
securing the grille vane (Fig. I), and place the vane
safely to one side. The towing shackle may now be
secured to the towing eye.
0 When thevehicle is being towed (see Towing Recovery), the
gear lever must be set to neutral, 'N' (see Gear-shift Inter- lock) and the ignition key turned to position 'II'to release the
steering lockand renderthe indicators, horn and brake lights
operational.
2.2.2 Gear-shift Interlock
The gear selector lever may only be moved from the park 'F" position by turning the ignition key to position '11' on the key
switch and applying pressure to the footbrake pedal.
To remove the ignition key from the key switch, the gear
selector lever must be moved to park
'P. With the key removed, the gear selector lever will be locked
in park
'P'.
2.2.3
In the event of electrical failure or when moving the vehicle
without power, the gear selector lever can be manually
unlocked from park
'P'. Below the left-hand side of the 'J' gate (Fig. Z), is the gear- shift interlock manual release catch. With a flat bladed
screwdriver, remove the plug, arrowed (Fig. 2). Insert
ignition key and press down catch whilst simultaneously
moving the gear
-shift lever from 'P' position.
Gear-shift Interlock - Manual Override
U: Gear-shift lever can only be moved approximately
25mm with the key still inserted.
Remove key and replace plug. Fig.
1
Fin. 2
Page 35 of 521
gg Jacking, lifting & Vehicle Recovery
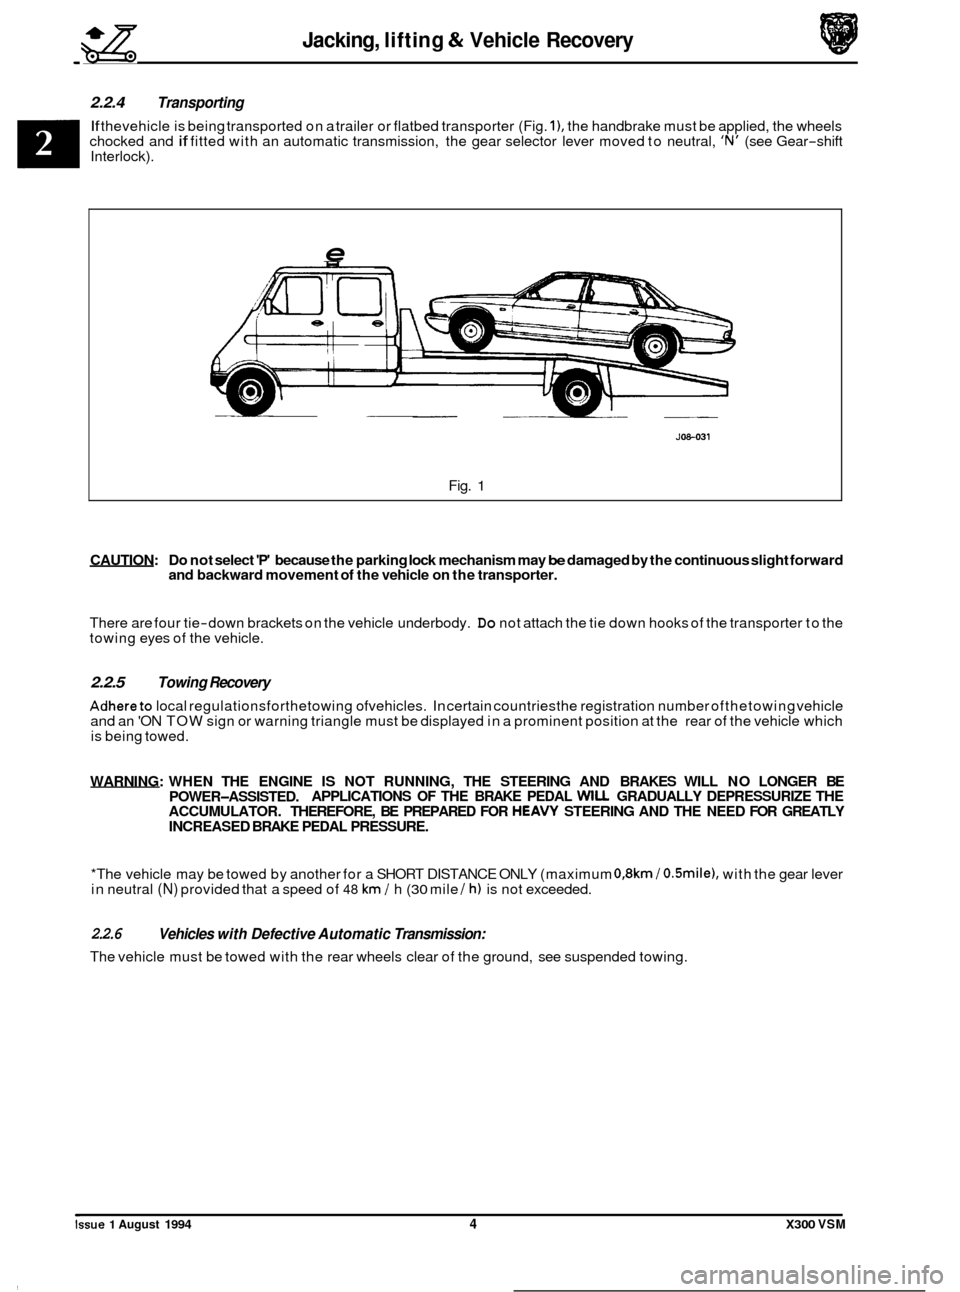
2.2.4 Transporting
If thevehicle is being transported on a trailer or flatbed transporter (Fig. I), the handbrake must be applied, the wheels
chocked and if fitted with an automatic transmission, the gear selector lever moved to neutral, 'N' (see Gear-shift
Interlock).
e
JOS-031
Fig. 1
CAUTION: Do not select 'P' because the parking lock mechanism may be damaged by the continuous slight forward
and backward movement of the vehicle on the transporter.
There are four tie-down brackets on the vehicle underbody. Do not attach the tie down hooks of the transporter to the
towing eyes of the vehicle.
2.2.5 Towing Recovery
Adhereto local regulationsforthetowing ofvehicles. In certain countriesthe registration number ofthetowing vehicle
and an 'ON TOW sign or warning triangle must be displayed in a prominent position at the rear of the vehicle which
is being towed.
WARNING: WHEN THE ENGINE
IS NOT RUNNING, THE STEERING AND BRAKES WILL NO LONGER BE
ACCUMULATOR. THEREFORE, BE PREPARED FOR
HEAVY STEERING AND THE NEED FOR GREATLY
INCREASED BRAKE PEDAL PRESSURE.
POWER-ASSISTED.
APPLICATIONS
OF THE BRAKE PEDAL WILL GRADUALLY DEPRESSURIZE THE
*The vehicle may be towed by another for a SHORT DISTANCE ONLY (maximum
0,8km / O.Smile), with the gear lever
in neutral (N) provided that a speed of 48 km / h (30 mile / h) is not exceeded.
2.2.6
The vehicle must be towed with the rear wheels clear of the ground, see suspended towing.
Vehicles with Defective Automatic Transmission:
Issue 1 August 1994 4 X300 VSM
Page 36 of 521
Jacking, lifting & Vehicle Recovery gg
2.2.7 Suspended Towing
CAUTION: Do not tow with sling-type equipment as damage to the bodywork may result. Do not front suspend tow vehides with automatic transmission.
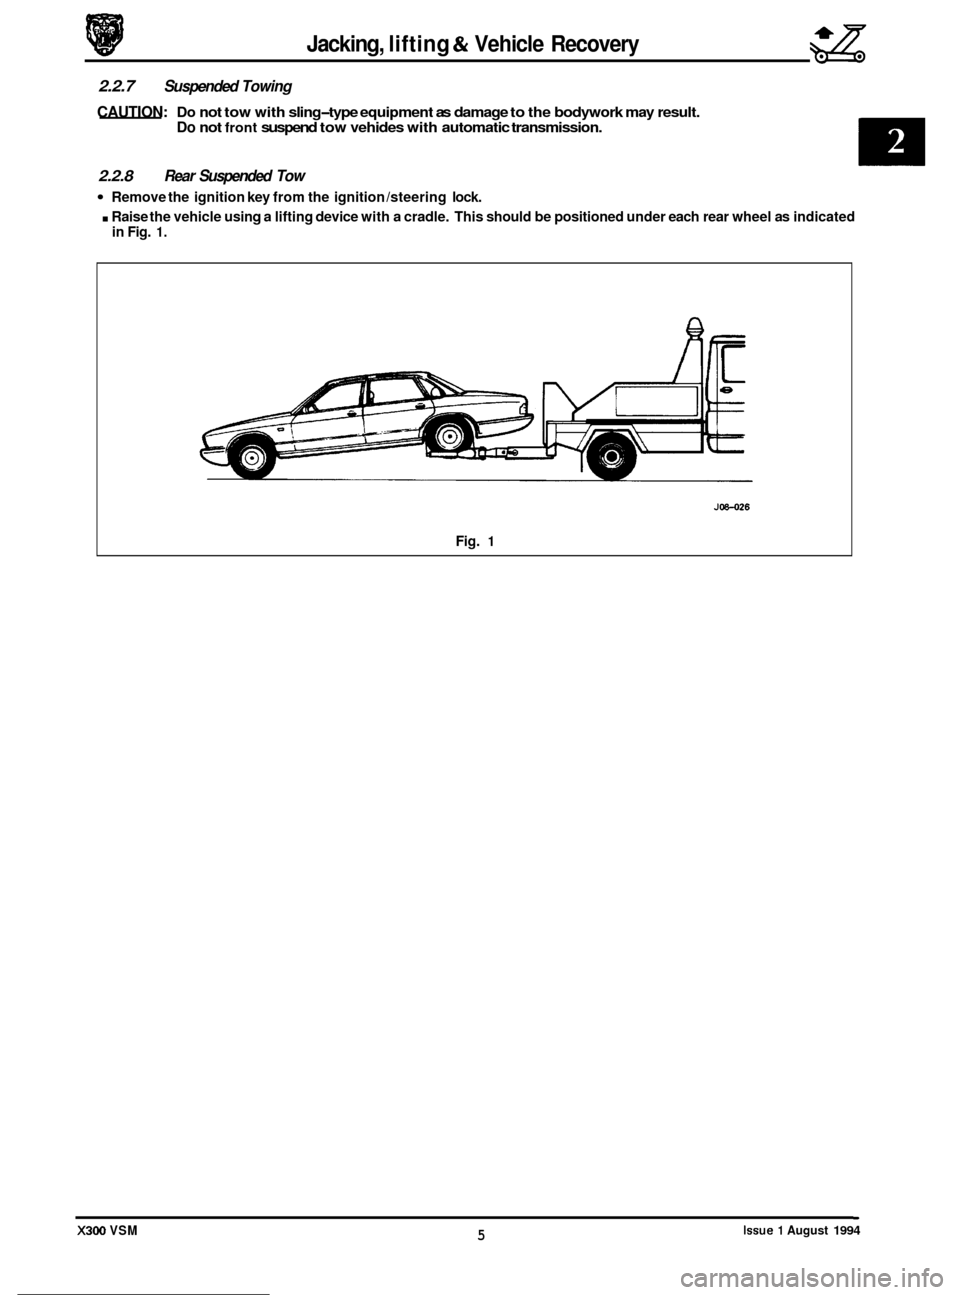
2.2.8 Rear Suspended Tow
Remove the ignition key from the ignition /steering lock.
. Raise the vehicle using a lifting device with a cradle. This should be positioned under each rear wheel as indicated
in Fig. 1.
0
0
0
J08-026
Fig. 1
Issue 1 August 1994 5 X300 VSM
Page 56 of 521
Cooling System (AJl6) m
4.1.1 COOLING SYSTEM DESCRIPTION
4.1.1.1 Major Components
o Main engine crossflow radiator, incorporating a concentric tube cooler for the power steering fluid mounted in
the right
-hand radiator side tank. Vehicles with automatic transmission have a transmission fluid cooler
mounted in the left
-hand radiator side tank; for 4,O liter supercharged engines a six-plate cooler is fitted; other
vehicles have
a tube-type cooler. Adouble-action temperature switch, for controlling the radiator cooling fans,
is mounted in the left
-hand radiator side tank.
0 Two electrically operated radiator cooling fans, mounted behind the main radiator.
0 Coolant circulating pump, belt driven from the engine crankshaft.
0 Coolant header tank with pressure relief cap and coolant level probe.
o Engine thermostat.
4.1.1.2
0 Heater matrix.
o Electrically operated coolant circulating pump, mounted on the left-hand side of the engine bulkhead.
o Solenoid operated valve, located adjacent to the coolant circulating pump.
Components for Climate Control System
4.1.1.3 Components for Supercharged Engine
0 0 Supercharger crossflow radiator, mounted in front of the main radiator. The supercharger radiator is reverse- circuited, i.e. the coolant inlet is at the bottom of the radiator.
0 Electrically operated coolant circulating pump, located at the left-hand side of the main radiator.
4.1.1.4 Operation
The configuration of the cooling system for normally aspirated and supercharged (4,O liter) engines is shown in Sub- section 4.1.2.
The cooling system is pressurized, which allows the system to operate at a higher temperature without overheating.
The header tank is fitted with a pressure relief cap to protect the system against overpressure.
Under cold start conditions, coolant is forced by the engine driven water pump through the cylinder block and cylinder
head to the thermostat housing. The thermostat is closed to give rapid engine warm up, hence the coolant is returned
directly to the water pump inlet. When normal engine operating temperature is reached, the thermostat opens and
coolant is diverted through the radiator before returning to the water pump inlet. In vehicles fitted with
a supercharger,
coolant is circulated through the supercharger radiator and intercooler by the supercharger water pump. The super- charger cooling circuit uses the same coolant header tank as the main engine cooling system.
The radiator cooling fans operate in series and parallel under the control of the double
-action radiator mounted tem- perature switch. The fans are also controlled by the climate control system on vehicles fitted with air conditioning.
Under hot operating conditions, the fans may continue to operate after the engine has been switched off. The fans
stop automatically when the coolant temperature has been reduced sufficiently.
The system also provides the coolant supply for the climate control system, which is described in Section
14.
X300 VSM 1 Issue 1 August 1994
Page 66 of 521
Cooling System (V12
4.2.1 COOLING SYSTEM DESCRIPTION I
4.2.1.1 Major Components
o Engine crossflow radiator, incorporating a concentric tube cooler for the power steering fluid mounted in the
left
-hand radiator side tank. Vehicles with automatic transmission have a six-plate transmission fluid cooler
mounted in the right
-hand radiator side tank. A double-action temperature switch, for controlling the electric
radiator cooling fans, is mounted in the left
-hand radiator side tank.
0 Engine driven, viscous-coupled, radiator cooling fan
0 Two electrically operated radiator cooling fans, mounted in front of the radiator.
o Coolant circulating pump, belt driven from the engine crankshaft.
0 Coolant header tank with pressure relief cap and coolant level probe.
0 Two engine thermostats, one in each cylinder bank.
4.2.1.2
0 Heater matrix.
0 Electrically operated coolant circulating pump, mounted on the left-hand side of the engine bulkhead.
o Solenoid operated valve, located adjacent to the coolant circulating pump.
Components for Climate Control System
1
4.2.1.3 Operation
The configuration of the cooling system is shown in Sub-section 4.2.2.
The cooling system is pressurized, which allows the system to operate at a higher temperature without overheating.
The header tank is fitted with a pressure relief cap to protect the system against overpressure.
Under cold start conditions, coolant is forced by the engine driven water pump through each cylinder block and cylin
- der head to the thermostat housings. The thermostats are closed to give rapid engine warm up, hence the coolant is
returned via the engine cross pipe to the water pump inlet. When normal engine operating temperature is reached,
the thermostats open and coolant is diverted through the radiator before returning to the water pump inlet.
If the engine driven fan is unable to provide sufficient cooling, the electrically operated fans operate in series and paral
-
lel underthe control of the radiator mounted temperature switch. Under hot operating conditions, the electric fans may
continue to operate after the engine has been switched off. The fans stop automatically when the coolant temperature
has been reduced sufficiently.
The system also provides the coolant supply for the climate control system, which is described in Section 14.
I
I X300 VSM 1 Issue 1 August 1994
Page 119 of 521
Manual Transmission & Clutch (AJ16)
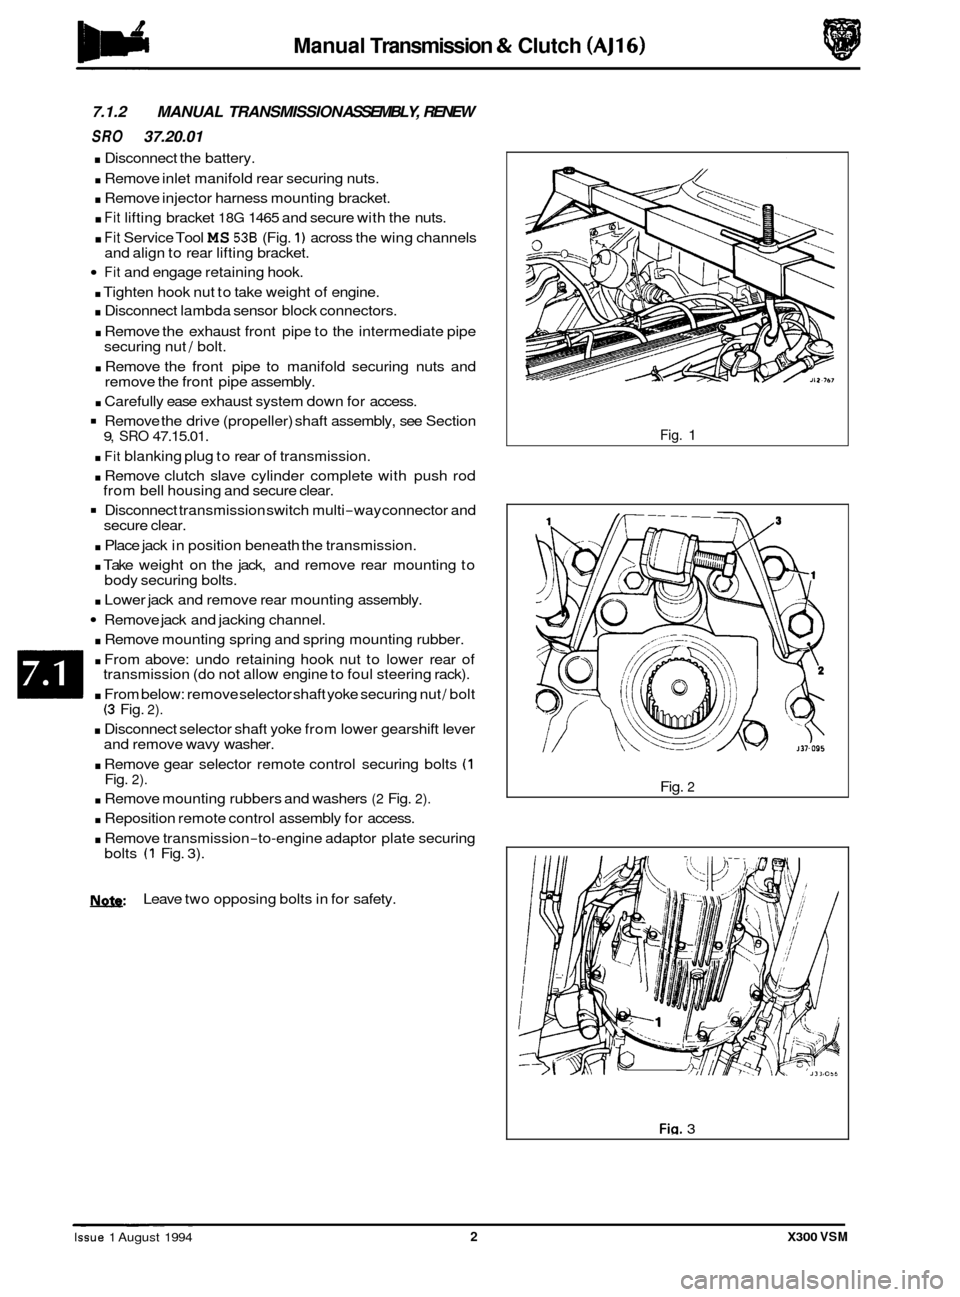
7.1.2 MANUAL TRANSMISSION ASSEMBLY, RENEW
SRO 37.20.01
. Disconnect the battery.
. Remove inlet manifold rear securing nuts.
. Remove injector harness mounting bracket.
. Fit lifting bracket 18G 1465 and secure with the nuts.
. Fit Service Tool MS 536 (Fig. 1) across the wing channels
Fit and engage retaining hook.
. Tighten hook nut to take weight of engine.
. Disconnect lambda sensor block connectors.
. Remove the exhaust front pipe to the intermediate pipe
securing nut / bolt.
. Remove the front pipe to manifold securing nuts and
remove the front pipe assembly.
. Carefully ease exhaust system down for access.
Remove the drive (propeller) shaft assembly, see Section
. Fit blanking plug to rear of transmission.
. Remove clutch slave cylinder complete with push rod
Disconnect transmission switch multi-way connector and
. Place jack in position beneath the transmission.
. Take weight on the jack, and remove rear mounting to
. Lower jack and remove rear mounting assembly.
Remove jack and jacking channel.
. Remove mounting spring and spring mounting rubber.
. From above: undo retaining hook nut to lower rear of
transmission (do not allow engine to foul steering rack).
. From below: remove selector shaft yoke securing nut / bolt (3 Fig. 2).
. Disconnect selector shaft yoke from lower gearshift lever
and remove wavy washer.
. Remove gear selector remote control securing bolts (1 Fig. 2).
. Remove mounting rubbers and washers (2 Fig. 2).
. Reposition remote control assembly for access.
. Remove transmission-to-engine adaptor plate securing
and
align to rear lifting bracket.
9, SRO 47.15.01.
from bell housing and secure clear.
secure clear.
body securing bolts.
bolts
(1 Fig. 3).
N.&: Leave two opposing bolts in for safety.
Fig. 1
Fig.
2
Fig. 3 ~ ~ ~~ ~
Issue 1 August 1994 2 X300 VSM
Page 124 of 521
Manual Transmission & Clutch (AJ16)
GEARSHIFT LEVER KNOB, RENEW
:RY 37.16.11
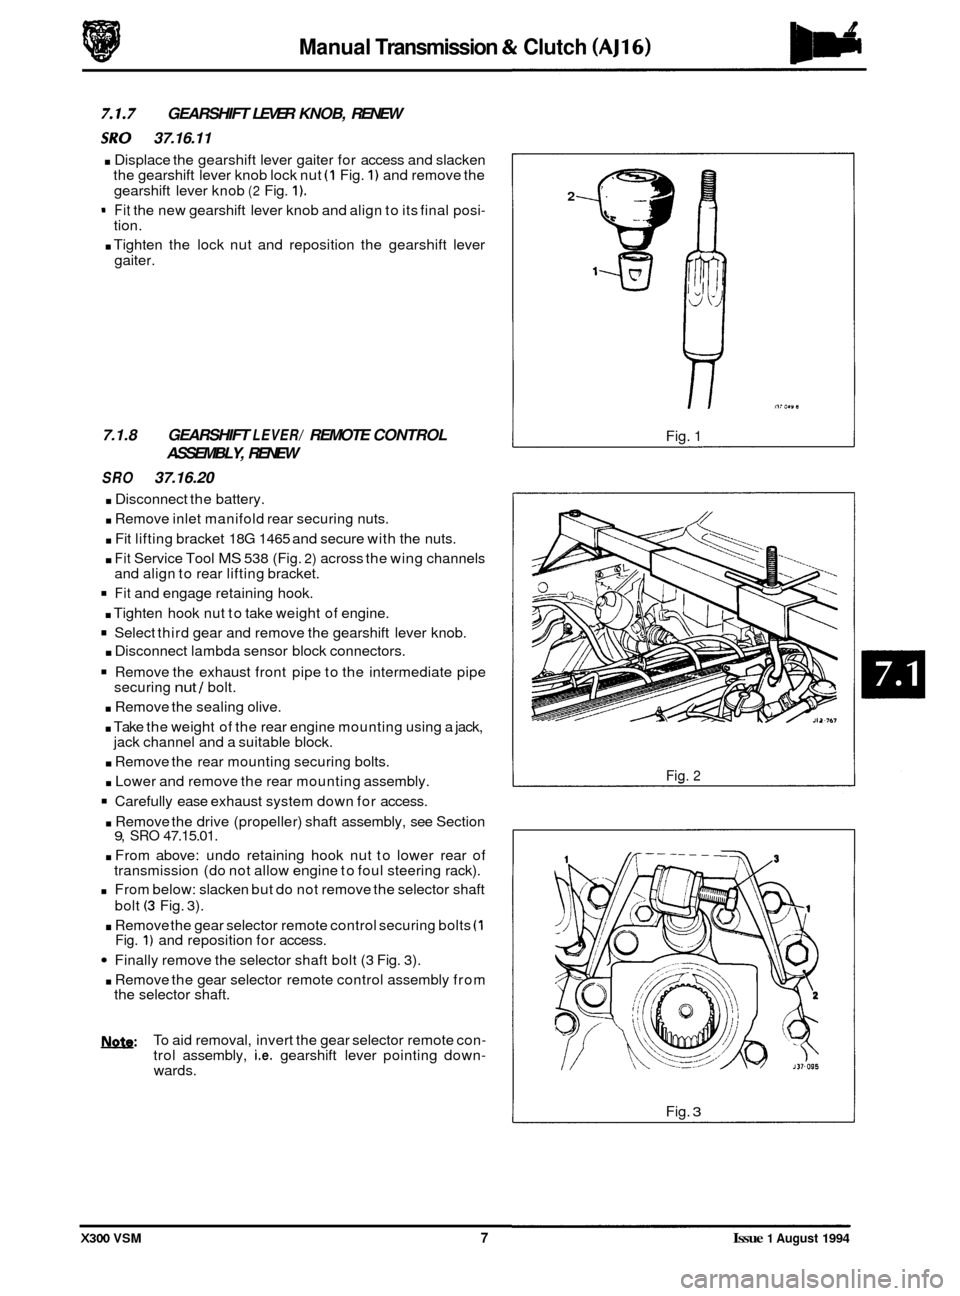
. Displace the gearshift lever gaiter for access and slacken
the gearshift lever knob lock nut (1 Fig. 1) and remove the
gearshift lever knob
(2 Fig. 1).
- Fit the new gearshift lever knob and align to its final posi- tion.
. Tighten the lock nut and reposition the gearshift lever
gaiter.
7.1.8 GEARSHIFT LEVER/ REMOTE CONTROL
ASSEMBLY, RENEW
SRO 37.16.20
. Disconnect the battery.
. Remove inlet manifold rear securing nuts.
. Fit lifting bracket 18G 1465 and secure with the nuts.
. Fit Service Tool MS 538 (Fig. 2) across the wing channels
and align to rear lifting bracket.
Fit and engage retaining hook.
. Tighten hook nut to take weight of engine.
Select third gear and remove the gearshift lever knob.
. Disconnect lambda sensor block connectors.
Remove the exhaust front pipe to the intermediate pipe
securing nut / bolt.
. Remove the sealing olive.
. Take the weight of the rear engine mounting using a jack,
. Remove the rear mounting securing bolts.
. Lower and remove the rear mounting assembly.
Carefully ease exhaust system down for access.
jack channel
and a suitable block.
. Remove the drive (propeller) shaft assembly, see Section 9, SRO 47.15.01.
. From above: undo retaining hook nut to lower rear of
transmission (do not allow engine to foul steering rack).
From below: slacken but do not remove the selector shaft
bolt
(3 Fig. 3).
. Remove the gear selector remote control securing bolts (1 Fig. 1) and reposition for access.
Finally remove the selector shaft bolt (3 Fig. 3).
. Remove the gear selector remote control assembly from
the selector shaft.
b: To aid removal, invert the gear selector remote con- trol assembly, i.e. gearshift lever pointing down- wards.
2
Fig. 1
Fig. 2
Fig. 3
X300 VSM 7 Issue 1 August 1994