ignition JAGUAR XJ6 1994 2.G Owner's Manual
[x] Cancel search | Manufacturer: JAGUAR, Model Year: 1994, Model line: XJ6, Model: JAGUAR XJ6 1994 2.GPages: 521, PDF Size: 17.35 MB
Page 140 of 521
Automatic Transmission (AJ16)
Both types of automatic transmission comprise a hydrodynamic torque converter driving an epicyclic gear train which
provides four forward ratios and reverse. Gearshift selection is made by a hydraulic (or electronichydraulic) trans- mission control unit. Six gearshift positions are provided:
Position
'P' (Park) -the driven wheels are mechanically locked at the transmission.
Position
'R' (Reverse) - reverse gear selected.
Position
'N' (Neutral) - engine disconnected from drive-line and wheels.
Position 'D' (Drive)
- all four speed ranges are selected automatically with lock-up available in top gear only.
Position
'3' - automatic selection of the lowest three speed ranges only.
Position '2'
- automatic selection of the lowest two speed ranges only; the transmission is prevented from shift- ing up to the third and top speed ranges.
Immediate selection of a lower ratio is also available, within mapped limits, by 'kick
-down' (pressing the accelerator
pedal down beyond the normal full throttle position) for example when overtaking.
A brake pedal/gearshift interlock is incorporated in the shift lever mechanism. Theshift lever may only be movedfrom
the 'P' (Park) position if the ignition key switch is in position 'll', and the foot brake is applied. The ignition key cannot
be removed from the ignition switch unless the shift lever is in the 'P' (Park) position. Once the ignition key has been
removed, the shift lever is locked in the Park position. The gearshift interlock may be over-ridden manually in the event
of an electrical failure or when it is required to move the vehicle manually for access, ie for removal of the propeller
shaft.
8.1.1.1
Gearshift selection causes the appropriate gear to be selected through a cable operated shift lever on the side of the
Gear Selection (ZF 4HP 22)
transmission unit. When a gea; is selected, the shift points are determined by accelerator pedal position through a
throttle cable connection and by pressures equivalent to road speed derived from a centrifugal governor on the output
shaft.
Gearshift speed and quality are controlled by the hydraulic control unit located in the lower part of the transmission
housing. The control unit contains selector valve, control pistons and pressure valves.
The hydraulic control unit can be overridden by 'kickdown'. This is actuated by the final travel of the accelerator pedal
and causes the next lower gear to be selected.
8.1.1.2
Gearshift selection causes the appropriate gear to be selected through a cable operated shift lever on the side of the
transmission unit; the shift lever also operates a rotary switch attached to the side of the transmission unit. When a
gear is selected, the rotary switch provides an output or combination of outputs to the TCM, which continuously moni
- tors the gear selected in addition to output shaft speed and transmission oil temperature. Information from the Engine
Control Module (ECM) representing engine speed, load and throttle position is also fed to the TCM to enable the most
suitable gear to be selected.
Gear selection and gearshift speeds are controlled by the manually operated selector valve, a solenoid operated pres
- sure regulator and three solenoid valves. On receipt of signalsfrom the TCM, the three solenoid valves MVI, MV2 and
MV3, in various combinations with the safety valve, determine the appropriate gear range. The TCM, on receipt of
information of engine state and road speed, determines the shift speed.
The Performance Mode switch, located on the shift lever surround, provides two alternative shift speed patterns:
1. 'Normal (Economy) Mode' - designed for everyday use.
2. 'Sport Mode'
- gear shift takes place at higher road speeds to enhance performance.
The 'kick
-down' switch, located beneath the accelerator pedal, is actuated by the final travel of the pedal and signals
to the TCM that the next lower gear is to be selected.
Gear Selection (ZF 4 HP 24 E)
X300 VSM 3 Issue 1 August 1994
Page 146 of 521

Automatic Transmission (AJ16)
8.1.5 TRANSMISSION ROTARY SWITCH, RENEW
0 (4,OL)
SRO 44.15.36
. Check the shift cable adjustment.
. Switch the ignition ON, apply the footbrake and move the
Switch the ignition OFF and disconnect the battery.
. Open the armrest lid.
. Release and remove the ashtray securing screws.
. Displace the ashtray assembly for access.
. Disconnect the cigar lighter / illumination harness con-
. Place the ashtray assembly aside.
. Displace and remove the console veneer panel rear fin-
isher.
Carefully displace the Performance Mode switch from the
gear surround finisher.
. Disconnect the Performance Mode switch from the har-
ness multi-pin plug.
Displace and remove the Performance Mode switch sur-
round finisher.
Displace and remove the shift lever surround finisher.
. Release and remove the veneer panel wing nuts.
= Displace and remove the console finisher veneer panel.
Cut and remove the rotary switch harness securing straps.
= Disconnect the rotary switch harness multi-pin plugs.
. Reposition the tunnel carpet for access to the harness
Displace and reposition the grommet down through the
. Feed the harness through the tunnel to the underside of
. Raise the vehicle on a ramp.
. From beneath the vehicle, release and remove the rotary
switch harness to transmission
'F" clip securing nut; dis-
place and reposition the 'P' clip from the stud.
Release and remove the rotary switch harness to trans-
mission 'P' clip securing screw.
Release and remove the rotary switch protection cover
(1 Fig.1) securing bolts; displace and remove the switch
cover.
shift
lever to
'N'.
n ect o rs .
@
grommet.
tunnel.
the vehicle.
Disconnect the transmission multi-pin socket (2 Fig.1).
. Reposition the harness clear of the transmission unit.
. Release and remove the rotary switch securing nuts.
. Displace and remove the switch assembly.
. Displace and remove the 'P' clips from the harness.
. Fit and align the 'P' clips to the new harness / switch as-
. Displace the rubber sealing plug (3 Fig.1) from the rotary
sembly.
switch.
i3 2 JLL-690
Fig.
1
X300 VSM 9 Issue 1 August 1994
Page 156 of 521
Automatic Transmission (V12 & AJl6 Supercharged) Pomrtrain
8.2.1 GENERAL DESCRIPTION
This section provides information relating to the Powertrain 4L80-E transmissions fitted to the 4,O liter supercharged
engine (4,OL SC) and to the 6,O liter engine (6,OL).
The Powertrain 4L80-E is a four-speed, high torque capacity, electronically controlled automatic transmission, which
comprises a torque converter with lock-up direct drive clutch and three planetary gear sets. Five multiple diskclutches,
one intermediate sprag clutch assembly, two roller clutch assemblies and two band assemblies provide the drive el- ements necessary for correct sequential gear engagement and operation.
The torque converter containing
a pump, a turbine (rotor), a stator assembly, and a clutch pressure disksplined to the
turbine, acts as a fluid coupling for smooth torque transmission from the engine. The converter also supplies addi- tional torque multiplication when necessary, and the torque converter clutch (TCC) pressure disk provides a mechan- ical direct drive or 'lock-up' above a certain speed in top gear for greater fuel economy.
Gearshift operations are controlled from the Transmission Control Module (TCM), which governs the electronically
controlled valve body situated within the transmission.
Three planetary gear sets provide reverse and the four forward ratios, the changing of which is fully automatic in rela
- tion to load, vehicle speed and throttle opening. The Transmission Control Module receives and integrates various ve- hicle sensor input signals, and transmits operating signals to the solenoids located in the control valve assembly.
These solenoids govern the transmission operating pressures, up-shift and down-shift gear selection patterns and
also the torque converter clutch operation by pulse width modulated control.
8.2.1.1 Gear Ranges
Selectable gear positions are: P - Park, R - Reverse, N - Neutral, D - Drive, 3, 2.
P - Park position of the shift lever provides a mechanical locking of the output shaft of the transmission, and as such,
must only be engaged when the the vehicle is stationary. In addition, and for
extra safety, the handbrake should also
be applied. It is necessary to have the ignition ON and the footbrake applied to move the shift lever from the Park
position. For ignition key removal the shift lever must be in the Park position. The engine can be started in the Park
position.
R - Reverse enables the vehicle to be operated in a rearwards direction. The engine cannot be started in the Reverse
position.
N
-Neutral position enables the engine to be started and operated without driving the vehicle. It also allows the vehicle
to be moved manually for access, ie for removal of the propeller shaft.
D
-Drive position allows the automatic selection of all four forward gear ratios during normal driving conditions for
maximum efficiency and fuel economy. On acceleration, down-shifts are obtained by depressing the accelerator pedal
or by manual selection. The engine cannot be started in this position.
3
- Manual third position allows automatic operation of the three lower gear ratios but inhibits selection of the fourth
ratio. This position is used for towing a trailer or negotiating hilly terrain when greater engine braking control is re- quired. The engine cannot be started in this position.
2 - Manual second position allows automatic operation of the two lower gear ratios but inhibits selection of the third
and fourth ratios. This position is used for heavy traffic congestion or negotiating hilly terrain when even greater en
- gine braking control is required than is provided by manual third. This ratio may be selected at any vehicle speed - even if the transmission is in third or fourth ratio, the transmission will immediately down-shift to second gear pro- vided the vehicle speed is below 137 km / h (85 mile / h). The engine cannot be started in this position.
N.g!b: With the Performance Mode switch in the NORMAL position, the vehicle will pull away in second gear. How- ever, if more than 75 per cent of throttle is applied when the vehicle speed is between zero and 13 km/ h (8 mile / h), then first gear will be selected. From 13 to 61 km/ h (8 to 38 mile/ h) first gear is obtainable by 'kick-down'.
In 'sport' mode thevehicle pulls away in first gear and the transmission operatesfully in all four forward gears.
X300 VSM 1 Issue 1 August 1994
Page 169 of 521
Automatic Transmission (V12 & AJ16 Supercharged) Powertrain
0
8.2.13 LUBRICATION SYSTEM, DRAIN AND REFILL
(4,OL SC AND 6,OL)
SRO 44.24.02
. Raise the vehicle on a ramp.
. Position a drain tin below the transmission unit.
. Release and remove the fluid pan drain plug.
. Allow the fluid to drain.
Clean the drain plug, including the magnet and the fluid
pan drain plug face.
. Fit and tighten the fluid pan drain plug.
. Remove the drain tin from below the transmission unit.
. Lower the vehicle on the ramp.
Open the hood and fit
a suitable fender cover.
Remove and wipe the dipstick.
. Fit a funnel to the dipstick tube.
. Initially fill the transmission with 4,5 liters of fluid.
. Remove the funnel.
. Open the front door.
. Check that the parking brake is applied.
. Start the engine.
Apply the footbrake.
Run the shift lever through all positions, finally returning
to the Park position.
. Release the footbrake.
. Insert the dipstick, then remove and inspect the level.
. Fit the funnel to the dipstick tube.
. Fill the transmission to the 'COLD' level mark on the dip-
stick with the correct fluid, see the Powertrain Automatic
Transmissions Service Manual, General Data.
CAUTION: On no account should the vehicle be driven un- less the fluid level is at the 'COLD' level and the
system primed.
0
Remove the funnel.
. Replace the dipstick.
. Switch the ignition OFF.
. Remove the fender cover and close the hood.
= Close the door.
J&&Q: 0 After road testing the vehicle, the fluid level on the
dipstick should be between the 'HOT' Min I Max
marks. Check the level with the transmission at nor-
mal operating temperature (90 to 100°C), with the
engine left running and the transmission in the Park
position.
m
0
Issue 1 August 1994 14 X300 VSM ~
__
Page 200 of 521
10.1 STEERING SYSTEM DESCRIPTION
10.1.1 Steering Column Major Components
Integrated column assembly incorporating power, or manual, reach /tilt mechanism and lock.
Ignition switch.
Ignition interlock solenoid.
Key transponder coil.
Body attachment points.
Depending upon model, the steering column may be adjusted for
tilt and reach, either by electrical or manual means.
Power variants may be either automatically or manually adjusted and all types have the entry / exit feature.
10.1.2 Steering Column Operating Principle
Power Adjust: Two independent motor / gearbox assemblies provide infinite adjustment for reach and height within
approximate ranges of 35mm and
13O respectively. Adjustments may be automatically made in conjunction with the
seat memory facility or manually when the adjustment switch is used. It should be noted that selection of 'Off will
disable the automatic entry / exit mode.
Manual Adjust: The cable operated reach adjustment is infinite within a range of 35mm, with the desired position being
fixed
by a rack and wedge. Tilt variations are stepped at approximately 3O intervals with 6 positions being available,
the uppermost being unlatched.
From the uppermost position the column may be pulled down to engage the first detent without using the
tilt lever.
WARNING: MANUAL ADJUST ONLY: TO AVOID PERSONAL INJURY, COLUMN UPWARD TRAVEL SHOULD BE MAN- UALLY RESTRAINED TO CHECK UPWARD SPRING ASSISTANCE. THIS IS ESPECIALLY IMPORTANT IF
THE STEERING WHEEL HAS BEEN REMOVED FOR MAINTENANCE REASONS.
WARNING: ALL TYPES; DO NOT REMOVE THE STEERING COLUMN FROM THE VEHICLE WITH THE STEERING
WHEEL ATTACHED UNLESS THE STEERING
IS CENTERED AND THE COLUMN LOCK IS ENGAGED. IFTHE
SERVE THIS MAY RESULT IN AN INOPERATIVE AIRBAG SYSTEM. SEE LABEL ON STEERING WHEEL
HUB. LOCK IS TO BE RENEWED, 'LOCK-WIRE THE ASSEMBLY TO PREVENT ROTATION. FAILURE TO OB-
0
X300 VSM 1 Issue 1 August 1994
J57-27L
3 Ignition switch 1 1 Tilt motor 2 Tilt motor flexible coupling 4 Reach motor
Fig.
1 Major components Power operated steering column
Page 204 of 521
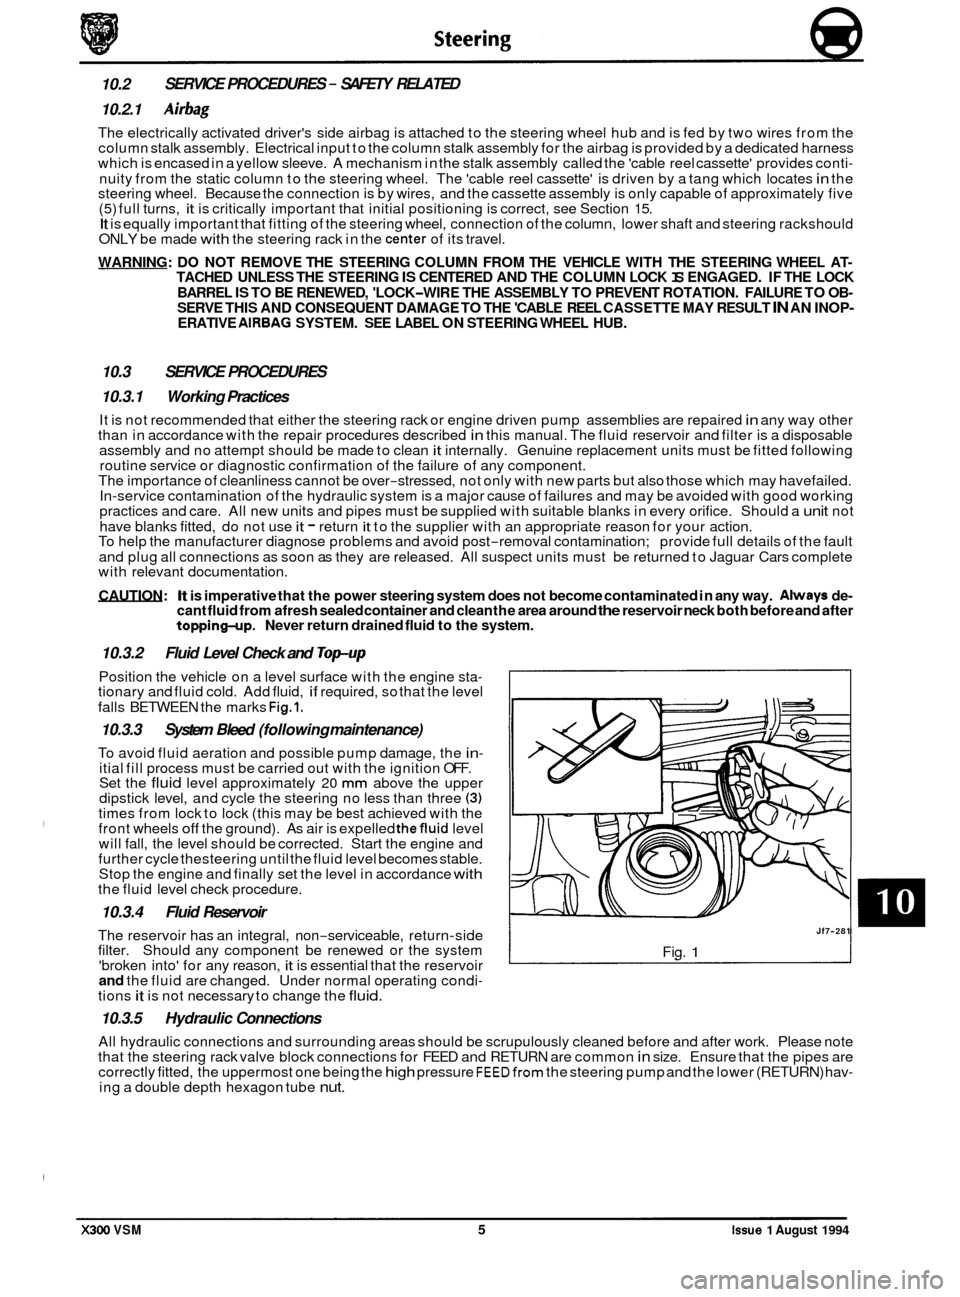
10.2 SERVICE
PROCEDURES - SAFETY RELATED
10.2.1
Airbag
The electrically activated driver's side airbag is attached to the steering wheel hub and is fed by two wires from the
column stalk assembly. Electrical input to the column stalk assembly for the airbag is provided by a dedicated harness
which is encased in a yellow sleeve. A mechanism in the stalk assembly called the 'cable reel cassette' provides conti
-
nuity from the static column to the steering wheel. The 'cable reel cassette' is driven by a tang which locates in the
steering wheel. Because the connection is by wires, and the cassette assembly is only capable of approximately five
(5) full turns,
it is critically important that initial positioning is correct, see Section 15. It is equally important that fitting of the steering wheel, connection of the column, lower shaft and steering rackshould
ONLY be made with the steering rack in the center of its travel.
WARNING: DO NOT REMOVE THE STEERING COLUMN FROM THE VEHICLE WITH THE STEERING WHEEL AT- TACHED UNLESS THE STEERING IS CENTERED AND THE COLUMN LOCK IS ENGAGED. IF THE LOCK
BARREL
IS TO BE RENEWED, 'LOCK-WIRE THE ASSEMBLY TO PREVENT ROTATION. FAILURE TO OB- SERVE THIS AND CONSEQUENT DAMAGE TO THE 'CABLE REEL CASSETTE MAY RESULT IN AN INOP- ERATIVE AIRBAG SYSTEM. SEE LABEL ON STEERING WHEEL HUB.
10.3 SERVICE PROCEDURES
10.3.1 Working Practices
It is not recommended that either the steering rack or engine driven pump assemblies are repaired in any way other
than in accordance with the repair procedures described in this manual. The fluid reservoir and filter is a disposable
assembly and no attempt should be made to clean it internally. Genuine replacement units must be fitted following
routine service or diagnostic confirmation of the failure of any component.
The importance of cleanliness cannot be over
-stressed, not only with new parts but also those which may havefailed.
In-service contamination of the hydraulic system is a major cause of failures and may be avoided with good working
practices and care. All new units and pipes must be supplied with suitable blanks in every orifice. Should a unit not
have blanks fitted, do not use
it - return it to the supplier with an appropriate reason for your action.
To help the manufacturer diagnose problems and avoid post-removal contamination; provide full details of the fault
and plug all connections as soon as they are released. All suspect units must be returned to Jaguar Cars complete
with relevant documentation.
CAUTION: It is imperative that the power steering system does not become contaminated in any way. Always de- cant fluid from afresh sealed container and clean the area around the reservoir neck both before and after topping-up. Never return drained fluid to the system.
10.3.2
Position the vehicle on a level surface with the engine sta- tionary and fluid cold. Add fluid, if required, so that the level
falls BETWEEN the marks
Fig.1.
10.3.3 System Bleed (following maintenance)
To avoid fluid aeration and possible pump damage, the in- itial fill process must be carried out with the ignition OFF.
Set the fluid level approximately 20 mm above the upper
dipstick level, and cycle the steering no less than three (3) times from lock to lock (this may be best achieved with the
front wheels off the ground). As air is expelled thefluid level
will fall, the level should be corrected. Start the engine and
further cycle thesteering until the fluid level becomes stable.
Stop the engine and finally set the level in accordance
with the fluid level check procedure.
10.3.4 Fluid Reservoir
The reservoir has an integral, non-serviceable, return-side
filter. Should any component be renewed or the system
'broken into' for any reason,
it is essential that the reservoir and the fluid are changed. Under normal operating condi- tions it is not necessary to change the fluid.
10.3.5 Hydraulic Connections
Fluid
Level Check and
Top-up
Jf7-281
Fig. 1
All hydraulic connections and surrounding areas should be scrupulously cleaned before and after work. Please note
that the steering rack valve block connections for FEED and RETURN are common in size. Ensure that the pipes are
correctly fitted, the uppermost one being the high pressure FEEDfrom the steering pump and the lower (RETURN) hav- ing a double depth hexagon tube nut.
X300 VSM 5 issue 1 August 1994
Page 224 of 521
12.1 ANTI-LOCK BRAKING SYSTEM (ASS), GENERAL DESCRIPTION
The anti-lock braking system (ABS) components are combined with a hydraulic booster and tandem master cylinder (TMC) to provide a two-circuit braking system. The anti-lock braking system comprises the following components:
0 Four inductive wheel speed sensors, hub end mounted
0 ABS warning light
0 Hydraulic module.
The hydraulic module consists of an electric motor driven pump,
two low pressure accumulators, valve block and an
ABS electronic control module.
m: Electronic control modules for vehicles without traction control are designated ABS CM. Control modules for
vehicles with traction control are designated ABS /TC CM.
The valve block houses solenoid operated valves which are activated by voltage signals from the control module. The
signals are generated using wheel speed information received from the wheel speed sensors.
For vehicles without traction control the valves operate on three circuits, two front and one rear, as necessary to pre
- vent wheel locking during braking. Brake pressure is modulated individually at thefront wheels and collectively at the
rear. Rear wheel control operates on a 'select low' principle i.e. locking in either wheel is sensed, and controlled brake
pressure is applied to both wheels.
For vehicles with traction control the valves operate on four circuits. During ABS control the rear wheel are controlled
on a 'select low' principle (as above), but during traction control operation the rear wheels are controlled individually.
0
1yQfB: Functional and diagnostic information for the ABS CM and the ABS/TC CM is contained in the Electrical Diag-
nostic Manual (EDM), Section 12.
ABS Warning lamp / Traction Control Warning lamp /Fluid level Indicator
The ABS and traction control warning lamps, mounted in the instrument panel, indicate a fault in the ABS or traction
control. These systems are inhibited or disabled when the lamps are lit, although conventional braking is unaffected.
When the ignition is switched on, an ABS self test is initiated. During this test, the ABS and traction control warning
lamps are
lit for approximately 1.7 seconds and then extinguish. A fault is indicated if the warning lamps remain lit or
come on whilst the vehicle is being driven.
W: The ABS self test is masked by the 5 second lamp test initiated when the ignition is switched on.
The fluid level indicator lamp, mounted in the instrument panel, is
lit when the brake fluid falls below the minimum
mark on the brake fluid reservoir.
ABS / Traction Control - Inhibit / Disable
Faults conditions are detected by the ABS/TC CM which disables the ABS and traction control until the fault is rectified.
The ABS and traction control warning lights on the instrument pack remains lit whilst a fault exists. The system will
be disabled when the following conditions occur:
0
0 Valve failure
0 Sensor failure
0 Main driver failure (internal ABS /TC CM fault)
0 Redundancy error (internal ABS JTC CM fault)
0 Overvoltage J undervoltage
0 Pump motor failure.
0 Throttle valve actuator motor failure (traction control vehicles only).
0 Throttle valve actuator potentiometer failure (traction control warning light only).
X300 VSM 1 Issue 1 August 1994
Page 229 of 521
12.1.5. ABS Components
Hydraulic Module
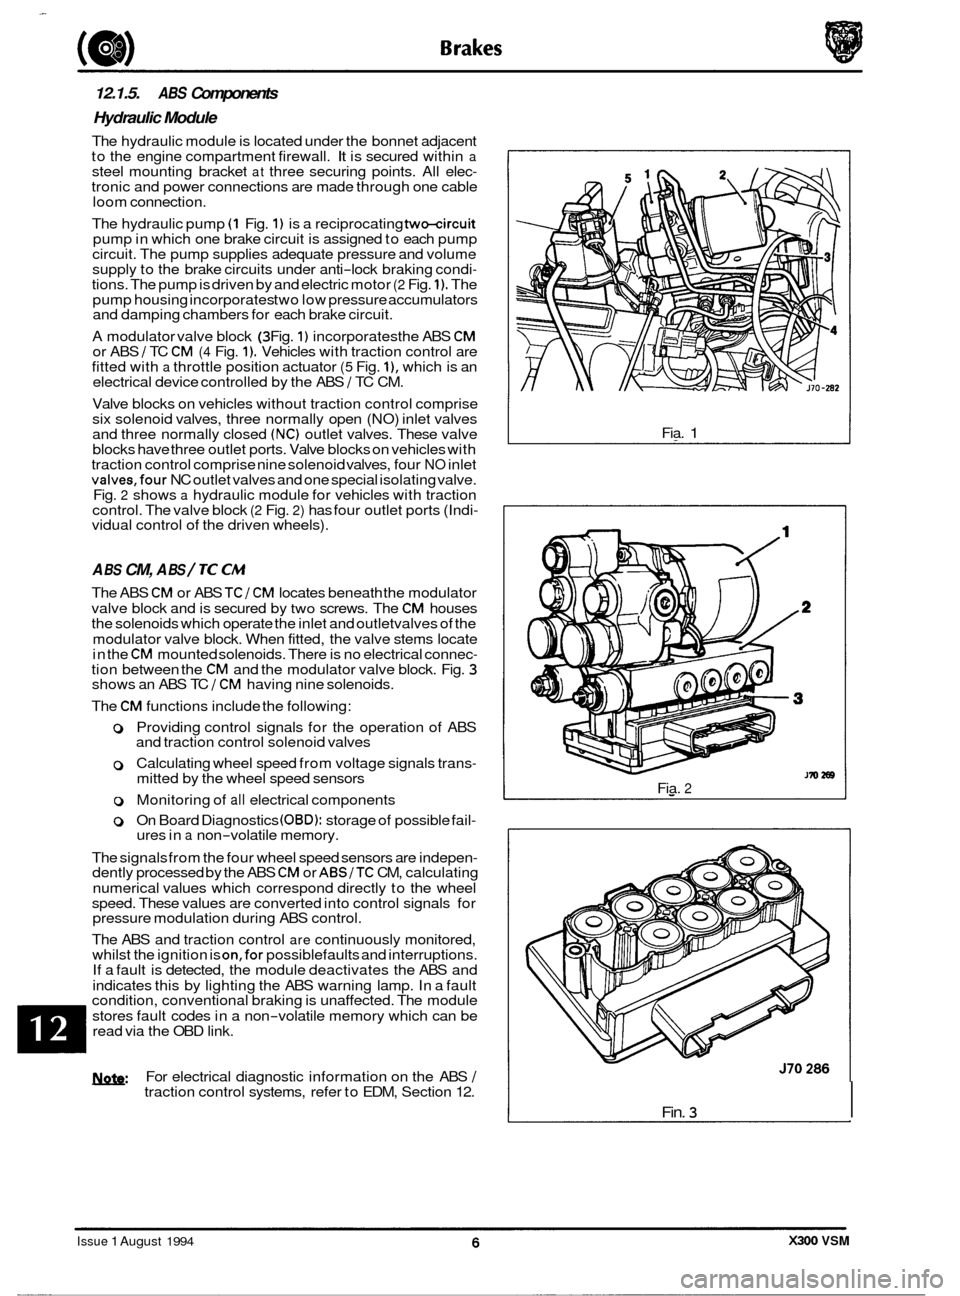
The hydraulic module is located under the bonnet adjacent
to the engine compartment firewall. It is secured within a steel mounting bracket at three securing points. All elec- tronic and power connections are made through one cable
loom connect ion.
The hydraulic pump
(1 Fig. 1) is a reciprocating two-circuit pump in which one brake circuit is assigned to each pump
circuit. The pump supplies adequate pressure and volume
supply to the brake circuits under anti
-lock braking condi- tions. The pump is driven by and electric motor (2 Fig. 1). The
pump housing incorporates two low pressure accumulators
and damping chambers for each brake circuit.
A modulator valve block
(3 Fig. 1) incorporates the ABS CM or ABS / TC CM (4 Fig. 1). Vehicles with traction control are
fitted with a throttle position actuator (5 Fig. I), which is an
electrical device controlled by the ABS 1 TC CM.
Valve blocks on vehicles without traction control comprise
six solenoid valves, three normally open (NO) inlet valves
and three normally closed
(NC) outlet valves. These valve
blocks have three outlet ports. Valve blocks on vehicles with
traction control comprise nine solenoid valves, four
NO inlet valves,four NC outlet valves and one special isolating valve.
Fig. 2 shows a hydraulic module for vehicles with traction
control. The valve block (2 Fig. 2) has four outlet ports (Indi- vidual control of the driven wheels).
A BS CM, A BS / TC CM
The ABS CM or ABS TCI CM locates beneath the modulator
valve block and is secured by
two screws. The CM houses
the solenoids which operate the inlet and outletvalves of the
modulator valve block. When fitted, the valve stems locate
in the
CM mounted solenoids. There is no electrical connec- tion between the CM and the modulator valve block. Fig. 3 shows an ABS TC 1 CM having nine solenoids.
The
CM functions include the following:
0 Providing control signals for the operation of ABS
and traction control solenoid valves
0 Calculating wheel speed from voltage signals trans- mitted by the wheel speed sensors
0 Monitoring of all electrical components
0 On Board Diagnostics (OBD): storage of possible fail- ures in a non-volatile memory.
The signals from the four wheel speed sensors are indepen
- dently processed by the ABS CM or ABSITC CM, calculating
numerical values which correspond directly to the wheel
speed. These values are converted into control signals for
pressure modulation during ABS control.
The ABS and traction control
are continuously monitored,
whilst the ignition is on,for possiblefaults and interruptions.
If a fault is detected, the module deactivates the ABS and
indicates this by lighting the ABS warning lamp. In a fault
condition, conventional braking is unaffected. The module
stores fault codes in a non
-volatile memory which can be
read via the OBD link.
U: For electrical diagnostic information on the ABS I traction control systems, refer to EDM, Section 12. Fia.
1
Fia. 2
Fin. 3 I
J70286
Issue 1 August 1994 X300 VSM
Page 279 of 521
~~ Body Components & Trim
e 13.3.18 Fascia 6oard - Remove
For Access And Refit
SRO 76.46.01/90
. Remove the battery cover. Disconnect the battery.
Remove the drivers side and passenger side underscuttle
. Remove the drivers airbag module, see section 15.5.
. Remove the steering wheel, section 10.
9 Remove the drivers side fascia closing panel, see sub-sec-
. Remove the passenger side fascia closing panel, see sub-
. Remove the fascia center veneer panel, see subsection
. Undo and remove the fascia tie bar securing nuts.
. Displace the tie bars.
. Undo and remove the instrument housing /fascia switch-
. Reposition the multi-plug mounting bracket.
. Disconnect the steering column control module multi-
. Disconnect the fascia switchpack harness multi-plugs.
. Displace and reposition the instrument pack for access.
. Disconnect the instrument pack harness multi-plugs.
. Remove the instrument pack / fascia switchpack assem-
. Disconnect the right hand fascia harness to cabin harness
. Disconnect the column switchgear and column motors
Disconnect the ignition switch harness multi-plug.
. Disconnect the exciter coil harness multi-plug.
. Disconnect the speaker tweeter harness multi-plug.
. Disconnect the speed control control module harness
. Undo and remove the fascia to center console securing
. Displace and remove the passenger side outlet duct.
. Disconnect the fascia harness to console harness multi-
9 Disconnect the let3 hand fascia harness to cabin harness
. Undo and remove the fascia ground eyelets to bodysecur-
. Displace and reposition the ground eyeletsfrom the stud.
. Displace and reposition the airbag control module from
Undo and remove the fascia assembly lower securing nut.
. Undo and remove the fascia outer body bracket to fascia
Carefully displace the fascia rearwards.
pads, see
sub
-sections 13.3.19 and 13.3.20.
tion 13.3.22.
section 13.3.21.
13.2.23.
pack securing screws.
0 plugs.
bly.
multi
-plug.
harness multi
-plug.
multi
-plug.
screws.
0 plugs.
multi
-plug.
ing nut.
the mounting bracket.
securing bolts.
m
0
X300 VSM Issue 1 August 1994 24
Page 284 of 521

Body Components & Trim -
13.3.24 Console Finisher Veneer Panel, Renew
SRO 76.47.26
Apply the handbrake.
. Turn the ignition ON.
. Press the brake pedal and position the gear selector in 'N'.
Turn the ignition OFF.
. Remove the console ashtray, see sub-section 13.3.28.
9 Carefully displace the mode switch from the gear sur-
. Disconnect the mode switch from the harness multi-plug.
. Displace and remove the switch surround finisher.
. Displace and remove the gear lever surround finisher.
. Displace and remove the veneer panel rear finisher.
. Undo and remove the veneer panel wing nuts. See Fig. 2.
. Displace and remove the console finisher veneer panel.
. Remove the stud plates.
. Place the veneer panel aside.
. Place the new panel to the front.
Fit and align the stud plates.
. Fit and fully seat the veneer panel to the console.
. Fully seat the rear of the veneer panel.
. Fit and tighten the wing nuts.
. Fit and align the veneer panel rear finisher.
. Fit and fully seat the gear lever surround.
. Fit and fully seat the mode switch surround.
. Connect the mode switch to harness multi-plug.
. Fully seat the mode switch.
. Refit the ashtray.
. Place the gear selector in 'I".
round finisher. See Fig. 1.
See Fig. 1.
See Fig. 3.
Fig. 1
J76.801
Fig. 2
Fig. 3
X300 VSM 29 Issue 1 August 1994