sensor JAGUAR XJ6 1994 2.G Owner's Guide
[x] Cancel search | Manufacturer: JAGUAR, Model Year: 1994, Model line: XJ6, Model: JAGUAR XJ6 1994 2.GPages: 521, PDF Size: 17.35 MB
Page 155 of 521
Automatic Transmission (V12 & AJ16 Supercharged) Powortrain
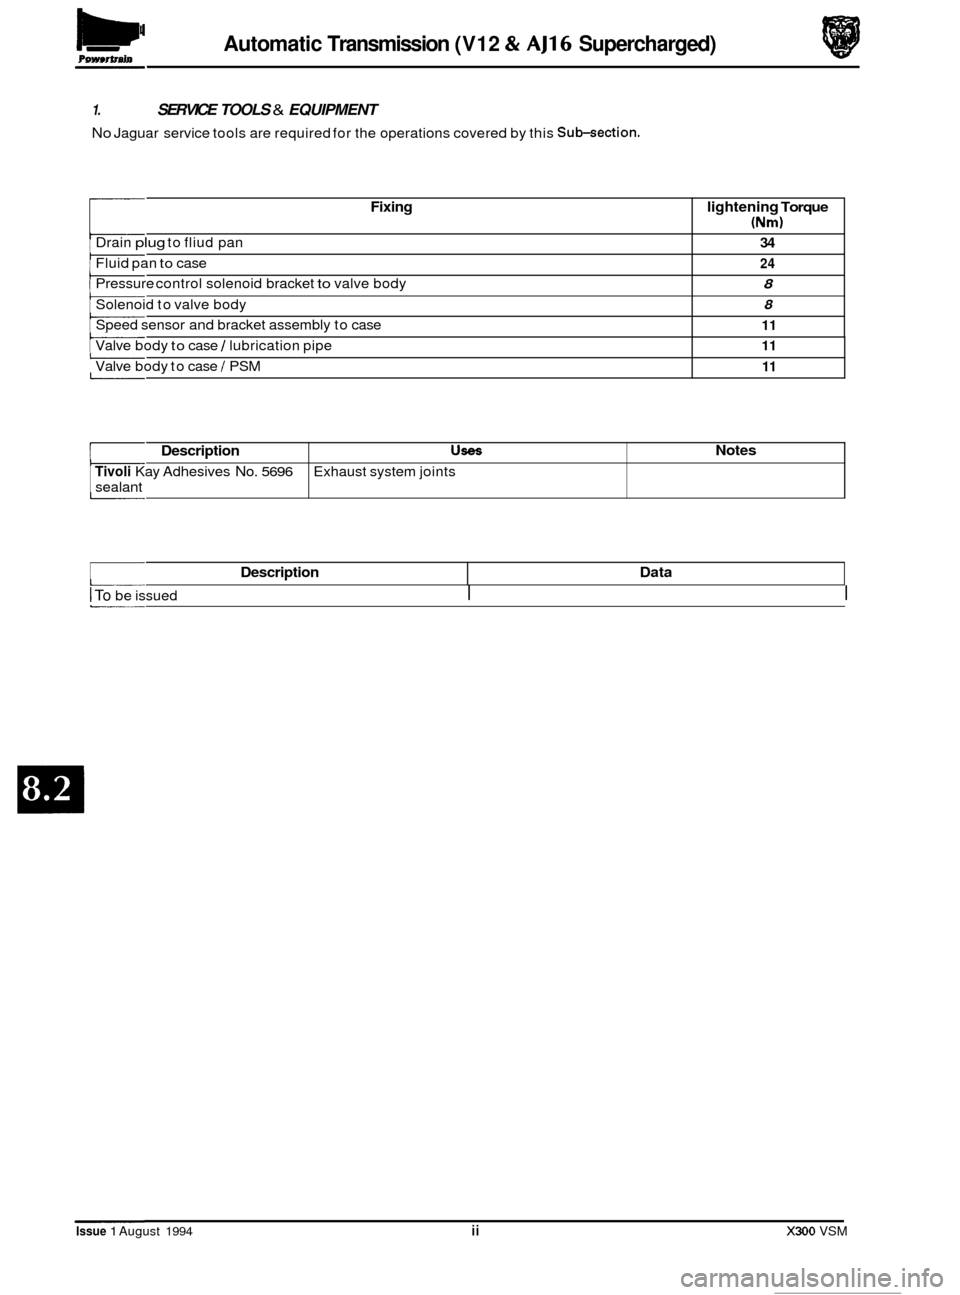
Fixing
Drain plug to fliud pan
Fluid pan
to case
Pressure control solenoid bracket
to valve body
Solenoid to valve body
Speed sensor and bracket assembly to case
Valve body
to case 1 lubrication pipe
Valve body to case
I PSM
1. SERVICE TOOLS & EQUIPMENT
No Jaguar service tools are required for the operations covered by this Sub-section.
lightening Torque
(Nm)
34
24
8
8
11
11
11
Description
Tivoli Kay Adhesives No. 5696
sealant
UseS Notes
Exhaust system joints
Description
I To be issued I I
Data
Issue 1 August 1994 ii X300 VSM
Page 156 of 521
Automatic Transmission (V12 & AJl6 Supercharged) Pomrtrain
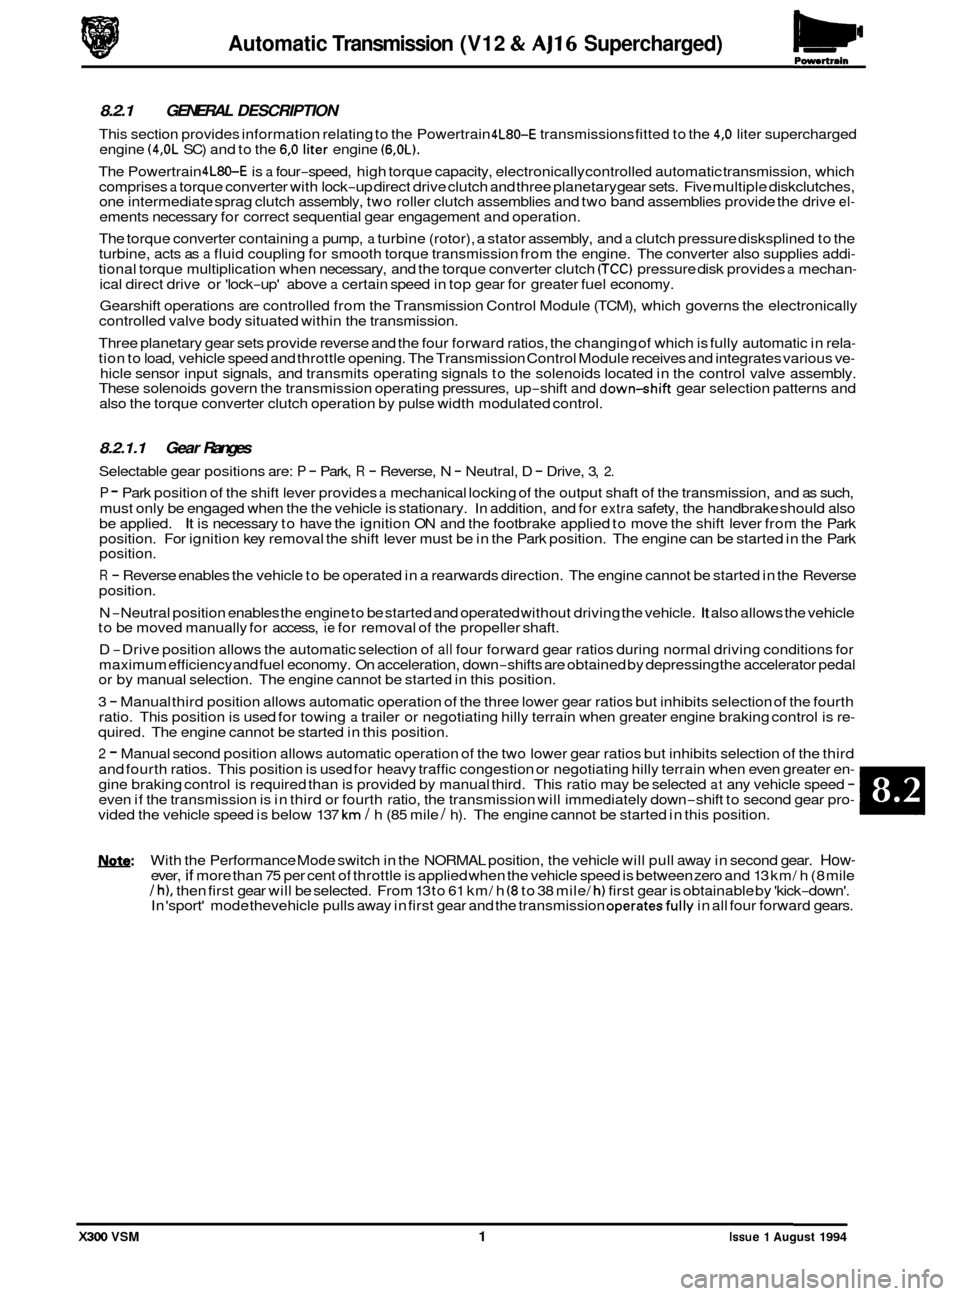
8.2.1 GENERAL DESCRIPTION
This section provides information relating to the Powertrain 4L80-E transmissions fitted to the 4,O liter supercharged
engine (4,OL SC) and to the 6,O liter engine (6,OL).
The Powertrain 4L80-E is a four-speed, high torque capacity, electronically controlled automatic transmission, which
comprises a torque converter with lock-up direct drive clutch and three planetary gear sets. Five multiple diskclutches,
one intermediate sprag clutch assembly, two roller clutch assemblies and two band assemblies provide the drive el- ements necessary for correct sequential gear engagement and operation.
The torque converter containing
a pump, a turbine (rotor), a stator assembly, and a clutch pressure disksplined to the
turbine, acts as a fluid coupling for smooth torque transmission from the engine. The converter also supplies addi- tional torque multiplication when necessary, and the torque converter clutch (TCC) pressure disk provides a mechan- ical direct drive or 'lock-up' above a certain speed in top gear for greater fuel economy.
Gearshift operations are controlled from the Transmission Control Module (TCM), which governs the electronically
controlled valve body situated within the transmission.
Three planetary gear sets provide reverse and the four forward ratios, the changing of which is fully automatic in rela
- tion to load, vehicle speed and throttle opening. The Transmission Control Module receives and integrates various ve- hicle sensor input signals, and transmits operating signals to the solenoids located in the control valve assembly.
These solenoids govern the transmission operating pressures, up-shift and down-shift gear selection patterns and
also the torque converter clutch operation by pulse width modulated control.
8.2.1.1 Gear Ranges
Selectable gear positions are: P - Park, R - Reverse, N - Neutral, D - Drive, 3, 2.
P - Park position of the shift lever provides a mechanical locking of the output shaft of the transmission, and as such,
must only be engaged when the the vehicle is stationary. In addition, and for
extra safety, the handbrake should also
be applied. It is necessary to have the ignition ON and the footbrake applied to move the shift lever from the Park
position. For ignition key removal the shift lever must be in the Park position. The engine can be started in the Park
position.
R - Reverse enables the vehicle to be operated in a rearwards direction. The engine cannot be started in the Reverse
position.
N
-Neutral position enables the engine to be started and operated without driving the vehicle. It also allows the vehicle
to be moved manually for access, ie for removal of the propeller shaft.
D
-Drive position allows the automatic selection of all four forward gear ratios during normal driving conditions for
maximum efficiency and fuel economy. On acceleration, down-shifts are obtained by depressing the accelerator pedal
or by manual selection. The engine cannot be started in this position.
3
- Manual third position allows automatic operation of the three lower gear ratios but inhibits selection of the fourth
ratio. This position is used for towing a trailer or negotiating hilly terrain when greater engine braking control is re- quired. The engine cannot be started in this position.
2 - Manual second position allows automatic operation of the two lower gear ratios but inhibits selection of the third
and fourth ratios. This position is used for heavy traffic congestion or negotiating hilly terrain when even greater en
- gine braking control is required than is provided by manual third. This ratio may be selected at any vehicle speed - even if the transmission is in third or fourth ratio, the transmission will immediately down-shift to second gear pro- vided the vehicle speed is below 137 km / h (85 mile / h). The engine cannot be started in this position.
N.g!b: With the Performance Mode switch in the NORMAL position, the vehicle will pull away in second gear. How- ever, if more than 75 per cent of throttle is applied when the vehicle speed is between zero and 13 km/ h (8 mile / h), then first gear will be selected. From 13 to 61 km/ h (8 to 38 mile/ h) first gear is obtainable by 'kick-down'.
In 'sport' mode thevehicle pulls away in first gear and the transmission operatesfully in all four forward gears.
X300 VSM 1 Issue 1 August 1994
Page 157 of 521
Automatic Transmission (V12 & AJ16 Supercharged) Powertrain
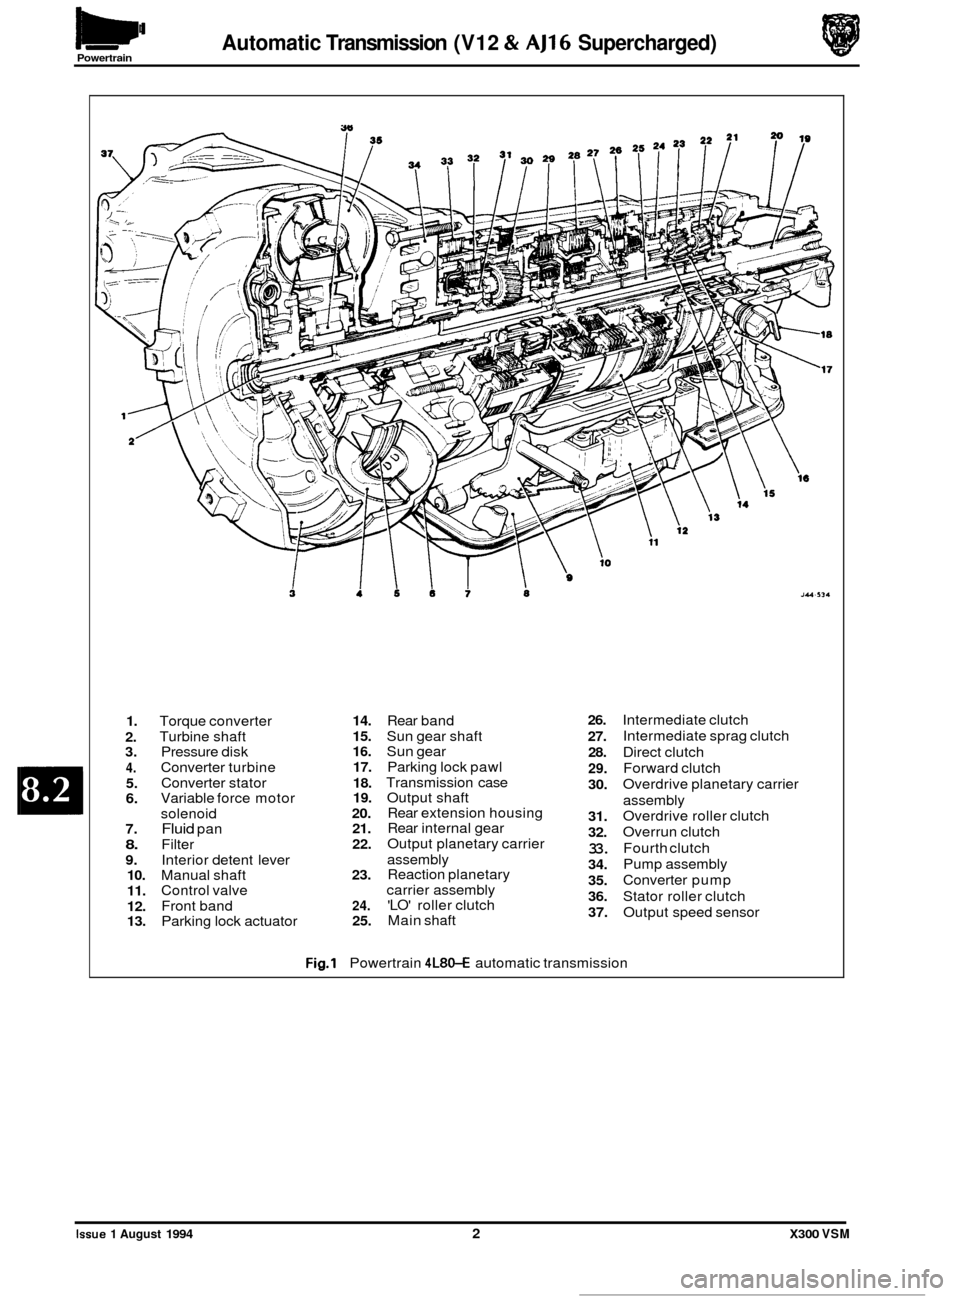
1.
2.
3.
4.
5. 6.
7.
8.
9. 10.
11.
12.
13.
Torque converter
Turbine shaft
Pressure disk
Converter turbine
Converter stator
Variable force motor
solenoid
Fluid pan
Filter
Interior detent lever
Manual shaft
Control valve
Front band
Parking lock actuator
3 4667 i JU-134
14.
15.
16.
17.
18.
19.
20. 21.
22.
23.
24. 25.
Rear band
Sun gear shaft
Sun gear
Parking lock pawl
Transmission case
Output shaft
Rear extension housing
Rear internal gear
Output planetary carrier
assembly Reaction planetary
carrier assembly
'LO' roller clutch
Main shaft
26.
27.
28.
29.
30.
31.
32.
33.
34.
35.
36.
37.
Intermediate clutch Intermediate sprag clutch
Direct clutch
Forward clutch
Overdrive planetary carrier
assembly
Overdrive roller clutch
Overrun clutch
Fourth clutch
Pump assembly
Converter pump
Stator roller clutch
Output speed sensor
Fig.1 Powertrain 4L8O-E automatic transmission
0
0
0
Issue 1 August 1994 2 X300 VSM
Page 162 of 521
Powertraln Automatic Transmission (V12 & AJ16 Supercharged)
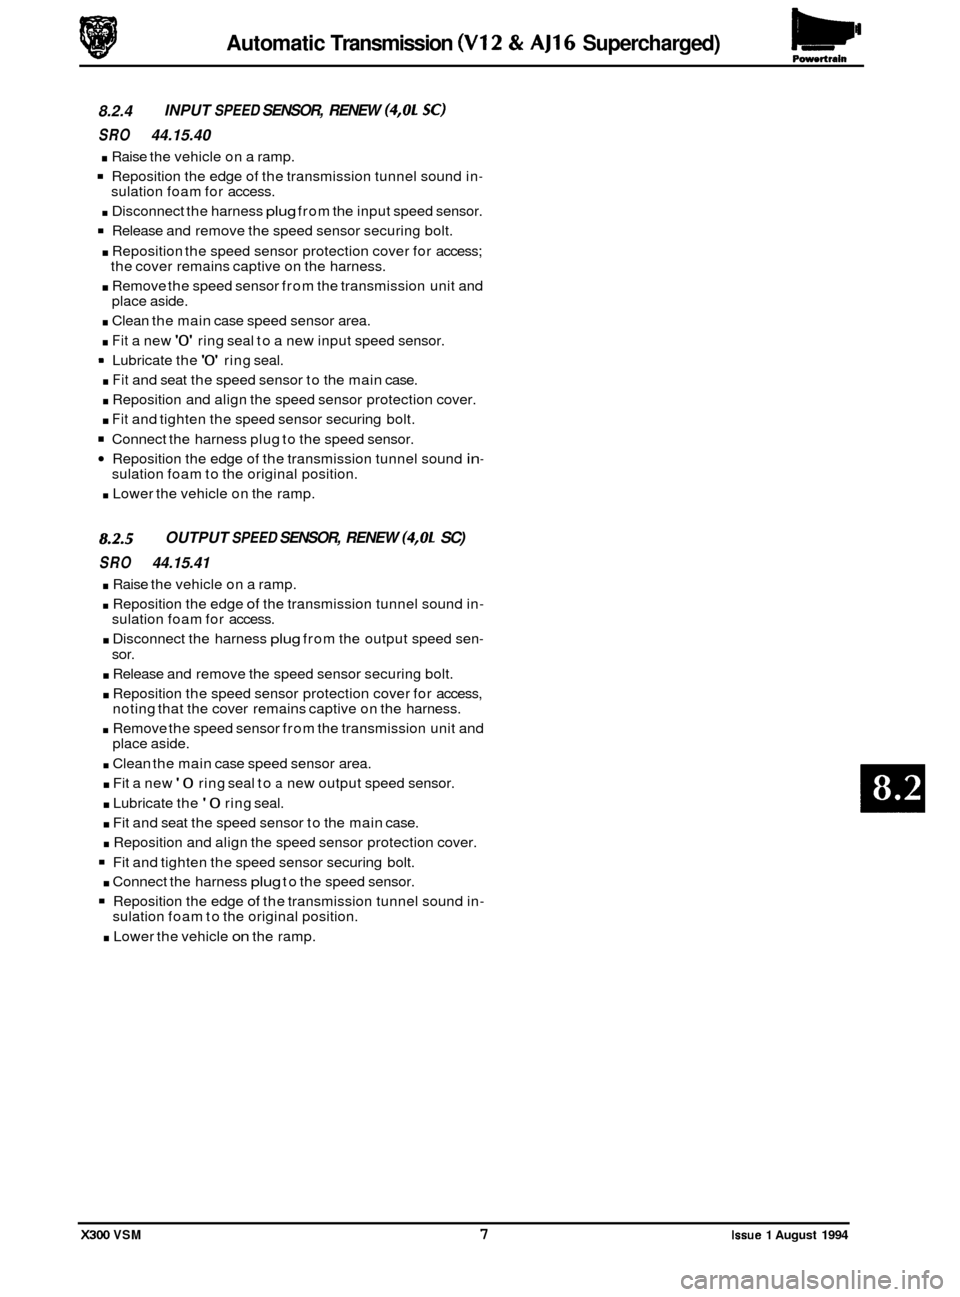
8.2.4 INPUT SPEED SENSOR, RENEW (4,OL SC)
SRO 44.15.40
. Raise
the vehicle on a ramp.
Reposition the edge of the transmission tunnel sound in- sulation foam for access.
. Disconnect the harness plug from the input speed sensor.
Release and remove the speed sensor securing bolt.
. Reposition the speed sensor protection cover for access;
. Remove the speed sensor from the transmission unit and
. Clean the main case speed sensor area.
. Fit a new '0' ring seal to a new input speed sensor.
9 Lubricate the '0' ring seal.
. Fit and seat the speed sensor to the main case.
. Reposition and align the speed sensor protection cover.
. Fit and tighten the speed sensor securing bolt.
Connect the harness plug to the speed sensor.
Reposition the edge of the transmission tunnel sound in-
. Lower the vehicle on the ramp.
the
cover remains captive on the harness.
place aside. @ sulation foam to the original position.
8.2.5
SRO 44.15.41
. Raise the vehicle on a ramp.
. Reposition the edge of the transmission tunnel sound in- sulation foam for access.
. Disconnect the harness plug from the output speed sen-
sor.
. Release and remove the speed sensor securing bolt.
. Reposition the speed sensor protection cover for access,
noting that the cover remains captive on the harness.
. Remove the speed sensor from the transmission unit and
place aside.
. Clean the main case speed sensor area.
. Fit a new '0 ring seal to a new output speed sensor.
. Lubricate the '0 ring seal.
. Fit and seat the speed sensor to the main case.
. Reposition and align the speed sensor protection cover.
Fit and tighten the speed sensor securing bolt.
. Connect the harness plug to the speed sensor.
Reposition the edge of the transmission tunnel sound in-
. Lower the vehicle on the ramp.
OUTPUT SPEED SENSOR, RENEW (4,OL SC)
sulation foam to the original position.
X300 VSM 7 Issue 1 August 1994
Page 163 of 521
Automatic Transmission (V12 & AJ16 Supercharged) Powertrain
8.2.6
SRO 44.15.40
. Open the hood and fit a suitable fender cover.
. Raise the vehicle on a ramp.
. Slacken the underfloor catalyst to downpipe clamps se-
. Displace and reposition the olive clamps on the pipes.
INPUT SPEED SENSOR, RENEW (6,OL)
curing bolts.
Slacken the underfloor catalyst
to intermediate silencer
clamps securing bolts.
9 Displace the underfloor catalyst assembly rearwards to
disconnect from the downpipes.
Displace and remove the olives from the downpipes.
Using a wire brush, clean the olives and downpipe joints.
. Place a suitable piece of wood between the underfloor
. Reposition the edge of the transmission tunnel insulation
. Release and remove the input speed sensor securing bolt.
. Reposition the speed sensor protection cover for access,
noting that the cover remains captive on the harness.
Disconnect the speed sensor harness multi
-pin plug.
- Displace and remove the speed sensor from the trans- mission case.
Clean the transmission case area.
. Fit a new ‘0 ring seal to a new input speed sensor.
. Lubricate the ‘0 ring seal.
. Fit and fully seat the speed sensor to the transmission
. Reconnect the harness multi-pin plug.
Reposition and align the protection cover.
. Fit and tighten the speed sensor securing bolt.
Reposition the insulation foam to its original position.
Remove the block of wood from between the underfloor
. Apply sealant to the downpipe joints and olives. See Ser-
Fit and seat the olives to the downpipes.
Reposition the olive clamps.
Tighten the underfloor catalyst to downpipe clamps secur-
Align the intermediate silencers to the underfloor catalyst
. Tighten the clamp securing bolts.
. Lower the vehicle on the ramp.
Remove the fender cover and close the hood.
catalyst
and the body for access.
foam for access.
0
case.
catalyst and the floor.
vice Materials
in the preliminary pages, this Section.
Reconnect the underfloor catalyst to the downpipes.
0
ing bolts.
assembly.
lppl
0
X300 VSM issue 1 August 1994 8
Page 164 of 521
Powertwin Automatic Transmission (V12 & AJ16 Supercharged)
8.2.7
SRO 44.15.41
OUTPUT SPEED SENSOR, RENEW (6,OL)
. Open the hood and fit a suitable fender cover.
. Raise the vehicle on a ramp.
. Slacken the underfloor catalyst to downpipe clamps se-
Displace and reposition the olive clamps on the pipes.
. Slacken the underfloor catalyst to intermediate silencer
. Displace the underfloor catalyst assembly rearwards to
. Displace and remove the olives from the downpipes.
. Using a wire brush, clean the olives and downpipe joints.
Place a suitable piece of wood between the underfloor
catalyst and the body for access.
. Reposition the edge of the transmission tunnel insulation
foam for access.
. Release and remove the output speed sensor securing
bolt.
Reposition the speed sensor protection cover for access,
noting that the cover remains captive on the harness.
. Disconnect the speed sensor harness multi-pin plug.
. Displace and remove the speed sensor from the trans-
. Clean the transmission case sensor area.
. Fit a new '0' ring seal to a new output speed sensor.
. Lubricate the '0' ring seal.
Fit and fully seat the speed sensor to the transmission
. Reconnect the harness multi-pin plug.
Reposition and align the protection cover.
. Fit and tighten the speed sensor securing bolt.
Reposition the insulation foam to its original position.
Remove the block of wood from between the underfloor
catalyst and the floor.
. Apply sealant to the downpipe joints and olives. See Ser- vice Materials in the preliminary pages, this Section.
. Fit and seat the olives to the downpipes.
. Reconnect the underfloor catalyst to the downpipes.
= Reposition the olive clamps.
. Tighten the underfloor catalyst to downpipe clamps secur-
= Align the intermediate silencers to the underfloor catalyst
. Tighten the clamp securing bolts.
Lower the vehicle on the ramp.
. Remove the fender cover and close the hood.
curing
bolts.
cl amps securing bolts.
disconnect from the downpipes.
mission case.
case.
0
ing bolts.
assembly.
Issue 1 August 1994 X300 VSM 9
Page 165 of 521
Automatic Transmission (V12 & AJ16 Supercharged) Powertrain
8.2.8 TEMPERATURE SENSOR, RENEW
(4,OL SC AND 6,011
The temperature sensor forms part of the internal wiring
harness. Should the sensor require replacement, a new wir- ing harness must be fitted. See Subsection 8.2.2.
8.2.9 VARIABLE FORCE MOTOR, RENEW
SRO 44.15.43
. Open the hood and fit a suitable fender cover.
. Raise the vehicle on a ramp.
. Drain the transmission lubrication system, see Sub-sec-
Remove the fluid pan, see Sub-section 8.2.14 (4,OL SC) or
Remove the fluid filter, see Subsection 8.2.18.
Disconnect the internal harness plug from the variable
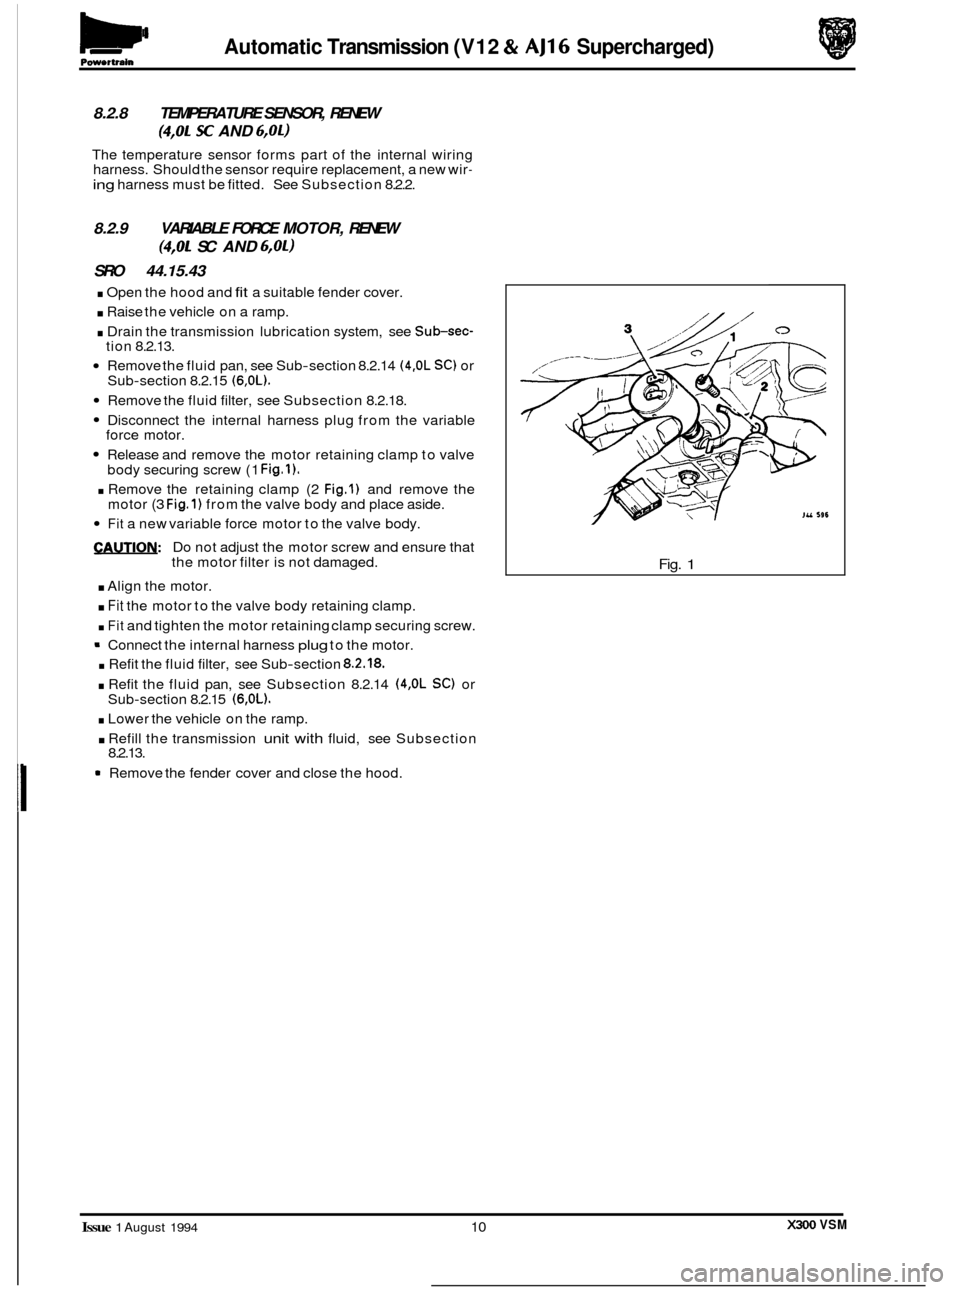
Release and remove the motor retaining clamp to valve
. Remove the retaining clamp (2 Fig.1) and remove the
Fit a new variable force motor to the valve body.
CAUTIOI\I: Do not adjust the motor screw and ensure that
the motor filter is not damaged.
. Align the motor.
. Fit the motor to the valve body retaining clamp.
. Fit and tighten the motor retaining clamp securing screw.
Connect the internal harness
plug to the motor.
. Refit the fluid filter, see Sub-section 8.2.18.
. Refit the fluid pan, see Subsection 8.2.14 (4,OL SC) or
. Lower the vehicle on the ramp.
. Refill the transmission unit with fluid, see Subsection
(4,OL SC AND 6,011
tion 8.2.13.
Sub
-section 8.2.15 (6,OL).
force motor.
body securing screw (1
Fig.1).
motor (3 Fig.1) from the valve body and place aside.
Sub
-section 8.2.15 (6,OL).
8.2.13.
m Remove the fender cover and close the hood.
JU 596
Fig. 1
X300 VSM Issue 1 August 1994 10
Page 183 of 521
-5 Driveshafts & Final Drive
0
Fixing
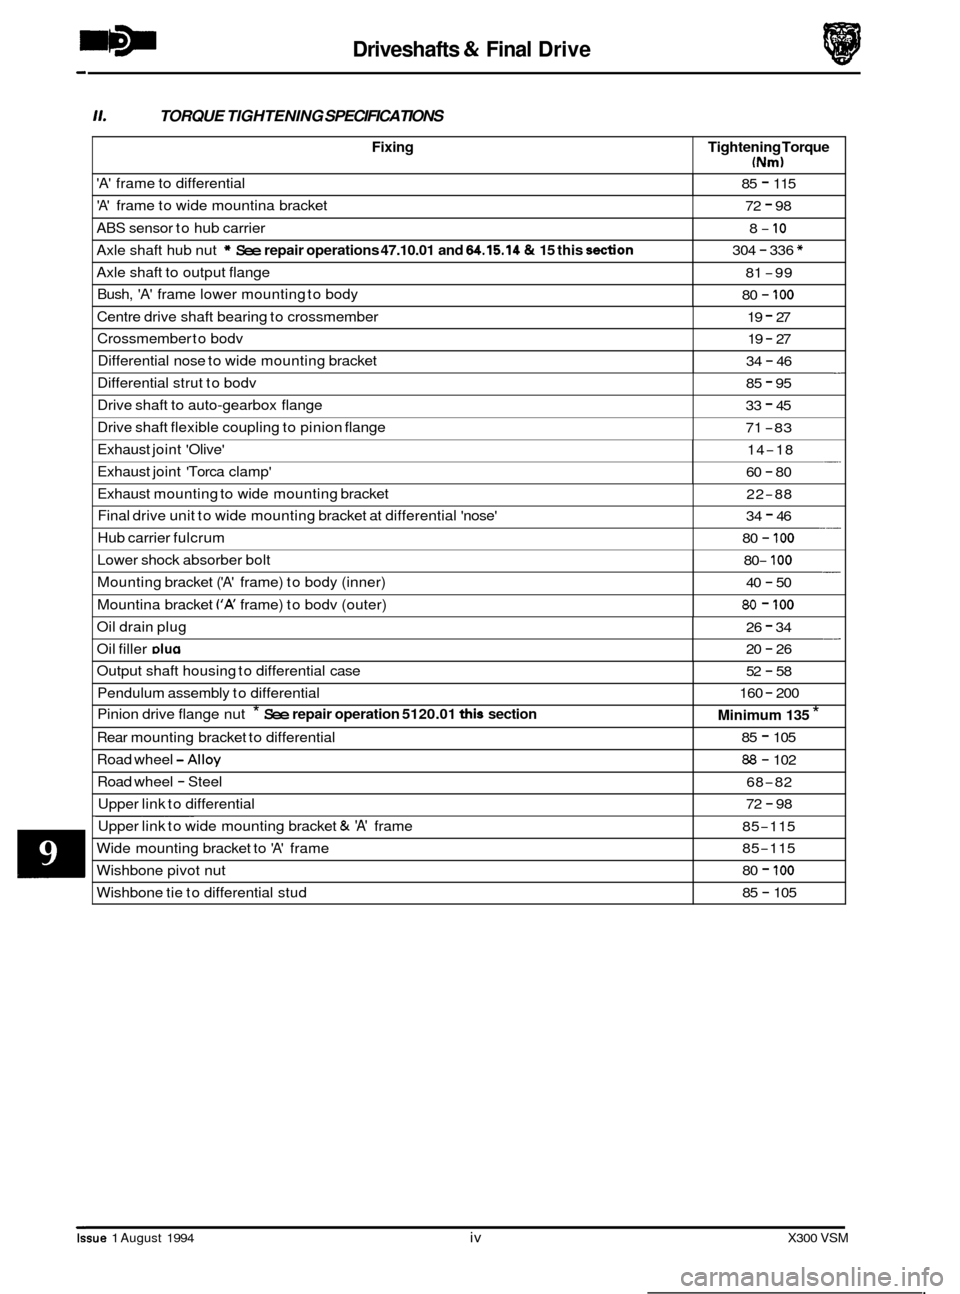
11. TORQUE TIGHTENING SPECIFICATIONS
Tightening Torque
(Nm)
'A' frame to differential 85 - 115
'A' frame to wide mountina bracket 72 - 98
ABS sensor to hub carrier
Axle shaft hub nut
* See repair operations 47.10.01 and 64.15.14 & 15 this don
8- 10
304 - 336 *
Axle shaft to output flange
Bush,
'A' frame lower mounting to body
81 -99
80
- 100
Centre drive shaft bearing to crossmember 19 - 27
Crossmember to bodv 19 - 27
Differential nose to wide mounting bracket - 34 - 46
Issue 1 August 1994 iv X300 VSM
Differential strut to bodv 85 - 95
Drive shaft to auto-gearbox flange
Drive shaft flexible coupling to pinion flange 33 - 45
71
-83
Exhaust joint 'Olive'
Exhaust joint 'Torca clamp' -. 14-18
60
- 80
Exhaust mounting to wide mounting bracket
Final drive unit to wide mounting bracket at differential 'nose'
Hub carrier fulcrum 22-88
34
- 46
80
- 100 ___
Lower shock absorber bolt
Mounting bracket
('A' frame) to body (inner)
Mountina bracket
('A' frame) to bodv (outer)
- 80- 100
40 - 50
80 - 100
Oil drain plug __ 26 - 34
Oil filler DIU~ 20 - 26
Output shaft housing to differential case
Pendulum assembly to differential
Pinion drive flange nut
* See repair operation 5120.01 this section
Road wheel -Alloy
Road wheel - Steel
Upper link to differential
Rear
mounting bracket to differential
52 - 58
160
- 200
Minimum 135 *
85 - 105
88 - 102
68
-82
72
- 98 ~~~~~
Upper
link to wide mounting bracket & 'A' frame
Wide mounting bracket to
'A' frame
85-115
85
-115
Wishbone pivot nut
Wishbone tie to differential stud 80 - 100
85 - 105
Page 191 of 521
Driveshafts & Final Drive
9.8 FINAL DRWE UNIT RENEW
SRO 51.25.13
. Disconnect vehicle battery ground lead.
. Support the vehicle at the rear and remove the rear road
wheels.
Disconnect brake pad wear sensor multi-plug at RH hub
carrier and remove tie straps from wishbone. Release
ABS speed sensors at
RH and LH hub carriers and remove
tie straps from wishbones.
. Remove rear brake calipers, see Section 12, and support
at bump stop. Disconnect main handbrake cable at com- pensator, short cables at joining piece and remove com- pensator.
. Remove fixings, FLEXIBLE coupling to differential DRIVE FLANGE.
CAUTIW: Under no circumstances must the flexible
coupling (or itsfixings) be loosened or removed
from the drive shaft flange.
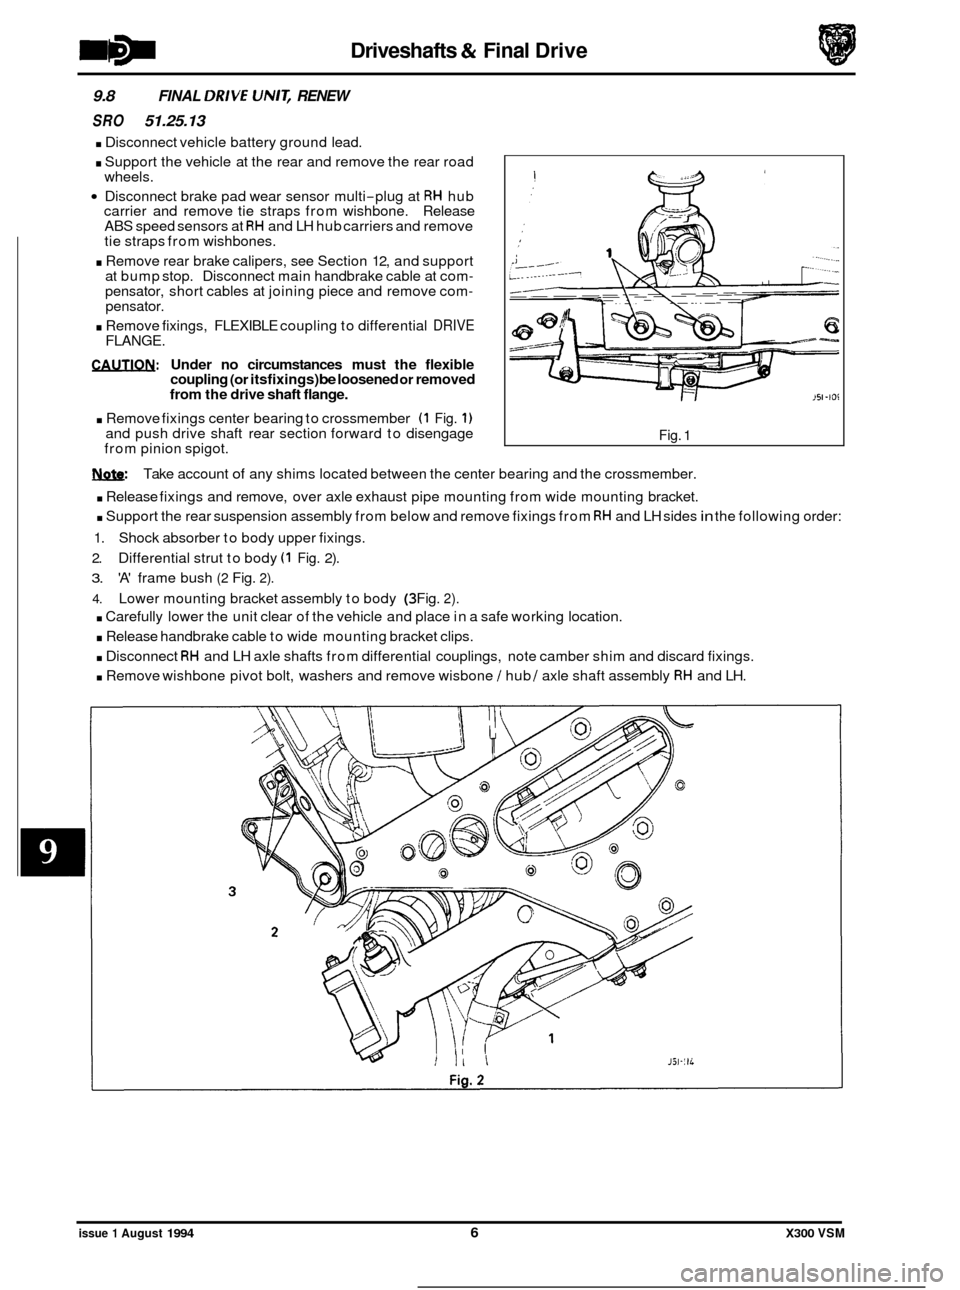
. Remove fixings center bearing to crossmember (1 Fig. 1) and push drive shaft rear section forward to disengage
from pinion spigot. Fig. 1
w: Take account of any shims located between the center bearing and the crossmember.
. Release fixings and remove, over axle exhaust pipe mounting from wide mounting bracket.
. Support the rear suspension assembly from below and remove fixings from RH and LH sides in the following order:
1. Shock absorber to body upper fixings.
2. Differential strut to body (1 Fig. 2).
3. 'A' frame bush (2 Fig. 2).
4. Lower mounting bracket assembly to body (3 Fig. 2).
. Carefully lower the unit clear of the vehicle and place in a safe working location.
. Release handbrake cable to wide mounting bracket clips.
. Disconnect RH and LH axle shafts from differential couplings, note camber shim and discard fixings.
. Remove wishbone pivot bolt, washers and remove wisbone / hub / axle shaft assembly RH and LH.
issue 1 August 1994 6 X300 VSM
Page 192 of 521
Driveshafts & Final Drive
. Remove upper link assembly from differential and wide mounting bracket / 'A' frame.
. Release fixings, 'A' frame to differential, 'A' frame to wishbone tie and wide mounting bracket to 'A' frame.
. Remove wishbone tie assembly, rear mounting bracket and pendulum assembly.
. Release fixings differential nose to wide mounting bracket.
. Assembly and fitting is the reversal of this procedure, taking note of the following:
Drive shaft must be aligned in accordance with Sub
-Section 9.2.
Renew all self locking nuts.
Renew all bolts that were originally fitted with thread locking adhesive.
Replace all locking wire and split pins (cotter pins).
Tighten all fixings to the specified torque.
Correct the final drive oil level
if required.
Check and adjust rear wheel camber setting as required.
9.9 AXLE SHAFT ASSEMBLY, RENEW
SRO
47.10.01
Disconnect vehicle battery ground lead.
. Slacken appropriate axle shaft hub nut.
. Support the vehicle at the rear and remove rear road
. Remove brake caliper in accordance with 70.55.03. Sec-
wheel.
tion 12, but do not disconnect hydraulics.
Slacken hub carrier fulcrum and remove ABS sensor from
hub carrier.
. Remove axle shaft hub nut and collar.
. Remove fixings axle shaft to differential output shaft
flange, note camber shim.
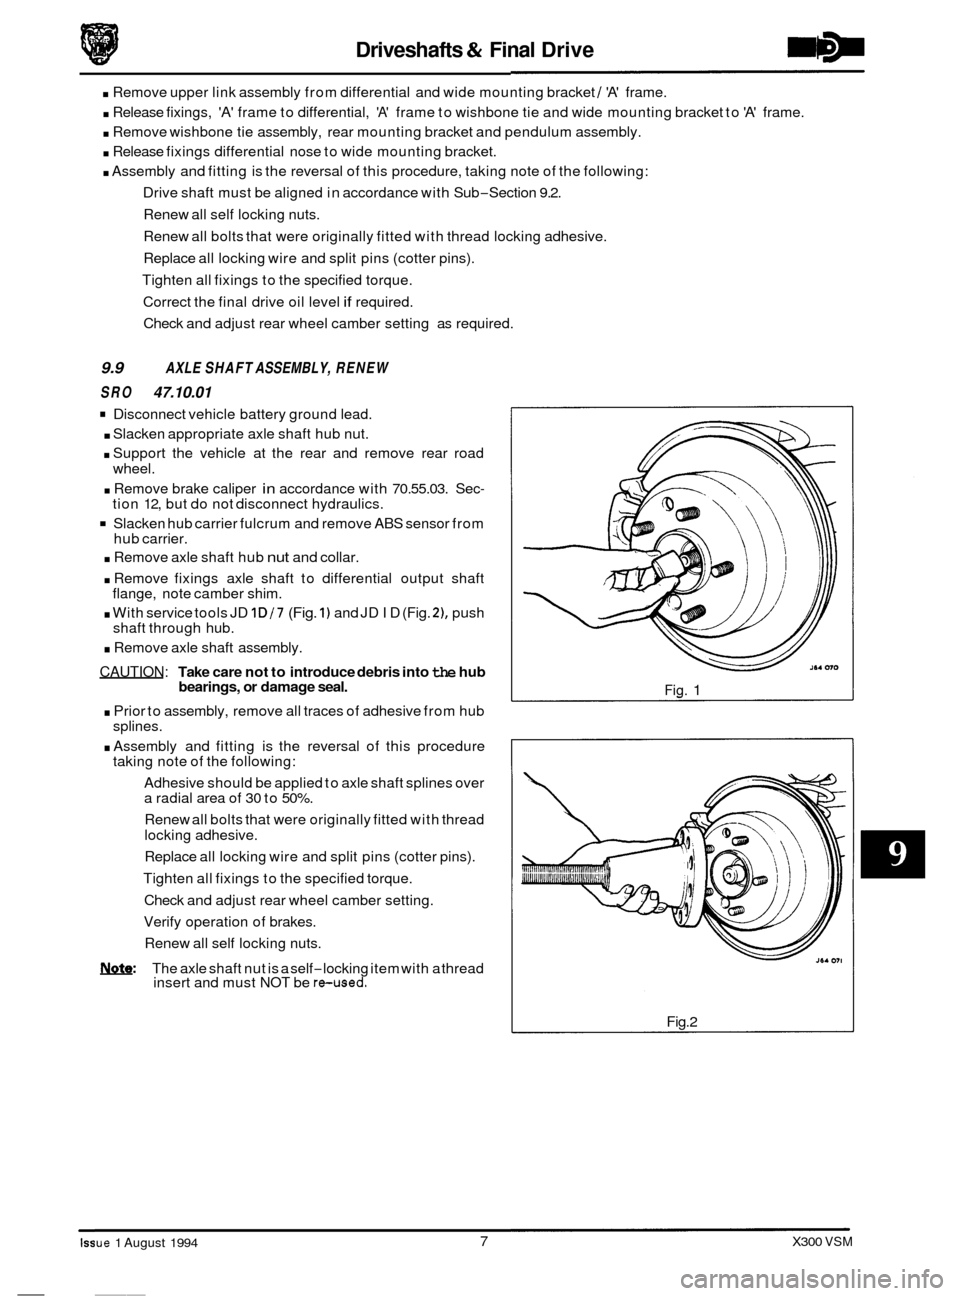
. With service tools JD 1D/7 (Fig. 1) and JD ID (Fig. 21, push
shaft through hub.
. Remove axle shaft assembly.
CAUTION: Take care not to introduce debris into the hub
bearings, or damage seal.
. Prior to assembly, remove all traces of adhesive from hub
. Assembly and fitting is the reversal of this procedure
Adhesive should be applied to axle shaft splines over
a radial area of
30 to 50%.
Renew all bolts that were originally fitted with thread
locking adhesive.
Replace all locking wire and split pins (cotter pins).
Tighten all fixings to the specified torque.
Check and adjust rear wheel camber setting.
Verify operation of brakes.
Renew all self locking nuts.
splines.
taking
note of the following:
0
NQ&: The axle shaft nut is a self-locking item with a thread
insert and must NOT be reused.
Fig. 1
Fig.2
- Iss ue 1 August 1994
__~
7 X300 VSM