air suspension JAGUAR XJ6 1997 2.G Workshop Manual
[x] Cancel search | Manufacturer: JAGUAR, Model Year: 1997, Model line: XJ6, Model: JAGUAR XJ6 1997 2.GPages: 227, PDF Size: 7.2 MB
Page 3 of 227

3261 Jaguar XJ6
REPAIRS & OVERHAUL
Engine and associated systems
Engine in-car repair procedures Page 2A•1
Engine removal and overhaul procedures Page 2B•1
Cooling, heating and air conditioning systems Page 3•1
Fuel and exhaust systems Page 4•1
Engine electrical systems Page 5•1
Emissions and engine cone control systems Page 6•1
Transmission
Automatic transmissionPage 7•1
DrivetrainPage 8•1
Brakes and suspension
Braking systemPage 9•1
Suspension and steering systems Page 10•1
Body equipment
Bodywork and fittingsPage 11•1
Body electrical systems Page 12•1
Wiring diagramsPage 12•16
REFERENCE
Dimensions and weights Page REF•1
Jacking and vehicle support Page REF•1
Radio/cassette unit anti-theft system - precaution Page REF•1
Conversion factorsPage REF•2
Use of EnglishPage REF•3
Buying spare parts and vehicle identification Page REF•4
General repair procedures Page REF•5
Tools and working facilities Page REF•6
MOT test checksPage REF•8
Fault findingPage REF•12
Glossary of technical terms Page REF•18
IndexPage REF•22
Contents
Page 14 of 227
3261 Jaguar XJ6
0•14Weekly checks
Tyre condition and pressure
It is very important that tyres are in good
condition, and at the correct pressure - having
a tyre failure at any speed is highly dangerous.
Tyre wear is influenced by driving style - harsh
braking and acceleration, or fast cornering,
will all produce more rapid tyre wear. As a
general rule, the front tyres wear out faster
than the rears. Interchanging the tyres from
front to rear ("rotating" the tyres) may result in
more even wear. However, if this is
completely effective, you may have the
expense of replacing all four tyres at once!
Remove any nails or stones embedded in the
tread before they penetrate the tyre to cause
deflation. If removal of a nail does reveal thatthe tyre has been punctured, refit the nail so
that its point of penetration is marked. Then
immediately change the wheel, and have the
tyre repaired by a tyre dealer.
Regularly check the tyres for damage in the
form of cuts or bulges, especially in the
sidewalls. Periodically remove the wheels,
and clean any dirt or mud from the inside and
outside surfaces. Examine the wheel rims for
signs of rusting, corrosion or other damage.
Light alloy wheels are easily damaged by
"kerbing" whilst parking; steel wheels may
also become dented or buckled. A new wheel
is very often the only way to overcome severe
damage.New tyres should be balanced when they are
fitted, but it may become necessary to re-
balance them as they wear, or if the balance
weights fitted to the wheel rim should fall off.
Unbalanced tyres will wear more quickly, as
will the steering and suspension components.
Wheel imbalance is normally signified by
vibration, particularly at a certain speed
(typically around 50 mph). If this vibration is
felt only through the steering, then it is likely
that just the front wheels need balancing. If,
however, the vibration is felt through the
whole car, the rear wheels could be out of
balance. Wheel balancing should be carried
out by a tyre dealer or garage.
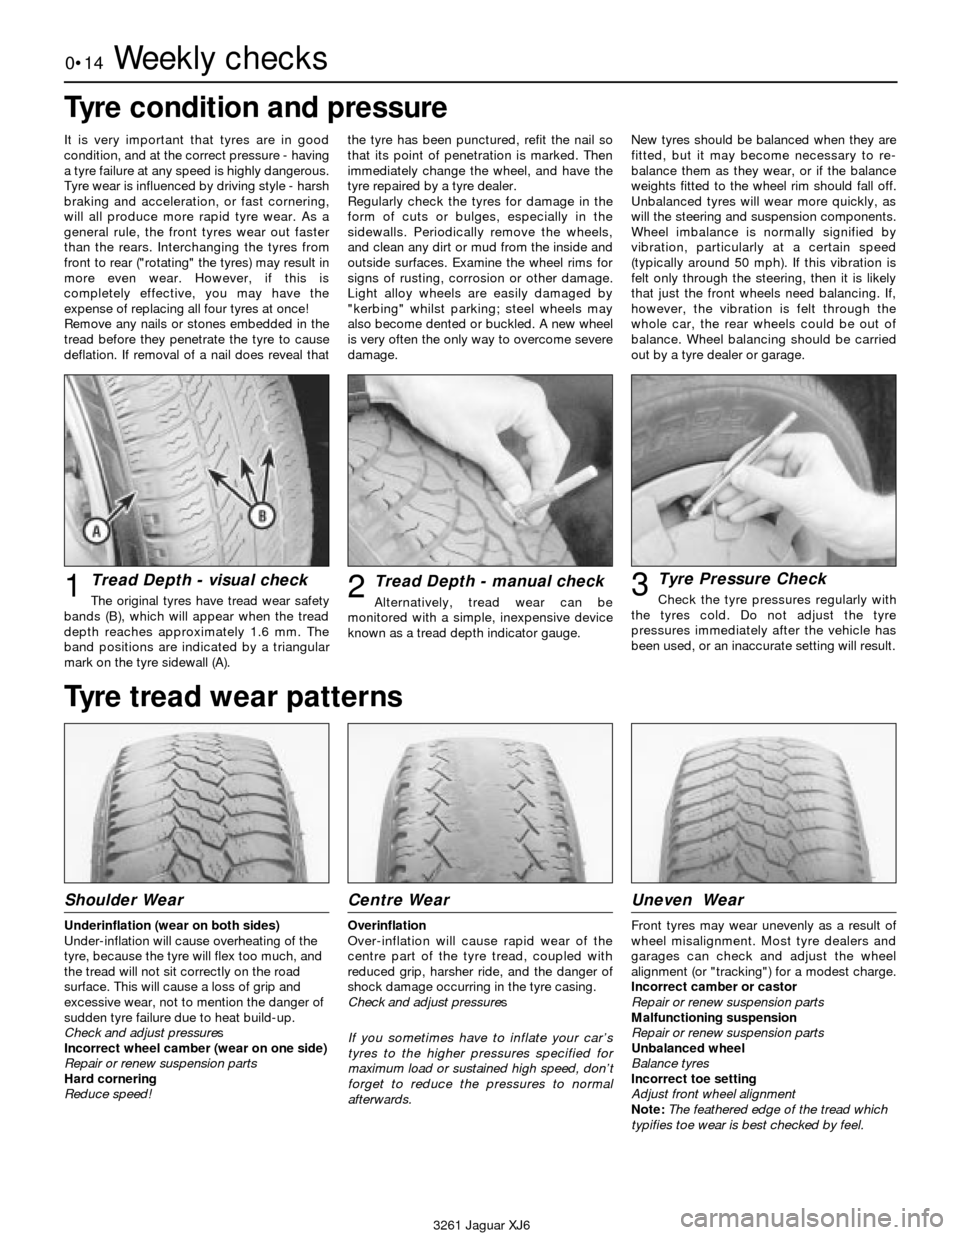
Tread Depth - visual check
The original tyres have tread wear safety
bands (B), which will appear when the tread
depth reaches approximately 1.6 mm. The
band positions are indicated by a triangular
mark on the tyre sidewall (A).1Tread Depth - manual check
Alternatively, tread wear can be
monitored with a simple, inexpensive device
known as a tread depth indicator gauge.2Tyre Pressure Check
Check the tyre pressures regularly with
the tyres cold. Do not adjust the tyre
pressures immediately after the vehicle has
been used, or an inaccurate setting will result.3
Tyre tread wear patterns
Shoulder Wear
Underinflation (wear on both sides)
Under-inflation will cause overheating of the
tyre, because the tyre will flex too much, and
the tread will not sit correctly on the road
surface. This will cause a loss of grip and
excessive wear, not to mention the danger of
sudden tyre failure due to heat build-up.
Check and adjust pressures
Incorrect wheel camber (wear on one side)
Repair or renew suspension parts
Hard cornering
Reduce speed!
Centre Wear
Overinflation
Over-inflation will cause rapid wear of the
centre part of the tyre tread, coupled with
reduced grip, harsher ride, and the danger of
shock damage occurring in the tyre casing.
Check and adjust pressures
If you sometimes have to inflate your car’s
tyres to the higher pressures specified for
maximum load or sustained high speed, don’t
forget to reduce the pressures to normal
afterwards.
Uneven Wear
Front tyres may wear unevenly as a result of
wheel misalignment. Most tyre dealers and
garages can check and adjust the wheel
alignment (or "tracking") for a modest charge.
Incorrect camber or castor
Repair or renew suspension parts
Malfunctioning suspension
Repair or renew suspension parts
Unbalanced wheel
Balance tyres
Incorrect toe setting
Adjust front wheel alignment
Note: The feathered edge of the tread which
typifies toe wear is best checked by feel.
Page 16 of 227
0•16Lubricants, fluids and tyre pressures
3261 Jaguar XJ6
Lubricants and fluids
Engine . . . . . . . . . . . . . . . . . . . . . . . . . . Multigrade engine oil to API SG or higher (Duckhams QS, QXR, Hypergrade Plus,
Hypergrade, or 10W-40 Motor Oil)
Cooling system . . . . . . . . . . . . . . . . . . . Ethylene glycol based (phosphate free) antifreeze
(Duckhams Antifreeze and Summer Coolant)
Automatic transmission . . . . . . . . . . . . Dexron type II automatic transmission fluid (ATF) (Duckhams Uni-Matic)
Differential:
Standard differential . . . . . . . . . . . . . . SAE EP90 to API GL5 (Duckhams 80W-90S Gear Oil)
Powr-lok differential . . . . . . . . . . . . . . . SAE 90 to API GL5 (Duckhams Hypoid 90 DL)
Braking system . . . . . . . . . . . . . . . . . . . Hydraulic fluid to DOT 4 (Duckhams Universal Brake and Clutch Fluid)
Power steering (with separate reservoir) .dependent on year of manufacture and system fitted - refer to your Jaguar dealer
Power hydraulic system . . . . . . . . . . . . . Castrol or Jaguar hydraulic system mineral oil (HSMO) Refer to your Jaguar dealer
Tyre pressures
Note:Tyre pressures must always be checked with the tyres cold to ensure accuracy.
Front . . . . . . . . . . . . . . . . . . . . . . . . . . . . . . . . . . . . . . . . . . . 34 psi (2.3 bar)
Rear . . . . . . . . . . . . . . . . . . . . . . . . . . . . . . . . . . . . . . . . . . . 34 psi (2.3 bar)
Note:Jaguar state that the tyre pressures maybe reduced by up to 8 psi (0.6 bar) on the front tyres and 6 psi (0.4 bar) on the rear
tyres to increase the ride comfort. This is only allowable if the vehicle is not to be driven at speeds in excess of 100 mph (160 kmh);
if speeds are to exceed this, the tyres must be run at the specified pressures.
Oils perform vital tasks in all engines. The
higher the engine’s performance, the greater
the demand on lubricants to minimise wear as
well as optimise power and economy.
Duckhams tailors lubricants to the highest
technical standards, meeting and exceeding
the demands of all modern engines.
HOW ENGINE OIL WORKS
• Beating friction
Without oil, the surfaces inside your engine
which rub together will heat, fuse and quickly
cause engine seizure. Oil, and its special
additives, forms a molecular barrier between
moving parts, to stop wear and minimise heat
build-up.
• Cooling hot spots
Oil cools parts that the engine’s water-based
coolant cannot reach, bathing the combustion
chamber and pistons, where temperatures
may exceed 1000°C. The oil assists intransferring the heat to the engine cooling
system. Heat in the oil is also lost by air flow
over the sump, and via any auxiliary oil cooler.
• Cleaning the inner engine
Oil washes away combustion by-products
(mainly carbon) on pistons and cylinders,
transporting them to the oil filter, and holding
the smallest particles in suspension until they
are flushed out by an oil change. Duckhams
oils undergo extensive tests in the laboratory,
and on the road.
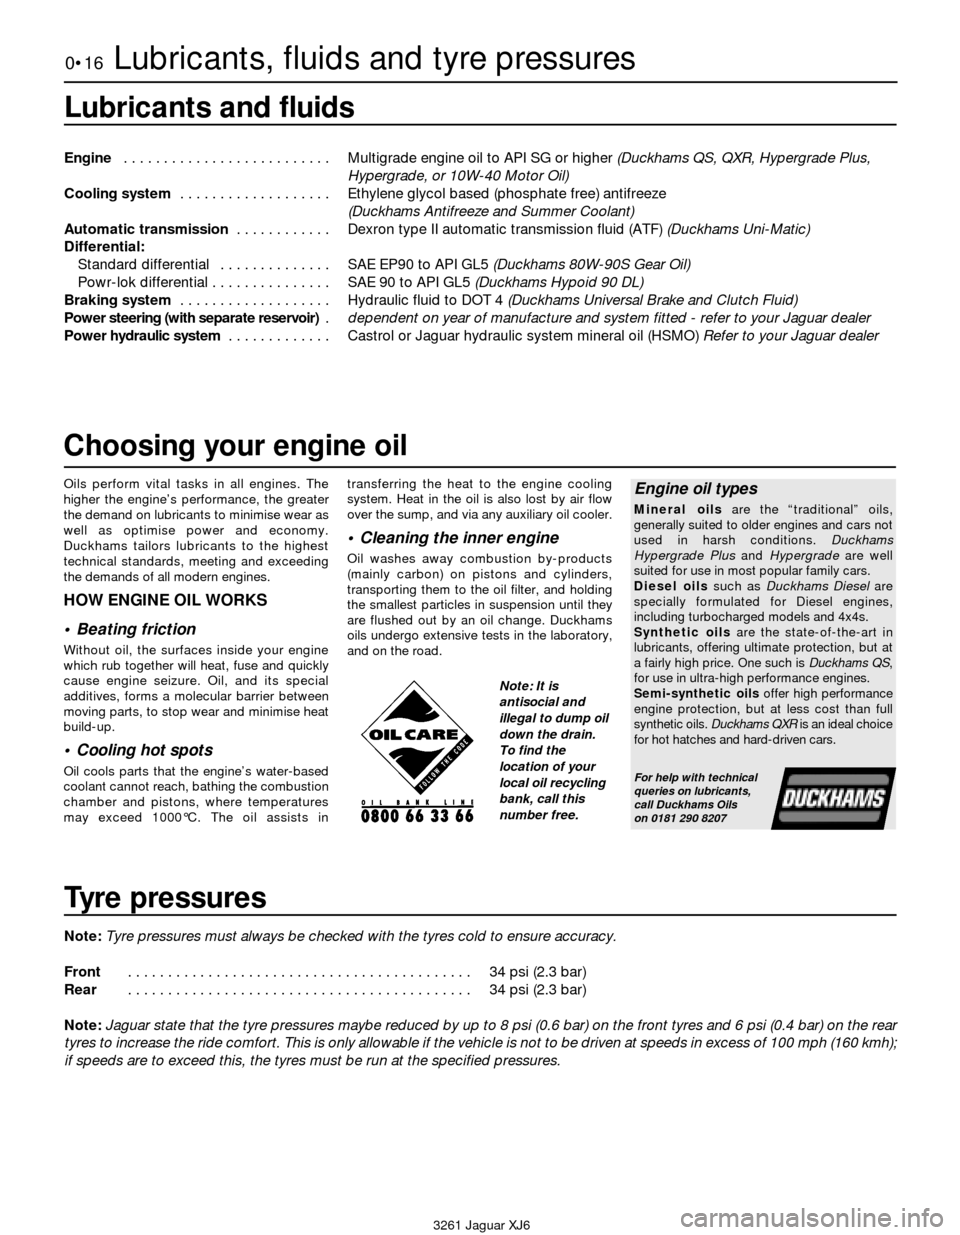
Engine oil types
Mineral oilsare the “traditional” oils,
generally suited to older engines and cars not
used in harsh conditions. Duckhams
Hypergrade Plus and Hypergradeare well
suited for use in most popular family cars.
Diesel oilssuch as Duckhams Dieselare
specially formulated for Diesel engines,
including turbocharged models and 4x4s.
Synthetic oilsare the state-of-the-art in
lubricants, offering ultimate protection, but at
a fairly high price. One such is Duckhams QS,
for use in ultra-high performance engines.
Semi-synthetic oilsoffer high performance
engine protection, but at less cost than full
synthetic oils. Duckhams QXRis an ideal choice
for hot hatches and hard-driven cars.
For help with technical
queries on lubricants,
call Duckhams Oils
on 0181 290 8207
Choosing your engine oil
Note: It is
antisocial and
illegal to dump oil
down the drain.
To find the
location of your
local oil recycling
bank, call this
number free.
Page 17 of 227
3261 Jaguar XJ6
1
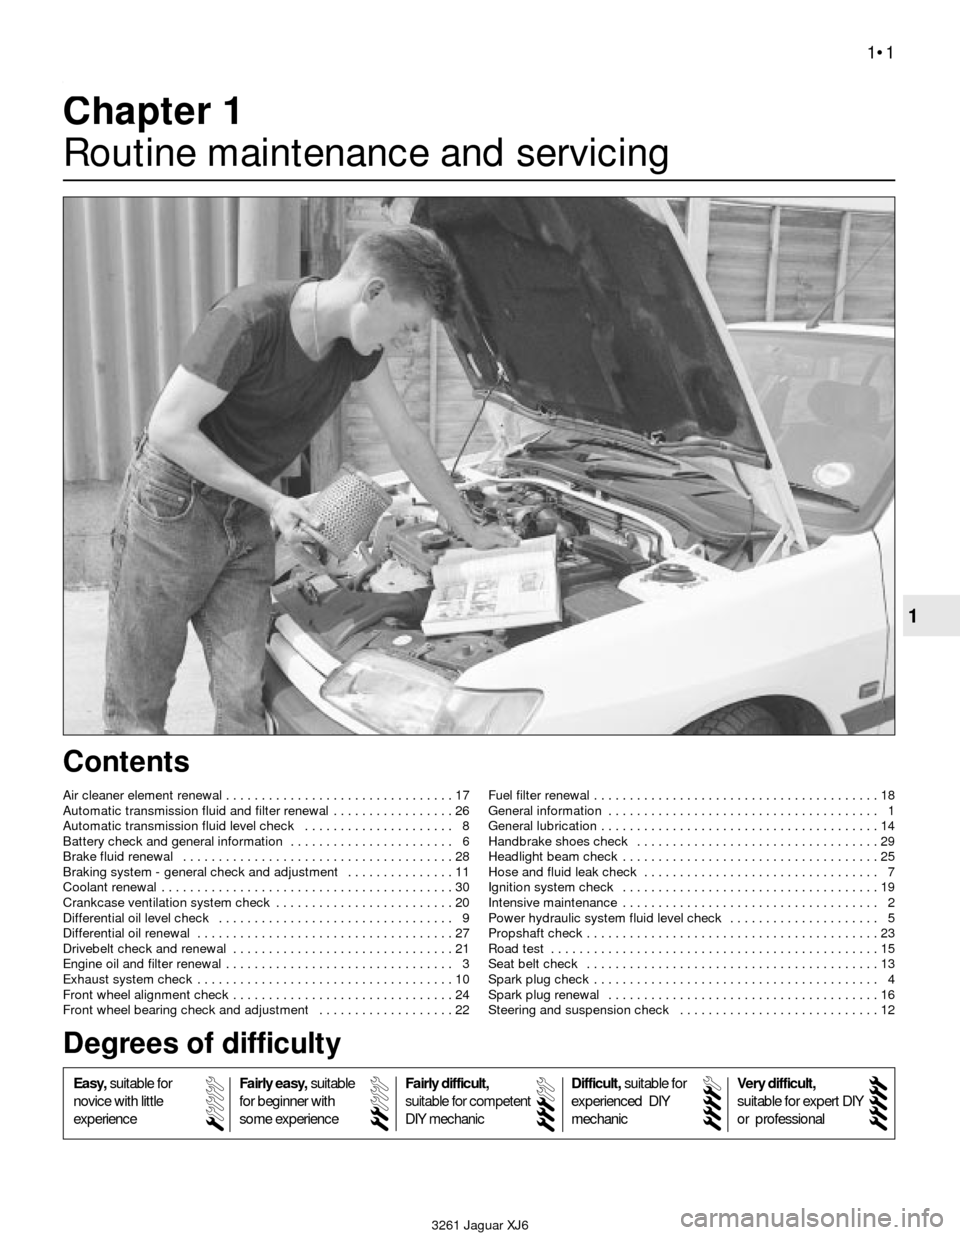
Chapter 1
Routine maintenance and servicing
Air cleaner element renewal . . . . . . . . . . . . . . . . . . . . . . . . . . . . . . . . 17
Automatic transmission fluid and filter renewal . . . . . . . . . . . . . . . . . 26
Automatic transmission fluid level check . . . . . . . . . . . . . . . . . . . . . 8
Battery check and general information . . . . . . . . . . . . . . . . . . . . . . . 6
Brake fluid renewal . . . . . . . . . . . . . . . . . . . . . . . . . . . . . . . . . . . . . . 28
Braking system - general check and adjustment . . . . . . . . . . . . . . . 11
Coolant renewal . . . . . . . . . . . . . . . . . . . . . . . . . . . . . . . . . . . . . . . . . 30
Crankcase ventilation system check . . . . . . . . . . . . . . . . . . . . . . . . . 20
Differential oil level check . . . . . . . . . . . . . . . . . . . . . . . . . . . . . . . . . 9
Differential oil renewal . . . . . . . . . . . . . . . . . . . . . . . . . . . . . . . . . . . . 27
Drivebelt check and renewal . . . . . . . . . . . . . . . . . . . . . . . . . . . . . . . 21
Engine oil and filter renewal . . . . . . . . . . . . . . . . . . . . . . . . . . . . . . . . 3
Exhaust system check . . . . . . . . . . . . . . . . . . . . . . . . . . . . . . . . . . . . 10
Front wheel alignment check . . . . . . . . . . . . . . . . . . . . . . . . . . . . . . . 24
Front wheel bearing check and adjustment . . . . . . . . . . . . . . . . . . . 22Fuel filter renewal . . . . . . . . . . . . . . . . . . . . . . . . . . . . . . . . . . . . . . . . 18
General information . . . . . . . . . . . . . . . . . . . . . . . . . . . . . . . . . . . . . . 1
General lubrication . . . . . . . . . . . . . . . . . . . . . . . . . . . . . . . . . . . . . . . 14
Handbrake shoes check . . . . . . . . . . . . . . . . . . . . . . . . . . . . . . . . . . 29
Headlight beam check . . . . . . . . . . . . . . . . . . . . . . . . . . . . . . . . . . . . 25
Hose and fluid leak check . . . . . . . . . . . . . . . . . . . . . . . . . . . . . . . . . 7
Ignition system check . . . . . . . . . . . . . . . . . . . . . . . . . . . . . . . . . . . . 19
Intensive maintenance . . . . . . . . . . . . . . . . . . . . . . . . . . . . . . . . . . . . 2
Power hydraulic system fluid level check . . . . . . . . . . . . . . . . . . . . . 5
Propshaft check . . . . . . . . . . . . . . . . . . . . . . . . . . . . . . . . . . . . . . . . . 23
Road test . . . . . . . . . . . . . . . . . . . . . . . . . . . . . . . . . . . . . . . . . . . . . . 15
Seat belt check . . . . . . . . . . . . . . . . . . . . . . . . . . . . . . . . . . . . . . . . . 13
Spark plug check . . . . . . . . . . . . . . . . . . . . . . . . . . . . . . . . . . . . . . . . 4
Spark plug renewal . . . . . . . . . . . . . . . . . . . . . . . . . . . . . . . . . . . . . . 16
Steering and suspension check . . . . . . . . . . . . . . . . . . . . . . . . . . . . 12
1•1
Contents
Easy,suitable for
novice with little
experienceFairly easy,suitable
for beginner with
some experienceFairly difficult,
suitable for competent
DIY mechanic
Difficult,suitable for
experienced DIY
mechanicVery difficult,
suitable for expert DIY
or professional
Degrees of difficulty
54321
Page 19 of 227
The maintenance intervals in this manual are provided with the
assumption that you, not the dealer, will be carrying out the work.
These are the minimum maintenance intervals recommended by us for
vehicles driven daily. If you wish to keep your vehicle in peak condition
at all times, you may wish to perform some of these procedures moreoften. We encourage frequent maintenance, because it enhances the
efficiency, performance and resale value of your vehicle.
When the vehicle is new, it should be serviced by a factory-
authorised dealer service department, in order to preserve the factory
warranty.
Maintenance schedule 1•3
1
3261 Jaguar XJ6
Weekly, or every 250 miles (400 km)
m mCarry out all the operations given in “Weekly
checks”at the start of this manual.
m
mRenew the fuel filter (Section 18)
m mCheck the ignition system components (Section 19)
m mCheck the crankcase ventilation system
(Section 20)
m mCheck the condition and tension of the drivebelt(s)
(Section 21)
m mCheck the front wheel bearing adjustment and
repack with grease (Section 22)
m mCheck the propshaft fasteners are tightened to the
specified torque (Section 23)
m mCheck the front wheel alignment (Section 24)
m mCheck the headlight beam alignment (Section 25)
Every 7500 miles (12 000 km)
or 6 months, whichever comes first
In addition to the operations listed previously, carry out the following:
m mRenew the engine oil and filter (Section 3)
m mCheck the spark plugs (Section 4)
m mCheck the power hydraulics fluid level (Section 5)
m mCheck the battery (Section 6)
m mCheck all pipes and hoses for signs of damage or
leakage (Section 7)
m mCheck the automatic transmission fluid level
(Section 8)
m mCheck the differential oil level (Section 9)
m mCheck the condition of the exhaust system
(Section 10)
m mCheck the brake pads and discs for wear and
adjust the handbrake (Section 11)
m mCheck the steering and suspension components
for wear or damage and check the wheel nuts are
tightened to the correct torque (Section 12)
m mCheck the condition of the seat belts (Section 13)
m mLubricate all locks and hinges, and exposed cables
(Section 14)
m mCarry out a road test (Section 15)
Every 2 years, regardless of mileage
m
mRenew the coolant (Section 30)
Every 60 000 miles (96 000 km)
In addition to the operations listed previously, carry out the following:
m
mCheck the handbrake shoes for wear (Section 29)
Every 30 000 miles (48 000 km)
or 2 years, whichever comes first
In addition to the operations listed previously, carry out the following:
m mRenew the automatic transmission fluid and filter
(Section 26)
m mRenew the differential oil (Section 27)
m mRenew the brake fluid (Section 28)
Every 15 000 miles (24 000 km)
or 12 months, whichever comes first
In addition to the operations listed previously, carry out the following:
m mRenew the spark plugs (Section 16)
m mRenew the air cleaner element (Section 17)
Page 21 of 227
Maintenance - component location 1•5
1
3261 Jaguar XJ6
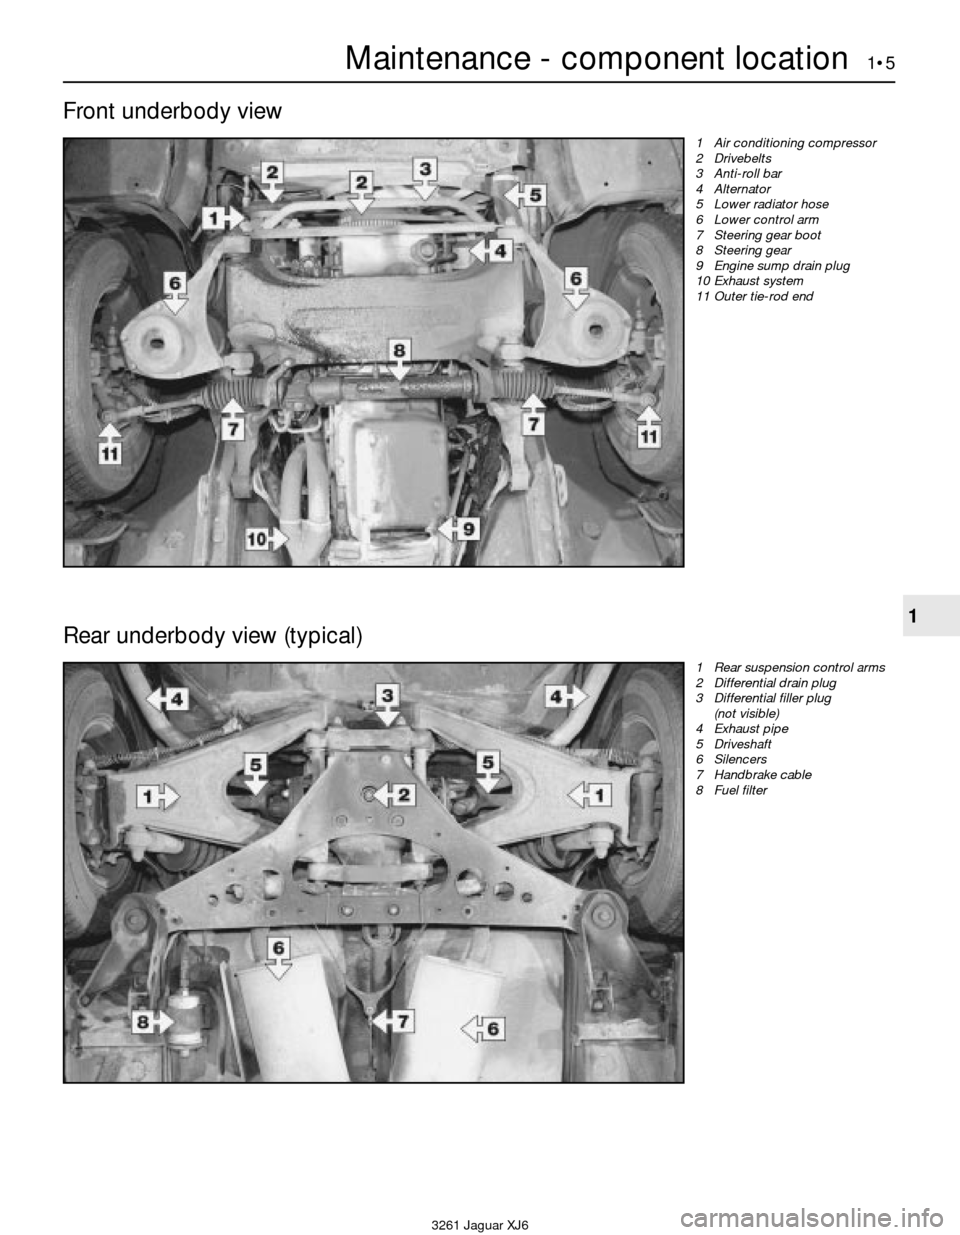
Front underbody view
1 Air conditioning compressor
2 Drivebelts
3 Anti-roll bar
4 Alternator
5 Lower radiator hose
6 Lower control arm
7 Steering gear boot
8 Steering gear
9 Engine sump drain plug
10 Exhaust system
11 Outer tie-rod end
Rear underbody view (typical)
1 Rear suspension control arms
2 Differential drain plug
3 Differential filler plug
(not visible)
4 Exhaust pipe
5 Driveshaft
6 Silencers
7 Handbrake cable
8 Fuel filter
Page 22 of 227
1 General information
1This Chapter is designed to help the home
mechanic maintain his/her vehicle for safety,
economy, long life and peak performance.
2The Chapter contains a master
maintenance schedule, followed by Sections
dealing specifically with each task in the
schedule. Visual checks, adjustments,
component renewal and other helpful items
are included. Refer to the accompanying
illustrations of the engine compartment and
the underside of the vehicle for the locations
of the various components.
3Servicing your vehicle in accordance with
the mileage/time maintenance schedule and
the following Sections will provide a planned
maintenance programme, which should result
in a long and reliable service life. This is a
comprehensive plan, so maintaining some
items but not others at the specified service
intervals, will not produce the same results.
4As you service your vehicle, you will
discover that many of the procedures can -
and should - be grouped together, because of
the particular procedure being performed, or
because of the proximity of two otherwise-
unrelated components to one another. For
example, if the vehicle is raised for any
reason, the exhaust can be inspected at the
same time as the suspension and steering
components.
5The first step in this maintenance
programme is to prepare yourself before the
actual work begins. Read through all theSections relevant to the work to be carried out,
then make a list and gather all the parts and
tools required. If a problem is encountered,
seek advice from a parts specialist, or a dealer
service department.
2 Intensive maintenance
1If, from the time the vehicle is new, the
routine maintenance schedule is followed
closely, and frequent checks are made of fluid
levels and high-wear items, as suggested
throughout this manual, the engine will be
kept in relatively good running condition, and
the need for additional work will be minimised.
2It is possible that there will be times when
the engine is running poorly due to the lack of
regular maintenance. This is even more likely
if a used vehicle, which has not received
regular and frequent maintenance checks, is
purchased. In such cases, additional work
may need to be carried out, outside of the
regular maintenance intervals.
3If engine wear is suspected, a compression
test (refer to Chapter 2) will provide valuable
information regarding the overall performance
of the main internal components. Such a test
can be used as a basis to decide on the extent
of the work to be carried out. If, for example, a
compression test indicates serious internal
engine wear, conventional maintenance as
described in this Chapter will not greatly
improve the performance of the engine, and
may prove a waste of time and money, unless
extensive overhaul work is carried out first.4The following series of operations are those
which are most often required to improve the
performance of a generally poor-running
engine:
Primary operations
a) Clean, inspect and test the battery
(Section 6).
b) Check all the engine-related fluids (refer
to “Weekly checks”).
c) Check the condition and tension of the
auxiliary drivebelt (Section 21).
d) Renew the spark plugs (Section 16).
e) Inspect the distributor cap and rotor arm
(Section 19).
f) Check the condition of the air filter, and
renew if necessary (Section 17).
g) Renew the fuel filter (Section 18).
h) Check the condition of all hoses, and
check for fluid leaks (Section 7).
i) Check the exhaust gas emissions (see
Chapter 6).
5If the above operations do not prove fully
effective, carry out the following secondary
operations:
Secondary operations
All items listed under “Primary operations”,
plus the following:
a) Check the charging system (refer to
Chapter 5).
b) Check the ignition system (refer to
Chapter 5).
c) Check the fuel system (refer to Chapter 4).
d) Renew the distributor cap and rotor arm
(Section 19).
e) Renew the ignition HT leads (Section 19).
1•6Maintenance procedures
3261 Jaguar XJ6
Every 7500 miles (12 000 km) or 6 months
3 Engine oil and filter renewal
2
1Frequent oil changes are the best
preventive maintenance the home mechanic
can give the engine, because ageing oil
becomes diluted and contaminated, which
leads to premature engine wear.
2Make sure that you have all the necessary
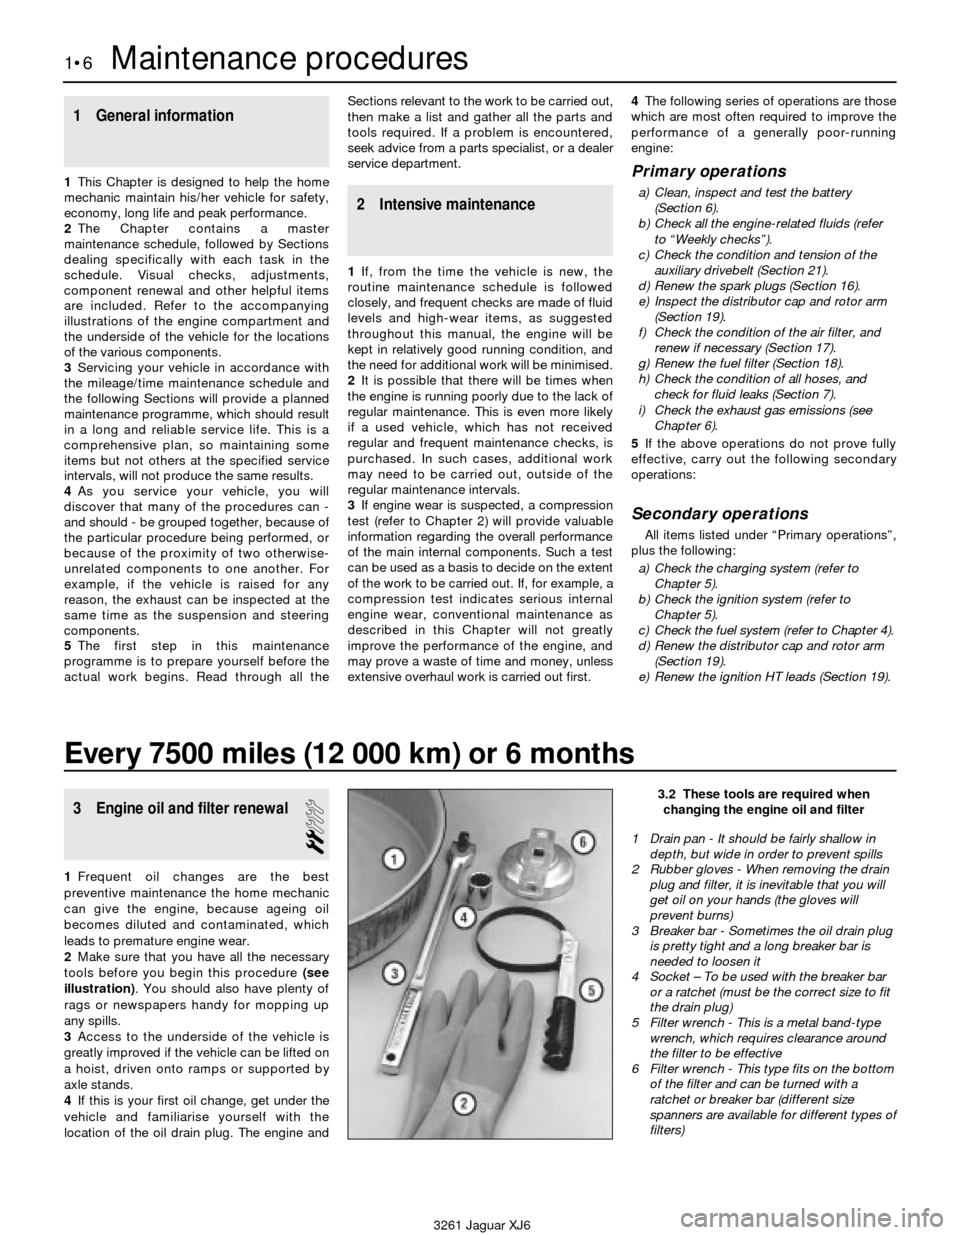
tools before you begin this procedure (see
illustration). You should also have plenty of
rags or newspapers handy for mopping up
any spills.
3Access to the underside of the vehicle is
greatly improved if the vehicle can be lifted on
a hoist, driven onto ramps or supported by
axle stands.
4If this is your first oil change, get under the
vehicle and familiarise yourself with the
location of the oil drain plug. The engine and
3.2 These tools are required when
changing the engine oil and filter
1 Drain pan - It should be fairly shallow in
depth, but wide in order to prevent spills
2 Rubber gloves - When removing the drain
plug and filter, it is inevitable that you will
get oil on your hands (the gloves will
prevent burns)
3 Breaker bar - Sometimes the oil drain plug
is pretty tight and a long breaker bar is
needed to loosen it
4 Socket – To be used with the breaker bar
or a ratchet (must be the correct size to fit
the drain plug)
5 Filter wrench - This is a metal band-type
wrench, which requires clearance around
the filter to be effective
6 Filter wrench - This type fits on the bottom
of the filter and can be turned with a
ratchet or breaker bar (different size
spanners are available for different types of
filters)
Page 28 of 227
silencer and catalytic converter. If the
components can come in contact with the
body or suspension parts, secure the exhaust
system with new mounts.
5Check the running condition of the engine
by inspecting inside the end of the tailpipe.
The exhaust deposits here are an indication of
engine state-of-tune. If the pipe is black and
sooty or coated with white deposits, the
engine is in need of a tune-up, including a
thorough fuel system inspection.
11 Braking system - general
check and adjustment
2
Warning: The dust created by
the brake system may contain
asbestos, which is harmful to
your health. Never blow it out
with compressed air and don’t inhale any
of it. An approved filtering mask should be
worn when working on the brakes. Do not,
under any circumstances, use petroleum-
based solvents to clean brake parts. Use
brake system cleaner only! Try to use non-
asbestos replacement parts whenever
possible.
Note: For detailed photographs of the brake
system, refer to Chapter 9.
1In addition to the specified intervals, the
brakes should be inspected every time the
wheels are removed or whenever a defect is
suspected. Any of the following symptoms
could indicate a potential brake system
defect: The vehicle pulls to one side when the
brake pedal is depressed; the brakes make
squealing or dragging noises when applied;
brake pedal travel is excessive; the pedal
pulsates; brake fluid leaks, usually onto the
inside of the tyre or wheel.
2The disc brakes have built-in electrical wear
indicators which cause a warning lamp to
illuminate on the instrument panel when
they’re worn to the renewal point. When the
warning light comes on, replace the pads
immediately or expensive damage to the
discs can result.
3Loosen the wheel nuts.
4Raise the vehicle and place it securely on
axle stands.
5Remove the wheels.
Disc brakes
6There are two pads (an outer and an inner)
in each caliper. The pads are visible through
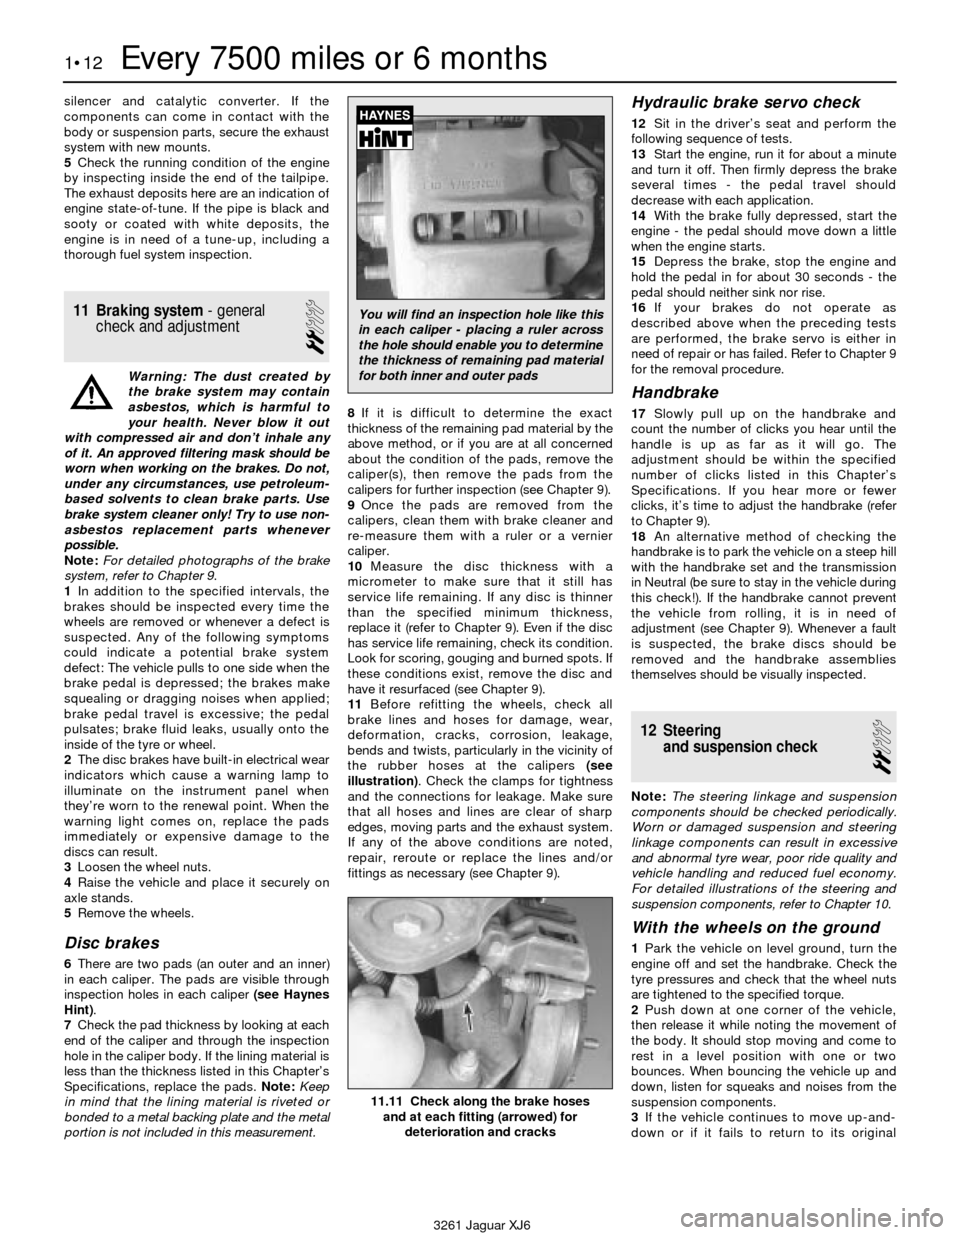
inspection holes in each caliper (see Haynes
Hint).
7Check the pad thickness by looking at each
end of the caliper and through the inspection
hole in the caliper body. If the lining material is
less than the thickness listed in this Chapter’s
Specifications, replace the pads. Note:Keep
in mind that the lining material is riveted or
bonded to a metal backing plate and the metal
portion is not included in this measurement.8If it is difficult to determine the exact
thickness of the remaining pad material by the
above method, or if you are at all concerned
about the condition of the pads, remove the
caliper(s), then remove the pads from the
calipers for further inspection (see Chapter 9).
9Once the pads are removed from the
calipers, clean them with brake cleaner and
re-measure them with a ruler or a vernier
caliper.
10Measure the disc thickness with a
micrometer to make sure that it still has
service life remaining. If any disc is thinner
than the specified minimum thickness,
replace it (refer to Chapter 9). Even if the disc
has service life remaining, check its condition.
Look for scoring, gouging and burned spots. If
these conditions exist, remove the disc and
have it resurfaced (see Chapter 9).
11Before refitting the wheels, check all
brake lines and hoses for damage, wear,
deformation, cracks, corrosion, leakage,
bends and twists, particularly in the vicinity of
the rubber hoses at the calipers (see
illustration). Check the clamps for tightness
and the connections for leakage. Make sure
that all hoses and lines are clear of sharp
edges, moving parts and the exhaust system.
If any of the above conditions are noted,
repair, reroute or replace the lines and/or
fittings as necessary (see Chapter 9).
Hydraulic brake servo check
12Sit in the driver’s seat and perform the
following sequence of tests.
13Start the engine, run it for about a minute
and turn it off. Then firmly depress the brake
several times - the pedal travel should
decrease with each application.
14With the brake fully depressed, start the
engine - the pedal should move down a little
when the engine starts.
15Depress the brake, stop the engine and
hold the pedal in for about 30 seconds - the
pedal should neither sink nor rise.
16If your brakes do not operate as
described above when the preceding tests
are performed, the brake servo is either in
need of repair or has failed. Refer to Chapter 9
for the removal procedure.
Handbrake
17Slowly pull up on the handbrake and
count the number of clicks you hear until the
handle is up as far as it will go. The
adjustment should be within the specified
number of clicks listed in this Chapter’s
Specifications. If you hear more or fewer
clicks, it’s time to adjust the handbrake (refer
to Chapter 9).
18An alternative method of checking the
handbrake is to park the vehicle on a steep hill
with the handbrake set and the transmission
in Neutral (be sure to stay in the vehicle during
this check!). If the handbrake cannot prevent
the vehicle from rolling, it is in need of
adjustment (see Chapter 9). Whenever a fault
is suspected, the brake discs should be
removed and the handbrake assemblies
themselves should be visually inspected.
12 Steering
and suspension check
2
Note: The steering linkage and suspension
components should be checked periodically.
Worn or damaged suspension and steering
linkage components can result in excessive
and abnormal tyre wear, poor ride quality and
vehicle handling and reduced fuel economy.
For detailed illustrations of the steering and
suspension components, refer to Chapter 10.
With the wheels on the ground
1Park the vehicle on level ground, turn the
engine off and set the handbrake. Check the
tyre pressures and check that the wheel nuts
are tightened to the specified torque.
2Push down at one corner of the vehicle,
then release it while noting the movement of
the body. It should stop moving and come to
rest in a level position with one or two
bounces. When bouncing the vehicle up and
down, listen for squeaks and noises from the
suspension components.
3If the vehicle continues to move up-and-
down or if it fails to return to its original
1•12Every 7500 miles or 6 months
11.11 Check along the brake hoses
and at each fitting (arrowed) for
deterioration and cracks
3261 Jaguar XJ6
You will find an inspection hole like this
in each caliper - placing a ruler across
the hole should enable you to determine
the thickness of remaining pad material
for both inner and outer pads
Page 30 of 227
16 Spark plug renewal
2
Refer to Section 4, renewing the plugs
regardless of their apparent condition.
17 Air cleaner element renewal
1
1The air filter is located inside a housing at
the left side of the engine compartment. To
remove the air filter, release the four spring
clips that secure the two halves of the air
cleaner housing together, then lift the cover
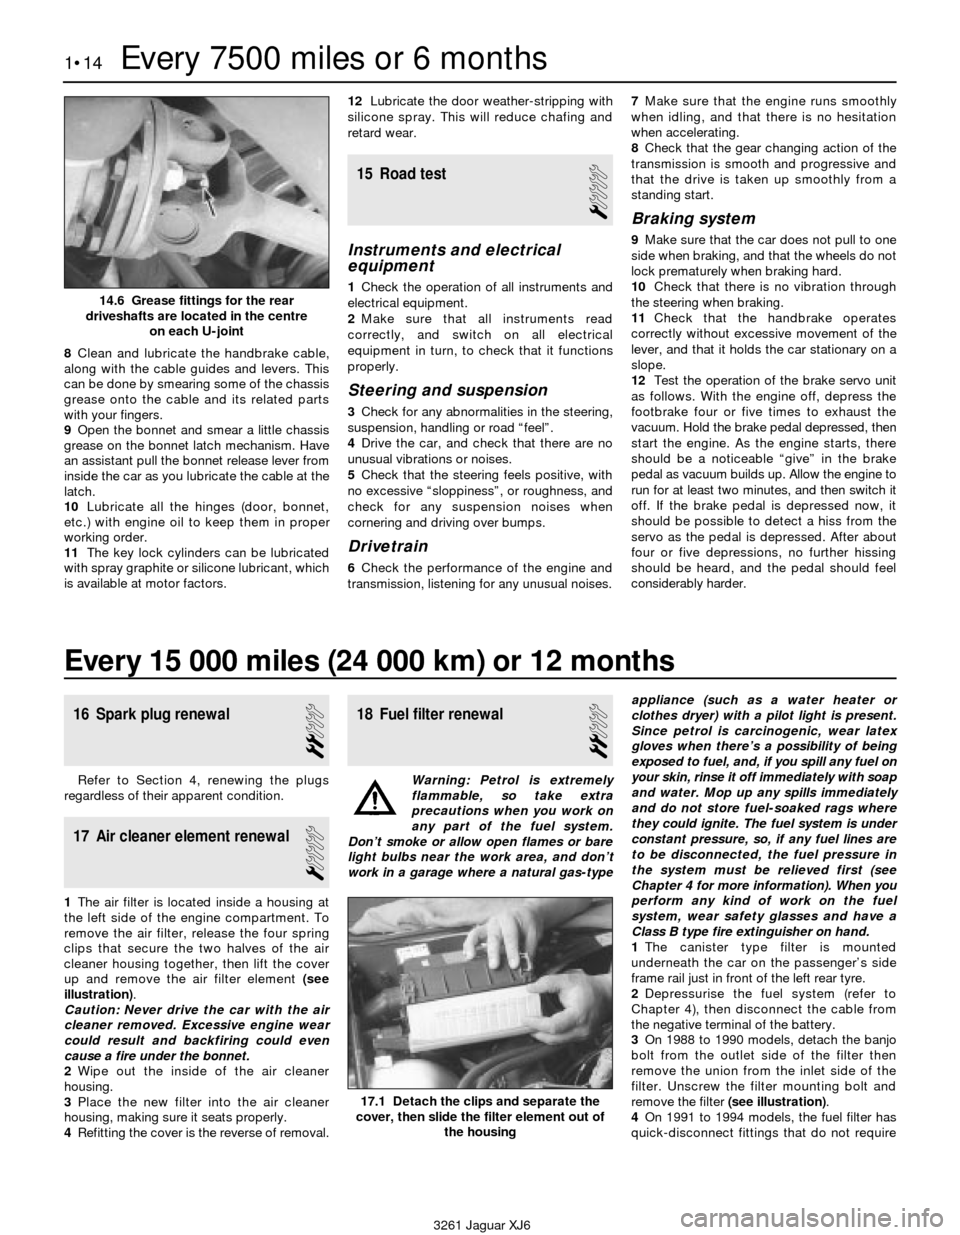
up and remove the air filter element (see
illustration).
Caution: Never drive the car with the air
cleaner removed. Excessive engine wear
could result and backfiring could even
cause a fire under the bonnet.
2Wipe out the inside of the air cleaner
housing.
3Place the new filter into the air cleaner
housing, making sure it seats properly.
4Refitting the cover is the reverse of removal.
18 Fuel filter renewal
2
Warning: Petrol is extremely
flammable, so take extra
precautions when you work on
any part of the fuel system.
Don’t smoke or allow open flames or bare
light bulbs near the work area, and don’t
work in a garage where a natural gas-typeappliance (such as a water heater or
clothes dryer) with a pilot light is present.
Since petrol is carcinogenic, wear latex
gloves when there’s a possibility of being
exposed to fuel, and, if you spill any fuel on
your skin, rinse it off immediately with soap
and water. Mop up any spills immediately
and do not store fuel-soaked rags where
they could ignite. The fuel system is under
constant pressure, so, if any fuel lines are
to be disconnected, the fuel pressure in
the system must be relieved first (see
Chapter 4 for more information). When you
perform any kind of work on the fuel
system, wear safety glasses and have a
Class B type fire extinguisher on hand.
1The canister type filter is mounted
underneath the car on the passenger’s side
frame rail just in front of the left rear tyre.
2Depressurise the fuel system (refer to
Chapter 4), then disconnect the cable from
the negative terminal of the battery.
3On 1988 to 1990 models, detach the banjo
bolt from the outlet side of the filter then
remove the union from the inlet side of the
filter. Unscrew the filter mounting bolt and
remove the filter (see illustration).
4On 1991 to 1994 models, the fuel filter has
quick-disconnect fittings that do not require 8Clean and lubricate the handbrake cable,
along with the cable guides and levers. This
can be done by smearing some of the chassis
grease onto the cable and its related parts
with your fingers.
9Open the bonnet and smear a little chassis
grease on the bonnet latch mechanism. Have
an assistant pull the bonnet release lever from
inside the car as you lubricate the cable at the
latch.
10Lubricate all the hinges (door, bonnet,
etc.) with engine oil to keep them in proper
working order.
11The key lock cylinders can be lubricated
with spray graphite or silicone lubricant, which
is available at motor factors.12Lubricate the door weather-stripping with
silicone spray. This will reduce chafing and
retard wear.
15 Road test
1
Instruments and electrical
equipment
1Check the operation of all instruments and
electrical equipment.
2Make sure that all instruments read
correctly, and switch on all electrical
equipment in turn, to check that it functions
properly.
Steering and suspension
3Check for any abnormalities in the steering,
suspension, handling or road “feel”.
4Drive the car, and check that there are no
unusual vibrations or noises.
5Check that the steering feels positive, with
no excessive “sloppiness”, or roughness, and
check for any suspension noises when
cornering and driving over bumps.
Drivetrain
6Check the performance of the engine and
transmission, listening for any unusual noises.7Make sure that the engine runs smoothly
when idling, and that there is no hesitation
when accelerating.
8Check that the gear changing action of the
transmission is smooth and progressive and
that the drive is taken up smoothly from a
standing start.
Braking system
9Make sure that the car does not pull to one
side when braking, and that the wheels do not
lock prematurely when braking hard.
10Check that there is no vibration through
the steering when braking.
11Check that the handbrake operates
correctly without excessive movement of the
lever, and that it holds the car stationary on a
slope.
12Test the operation of the brake servo unit
as follows. With the engine off, depress the
footbrake four or five times to exhaust the
vacuum. Hold the brake pedal depressed, then
start the engine. As the engine starts, there
should be a noticeable “give” in the brake
pedal as vacuum builds up. Allow the engine to
run for at least two minutes, and then switch it
off. If the brake pedal is depressed now, it
should be possible to detect a hiss from the
servo as the pedal is depressed. After about
four or five depressions, no further hissing
should be heard, and the pedal should feel
considerably harder.
1•14Every 7500 miles or 6 months
17.1 Detach the clips and separate the
cover, then slide the filter element out of
the housing
3261 Jaguar XJ6
14.6 Grease fittings for the rear
driveshafts are located in the centre
on each U-joint
Every 15 000 miles (24 000 km) or 12 months
Page 39 of 227
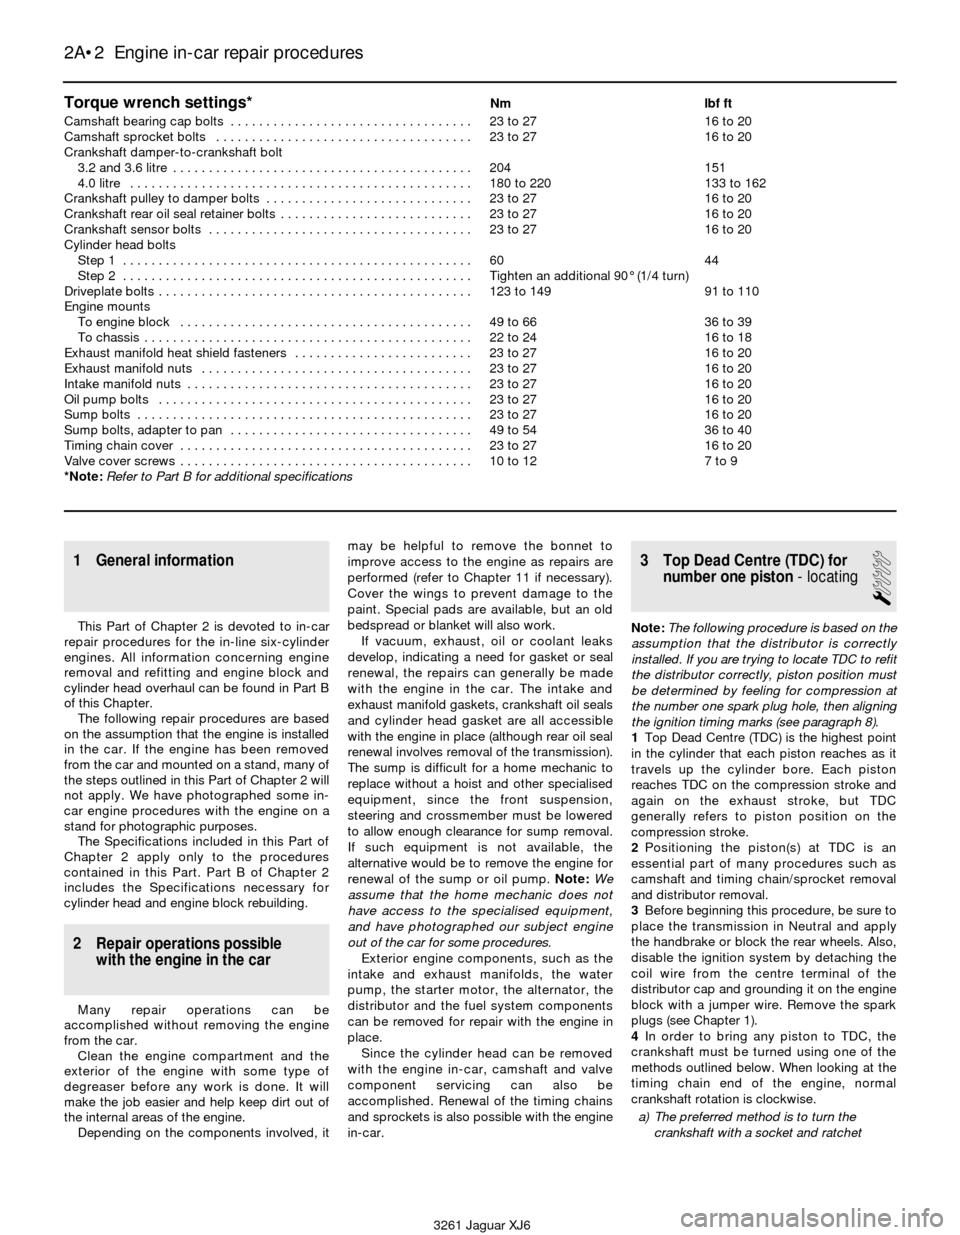
Torque wrench settings*Nm lbf ft
Camshaft bearing cap bolts . . . . . . . . . . . . . . . . . . . . . . . . . . . . . . . . . . 23 to 27 16 to 20
Camshaft sprocket bolts . . . . . . . . . . . . . . . . . . . . . . . . . . . . . . . . . . . . 23 to 27 16 to 20
Crankshaft damper-to-crankshaft bolt
3.2 and 3.6 litre . . . . . . . . . . . . . . . . . . . . . . . . . . . . . . . . . . . . . . . . . . 204 151
4.0 litre . . . . . . . . . . . . . . . . . . . . . . . . . . . . . . . . . . . . . . . . . . . . . . . . 180 to 220 133 to 162
Crankshaft pulley to damper bolts . . . . . . . . . . . . . . . . . . . . . . . . . . . . . 23 to 27 16 to 20
Crankshaft rear oil seal retainer bolts . . . . . . . . . . . . . . . . . . . . . . . . . . . 23 to 27 16 to 20
Crankshaft sensor bolts . . . . . . . . . . . . . . . . . . . . . . . . . . . . . . . . . . . . . 23 to 27 16 to 20
Cylinder head bolts
Step 1 . . . . . . . . . . . . . . . . . . . . . . . . . . . . . . . . . . . . . . . . . . . . . . . . . 60 44
Step 2 . . . . . . . . . . . . . . . . . . . . . . . . . . . . . . . . . . . . . . . . . . . . . . . . . Tighten an additional 90° (1/4 turn)
Driveplate bolts . . . . . . . . . . . . . . . . . . . . . . . . . . . . . . . . . . . . . . . . . . . . 123 to 149 91 to 110
Engine mounts
To engine block . . . . . . . . . . . . . . . . . . . . . . . . . . . . . . . . . . . . . . . . . 49 to 66 36 to 39
To chassis . . . . . . . . . . . . . . . . . . . . . . . . . . . . . . . . . . . . . . . . . . . . . . 22 to 24 16 to 18
Exhaust manifold heat shield fasteners . . . . . . . . . . . . . . . . . . . . . . . . . 23 to 27 16 to 20
Exhaust manifold nuts . . . . . . . . . . . . . . . . . . . . . . . . . . . . . . . . . . . . . . 23 to 27 16 to 20
Intake manifold nuts . . . . . . . . . . . . . . . . . . . . . . . . . . . . . . . . . . . . . . . . 23 to 27 16 to 20
Oil pump bolts . . . . . . . . . . . . . . . . . . . . . . . . . . . . . . . . . . . . . . . . . . . . 23 to 27 16 to 20
Sump bolts . . . . . . . . . . . . . . . . . . . . . . . . . . . . . . . . . . . . . . . . . . . . . . . 23 to 27 16 to 20
Sump bolts, adapter to pan . . . . . . . . . . . . . . . . . . . . . . . . . . . . . . . . . . 49 to 54 36 to 40
Timing chain cover . . . . . . . . . . . . . . . . . . . . . . . . . . . . . . . . . . . . . . . . . 23 to 27 16 to 20
Valve cover screws . . . . . . . . . . . . . . . . . . . . . . . . . . . . . . . . . . . . . . . . . 10 to 12 7 to 9
*Note:Refer to Part B for additional specifications
2A•2 Engine in-car repair procedures
3261 Jaguar XJ6
1 General information
This Part of Chapter 2 is devoted to in-car
repair procedures for the in-line six-cylinder
engines. All information concerning engine
removal and refitting and engine block and
cylinder head overhaul can be found in Part B
of this Chapter.
The following repair procedures are based
on the assumption that the engine is installed
in the car. If the engine has been removed
from the car and mounted on a stand, many of
the steps outlined in this Part of Chapter 2 will
not apply. We have photographed some in-
car engine procedures with the engine on a
stand for photographic purposes.
The Specifications included in this Part of
Chapter 2 apply only to the procedures
contained in this Part. Part B of Chapter 2
includes the Specifications necessary for
cylinder head and engine block rebuilding.
2 Repair operations possible
with the engine in the car
Many repair operations can be
accomplished without removing the engine
from the car.
Clean the engine compartment and the
exterior of the engine with some type of
degreaser before any work is done. It will
make the job easier and help keep dirt out of
the internal areas of the engine.
Depending on the components involved, itmay be helpful to remove the bonnet to
improve access to the engine as repairs are
performed (refer to Chapter 11 if necessary).
Cover the wings to prevent damage to the
paint. Special pads are available, but an old
bedspread or blanket will also work.
If vacuum, exhaust, oil or coolant leaks
develop, indicating a need for gasket or seal
renewal, the repairs can generally be made
with the engine in the car. The intake and
exhaust manifold gaskets, crankshaft oil seals
and cylinder head gasket are all accessible
with the engine in place (although rear oil seal
renewal involves removal of the transmission).
The sump is difficult for a home mechanic to
replace without a hoist and other specialised
equipment, since the front suspension,
steering and crossmember must be lowered
to allow enough clearance for sump removal.
If such equipment is not available, the
alternative would be to remove the engine for
renewal of the sump or oil pump. Note:We
assume that the home mechanic does not
have access to the specialised equipment,
and have photographed our subject engine
out of the car for some procedures.
Exterior engine components, such as the
intake and exhaust manifolds, the water
pump, the starter motor, the alternator, the
distributor and the fuel system components
can be removed for repair with the engine in
place.
Since the cylinder head can be removed
with the engine in-car, camshaft and valve
component servicing can also be
accomplished. Renewal of the timing chains
and sprockets is also possible with the engine
in-car.
3 Top Dead Centre (TDC) for
number one piston- locating
1
Note:The following procedure is based on the
assumption that the distributor is correctly
installed. If you are trying to locate TDC to refit
the distributor correctly, piston position must
be determined by feeling for compression at
the number one spark plug hole, then aligning
the ignition timing marks (see paragraph 8).
1Top Dead Centre (TDC) is the highest point
in the cylinder that each piston reaches as it
travels up the cylinder bore. Each piston
reaches TDC on the compression stroke and
again on the exhaust stroke, but TDC
generally refers to piston position on the
compression stroke.
2Positioning the piston(s) at TDC is an
essential part of many procedures such as
camshaft and timing chain/sprocket removal
and distributor removal.
3Before beginning this procedure, be sure to
place the transmission in Neutral and apply
the handbrake or block the rear wheels. Also,
disable the ignition system by detaching the
coil wire from the centre terminal of the
distributor cap and grounding it on the engine
block with a jumper wire. Remove the spark
plugs (see Chapter 1).
4In order to bring any piston to TDC, the
crankshaft must be turned using one of the
methods outlined below. When looking at the
timing chain end of the engine, normal
crankshaft rotation is clockwise.
a) The preferred method is to turn the
crankshaft with a socket and ratchet