JEEP CHEROKEE 1994 Service Repair Manual
CHEROKEE 1994
JEEP
JEEP
https://www.carmanualsonline.info/img/16/57038/w960_57038-0.png
JEEP CHEROKEE 1994 Service Repair Manual
Trending: oil, clock, remote start, belt, navigation, fog light bulb, oil change
Page 1421 of 1784
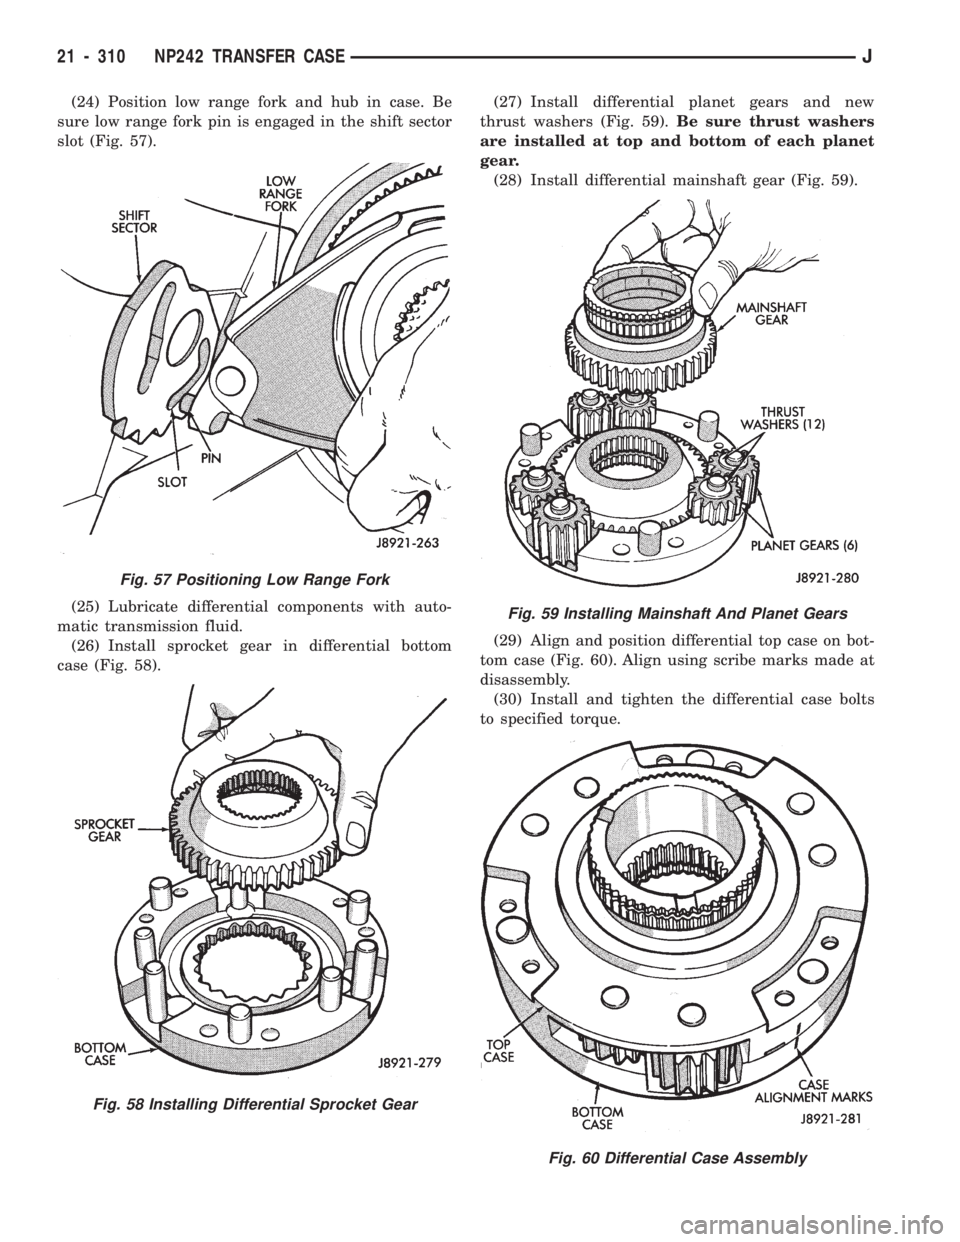
(24) Position low range fork and hub in case. Be
sure low range fork pin is engaged in the shift sector
slot (Fig. 57).
(25) Lubricate differential components with auto-
matic transmission fluid.
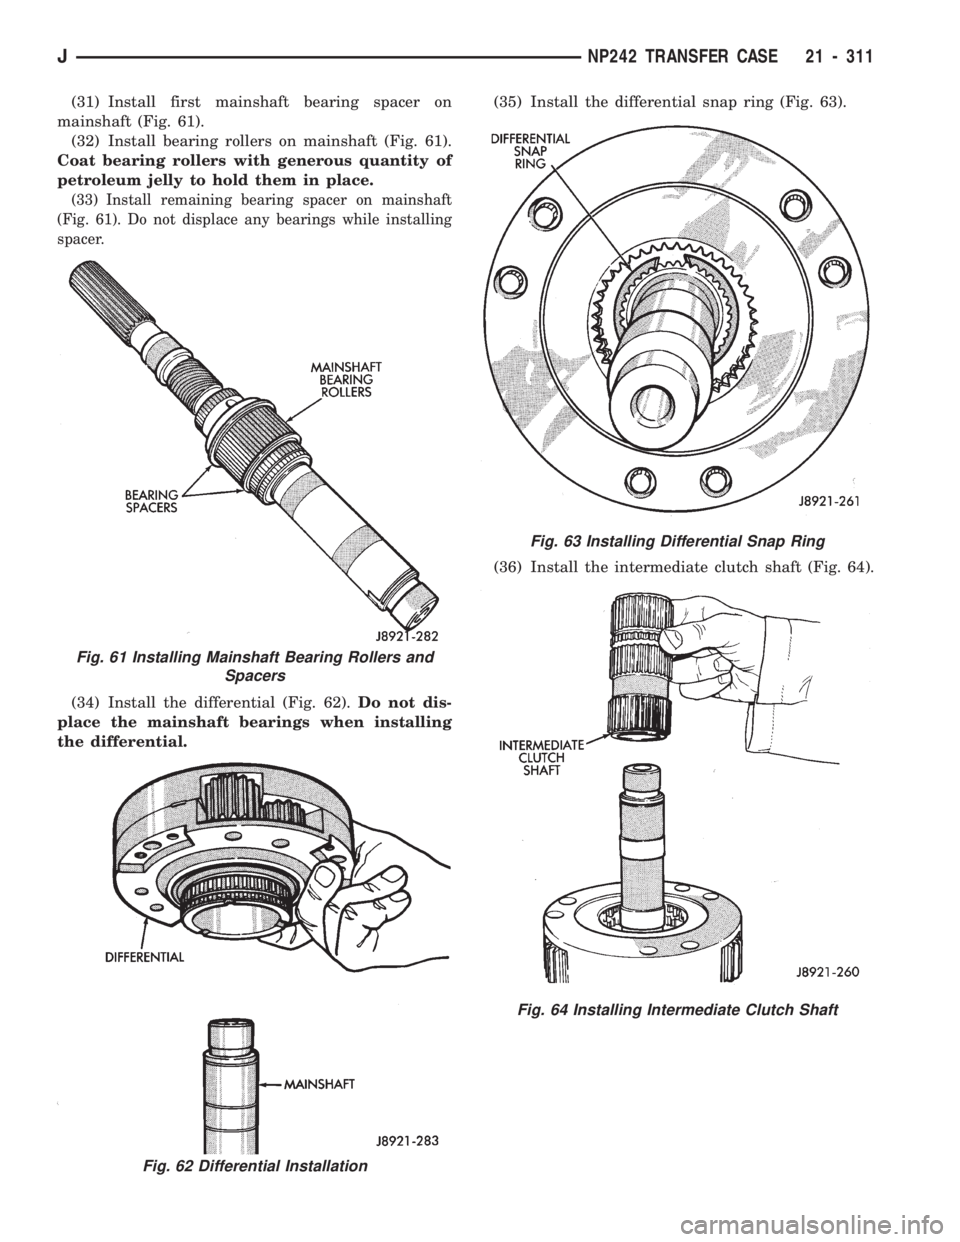
(26) Install sprocket gear in differential bottom
case (Fig. 58).(27) Install differential planet gears and new
thrust washers (Fig. 59).Be sure thrust washers
are installed at top and bottom of each planet
gear.
(28) Install differential mainshaft gear (Fig. 59).
(29) Align and position differential top case on bot-
tom case (Fig. 60). Align using scribe marks made at
disassembly.
(30) Install and tighten the differential case bolts
to specified torque.
Fig. 57 Positioning Low Range Fork
Fig. 58 Installing Differential Sprocket Gear
Fig. 59 Installing Mainshaft And Planet Gears
Fig. 60 Differential Case Assembly
21 - 310 NP242 TRANSFER CASEJ
Page 1422 of 1784
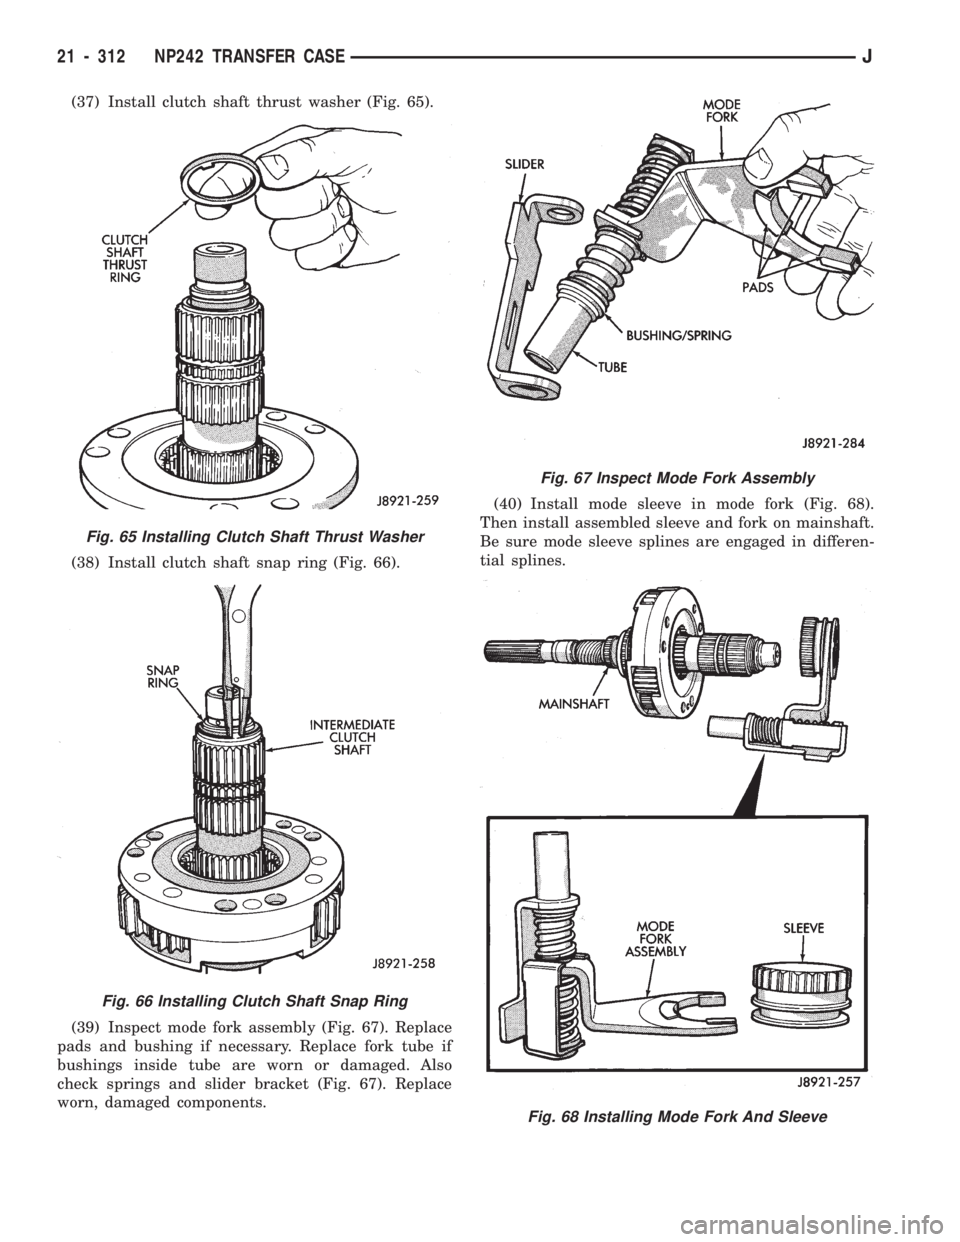
(31) Install first mainshaft bearing spacer on
mainshaft (Fig. 61).
(32) Install bearing rollers on mainshaft (Fig. 61).
Coat bearing rollers with generous quantity of
petroleum jelly to hold them in place.
(33) Install remaining bearing spacer on mainshaft
(Fig. 61). Do not displace any bearings while installing
spacer.
(34) Install the differential (Fig. 62).Do not dis-
place the mainshaft bearings when installing
the differential.(35) Install the differential snap ring (Fig. 63).
(36) Install the intermediate clutch shaft (Fig. 64).
Fig. 61 Installing Mainshaft Bearing Rollers and
Spacers
Fig. 62 Differential Installation
Fig. 63 Installing Differential Snap Ring
Fig. 64 Installing Intermediate Clutch Shaft
JNP242 TRANSFER CASE 21 - 311
Page 1423 of 1784
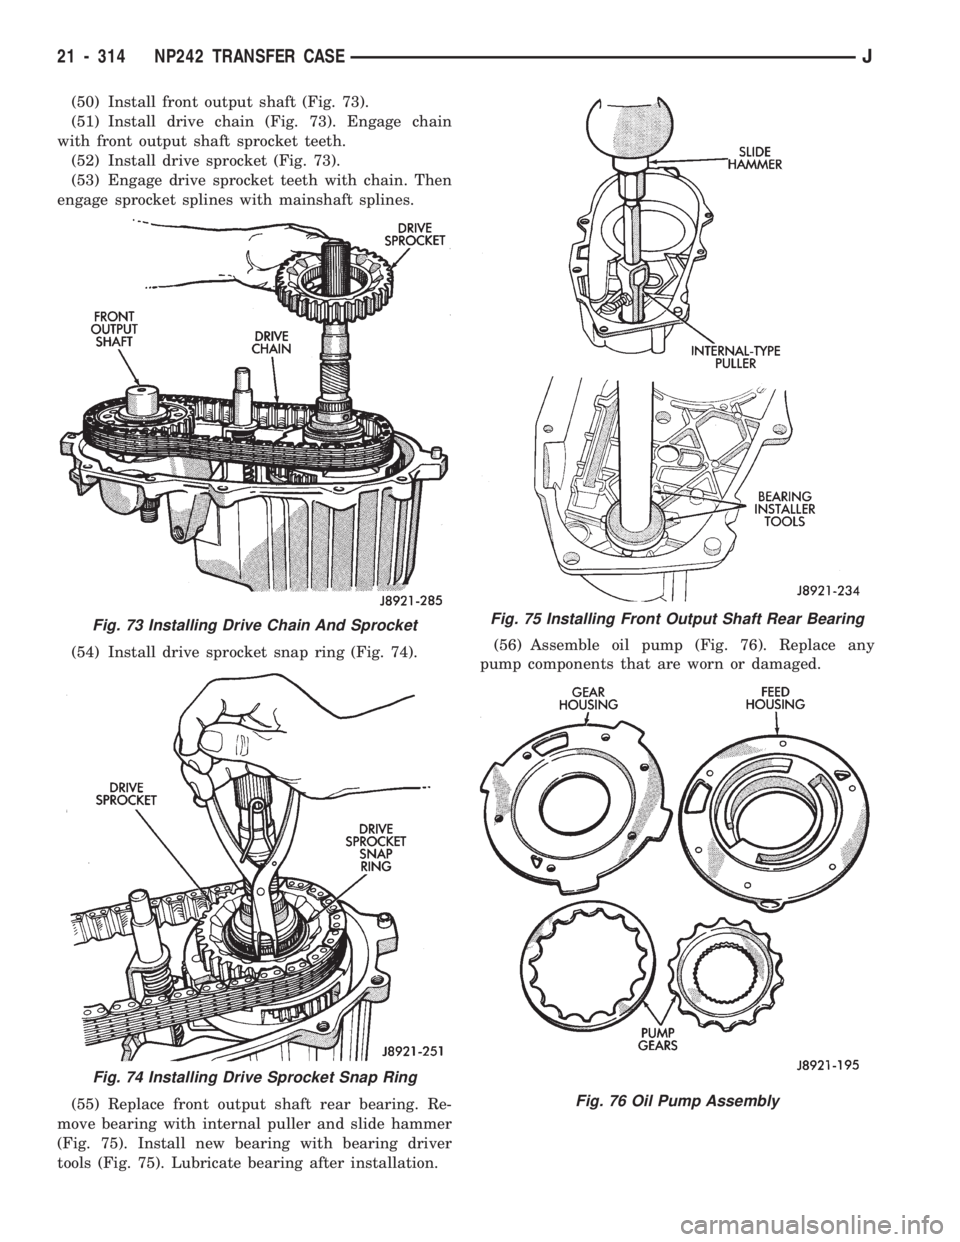
(37) Install clutch shaft thrust washer (Fig. 65).
(38) Install clutch shaft snap ring (Fig. 66).
(39) Inspect mode fork assembly (Fig. 67). Replace
pads and bushing if necessary. Replace fork tube if
bushings inside tube are worn or damaged. Also
check springs and slider bracket (Fig. 67). Replace
worn, damaged components.(40) Install mode sleeve in mode fork (Fig. 68).
Then install assembled sleeve and fork on mainshaft.
Be sure mode sleeve splines are engaged in differen-
tial splines.
Fig. 65 Installing Clutch Shaft Thrust Washer
Fig. 66 Installing Clutch Shaft Snap Ring
Fig. 67 Inspect Mode Fork Assembly
Fig. 68 Installing Mode Fork And Sleeve
21 - 312 NP242 TRANSFER CASEJ
Page 1424 of 1784
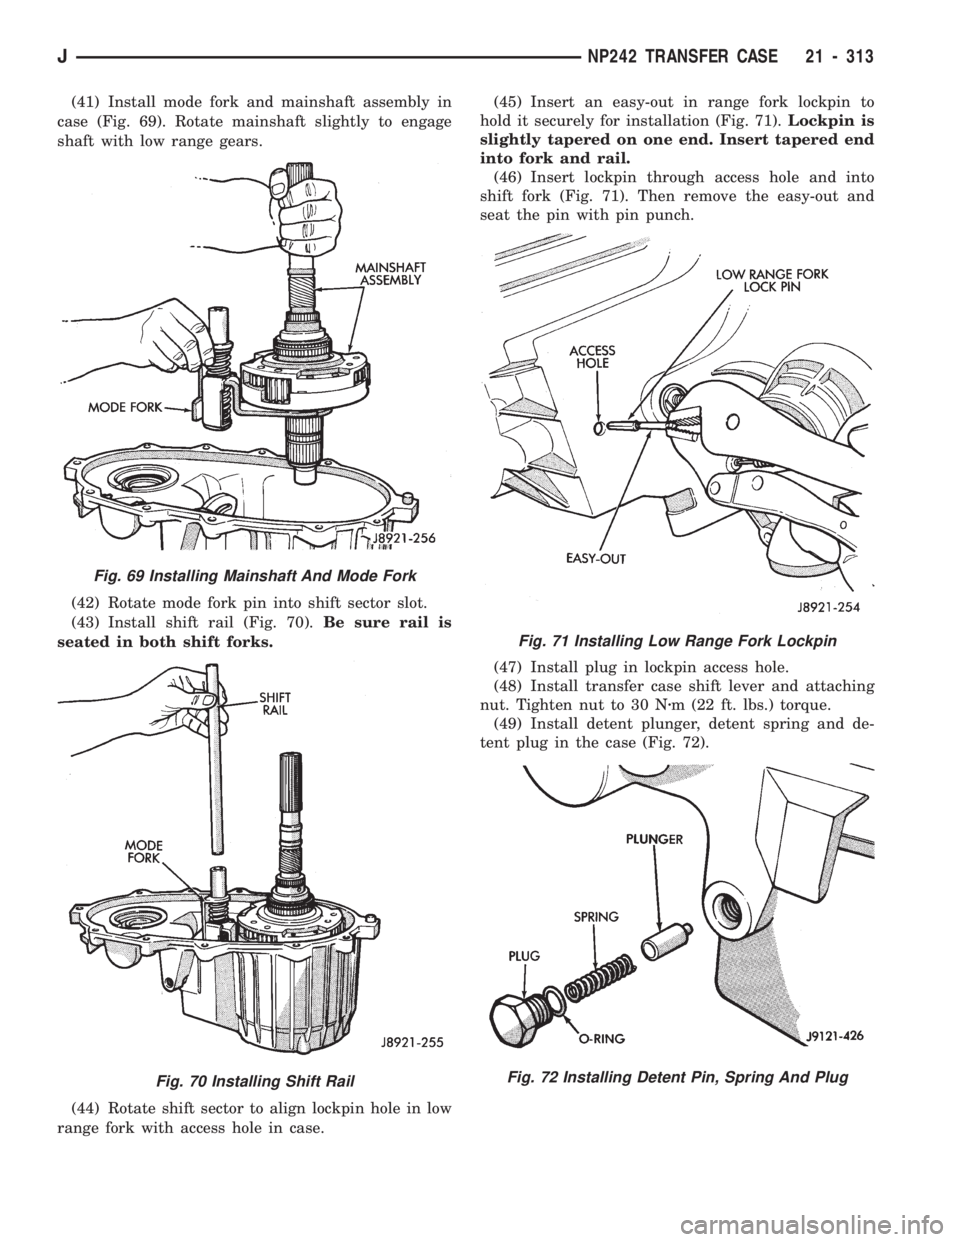
(41) Install mode fork and mainshaft assembly in
case (Fig. 69). Rotate mainshaft slightly to engage
shaft with low range gears.
(42) Rotate mode fork pin into shift sector slot.
(43) Install shift rail (Fig. 70).Be sure rail is
seated in both shift forks.
(44) Rotate shift sector to align lockpin hole in low
range fork with access hole in case.(45) Insert an easy-out in range fork lockpin to
hold it securely for installation (Fig. 71).Lockpin is
slightly tapered on one end. Insert tapered end
into fork and rail.
(46) Insert lockpin through access hole and into
shift fork (Fig. 71). Then remove the easy-out and
seat the pin with pin punch.
(47) Install plug in lockpin access hole.
(48) Install transfer case shift lever and attaching
nut. Tighten nut to 30 Nzm (22 ft. lbs.) torque.
(49) Install detent plunger, detent spring and de-
tent plug in the case (Fig. 72).
Fig. 69 Installing Mainshaft And Mode Fork
Fig. 70 Installing Shift Rail
Fig. 71 Installing Low Range Fork Lockpin
Fig. 72 Installing Detent Pin, Spring And Plug
JNP242 TRANSFER CASE 21 - 313
Page 1425 of 1784
(50) Install front output shaft (Fig. 73).
(51) Install drive chain (Fig. 73). Engage chain
with front output shaft sprocket teeth.
(52) Install drive sprocket (Fig. 73).
(53) Engage drive sprocket teeth with chain. Then
engage sprocket splines with mainshaft splines.
(54) Install drive sprocket snap ring (Fig. 74).
(55) Replace front output shaft rear bearing. Re-
move bearing with internal puller and slide hammer
(Fig. 75). Install new bearing with bearing driver
tools (Fig. 75). Lubricate bearing after installation.(56) Assemble oil pump (Fig. 76). Replace any
pump components that are worn or damaged.
Fig. 73 Installing Drive Chain And Sprocket
Fig. 74 Installing Drive Sprocket Snap Ring
Fig. 75 Installing Front Output Shaft Rear Bearing
Fig. 76 Oil Pump Assembly
21 - 314 NP242 TRANSFER CASEJ
Page 1426 of 1784
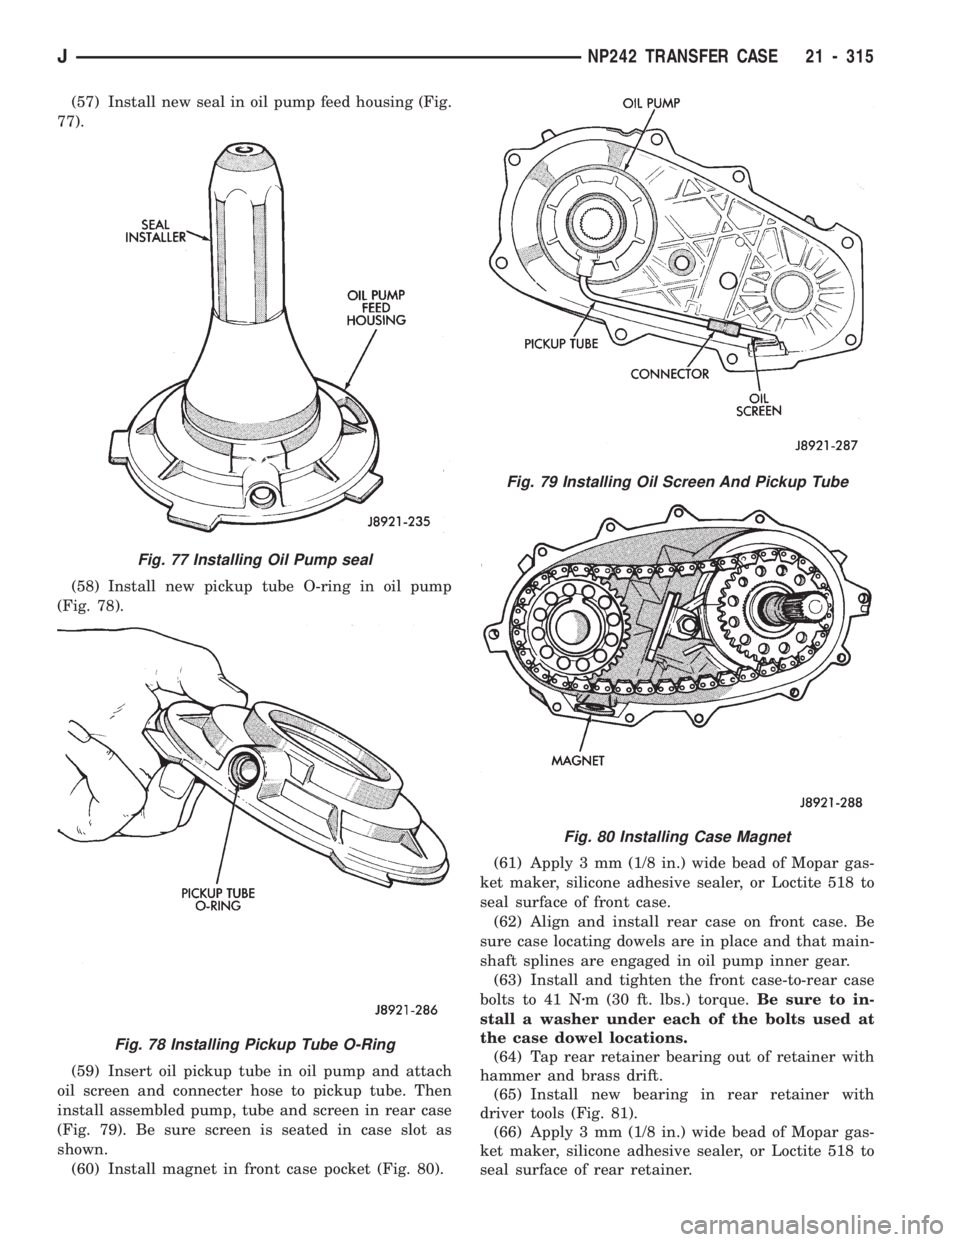
(57) Install new seal in oil pump feed housing (Fig.
77).
(58) Install new pickup tube O-ring in oil pump
(Fig. 78).
(59) Insert oil pickup tube in oil pump and attach
oil screen and connecter hose to pickup tube. Then
install assembled pump, tube and screen in rear case
(Fig. 79). Be sure screen is seated in case slot as
shown.
(60) Install magnet in front case pocket (Fig. 80).(61) Apply 3 mm (1/8 in.) wide bead of Mopar gas-
ket maker, silicone adhesive sealer, or Loctite 518 to
seal surface of front case.
(62) Align and install rear case on front case. Be
sure case locating dowels are in place and that main-
shaft splines are engaged in oil pump inner gear.
(63) Install and tighten the front case-to-rear case
bolts to 41 Nzm (30 ft. lbs.) torque.Be sure to in-
stall a washer under each of the bolts used at
the case dowel locations.
(64) Tap rear retainer bearing out of retainer with
hammer and brass drift.
(65) Install new bearing in rear retainer with
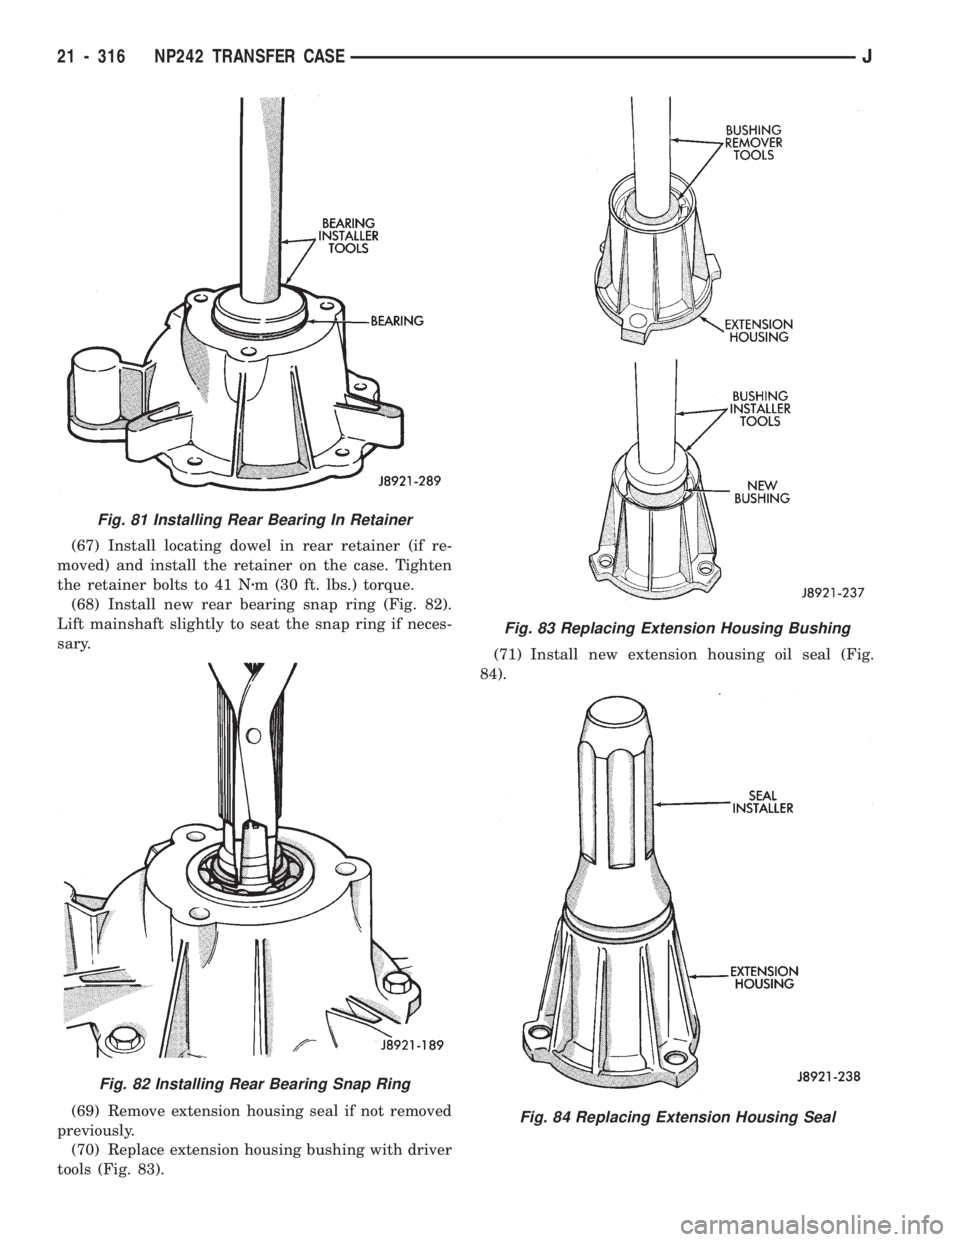
driver tools (Fig. 81).
(66) Apply 3 mm (1/8 in.) wide bead of Mopar gas-
ket maker, silicone adhesive sealer, or Loctite 518 to
seal surface of rear retainer.
Fig. 77 Installing Oil Pump seal
Fig. 78 Installing Pickup Tube O-Ring
Fig. 79 Installing Oil Screen And Pickup Tube
Fig. 80 Installing Case Magnet
JNP242 TRANSFER CASE 21 - 315
Page 1427 of 1784
(67) Install locating dowel in rear retainer (if re-
moved) and install the retainer on the case. Tighten
the retainer bolts to 41 Nzm (30 ft. lbs.) torque.
(68) Install new rear bearing snap ring (Fig. 82).
Lift mainshaft slightly to seat the snap ring if neces-
sary.
(69) Remove extension housing seal if not removed
previously.
(70) Replace extension housing bushing with driver
tools (Fig. 83).(71) Install new extension housing oil seal (Fig.
84).
Fig. 83 Replacing Extension Housing Bushing
Fig. 84 Replacing Extension Housing Seal
Fig. 81 Installing Rear Bearing In Retainer
Fig. 82 Installing Rear Bearing Snap Ring
21 - 316 NP242 TRANSFER CASEJ
Page 1428 of 1784
(72) Apply 3 mm (1/8 in.) wide bead of Mopar gas-
ket maker, silicone adhesive sealer, or Loctite 518 to
seal surface of extension housing.
(73) Install extension housing on case. Tighten
housing bolts to 41 Nzm (30 ft. lbs.) torque.
(74) Install front yoke. Secure yoke with new seal
washer and nut. Tighten nut to 149 Nzm (110 ft. lbs.)
torque.
(75) Install new gasket on vacuum switch and in-
stall switch in the case. Tighten switch to 27 Nzm (20
ft. lbs.) torque.
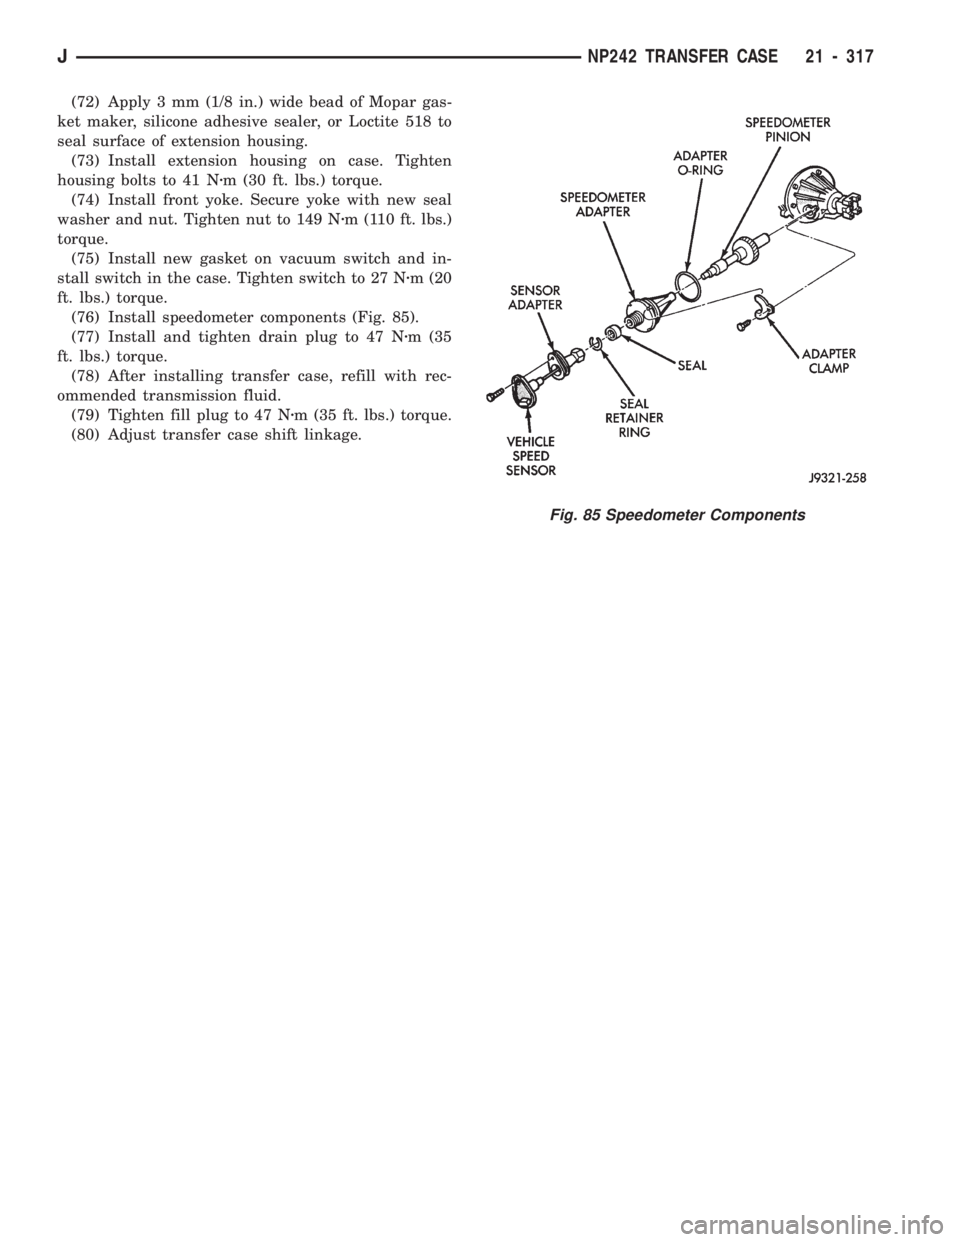
(76) Install speedometer components (Fig. 85).
(77) Install and tighten drain plug to 47 Nzm (35
ft. lbs.) torque.
(78) After installing transfer case, refill with rec-
ommended transmission fluid.
(79) Tighten fill plug to 47 Nzm (35 ft. lbs.) torque.
(80) Adjust transfer case shift linkage.
Fig. 85 Speedometer Components
JNP242 TRANSFER CASE 21 - 317
Page 1429 of 1784
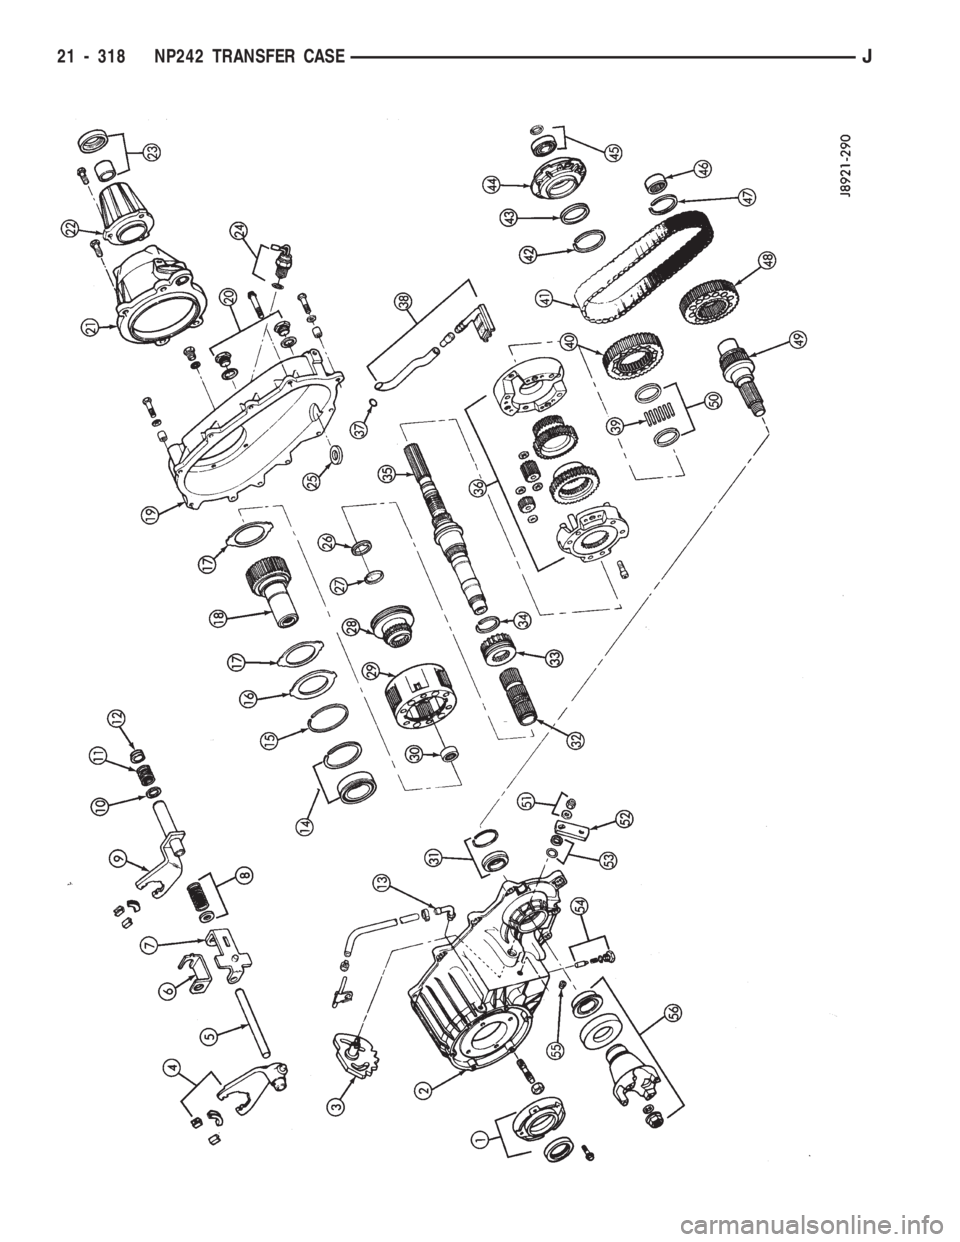
21 - 318 NP242 TRANSFER CASEJ
Page 1430 of 1784
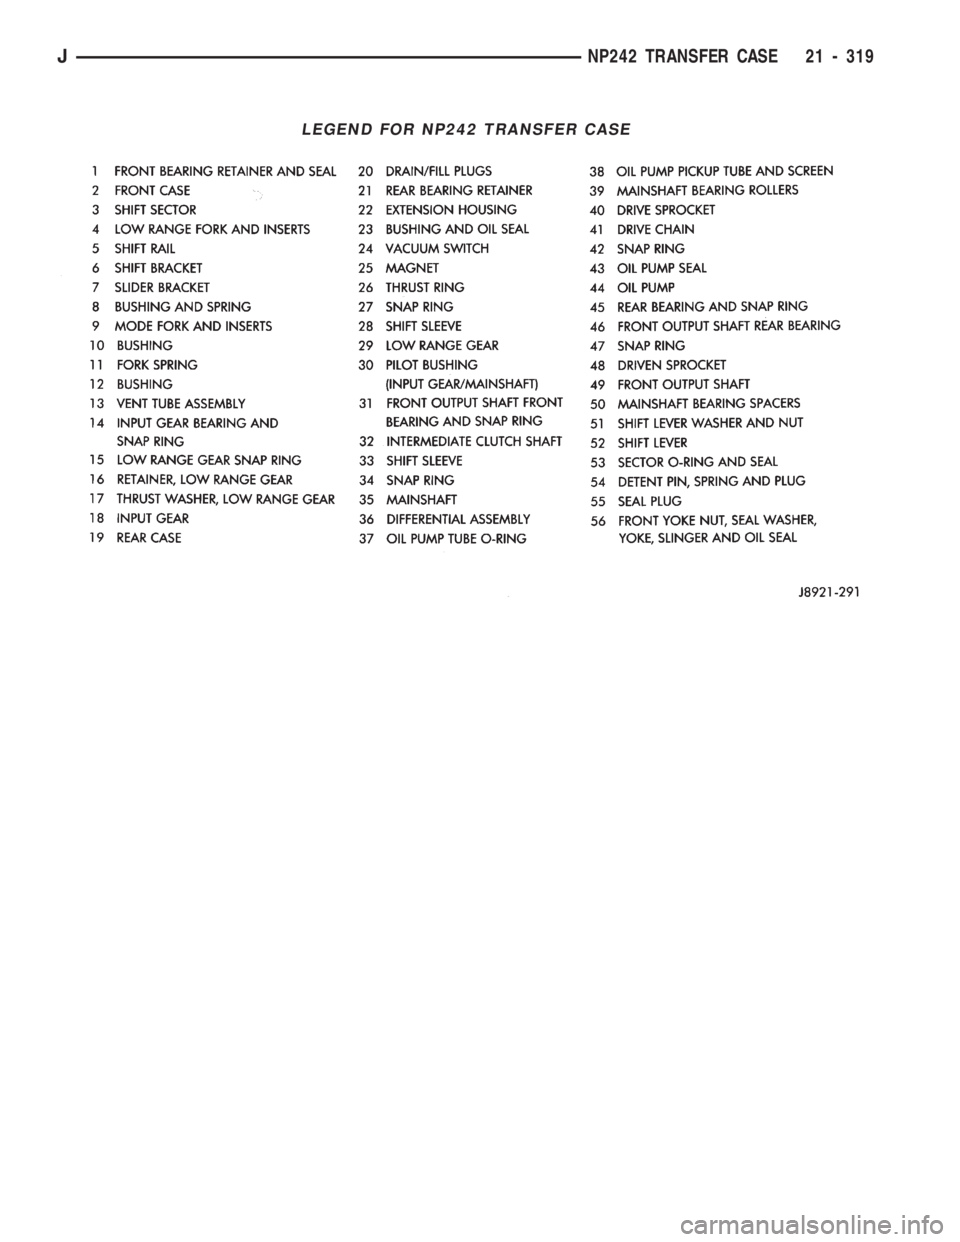
LEGEND FOR NP242 TRANSFER CASE
JNP242 TRANSFER CASE 21 - 319
Trending: buttons, clock setting, run flat, cruise control, warning light, wheel, drain bolt
