display JEEP CHEROKEE 2019 Owner handbook (in English)
[x] Cancel search | Manufacturer: JEEP, Model Year: 2019, Model line: CHEROKEE, Model: JEEP CHEROKEE 2019Pages: 344, PDF Size: 6.35 MB
Page 81 of 344
WARNING!
acting on the vehicle, nor can it increase
the traction afforded by prevailing road
conditions. BAS cannot prevent collisions,
including those resulting from excessive
speed in turns, driving on very slippery
surfaces, or hydroplaning. The capabilities
of a BAS-equipped vehicle must never be
exploited in a reckless or dangerous man-
ner, which could jeopardize the user's
safety or the safety of others.
Hill Start Assist (HSA)
The HSA system is designed to mitigate roll
back from a complete stop while on an in-
cline. If the driver releases the brake while
stopped on an incline, HSA will continue to
hold the brake pressure for a short period. If
the driver does not apply the throttle before
this time expires, the system will release
brake pressure and the vehicle will roll down
the hill as normal.
The following conditions must be met in
order for HSA to activate:
• The feature must be enabled.• The vehicle must be stopped.
• Park brake must be off.
• Driver door must be closed.
• The vehicle must be on a sufficient grade.
• The gear selection must match vehicle up-
hill direction (i.e., vehicle facing uphill is in
forward gear; vehicle backing uphill is in
REVERSE gear).
• HSA will work in REVERSE gear and all
forward gears. The system will not activate
if the transmission is in PARK or NEU-
TRAL. For vehicles equipped with a manual
transmission, if the clutch is pressed, HSA
will remain active.
WARNING!
There may be situations where the Hill
Start Assist (HSA) will not activate and
slight rolling may occur, such as on minor
hills or with a loaded vehicle, or while
pulling a trailer. HSA is not a substitute for
active driving involvement. It is always the
driver’s responsibility to be attentive to
distance to other vehicles, people, and
objects, and most importantly brake op-
WARNING!
eration to ensure safe operation of the
vehicle under all road conditions. Your
complete attention is always required
while driving to maintain safe control of
your vehicle. Failure to follow these warn-
ings can result in a collision or serious
personal injury.
Disabling And Enabling HSA
This feature can be turned on or turned off. To
change the current setting, proceed as fol-
lows:
• If disabling HSA using your instrument
cluster display, refer to “Instrument Cluster
Display” in “Getting To Know Your Instru-
ment Panel” for further information.
• If disabling HSA using Uconnect Settings,
refer to “Uconnect Settings” in “Multime-
dia” for further information.
For vehicles not equipped with an instrument
cluster display, perform the following steps:
1. Center the steering wheel (front wheels
pointing straight forward).
79
Page 84 of 344
should be used for most driving conditions.
Alternate ESC modes should only be used for
specific reasons as noted in the following
paragraphs.
Partial Off
The “Partial Off” mode is intended for times
when a more spirited driving experience is
desired. This mode may modify TCS and ESC
thresholds for activation, which allows for
more wheel spin than normally allowed. This
mode may be useful if the vehicle becomes
stuck.
To enter the “Partial Off” mode, momentarily
push the “ESC Off” switch and the “ESC Off
Indicator Light” will illuminate. To turn the
ESC on again, momentarily push the “ESC
Off” switch and the “ESC Off Indicator Light”
will turn off.
NOTE:
For vehicles with multiple partial ESC modes
a momentary button push will toggle the ESC
mode. Multiple momentary button pushed
may be required to return to ESC On.WARNING!
• When in “Partial Off” mode, the TCS
functionality of ESC, (except for the lim-
ited slip feature described in the TCS
section), has been disabled and the
“ESC Off Indicator Light” will be illumi-
nated. When in “Partial Off” mode, the
engine power reduction feature of TCS is
disabled, and the enhanced vehicle sta-
bility offered by the ESC system is re-
duced.
• Trailer Sway control (TSC) is disabled
when the ESC system is in the “Partial
Off” mode.
Full Off — If Equipped
This mode is intended for off-highway or
off-road use only and should not be used on
any public roadways. In this mode, TCS and
ESC features are turned OFF. To enter the
“Full Off” mode, push and hold the “ESC
Off” switch for five seconds while the vehicle
is stopped with the engine running. After five
seconds, a chime will sound, the “ESC Off
Indicator Light” will illuminate, and the“ESC OFF” message will display in the in-
strument cluster. To turn ESC ON again,
momentarily push the “ESC Off” switch.
NOTE:
System may switch from ESC “Full Off” to
“Partial Off” mode when vehicle exceeds a
predetermined speed. When the vehicle
speed slows below the predetermined speed
the system will return to ESC “Full Off”.
ESC modes may also be affected by drive
modes if so equipped.
WARNING!
• In the ESC “Full Off” mode, the engine
torque reduction and stability features
are disabled. Therefore, enhanced ve-
hicle stability offered by the ESC system
is unavailable. In an emergency evasive
maneuver, the ESC system will not en-
gage to assist in maintaining stability.
ESC “Full Off” mode is intended for
off-highway or off-road use only.
• With the ESC switched off, the en-
hanced vehicle stability offered by ESC
is unavailable. In an emergency evasive
SAFETY
82
Page 93 of 344
WARNING!
other vehicles, obstructions, and blind
spots before backing up. Failure to do so
can result in serious injury or death.
Modes Of Operation
Three selectable modes of operation are
available in the Uconnect System. Refer to
“Uconnect Settings” in “Multimedia” in the
Owner’s Manual for further information.
Blind Spot Alert Lights Only
When operating in Blind Spot Alert mode, the
BSM system will provide a visual alert in the
appropriate side view mirror based on a de-
tected object. However, when the system is
operating in Rear Cross Path (RCP) mode, the
system will respond with both visual and
audible alerts when a detected object is pres-
ent. Whenever an audible alert is requested,
the radio is muted.
Blind Spot Alert Lights/Chime
When operating in Blind Spot Alert Lights/
Chime mode, the BSM system will provide a
visual alert in the appropriate side view mirrorbased on a detected object. If the turn signal
is then activated, and it corresponds to an
alert present on that side of the vehicle, an
audible chime will also be sounded. When-
ever a turn signal and detected object are
present on the same side at the same time,
both the visual and audible alerts will be
issued. In addition to the audible alert the
radio (if on) will also be muted.
NOTE:
Whenever an audible alert is requested by the
BSM system, the radio is also muted.
When the system is in RCP, the system shall
respond with both visual and audible alerts
when a detected object is present. Whenever
an audible alert is requested, the radio is also
muted. Turn/hazard signal status is ignored;
the RCP state always requests the chime.
Blind Spot Alert Off
When the BSM system is turned off there will
be no visual or audible alerts from either the
BSM or RCP systems.NOTE:
The BSM system will store the current oper-
ating mode when the vehicle is shut off. Each
time the vehicle is started the previously
stored mode will be recalled and used.
Forward Collision Warning (FCW) With
Mitigation — If Equipped
Forward Collision Warning (FCW) With Miti-
gation Operation
The Forward Collision Warning (FCW) system
with mitigation provides the driver with au-
dible warnings, visual warnings (within the
instrument cluster display), and may apply a
brake jerk to warn the driver when it detects a
potential frontal collision. The warnings and
limited braking are intended to provide the
driver with enough time to react, avoid or
mitigate the potential collision.
NOTE:
FCW monitors the information from the for-
ward looking sensors as well as the Electronic
Brake Controller (EBC), to calculate the prob-
ability of a forward collision. When the sys-
91
Page 95 of 344
Changing the FCW status to the “Near” set-
ting, allows the system to warn the driver of a
possible collision with the vehicle in front
when the distance between the vehicle in the
front is much closer. This setting provides
less reaction time than the “Far” and “Me-
dium” settings, which allows for a more dy-
namic driving experience.
NOTE:
• Changing the FCW status to “Only Warn-
ing” prevents the system from providing
limited active braking, or additional brake
support if the driver is not braking ad-
equately in the event of a potential frontal
collision, but maintains the audible and
visual warnings.
• Changing the FCW status to “Off” prevents
the system from providing autonomous
braking, or additional brake support if the
driver is not braking adequately in the event
of a potential frontal collision.
• The system will NOT retain the last setting
selected by the driver after ignition shut
down. The system will reset to the default
setting when the vehicle is restarted.• FCW may not react to irrelevant objects
such as overhead objects, ground reflec-
tions, objects not in the path of the vehicle,
stationary objects that are far away, oncom-
ing traffic, or leading vehicles with the
same or higher rate of speed.
• FCW will be disabled like ACC, with the
unavailable screens.
FCW Limited Warning
If the instrument cluster display reads “ACC/
FCW Limited Functionality” or “ACC/FCW
Limited Functionality Clean Front Wind-
shield” momentarily, there may be a condi-
tion that limits FCW functionality. Although
the vehicle is still drivable under normal
conditions, the active braking may not be
fully available. Once the condition that lim-
ited the system performance is no longer
present, the system will return to its full
performance state. If the problem persists,
see an authorized dealer.
Service FCW Warning
If the system turns off, and the instrument
cluster display reads:
• ACC/FCW Unavailable Service Required• Cruise/FCW Unavailable Service Required
This indicates there is an internal system
fault. Although the vehicle is still drivable
under normal conditions, have the system
checked by an authorized dealer.
Pedestrian Emergency Braking (PEB) — If
Equipped
The Pedestrian Emergency Braking (PEB) is a
sub-system of the FCW system which pro-
vides the driver with audible and visual warn-
ings in the instrument cluster display, and
may apply automatic braking when it detects
a potential frontal collision with a pedestrian.
If a PEB event begins at a speed below
37 mph (60 km/h), the system may provide
braking to mitigate the potential collision
with a pedestrian. If the PEB event stops the
vehicle completely, the system will hold the
vehicle at a standstill for two seconds and
then release the brakes. When the system
determines a collision with the pedestrian in
front of you is no longer probable, the warning
message will be deactivated.
The minimum speed for PEB activation is
3 mph (5 km/h).
93
Page 96 of 344
WARNING!
Pedestrian Emergency Braking (PEB) is
not intended to avoid a collision on its
own, nor can PEB detect every type of
potential collision with a pedestrian. The
driver has the responsibility to avoid a
collision by controlling the vehicle via
braking and steering. Failure to follow this
warning could lead to serious injury or
death.
Turning PEB On Or Off
NOTE:
The default status of PEB is “On.” This
allows the system to warn you of a possible
frontal collision with the pedestrian.
The PEB button is located in the Uconnect
display in the Controls settings. Refer to
“Uconnect Settings” in “Multimedia” in the
Owner’s Manual for further information.
To turn the PEB system off, push the “Pedes-
trian Emergency Braking” button once.
To turn the PEB system back on, push the
“Pedestrian Emergency Braking” button
again.Changing the PEB status to “Off” deactivates
the system, so no warning or active braking
will be available in case of a possible frontal
collision with the pedestrian.
NOTE:
The PEB system will NOT retain the last
setting selected by the driver after ignition
shut down. The system will reset to the de-
fault setting when the vehicle is restarted.
Tire Pressure Monitor System (TPMS)
The Tire Pressure Monitor System (TPMS)
will warn the driver of a low tire pressure
based on the vehicle recommended cold
placard pressure.
NOTE:
The system only warns the tire pressure is
low: it is not able to inflate them.
The tire pressure will vary with temperature
by approximately 1 psi (7 kPa) for every 12°F
(6.5°C). This means that when the outside
temperature decreases, the tire pressure will
decrease. Tire pressure should always be set
based on cold inflation tire pressure. This is
defined as the tire pressure after the vehicle
has not been driven for at least three hours, ordriven less than 1 mile (1.6 km) after a three
hour period. The cold tire inflation pressure
must not exceed the maximum inflation pres-
sure molded into the tire sidewall. The tire
pressure will also increase as the vehicle is
driven. This is normal and there should be no
adjustment for this increased pressure.
Refer to “Tires” in “Servicing And Mainte-
nance” for information on how to properly
inflate the vehicle’s tires.
The TPMS will warn the driver of a low tire
pressure if the tire pressure falls below the
low-pressure warning limit for any reason,
including low temperature effects and natu-
ral pressure loss through the tire.
The TPMS will continue to warn the driver of
low tire pressure as long as the condition
exists, and will not turn off until the tire
pressure is at or above the recommended
cold placard pressure. Once the low tire pres-
sure warning (Tire Pressure Monitoring Tell-
tale Light) illuminates, you must increase the
tire pressure to the recommended cold plac-
ard pressure in order for the “Tire Pressure
Monitoring Telltale Light” to turn off.
SAFETY
94
Page 98 of 344
• Seasonal temperature changes will affect
tire pressure, and the TPMS will monitor
the actual tire pressure in the tire.
Premium System
The Tire Pressure Monitor System (TPMS)
uses wireless technology with wheel rim
mounted electronic sensors to monitor tire
pressure levels. Sensors, mounted to each
wheel as part of the valve stem, transmit tire
pressure readings to the receiver module.
NOTE:
It is particularly important for you to check
the tire pressure in all of the tires on your
vehicle monthly and to maintain the proper
pressure.
The TPMS consists of the following compo-
nents:
• Receiver module
• Four tire pressure monitoring sensors
• Various tire pressure monitoring system
messages, which display in the instrument
cluster
• Tire Pressure Monitoring System Warning
LightTire Pressure Monitoring Low Pressure Warn-
ings
The “Tire Pressure Monitoring
Telltale Light” will illuminate in
the instrument cluster and a
chime will sound when tire pres-
sure is low in one or more of the
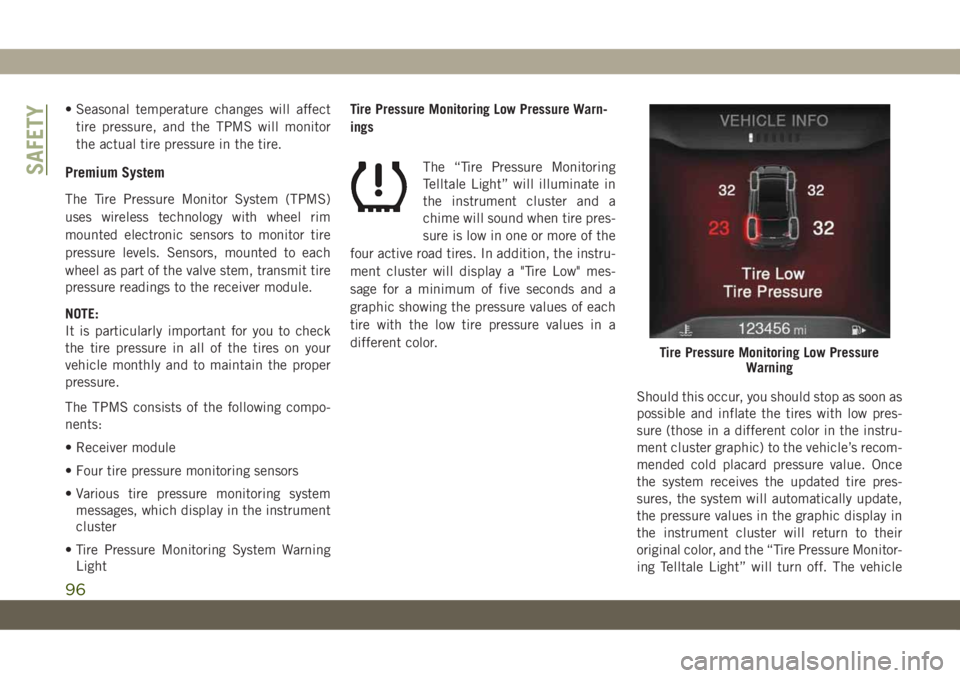
four active road tires. In addition, the instru-
ment cluster will display a "Tire Low" mes-
sage for a minimum of five seconds and a
graphic showing the pressure values of each
tire with the low tire pressure values in a
different color.
Should this occur, you should stop as soon as
possible and inflate the tires with low pres-
sure (those in a different color in the instru-
ment cluster graphic) to the vehicle’s recom-
mended cold placard pressure value. Once
the system receives the updated tire pres-
sures, the system will automatically update,
the pressure values in the graphic display in
the instrument cluster will return to their
original color, and the “Tire Pressure Monitor-
ing Telltale Light” will turn off. The vehicle
Tire Pressure Monitoring Low Pressure
Warning
SAFETY
96
Page 99 of 344
may need to be driven for up to 10 minutes
above 15 mph (24 km/h) in order for the
TPMS to receive this information.
NOTE:
When filling warm tires, the tire pressure may
need to be increased up to an additional 4 psi
(28 kPa) above the recommended cold plac-
ard pressure in order to turn the Tire Pressure
Monitoring Telltale Light off.
Service TPMS Warning
When a system fault is detected, the “Tire
Pressure Monitoring Telltale Light” will flash
on and off for 75 seconds and then remain on
solid. The system fault will also sound a
chime. In addition, the instrument cluster
will display a "SERVICE TPM SYSTEM" mes-
sage for a minimum of five seconds and then
display dashes (- -) in place of the pressure
value to indicate which sensor is not being
received.
If the ignition key is cycled, this sequence
will repeat, providing the system fault still
exists. If the system fault no longer exists, the
“Tire Pressure Monitoring Telltale Light” will
no longer flash, and the “SERVICE TPM SYS-
TEM” message will no longer display, and apressure value will display in place of the
dashes. A system fault can occur due to any
of the following:
• Jamming due to electronic devices or driv-
ing next to facilities emitting the same
radio frequencies as the TPMS sensors.
• Installing some form of aftermarket window
tinting that affects radio wave signals.
• Lots of snow or ice around the wheels or
wheel housings.
• Using tire chains on the vehicle.
• Using wheels/tires not equipped with TPMS
sensors.
Vehicles With Compact Spare or Non-Matching
Full Size Spare
1. The compact spare tire or non-matching
full size does not have a tire pressure
monitoring sensor. Therefore, the TPMS
will not monitor the pressure in the com-
pact spare tire.
2. If you install the compact or non-
matching full size spare tire in place of a
road tire that has a pressure below the
low-pressure warning limit, upon the next
ignition key cycle, the “TPMS TelltaleLight” will remain on and a chime will
sound. In addition, the graphic in the
instrument cluster will still display a dif-
ferent color pressure value.
3. After driving the vehicle for up to 10 min-
utes above 15 mph (24 km/h), the “TPMS
Telltale Light” will flash on and off for
75 seconds and then remain on solid. In
addition, the instrument cluster will dis-
play a “Service Tire Pressure System”
message for five seconds and then display
dashes (- -) in place of the pressure value.
4. For each subsequent ignition key cycle, a
chime will sound, the “TPMS Telltale
Light” will flash on and off for 75 seconds
and then remain on solid, and the instru-
ment cluster will display a “SERVICE TPM
SYSTEM” message for five seconds and
then display dashes (- -) in place of the
pressure value.
5. Once you repair or replace the original
road tire and reinstall it on the vehicle in
place of the compact spare or non-
matching full size, the TPMS will update
automatically. In addition, the “TPMS
Telltale Light” will turn off and the
97
Page 100 of 344
graphic in the instrument cluster will dis-
play a new pressure value instead of
dashes (- -), as long as no tire pressure is
below the low-pressure warning limit in
any of the four active road tires. The
vehicle may need to be driven for up to
10 minutes above 15 mph (24 km/h) in
order for the TPMS to receive this
information.
TPMS Deactivation — If Equipped
The TPMS can be deactivated if replacing all
four wheel and tire assemblies (road tires)
with wheel and tire assemblies that do not
have TPMS Sensors, such as when installing
winter wheel and tire assemblies on your
vehicle.
To deactivate the TPMS, first replace all four
wheel and tire assemblies (road tires) with
tires not equipped with Tire Pressure Moni-
toring (TPM) Sensors. Then, drive the vehicle
for 10 minutes above 15 mph (24 km/h). The
TPMS will chime, the "TPM Telltale Light"
will flash on and off for 75 seconds and thenremain on. The instrument cluster will dis-
play the “SERVICE TPM SYSTEM” message
and then display dashes (--) in place of the
pressure values.
Beginning with the next ignition cycle, the
TPMS will no longer chime or display the
“SERVICE TPM SYSTEM” message in the
instrument cluster but dashes (--) will remain
in place of the pressure values.
To reactivate the TPMS, replace all four
wheel and tire assemblies (road tires) with
tires equipped with TPM sensors. Then, drive
the vehicle for up to 10 minutes above
15 mph (24 km/h). The TPMS will chime, the
"TPM Telltale Light" will flash on and off for
75 seconds and then turn off. The instrument
cluster will display the “SERVICE TPM SYS-
TEM” message and then display pressure
values in place of the dashes. On the next
ignition cycle the "SERVICE TPM SYSTEM"
message will no longer be displayed as long
as no system fault exists.OCCUPANT RESTRAINT
SYSTEMS
Some of the most important safety features in
your vehicle are the restraint systems:
Occupant Restraint Systems Features
• Seat Belt Systems
• Supplemental Restraint Systems (SRS) Air
Bags
• Child Restraints
Some of the safety features described in this
section may be standard equipment on some
models, or may be optional equipment on
others. If you are not sure, ask an authorized
dealer.
Important Safety Precautions
Please pay close attention to the information
in this section. It tells you how to use your
restraint system properly, to keep you and
your passengers as safe as possible.
SAFETY
98
Page 141 of 344
STARTING THE ENGINE
Before starting your vehicle, adjust your seat,
adjust both inside and outside mirrors, and
fasten your seat belts.
WARNING!
• When leaving the vehicle, always remove
the key fob from the ignition and lock
your vehicle. If equipped with Keyless
Enter-N-Go, always make sure the key-
less ignition node is in “OFF” mode,
remove the key fob from the vehicle and
lock the vehicle.
• Never leave children alone in a vehicle,
or with access to an unlocked vehicle.
• Allowing children to be in a vehicle un-
attended is dangerous for a number of
reasons. A child or others could be seri-
ously or fatally injured. Children should
be warned not to touch the parking
brake, brake pedal or the gear selector.
• Do not leave the key fob in or near the
vehicle, or in a location accessible to
children, and do not leave the ignition of
a vehicle equipped with Keyless Enter-
WARNING!
N-Go in the ACC or ON/RUN mode. A
child could operate power windows,
other controls, or move the vehicle.
Start the engine with the gear selector in the
NEUTRAL or PARK position. Apply the brake
before shifting to any driving range.
Normal Starting — Gasoline Engine
NOTE:
Normal starting of either a cold or a warm
engine is obtained without pumping or push-
ing the accelerator pedal.
Place your foot on the brake and place the
ignition to the START mode and release when
the engine starts. If the engine fails to start
within 10 seconds:
1. Place the ignition in the OFF mode.
2. Wait 10 to 15 seconds.
3. Repeat the “Normal Starting” procedure.NOTE:
Only press one pedal at a time while driving
the vehicle. Torque performance of the ve-
hicle could be reduced if both pedals are
pressed at the same time. If pressure is
detected on both pedals simultaneously, a
warning message will display in the instru-
ment cluster. For further information, refer to
“Instrument Cluster Display” in “Getting To
Know Your Instrument Panel”.Tip Start Feature
Place the ignition in the START mode and
release it as the starter engages. The starter
motor will automatically disengage itself
once engine is running. If the engine fails to
start, the starter will disengage automatically
in 10 seconds. If this occurs:
1. Place the ignition in the OFF mode.
2. Wait 10 to 15 seconds.
3. Repeat the “Normal Starting” procedure.
139
Page 150 of 344
Brake/Transmission Shift Interlock
System
This vehicle is equipped with a Brake Trans-
mission Shift Interlock system (BTSI) that
holds the transmission gear selector in PARK
unless the brakes are applied. To shift the
transmission out of PARK, the ignition must
be in the ON/RUN mode (engine running or
not) and the brake pedal must be pressed.
The brake pedal must also be pressed to shift
from NEUTRAL into DRIVE or REVERSE
when the vehicle is stopped or moving at low
speeds.
Nine-Speed Automatic Transmission
The transmission gear range (PRND) is dis-
played both beside the gear selector and in
the instrument cluster. To select a gear range,
press the lock button on the gear selector and
move the selector rearward or forward. You
must also press the brake pedal to shift the
transmission out of PARK (or NEUTRAL,
when the vehicle is stopped or moving at low
speeds). Select the DRIVE range for normal
driving.NOTE:
In the event of a mismatch between the gear
selector position and the actual transmission
gear (for example, driver selects REVERSE
while driving forward), the position indicator
will blink continuously until the selector is
returned to the proper position, or the re-
quested shift can be completed.
The electronically-controlled transmission
adapts its shift schedule based on driver
inputs, along with environmental and road
conditions. The transmission electronics are
self-calibrating; therefore, the first few shifts
on a new vehicle may be somewhat abrupt.
This is a normal condition, and precision
shifts will develop within a few hundred miles
(kilometers).
The nine-speed transmission has been devel-
oped to meet the needs of current and future
FWD/AWD vehicles. Software and calibration
is refined to optimize the customer’s driving
experience and fuel economy. By design,
some vehicle and driveline combinations uti-
lize 9th gear only in very specific driving
situations and conditions.Only shift from DRIVE to PARK or REVERSE
when the accelerator pedal is released and
the vehicle is stopped. Be sure to keep your
foot on the brake pedal when shifting be-
tween these gears.
The transmission gear selector provides
PARK, REVERSE, NEUTRAL, DRIVE, and
MANUAL (AutoStick) shift positions. Manual
shifts can be made using the AutoStick shift
control. Moving the gear selector into the
MANUAL (-/+) position (beside the DRIVE
position) activates AutoStick mode, provid-
ing manual shift control and displaying the
current gear in the instrument cluster (as 1,
2, 3, etc.). Toggling the gear selector forward
(-) or rearward (+) while in the MANUAL
position will manually select the transmis-
sion gear.
Refer to “AutoStick” in the Owner’s Manual.
STARTING AND OPERATING
148