display JEEP CHEROKEE 2019 Owner handbook (in English)
[x] Cancel search | Manufacturer: JEEP, Model Year: 2019, Model line: CHEROKEE, Model: JEEP CHEROKEE 2019Pages: 344, PDF Size: 6.35 MB
Page 151 of 344
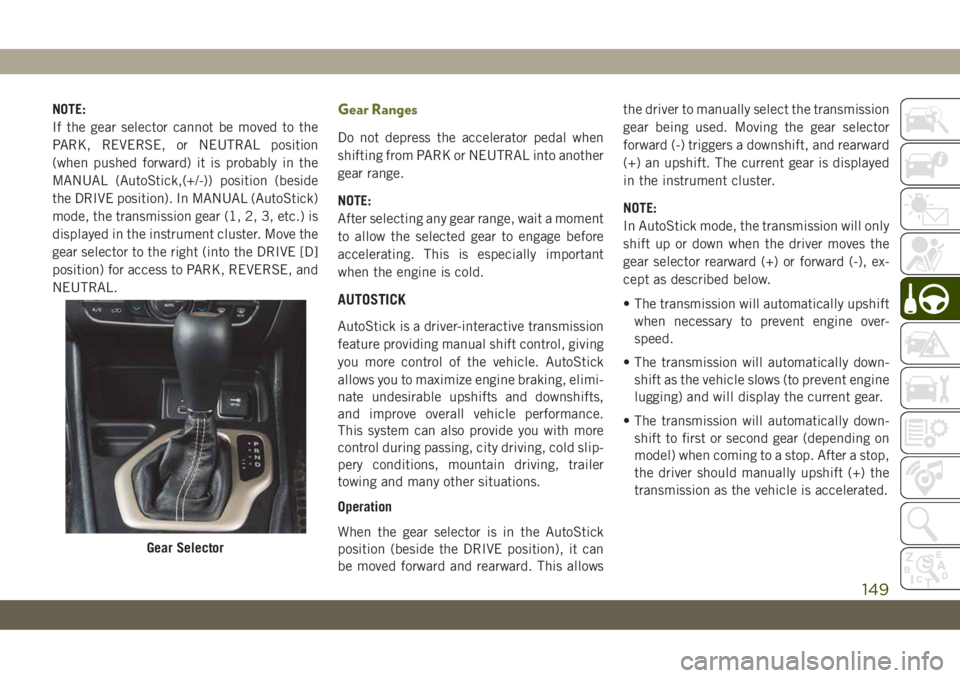
NOTE:
If the gear selector cannot be moved to the
PARK, REVERSE, or NEUTRAL position
(when pushed forward) it is probably in the
MANUAL (AutoStick,(+/-)) position (beside
the DRIVE position). In MANUAL (AutoStick)
mode, the transmission gear (1, 2, 3, etc.) is
displayed in the instrument cluster. Move the
gear selector to the right (into the DRIVE [D]
position) for access to PARK, REVERSE, and
NEUTRAL.Gear Ranges
Do not depress the accelerator pedal when
shifting from PARK or NEUTRAL into another
gear range.
NOTE:
After selecting any gear range, wait a moment
to allow the selected gear to engage before
accelerating. This is especially important
when the engine is cold.
AUTOSTICK
AutoStick is a driver-interactive transmission
feature providing manual shift control, giving
you more control of the vehicle. AutoStick
allows you to maximize engine braking, elimi-
nate undesirable upshifts and downshifts,
and improve overall vehicle performance.
This system can also provide you with more
control during passing, city driving, cold slip-
pery conditions, mountain driving, trailer
towing and many other situations.
Operation
When the gear selector is in the AutoStick
position (beside the DRIVE position), it can
be moved forward and rearward. This allowsthe driver to manually select the transmission
gear being used. Moving the gear selector
forward (-) triggers a downshift, and rearward
(+) an upshift. The current gear is displayed
in the instrument cluster.
NOTE:
In AutoStick mode, the transmission will only
shift up or down when the driver moves the
gear selector rearward (+) or forward (-), ex-
cept as described below.
• The transmission will automatically upshift
when necessary to prevent engine over-
speed.
• The transmission will automatically down-
shift as the vehicle slows (to prevent engine
lugging) and will display the current gear.
• The transmission will automatically down-
shift to first or second gear (depending on
model) when coming to a stop. After a stop,
the driver should manually upshift (+) the
transmission as the vehicle is accelerated.
Gear Selector
149
Page 154 of 344
Shift Positions
For additional information on the appropriate
use of each 4WD system mode position, see
the information below:
NEUTRAL
This range disengages the driveline from the
powertrain.
WARNING!
You or others could be injured or killed if
you leave the vehicle unattended with the
power transfer unit in the NEUTRAL (N)
position without first fully engaging the
parking brake. The NEUTRAL (N) position
disengages both the front and rear drive-
shafts from the powertrain and will allow
the vehicle to roll, even if the automatic
transmission is in PARK (or manual trans-
mission is in gear). The parking brake
should always be applied when the driver
is not in the vehicle.
4WD LOW
This range is for low speed four-wheel drive.
It provides an additional gear reduction
which allows for increased torque to be deliv-
ered to both the front and rear wheels while
providing maximum pulling power for loose,
slippery road surfaces only. Do not exceed
25 mph (40 km/h).
NOTE:
Refer to “Selec-Terrain — If Equipped” for
further information on the various positions
and their intended usages.
Shifting Procedures
Shifting Into 4X4 LOW
With the vehicle at speeds of 0 to 3 mph (0 to
5 km/h), the ignition in the ON mode and the
engine running, shift the transmission into
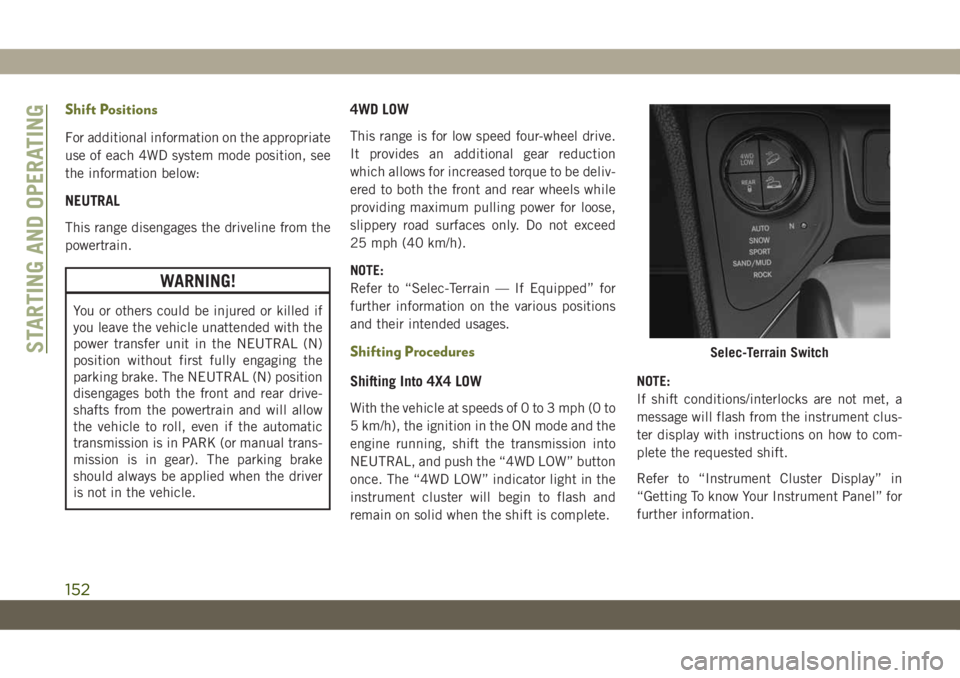
NEUTRAL, and push the “4WD LOW” button
once. The “4WD LOW” indicator light in the
instrument cluster will begin to flash and
remain on solid when the shift is complete.NOTE:
If shift conditions/interlocks are not met, a
message will flash from the instrument clus-
ter display with instructions on how to com-
plete the requested shift.
Refer to “Instrument Cluster Display” in
“Getting To know Your Instrument Panel” for
further information.
Selec-Terrain SwitchSTARTING AND OPERATING
152
Page 155 of 344
Shifting Out Of 4X4 LOW
With the vehicle at speeds of 0 to 3 mph (0 to
5 km/h), the ignition in the ON mode and the
engine running, shift the transmission into
NEUTRAL, and push the “4WD LOW” button
once. The “4WD LOW” indicator light in the
instrument cluster will flash and go out when
the shift is complete.
NOTE:
• If shift conditions/interlocks are not met, a
message will flash from the instrument
cluster display with instructions on how to
complete the requested shift. Refer to “In-
strument Cluster Display” in “Getting To
Know Your Instrument Panel” for further
information.
• Shifting into or out of 4WD LOW is possible
with the vehicle completely stopped; how-
ever, difficulty may occur due to the mating
clutch teeth not being properly aligned.
Several attempts may be required for
clutch teeth alignment and shift comple-
tion to occur. The preferred method is with
the vehicle rolling 0 to 3 mph (0 to 5 km/h).If the vehicle is moving faster than 3 mph
(5 km/h), the 4WD system will not allow the
shift.
NEUTRAL Shift Procedure
WARNING!
You or others could be injured or killed if
you leave the vehicle unattended with the
power transfer unit in the NEUTRAL (N)
position without first fully engaging the
parking brake. The NEUTRAL (N) position
disengages both the front and rear drive-
shafts from the powertrain and will allow
the vehicle to roll, even if the automatic
transmission is in PARK (or manual trans-
mission is in gear). The parking brake
should always be applied when the driver
is not in the vehicle.
1. Bring the vehicle to a complete stop on
level ground and shift the automatic
transmission to PARK
2. Turn the engine OFF.
3. Turn the ignition to the ON/RUN mode,
but do not start the engine.
4. Press and hold the brake pedal.5. Shift the transmission into NEUTRAL.
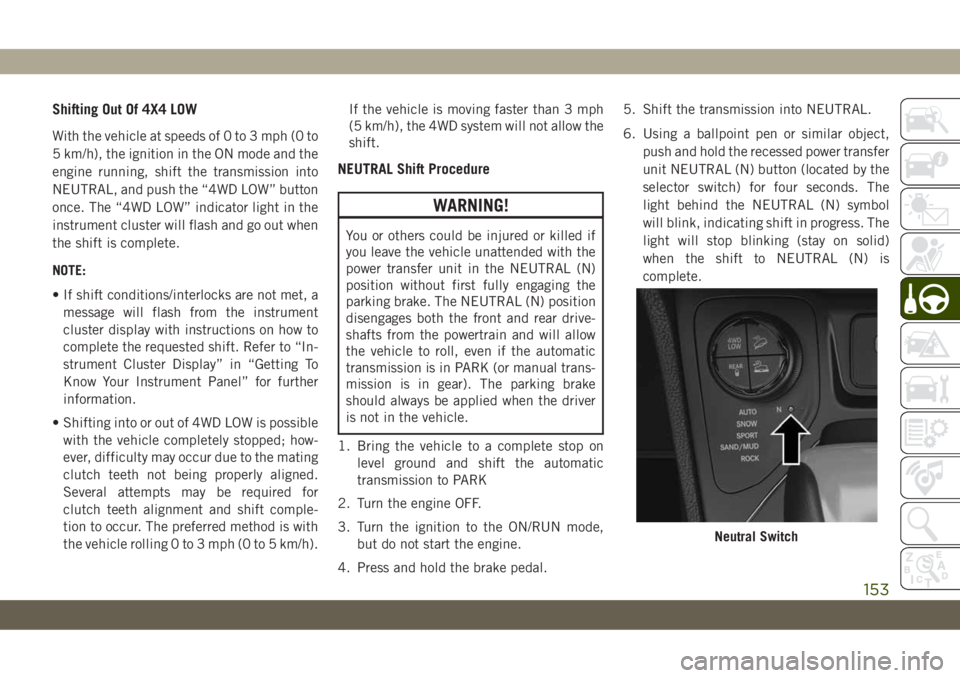
6. Using a ballpoint pen or similar object,
push and hold the recessed power transfer
unit NEUTRAL (N) button (located by the
selector switch) for four seconds. The
light behind the NEUTRAL (N) symbol
will blink, indicating shift in progress. The
light will stop blinking (stay on solid)
when the shift to NEUTRAL (N) is
complete.
Neutral Switch
153
Page 157 of 344
3. To disengage Rear E-Locker, push the
REAR LOCK button once.
NOTE:
• It may also be necessary to drive slowly
steering back and forth to complete en-
gagement and disengagement of the
E-Locker.
• When engaging Rear E-Locker, the indica-
tor lights in the instrument cluster and on
the REAR LOCK button will begin to flash.
When the shift is complete the REAR LOCK
indicator lights will remain on.
• When disengaging Rear E-Locker, the indi-
cator lights in the instrument cluster and on
the REAR LOCK button will begin to flash.
When the shift is complete the REAR LOCK
indicator lights will remain off.
• Shifting into or out of Rear E-Locker is
possible with the vehicle completely
stopped; however, difficulty may occur due
to the mating clutch teeth not being prop-
erly aligned. Several attempts may be re-
quired for clutch teeth alignment and shift
completion to occur. The preferred methodis for the vehicle to be rolling, below
15 MPH (24 km/h), while including right
and left steering maneuvers to allow for the
clutch teeth to align.
• The Rear E-Locker System must be disen-
gaged prior to taking the vehicle out of 4WD
LOW range. If 4WD LOW shift conditions/
interlocks are not met, a message will flash
from the instrument cluster display with
instructions on how to complete the re-
quested shift.
SELEC-TERRAIN
Description
Selec-Terrain combines the capabilities of
the vehicle control systems, along with driver
input, to provide the best performance for all
terrains.
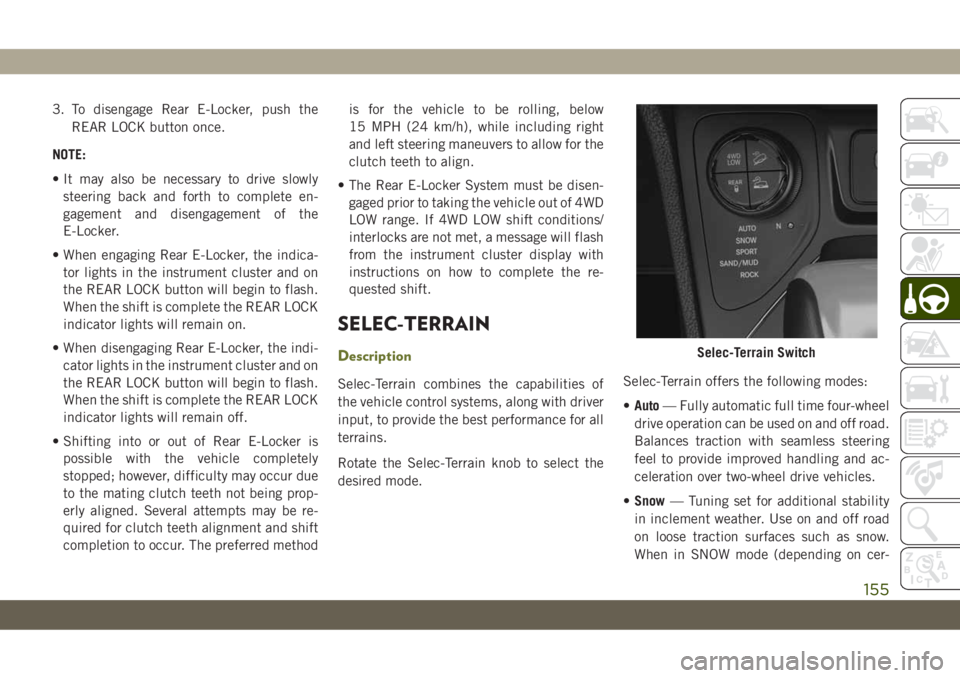
Rotate the Selec-Terrain knob to select the
desired mode.Selec-Terrain offers the following modes:
•Auto— Fully automatic full time four-wheel
drive operation can be used on and off road.
Balances traction with seamless steering
feel to provide improved handling and ac-
celeration over two-wheel drive vehicles.
•Snow— Tuning set for additional stability
in inclement weather. Use on and off road
on loose traction surfaces such as snow.
When in SNOW mode (depending on cer-
Selec-Terrain Switch
155
Page 158 of 344
tain operating conditions), the transmis-
sion may use second gear (rather than first
gear) during launches, to minimize wheel
slippage.
•Sport— This mode alters the transmis-
sion's automatic shift schedule for sportier
driving. Upshift speeds are increased to
make full use of available engine power.
NOTE:
SPORT mode is not available when 4WD LOW
is selected.
•Sand/Mud— Off-road calibration for use on
low traction surfaces such as mud, sand, or
wet grass. Driveline is maximized for trac-
tion. Some binding may be felt on less
forgiving surfaces. The electronic brake
controls are set to limit traction control
management of throttle and wheel spin.
•Rock— Off-road calibration only available
in 4WD LOW range. Traction based tuning
with improved steer-ability for use on high
traction off-road surfaces. Use for low
speed obstacles such as large rocks, deep
ruts, etc.NOTE:
• Rock mode is only available on the vehicles
equipped with the Off-Road package.
• Activate the Hill Descent Control or Selec
Speed Control for steep downhill control.
See “Electronic Brake Control System” in
“Safety” for further information.
STOP/START SYSTEM
The Stop/Start function was developed to
reduce fuel consumption. The system will
stop the engine automatically during a ve-
hicle stop if the required conditions are met.
Releasing the brake pedal or pressing the
accelerator pedal will automatically restart
the engine.
This vehicle has been upgraded with a Heavy
Duty Battery, Starter, as well as other engine
parts, to handle the Additional engine starts.
Automatic Mode
The Stop/Start feature is enabled after every
normal customer engine start. At that time,
the system will go into STOP/START READY
and if all other conditions are met, can go
into a STOP/START AUTOSTOP ACTIVE “Au-
tostop” mode.
To Activate The Autostop Mode, The Following
Must Occur:
• The system must be in STOP/START
READY state. A STOP/START READY mes-
sage will be displayed in the instrument
cluster display within the Stop/Start sec-
tion. Refer to “Warning Lights And Mes-
sages” in “Getting To Know Your Instru-
ment Panel” in your Owner’s Manual.
• The vehicle must be completely stopped.
• The gear selector must be in a forward gear
and the brake pedal depressed.
The engine will shut down, the tachometer
will move to the zero position and the Stop/
Start telltale will illuminate indicating you
are in Autostop. Customer settings will be
maintained upon return to an engine running
condition.
STARTING AND OPERATING
156
Page 160 of 344
Conditions That Force An Application Of The
Electric Park Brake While In Autostop Mode:
• The driver’s door is open and brake pedal
released.
• The driver’s door is open and the driver’s
seat belt is unbuckled.
• The engine hood has been opened.
• A STOP/START system error occurs.
If the Electric Park Brake is applied with the
engine off, the engine may require a manual
restart and the electric park brake may re-
quire a manual release (depress brake pedal
and push Electric Park Brake switch). Refer
to “Instrument Cluster Display” in “Getting
To Know Your Instrument Panel” in your Own-
er’s Manual.
To Manually Turn Off The Stop/Start
System
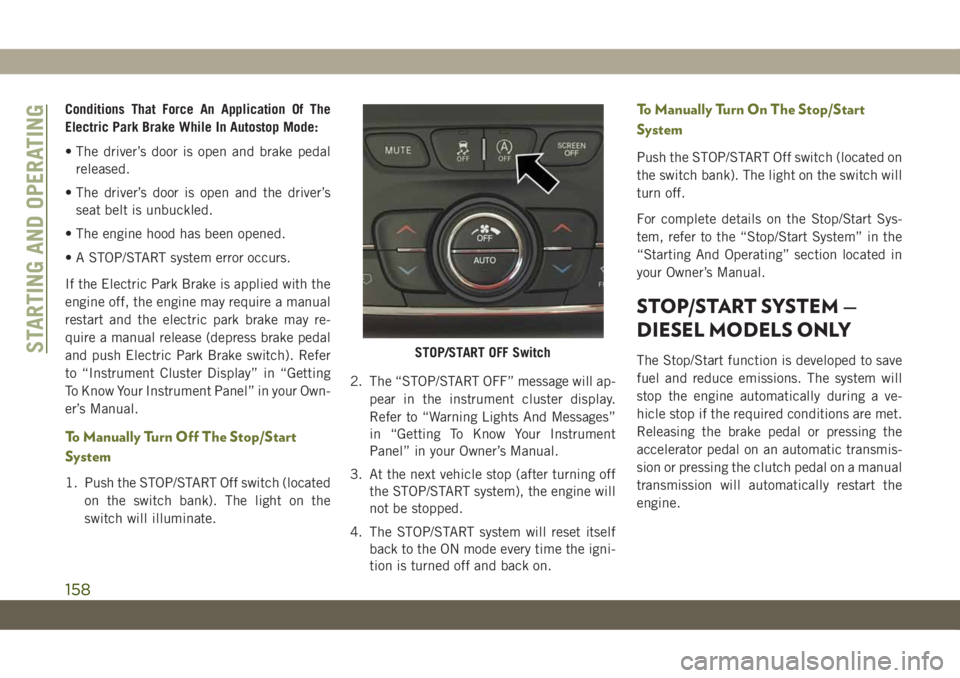
1. Push the STOP/START Off switch (located
on the switch bank). The light on the
switch will illuminate.2. The “STOP/START OFF” message will ap-
pear in the instrument cluster display.
Refer to “Warning Lights And Messages”
in “Getting To Know Your Instrument
Panel” in your Owner’s Manual.
3. At the next vehicle stop (after turning off
the STOP/START system), the engine will
not be stopped.
4. The STOP/START system will reset itself
back to the ON mode every time the igni-
tion is turned off and back on.
To Manually Turn On The Stop/Start
System
Push the STOP/START Off switch (located on
the switch bank). The light on the switch will
turn off.
For complete details on the Stop/Start Sys-
tem, refer to the “Stop/Start System” in the
“Starting And Operating” section located in
your Owner’s Manual.
STOP/START SYSTEM —
DIESEL MODELS ONLY
The Stop/Start function is developed to save
fuel and reduce emissions. The system will
stop the engine automatically during a ve-
hicle stop if the required conditions are met.
Releasing the brake pedal or pressing the
accelerator pedal on an automatic transmis-
sion or pressing the clutch pedal on a manual
transmission will automatically restart the
engine.STOP/START OFF SwitchSTARTING AND OPERATING
158
Page 161 of 344
Automatic Mode
The Stop/Start feature is enabled after every
normal customer engine start. It will remain
in STOP/START NOT READY until you drive
forward with a vehicle speed greater than
4 mph (7 km/h). At that time, the system will
go into STOP/START READY and if all other
conditions are met, can go into a STOP/
START AUTOSTOP ACTIVE “Autostop”
mode.
To Activate The Autostop Mode, The Following
Must Occur:
• The system must be in STOP/START
READY state. A STOP/START READY mes-
sage will be displayed in the instrument
cluster display within the Stop/Start sec-
tion. Refer to “Instrument Cluster Display”
in “Getting To Know Your Instrument
Panel” in your Owner’s information for fur-
ther details.
• The vehicle must be completely stopped.
• The gear selector must be in DRIVE and the
brake pedal depressed (automatic trans-
mission) or the gear selector must be in
NEUTRAL and the clutch pedal must be
fully released (manual transmission).The engine will shut down, the tachometer
will move to the zero position and the Stop/
Start telltale will illuminate indicating you
are in Autostop. While in Autostop, the Cli-
mate Controls system may automatically ad-
just airflow to maintain cabin comfort. Cus-
tomer settings will be maintained upon return
to an engine running condition.
Possible Reasons The Engine Does Not
Autostop
Prior to engine shut down, the system will
check many safety and comfort conditions to
see if they are fulfilled. Detailed information
about the operation of the Stop/Start system
may be viewed in the instrument cluster
Stop/Start Screen. In the following situations
the engine will not stop:
• Driver’s seat belt is not buckled.
• Driver’s door is not closed.
• Battery temperature is too warm or cold.
• The vehicle is on a steep grade.
• Cabin heating or cooling is in process and
an acceptable cabin temperature has not
been achieved.• HVAC is set to full defrost mode at a high
blower speed.
• Engine has not reached normal operating
temperature.
• Battery charge is low.
• The transmission is not in DRIVE (auto-
matic transmission) or NEUTRAL (manual
transmission).
• Hood is open.
• Vehicle is in 4LO transfer case mode.
• Exhaust system regeneration in process.
Other Factors Which Can Inhibit Autostop In-
clude:
• Fuel level.
• Accelerator pedal input (automatic trans-
mission only).
• Engine temperature too high.
It may be possible for the vehicle to be driven
several times without the STOP/START sys-
tem going into a STOP/START READY state
under more extreme conditions of the items
listed above.
159
Page 162 of 344
To Start The Engine While In Autostop
Mode
Automatic Transmission:
While in DRIVE, the engine will start when
the brake pedal is released or the throttle
pedal is depressed. The transmission will
automatically re-engage upon engine restart.
During this transition, the brakes will hold
the vehicle to avoid undesired vehicle move-
ment.
Manual Transmission:
When the gear selector is in NEUTRAL, the
engine will start when the clutch pedal is
pressed. The vehicle will go into STOP/
START SYSTEM NOT READY mode until the
vehicle speed is greater than 4 mph (7 km/h).
Conditions That Will Cause The Engine To Start
Automatically While In Autostop Mode:
• The transmission gear selector is moved
from DRIVE to REVERSE or NEUTRAL.
• To maintain cabin temperature comfort.
• HVAC is set to full defrost mode.
• Battery voltage drops too low.• Low brake vacuum (e.g. after several brake
pedal applications).
• STOP/START OFF switch is pushed.
• 4WD system is put into 4LO mode.
• The emissions system requires it.
• A STOP/START system error occurs.
• HVAC system temperature or fan speed is
manually adjusted.
Conditions That Force An Application Of The
Electric Park Brake While In Autostop Mode:
• The driver door is open and brake pedal
released.
• The driver door is open and the driver seat
belt is unbuckled.
• The engine hood has been opened.
• A STOP/START system error occurs.
If the Electric Park Brake is applied with the
engine off, the engine may require a manual
restart and the electric park brake may re-
quire a manual release (depress brake pedal
and push Electric Park Brake switch). Referto “Instrument Cluster Display” in “Getting
To Know Your Instrument Panel” in your Own-
er’s Manual for further information.To Manually Turn Off The Stop/Start
System
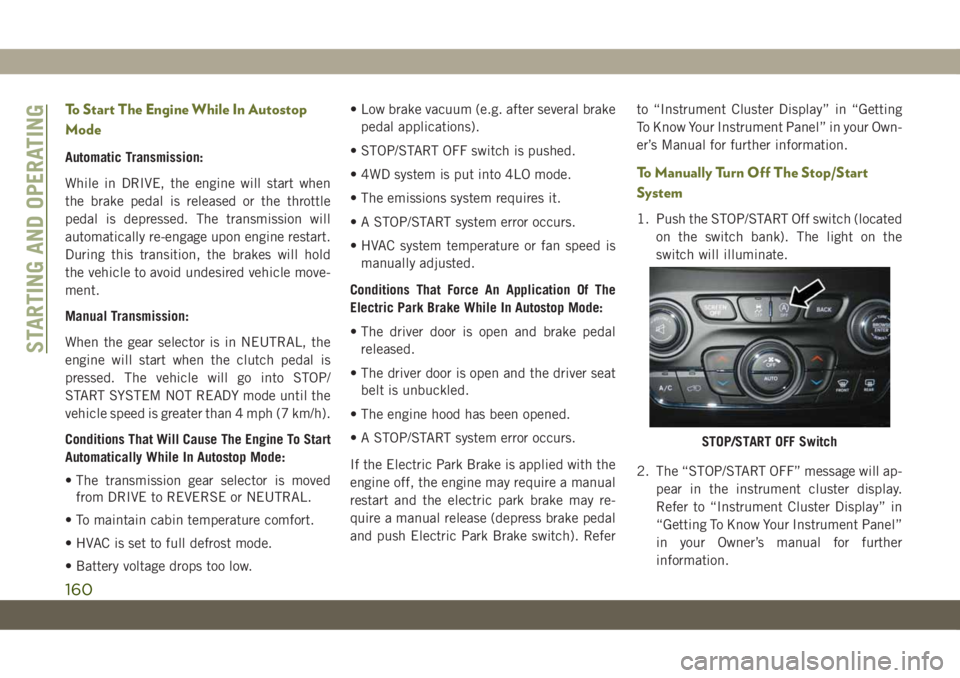
1. Push the STOP/START Off switch (located
on the switch bank). The light on the
switch will illuminate.
2. The “STOP/START OFF” message will ap-
pear in the instrument cluster display.
Refer to “Instrument Cluster Display” in
“Getting To Know Your Instrument Panel”
in your Owner’s manual for further
information.
STOP/START OFF Switch
STARTING AND OPERATING
160
Page 163 of 344
3. At the next vehicle stop (after turning off
the STOP/START system) the engine will
not be stopped.
4. If the STOP/START system is manually
turned off, the engine can only be started
and stopped by cycling the ignition
switch.
5. The STOP/START system will reset itself
back to an ON condition every time the
key is turned off and back on.
To Manually Turn On The Stop/Start
System
Push the STOP/START Off switch (located on
the switch bank). The light on the switch will
turn off.
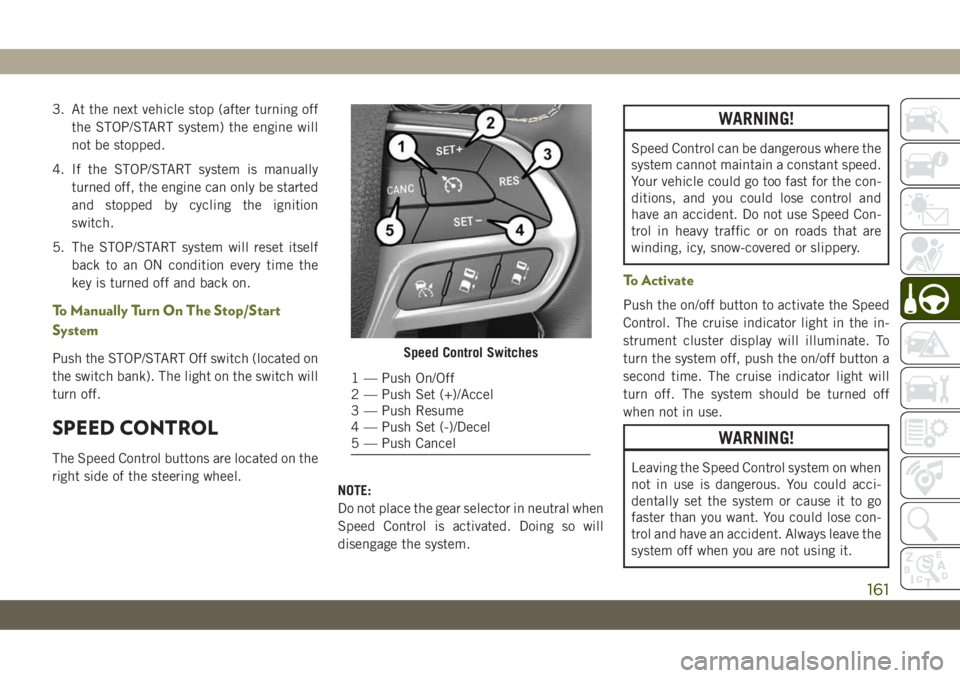
SPEED CONTROL
The Speed Control buttons are located on the
right side of the steering wheel.
NOTE:
Do not place the gear selector in neutral when
Speed Control is activated. Doing so will
disengage the system.
WARNING!
Speed Control can be dangerous where the
system cannot maintain a constant speed.
Your vehicle could go too fast for the con-
ditions, and you could lose control and
have an accident. Do not use Speed Con-
trol in heavy traffic or on roads that are
winding, icy, snow-covered or slippery.
To Activate
Push the on/off button to activate the Speed
Control. The cruise indicator light in the in-
strument cluster display will illuminate. To
turn the system off, push the on/off button a
second time. The cruise indicator light will
turn off. The system should be turned off
when not in use.
WARNING!
Leaving the Speed Control system on when
not in use is dangerous. You could acci-
dentally set the system or cause it to go
faster than you want. You could lose con-
trol and have an accident. Always leave the
system off when you are not using it.
Speed Control Switches
1 — Push On/Off
2 — Push Set (+)/Accel
3 — Push Resume
4 — Push Set (-)/Decel
5 — Push Cancel
161
Page 165 of 344
• If the ACC sensor detects a vehicle ahead,
ACC will apply limited braking or accelera-
tion (not to exceed the original set speed)
automatically to maintain a preset follow-
ing distance, while matching the speed of
the vehicle ahead.
WARNING!
• Adaptive Cruise Control (ACC) is a con-
venience system. It is not a substitute
for active driving involvement. It is al-
ways the driver’s responsibility to be at-
tentive of road, traffic, and weather con-
ditions, vehicle speed, distance to the
vehicle ahead; and, most importantly,
brake operation to ensure safe operation
of the vehicle under all road conditions.
Your complete attention is always re-
quired while driving to maintain safe
control of your vehicle. Failure to follow
these warnings can result in a collision
and death or serious personal injury.
• The ACC system:
• Does not react to pedestrians, on-
coming vehicles, and stationary ob-
WARNING!
jects (e.g., a stopped vehicle in a
traffic jam or a disabled vehicle).
• Cannot take street, traffic, and
weather conditions into account,
and may be limited upon adverse
sight distance conditions.
• Does not always fully recognize
complex driving conditions, which
can result in wrong or missing dis-
tance warnings.
• Will bring the vehicle to a complete
stop while following a target vehicle
and hold the vehicle for approxi-
mately 3 minutes in the stop posi-
tion. If the target vehicle does not
start moving within 3 minutes the
parking brake will be activated, and
the ACC system will be cancelled.
You should switch off the ACC system:
• When driving in fog, heavy rain, heavy
snow, sleet, heavy traffic, and complex
driving situations (i.e., in highway con-
struction zones).
WARNING!
• When entering a turn lane or highway off
ramp; when driving on roads that are
winding, icy, snow-covered, slippery, or
have steep uphill or downhill slopes.
• When towing a trailer up or down steep
slopes.
• When circumstances do not allow safe
driving at a constant speed.
Activating Adaptive Cruise Control (ACC )
Push and release the Adaptive Cruise Control
(ACC) on/off button.
The minimum set speed for the ACC system is
19 mph (30 km/h).
When the system is turned on and in the
ready state, the instrument cluster display
will read “ACC Ready.”
When the system is off, the instrument clus-
ter display will read “Adaptive Cruise Control
(ACC) Off.”
163