instrument panel JEEP CJ 1953 User Guide
[x] Cancel search | Manufacturer: JEEP, Model Year: 1953, Model line: CJ, Model: JEEP CJ 1953Pages: 376, PDF Size: 19.96 MB
Page 320 of 376
STEERING
SYSTEM
FIG.
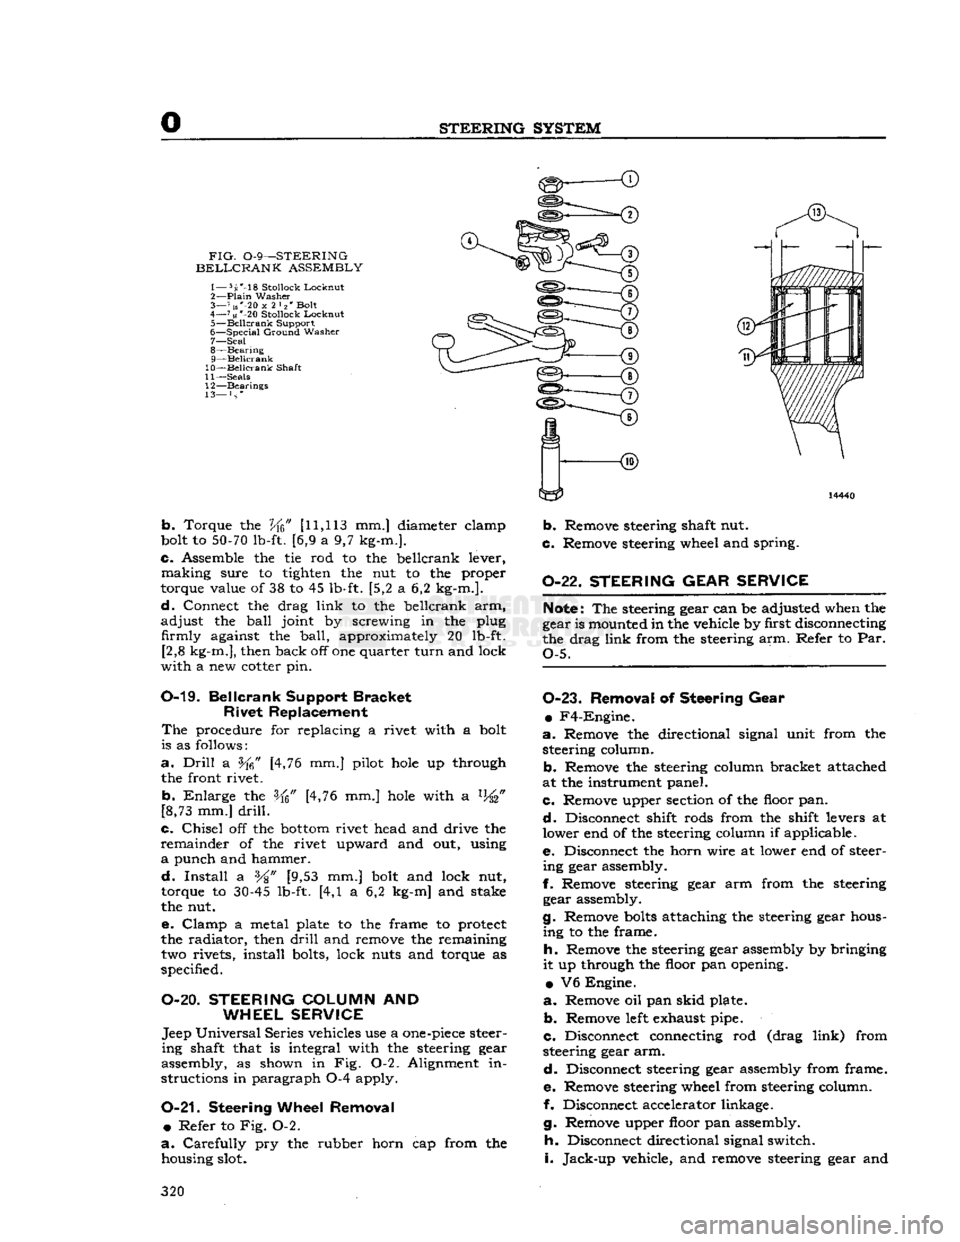
0-9—STEERING
BELLCRANK
ASSEMBLY
1— 5s'-18
Stollock
Lockout
2—
Plain
Washer
3— 7 us"-20
x
2 l2' Bolt
4—
71«
*-20
Stollock
Locknut
5—
Beilcrank
Support
6—
Special
Ground
Washer
7— Seal
8—
Bearing
9— Beilcrank
10— Beilcrank
Shaft
11—
Seals
12—
Bearings
13— } s *
b.
Torque the
Vfc"
[11,113
mm.] diameter elamp
bolt to
50-70
lb-ft. [6,9 a 9,7 kg-m.].
c.
Assemble the tie rod to the beilcrank lever,
making
sure to tighten the nut to the proper
torque value of 38 to 45 lb-ft. [5,2 a 6,2 kg-m.].
d.
Connect the drag
link
to the beilcrank arm,
adjust
the
ball
joint by screwing in the plug firmly against the
ball,
approximately 20 lb-ft. [2,8 kg-m.], then back off one quarter
turn
and lock
with
a new cotter pin.
0-19.
Beilcrank
Support
Bracket
Rivet
Replacement
The
procedure for replacing a rivet with a bolt
is as follows:
a.
Drill
a [4,76 mm.] pilot
hole
up through
the front rivet.
b.
Enlarge
the [4,76 mm.]
hole
with a %"
[8,73 mm.]
drill.
c.
Chisel
off the
bottom
rivet head and drive the
remainder
of the rivet upward and out, using
a
punch and hammer.
d.
Install
a %" [9,53 mm.] bolt and lock nut,
torque to
30-45
lb-ft. [4,1 a 6,2 kg-m] and stake
the nut.
e.
Clamp
a metal plate to the frame to protect
the radiator, then
drill
and remove the remaining two rivets, install bolts, lock nuts and torque as
specified.
O-20.
STEERING
COLUMN
AND
WHEEL SERVICE
Jeep
Universal
Series vehicles use a
one-piece
steer
ing
shaft that is integral with the steering gear
assembly, as shown in Fig. 0-2. Alignment in
structions in paragraph 0-4 apply.
0-21.
Steering
Wheel Removal •
Refer to Fig. 0-2.
a.
Carefully
pry the rubber horn cap from the housing slot.
b.
Remove steering shaft nut.
c.
Remove steering wheel and spring.
0-22.
STEERING GEAR SERVICE
Note:
The steering gear can be adjusted when the
gear is mounted in the vehicle by first disconnecting
the drag
link
from the steering arm. Refer to Par.
Q-5.
0-23.
Removal
of
Steering Gear
•
F4-Engine.
a.
Remove the directional signal unit from the steering column.
b.
Remove the steering column bracket attached
at the instrument panel.
c.
Remove upper section of the floor pan.
d.
Disconnect shift rods from the shift levers at
lower end of the steering column if applicable.
e.
Disconnect the horn wire at lower end of steer
ing
gear assembly.
f.
Remove steering gear arm from the steering gear assembly.
g.
Remove
bolts
attaching the steering gear hous
ing
to the frame.
h.
Remove the steering gear assembly by bringing
it
up through the floor pan opening.
•
V6 Engine.
a.
Remove oil pan
skid
plate.
b.
Remove
left
exhaust pipe.
c.
Disconnect connecting rod (drag
link)
from
steering gear arm.
d.
Disconnect steering gear assembly from frame.
e.
Remove steering wheel from steering column.
f. Disconnect accelerator linkage.
g.
Remove upper floor pan assembly.
h.
Disconnect directional signal switch.
i.
Jack-up
vehicle, and remove steering gear and
320
Page 324 of 376
p
BRAKES
13264
FIG- P-2—DOUBLE
SAFETY BRAKE
MASTER
CYLINDER
With
the Double-Safety brake system type master
cylinder,
failure
in one part of the brake system
does
not result in
failure
of the entire hydraulic
brake system. Failure in the
front
brake system
will
leave the rear brake system
still
operative or
failure
in
the rear system
will
leave the
front
brake system
operative.
A
double hydraulic
cylinder
with
two outlets, two
residual
check valves, two
fluid
reservoirs, and
two
hydraulic pistons (a
primary
and secondary)
are operated in tandem by a single hydraulic push
rod.
The
primary
outlet is connected to the
front
brakes
with
the secondary outlet connected to the rear brakes.
With
the master
cylinder
fluid
reservoirs
filled
and the
front
and rear brake system
bled,
there is a
solid
column
of
fluid
on the
forward
side of both the
primary
and the secondary pistons.
Upon
application
of the brakes, through movement
of
the brake pedal,
fluid
is displaced by the pistons
into
the wheel cylinders to activate both
front
and
rear brakes.
Upon
release
of the brakes,
fluid
re
turns
from
the rear wheel cylinders through the secondary residual check valve to the secondary
portion
of the master
cylinder
bore.
Fluid
also
returns
from
the
front
wheel cylinders through the
primary
residual check valve to the
primary
portion
of the master
cylinder
bore.
P-3.
Parking
Brakes
— DJ-5, DJ-6
a.
The parking brake is operated by a T-handle
lever
mounted to the
left
of the steering
column
and
suspended
from
the instrument panel. When
the brake lever is
pulled
outward, tension is exerted
on
the parking brake cable leading to the brake.
The
amount of brake
grip
depends
on the number
of
notches the lever is
pulled
out. To set the park
ing
brake,
pull
out on the parking brake
control
T-handle.
To
release
the brake,
turn
the handle
slightly
and push it
forward.
0
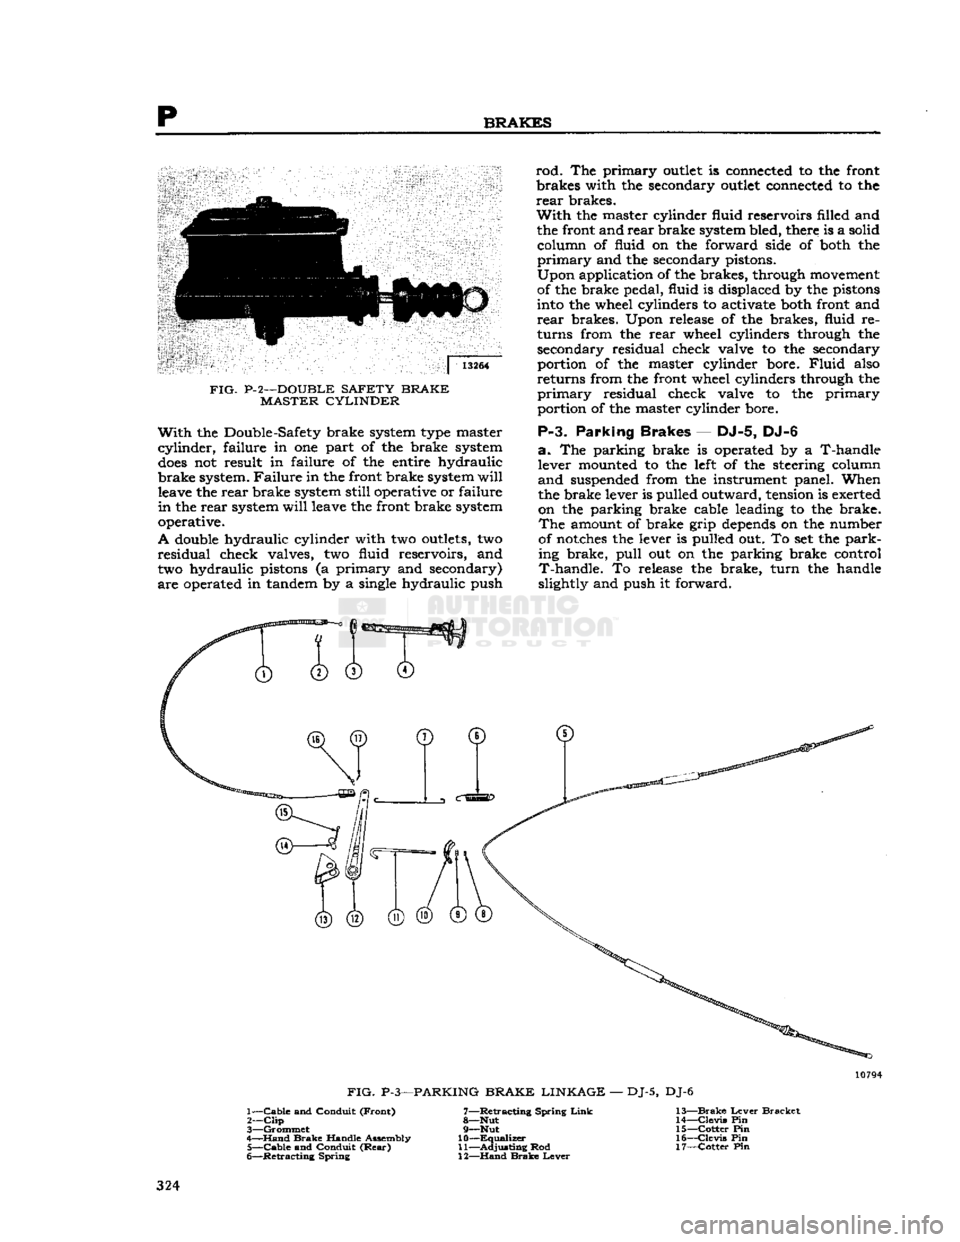
FIG.
P-3—PARKING
BRAKE LINKAGE
—
DJ-5,
DJ-6
1—
Cable
and
Conduit
(Front)
7—Retracting
Spring
Link
13—Brake
Lever
Bracket
2—
Clip
8—Nut
14—Clevis
Pin
3—
Grommet
9—Nut
15—Cotter
Pin
4—
Hand
Brake
Handle
Assembly
10—Equalizer
16—Clevis
Pin
5—
Cable
and
Conduit
(Rear)
11—Adjusting
Rod
17—Cotter
Pin
6—
Retracting
Spring
12—Hand
Brake
Lever
324
Page 327 of 376
'Jeep'
UNIVERSAL
SERIES SERVICE
MANUAL
P
lengthening of the brake master cylinder eye bolt.
This
is
done
so the primary cup
will
clear the by
pass port when the piston is in the off position,
otherwise the compensating action of the master
cylinder
for expansion and contraction of the fluid
in
the system, due to temperature changes,
will
be destroyed and cause the brakes to drag.
Note:
Some older 'Jeep' vehicles may
develop
side
movement
of the clutch and brake pedals resulting
from wear of the pedals, shafts, and bushings. One
way to
compensate
for this wear is to install a pedal
slack
adjuster kit,
Part
No.
921936.
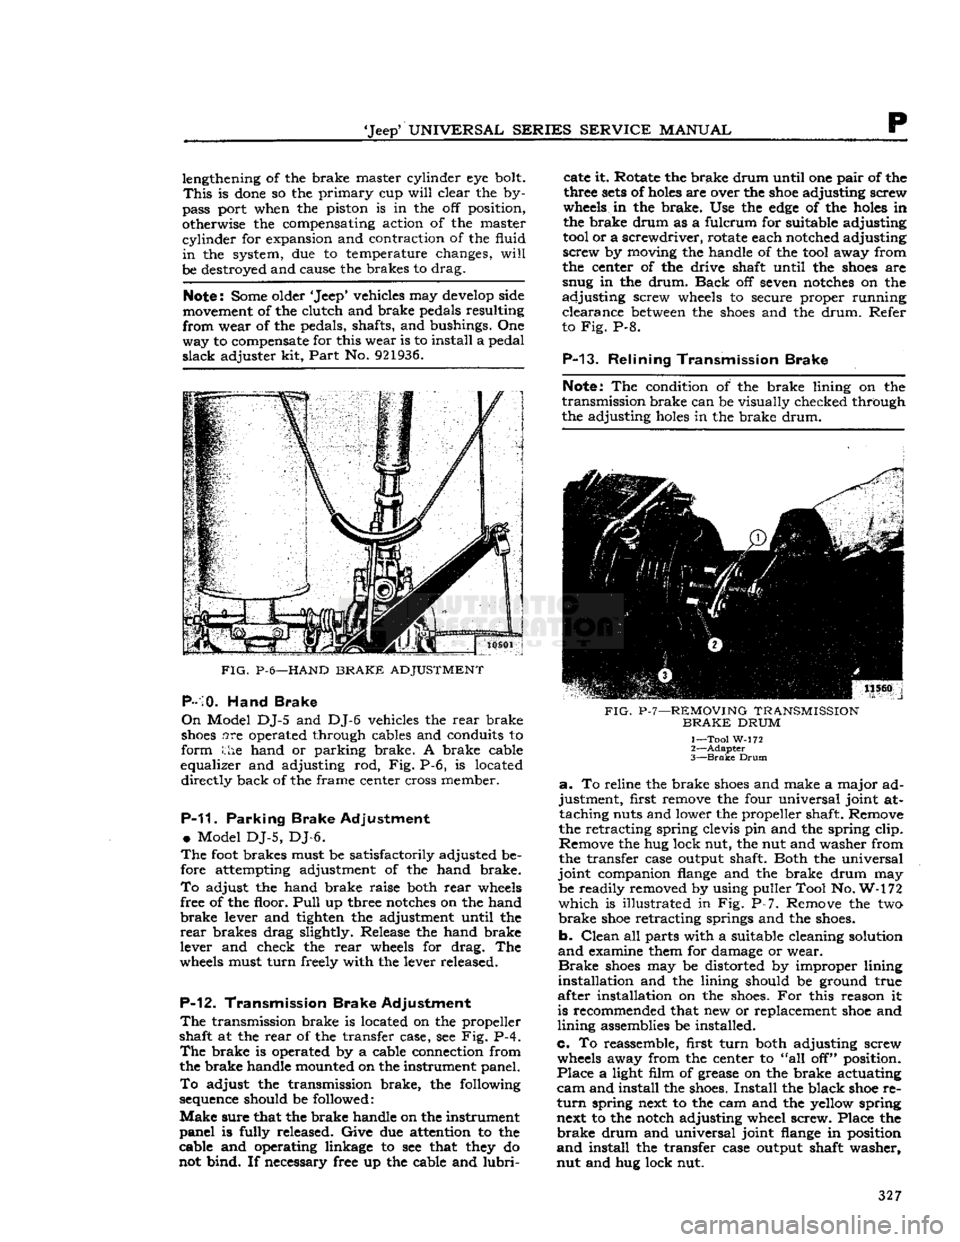
FIG.
P-6—HAND
BRAKE
ADJUSTMENT
P-10.
Hand Brake
On
Model DJ-5 and DJ-6 vehicles the rear brake
shoes
are operated through cables and conduits to
form the hand or parking brake. A brake cable
equalizer and adjusting rod, Fig. P-6, is located directly back of the frame center cross member.
P-11.
Parking Brake Adjustment
•
Model DJ-5, DJ-6.
The
foot
brakes must be satisfactorily adjusted be
fore attempting adjustment of the hand brake.
To
adjust the hand brake raise both rear
wheels
free of the floor.
Pull
up three
notches
on the hand
brake
lever and tighten the adjustment until the
rear
brakes drag slightly. Release the hand brake
lever and check the rear
wheels
for drag. The
wheels
must turn freely with the lever released.
P-12.
Transmission Brake Adjustment
The
transmission brake is located on the propeller
shaft at the rear of the transfer case, see Fig. P-4.
The
brake is operated by a cable connection from
the brake handle mounted on the instrument panel.
To
adjust the transmission brake, the following
sequence
should be followed:
Make
sure that the brake handle on the instrument
panel is fully released. Give due attention to the
cable and operating linkage to see that
they
do
not bind. If necessary free up the cable and
lubri
cate it. Rotate the brake drum until one pair of the
three
sets
of
holes
are over the
shoe
adjusting screw
wheels
in the brake. Use the
edge
of the
holes
in
the brake drum as a fulcrum for suitable adjusting
tool
or a screwdriver, rotate each notched adjusting
screw by moving the handle of the
tool
away from
the center of the drive shaft until the
shoes
are
snug in the drum.
Back
off seven
notches
on the
adjusting screw
wheels
to secure proper running clearance
between
the
shoes
and the drum. Refer
to Fig. P-8.
P-13.
Relining Transmission Brake
Note:
The condition of the brake lining on the
transmission brake can be visually checked through
the adjusting
holes
in the brake drum.
FIG.
P-7—REMOVING
TRANSMISSION
BRAKE
DRUM
1— Tool W-172
2—
Adapter
3—
Brake
Drum
a.
To reline the brake
shoes
and make a major ad
justment, first remove the four universal joint at taching nuts and lower the propeller shaft. Remove
the retracting spring clevis pin and the spring clip.
Remove the hug lock nut, the nut and washer from
the transfer case output shaft. Both the universal
joint companion
flange
and the brake drum may be readily removed by using puller Tool No. W-172
which
is illustrated in Fig. P-7. Remove the two
brake
shoe
retracting springs and the
shoes.
b. Clean all parts with a suitable cleaning solution
and
examine them for damage or wear.
Brake
shoes
may be distorted by improper lining
installation and the lining should be ground true
after installation on the
shoes.
For this reason it
is recommended that new or replacement
shoe
and
lining assemblies be installed.
c. To reassemble, first turn both adjusting screw
wheels
away from the center to "all off" position.
Place a light film of grease on the brake actuating
cam
and install the
shoes.
Install the black
shoe
re
turn
spring next to the cam and the yellow spring next to the notch adjusting wheel screw. Place the
brake
drum and universal joint
flange
in position
and
install the transfer case output shaft washer,
nut and hug lock nut. 327
Page 328 of 376
p
BRAKES
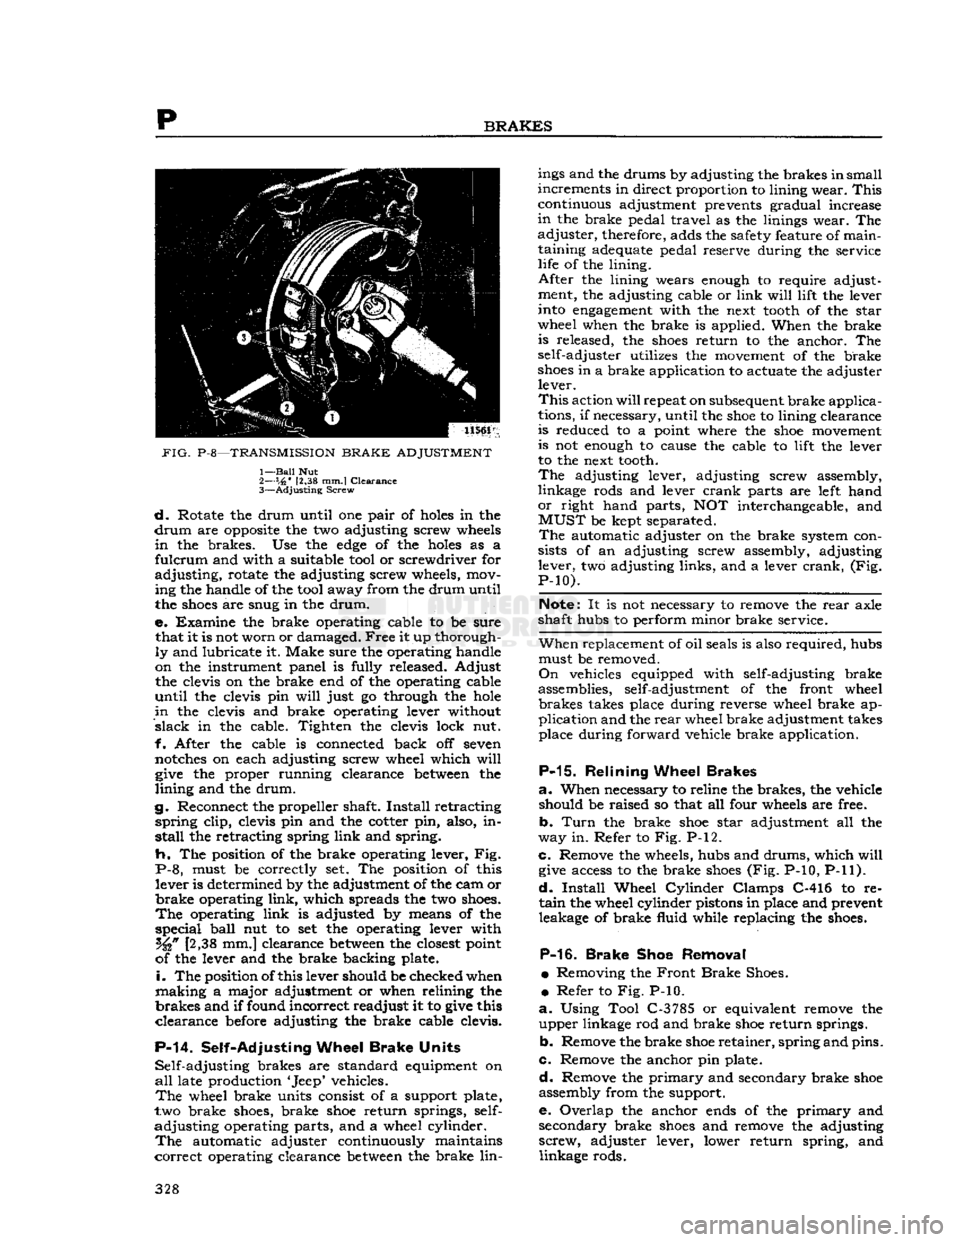
PIG.
P-8—TRANSMISSION
BRAKE
ADJUSTMENT
1—
Bail
Nut
2— s,6"
12,38 mm.I
Clearance
3—
Adjusting
Screw
d.
Rotate the
drum
until
one pair of holes in the
drum
are opposite the two adjusting screw wheels
in
the brakes. Use the
edge
of the holes as a
fulcrum
and
with
a suitable
tool
or screwdriver for
adjusting,
rotate the adjusting screw wheels,
mov
ing
the handle of the
tool
away
from
the
drum
until
the
shoes
are snug in the
drum.
e.
Examine the brake operating cable to be
sure
that
it is not
worn
or damaged. Free it up thorough
ly
and lubricate
it.
Make
sure
the operating handle
on
the instrument panel is
fully
released.
Adjust
the clevis on the brake end of the operating cable
until
the clevis pin
will
just go through the hole
in
the clevis and brake operating lever
without
slack
in the cable.
Tighten
the clevis
lock
nut.
f.
After
the cable is connected back off seven
notches on each adjusting screw wheel
which
will
give
the proper
running
clearance between the
lining
and the
drum.
g.
Reconnect the propeller shaft.
Install
retracting
spring
clip,
clevis pin and the cotter pin, also, in
stall
the retracting spring
link
and spring.
h. The
position
of the brake operating lever, Fig.
P-8, must be correctly set. The
position
of this
lever
is determined by the adjustment of the cam or
brake operating
link,
which
spreads
the two
shoes.
The
operating
link
is adjusted by
means
of the
special
ball
nut to set the operating lever
with
[2,38
mm.] clearance between the closest
point
of
the lever and the brake backing plate.
i.
The
position
of
this
lever should be checked when
making
a major adjustment or when
relining
the
brakes and
if
found
incorrect readjust it to give this
clearance before adjusting the brake cable
clevis.
P-14.
Self-Adjusting
Wheel
Brake
Units
Self-adjusting
brakes are standard equipment on
all
late production
'Jeep'
vehicles.
The
wheel brake units consist of a support plate,
two
brake
shoes,
brake
shoe
return springs, self-
adjusting
operating parts, and a wheel
cylinder.
The
automatic adjuster continuously maintains
correct
operating clearance between the brake
lin
ings
and the drums by adjusting the brakes
in
small
increments in direct
proportion
to
lining
wear. This
continuous
adjustment prevents gradual increase
in
the brake pedal
travel
as the
linings
wear. The
adjuster, therefore,
adds
the safety feature of
main
taining
adequate
pedal reserve
during
the service
life
of the
lining.
After
the
lining
wears enough to require adjustment, the adjusting cable or
link
will lift
the lever
into
engagement
with
the next
tooth
of the
star
wheel
when the brake is applied. When the brake
is
released, the
shoes
return to the anchor. The
self-adjuster
utilizes
the movement of the brake
shoes
in a brake application to
actuate
the adjuster
lever.
This
action
will
repeat
on
subsequent
brake applica
tions,
if
necessary,
until
the
shoe
to
lining
clearance
is
reduced to a
point
where the
shoe
movement
is
not enough to
cause
the cable to
lift
the lever
to
the next
tooth.
The
adjusting lever, adjusting screw assembly,
linkage
rods and lever crank parts are
left
hand
or
right
hand parts, NOT interchangeable, and
MUST
be kept
separated.
The
automatic adjuster on the brake system con
sists
of an adjusting screw assembly, adjusting
lever,
two adjusting
links,
and a lever crank, (Fig.
P-10).
Note:
It is not
necessary
to remove the rear axle
shaft hubs to
perform
minor
brake service.
When
replacement of
oil
seals
is also required, hubs must be removed.
On
vehicles equipped
with
self-adjusting brake
assemblies, self-adjustment of the
front
wheel brakes
takes
place
during
reverse wheel brake ap
plication
and the rear wheel brake adjustment
takes
place
during
forward
vehicle brake application.
P-15.
Relining
Wheel
Brakes
a.
When
necessary
to reline the brakes, the vehicle
should
be raised so that all
four
wheels are free.
b.
Turn
the brake
shoe
star
adjustment all the
way
in. Refer to Fig. P-12.
c.
Remove the wheels, hubs and drums,
which
will
give
access
to the brake
shoes
(Fig.
P-10, P-11).
d.
Install
Wheel
Cylinder
Clamps C-416 to re
tain
the wheel
cylinder
pistons in place and prevent leakage of brake
fluid
while
replacing the
shoes.
P-16.
Brake
Shoe
Removal
•
Removing the Front Brake
Shoes.
•
Refer to Fig. P-10.
a.
Using
Tool
C-3785
or equivalent remove the
upper linkage rod and brake
shoe
return springs.
b.
Remove the brake
shoe
retainer, spring and pins.
c. Remove the anchor pin plate.
d.
Remove the
primary
and secondary brake
shoe
assembly
from
the support.
e.
Overlap the anchor
ends
of the
primary
and
secondary brake
shoes
and remove the adjusting
screw, adjuster lever,
lower
return spring, and
linkage
rods. 328
Page 351 of 376
'Jeep'
UNIVERSAL
SERIES
SERVICE
MANUAL
T
BODY
Contents
SUBJECT
PAR.
Brake
and
Clutch
Pedal Pads T-7
Canvas
Tops T-5
Care
of
Fabric
Tops. : T-6
Front
Seat Adjustment. . . T-8
Passenger Seat Safety
Catch
. .T-9
Windshield
T-2, T-3
Windshield
Glass and Weatherstrip T-4
T-1.
GENERAL
The
body
is of
all
steel construction with mountings
that provide a secure attachment to the frame.
All
major panels are of No. 18
gauge
steel. All
open
edges
of the panels are turned under, reinforced
and
flanged to provide strength. These panels are reinforced with
"U"
sections
and welded. All com
ponent
panels are seamed and welded
together.
The
body
is insulated from the frame with insulator shims placed
between
the
body
and frame and
held in position by the
body
bolts.
The
instruments and controls, mounted on the
instrument panel are within clear view and easy
to reach.
Note:
A new floor pan cover plate has
been
released on late CJ-5 and CJ-6 models, that is
identified by a stamped oval-shaped bubble or
relief, located to the right of the accelerator treadle.
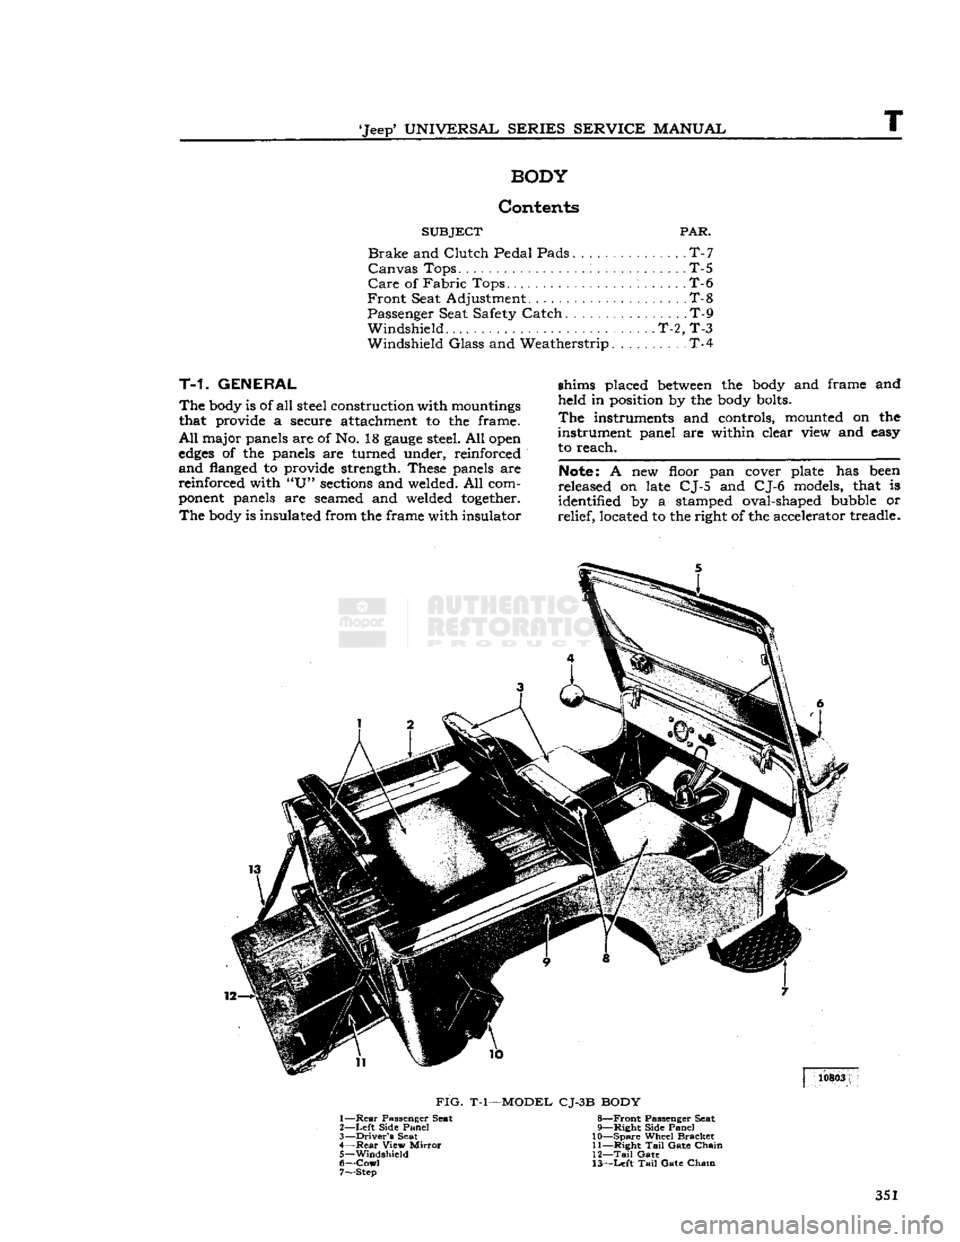
FIG.
T-l—MODEL CJ-3B BODY
1—
Rear
Passenger Seat 8—Front Passenger Seat
2—
Left
Side
Panel
9—Right Side
Panel
3—
Driver's
Seat 10—Spare Wheel
Bracket
4—
Rear
View
Mirror
11—Right
Tail
Gate
Chain
5—
Windshield
12—Tail
Gate
6—
Cowl
13—Left
Tail
Gate
Chain
7— Step
351
Page 352 of 376
BODY
10728
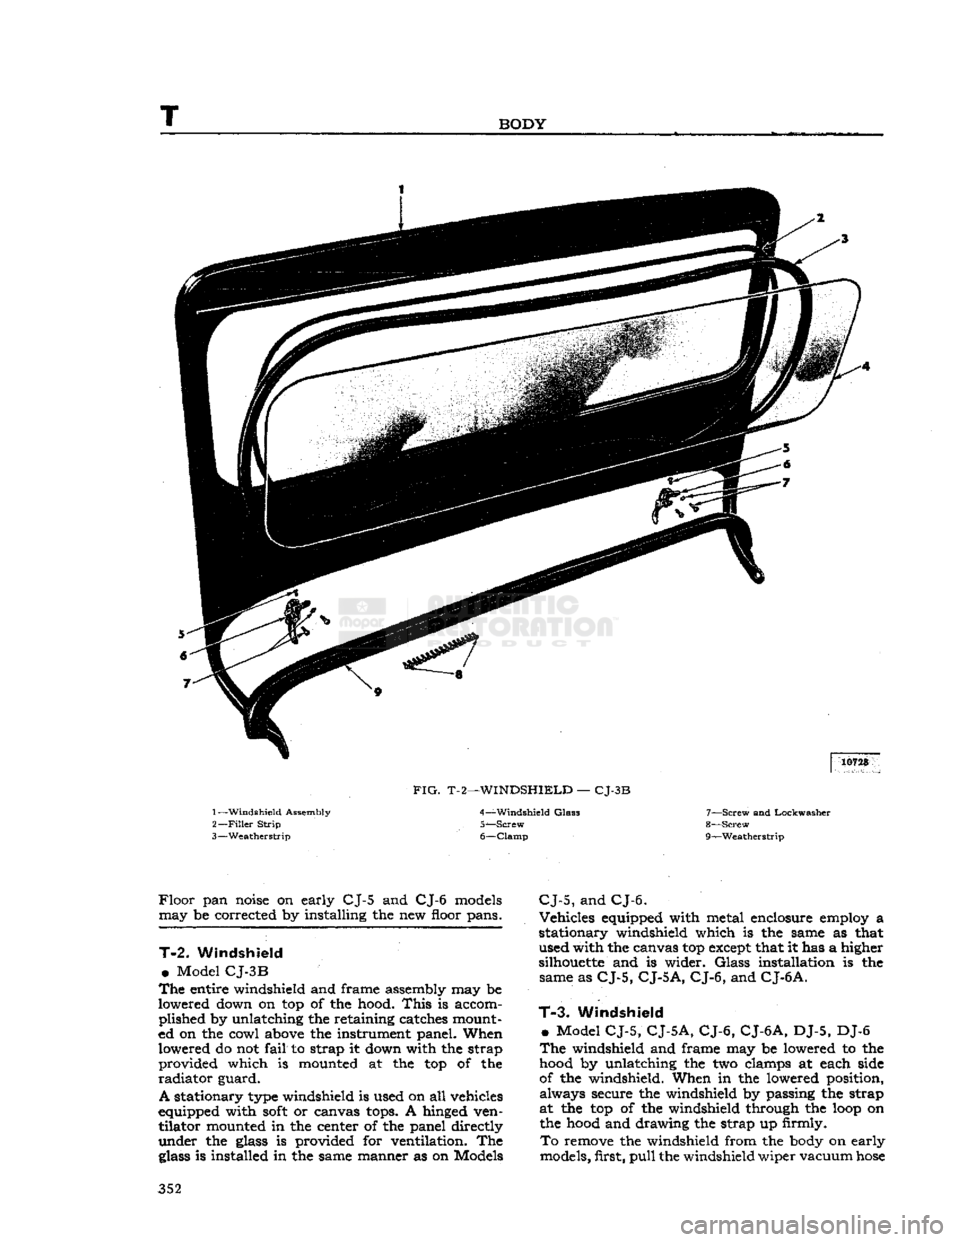
FIG.
T-2—WINDSHIELD
—
CJ-3B
1—
Windshield
Assembly
2—
Filler
Strip
3—
Weatherstrip 4—
Windshield
Glas3
5—
Screw
6—
Clamp
7—
Screw
and Lockwasher
8—
Screw
r
9— —Weatherstrip
Floor
pan
noise
on early CJ-5 and CJ-6
models
may be corrected by installing the new floor pans.
T-2.
Windshield
•
Model
CJ-3B
The
entire windshield and frame assembly may be
lowered down on top of the hood.
This
is accom plished by unlatching the retaining catches mount
ed on the cowl
above
the instrument panel. When lowered do not
fail
to strap it down with the strap provided which is mounted at the top of the
radiator
guard.
A
stationary
type
windshield is used on all vehicles
equipped with
soft
or canvas
tops.
A hinged ven tilator mounted in the center of the panel directly
under the
glass
is provided for ventilation. The
glass
is installed in the same manner as on Models
CJ-5,
and
CJ-6.
Vehicles equipped with metal enclosure employ a
stationary windshield which is the same as that used with the canvas top
except
that it has a higher
silhouette
and is wider.
Glass
installation is the same as
CJ-5,
CJ-5
A, CJ-6,
and
CJ-6
A.
T-3.
Windshield
»
Model
CJ-5, CJ-5A, CJ-6, CJ-6A,
DJ-5, DJ-6
The
windshield and frame may be lowered to the
hood
by unlatching the two clamps at each side
of the windshield. When in the lowered position, always secure the windshield by passing the strap
at the top of the windshield through the
loop
on the
hood
and drawing the strap up firmly.
To
remove the windshield from the
body
on early
models, first,
pull
the windshield wiper vacuum
hose
352
Page 357 of 376
'Jeep'
UNIVERSAL SERIES SERVICE
MANUAL
u
MISCEIiLaNEOUS
Contents
SUBJECT
PAR.
Abbreviations
U-15
Extra
Equipment U-2
Front
Bumper Weight U-9
Governor
U-3
Governor
Adjustment U-4
Governor
Maintenance. U-6
U-1. GENERAL
Miscellaneous information included in this sectioi
includes coverage of extra equipment, special
tools,
torque specifications, and charts and tables.
U-2. EXTRA
EQUIPMENT
Much
of the utility of the
*
Jeep*
Universal
is due to
the extra equipment which has been designed to adapt it for farming and industry. The mainte
nance and use of
some
of this equipment is out
lined
in this section.
U-3.
Governor Assembly
The
Novi governor is supplied for models equipped
with
the F4 engine.
This
is a centrifugal type governor and is illustrated in Fig. U-2. Complete
installation
instructions are supplied with each
assembly. Adjustment and operating procedures
are
given below.
U-4.
Governor Adjustment
a.
Adjust the carburetor to obtain smooth
engine
idle at 600 rpm., then
stop
the engine.
b.
Check
throttle linkage to ensure maximum
throttle opening. Be certain that throttle and
governor linkage is free.
c.
Place the carburetor throttle in wide-open posi tion and
pull
the governor control handle out to
the last notch. Adjust the governor to bellcrank
rod
so that the linkage
will
hold the carburetor
throttle in wide-open position.
d.
Close the governor control and start the
engine
Again
pull
the control out to the last notch and
adjust
the length of the cable at adjusting yoke so
that the
engine
will
run at
2600
rpm. Close the
control
to recheck the linkage for free action and
to make sure the
engine
will
return to 600 rpm.
idle speed.
If
the
engine
runs faster than this speed,
loosen
the lock nut which locks the governor hand control
handle on the dash to the rod and back off the
handle until the carburetor idle speed adjusting
screw
bears on the stop. Tighten the lock nut.
In
the absence of electrical tachometer equipment,
engine
speed may be determined by the speedom
eter. Safely
jack
up the
rear
wheels and be sure the front wheel drive is not
engaged.
When driving
the
rear
wheels in high or direct transmission gear,
the
speedometer
will
read from 13j^ to 15 mph. [21.6 to 24.0 kph.] at an
engine
speed of from 900
to 1000 rpm.
SUBJECT
PAR.
Heater
U-10 Miscellaneous Data U-16
Pintle
Hook 1X7
Special
Tools. U-ll
Torque
Specifications U-13, 14, 15
Standard
and Recommended Tools
j.
.U-12
U-5.
Novi Governor Operation /
The
Novi governor is directly belted to the F4
engine
as no clutch is provided to disconnect the
drive.
To
operate the vehicle
WITHOUT
governor con
trol,
push the governor hand control all the way
IN
against the instrument panel.
To
operate the vehicle
WITH
governor control,
pull
the governor hand control handle out. The
hand
control has nine notched positions. Pulling the
control
out to the first notch
sets
the controlled
engine
speed at approximately 1000 rpm. and each successive notch increases the speed 200 rpm.
until
2600
rpm. is reached in the ninth notch. The
hand
control may be released by turning the han dle one-quarter
turn
in either direction.
When
the
engine
is being operated under governor
control
(hand control out) the controlled
engine
speed may be
exceeded
at any time by depressing
the
foot
accelerator in the conventional manner to
secure a greater carburetor throttle opening than
that determined by the governor hand control
setting.
U-6.
Governor Maintenance
The
belt tension may be adjusted by raising or
lowering the governor in the slotted
holes
in the mounting bracket. Keep the pulleys and belt free
of
dirt
and oil. Belt slippage
will
affect governor
operation and a tight belt may cause
rapid
wear
of the governor shaft and bearings. Adjust it to
allow Yi' [12,7 mm.] depression midway
between
the pulleys with thumb pressure.
There
is little wear of the internal parts for they
operate in oil. The governor housings are equipped
with
both
fill
and
drain
plugs and also with level
indicating
plugs.
Check
the oil level at each vehicle
lubrication
and change the oil each time the en
gine
oil is changed using the same grade oil used
in
the engine.
Caution:
Do not
fill
the governor housing above
the level plug. Overfilling
will
prevent governor
control
and possibly cause damage to governor in
ternal
parts. The capacity of
these
governors is two fluid ounces [59,15 cm3]. The filler plug is
also a vent which should be cleaned thoroughly at
each oil change to be sure that the vent operates.
U-7.
Pintle Hook
The
standard type pintle hook, Fig. U-1, affords a
safe, easy hitch for towing a
trailer
or other vehicle. 357
Page 359 of 376
'Jeep*
UNIVERSAL
SERIES
SERVICE
MANUAL
U
U-10. FRESH AIR HEATER AND
DEFROSTER
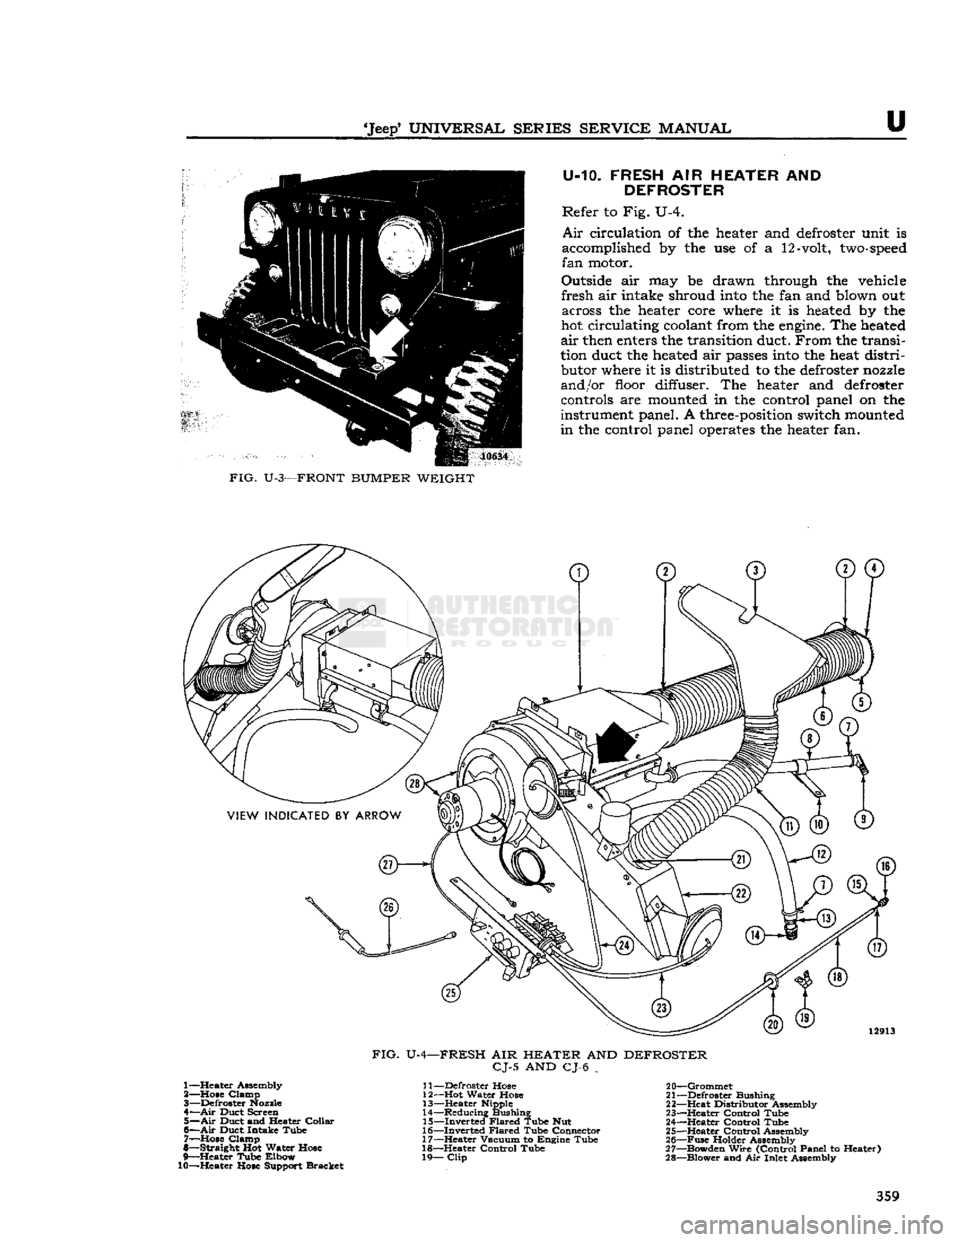
Refer to Fig. U-4.
Air
circulation of the
heater
and
defroster
unit
is
accomplished
by the use of a
12-volt,
two-speed
fan
motor.
Outside
air may be drawn
through
the
vehicle
fresh air
intake
shroud
into
the fan and
blown
out
across
the
heater
core
where
it is
heated
by the
hot circulating
coolant
from the
engine.
The
heated
air
then
enters
the transition
duct.
From the transi
tion
duct
the
heated
air
passes
into
the
heat
distri
butor
where
it is
distributed
to the
defroster
nozzle
and/or
floor
diffuser.
The
heater
and
defroster
controls
are
mounted
in the
control
panel
on the
instrument
panel. A
three-position
switch
mounted
in the
control
panel
operates
the
heater
fan.
FIG.
U-3—FRONT
BUMPER
WEIGHT
FIG.
U-4-
-FRESH
AIR
HEATER
AND
DEFROSTER
CJ-5
AND CJ-6 _ 1— Heater Assembly
2— Hose Clamp
3— Defroster
Nozzle
4—
Air
Duct Screen 5—
Air
Duct and Heater Collar
6—
Air
Duct Intake Tube 7— Hose Clamp
8— Straight Hot Water Hose
9— Heater Tube Elbow
10—Heater Hose Support Bracket
I
j—Defroster Hose
12— Hot Water Hose
13— Heater Nipple
14— Reducing Bushing
15— Inverted Flared Tube Nut
16— Inverted Flared Tube Connector
17— Heater Vacuum to Engine Tube
18— Heater Control Tube
19—
Clip
20— Grommet
21— Defroster Bushing
22— Heat Distributor Assembly
23— Heater Control Tube
24— Heater Control Tube
25— Heater Control Assembly
26—
Fuse
Holder Assembly
27— Bowden Wire (Control Panel to Heater)
28— Blower and Air Inlet Assembly 359