tow JEEP CJ 1953 Workshop Manual
[x] Cancel search | Manufacturer: JEEP, Model Year: 1953, Model line: CJ, Model: JEEP CJ 1953Pages: 376, PDF Size: 19.96 MB
Page 333 of 376

'Jeep'
UNIVERSAL
SERIES SERVICE
MANUAL
P h.
Install
the tube seats, flat side toward the check
valve,
and press in with tube nuts or the master
cylinder
brake pipe tube nuts.
BLEEDING
a.
Before the master cylinder is installed on the
car,
the unit must be bled.
b.
Support the cylinder assembly in a vise and
fill
both fluid reservoirs with approved brake fluid,
e.
Loosely install a plug in each
outlet
of the
cylinder.
Depress the push rod several times until
air
bubbles cease to appear in the brake fluid.
d.
Tighten the plugs and attempt to depress the piston. The piston travel should be restricted after
all
air is expelled.
e.
Install
the master cylinder on the car and bleed
the hydraulic lines at the wheel cylinder. Refer to
Par.
P-7.
P-21.
Wheel
Cylinder
Reconditioning
•
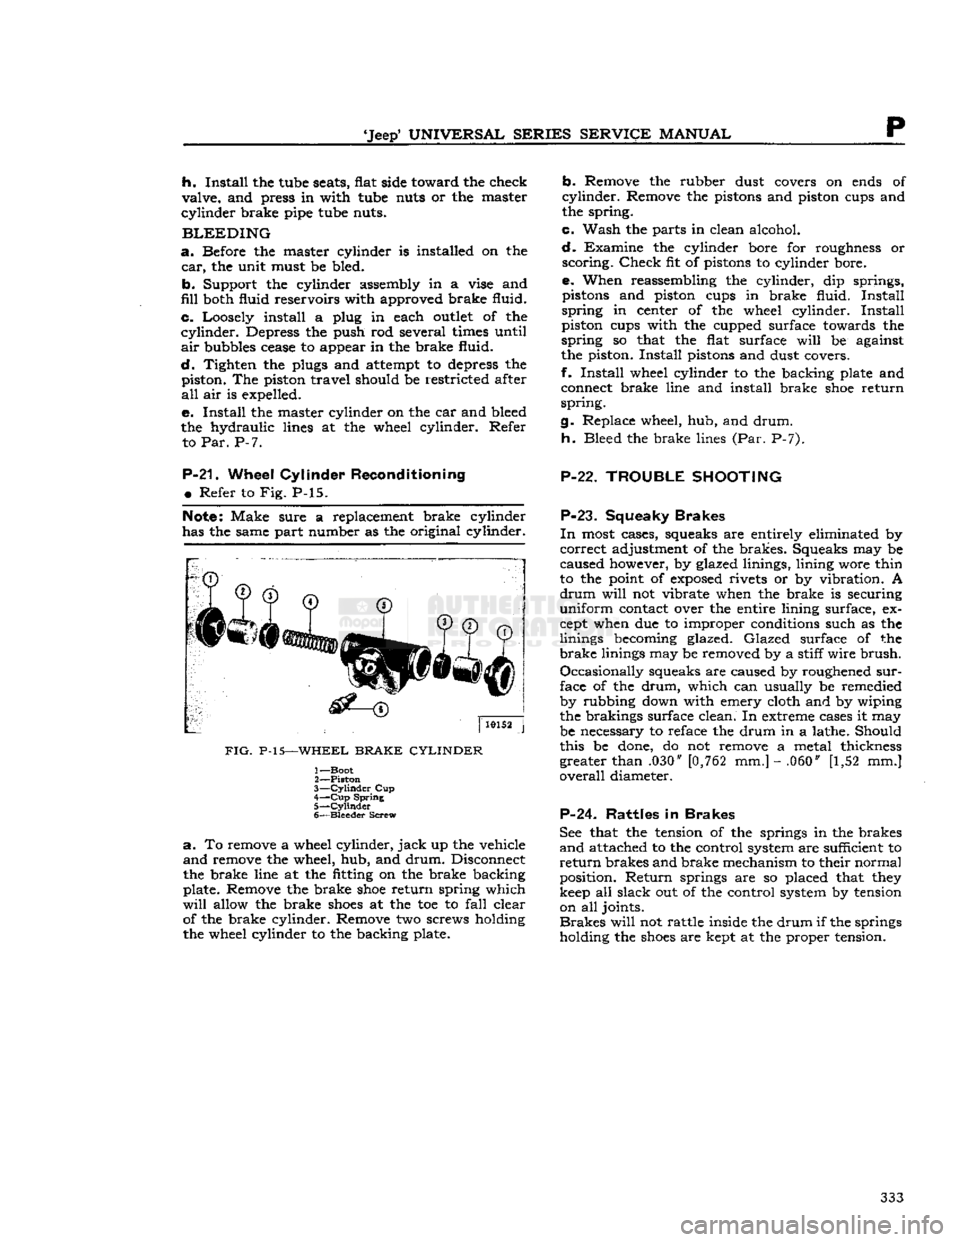
Refer to Fig. P-15.
Note:
Make sure a replacement brake cylinder
has the same part number as the original cylinder.
FIG.
P-15—WHEEL
BRAKE CYLINDER
1— Boot
2—
Piston
3—
Cylinder
Cup
4—
Cup
Spring
5—
Cylinder
6—
Bleeder
Screw
a.
To remove a wheel cylinder,
jack
up the vehicle
and
remove the wheel, hub, and
drum.
Disconnect
the brake line at the fitting on the brake backing
plate. Remove the brake
shoe
return spring which
will
allow the brake
shoes
at the toe to
fall
clear of the brake cylinder. Remove two screws holding
the wheel cylinder to the backing plate.
b.
Remove the rubber dust covers on ends of
cylinder.
Remove the pistons and piston cups and
the spring.
c.
Wash the parts in clean alcohol.
d.
Examine the cylinder bore for roughness or
scoring.
Check
fit of pistons to cylinder bore.
e. When reassembling the cylinder, dip springs, pistons and piston cups in brake fluid.
Install
spring
in center of the wheel cylinder.
Install
piston cups with the cupped surface towards the
spring
so that the flat surface
will
be against
the piston.
Install
pistons and dust covers.
f.
Install
wheel cylinder to the backing plate and connect brake line and install brake
shoe
return
spring.
g. Replace wheel, hub, and
drum.
h.
Bleed the brake lines (Par. P-7).
P-22. TROUBLE
SHOOTING
P-23.
Squeaky
Brakes
In
most cases, squeaks are entirely eliminated by
correct
adjustment of the brakes. Squeaks may be
caused however, by glazed linings, lining wore thin
to the point of
exposed
rivets or by vibration. A
drum
will
not vibrate when the brake is securing
uniform
contact over the entire lining surface, ex
cept when due to improper conditions such as the
linings becoming glazed.
Glazed
surface of the
brake
linings may be removed by a stiff
wire
brush.
Occasionally
squeaks are caused by roughened
sur
face of the
drum,
which can usually be remedied
by rubbing down with emery cloth and by wiping
the brakings surface clean. In extreme cases it may
be necessary to reface the drum in a lathe. Should
this be done, do not remove a metal thickness greater than .030" [0,762 mm.] - .060" [1,52 mm.]
overall
diameter.
P-24. Rattles
in
Brakes
See that the tension of the springs in the brakes
and
attached to the control system are sufficient to
return
brakes and brake mechanism to their normal
position.
Return
springs are so placed that they
keep all slack out of the control system by tension on all joints.
Brakes
will
not rattle inside the
drum
if the springs
holding the
shoes
are kept at the proper tension. 333
Page 357 of 376

'Jeep'
UNIVERSAL SERIES SERVICE
MANUAL
u
MISCEIiLaNEOUS
Contents
SUBJECT
PAR.
Abbreviations
U-15
Extra
Equipment U-2
Front
Bumper Weight U-9
Governor
U-3
Governor
Adjustment U-4
Governor
Maintenance. U-6
U-1. GENERAL
Miscellaneous information included in this sectioi
includes coverage of extra equipment, special
tools,
torque specifications, and charts and tables.
U-2. EXTRA
EQUIPMENT
Much
of the utility of the
*
Jeep*
Universal
is due to
the extra equipment which has been designed to adapt it for farming and industry. The mainte
nance and use of
some
of this equipment is out
lined
in this section.
U-3.
Governor Assembly
The
Novi governor is supplied for models equipped
with
the F4 engine.
This
is a centrifugal type governor and is illustrated in Fig. U-2. Complete
installation
instructions are supplied with each
assembly. Adjustment and operating procedures
are
given below.
U-4.
Governor Adjustment
a.
Adjust the carburetor to obtain smooth
engine
idle at 600 rpm., then
stop
the engine.
b.
Check
throttle linkage to ensure maximum
throttle opening. Be certain that throttle and
governor linkage is free.
c.
Place the carburetor throttle in wide-open posi tion and
pull
the governor control handle out to
the last notch. Adjust the governor to bellcrank
rod
so that the linkage
will
hold the carburetor
throttle in wide-open position.
d.
Close the governor control and start the
engine
Again
pull
the control out to the last notch and
adjust
the length of the cable at adjusting yoke so
that the
engine
will
run at
2600
rpm. Close the
control
to recheck the linkage for free action and
to make sure the
engine
will
return to 600 rpm.
idle speed.
If
the
engine
runs faster than this speed,
loosen
the lock nut which locks the governor hand control
handle on the dash to the rod and back off the
handle until the carburetor idle speed adjusting
screw
bears on the stop. Tighten the lock nut.
In
the absence of electrical tachometer equipment,
engine
speed may be determined by the speedom
eter. Safely
jack
up the
rear
wheels and be sure the front wheel drive is not
engaged.
When driving
the
rear
wheels in high or direct transmission gear,
the
speedometer
will
read from 13j^ to 15 mph. [21.6 to 24.0 kph.] at an
engine
speed of from 900
to 1000 rpm.
SUBJECT
PAR.
Heater
U-10 Miscellaneous Data U-16
Pintle
Hook 1X7
Special
Tools. U-ll
Torque
Specifications U-13, 14, 15
Standard
and Recommended Tools
j.
.U-12
U-5.
Novi Governor Operation /
The
Novi governor is directly belted to the F4
engine
as no clutch is provided to disconnect the
drive.
To
operate the vehicle
WITHOUT
governor con
trol,
push the governor hand control all the way
IN
against the instrument panel.
To
operate the vehicle
WITH
governor control,
pull
the governor hand control handle out. The
hand
control has nine notched positions. Pulling the
control
out to the first notch
sets
the controlled
engine
speed at approximately 1000 rpm. and each successive notch increases the speed 200 rpm.
until
2600
rpm. is reached in the ninth notch. The
hand
control may be released by turning the han dle one-quarter
turn
in either direction.
When
the
engine
is being operated under governor
control
(hand control out) the controlled
engine
speed may be
exceeded
at any time by depressing
the
foot
accelerator in the conventional manner to
secure a greater carburetor throttle opening than
that determined by the governor hand control
setting.
U-6.
Governor Maintenance
The
belt tension may be adjusted by raising or
lowering the governor in the slotted
holes
in the mounting bracket. Keep the pulleys and belt free
of
dirt
and oil. Belt slippage
will
affect governor
operation and a tight belt may cause
rapid
wear
of the governor shaft and bearings. Adjust it to
allow Yi' [12,7 mm.] depression midway
between
the pulleys with thumb pressure.
There
is little wear of the internal parts for they
operate in oil. The governor housings are equipped
with
both
fill
and
drain
plugs and also with level
indicating
plugs.
Check
the oil level at each vehicle
lubrication
and change the oil each time the en
gine
oil is changed using the same grade oil used
in
the engine.
Caution:
Do not
fill
the governor housing above
the level plug. Overfilling
will
prevent governor
control
and possibly cause damage to governor in
ternal
parts. The capacity of
these
governors is two fluid ounces [59,15 cm3]. The filler plug is
also a vent which should be cleaned thoroughly at
each oil change to be sure that the vent operates.
U-7.
Pintle Hook
The
standard type pintle hook, Fig. U-1, affords a
safe, easy hitch for towing a
trailer
or other vehicle. 357
Page 365 of 376

u
MISCELLANEOUS
U-16. MISCELLtflNEOUS DATA
DRAW
BAR
PULL
The
power plant of the 'Jeep* Universal is particularly well adapted to the great variety of ap
plications. For higher speed highway use, and draw bar
pull
requirements for towing loads, the
full
engine
power is available; for power take-off shaft and pulley drive, the
full
engine
torque
(turning
effort) is available.
Draw
bar
pull
is the force exerted by a vehicle to tow a trailed load and is expressed in pounds.
For
continuous
agricultural
work, the maximum draw bar
pull
should be limited to 1200 pounds [544 kg.]. The 'Jeep' Universal is capable of much higher draw bar pulls than the 1200 pounds
approved for continuous service, which may be used for starting loads or towing loads for short
periods on
good
ground in which case a draw bar
pull
as high as 1800 pounds [817 kg.] may be
safely used.
Maximum
continuous draw bar pulls are most
often
encountered in plowing, disking and
har
rowing
and it is in
these
applications that the owner should guard against continuously exceeding
the recommended limit.
The
approved limit of 1200 pounds [544 kg.] may be judged by the following operations which
nearly
approach this limit:
Operating
two 12 inch [30,5 cm.] plows at a depth of 6)4 inches [16,5 cm.] in dry clay loam.
Operating
a 7
foot
[2,13 meter] tandem disk at a depth of 4j^ inches [11,4 cm.] in
hard
winter
packed soil.
Operating
a 3-section spring
tooth
harrow at a depth of 5 inches [12,7 cm.] in soil which
has been previously disked.
It
is expected that, either on account of soil conditions or implement adjustments,
these
draw
bar
pulls
will
be exceeded. In
these
instances, tire slippage provides an inherent safeguard against
overloading. Do not add weight, other than the standard bumper weight, to increase draw bar
pull.