tow JEEP CJ 1953 Owner's Manual
[x] Cancel search | Manufacturer: JEEP, Model Year: 1953, Model line: CJ, Model: JEEP CJ 1953Pages: 376, PDF Size: 19.96 MB
Page 192 of 376
H
ELECTRICAL
SYSTEM
Regulator
ground screw to battery ground post
—.03-volt maximum.
Generator
frame to battery ground post—.03-volt
maximum.
H-47.
Test Procedure
a.
Circuit
Breaker—Connect
an ammeter in series between the regulator B-terminal and the lead
wire
removed from that terminal. Connect a
voltmeter between the regulator
A-terminal
and the regulator mounting base. Disconnect the field lead
from
the regulator
F-terminal
and insert a variable resistance (3 amp., 50 ohm capacity) between the
lead
and the regulator terminal. Run the generator
at about 1000 generator rpm. Insert all the re
sistance in the field
circuit,
then slowly reduce the
resistance noting the voltage reading just before the change caused by the closing of the circuit
breaker.
Increase the charging rate to the figure
specified for the regulator being tested then reduce
the charging rate by inserting resistance in the
field
circuit.
Note
the voltmeter and ammeter
reading
just before the circuit breaker
opens
and
the ammeter reading drops to zero. The closing voltage and the opening voltage or current should
be within the limits specified. An accurate method
for noting the exact instant of the opening or closing
of the circuit breaker is to connect a headphone (2000 ohms or higher) to the battery and armature
terminals
of the regulator. When the contacts
open or close a
click
will
be
heard
in the headphones.
To
adjust the closing voltage change the armature
spring
tension by bending the hanger at the lower end of the spring. Increase the spring tension to
raise
the closing voltage or decrease the tension
to lower the closing voltage. To adjust the opening voltage raise or lower the stationary contact
keeping the contacts perfectly aligned. Increasing
the contact gap lowers the opening
'
voltage.
Change
the contact gap by expanding or contract
ing the stationary contact bracket, keeping the
contacts aligned. Do not adjust the gap between
the contacts to less than the specified minimum.
b.
Voltage Regulator—Connect the ammeter as in
step
a. Connect the voltmeter between the regulator
B-terminal
and the regulator base. Remove the
variable
resistance from the field
circuit.
Run the
generator at
half
output for 15 minutes to bring
the regulator to normal operating temperature.
Keep
the cover on the regulator during the
warm-
up period and also when taking readings.
Stop the engine then bring it up to approximately 2500 generator rpm. Adjust the amperage to
half
maximum
output by turning on lights or accessor
ies and then
note
the voltmeter reading.
This
read
ing should be within the limits specified for the voltage regulator operation. To adjust the oper
ating voltage change the
armature
spring tension by
bending the hanger at the lower end of the
arma
ture
spring. After each adjustment
stop
the engine then restart it.
Bring
it up to speed and adjust the
current
before taking a reading. In order to obtain
an
accurate indication of the operation of the volt
age regulator unit connect a headphone (2000 ohm
or
higher) between the
F-terminal
and ground to
pick
up the sound of the opening and closing of the
contacts. The clicks should be regular and clear without irregularities or missing. If the
tone
is not
clear
and regular remove the regulator cover and
inspect the contacts. The contacts should be flat
and
not burned excessively and should be aligned
to make
full
face contact. If the contacts need
cleaning refer to paragraph d for the method.
c.
Current
Regulator—Connect the regulator and the
test
equipment as in
step
b. Running the generator at approximately 3000 generator rpm.,
turn
on lights and accessories so that the generator must charge at maximum rate. The ammeter should give a reading within the limits specified.
To
adjust opening amperage, change the armature
spring
tension by bending the hanger at the lower
end of the armature spring. After each adjustment,
stop
the engine, then restart it.
Bring
the engine up to speed and take an ammeter reading. Keep
the cover on the regulator when taking
these
readings.
Connect
a headphone (2000 ohms or higher) be
tween the regulator
F-terminal
and ground to pick
up the sound of opening and closing of the contacts.
Clear,
regular clicks should be heard over the
headphones; they should not be
irregular
or missing.
If
the
tone
is not clear and regular remove the
regulator cover and inspect the contacts. The
contacts should be flat and not burned excessively
and
should be aligned to make
full
face contact. If
the contacts need cleaning refer to paragraph d.
below for the method.
d.
Contacts—Inspect the contacts on all three
units.
In normal use the contacts
will
become
grayed.
If the contacts are burned or dirty or if they are not smooth, file the contacts with a #6
American,
Swiss cut, equalling file. Move the file
parallel
and lengthwise to the armature.
File
just
enough so that the contacts present a smooth
sur
face toward each other. It is not necessary to remove every trace of pitting. After filing, dampen
a
piece of linen or lintless bond tape in refined
carbon
tetrachloride and draw the tape between
the contacts. Repeat with a dry piece of tape. Use
clean
tape for each set of contacts.
e. Recheck—Operate the unit at
half
maximum
output for five minutes with the cover on the regu
lator.
Repeat the testing procedure for all units as described in a, b, c above. Be sure cover is on regu
lator
when taking readings.
H-48.
Quick
Checks
H-49.
Low Charging Rate with a
Fully
Charged
Battery
A
fully charged battery and a low charging rate
indicates normal regulator operation.
A
further check of the regulator operation can be
made by using the starting motor for 5 to 10
seconds with the ignition switch in the "off" posi tion.
Then
start the engine and operate at a genera
tor speed of 2500 to 3000 rpm. The charging rate should rise to its maximum value then taper off to
a
minimum charge as the battery becomes charged.
H-50.
High Charging Rate with a
Fully
Charged
Battery
This
is usually an indication that the voltage regu
lator
is not operating correctly. The high voltage 192
Page 205 of 376
SERIES
SERVICE
MANUAL
H
t
^
12956
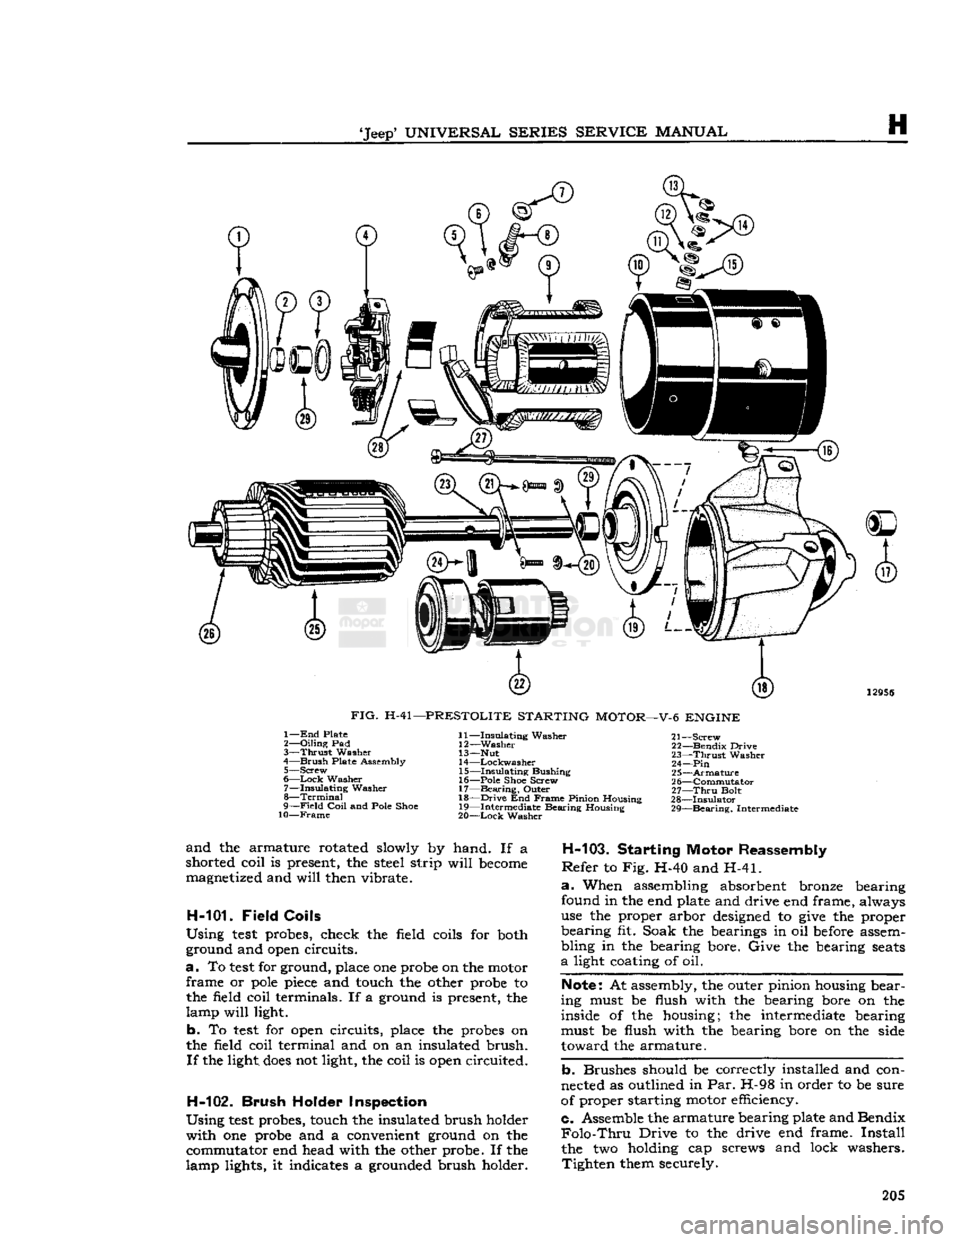
FIG.
H-41—PRESTOLITE
STARTING
MOTOR—V-6
ENGINE
1—
End
Plate
2—
Oiling
Pad
3—
Thrust
Washer
4—
Brush
Plate Assembly 5—
Screw
6—
Lock
Washer 7—
Insulating
Washer
8—
Terminal
9—
Field
Coil
and Pole Shoe
10—Frame
11—
Insulating
Washer
12—
Washer
13— Nut
14
—Lockwasher
15—
Insulating
Bushing
16— Pole Shoe Screw
17—
Bearing,
Outer
18—
Drive
End
Frame
Pinion Housing
19— Intermediate Bearing Housing
20—
Lock
Washer 21—
Screw
22— Bendix Drive
23—
Thrust
Washer
24—Pin
25—
Armature
2 6—Commutator
27—
Thru
Bolt
28—
Insulator
29—
Bearing,
Intermediate
and
the armature rotated slowly by hand. If a
shorted coil is present, the steel strip
will
become
magnetized and
will
then vibrate.
H-101-
Field
Coils
Using
test
probes, check the field coils for both
ground and
open
circuits.
a.
To
test
for ground, place one probe on the motor frame or
pole
piece
and touch the other probe to the field coil terminals. If a ground is present, the
lamp
will
light.
b.
To
test
for
open
circuits, place the probes on
the field coil terminal and on an insulated brush.
If
the light,
does
not light, the coil is
open
circuited.
H-102.
Brush
Holder Inspection
Using
test
probes, touch the insulated brush holder with one probe and a convenient ground on the commutator end head with the other probe. If the
lamp lights, it indicates a grounded brush holder.
H-103.
Starting Motor Reassembly
Refer
to Fig. H-40 and H-41.
a.
When assembling absorbent bronze bearing
found in the end plate and drive end frame, always
use the proper arbor
designed
to
give
the proper
bearing fit. Soak the bearings in oil
before
assem
bling in the bearing bore. Give the bearing
seats
a
light coating of oil.
Note:
At assembly, the outer pinion housing bear
ing must be flush with the bearing bore on the inside of the housing; the intermediate bearing
must be flush with the bearing bore on the side
toward the armature.
b.
Brushes should be correctly installed and con
nected as outlined in Par. H-98 in order to be sure
of proper starting motor efficiency.
c. Assemble the armature bearing plate and Bendix
Folo-Thru
Drive to the drive end frame.
Install
the two holding cap screws and lock washers. Tighten them securely. 205
Page 208 of 376
H
ELECTRICAL
SYSTEM
sibility
of the cable shorting at the
engine
or frame.
Remove nut and lock washer securing the ignition
wire
to the solenoid
post
and remove the two screws and lock washers securing the solenoid to
the starter frame. Remove the switch,
b.
To install the solenoid switch reverse the re
moval
procedure given above.
H-10S.
STARTING MOTOR
—
DELCO
DAUNTLESS
V-6
ENGINE
Refer
to Fig. H-45.
The
starting motor used on the Dauntless V-6 en
gine
has an integral solenoid switch and enclosed
shift lever which first shifts the overrunning clutch
pinion into
engagement
with the ring gear on the
flywheel of the
engine
and then
closes
the electrical
circuit
to cause
engine
cranking. When the
engine
starts,
the overrunning clutch
disengages
to pre vent transfer of
engine
speed to the starting motor.
Note:
Should a service replacement starter motor
be required the factory recommends replacement
with
original equipment parts; however, should the need arise an existing starter motor (Delco or
Prestolite) could be replaced with the current
Delco-Remy
starter, model 1108375, with the
following modifications to the wiring harness. If
the existing starter motor wiring harness
does
not
provide a 12 ga. purple conduit wire, (connects the ignition switch to the starter motor) then a 12 ga.
purple
conduit wire 70 inches long, must be in
stalled.
Should the existing starter motor wiring
harness
contain a 16 ga. light blue conduit wire, (connects the ignition switch and starter motor)
bend this wire back and tape out of the way.
H-109.
Starting Motor Disassembly
a.
Before removing the starting motor from the
engine, disconnect leads and cover battery lead
terminal
with piece of
hose
or tape to prevent
short circuiting.
Note
locations of wiring connec
tions to assure proper reconnection. Remove the cap screw that secures the starting motor to the
angle bracket on the side of the engine. Remove
the two cap screws that secure the drive end of
the starting motor to the cylinder block; remove
the starting motor.
b.
Remove terminal nut and disconnect field lead,
which
passes through grommet at top of motor,
from
motor terminal of solenoid. Remove two
thru
bolts
from motor. Remove commutator end frame
and
field frame assembly from solenoid and drive assembly.
e.
Pull
out pivot pins of brush holders and remove each of two brush holder and spring assemblies
from
field housing. Remove screws which attach
brushes and leads to holders.
d.
Remove armature and drive assembly from
drive
housing. Remove thrust collar from pinion
end of armature shaft. Remove leather thrust
washer
from
opposite
end of shaft.
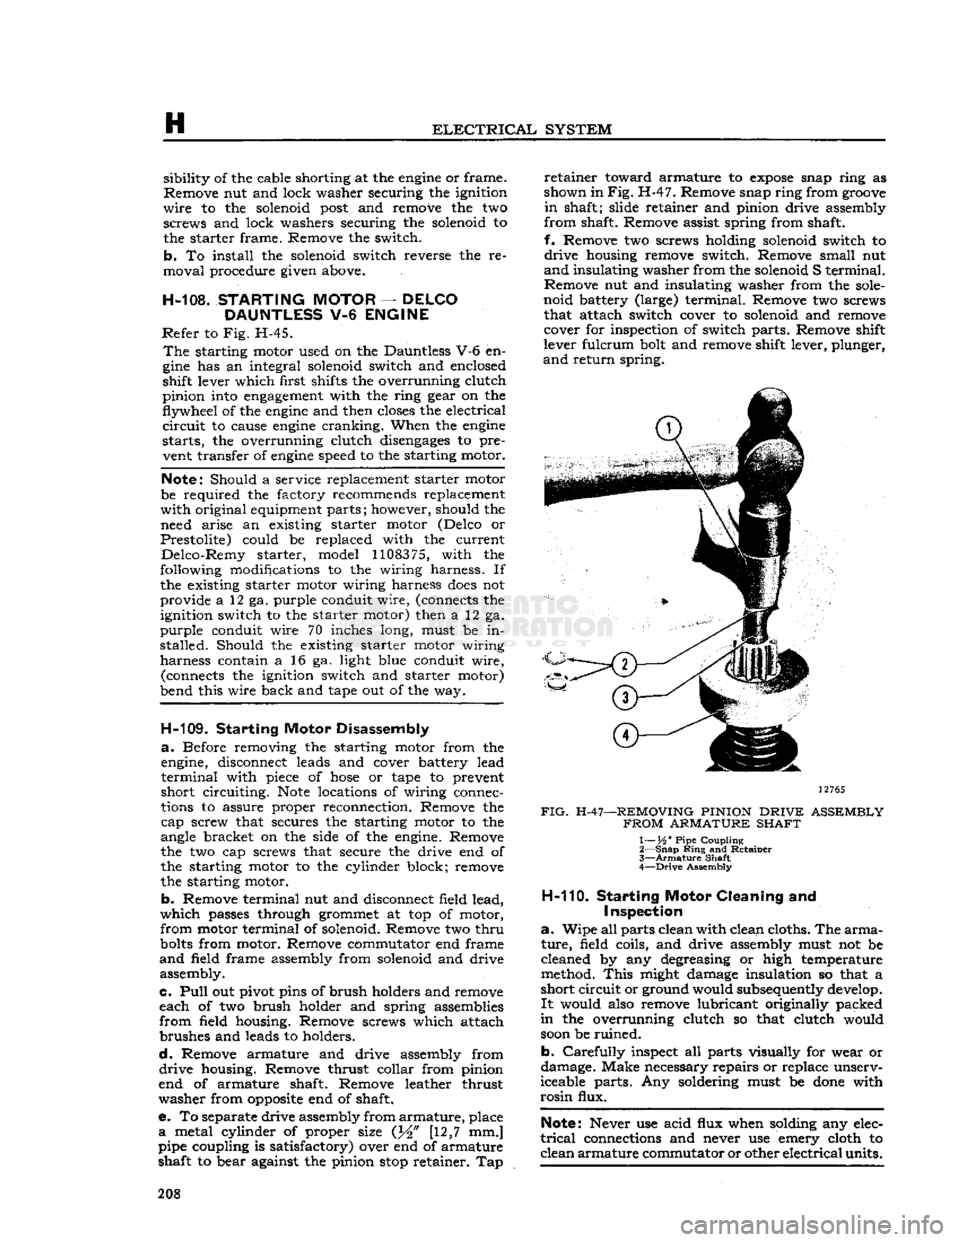
e. To separate drive assembly from
armature,
place
a
metal cylinder of proper size (J^" [12,7 mm.]
pipe coupling is satisfactory) over end of armature
shaft to bear against the pinion
stop
retainer. Tap
retainer
toward armature to
expose
snap ring as
shown in
Fig.
H-47. Remove snap ring from
groove
in
shaft; slide retainer and pinion drive assembly
from
shaft. Remove assist spring from shaft,
f.
Remove two screws holding solenoid switch to
drive
housing remove switch. Remove small nut
and
insulating washer from the solenoid S terminal.
Remove nut and insulating washer from the
sole
noid battery (large) terminal. Remove two screws that attach switch cover to solenoid and remove cover for inspection of switch parts. Remove shift
lever fulcrum bolt and remove shift lever, plunger,
and
return spring.
12765
FIG.
H-47—REMOVING PINION
DRIVE
ASSEMBLY
FROM
ARMATURE SHAFT
1— XA ' Pipe Coupling
2—
Snap
Ring
and Retainer
3—
Armature
Shaft
4—
Drive
Assembly
H-110.
Starting
Motor
Cleaning and
Inspection
a.
Wipe all parts clean with clean cloths. The
arma
ture,
field coils, and drive assembly must not be
cleaned by any degreasing or high temperature
method.
This
might damage insulation so that a
short
circuit
or ground would subsequently develop.
It
would also remove lubricant originally packed
in
the overrunning clutch so that clutch would
soon
be ruined.
b.
Carefully
inspect all parts visually for wear or
damage. Make necessary repairs or replace unserv
iceable parts. Any soldering must be
done
with
rosin
flux.
Note:
Never use acid flux when solding any elec
trical
connections and never use emery cloth to
clean
armature
commutator or other
electrical
units. 208
Page 229 of 376
'Jeep'
UNIVERSAL
SERIES SERVICE
MANUAL
I
Note:
The clutch release bearing is lubricated at
time of assembly and no attempt should be made
to lubricate it Refer to Fig. 1-23 when lubricating
the clutch throwout bearing collar. c. Reassembly
To
assemble the clutch to the flywheel, first put
a
small amount of light cup grease in the flywheel
pilot bushing, install the driven plate, with short
end of hub toward the flywheel, then place the pressure plate assembly in position.
With
a clutch
plate aligning arbor or a spare transmission main
shaft, align the driven plate splines leaving the
arbor
in position while tightening the pressure plate
screws evenly.
Next, assemble the flywheel housing to the
engine
and
reinstall the transmission and transfer case or
install
the
engine
in the vehicle, depending on the
procedure of removal. Make sure that the clutch
release bearing
carrier
return spring is hooked in place. For the remainder of the assembly reverse
the operations that were used in removing the
transmission and transfer case or the
engine
referring
to the instructions given in Section J for the transmission and Section D and Dl for the
engine.
d.
Adjust the clutch control cable so there is 3A" [19,05 mm.] free pedal travel. (Refer to Par. 1-3)
1-10.
CLUTCH
—
DAUNTLESS
V-6
ENGINE
•
Diaphragm Spring Type
(Early
Models)
*
Jeep' vehicles equipped with a Dauntless V-6 en
gine
use a 10.4" [26,4 cm.] single-plate, dry-disc
clutch,
incorporating a diaphragm-type spring as
sembly.
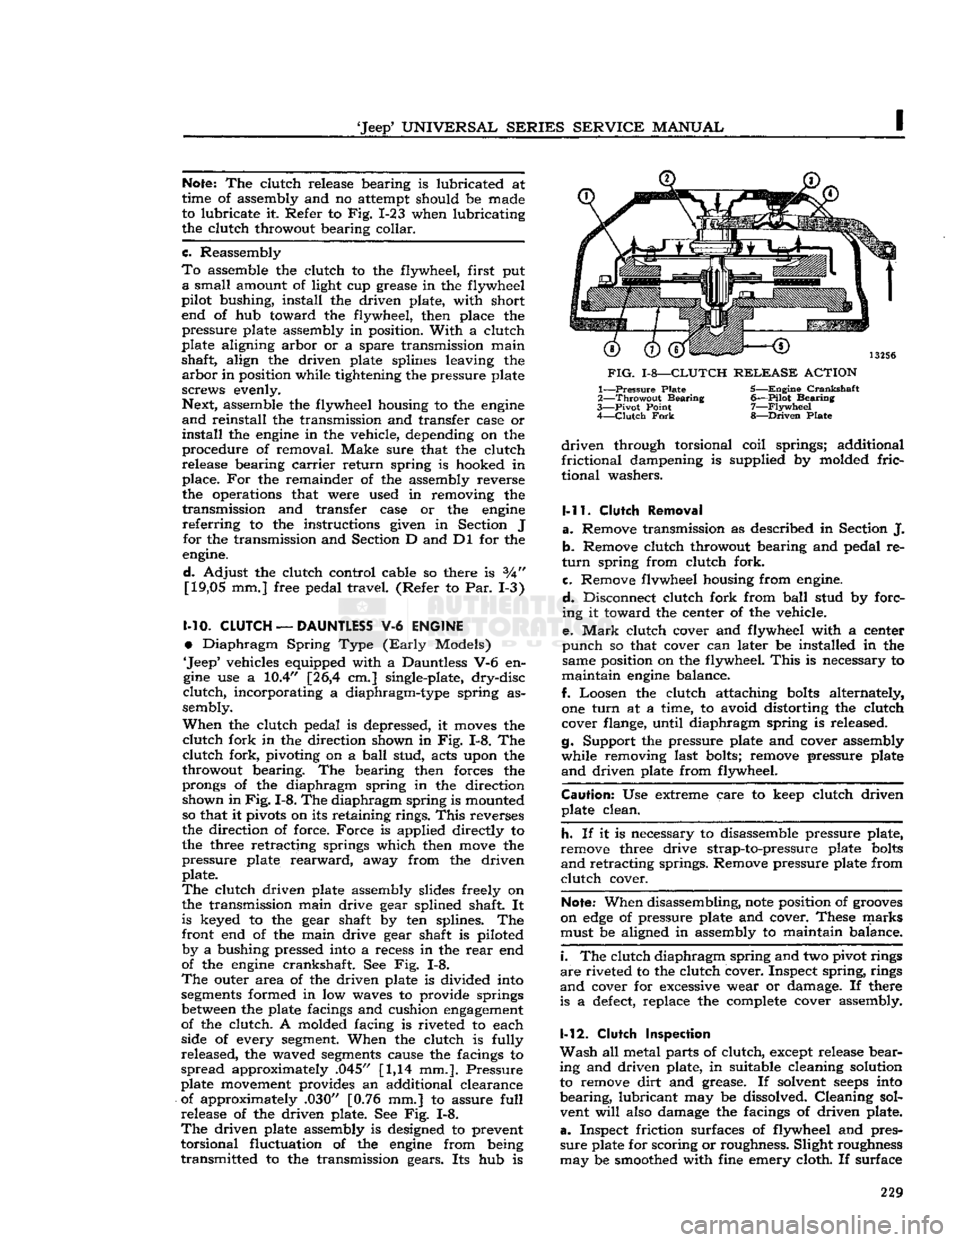
When
the clutch pedal is depressed, it
moves
the
clutch
fork in the direction shown in Fig. 1-8. The
clutch
fork, pivoting on a
ball
stud, acts upon the
throwout bearing. The bearing then forces the
prongs of the diaphragm spring in the direction shown in
Fig.
1-8. The diaphragm spring is mounted
so that it pivots on its retaining rings.
This
reverses
the direction of force.
Force
is applied directly to
the three retracting springs which then
move
the
pressure plate
rearward,
away from the driven plate.
The
clutch driven plate assembly slides freely on
the transmission main drive gear splined shaft. It is keyed to the gear shaft by ten splines. The
front end of the main drive gear shaft is piloted by a bushing pressed into a recess in the
rear
end
of the
engine
crankshaft. See Fig. 1-8.
The
outer area of the driven plate is divided into
segments
formed in low waves to provide springs
between
the plate facings and cushion
engagement
of the clutch. A molded facing is riveted to each
side of every
segment.
When the clutch is fully
released, the waved
segments
cause the facings to
spread
approximately .045" [1,14 mm.]. Pressure
plate movement provides an additional clearance
of approximately .030" [0.76 mm.] to assure
full
release of the driven plate. See Fig. 1-8.
The
driven plate assembly is designed to prevent
torsional fluctuation of the
engine
from being
transmitted to the transmission gears. Its hub is
FIG.
1-8—CLUTCH
RELEASE
ACTION
1—
Pressure
Plate 5—Engine
Crankshaft
2—
Throwout
Bearing
6—Pilot
Bearing
3—
Pivot
Point
7—Flywheel
4—
Clutch
Fork
8—Driven
Plate
driven
through torsional coil springs; additional
frictional
dampening is supplied by molded
fric-
tional washers.
1-11.
Clutch
Removal
a.
Remove transmission as described in Section J. b. Remove clutch throwout bearing and pedal re
turn
spring from clutch fork.
c. Remove flvwheel housing from engine.
d.
Disconnect clutch fork from
ball
stud by forc
ing it toward the center of the vehicle.
e.
Mark
clutch cover and flywheel with a center
punch
so that cover can later be installed in the same position on the flywheel.
This
is necessary to
maintain
engine
balance.
f. Loosen the clutch attaching
bolts
alternately,
one
turn
at a time, to avoid distorting the clutch
cover flange, until diaphragm spring is released.
g. Support the pressure plate and cover assembly
while removing last bolts; remove pressure plate
and
driven plate from flywheel.
Caution:
Use extreme care to keep clutch driven plate clean.
h.
If it is necessary to disassemble pressure plate,
remove three drive strap-to-pressure plate
bolts
and
retracting springs. Remove pressure plate from
clutch
cover.
Note:
When disassembling,
note
position of
grooves
on
edge
of pressure plate and cover. These marks must be aligned in assembly to maintain balance.
i.
The clutch diaphragm spring and two pivot rings
are
riveted to the clutch cover. Inspect spring, rings
and
cover for excessive wear or damage. If there
is a
defect,
replace the complete cover assembly.
1-12.
Clutch
inspection
Wash
all metal parts of clutch, except release bear
ing and driven plate, in suitable cleaning solution to remove
dirt
and grease. If solvent
seeps
into
bearing,
lubricant may be dissolved. Cleaning sol
vent
will
also damage the facings of driven plate,
a.
Inspect friction surfaces of flywheel and pres
sure
plate for scoring or roughness. Slight roughness
may be smoothed with fine emery cloth. If surface 229
Page 230 of 376
CLUTCH
is deeply scored or grooved, the part should be
replaced.
b. Inspect driven plate for wear or damage to fac
ings,
loose
rivets, broken or
loose
torsion springs,
and
flattened cushion springs. If facings are worn
near
rivets or are oily, replace the plate assembly.
A
slight amount of oil on clutch facings
will
cause
clutch
grab and chatter; excessive oil on facings
will
cause slippage. It is not practical to remove
oil
with solvents or by buffing since oil
will
con
tinue to bleed from facing material when hot. If
oil
is found on driven plate facings, examine trans
mission drainback hole, pilot bushing,
engine
rear
main
bearing and other points of possible oil leakage. Test the fit of driven plate hub on trans
mission main drive gear for an easy sliding fit.
c. Inspect clutch release bearing for scoring or ex cessive wear on front contact face. Test for rough
ness
of balls and races by pressing and turning
front race slowly. Inspect main drive gear pilot
bushing in crankshaft. Replace bushing if it is rough or worn. Regardless of whether the old plate
or
a new plate is to be installed, check the plate
for runout. Slide the driven plate, front side first,
over the transmission main drive gear shaft so that
it
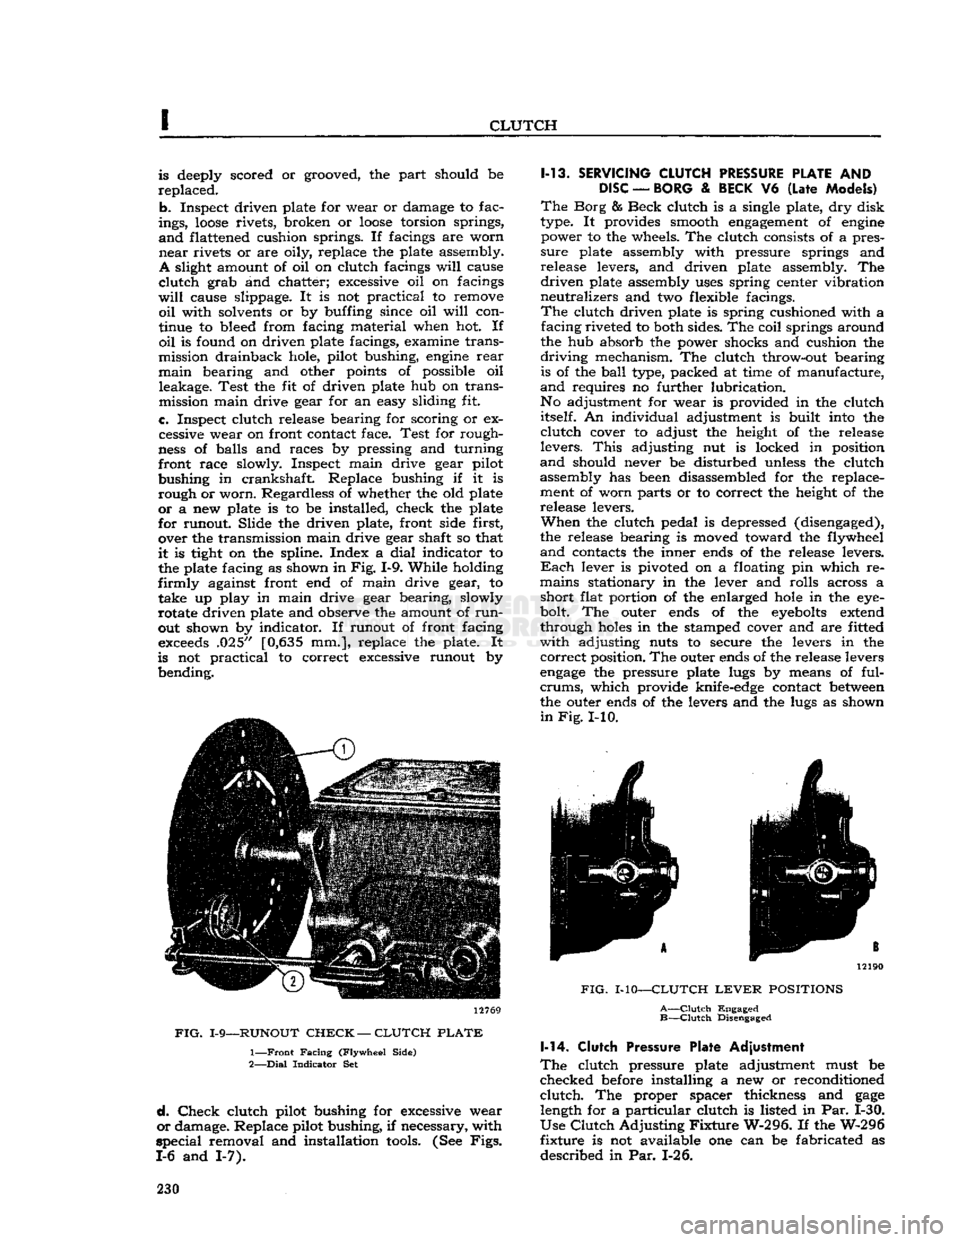
is tight on the spline. Index a
dial
indicator to the plate facing as shown in
Fig.
1-9. While holding
firmly
against front end of main drive gear, to take up play in main drive gear bearing, slowly
rotate driven plate and observe the amount of
run
out shown by indicator. If runout of front facing
exceeds
.025" [0,635 mm.], replace the plate. It
is not practical to correct excessive runout by bending. 12769
FIG.
1-9—RUNOUT
CHECK
—
CLUTCH
PLATE
1—
Front
Facing
(Flywheel
Side)
2—
Dial
Indicator
Set
d.
Check
clutch pilot bushing for excessive wear
or
damage. Replace pilot bushing, if necessary, with
special
removal and installation
tools.
(See
Figs.
1-6 and 1-7). 1-13.
SERVICING
CLUTCH
PRESSURE
PLATE
AND
DISC
—
BORG
&
BECK
V6
(Late
Models)
The
Borg & Beck clutch is a single plate, dry disk
type. It provides smooth
engagement
of
engine
power to the wheels. The clutch consists of a pres
sure
plate assembly with pressure springs and
release levers, and driven plate assembly. The
driven
plate assembly
uses
spring center vibration
neutralizes and two flexible facings.
The
clutch driven plate is spring cushioned with a facing riveted to both sides. The coil springs around
the hub absorb the power shocks and cushion the
driving
mechanism. The clutch throw-out bearing is of the
ball
type, packed at time of manufacture,
and
requires no further lubrication.
No adjustment for wear is provided in the clutch itself. An individual adjustment is built into the
clutch
cover to adjust the height of the release
levers.
This
adjusting nut is locked in position
and
should never be disturbed unless the clutch assembly has been disassembled for the replace
ment of worn parts or to correct the height of the release levers.
When
the clutch pedal is depressed (disengaged),
the release bearing is moved toward the flywheel
and
contacts the inner ends of the release levers.
Each
lever is pivoted on a floating pin which re
mains stationary in the lever and rolls across a short flat portion of the enlarged
hole
in the eye-
bolt. The outer ends of the
eyebolts
extend
through
holes
in the stamped cover and are fitted
with
adjusting nuts to secure the levers in the
correct
position. The outer ends of the release levers
engage
the pressure plate lugs by means of ful-
crums,
which provide knife-edge contact
between
the outer ends of the levers and the lugs as shown
in
Fig.
I-10. 12190
FIG.
MO—CLUTCH
LEVER
POSITIONS
A—Clutch
Engaged
B—Clutch
Disengaged 1-14.
Clutch
Pressure Plate Adjustment
The
clutch pressure plate adjustment must be
checked before installing a new or reconditioned
clutch.
The proper spacer thickness and
gage
length for a particular clutch is listed in Par. 1-30.
Use
Clutch
Adjusting
Fixture
W-296. If the W-296
fixture is not available one can be fabricated as
described in Par. 1-26. 230
Page 232 of 376
CLUTCH
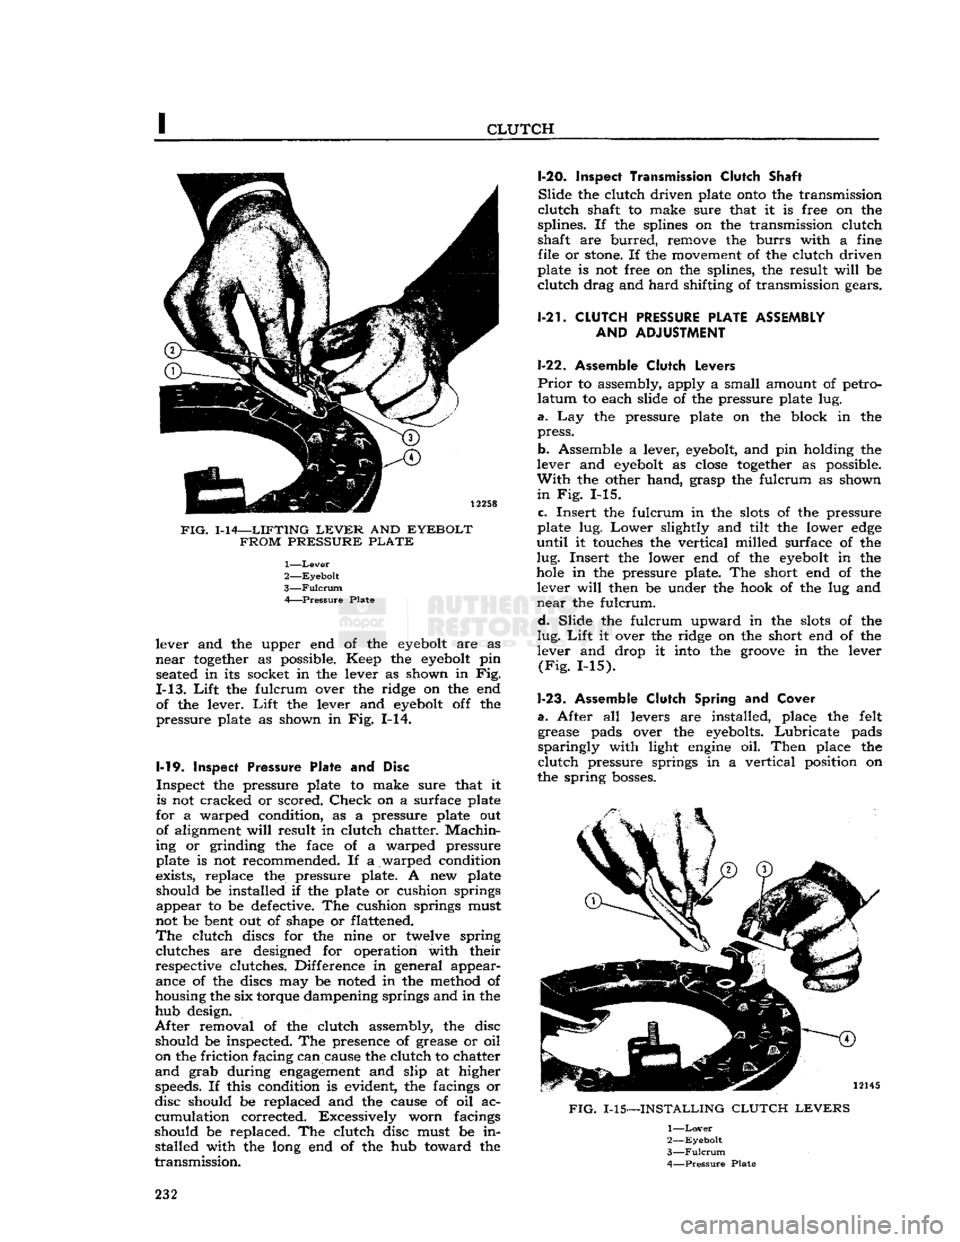
FIG.
1-14—LIFTING
LEVER
AND
EYEBOLT FROM PRESSURE PLATE
1—
Lever
2—
Eyebolt
3—
Fulcrum
A Pressure Plate
lever and the upper end of the
eyebolt
are as
near
together
as possible. Keep the
eyebolt
pin seated in its socket in the lever as shown in Fig.
1-13.
Lift
the fulcrum over the ridge on the end of the lever.
Lift
the lever and
eyebolt
off the
pressure plate as shown in Fig. 1-14.
1-19.
Inspect
Pressure Plate and Disc
Inspect the pressure plate to make sure that it is not cracked or scored.
Check
on a surface plate
for a warped condition, as a pressure plate out of alignment
will
result in clutch chatter.
Machin
ing or grinding the face of a warped pressure
plate is not recommended. If a warped condition
exists, replace the pressure plate. A new plate
should be installed if the plate or cushion springs appear to be defective. The cushion springs must
not be bent out of shape or flattened.
The
clutch discs for the nine or twelve spring clutches are designed for operation with their
respective clutches. Difference in general appear ance of the discs may be noted in the method of
housing the six torque dampening springs and in the
hub design.
After
removal of the clutch assembly, the disc should be inspected. The presence of grease or oil
on the friction facing can cause the clutch to chatter
and
grab during
engagement
and slip at higher speeds. If this condition is evident, the facings or
disc should be replaced and the cause of oil ac
cumulation corrected. Excessively worn facings
should be replaced. The clutch disc must be in stalled with the long end of the hub toward the
transmission.
1-20.
Inspect Transmission Clutch
Shaft
Slide
the clutch driven plate
onto
the transmission
clutch
shaft to make sure that it is free on the
splines. If the splines on the transmission clutch
shaft are
burred,
remove the
burrs
with a fine file or
stone.
If the movement of the clutch driven
plate is not free on the splines, the result
will
be
clutch
drag and
hard
shifting of transmission gears.
1-21.
CLUTCH
PRESSURE
PLATE ASSEMBLY AND
ADJUSTMENT
1-22. Assemble
Clutch
Levers
Prior
to assembly, apply a small amount of petro
latum
to each slide of the pressure plate lug.
a.
Lay the pressure plate on the block in the
press.
b. Assemble a lever,
eyebolt,
and pin holding the
lever and
eyebolt
as
close
together
as possible.
With
the other hand, grasp the fulcrum as shown
in
Fig. 1-15.
c.
Insert the fulcrum in the
slots
of the pressure
plate lug.
Lower
slightly and tilt the lower
edge
until
it touches the vertical milled surface of the
lug.
Insert the lower end of the
eyebolt
in the
hole
in the pressure plate. The short end of the lever
will
then be under the hook of the lug and
near
the fulcrum.
d.
Slide the fulcrum upward in the
slots
of the
lug.
Lift
it over the ridge on the short end of the
lever and drop it into the
groove
in the lever
(Fig.
1-15).
1-23.
Assemble
Clutch
Spring and
Cover
a.
After all levers are installed, place the felt grease pads over the eyebolts.
Lubricate
pads
sparingly
with light
engine
oil.
Then
place the
clutch
pressure springs in a vertical position on
the spring
bosses.
FIG.
1-15—INSTALLING
CLUTCH LEVERS
1—
Lover
2—
Eyebolt
3—
Fulcrum
4—
Pressure
Plate
232
Page 240 of 376
THREE-SPEED
TRANSMISSION
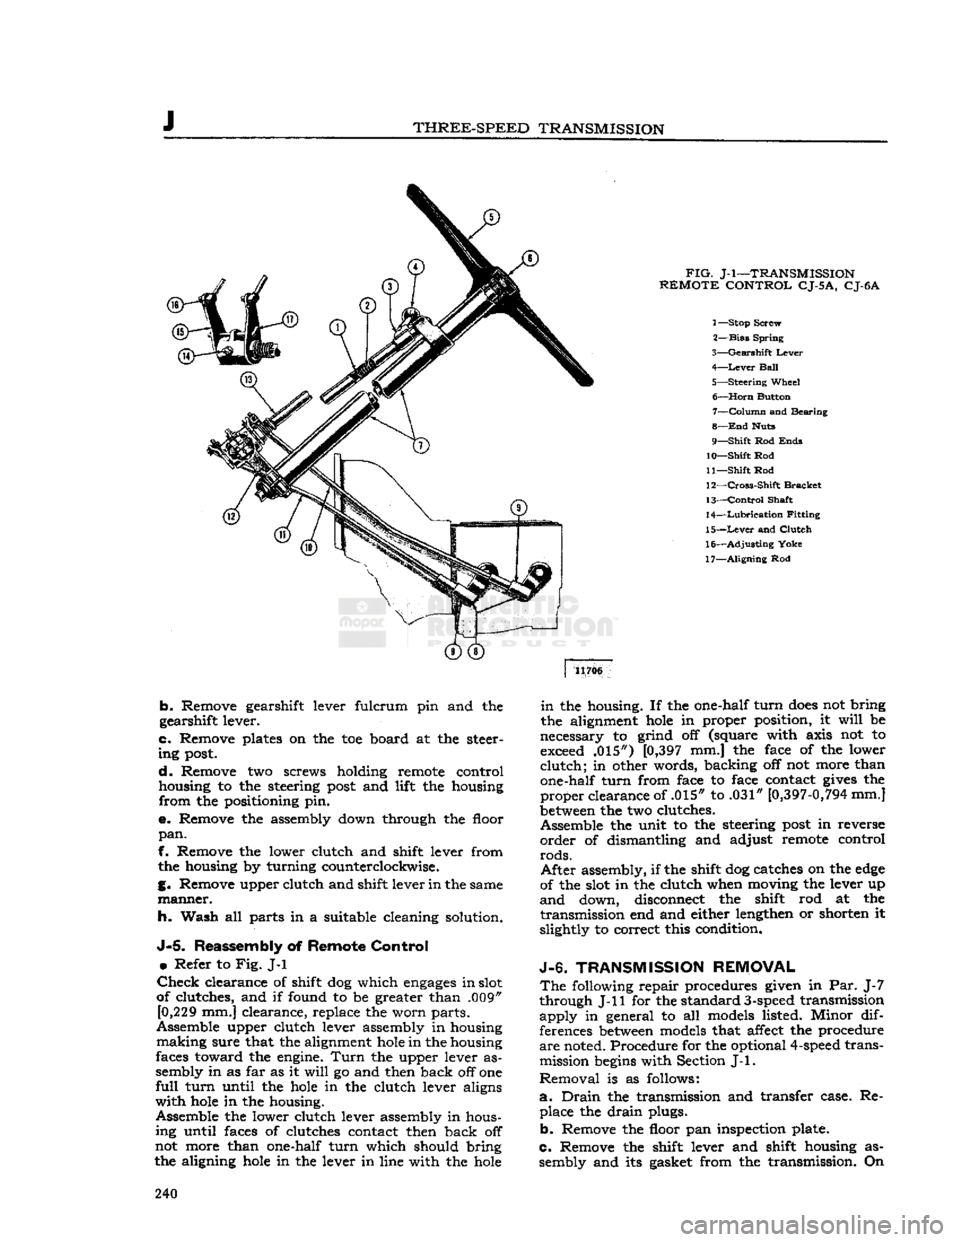
FIG.
J-l—TRANSMISSION
REMOTE
CONTROL
CJ-5
A,
CJ-6A
1— Stop Screw
2—
Bias
Spring
3—
Gearshift
Lever
4—
Lever
Ball
5—
Steering
Wheel 6—
Horn
Button 7—
Column
and Bearing
8—
End
Huts
9—
Shift
Rod
Ends
10—
Shift
Rod
11—
Shift
Rod
12—
Cross-Shift
Bracket
13—
Control
Shaft
14—
Lubrication
Fitting
15—
Lever
and
Clutch
16—
Adjusting
Yoke
17—
Aligning
Rod 11706
b.
Remove gearshift lever fulcrum pin and the
gearshift lever.
c.
Remove plates on the toe board at the steer
ing
post.
d.
Remove two screws holding remote control
housing to the steering
post
and lift the housing
from
the positioning pin.
e.
Remove the assembly down through the floor
pan.
f. Remove the lower clutch and shift lever from the housing by turning counterclockwise.
g. Remove upper clutch and shift lever in the same
manner.
h. Wash all parts in a suitable cleaning solution.
J-5.
Reassembly of
Remote
Control
•
Refer to
Fig.
J-l
Check
clearance of shift dog which
engages
in slot
of clutches, and if found to be greater than .009" [0,229 mm.] clearance, replace the worn parts.
Assemble upper clutch lever assembly in housing
making
sure that the alignment
hole
in the housing
faces toward the engine.
Turn
the upper lever as
sembly in as far as it
will
go and then back off one
full
turn
until the
hole
in the clutch lever aligns
with
hole
in the housing.
Assemble the lower clutch lever assembly in hous ing until faces of clutches contact then back off
not more than one-half
turn
which should bring
the aligning
hole
in the lever in line with the
hole
in
the housing. If the one-half
turn
does
not bring
the alignment
hole
in proper position, it
will
be
necessary to grind off (square with axis not to exceed .015") [0,397 mm.] the face of the lower
clutch;
in other words, backing off not more than
one-half
turn
from face to face contact
gives
the
proper
clearance of .015" to .031"
[0,397-0,794
mm.]
between
the two clutches.
Assemble the unit to the steering
post
in reverse
order
of dismantling and adjust remote control
rods.
After
assembly, if the shift dog catches on the
edge
of the slot in the clutch when moving the lever up
and
down, disconnect the shift rod at the
transmission
end and either lengthen or shorten it
slightly to correct this condition.
J-6.
TRANSMISSION
REMOVAL
The
following repair procedures given in Par. J-7
through J-ll for the standard
3-speed
transmission
apply
in general to all models listed. Minor dif
ferences
between
models that affect the procedure
are
noted. Procedure for the optional
4-speed
transmission
begins
with Section
J-l.
Removal
is as follows:
a.
Drain
the transmission and transfer case. Re place the
drain
plugs.
b.
Remove the floor pan inspection plate.
c.
Remove the shift lever and shift housing as sembly and its gasket from the transmission. On 240
Page 241 of 376
'Jeep'
UNIVERSAL
SERIES
SERVICE
MANUAL
J
10489
FIG.
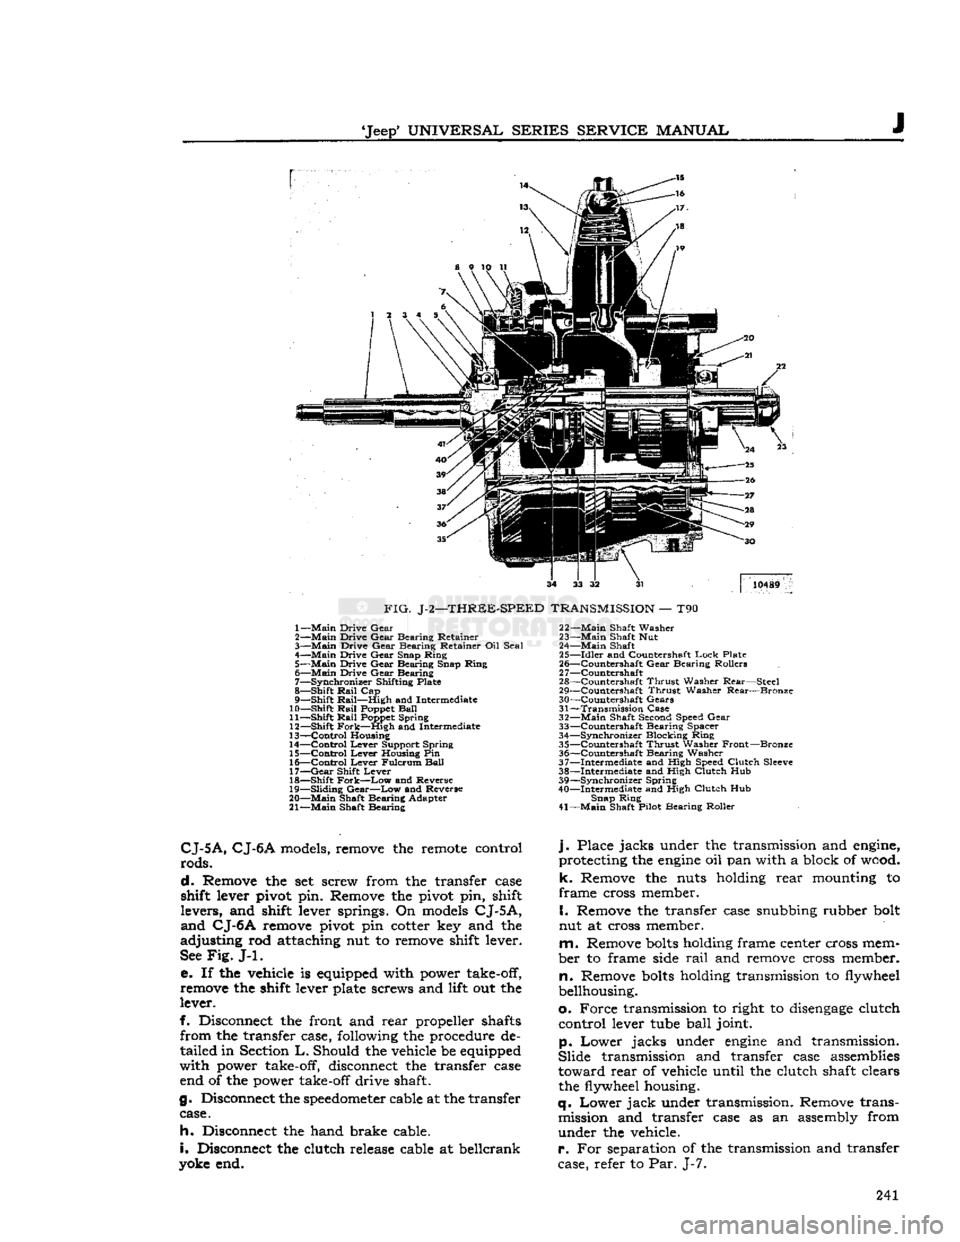
J-2—THREE-SPEED
TRANSMISSION
— T90 1—
Main
Drive
Gear
2—
Main
Drive
Gear
Bearing
Retainer
3—
Main
Drive
Gear
Bearing
Retainer Oil
Seal
4—
Main
Drive
Gear
Snap
Ring
5—
Main
Drive
Gear
Bearing
Snap
Ring
6—
Main
Drive
Gear
Bearing
7—
Synchronizer
Shifting Plate
8—
Shift
Rail
Cap
9—
Shift
Rail—High
and Intermediate
10—
Shift
Rail
Poppet
Ball
11—
Shift
Rail
Poppet
Spring
12—
Shift
Fork—High
and Intermediate
13—
Control
Housing
14—
Control
Lever
Support
Spring
15—
Control
Lever
Housing Pin
16—
Control
Lever
Fulcrum
Ball
17—
Gear
Shift
Lever
18—
Shift
Fork—Low
and Reverse
19—
Sliding
Gear—Low
and Reverse
20—
Main
Shaft
Bearing
Adapter
21—
Main
Shaft
Bearing
22—
Main
Shaft
Washer
23—
Main
Shaft Nut
24—
Main
Shaft
25—
Idler
and Countershaft
Lock
Plate
26—
^Countershaft
Gear
Bearing
Rollers
2
7—Countershaft
28—
Countershaft
Thrust
Washer
Rear—Steel
29—
Countershaft
Thrust
Washer
Rear—Bronze
30—
Countershaft
Gears
31—
Transmission
Case
32—
Main
Shaft Second Speed
Gear
33—
Countershaft
Bearing
Spacer
34—
Synchronizer
Blocking
Ring
35—
Countershaft
Thrust
Washer
Front—Bronze
36—
Countershaft
Bearing
Washer
37—
Intermediate
and High Speed
Clutch
Sleeve
38—
Intermediate
and High
Clutch
Hub
39—
Synchronizer
Spring
40—
Intermediate
and High
Clutch
Hub
Snap
Ring
41—
Main
Shaft Pilot
Bearing
Roller
CJ-5A,
CJ-6A
models, remove the remote control
rods.
d.
Remove the set screw from the transfer case
shift lever pivot pin. Remove the pivot pin, shift
levers,
and shift lever springs. On models
CJ-5A,
and
CJ-6A
remove pivot pin cotter key and the
adjusting
rod attaching nut to remove shift lever.
See
Fig.
J-l.
e. If the vehicle is equipped with power take-off,
remove the shift lever plate screws and lift out the
lever.
f. Disconnect the front and
rear
propeller shafts
from
the transfer case, following the procedure de
tailed
in Section
L.
Should the vehicle be equipped
with
power take-off, disconnect the transfer case end of the power take-off drive shaft.
g. Disconnect the
speedometer
cable at the transfer case.
h.
Disconnect the hand brake cable.
i.
Disconnect the clutch release cable at beilcrank
yoke end.
j.
Place
jacks
under the transmission and engine,
protecting the
engine
oil pan with a block of wood,
k.
Remove the nuts holding
rear
mounting to
frame
cross member.
I.
Remove the transfer case snubbing rubber bolt
nut at cross member.
m.
Remove
bolts
holding frame center cross mem
ber
to frame side
rail
and remove cross member,
n.
Remove
bolts
holding transmission to flywheel
bellhousing.
o.
Force
transmission to right to
disengage
clutch
control
lever tube
ball
joint.
p.
Lower
jacks
under
engine
and transmission.
Slide
transmission and transfer case assemblies
toward
rear
of vehicle until the clutch shaft clears the flywheel housing.
q.
Lower
jack
under transmission. Remove trans mission and transfer case as an assembly from
under
the vehicle.
r.
For separation of the transmission and transfer
case, refer to Par. J-7. 241
Page 245 of 376
'Jeep*
UNIVERSAL
SERIES'
SERVICE
MANUAL
lightly
on the end of the
mainshaft
to
loosen
the
gear
and
separate
the two
units.
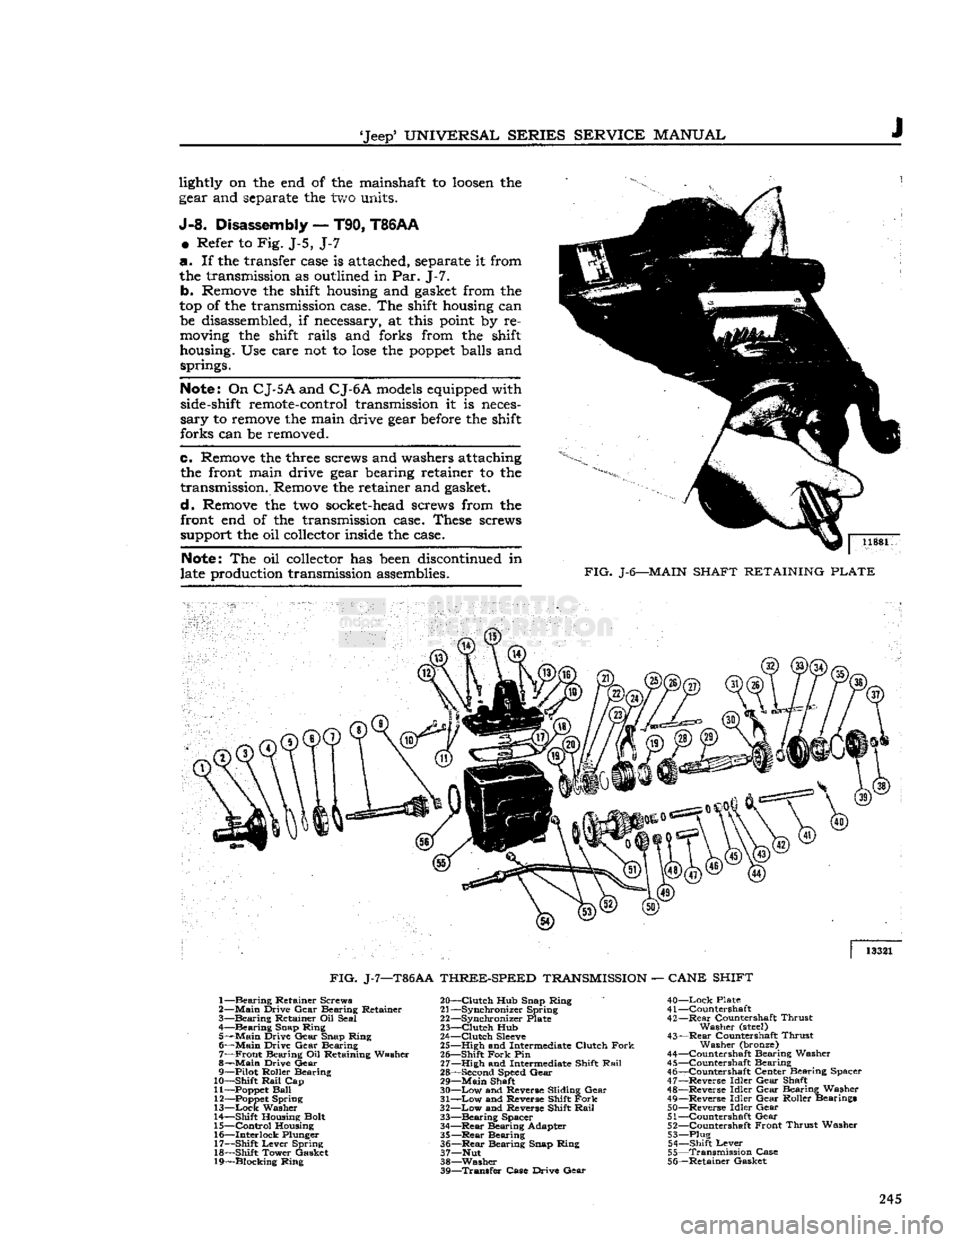
J-8.
Disassembly
—
T90,
T86AA
®
Refer to Fig. J-5, J-7
a. If the transfer
case
is
attached,
separate
it from
the
transmission
as
outlined
in Par. J-7. b.
Remove
the
shift
housing
and
gasket
from the
top of the
transmission
case.
The
shift
housing
can
be
disassembled,
if
necessary,
at
this
point
by re
moving
the
shift
rails and forks from the
shift
housing.
Use care not to
lose
the
poppet
balls
and
springs.
Note;
On
CJ-5
A
and
C
J-6A
models
equipped
with
side-shift
remote-control
transmission
it is
neces
sary to
remove
the main drive
gear
before
the
shift
forks can be
removed.
e.
Remove
the
three
screws
and
washers
attaching
the
front
main drive
gear
bearing
retainer to the
transmission.
Remove
the retainer and
gasket,
d.
Remove
the two
socket-head
screws
from the
front
end of the
transmission
case.
These
screws
support
the oil
collector
inside
the
case.
Note:
The oil
collector
has
been
discontinued
in
late
production
transmission
assemblies.
11881
FIG.
J-6—MAIN
SHAFT
RETAINING
PLATE
13321
FIG.
J-7—T86AA
THREE-SPEED
TRANSMISSION
—
CANE
SHIFT
1—
Bearing
Retainer Screws
2—
Main
Drive Gear Bearing Retainer
3—
Bearing
Retainer Oil Seal
,
4—Bearing Snap Ring
5—
Main
Drive Gear Snap Ring 6—
Main
Drive Gear Bearing 7—
Front
Bearing Oil Retaining Washer
8—
Main
Drive Gear
9— Pilot Roller Bearing
10— Shift
Rail
Cap
11—
Poppet
Ball
12—
Poppet
Spring
13—
Lock
Washer
14— Shift Housing Bolt
15—
Control
Housing 16— Interlock Plunger
17— Shift Lever Spring
18— Shift Tower Gasket
19— Blocking Ring 20—
Clutch
Hub Snap Ring
21— Synchronizer Spring
22— Synchronizer Plate
23—
Clutch
Hub
24—
Clutch
Sleeve
25— High and Intermediate Clutch
Fork
26— Shift
Fork
Pin
27— High and Intermediate Shift
Rail
28— Second Speed Gear 29—
Main
Shaft
30—
Low
and Reverse Sliding Gear
31—
Low
and Reverse Shift
Fork
32—
Low
and Reverse Shift
Rail
33—
Bearing
Spacer
34—
—Rear
Bearing Adapter
35—Rear
Bearing 36—
Rear
Bearing Snap Ring
37— Nut
38—Washer 39—
Transfer
Case Drive Gear
40—Lock
Plate
41 —Countershaft
42—
Rear
Countershaft Thrust Washer
(steel)
43—
Rear
Countershaft Thrust Washer (bronze)
44— Countershaft Bearing Washer
45— Countershaft Bearing 46— Countershaft Center Bearing Spacer
47— Reverse Idler Gear Shaft
48— Reverse Idler Gear Bearing Washer
49— Reverse Idler Gear Roller Bearings 50— Reverse Idler Gear
51— Countershaft Gear 52— Countershaft Front Thrust Washer
53— Plug 54— Shift Lever
55—
Transmission
Case
56— Retainer Gasket 245
Page 246 of 376
J
THREE-SPEED
TRANSMISSION
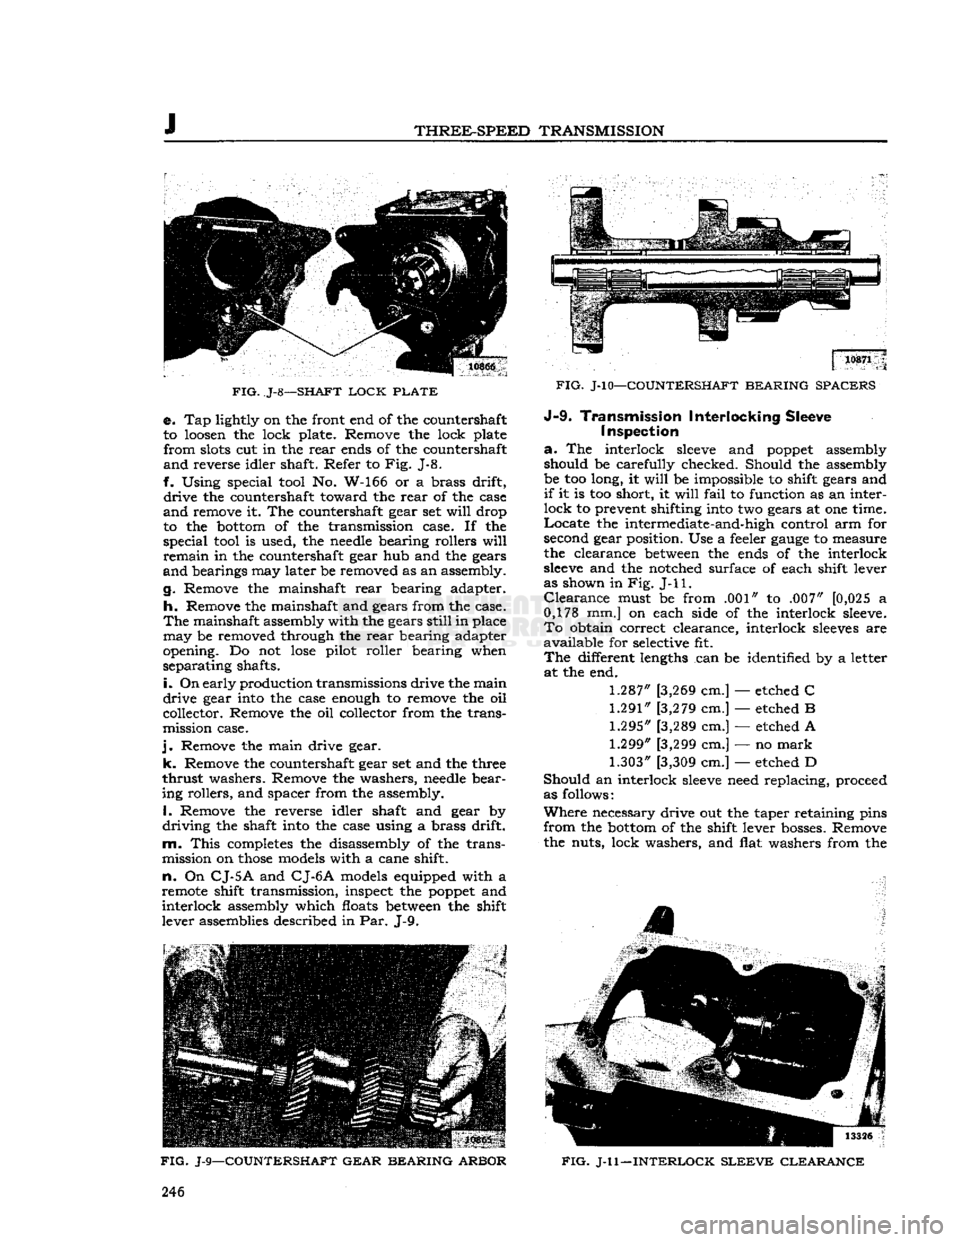
FIG.
J-8—SHAFT
LOCK
PLATE
e. Tap lightly on the front end of the countershaft
to loosen the lock plate. Remove the lock plate
from
slots cut in the
rear
ends of the countershaft
and
reverse idler shaft. Refer to Fig. J-8.
f. Using special tool No. W-166 or a brass drift,
drive
the countershaft toward the
rear
of the case
and
remove it. The countershaft gear set
will
drop
to the bottom of the transmission case. If the
special
tool is used, the needle bearing rollers
will
remain
in the countershaft gear hub and the gears
and
bearings may later be removed as an assembly.
g. Remove the mainshaft
rear
bearing adapter.
h.
Remove the mainshaft and gears from the case.
The
mainshaft assembly with the gears
still
in place
may
be removed through the
rear
bearing adapter
opening. Do not
lose
pilot roller bearing when
separating
shafts.
i.
On
early production transmissions drive the main
drive
gear into the case enough to remove the oil
collector. Remove the oil collector from the trans
mission case.
j.
Remove the main drive gear,
k.
Remove the countershaft gear set and the three
thrust
washers. Remove the washers, needle bear
ing rollers, and spacer from the assembly. 1, Remove the reverse idler shaft and gear by
driving
the shaft into the case using a brass drift,
m.
This
completes the disassembly of the trans
mission on
those
models with a cane shift,
n.
On
CJ-5
A
and
CJ-6 A
models equipped with a
remote shift transmission, inspect the poppet and
interlock
assembly which floats between the shift
lever assemblies described in Par. J-9.
FIG.
J-9—COUNTERSHAFT GEAR BEARING ARBOR
FIG.
J-l0—COUNTERSHAFT BEARING SPACERS J-9-
Transmission Interlocking Sleeve
I
inspection
a.
The interlock
sleeve
and poppet assembly should be carefully checked. Should the assembly
be too long, it
will
be impossible to shift gears and
if
it is too short, it
will
fail
to function as an inter
lock
to prevent shifting into two gears at one time.
Locate
the intermediate-and-high control arm for
second gear position. Use a feeler
gauge
to measure
the clearance between the ends of the interlock
sleeve
and the notched surface of each shift lever
as shown in Fig.
J-l
1.
Clearance
must be from .001" to .007" [0,025 a
0,178 mm.] on each side of the interlock sleeve.
To
obtain correct clearance, interlock
sleeves
are
available
for selective fit.
The
different lengths can be identified by a letter at the end.
1.287"
[3,269 cm.] — etched C
1.291"
[3,279 cm.] — etched B
1.295"
[3,289 cm.] — etched A
1.299"
[3,299 cm.] — no
mark
1.303"
[3,309 cm.] — etched D
Should
an interlock
sleeve
need replacing, proceed
as follows:
Where
necessary drive out the taper retaining pins
from
the bottom of the shift lever bosses. Remove
the nuts, lock washers, and flat washers from the
4
FIG.
J-l 1—INTERLOCK
SLEEVE
CLEARANCE
246