transmission JEEP COMMANDER 2010 1.G User Guide
[x] Cancel search | Manufacturer: JEEP, Model Year: 2010, Model line: COMMANDER, Model: JEEP COMMANDER 2010 1.GPages: 78, PDF Size: 7.31 MB
Page 3 of 78
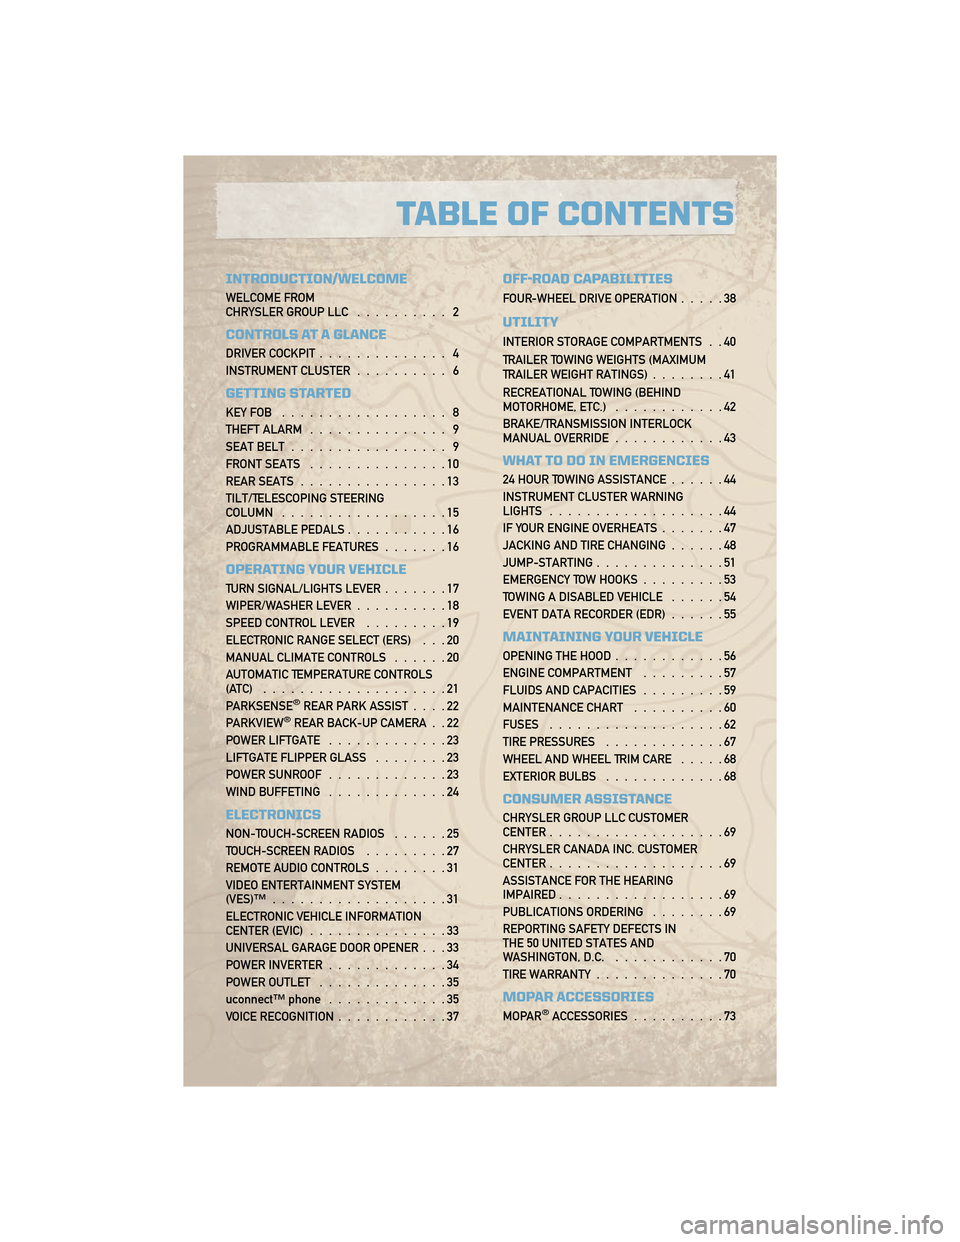
INTRODUCTION/WELCOME
WELCOME FROM
CHRYSLER GROUP LLC.......... 2
CONTROLS AT A GLANCE
DRIVER COCKPIT.............. 4
INSTRUMENT CLUSTER .......... 6
GETTING STARTED
KEYFOB .................. 8
THEFT ALARM............... 9
SEAT BELT ................. 9
FRONT SEATS ...............10
REAR SEATS ................13
TILT/TELESCOPING STEERING
COLUMN ..................15
ADJUSTABLE PEDALS ...........16
PROGRAMMABLE FEATURES .......16
OPERATING YOUR VEHICLE
TURN SIGNAL/LIGHTS LEVER .......17
WIPER/WASHER LEVER ..........18
SPEED CONTROL LEVER .........19
ELECTRONIC RANGE SELECT (ERS) . . . 20
MANUAL CLIMATE CONTROLS ......20
AUTOMATIC TEMPERATURE CONTROLS
(ATC) ....................21
PARKSENSE
®REAR PARK ASSIST ....22
PARKVIEW®REAR BACK-UP CAMERA . . 22
POWER LIFTGATE .............23
LIFTGATE FLIPPER GLASS ........23
POWER SUNROOF .............23
WIND BUFFETING .............24
ELECTRONICS
NON-TOUCH-SCREEN RADIOS ......25
TOUCH-SCREEN RADIOS .........27
REMOTE AUDIO CONTROLS ........31
VIDEO ENTERTAINMENT SYSTEM
(VES)™ ...................31
ELECTRONIC VEHICLE INFORMATION
CENTER (EVIC) ...............33
UNIVERSAL GARAGE DOOR OPENER . . . 33
POWER INVERTER .............34
POWER OUTLET ..............35
uconnect™ phone .............35
VOICE RECOGNITION ............37
OFF-ROAD CAPABILITIES
FOUR-WHEEL DRIVE OPERATION .....38
UTILITY
INTERIOR STORAGE COMPARTMENTS . . 40
TRAILER TOWING WEIGHTS (MAXIMUM
TRAILER WEIGHT RATINGS)........41
RECREATIONAL TOWING (BEHIND
MOTORHOME, ETC.) ............42
BRAKE/TRANSMISSION INTERLOCK
MANUAL OVERRIDE ............43
WHAT TO DO IN EMERGENCIES
24 HOUR TOWING ASSISTANCE ......44
INSTRUMENT CLUSTER WARNING
LIGHTS ...................44
IF YOUR ENGINE OVERHEATS .......47
JACKING AND TIRE CHANGING ......48
JUMP-STARTING ..............51
EMERGENCY TOW HOOKS .........53
TOWING A DISABLED VEHICLE ......54
EVENT DATA RECORDER (EDR) ......55
MAINTAINING YOUR VEHICLE
OPENING THE HOOD............56
ENGINE COMPARTMENT .........57
FLUIDS AND CAPACITIES .........59
MAINTENANCE CHART ..........60
FUSES ...................62
TIRE PRESSURES .............67
WHEEL AND WHEEL TRIM CARE .....68
EXTERIOR BULBS .............68
CONSUMER ASSISTANCE
CHRYSLER GROUP LLC CUSTOMER
CENTER...................69
CHRYSLER CANADA INC. CUSTOMER
CENTER ...................69
ASSISTANCE FOR THE HEARING
IMPAIRED ..................69
PUBLICATIONS ORDERING ........69
REPORTING SAFETY DEFECTS IN
THE 50 UNITED STATES AND
WASHINGTON, D.C. ............70
TIRE WARRANTY ..............70
MOPAR ACCESSORIES
MOPAR®ACCESSORIES..........73
TABLE OF CONTENTS
Page 40 of 78
FOUR-WHEEL DRIVE
OPERATION
Quadra-Trac I®Operating
Instructions/Precautions
• The Quadra-Trac I®is a single-speed
(HI range only) transfer case, which
provides convenient full-time
four–wheel drive. No driver interaction
is required. The Brake Traction Control
(BTC) System, which combines
standard ABS and Traction Control,
provides resistance to any wheel that is
slipping to allow additional torque
transfer to wheels with traction.
Quadra-Trac II®/Quadra-Drive
II®Operating Instructions/
Precautions
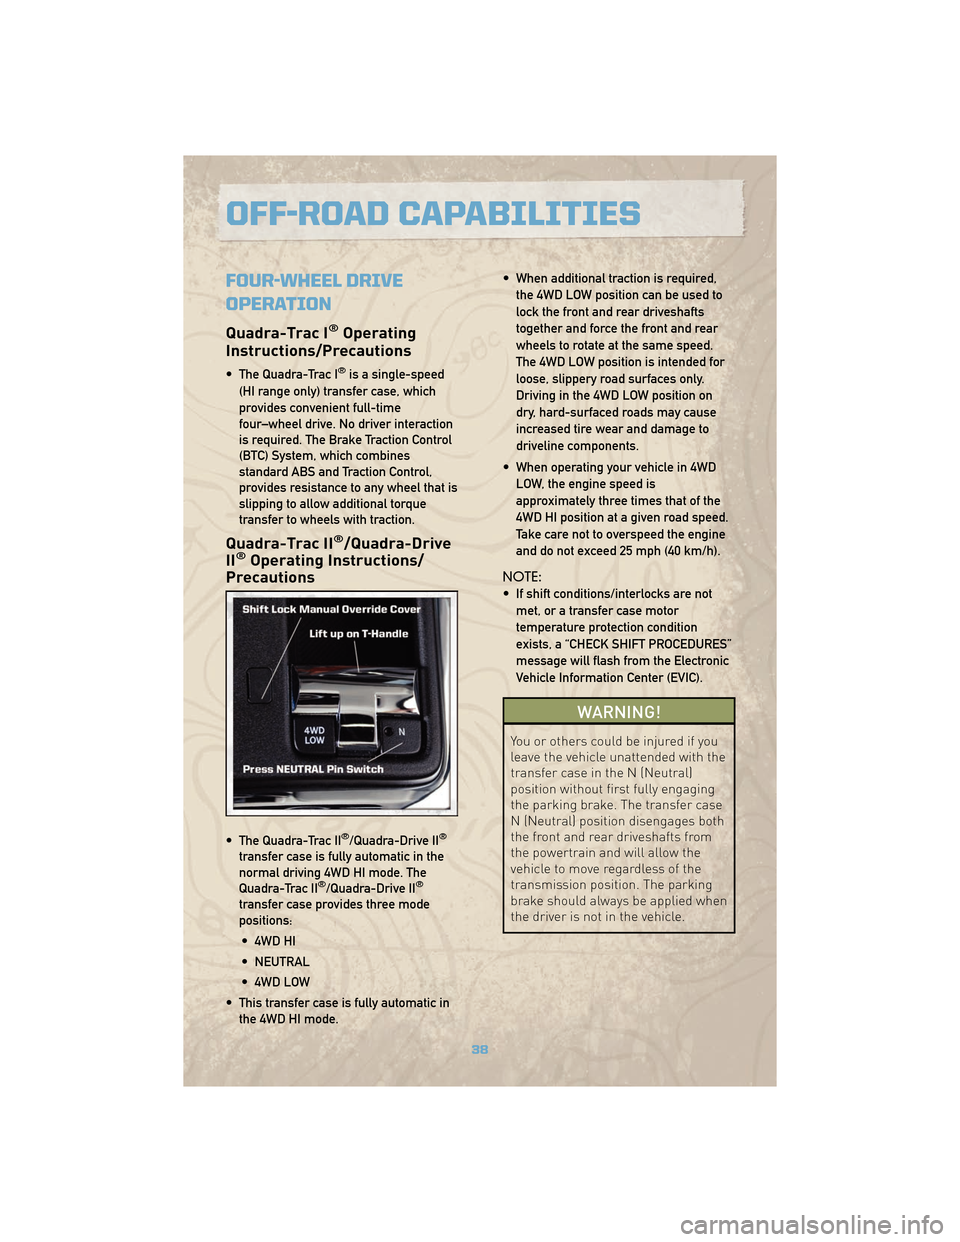
• The Quadra-Trac II®/Quadra-Drive II®
transfer case is fully automatic in the
normal driving 4WD HI mode. The
Quadra-Trac II
®/Quadra-Drive II®
transfer case provides three mode
positions:
• 4WD HI
• NEUTRAL
• 4WD LOW
• This transfer case is fully automatic in the 4WD HI mode. • When additional traction is required,
the 4WD LOW position can be used to
lock the front and rear driveshafts
together and force the front and rear
wheels to rotate at the same speed.
The 4WD LOW position is intended for
loose, slippery road surfaces only.
Driving in the 4WD LOW position on
dry, hard-surfaced roads may cause
increased tire wear and damage to
driveline components.
• When operating your vehicle in 4WD LOW, the engine speed is
approximately three times that of the
4WD HI position at a given road speed.
Take care not to overspeed the engine
and do not exceed 25 mph (40 km/h).
NOTE:
• If shift conditions/interlocks are not met, or a transfer case motor
temperature protection condition
exists, a “CHECK SHIFT PROCEDURES”
message will flash from the Electronic
Vehicle Information Center (EVIC).
WARNING!
You or others could be injured if you
leave the vehicle unattended with the
transfer case in the N (Neutral)
position without first fully engaging
the parking brake. The transfer case
N (Neutral) position disengages both
the front and rear driveshafts from
the powertrain and will allow the
vehicle to move regardless of the
transmission position. The parking
brake should always be applied when
the driver is not in the vehicle.
OFF-ROAD CAPABILITIES
38
Page 41 of 78
Shifting Procedures
4WD HI To 4WD LOW
• With the vehicle at speeds of 0 to 3 mph(0 to 5 km/h), key ON or engine
running, shift the transmission into
NEUTRAL, and raise the transfer case
T-handle. The “4WD LOW” indicator
light in the instrument cluster will
begin to flash and remain on solid
when the shift is complete. Release the
T-handle.
• Shifting into or out of 4WD LOW is possible with the vehicle completely
stopped; however, difficulty may occur
due to the mating clutch teeth not being
properly aligned. Several attempts may
be required for clutch teeth alignment
and shift completion to occur. The
preferred method is with the vehicle
rolling 0 to 3 mph (0 to 5 km/h). If the
vehicle is moving faster than 3 mph
(5 km/h), the transfer case will not
allow the shift.
4WD LOW To 4WD HI
• With the vehicle at speeds of 0 to 3 mph(0 to 5 km/h), key ON or engine
running, shift the transmission into
NEUTRAL, and raise the transfer case
T-handle. The “4WD LOW” indicator
light in the instrument cluster will flash
and go out when the shift is complete.
Release the T-handle.
NEUTRAL Shift Procedure
• Key ON, engine off.
• Vehicle stopped, with foot on brake.
• Place the transmission into NEUTRAL.
• Hold down the NEUTRAL “pin” switch
(with a pen, etc.) for four seconds until
the LED light by the switch starts to
blink indicating shift in progress. The
light will stop blinking (stay on solid)
when the NEUTRAL shift is complete. A
“4WD SYSTEM IN NEUTRAL” message
will display on the Electronic Vehicle
Information Center (EVIC).
• Repeat these Steps to shift out of NEUTRAL.
39
OFF-ROAD CAPABILITIES
Page 44 of 78
RECREATIONAL TOWING
(BEHIND MOTORHOME,
ETC.)
Towing - Two-Wheel Drive
Models
• Recreational towing is allowed ONLY ifthe driveshaft is removed. Towing with
the rear wheels on the ground while
the driveshaft is connected can result
in severe transmission damage.
WARNING!
If the driveshaft is removed, the
vehicle can roll even if the
transmission is in PARK, which could
cause serious injury or death.
• The parking brake must be firmly engaged and the wheels chocked
during driveshaft removal and
installation. The parking brake must
remain engaged unless the vehicle is
securely and properly connected to the
tow vehicle, or the driveshaft is
completely reinstalled. See your
authorized dealer for proper driveshaft
removal and reinstallation procedures,
including flange orientation/alignment,
use of thread-locking compound,
proper bolt torque specifications, etc.
Towing - Quadra-Trac I®
(Single-Speed Transfer Case)
Four-Wheel Drive Models
• Recreational towing is not allowed.This model does not have a NEUTRAL
position in the transfer case.
Towing - Quadra-Trac II®
/Quadra-Drive II®Four-Wheel
Drive Models
• Depress the brake pedal and turn the
ignition switch ON with the engine shut
off.
• Shift the transmission into NEUTRAL.
• Shift the transfer case into NEUTRAL by holding down the NEUTRAL Pin
switch for four seconds until the LED
starts to blink. The LED will stop
blinking and remain on when the shift
is complete.
• Start the engine and shift into DRIVE to ensure there is no vehicle movement.
• Shut the engine off and shift the transmission into PARK.
• Place the ignition switch in the OFF position and remove the key.
• Apply the parking brake, attach the vehicle to the tow vehicle with a tow
bar and release the parking brake.
• Refer to your Owner's Manual on the DVD for further details.
UTILITY
42
Page 45 of 78
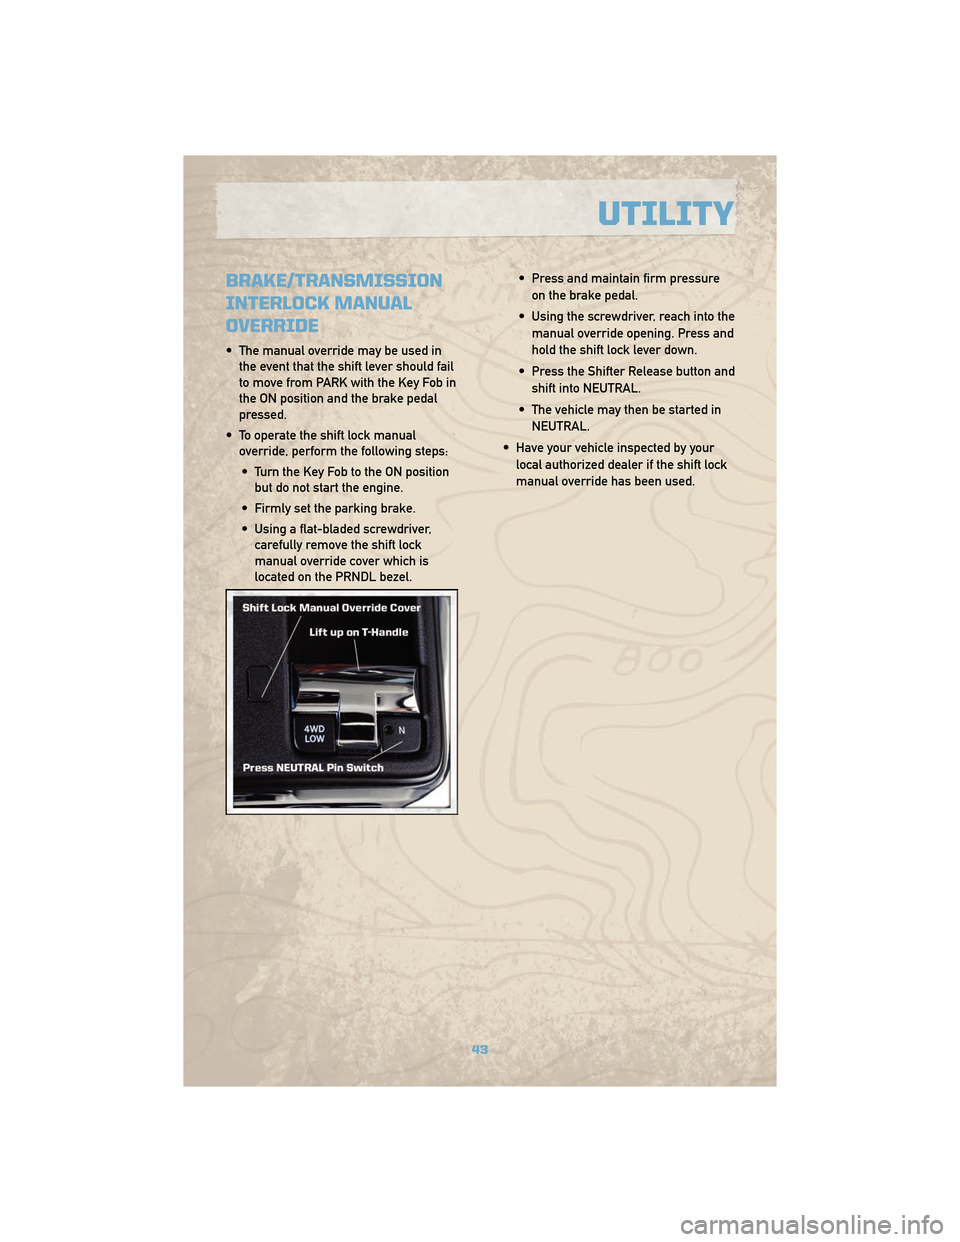
BRAKE/TRANSMISSION
INTERLOCK MANUAL
OVERRIDE
• The manual override may be used inthe event that the shift lever should fail
to move from PARK with the Key Fob in
the ON position and the brake pedal
pressed.
• To operate the shift lock manual override, perform the following steps:
• Turn the Key Fob to the ON position but do not start the engine.
• Firmly set the parking brake.
• Using a flat-bladed screwdriver, carefully remove the shift lock
manual override cover which is
located on the PRNDL bezel. • Press and maintain firm pressure
on the brake pedal.
• Using the screwdriver, reach into the manual override opening. Press and
hold the shift lock lever down.
• Press the Shifter Release button and shift into NEUTRAL.
• The vehicle may then be started in NEUTRAL.
• Have your vehicle inspected by your local authorized dealer if the shift lock
manual override has been used.
43
UTILITY
Page 49 of 78
IF YOUR ENGINE OVERHEATS
• In any of the following situations, you can reduce the potential for overheating by takingthe appropriate action.
• On the highways — slow down.
• In city traffic — while stopped, shift transmission into NEUTRAL, but do not increase engine idle speed.
NOTE: There are steps that you can take to slow down an impending overheat condition:
• If your air conditioner (A/C) is on, turn it off. The A/C system adds heat to the engine cooling system and turning the A/C off can help remove this heat.
• You can also turn the Temperature Control to maximum heat, the Mode Control to floor and the Fan Control to high. This allows the heater core to act as a supplement to the
radiator and aids in removing heat from the engine cooling system.
• If the temperature reading does not return to normal, turn the engine off immediately.
• We recommend that you do not operate the vehicle or engine damage will occur. Have the vehicle serviced immediately.
CAUTION!
Driving with a hot cooling system could damage your vehicle. If the temperature
gauge reads HOT (H), pull over and stop the vehicle. Idle the vehicle with the air
conditioner turned off until the pointer drops back into the normal range. If the
pointer remains on HOT (H), and you hear continuous chimes, turn the engine off
immediately and call for service.
WARNING!
You or others can be badly burned by hot engine coolant (antifreeze) or steam from
your radiator. If you see or hear steam coming from under the hood, do not open the
hood until the radiator has had time to cool. Never try to open a cooling system
pressure cap when the radiator or coolant bottle is hot.
47
WHAT TO DO IN EMERGENCIES
Page 51 of 78
Spare Tire Stowage
• To remove or stow the spare, use the jack handle to rotate the “spare tire drive” nut whichis located under a plastic cover under the cargo load floor, just inside the liftgate opening.
• Lower the spare tire by turning the drive nut counterclockwise with the jack-handle assembly until the spare tire is on the ground with enough cable slack to allow you to
pull the spare tire out from underneath the vehicle.
• When the spare is clear, tilt the retainer at the end of the cable and pull it through the center of the wheel.
Preparations For Jacking
• Park on a firm, level surface. Avoid ice or slippery areas.
• Set the parking brake and shift the automatic transmission into PARK.
• Turn the ignition to LOCK and turn on the Hazard Warning flasher.
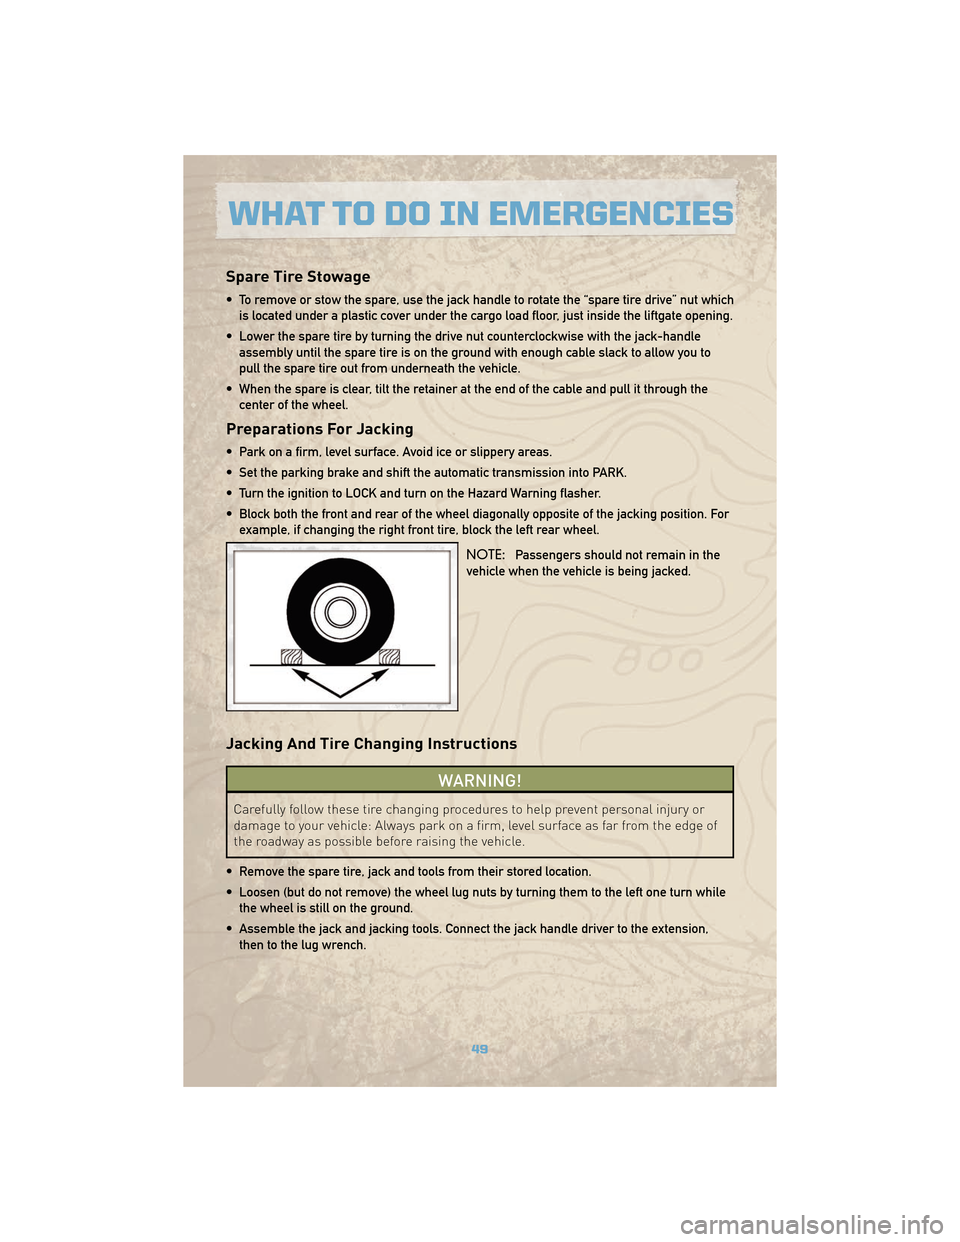
• Block both the front and rear of the wheel diagonally opposite of the jacking position. Forexample, if changing the right front tire, block the left rear wheel.
NOTE:Passengers should not remain in the
vehicle when the vehicle is being jacked.
Jacking And Tire Changing Instructions
WARNING!
Carefully follow these tire changing procedures to help prevent personal injury or
damage to your vehicle: Always park on a firm, level surface as far from the edge of
the roadway as possible before raising the vehicle.
• Remove the spare tire, jack and tools from their stored location.
• Loosen (but do not remove) the wheel lug nuts by turning them to the left one turn while the wheel is still on the ground.
• Assemble the jack and jacking tools. Connect the jack handle driver to the extension, then to the lug wrench.
49
WHAT TO DO IN EMERGENCIES
Page 54 of 78
WARNING!(Continued)
• A battery generates hydrogen gas which is flammable and explosive. Keep flamesor sparks away from the battery vent holes. Don’t lean over the battery when
attaching clamps or allow the clamps to touch each other.
• Do not use a booster battery or any other booster source with an output that exceeds 12-volts (i.e., do not use a 24-volt power source).
• Check the battery test indicator (if equipped). If a light or bright colored dot is visible in the indicator, DO NOT jump-start the battery. If the indicator is dark or shows a green dot,
proceed as follows:
• Remove all metal jewelry, such as watch bands or bracelets, which might make an unintended electrical contact.
WARNING!
• Do not permit vehicles to touch each other as this could establish a ground connection and personal injury could result.
• Do not connect the cable to the negative post of the discharged battery. The resulting electrical spark could cause the battery to explode and could result in
personal injury.
• Park the booster vehicle within cable reach but without letting the vehicles touch. Set the parking brake on both vehicles, shift the automatic transmission into PARK, and turn the
ignition to LOCK.
• Turn off the heater, radio, and all unnecessary electrical loads.
• Connect one end of a jumper cable to the positive terminal of the booster battery. Connect the other end of the same cable to the positive terminal of the discharged battery.
• Connect the other cable, first to the negative terminal of the booster battery and then to the engine ground (-) of the vehicle with the discharged battery. Make sure you have a
good contact on the engine ground.
• Start the engine in the vehicle which has the booster battery; let the engine idle a few minutes.
• Start the engine in the vehicle with the discharged battery.
• When removing the jumper cables, reverse the above sequence exactly. Be careful of the moving belts and fan.
WARNING!
During cold weather when temperatures are below the freezing point, electrolyte in a
discharged battery may freeze. Do not attempt jump-starting because the battery
could rupture or explode. The battery temperature must be brought up above the
freezing point before attempting a jump-start.
WHAT TO DO IN EMERGENCIES
52
Page 56 of 78
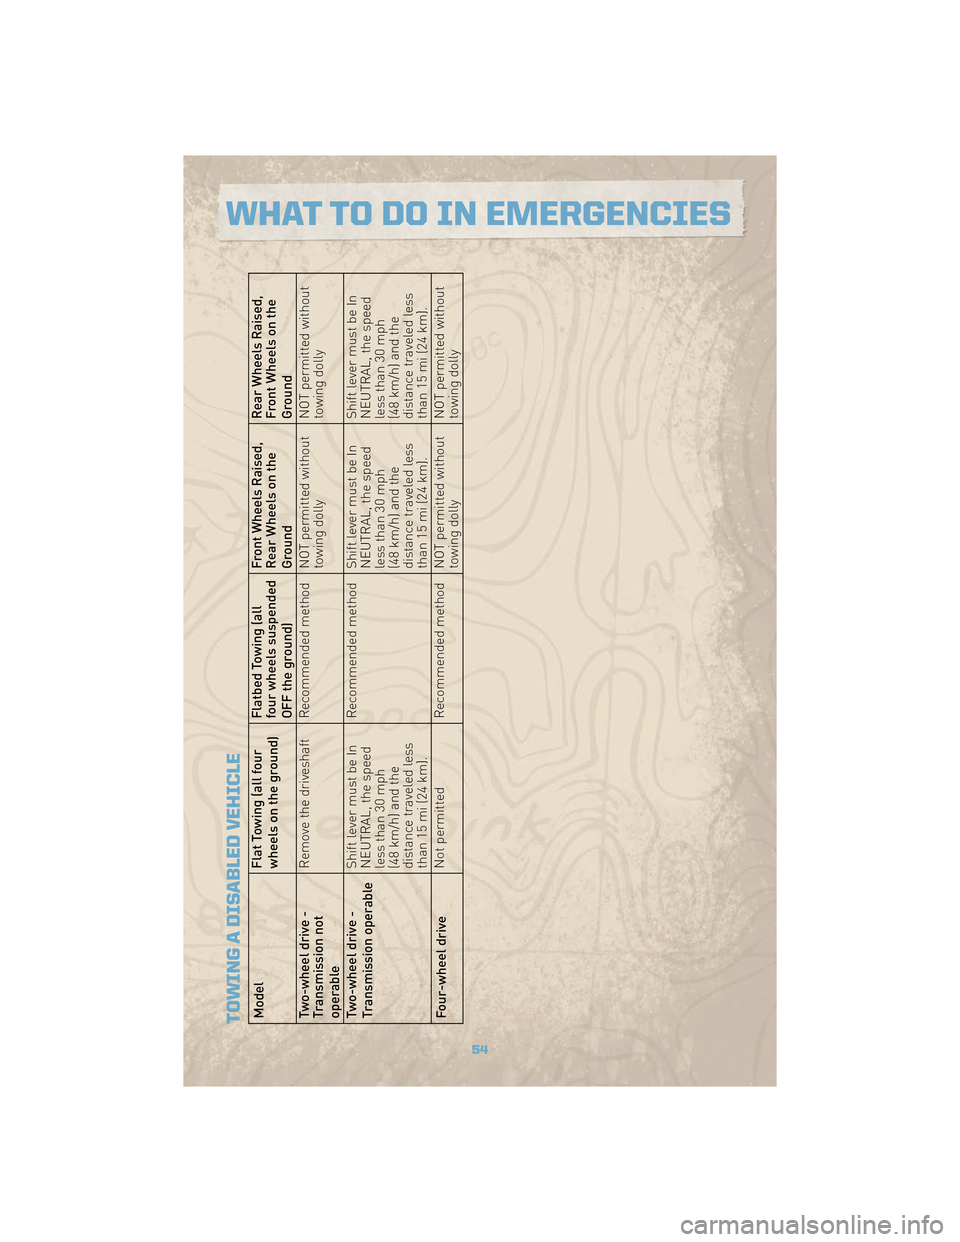
TOWING A DISABLED VEHICLEModelFlat Towing (all four
wheels on the ground)Flatbed Towing (all
four wheels suspended
OFF the ground)Front Wheels Raised,
Rear Wheels on the
GroundRear Wheels Raised,
Front Wheels on the
Ground
Two-wheel drive -
Transmission not
operable Remove the driveshaft Recommended method NOT permitted without
towing dollyNOT permitted without
towing dolly
Two-wheel drive -
Transmission operable Shift lever must be In
NEUTRAL, the speed
less than 30 mph
(48 km/h) and the
distance traveled less
than 15 mi (24 km).Recommended method Shift lever must be In
NEUTRAL, the speed
less than 30 mph
(48 km/h) and the
distance traveled less
than 15 mi (24 km).Shift lever must be In
NEUTRAL, the speed
less than 30 mph
(48 km/h) and the
distance traveled less
than 15 mi (24 km).
Four-wheel drive Not permitted
Recommended method NOT permitted without
towing dollyNOT permitted without
towing dolly
54
WHAT TO DO IN EMERGENCIES
Page 61 of 78
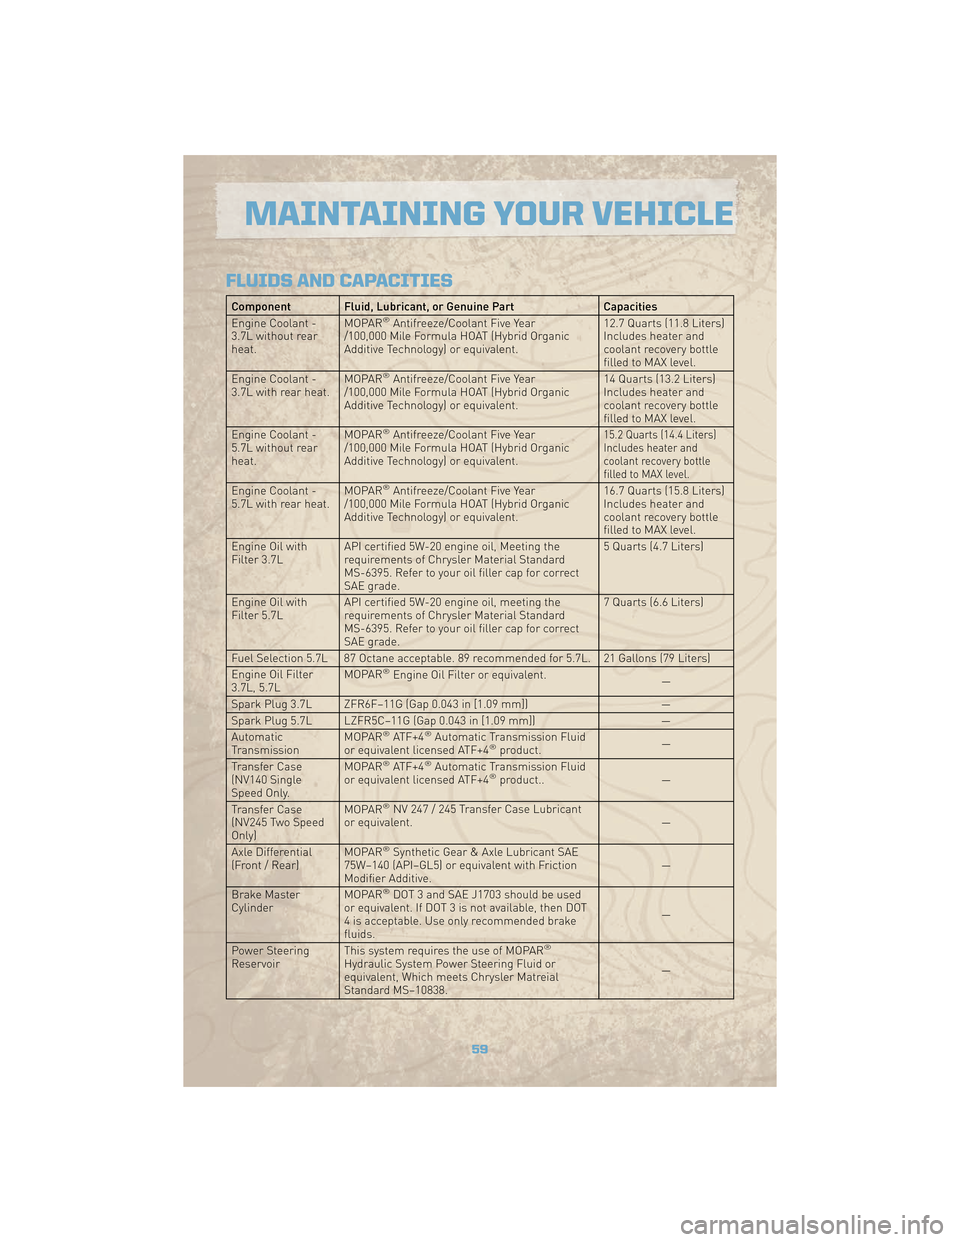
FLUIDS AND CAPACITIES
Component Fluid, Lubricant, or Genuine PartCapacities
Engine Coolant -
3.7L without rear
heat. MOPAR®Antifreeze/Coolant Five Year
/100,000 Mile Formula HOAT (Hybrid Organic
Additive Technology) or equivalent. 12.7 Quarts (11.8 Liters)
Includes heater and
coolant recovery bottle
filled to MAX level.
Engine Coolant -
3.7L with rear heat. MOPAR
®Antifreeze/Coolant Five Year
/100,000 Mile Formula HOAT (Hybrid Organic
Additive Technology) or equivalent. 14 Quarts (13.2 Liters)
Includes heater and
coolant recovery bottle
filled to MAX level.
Engine Coolant -
5.7L without rear
heat. MOPAR
®Antifreeze/Coolant Five Year
/100,000 Mile Formula HOAT (Hybrid Organic
Additive Technology) or equivalent.15.2 Quarts (14.4 Liters)
Includes heater and
coolant recovery bottle
filled to MAX level.
Engine Coolant -
5.7L with rear heat. MOPAR®Antifreeze/Coolant Five Year
/100,000 Mile Formula HOAT (Hybrid Organic
Additive Technology) or equivalent. 16.7 Quarts (15.8 Liters)
Includes heater and
coolant recovery bottle
filled to MAX level.
Engine Oil with
Filter 3.7L API certified 5W-20 engine oil, Meeting the
requirements of Chrysler Material Standard
MS-6395. Refer to your oil filler cap for correct
SAE grade. 5 Quarts (4.7 Liters)
Engine Oil with
Filter 5.7L API certified 5W-20 engine oil, meeting the
requirements of Chrysler Material Standard
MS-6395. Refer to your oil filler cap for correct
SAE grade. 7 Quarts (6.6 Liters)
Fuel Selection 5.7L 87 Octane acceptable. 89 recommended for 5.7L. 21 Gallons (79 Liters)
Engine Oil Filter
3.7L, 5.7L MOPAR
®Engine Oil Filter or equivalent.
—
Spark Plug 3.7L ZFR6F–11G (Gap 0.043 in [1.09 mm]) —
Spark Plug 5.7L LZFR5C–11G (Gap 0.043 in [1.09 mm]) —
Automatic
Transmission MOPAR
®ATF+4®Automatic Transmission Fluid
or equivalent licensed ATF+4®product. —
Transfer Case
(NV140 Single
Speed Only. MOPAR®ATF+4®Automatic Transmission Fluid
or equivalent licensed ATF+4®product.. —
Transfer Case
(NV245 Two Speed
Only) MOPAR
®NV 247 / 245 Transfer Case Lubricant
or equivalent. —
Axle Differential
(Front / Rear) MOPAR
®Synthetic Gear & Axle Lubricant SAE
75W–140 (API–GL5) or equivalent with Friction
Modifier Additive. —
Brake Master
Cylinder MOPAR
®DOT 3 and SAE J1703 should be used
or equivalent. If DOT 3 is not available, then DOT
4 is acceptable. Use only recommended brake
fluids. —
Power Steering
Reservoir This system requires the use of MOPAR
®
Hydraulic System Power Steering Fluid or
equivalent, Which meets Chrysler Matreial
Standard MS–10838. —
59
MAINTAINING YOUR VEHICLE