headlamp JEEP COMPASS 2019 Owner handbook (in English)
[x] Cancel search | Manufacturer: JEEP, Model Year: 2019, Model line: COMPASS, Model: JEEP COMPASS 2019Pages: 362, PDF Size: 6.23 MB
Page 8 of 362
WELCOME FROM FCA
HOW TO FIND YOUR OWNER’S MANUAL ONLINE.... 1
HOW TO USE THIS MANUAL
HOW TO USE THIS MANUAL............... 2Essential Information................ 2
Symbols........................ 2
ROLLOVER WARNING................... 2
IMPORTANT NOTICE................... 3
WARNINGS AND CAUTIONS............... 4
VEHICLE CHANGES/ALTERATIONS............ 4
GRAPHICAL TABLE OF CONTENTS
INSTRUMENT PANEL.................. 11
INTERIOR......................... 12
GETTING TO KNOW YOUR VEHICLE
KEYS........................... 13Key Fobs...................... 13
IGNITION SWITCH.................... 15Keyless Enter-N-Go — Ignition —
If Equipped..................... 15
Integrated/Manual Ignition — If Equipped . . 16
Electronic Steering Wheel Lock —
If Equipped..................... 16
Mechanical Steering Wheel Lock —
If Equipped..................... 16
REMOTE STARTING SYSTEM — IF EQUIPPED.... 17How To Use Remote Start — If Equipped . . . 17
To Enter Remote Start Mode........... 18
VEHICLE SECURITY ALARM — IF EQUIPPED..... 18To Arm The System................ 18
To Disarm The System.............. 19
Security System Manual Override........ 19
PREMIUM VEHICLE SECURITY ALARM —
IF EQUIPPED...................... 19
To Arm The System................ 20
To Disarm The System.............. 20
Security System Manual Override........ 21
DOORS.......................... 21Keyless Enter-N-Go — Passive Entry...... 21
Child-Protection Door Lock System —
Rear Doors..................... 23
SEATS .......................... 24Manual Adjustment (Rear Seats)........ 24
Driver Memory Seat — If Equipped....... 26
Front Heated Seats — If Equipped....... 28
Front Ventilated Seats — If Equipped..... 29
40/20/40 Rear Seat Armrest— If Equipped . 29
HEAD RESTRAINTS................... 29Front Head Restraint Adjustment........ 30
Rear Head Restraints............... 31
STEERING WHEEL................... 32Tilt/Telescoping Steering Column........ 32
Heated Steering Wheel — If Equipped..... 32
EXTERIOR LIGHTS.................... 33Multifunction Lever................ 33
Headlight Switch.................. 33
Daytime Running Lights (DRL) —
If Equipped..................... 34
High/Low Beam Switch.............. 34
Automatic High Beam Headlamp Control —
If Equipped..................... 34
Flash-To-Pass................... 34
Automatic Headlights — If Equipped..... 34
Headlight Time Delay............... 35
Lights-On Reminder — If Equipped...... 35
Front And Rear Fog Lights — If Equipped . . . 35
Turn Signals.................... 36Headlight Leveling System — If Equipped . . 36
Battery Saver Feature............... 36
WINDSHIELD WIPERS AND WASHERS......... 37Windshield Wiper Operation........... 37
Rain Sensing Wipers — If Equipped...... 38
Rear Window Wiper/Washer........... 39
CLIMATE CONTROLS................... 39Automatic Climate Controls Overview..... 39
Automatic Temperature Control (ATC)..... 47
Operating Tips................... 47
WINDOWS........................ 48Power Window Controls.............. 48
Auto-Down Feature................ 49
Auto-Up Feature With Anti-Pinch Protection . 49
Window Lockout Switch............. 49
Wind Buffeting.................. 50
POWER SUNROOF WITH POWER SHADE —
IF EQUIPPED....................... 50
Opening Sunroof.................. 51
Opening Sunroof — Vent............. 51
Closing Sunroof.................. 51
Opening Power Shade............... 51
Closing Power Shade............... 52
Pinch Protect Feature............... 52
Sunroof Maintenance............... 52
Ignition Off Operation............... 53
HOOD.......................... 53Opening The Hood................. 53
Closing The Hood................. 53
LIFTGATE......................... 54Opening....................... 54
Closing........................ 54
Power Liftgate — If Equipped.......... 54
INTERNAL EQUIPMENT................. 56Power Outlets.................... 56
TABLE OF CONTENTS
6
Page 36 of 362
Rotate the headlight switch clockwise to the
first detent for parking light and instrument
panel light operation. Rotate the headlight
switch to the second detent for headlight,
parking light and instrument panel light op-
eration.
Daytime Running Lights (DRL) —
If Equipped
The Daytime Running Lights will turn on
when the engine is started and remain on
unless the headlamps are turned on or the
ignition is turned OFF.
NOTE:
If allowed by law in the country in which the
vehicle was purchased the Daytime Running
Lights can be turned on and off using the
Uconnect System. Refer to “Uconnect Set-
tings” in “Multimedia” in the Owner’s
Manual for further details.
High/Low Beam Switch
Push the multifunction lever toward the in-
strument panel to switch the headlights to
high beams. Pulling the multifunction lever
back toward the steering wheel will return the
lights to low beams.
Automatic High Beam Headlamp Control
— If Equipped
The Automatic High Beam Headlamp Control
system provides increased forward lighting at
night by automating high beam control
through the use of a digital camera mounted
on the inside rearview mirror. This camera
detects vehicle specific light and automati-
cally switches from high beams to low beams
until the approaching vehicle is out of view.
NOTE:
• The Automatic High Beam Headlamp Con-
trol can be turned on or off using the
Uconnect System. Refer to “Uconnect Set-
tings” in “Multimedia” in the Owner’s
Manual for further information.• Broken, muddy, or obstructed headlights
and taillights of vehicles in the field of view
will cause headlights to remain on longer
(closer to the vehicle). Also, dirt, film, and
other obstructions on the windshield or
camera lens will cause the system to func-
tion improperly.
Flash-To-Pass
You can signal another vehicle with your
headlights by lightly pulling the multifunc-
tion lever toward you. This will cause the high
beam headlights to turn on, and remain on,
until the lever is released.
Automatic Headlights — If Equipped
This system automatically turns the head-
lights on or off according to ambient light
levels. To turn the system on, rotate the
headlight switch clockwise to the last detent
for automatic headlight operation. When the
system is on, the headlight time delay feature
is also on. This means the headlights will stay
on for up to 90 seconds after you place the
ignition into the OFF position. To turn the
automatic system off, move the headlight
switch out of the AUTO position.
GETTING TO KNOW YOUR VEHICLE
34
Page 121 of 362
see your doctor. If these particles settle on
your clothing, follow the garment manufac-
turer’s instructions for cleaning.
Do not drive your vehicle after the air bags
have deployed. If you are involved in another
collision, the air bags will not be in place to
protect you.
WARNING!
Deployed air bags and seat belt preten-
sioners cannot protect you in another col-
lision. Have the air bags, seat belt preten-
sioners, and the seat belt retractor
assemblies replaced by an authorized
dealer immediately. Also, have the Occu-
pant Restraint Controller System serviced
as well.
NOTE:
• Air bag covers may not be obvious in the
interior trim, but they will open during air
bag deployment.
• After any collision, the vehicle should be
taken to an authorized dealer immediately.
Enhanced Accident Response System
In the event of an impact, if the communica-
tion network remains intact, and the power
remains intact, depending on the nature of
the event, the ORC will determine whether to
have the Enhanced Accident Response Sys-
tem perform the following functions:
• Cut off fuel to the engine (If Equipped)
• Cut off battery power to the electric motor
(If Equipped)
• Flash hazard lights as long as the battery
has power
• Turn on the interior lights, which remain on
as long as the battery has power or for 15
minutes from the intervention of the En-
hanced Accident Response System.
• Unlock the power door locks.
Your vehicle may also be designed to perform
any of these other functions in response to
the Enhanced Accident Response System:
• Turn off the Fuel Filter Heater, Turn off the
HVAC Blower Motor, Close the HVAC Circu-
lation Door• Cut off battery power to the:
– Engine
– Electric Motor (if equipped)
– Electric power steering
– Brake booster
– Electric park brake
– Automatic transmission gear selector
– Horn
– Front wiper
– Headlamp washer pump
NOTE:
After an accident, remember to cycle the
ignition to the STOP (OFF/LOCK) position
and remove the key from the ignition switch
to avoid draining the battery. Carefully check
the vehicle for fuel leaks in the engine com-
partment and on the ground near the engine
compartment and fuel tank before resetting
the system and starting the engine. If there
are no fuel leaks or damage to the vehicle
electrical devices (e.g. headlights) after an
accident, reset the system by following the
procedure described below. If you have any
doubt, contact an authorized dealer.
119
Page 196 of 362
Exterior Bulbs
Lamps Bulb Number
Low Beam Headlamps (Halogen) H11LL
High Beam Headlamps (Halogen) 9005LL
Front Position/Daytime Running Lights (DRL ) PSX24W
Front Direction Indicator Lamps 7444NA
Front Position – Premium LED LED (Serviced At An Authorized Dealer)
Front Fog Lamps H11LL
Low Beam / High Beam Headlamps (HID) D3S (HID) (Serviced At An Authorized Dealer)
Side Indicators (Side View Mirror) LED (Serviced At An Authorized Dealer)
Tail/Brake Lights Premium Tail Lights: LED (Serviced At An Authorized Dealer)
Base Tail Lights: W21/5WLL-M
Rear Fog Lamps W21WLL
Turn Indicators W21WLL For Premium Tail Lamps
W21/5WLL For Base Tail Lamps
Center High Mounted Stop Lamp (CHMSL) LED (Serviced At An Authorized Dealer)
License Plate Lamp LED (Serviced At An Authorized Dealer)
Liftgate Lamp Reverse W21WLL
Liftgate Lamp Tail LED (Serviced At An Authorized Dealer)
IN CASE OF EMERGENCY
194
Page 197 of 362
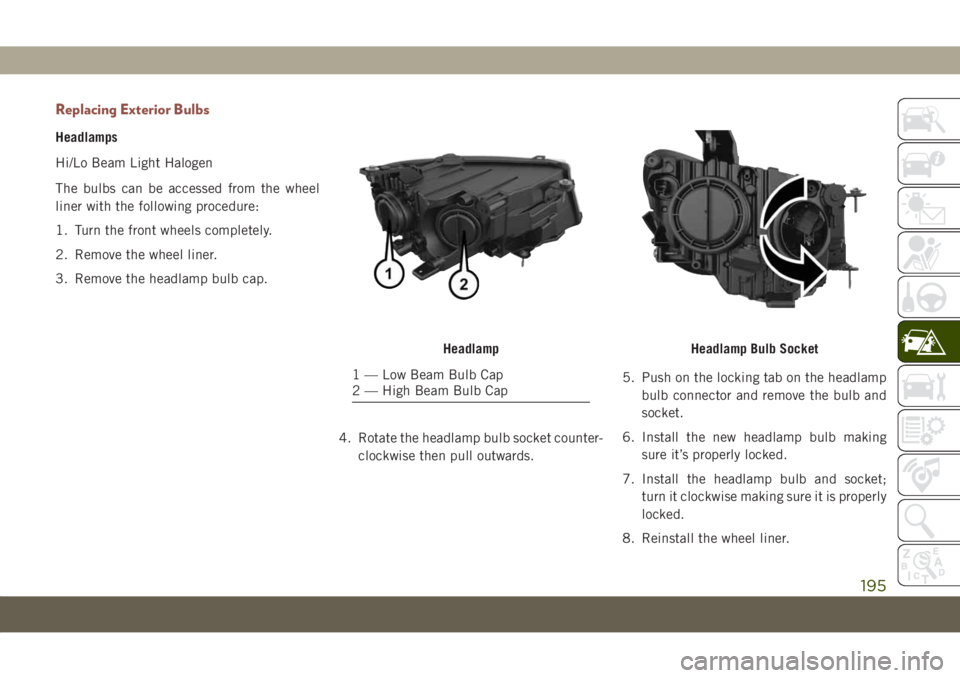
Replacing Exterior Bulbs
Headlamps
Hi/Lo Beam Light Halogen
The bulbs can be accessed from the wheel
liner with the following procedure:
1. Turn the front wheels completely.
2. Remove the wheel liner.
3. Remove the headlamp bulb cap.
4. Rotate the headlamp bulb socket counter-
clockwise then pull outwards.5. Push on the locking tab on the headlamp
bulb connector and remove the bulb and
socket.
6. Install the new headlamp bulb making
sure it’s properly locked.
7. Install the headlamp bulb and socket;
turn it clockwise making sure it is properly
locked.
8. Reinstall the wheel liner.
Headlamp
1 — Low Beam Bulb Cap
2 — High Beam Bulb Cap
Headlamp Bulb Socket
195
Page 208 of 362
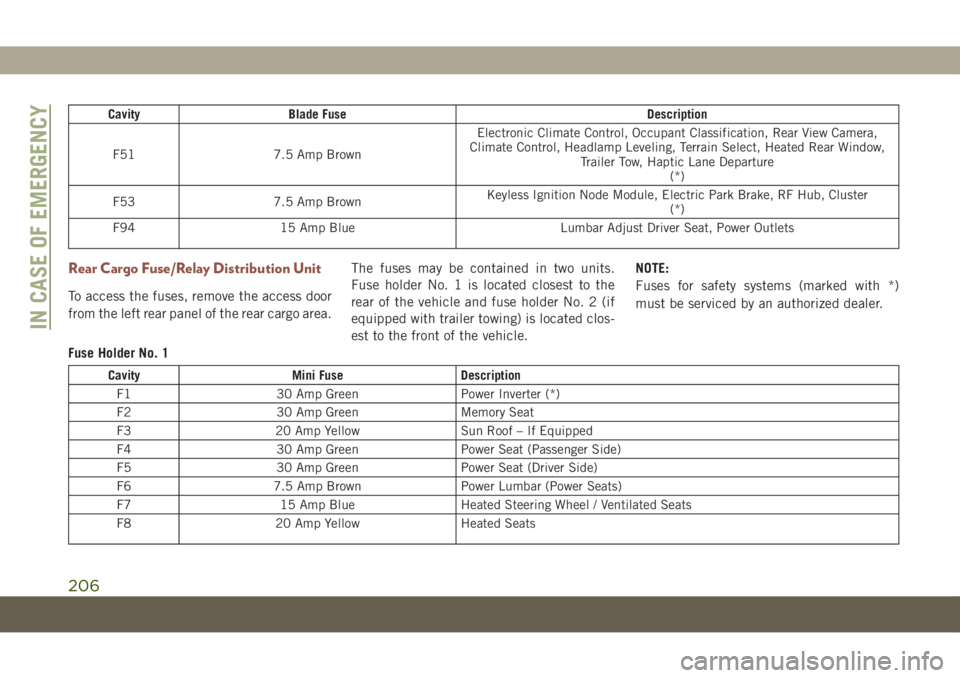
Cavity Blade Fuse Description
F51 7.5 Amp BrownElectronic Climate Control, Occupant Classification, Rear View Camera,
Climate Control, Headlamp Leveling, Terrain Select, Heated Rear Window,
Trailer Tow, Haptic Lane Departure
(*)
F53 7.5 Amp BrownKeyless Ignition Node Module, Electric Park Brake, RF Hub, Cluster
(*)
F94 15 Amp Blue Lumbar Adjust Driver Seat, Power Outlets
Rear Cargo Fuse/Relay Distribution Unit
To access the fuses, remove the access door
from the left rear panel of the rear cargo area.The fuses may be contained in two units.
Fuse holder No. 1 is located closest to the
rear of the vehicle and fuse holder No. 2 (if
equipped with trailer towing) is located clos-
est to the front of the vehicle.NOTE:
Fuses for safety systems (marked with *)
must be serviced by an authorized dealer.
Fuse Holder No. 1
Cavity Mini Fuse Description
F1 30 Amp Green Power Inverter (*)
F2 30 Amp Green Memory Seat
F3 20 Amp Yellow Sun Roof – If Equipped
F4 30 Amp Green Power Seat (Passenger Side)
F5 30 Amp Green Power Seat (Driver Side)
F6 7.5 Amp Brown Power Lumbar (Power Seats)
F7 15 Amp Blue Heated Steering Wheel / Ventilated Seats
F8 20 Amp Yellow Heated Seats
IN CASE OF EMERGENCY
206