change wheel JEEP COMPASS 2020 Owner handbook (in English)
[x] Cancel search | Manufacturer: JEEP, Model Year: 2020, Model line: COMPASS, Model: JEEP COMPASS 2020Pages: 328, PDF Size: 8.85 MB
Page 166 of 328
STARTING AND OPERATING
164
When the LaneSense system senses the
lane has been approached and is in a lane
departure situation, the left thick lane line
flashes yellow, the left thin line remains
solid yellow and the LaneSense telltale
changes from solid white to flashing
yellow.
NOTE:
The LaneSense system operates with the
similar behavior for a right lane departure
when only the right lane marking has been
detected.
Left Lane Departure — Both Lanes Detected
When the LaneSense system is on, the
lane lines turn from grey to white to indi-
cate that both of the lane markings have
been detected. The LaneSense telltale
is solid green when both lane markings
have been detected and the system is
“armed” to provide visual warnings in the
instrument cluster display and a torque
warning in the steering wheel if an unin -
tentional lane departure occurs.
When the LaneSense system senses a lane
drift situation, the left thick lane line and
left thin line turn solid yellow. The Lane-
Sense telltale changes from solid green to solid yellow. At this time torque is
applied to the steering wheel in the oppo-
site direction of the lane boundary.
For example: if approaching the left side
of the lane the steering wheel will turn to
the right.
When the LaneSense system senses the
lane has been approached and is in a lane
departure situation, the left thick lane line
flashes yellow and the left thin line
remains solid yellow. The LaneSense tell
-
tale stays solid yellow. At this time
torque is applied to the steering wheel in
the opposite direction of the lane
boundary.
For example: if approaching the left side
of the lane the steering wheel will turn to
the right.
NOTE:
The LaneSense system operates with the
similar behavior for a right lane departure.
Changing LaneSense Status
The LaneSense system has settings to adjust
the intensity of the torque warning (Low/
Medium/High) and the warning zone sensi -
tivity (Early/Medium/Late) that you can
configure through the Uconnect system screen. Refer to “Uconnect Settings” in
“Multimedia” in the Owner’s Manual for
further details.
NOTE:
The system will not apply torque to the
steering wheel whenever a safety system
engages (Anti-Lock Brakes, Traction
Control System, Electronic Stability
Control, Forward Collision Warning, etc.).
Use of the turn signals and Hazard
Warning flashers also suppresses the
warnings.
PARKVIEW REAR BACK UP
CAMERA — IF EQUIPPED
You can see an on-screen image of the rear
of your vehicle whenever the transmission is
shifted into REVERSE. The ParkView Rear
Back Up Camera image will be displayed on
the Uconnect Display, located on the center
stack of the instrument panel.
If the Uconnect Display appears foggy, clean
the camera lens located on the rear of the
vehicle above the rear license plate
Refer to “ParkView Back Up Camera” in
“Starting And Operating” in your Owner's
Manual for further information.
2020_JEEP_M6_UG_UK.book Page 164
Page 191 of 328
189
JACKING AND TIRE
CHANGING Jack Location/Spare Tire Stowage
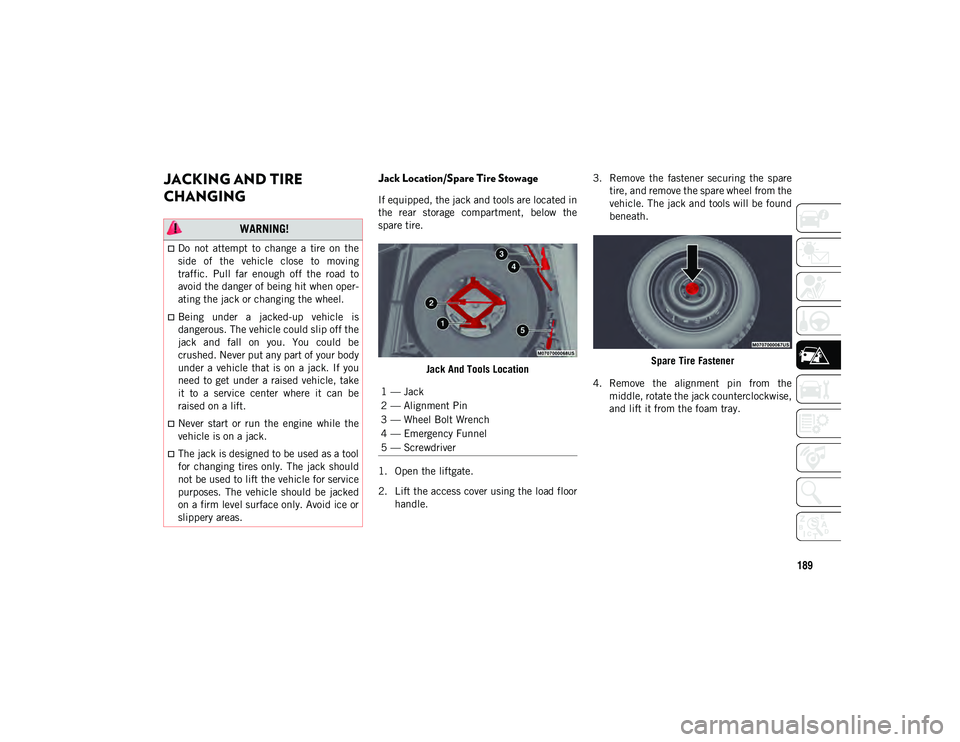
If equipped, the jack and tools are located in
the rear storage compartment, below the
spare tire.Jack And Tools Location
1. Open the liftgate.
2. Lift the access cover using the load floor handle. 3. Remove the fastener securing the spare
tire, and remove the spare wheel from the
vehicle. The jack and tools will be found
beneath.
Spare Tire Fastener
4. Remove the alignment pin from the middle, rotate the jack counterclockwise,
and lift it from the foam tray.
WARNING!
Do not attempt to change a tire on the
side of the vehicle close to moving
traffic. Pull far enough off the road to
avoid the danger of being hit when oper -
ating the jack or changing the wheel.
Being under a jacked-up vehicle is
dangerous. The vehicle could slip off the
jack and fall on you. You could be
crushed. Never put any part of your body
under a vehicle that is on a jack. If you
need to get under a raised vehicle, take
it to a service center where it can be
raised on a lift.
Never start or run the engine while the
vehicle is on a jack.
The jack is designed to be used as a tool
for changing tires only. The jack should
not be used to lift the vehicle for service
purposes. The vehicle should be jacked
on a firm level surface only. Avoid ice or
slippery areas.
1 — Jack
2 — Alignment Pin
3 — Wheel Bolt Wrench
4 — Emergency Funnel
5 — Screwdriver
2020_JEEP_M6_UG_UK.book Page 189
Page 192 of 328
IN CASE OF EMERGENCY
190(Continued)
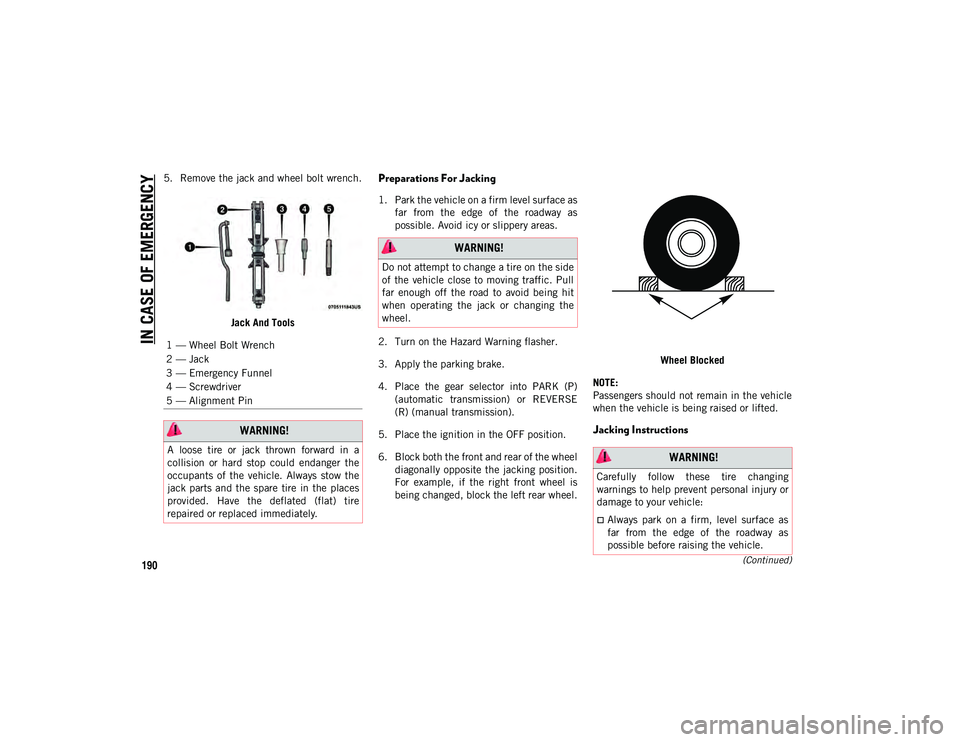
5. Remove the jack and wheel bolt wrench.Jack And ToolsPreparations For Jacking
1. Park the vehicle on a firm level surface asfar from the edge of the roadway as
possible. Avoid icy or slippery areas.
2. Turn on the Hazard Warning flasher.
3. Apply the parking brake.
4. Place the gear selector into PARK (P) (automatic transmission) or REVERSE
(R) (manual transmission).
5. Place the ignition in the OFF position.
6. Block both the front and rear of the wheel diagonally opposite the jacking position.
For example, if the right front wheel is
being changed, block the left rear wheel. Wheel Blocked
NOTE:
Passengers should not remain in the vehicle
when the vehicle is being raised or lifted.
Jacking Instructions
1 — Wheel Bolt Wrench
2 — Jack
3 — Emergency Funnel
4 — Screwdriver
5 — Alignment Pin
WARNING!
A loose tire or jack thrown forward in a
collision or hard stop could endanger the
occupants of the vehicle. Always stow the
jack parts and the spare tire in the places
provided. Have the deflated (flat) tire
repaired or replaced immediately.
WARNING!
Do not attempt to change a tire on the side
of the vehicle close to moving traffic. Pull
far enough off the road to avoid being hit
when operating the jack or changing the
wheel.
WARNING!
Carefully follow these tire changing
warnings to help prevent personal injury or
damage to your vehicle:
Always park on a firm, level surface as
far from the edge of the roadway as
possible before raising the vehicle.
2020_JEEP_M6_UG_UK.book Page 190
Page 193 of 328
191(Continued)
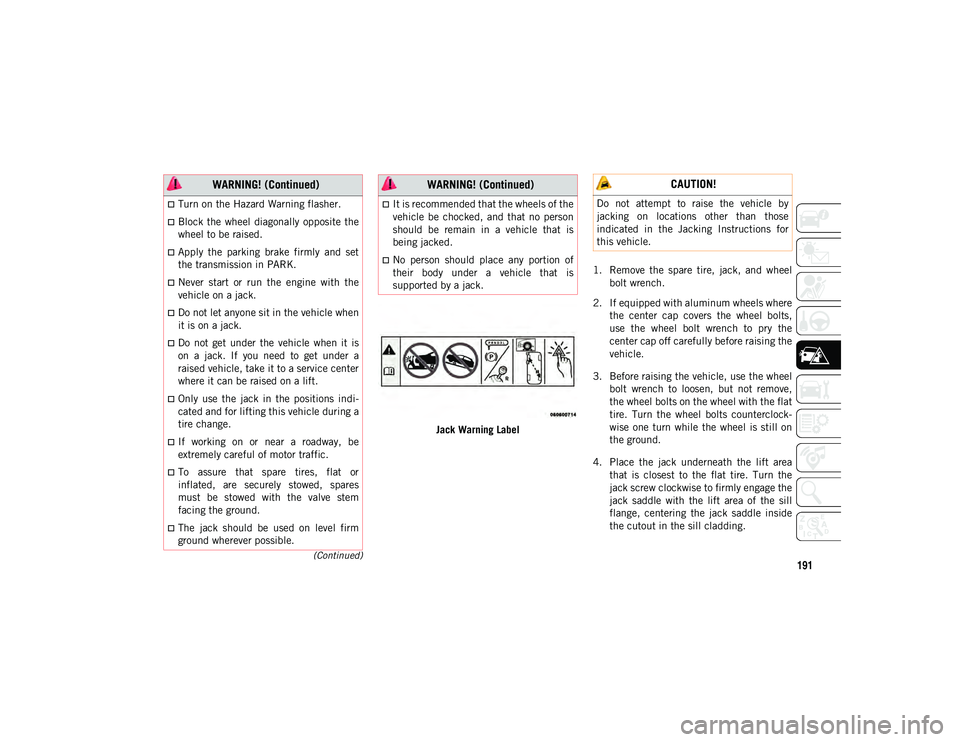
Jack Warning Label1. Remove the spare tire, jack, and wheel
bolt wrench.
2. If equipped with aluminum wheels where the center cap covers the wheel bolts,
use the wheel bolt wrench to pry the
center cap off carefully before raising the
vehicle.
3. Before raising the vehicle, use the wheel bolt wrench to loosen, but not remove,
the wheel bolts on the wheel with the flat
tire. Turn the wheel bolts counterclock -
wise one turn while the wheel is still on
the ground.
4. Place the jack underneath the lift area that is closest to the flat tire. Turn the
jack screw clockwise to firmly engage the
jack saddle with the lift area of the sill
flange, centering the jack saddle inside
the cutout in the sill cladding.
Turn on the Hazard Warning flasher.
Block the wheel diagonally opposite the
wheel to be raised.
Apply the parking brake firmly and set
the transmission in PARK.
Never start or run the engine with the
vehicle on a jack.
Do not let anyone sit in the vehicle when
it is on a jack.
Do not get under the vehicle when it is
on a jack. If you need to get under a
raised vehicle, take it to a service center
where it can be raised on a lift.
Only use the jack in the positions indi -
cated and for lifting this vehicle during a
tire change.
If working on or near a roadway, be
extremely careful of motor traffic.
To assure that spare tires, flat or
inflated, are securely stowed, spares
must be stowed with the valve stem
facing the ground.
The jack should be used on level firm
ground wherever possible.
WARNING! (Continued)
It is recommended that the wheels of the
vehicle be chocked, and that no person
should be remain in a vehicle that is
being jacked.
No person should place any portion of
their body under a vehicle that is
supported by a jack.
WARNING! (Continued) CAUTION!
Do not attempt to raise the vehicle by
jacking on locations other than those
indicated in the Jacking Instructions for
this vehicle.
2020_JEEP_M6_UG_UK.book Page 191
Page 197 of 328
195
Jack Usage Precautions
To complete the Use and Maintenance
Handbook to which this supplement is
attached, given below are some instructions
on the proper use of the jack.MaintenanceMake sure grime does not build up on the
“worm screw.”
Keep the “worm screw” lubricated.
Never modify the jack.
Conditions Of Non-Use:
Temperatures below −40°C.
On sandy or muddy ground.
On uneven ground.
On steep roads.
In extreme weather conditions: thunder -
storms, typhoons, hurricanes, blizzards,
storms, etc.
WARNING!
When using the crank, make sure it turns
freely without the risk of scraping hands
against the ground.
Even the moving parts of the jack, the
“worm screw” and joints can cause
injuries: avoid contact with them. Clean it
thoroughly if dirtied with grease.
CAUTION!
The jack is a tool designed exclusively for
changing a wheel, in case of a puncture or
damage to a tire of the vehicle on which it
is fitted or on vehicles of the same model.
Any other use, e.g. to jack up other vehicle
models or different things, is strictly
prohibited. Never use it to carry out
maintenance or repairs under the vehicle
or to change summer/winter wheels and
vice versa. Never go under the raised
vehicle. If any work under the vehicle is
necessary, contact an authorized dealer.
Incorrect placing of the jack can cause the
vehicle to drop: use it only in the positions
indicated. Do not use the jack for loads
higher than that specified on the label.
Never start the engine with vehicle raised.
If the vehicle is raised more than
necessary, everything can become more
unstable, with the risk of the vehicle
dropping violently. Therefore raise the
vehicle only as much as necessary for the
wheel/spare.
2020_JEEP_M6_UG_UK.book Page 195
Page 200 of 328
IN CASE OF EMERGENCY
198
(Continued)
Sealing A Tire With Tire Service Kit
Whenever You Stop To Use Tire Service Kit:
1. Pull over to a safe location and turn onthe vehicle’s Hazard Warning flashers.
2. Verify that the valve stem (on the wheel with the deflated tire) is in a position that
is near to the ground. This will allow the
Tire Service Kit Hose to reach the valve
stem and keep the Tire Service Kit flat on
the ground. This will provide the best
positioning of the kit when injecting the
sealant into the deflated tire and running
the air pump. Move the vehicle as neces -
sary to place the valve stem in this posi -
tion before proceeding. 3. Place the transmission in PARK and
cycle the ignition in the OFF position.
4. Apply the parking brake.
Setting Up To Use Tire Service Kit:
1. Uncoil the Sealant Hose and then remove the cap from the fitting at the end of the
hose.
2. Place the Tire Service Kit flat on the ground next to the deflated tire.
3. Remove the cap from the valve stem and then screw the fitting at the end of the
Sealant Hose onto the valve stem.
4. Uncoil the Power Plug and insert the plug into the vehicle’s 12 Volt power outlet.
NOTE:
Do not remove foreign objects (e.g., screws
or nails) from the tire.
Injecting Tire Service Kit Sealant Into The
Deflated Tire:
1. Always start the vehicle before turning the Tire Service Kit on.
2. Ensure the Mode Select Knob is to the Sealant Mode position.
If the wheel has any damage.
If you are unsure of the condition ofthe tire or the wheel.
Keep Tire Service Kit away from open
flames or heat source.
A loose Tire Service Kit thrown forward in
a collision or hard stop could endanger
the occupants of the vehicle. Always
stow the Tire Service Kit in the place
provided. Failure to follow these warn -
ings can result in injuries that are serious
or fatal to you, your passengers, and
others around you.
Take care not to allow the contents of
Tire Service Kit to come in contact with
hair, eyes, or clothing. Tire Service Kit
sealant is harmful if inhaled, swallowed,
or absorbed through the skin. It causes
skin, eye, and respiratory irritation.
Flush immediately with plenty of water if
there is any contact with eyes or skin.
Change clothing as soon as possible, if
there is any contact with clothing.
WARNING! (Continued)
Tire Service Kit Sealant solution
contains latex. In case of an allergic
reaction or rash, consult a physician
immediately. Keep Tire Service Kit out
of reach of children. If swallowed, rinse
mouth immediately with plenty of water
and drink plenty of water. Do not induce
vomiting! Consult a physician immedi -
ately.
WARNING! (Continued)
2020_JEEP_M6_UG_UK.book Page 198
Page 238 of 328
SERVICING AND MAINTENANCE
236
(Continued)
NOTE:
Wheel Valve Stem must be replaced as well
when installing new tires due to wear and
tear in existing tires.
Keep dismounted tires in a cool, dry place
with as little exposure to light as possible.
Protect tires from contact with oil, grease,
and gasoline.
Replacement Tires
The tires on your new vehicle provide a
balance of many characteristics. They should
be inspected regularly for wear and correct
cold tire inflation pressures. The manufac-
turer strongly recommends that you use tires
equivalent to the originals in size, quality
and performance when replacement is
needed. Refer to the paragraph on “Tread
Wear Indicators” in this section. Refer to the
Tire and Loading Information placard or the
Vehicle Certification Label for the size desig -
nation of your tire. The Load Index and
Speed Symbol for your tire will be found on
the original equipment tire sidewall.
It is recommended to replace the two front
tires or two rear tires as a pair. Replacing just
one tire can seriously affect your vehicle’s
handling. If you ever replace a wheel, make
sure that the wheel’s specifications match
those of the original wheels. It is recommended you contact an authorized
tire dealer or original equipment dealer with
any questions you may have on tire specifica
-
tions or capability. Failure to use equivalent
replacement tires may adversely affect the
safety, handling, and ride of your vehicle.
Tire Types
All Season Tires — If Equipped
All Season tires provide traction for all
seasons (Spring, Summer, Fall, and Winter).
Traction levels may vary between different all
season tires. All season tires can be identi -
fied by the M+S, M&S, M/S or MS designa -
tion on the tire sidewall. Use all season tires
only in sets of four; failure to do so may
adversely affect the safety and handling of
your vehicle.
WARNING!
Do not use a tire, wheel size, load rating,
or speed rating other than that specified
for your vehicle. Some combinations of
unapproved tires and wheels may change
suspension dimensions and performance
characteristics, resulting in changes to
steering, handling, and braking of your
vehicle. This can cause unpredictable
handling and stress to steering and
suspension components. You could lose
control and have a collision resulting in
serious injury or death. Use only the tire
and wheel sizes with load ratings
approved for your vehicle.
Never use a tire with a smaller load index
or capacity, other than what was origi -
nally equipped on your vehicle. Using a
tire with a smaller load index could result
in tire overloading and failure. You could
lose control and have a collision.
Failure to equip your vehicle with tires
having adequate speed capability can
result in sudden tire failure and loss of
vehicle control.
CAUTION!
Replacing original tires with tires of a
different size may result in false
speedometer and odometer readings.
WARNING! (Continued)
2020_JEEP_M6_UG_UK.book Page 236
Page 272 of 328
MULTIMEDIA
270
Media Hub — USB/Audio Jack (AUX) — If
Equipped
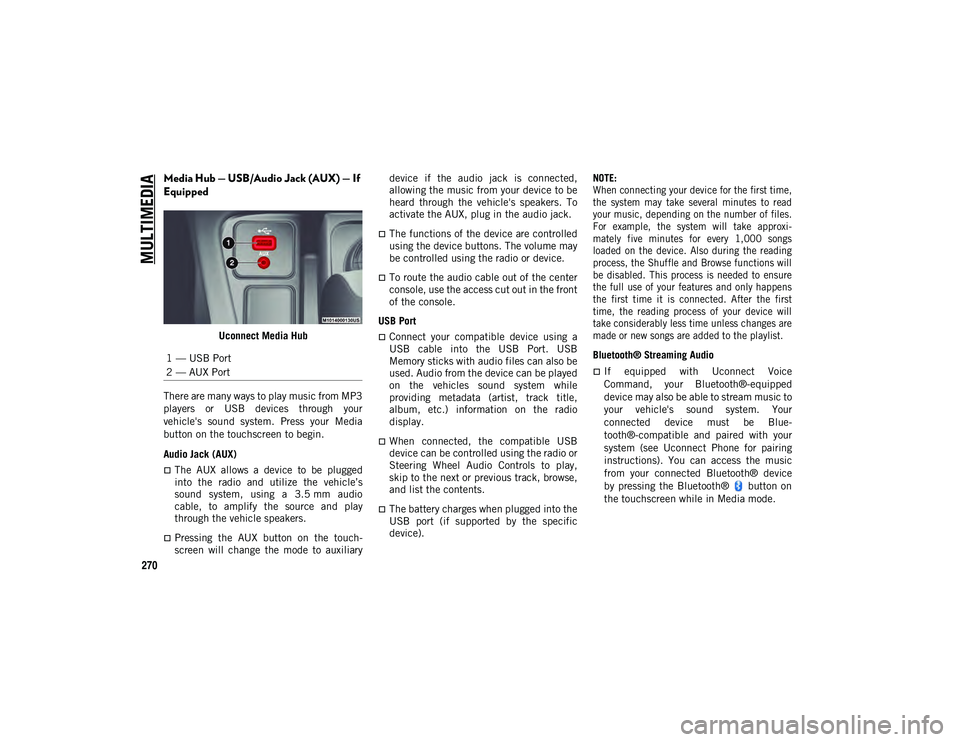
Uconnect Media Hub
There are many ways to play music from MP3
players or USB devices through your
vehicle's sound system. Press your Media
button on the touchscreen to begin.
Audio Jack (AUX)
The AUX allows a device to be plugged
into the radio and utilize the vehicle’s
sound system, using a 3.5 mm audio
cable, to amplify the source and play
through the vehicle speakers.
Pressing the AUX button on the touch -
screen will change the mode to auxiliary device if the audio jack is connected,
allowing the music from your device to be
heard through the vehicle's speakers. To
activate the AUX, plug in the audio jack.
The functions of the device are controlled
using the device buttons. The volume may
be controlled using the radio or device.
To route the audio cable out of the center
console, use the access cut out in the front
of the console.
USB Port
Connect your compatible device using a
USB cable into the USB Port. USB
Memory sticks with audio files can also be
used. Audio from the device can be played
on the vehicles sound system while
providing metadata (artist, track title,
album, etc.) information on the radio
display.
When connected, the compatible USB
device can be controlled using the radio or
Steering Wheel Audio Controls to play,
skip to the next or previous track, browse,
and list the contents.
The battery charges when plugged into the
USB port (if supported by the specific
device).
NOTE:
When connecting your device for the first time,
the system may take several minutes to read
your music, depending on the number of files.
For example, the system will take approxi
-
mately five minutes for every 1,000 songs
loaded on the device. Also during the reading
process, the Shuffle and Browse functions will
be disabled. This process is needed to ensure
the full use of your features and only happens
the first time it is connected. After the first
time, the reading process of your device will
take considerably less time unless changes are
made or new songs are added to the playlist.
Bluetooth® Streaming Audio
If equipped with Uconnect Voice
Command, your Bluetooth®-equipped
device may also be able to stream music to
your vehicle's sound system. Your
connected device must be Blue-
tooth®-compatible and paired with your
system (see Uconnect Phone for pairing
instructions). You can access the music
from your connected Bluetooth® device
by pressing the Bluetooth® button on
the touchscreen while in Media mode.
1 — USB Port
2 — AUX Port
2020_JEEP_M6_UG_UK.book Page 270
Page 279 of 328
277
Audio Jack (AUX)
The AUX allows a device to be plugged
into the radio and utilize the vehicle’s
sound system, using a 3.5 mm audio
cable, to amplify the source and play
through the vehicle speakers.
Pressing the AUX button on the touch -
screen will change the mode to auxiliary
device if the audio jack is connected,
allowing the music from your device to be
heard through the vehicle's speakers. To
activate the AUX, plug in the audio jack.
The functions of the device are controlled
using the device buttons. The volume may
be controlled using the radio or device.
To route the audio cable out of the center
console, use the access cut out in the front
of the console. USB Port
Connect your compatible device using a
USB cable into the USB Port. USB
Memory sticks with audio files can also be
used. Audio from the device can be played
on the vehicles sound system while
providing metadata (artist, track title,
album, etc.) information on the radio
display.
When connected, the compatible USB
device can be controlled using the radio or
Steering Wheel Audio Controls to play,
skip to the next or previous track, browse,
and list the contents.
The battery charges when plugged into the
USB port (if supported by the specific
device).
NOTE:
When connecting your device for the first time,
the system may take several minutes to read
your music, depending on the number of files.
For example, the system will take approxi
-
mately five minutes for every 1,000 songs
loaded on the device. Also during the
reading process, the Shuffle and Browse
functions will be disabled. This process is
needed to ensure the full use of your features
and only happens the first time it is
connected. After the first time, the reading
process of your device will take considerably
less time unless changes are made or new
songs are added to the playlist.
2020_JEEP_M6_UG_UK.book Page 277
Page 281 of 328
279
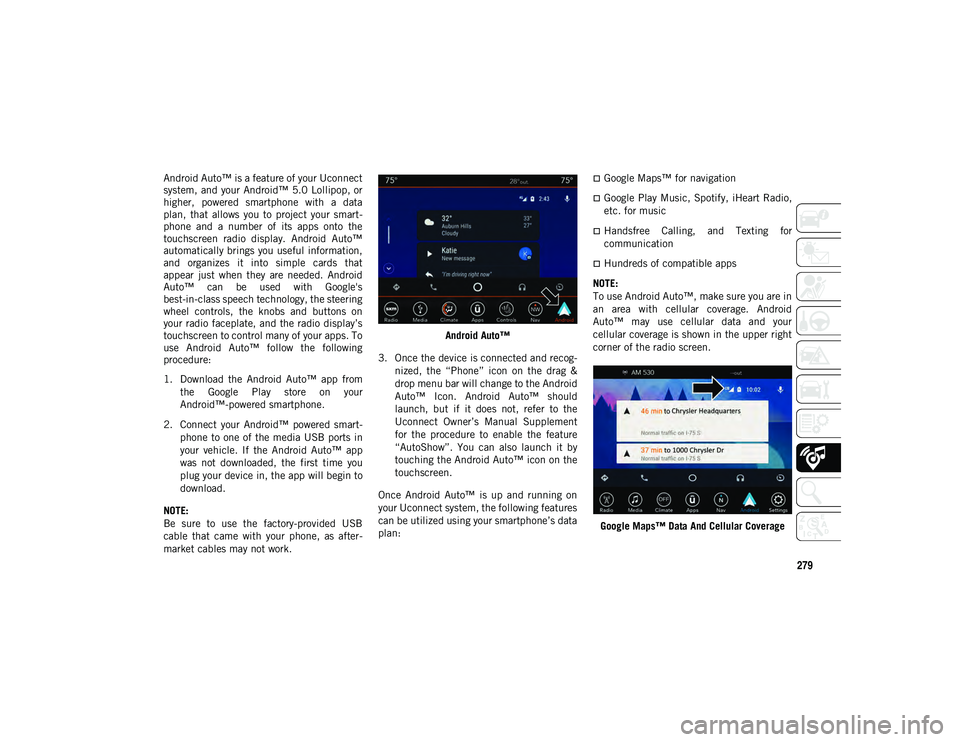
Android Auto™ is a feature of your Uconnect
system, and your Android™ 5.0 Lollipop, or
higher, powered smartphone with a data
plan, that allows you to project your smart-
phone and a number of its apps onto the
touchscreen radio display. Android Auto™
automatically brings you useful information,
and organizes it into simple cards that
appear just when they are needed. Android
Auto™ can be used with Google's
best-in-class speech technology, the steering
wheel controls, the knobs and buttons on
your radio faceplate, and the radio display’s
touchscreen to control many of your apps. To
use Android Auto™ follow the following
procedure:
1. Download the Android Auto™ app from
the Google Play store on your
Android™-powered smartphone.
2. Connect your Android™ powered smart -
phone to one of the media USB ports in
your vehicle. If the Android Auto™ app
was not downloaded, the first time you
plug your device in, the app will begin to
download.
NOTE:
Be sure to use the factory-provided USB
cable that came with your phone, as after -
market cables may not work. Android Auto™
3. Once the device is connected and recog -
nized, the “Phone” icon on the drag &
drop menu bar will change to the Android
Auto™ Icon. Android Auto™ should
launch, but if it does not, refer to the
Uconnect Owner’s Manual Supplement
for the procedure to enable the feature
“AutoShow”. You can also launch it by
touching the Android Auto™ icon on the
touchscreen.
Once Android Auto™ is up and running on
your Uconnect system, the following features
can be utilized using your smartphone’s data
plan:Google Maps™ for navigation
Google Play Music, Spotify, iHeart Radio,
etc. for music
Handsfree Calling, and Texting for
communication
Hundreds of compatible apps
NOTE:
To use Android Auto™, make sure you are in
an area with cellular coverage. Android
Auto™ may use cellular data and your
cellular coverage is shown in the upper right
corner of the radio screen.
Google Maps™ Data And Cellular Coverage
2020_JEEP_M6_UG_UK.book Page 279