belt JEEP COMPASS 2020 Owner handbook (in English)
[x] Cancel search | Manufacturer: JEEP, Model Year: 2020, Model line: COMPASS, Model: JEEP COMPASS 2020Pages: 328, PDF Size: 8.85 MB
Page 111 of 328
109
(Continued)
Side Impacts
The Side Air Bags are designed to activate in
certain side impacts. The Occupant
Restraint Controller (ORC) determines
whether the deployment of the Side Air Bags
in a particular impact event is appropriate,
based on the severity and type of collision.
The side impact sensors aid the ORC in
determining the appropriate response to
impact events. The system is calibrated to
deploy the Side Air Bags on the impact side
of the vehicle during impacts that require
Side Air Bag occupant protection. In side
impacts, the Side Air Bags deploy inde-
pendently; a left side impact deploys the left
Side Air Bags only and a right-side impact
deploys the right Side Air Bags only. Vehicle
damage by itself is not a good indicator of
whether or not Side Air Bags should have
deployed.
The Side Air Bags will not deploy in all side
collisions, including some collisions at
certain angles, or some side collisions that
do not impact the area of the passenger
compartment. The Side Air Bags may deploy
during angled or offset frontal collisions
where the front air bags deploy.
Side Air Bags are a supplement to the seat
belt restraint system. Side Air Bags deploy in
less time than it takes to blink your eyes. NOTE:
Air bag covers may not be obvious in the inte
-
rior trim, but they will open during air bag
deployment.
Rollover Events (If Equipped With Rollover
Sensing)
Side Air Bags and seat belt pretensioners are
designed to activate in certain rollover events
(if equipped with rollover sensing). The
Occupant Restraint Controller (ORC) deter -
mines whether deployment in a particular
rollover event is appropriate, based on the
severity and type of collision. Vehicle
damage by itself is not a good indicator of
whether or not Side Air Bags and seat belt
pretensioners should have deployed. WARNING!
Occupants, including children, who are
up against or very close to Side Air Bags
can be seriously injured or killed. Occu -
pants, including children, should never
lean on or sleep against the door, side
windows, or area where the side air bags
inflate, even if they are in an infant or
child restraint.
Seat belts (and child restraints where
appropriate) are necessary for your
protection in all collisions. They also
help keep you in position, away from an
inflating Side Air Bag. To get the best
protection from the Side Air Bags, occu -
pants must wear their seat belts properly
and sit upright with their backs against
the seats. Children must be properly
restrained in a child restraint or booster
seat that is appropriate for the size of the
child.
WARNING!
Side Air Bags need room to inflate. Do
not lean against the door or window. Sit
upright in the center of the seat.
Being too close to the Side Air Bags
during deployment could cause you to be
severely injured or killed.
Relying on the Side Air Bags alone could
lead to more severe injuries in a colli -
sion. The Side Air Bags work with your
seat belt to restrain you properly. In
some collisions, Side Air Bags won’t
deploy at all. Always wear your seat belt
even though you have Side Air Bags.
WARNING! (Continued)
2020_JEEP_M6_UG_UK.book Page 109
Page 112 of 328
SAFETY
110
The Side Air Bags and seat belt preten-
sioners will not deploy in all rollover events.
The rollover sensing system determines if a
rollover event may be in progress and
whether deployment is appropriate. In the
event the vehicle experiences a rollover or
near rollover event, and deployment of the
Side Air Bags is appropriate, the rollover
sensing system will deploy the Side Air Bags
and seat belt pretensioners on both sides of
the vehicle.
The SABICs may help reduce the risk of
partial or complete ejection of vehicle occu -
pants through side windows in certain roll -
over or side impact events.
Air Bag System Components
NOTE:
The Occupant Restraint Controller (ORC)
monitors the internal circuits and intercon -
necting wiring associated with electrical Air
Bag System Components listed below:
Occupant Restraint Controller (ORC)
Air Bag Warning Light
Steering Wheel and Column
Instrument Panel
Knee Impact Bolsters
Driver and Front Passenger Air Bags
Seat Belt Buckle Switch
Supplemental Side Air Bags
Front and Side Impact Sensors
Seat Belt Pretensioners
Seat Track Position Sensors
If A Deployment Occurs
The front air bags are designed to deflate
immediately after deployment.
NOTE:
Front and/or side air bags will not deploy in
all collisions. This does not mean something
is wrong with the air bag system.
If you do have a collision which deploys the
air bags, any or all of the following may
occur:
The air bag material may sometimes cause
abrasions and/or skin reddening to the
occupants as the air bags deploy and
unfold. The abrasions are similar to fric-
tion rope burns or those you might get
sliding along a carpet or gymnasium floor.
They are not caused by contact with chem -
icals. They are not permanent and
normally heal quickly. However, if you haven’t healed significantly within a few
days, or if you have any blistering, see your
doctor immediately.
As the air bags deflate, you may see some
smoke-like particles. The particles are a
normal by-product of the process that
generates the non-toxic gas used for air
bag inflation. These airborne particles may
irritate the skin, eyes, nose, or throat. If
you have skin or eye irritation, rinse the
area with cool water. For nose or throat irri
-
tation, move to fresh air. If the irritation
continues, see your doctor. If these parti -
cles settle on your clothing, follow the
garment manufacturer’s instructions for
cleaning.
Do not drive your vehicle after the air bags
have deployed. If you are involved in another
collision, the air bags will not be in place to
protect you.
WARNING!
Deployed air bags and seat belt
pretensioners cannot protect you in
another collision. Have the air bags, seat
belt pretensioners, and the seat belt
retractor assemblies replaced by an
authorized dealer immediately. Also, have
the Occupant Restraint Controller System
serviced as well.
2020_JEEP_M6_UG_UK.book Page 110
Page 115 of 328
113(Continued)
If a reset procedure step is not completed
within 60 seconds, then the turn signal
lights will blink and the reset procedure must
be performed again in order to be successful.
Maintaining Your Air Bag System Event Data Recorder (EDR)
This vehicle is equipped with an Event Data
Recorder (EDR). The main purpose of an
EDR is to record, in certain crash or near
crash-like situations, such as an air bag
deployment or hitting a road obstacle, data
that will assist in understanding how a
vehicle’s systems performed. The EDR is
designed to record data related to vehicle
dynamics and safety systems for a short
period of time, typically 30 seconds or less.
The EDR in this vehicle is designed to record
such data as:
How various systems in your vehicle were
operating;
Whether or not the driver and passenger
safety belts were buckled/fastened;
11. Turn ignition STOP/OFF/LOCK.
12. Turn ignition MAR/ACC/ON/RUN. (Entire sequence needs to be
completed within one minute or sequence will need to be repeated).
System is now reset and the engine may be started.
Turn hazard flashers OFF (Manually).
Customer Action Customer Will SeeNOTE:
Each step MUST BE held for at least two seconds
WARNING!
Modifications to any part of the air bag
system could cause it to fail when you
need it. You could be injured if the air
bag system is not there to protect you.
Do not modify the components or wiring,
including adding any kind of badges or
stickers to the steering wheel hub trim
cover or the upper passenger side of the
instrument panel. Do not modify the
front bumper, vehicle body structure, or
add aftermarket side steps or running
boards.
It is dangerous to try to repair any part of
the air bag system yourself. Be sure to
tell anyone who works on your vehicle
that it has an air bag system.
Do not attempt to modify any part of your
air bag system. The air bag may inflate
accidentally or may not function properly if
modifications are made. Take your vehicle
to an authorized dealer for any air bag
system service. If your seat, including your
trim cover and cushion, needs to be
serviced in any way (including removal or
loosening/tightening of seat attachment
bolts), take the vehicle to an authorized
dealer. Only manufacturer approved seat
accessories may be used. If it is necessary
to modify the air bag system for persons
with disabilities, contact an authorized
dealer.
WARNING! (Continued)
2020_JEEP_M6_UG_UK.book Page 113
Page 117 of 328
115
There are different sizes and types of
restraints for children from newborn size to
the child almost large enough for an adult
safety belt. Children should ride rearward
facing as long as possible; this is the most
protected position for a child in the event of
a crash. Always check the child seat Owner’s
Manual to make sure you have the correct
seat for your child. Carefully read and follow
all the instructions and warnings in the child
restraint Owner’s Manual and on all the
labels attached to the child restraint.
In Europe, children restraint systems are
defined by regulation ECE-R44, which
divides them into five weight groups:Check the label of your child restraint. All
approved child restraints must include
type-approval data and the control mark on
its label. The label must be permanently
secured to the child restraint system. You
should not remove this label from the child
restraint.
“Universal” Child Restraint Systems
The figures in the following sections are
examples of each type of universal child
restraint system. Typical installations are
shown. Always install your child restraint
system according to the child restraint
manufacturer’s instructions, which must
be included with this type of restraint
system.
Child restraint systems with ISOFIX
anchorages are available for installing the
child restraint system to the vehicle
without using the vehicle’s seat belts.
In a collision, an unrestrained child can
become a projectile inside the vehicle.
The force required to hold even an infant
on your lap could become so great that
you could not hold the child, no matter
how strong you are. The child and others
could be badly injured or killed. Any
child riding in your vehicle should be in
a proper restraint for the child’s size.
WARNING! (Continued)Restraint Group Weight Group
Group 0
up to 10 kg
Group 0+ up to 13 kg
Group 1 9-18 kg
Group 2 15-25 kg
Group 3 22-36 kg
WARNING!
Extreme Hazard! Do not place a rear-facing
child restraint in front of an active air bag.
Refer to visor mounted labels for
information. Deployment of the air bag in
an accident could cause fatal injuries to
the baby regardless of the severity of the
collision. It is advisable to always carry
children in a child restraint system on the
rear seat, which is the most protected
position in the event of a collision.
WARNING!
Should it be necessary to carry a child on
the passenger side front seat in a
rear-facing child restraint system, the
passenger side front airbag and side bag
(for versions/markets, where provided)
must be deactivated through the Setup
menu. Deactivation should be verified by
checking whether the warning light is
switched on in the instrument panel. The
passenger seat must also be positioned
backward as far as possible to avoid the
child restraint system from coming into
contact with the dashboard.
2020_JEEP_M6_UG_UK.book Page 115
Page 118 of 328
SAFETY
116
Group 0 And 0+
Fig. A
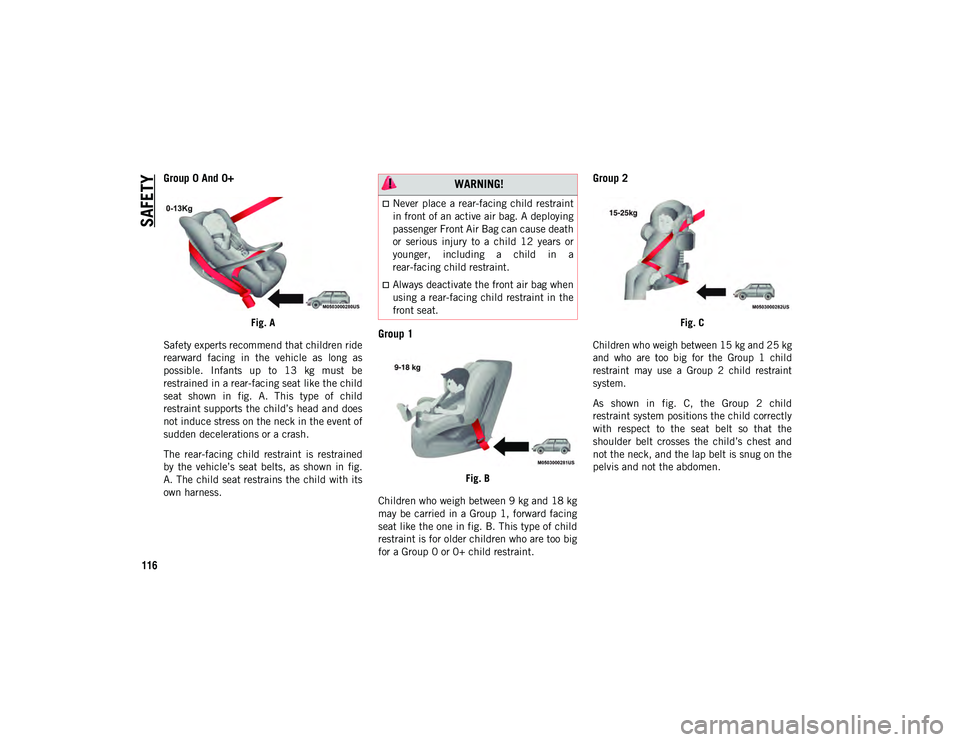
Safety experts recommend that children ride
rearward facing in the vehicle as long as
possible. Infants up to 13 kg must be
restrained in a rear-facing seat like the child
seat shown in fig. A. This type of child
restraint supports the child’s head and does
not induce stress on the neck in the event of
sudden decelerations or a crash.
The rear-facing child restraint is restrained
by the vehicle’s seat belts, as shown in fig.
A. The child seat restrains the child with its
own harness.Group 1
Fig. B
Children who weigh between 9 kg and 18 kg
may be carried in a Group 1, forward facing
seat like the one in fig. B. This type of child
restraint is for older children who are too big
for a Group 0 or 0+ child restraint.
Group 2
Fig. C
Children who weigh between 15 kg and 25 kg
and who are too big for the Group 1 child
restraint may use a Group 2 child restraint
system.
As shown in fig. C, the Group 2 child
restraint system positions the child correctly
with respect to the seat belt so that the
shoulder belt crosses the child’s chest and
not the neck, and the lap belt is snug on the
pelvis and not the abdomen.
WARNING!
Never place a rear-facing child restraint
in front of an active air bag. A deploying
passenger Front Air Bag can cause death
or serious injury to a child 12 years or
younger, including a child in a
rear-facing child restraint.
Always deactivate the front air bag when
using a rear-facing child restraint in the
front seat.
2020_JEEP_M6_UG_UK.book Page 116
Page 119 of 328
117
(Continued)
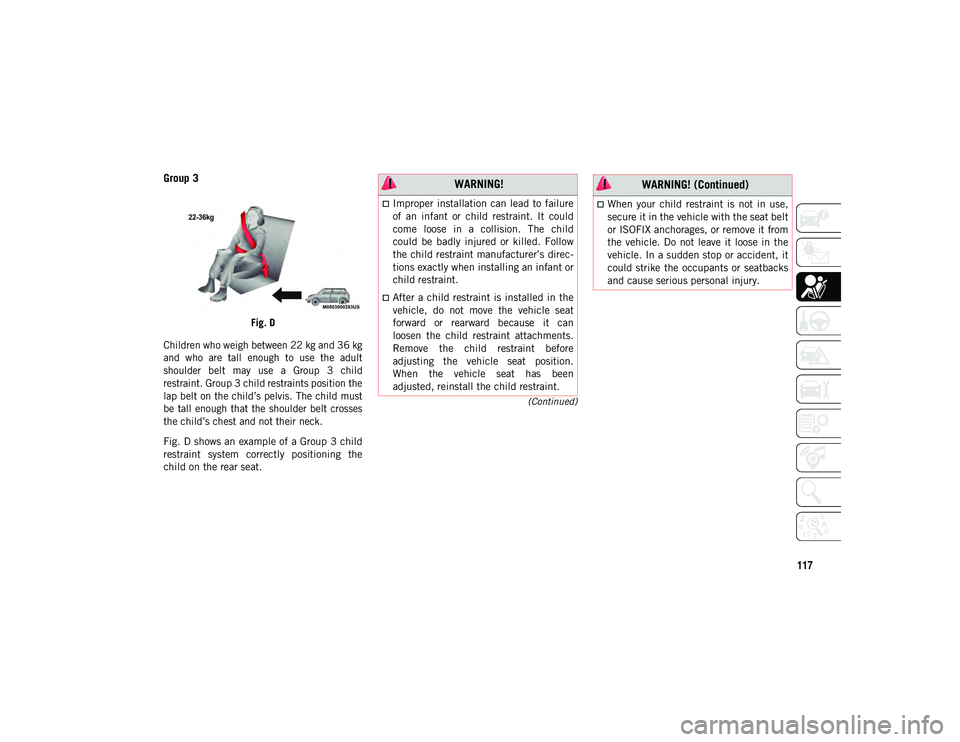
Group 3
Fig. D
Children who weigh between 22 kg and 36 kg
and who are tall enough to use the adult
shoulder belt may use a Group 3 child
restraint. Group 3 child restraints position the
lap belt on the child’s pelvis. The child must
be tall enough that the shoulder belt crosses
the child’s chest and not their neck.
Fig. D shows an example of a Group 3 child
restraint system correctly positioning the
child on the rear seat.
WARNING!
Improper installation can lead to failure
of an infant or child restraint. It could
come loose in a collision. The child
could be badly injured or killed. Follow
the child restraint manufacturer’s direc-
tions exactly when installing an infant or
child restraint.
After a child restraint is installed in the
vehicle, do not move the vehicle seat
forward or rearward because it can
loosen the child restraint attachments.
Remove the child restraint before
adjusting the vehicle seat position.
When the vehicle seat has been
adjusted, reinstall the child restraint.
When your child restraint is not in use,
secure it in the vehicle with the seat belt
or ISOFIX anchorages, or remove it from
the vehicle. Do not leave it loose in the
vehicle. In a sudden stop or accident, it
could strike the occupants or seatbacks
and cause serious personal injury.
WARNING! (Continued)
2020_JEEP_M6_UG_UK.book Page 117
Page 122 of 328
SAFETY
120
Seat Belts For Older Children
Children over 1.50 m in height can wear seat
belts instead of using child restraints.
Use this simple 5-step test to decide
whether the seat belt properly fits the child
or if they should still use a Group 2 or Group
3 child restraint to improve the fit of the seat
belt:
1. Can the child sit all the way back againstthe back of the vehicle seat?
2. Do the child’s knees bend comfortably over the front of the vehicle seat – while
the child is still sitting all the way back?
3. Does the shoulder belt cross the child’s shoulder between the neck and arm?
4. Is the lap part of the belt as low as possible, touching the child’s thighs and
not the stomach?
5. Can the child stay seated like this for the whole trip?
If the answer to any of these questions was
“no,” then the child still needs to use a
Group 2 or 3 child restraint in this vehicle. If
the child is using the lap/shoulder belt,
check belt fit periodically and make sure the seat belt buckle is latched. A child’s
squirming or slouching can move the belt out
of position. If the shoulder belt contacts the
face or neck, move the child closer to the
center of the vehicle, or use a booster seat to
position the seat belt on the child correctly.
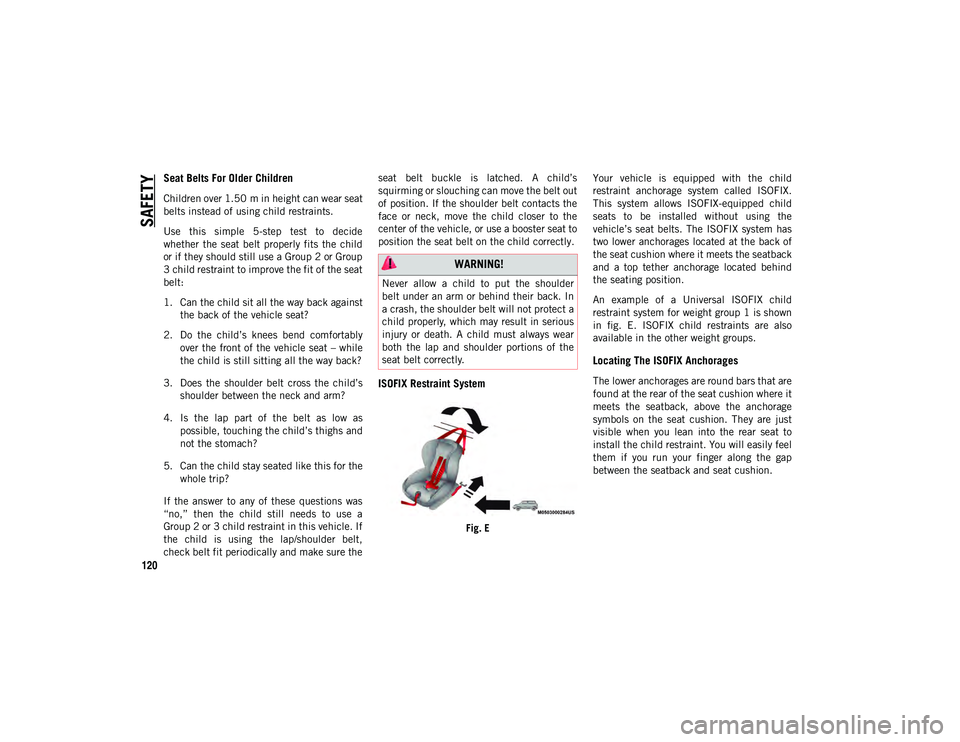
ISOFIX Restraint System
Fig. E
Your vehicle is equipped with the child
restraint anchorage system called ISOFIX.
This system allows ISOFIX-equipped child
seats to be installed without using the
vehicle’s seat belts. The ISOFIX system has
two lower anchorages located at the back of
the seat cushion where it meets the seatback
and a top tether anchorage located behind
the seating position.
An example of a Universal ISOFIX child
restraint system for weight group 1 is shown
in fig. E. ISOFIX child restraints are also
available in the other weight groups.
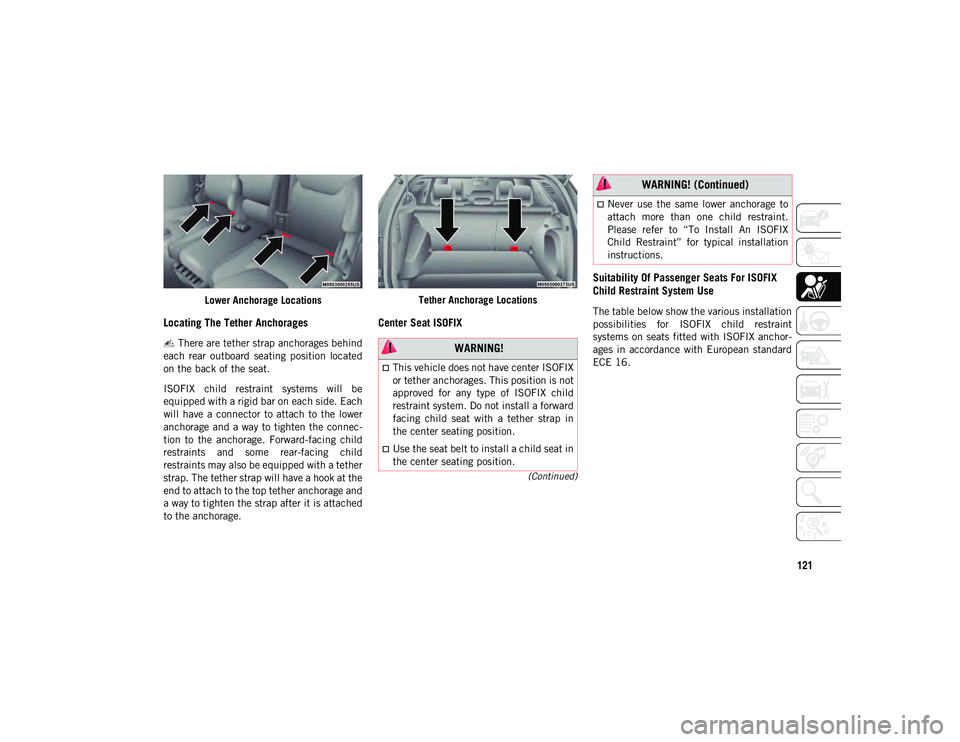
Locating The ISOFIX Anchorages
The lower anchorages are round bars that are
found at the rear of the seat cushion where it
meets the seatback, above the anchorage
symbols on the seat cushion. They are just
visible when you lean into the rear seat to
install the child restraint. You will easily feel
them if you run your finger along the gap
between the seatback and seat cushion.
WARNING!
Never allow a child to put the shoulder
belt under an arm or behind their back. In
a crash, the shoulder belt will not protect a
child properly, which may result in serious
injury or death. A child must always wear
both the lap and shoulder portions of the
seat belt correctly.
2020_JEEP_M6_UG_UK.book Page 120
Page 123 of 328
121
(Continued)
Lower Anchorage Locations
Locating The Tether Anchorages
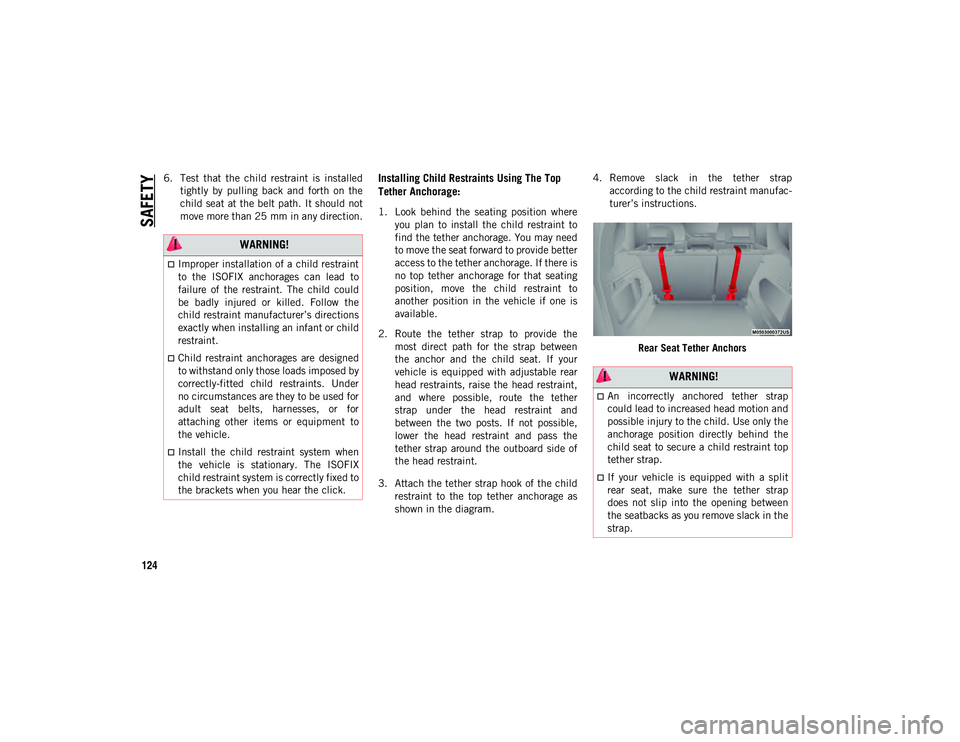
There are tether strap anchorages behind
each rear outboard seating position located
on the back of the seat.
ISOFIX child restraint systems will be
equipped with a rigid bar on each side. Each
will have a connector to attach to the lower
anchorage and a way to tighten the connec -
tion to the anchorage. Forward-facing child
restraints and some rear-facing child
restraints may also be equipped with a tether
strap. The tether strap will have a hook at the
end to attach to the top tether anchorage and
a way to tighten the strap after it is attached
to the anchorage. Tether Anchorage Locations
Center Seat ISOFIX
Suitability Of Passenger Seats For ISOFIX
Child Restraint System UseThe table below show the various installation
possibilities for ISOFIX child restraint
systems on seats fitted with ISOFIX anchor
-
ages in accordance with European standard
ECE 16.
WARNING!
This vehicle does not have center ISOFIX
or tether anchorages. This position is not
approved for any type of ISOFIX child
restraint system. Do not install a forward
facing child seat with a tether strap in
the center seating position.
Use the seat belt to install a child seat in
the center seating position.
Never use the same lower anchorage to
attach more than one child restraint.
Please refer to “To Install An ISOFIX
Child Restraint” for typical installation
instructions.
WARNING! (Continued)
2020_JEEP_M6_UG_UK.book Page 121
Page 126 of 328
SAFETY
124
6. Test that the child restraint is installedtightly by pulling back and forth on the
child seat at the belt path. It should not
move more than 25 mm in any direction.Installing Child Restraints Using The Top
Tether Anchorage:
1. Look behind the seating position whereyou plan to install the child restraint to
find the tether anchorage. You may need
to move the seat forward to provide better
access to the tether anchorage. If there is
no top tether anchorage for that seating
position, move the child restraint to
another position in the vehicle if one is
available.
2. Route the tether strap to provide the most direct path for the strap between
the anchor and the child seat. If your
vehicle is equipped with adjustable rear
head restraints, raise the head restraint,
and where possible, route the tether
strap under the head restraint and
between the two posts. If not possible,
lower the head restraint and pass the
tether strap around the outboard side of
the head restraint.
3. Attach the tether strap hook of the child restraint to the top tether anchorage as
shown in the diagram. 4. Remove slack in the tether strap
according to the child restraint manufac -
turer’s instructions.
Rear Seat Tether Anchors
WARNING!
Improper installation of a child restraint
to the ISOFIX anchorages can lead to
failure of the restraint. The child could
be badly injured or killed. Follow the
child restraint manufacturer’s directions
exactly when installing an infant or child
restraint.
Child restraint anchorages are designed
to withstand only those loads imposed by
correctly-fitted child restraints. Under
no circumstances are they to be used for
adult seat belts, harnesses, or for
attaching other items or equipment to
the vehicle.
Install the child restraint system when
the vehicle is stationary. The ISOFIX
child restraint system is correctly fixed to
the brackets when you hear the click.
WARNING!
An incorrectly anchored tether strap
could lead to increased head motion and
possible injury to the child. Use only the
anchorage position directly behind the
child seat to secure a child restraint top
tether strap.
If your vehicle is equipped with a split
rear seat, make sure the tether strap
does not slip into the opening between
the seatbacks as you remove slack in the
strap.
2020_JEEP_M6_UG_UK.book Page 124
Page 127 of 328
125
Suitability of Passenger Seats for i-Size
Child Restraint System Use
The rear outboard seats of the vehicle are
type-approved to house the state-of-the-art
i-Size child restraint systems.
These child restraint systems, built and
type-approved according to the i-Size (ECE
R129) standard, ensure better safety condi-
tions to carry children on board a vehicle:
The child must be transported rearward
facing until 15 months:
Child restraint system protection is
increased in the event of a side collision:
The use of the ISOFIX system is promoted
to avoid faulty installation of the child
restraint system:
Efficiency in the choice of the child
restraint system, which isn't made
according to weight anymore but
according to the child's height, is
increased:
Compatibility between the vehicle seats
and the child restraint systems is better:
the i-Size child restraint systems can be
considered as "Super ISOFIX"; this means
that they can be perfectly fitted in
type-approved i-Size seats, but can also be
fitted in ISOFIX (ECE R44) type-approved
seats.
NOTE:
The vehicle seats, i-Size type-approved, are
marked by the symbol shown in Figure XX.
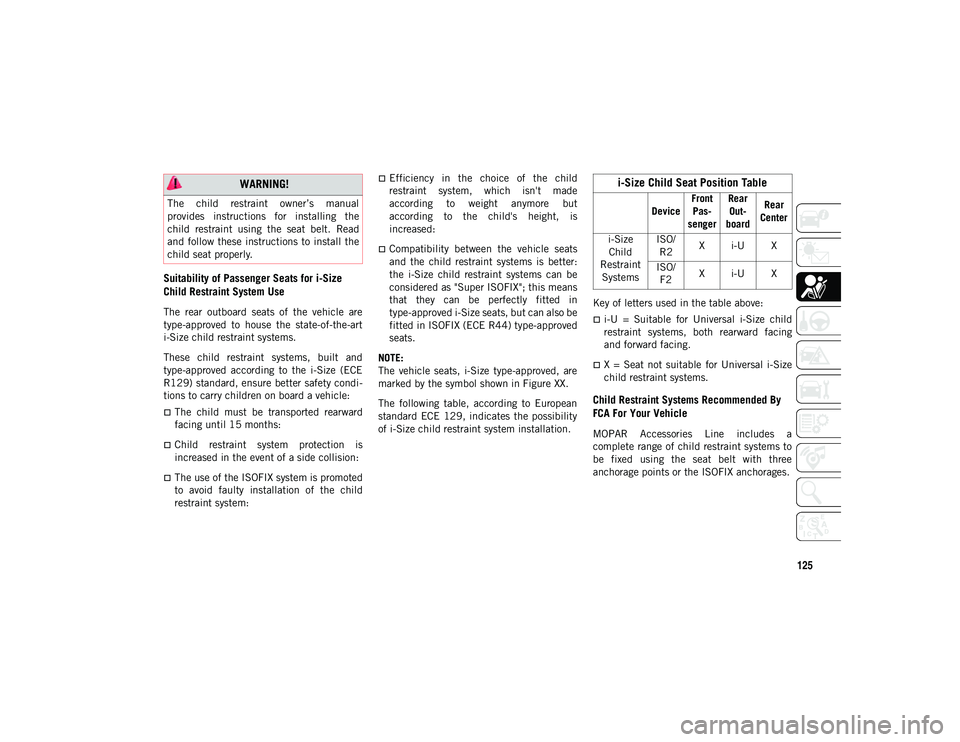
The following table, according to European
standard ECE 129, indicates the possibility
of i-Size child restraint system installation. Key of letters used in the table above:
i-U = Suitable for Universal i-Size child
restraint systems, both rearward facing
and forward facing.
X = Seat not suitable for Universal i-Size
child restraint systems.
Child Restraint Systems Recommended By
FCA For Your Vehicle
MOPAR Accessories Line includes a
complete range of child restraint systems to
be fixed using the seat belt with three
anchorage points or the ISOFIX anchorages.
WARNING!
The child restraint owner’s manual
provides instructions for installing the
child restraint using the seat belt. Read
and follow these instructions to install the
child seat properly.
i-Size Child Seat Position Table
Device
Front
Pas -
senger Rear
Out -
board Rear
Center
i-Size Child
Restraint Systems ISO/
R2 X i-U X
ISO/ F2 X i-U X
2020_JEEP_M6_UG_UK.book Page 125