isofix JEEP GRAND CHEROKEE 2012 Owner handbook (in English)
[x] Cancel search | Manufacturer: JEEP, Model Year: 2012, Model line: GRAND CHEROKEE, Model: JEEP GRAND CHEROKEE 2012Pages: 380, PDF Size: 3.21 MB
Page 33 of 380
•If your liftgate is power closing and you
put the vehicle in gear, the liftgate will
continue to power close. However, ve-
hicle movement may result in a detection
of an obstruction.
WARNING!
•Driving with the liftgate open can allow
poisonous exhaust gases into your vehicle.
You and your passengers could be injured
by these fumes. Keep the liftgate closed
when you are operating the vehicle.
• If you are required to drive with the liftgate
open, make sure that all windows are
closed, and the climate control blower
switch is set at high speed. Do not use the
recirculation mode.
Gas props support the liftgate in the open
position. However, because the gas pressure
drops with temperature, it may be necessary to
assist the props when opening the liftgate in
cold weather.
OCCUPANT RESTRAINTSSome of the most important safety features in
your vehicle are the restraint systems:
• Three-point lap and shoulder belts for the
driver and all passengers
• Advanced Front Air Bags for driver and front
passenger
• Supplemental Active Head Restraints (AHR)
located on top of the front seats (integrated
into the head restraint)
• Supplemental Driver Side Knee Air Bag
• Supplemental Side Air Bag Inflatable Cur-
tains (SABIC) for the driver and passengers
seated next to a window
• Supplemental Seat-Mounted Side Air Bags
(SAB)
• An energy-absorbing steering column and
steering wheel
• Knee bolsters/blockers for front seat occu-
pant •
Front seat belts incorporate pretensioners
that may enhance occupant protection by
managing occupant energy during an im-
pact event
• All seat belt systems (except the driver’s and
front passenger) include Automatic Locking
Retractors (ALRs), which lock the seat belt
webbing into position by extending the belt
all the way out and then adjusting the belt to
the desired length to restrain a child seat or
secure a large item in a seat — if equipped
If you will be carrying children too small for
adult-sized seat belts, the seat belts or the
ISOFIX feature also can be used to hold infant
and child restraint systems. Refer to ISOFIX —
Child Seat Anchorage System for more infor-
mation.
NOTE:
The Advanced Front Air Bags have a multi-
stage inflator design. This allows the air bag
to have different rates of inflation based on
the severity and type of collision.
Please pay close attention to the information in
this section. It tells you how to use your restraint
29
Page 52 of 380
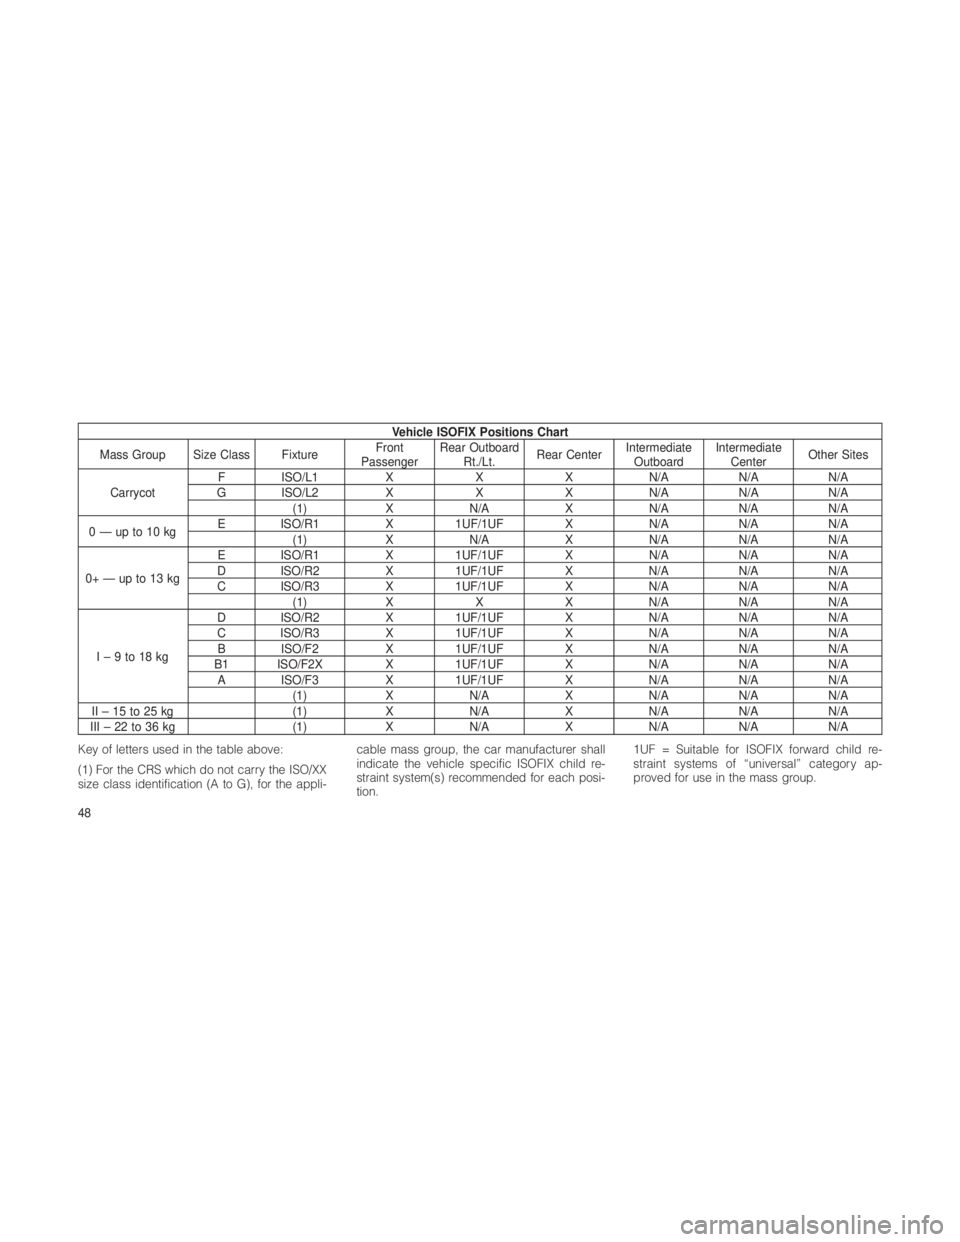
Vehicle ISOFIX Positions Chart
Mass Group Size Class Fixture Front
Passenger Rear Outboard
Rt./Lt. Rear Center Intermediate
Outboard Intermediate
Center Other Sites
Carrycot F ISO/L1
XXXN/A N/AN/A
G ISO/L2 XXXN/A N/AN/A
(1) XN/A XN/A N/AN/A
0—upto10kg E ISO/R1
X1UF/1UF XN/A N/AN/A
(1) XN/A XN/A N/AN/A
0+—upto13kg E ISO/R1
X1UF/1UF XN/A N/AN/A
D ISO/R2 X1UF/1UF XN/A N/AN/A
C ISO/R3 X1UF/1UF XN/A N/AN/A
(1) XXXN/A N/AN/A
I–9to18kg D ISO/R2
X1UF/1UF XN/A N/AN/A
C ISO/R3 X1UF/1UF XN/A N/AN/A
B ISO/F2 X1UF/1UF XN/A N/AN/A
B1 ISO/F2X X1UF/1UF XN/A N/AN/A
A ISO/F3 X1UF/1UF XN/A N/AN/A
(1) XN/A XN/A N/AN/A
II – 15 to 25 kg (1)XN/A XN/A N/AN/A
III – 22 to 36 kg (1)XN/A XN/A N/AN/A
Key of letters used in the table above:
(1) For the CRS which do not carry the ISO/XX
size class identification (A to G), for the appli- cable mass group, the car manufacturer shall
indicate the vehicle specific ISOFIX child re-
straint system(s) recommended for each posi-
tion.1UF = Suitable for ISOFIX forward child re-
straint systems of “universal” category ap-
proved for use in the mass group.
48
Page 53 of 380
IL = Suitable for particular ISOFIX child restraint
systems (CRS) given in the attachment list.
These ISOFIX CRS are those of the “specific
vehicle”, “restricted” or “semi-universal” cat-
egories.
X = ISOFIX position not suitable for ISOFIX
child restraint systems in this mass group
and/or this size class.
Children 12 years or under should ride properly
buckled up in a rear seat, if available. Accord-
ing to crash statistics, children are safer when
properly restrained in the rear seats rather than
in the front.
There are different sizes and types of restraints
for children from newborn size to the child
almost large enough for an adult safety belt.
Always check the child seat Owner’s Manual to
ensure you have the right seat for your child.
Use the restraint that is correct for your child.WARNING!
In a collision, an unrestrained child, even a
tiny baby, can become a projectile inside the
vehicle. The force required to hold even an
infant on your lap can become so great that
you could not hold the child, no matter how
strong you are. The child and others could be
badly injured. Any child riding in your vehicle
should be in a proper restraint for the child’s
size.
Infants And Child Restraints
Safety experts recommend that children ride
rearward-facing in the vehicle until they are two
years old or until they reach either the height or
weight limit of their rear facing child safety seat.
Two types of child restraints can be used
rearward-facing: infant carriers and convertible
child seats. The infant carrier is only used rearward-facing
in the vehicle. It is recommended for children
from birth until they reach the weight or height
limit of the infant carrier. Convertible child seats
can be used either rearward-facing or forward-
facing in the vehicle. Convertible child seats
often have a higher weight limit in the rearward-
facing direction than infant carriers do, so they
can be used rearward-facing by children who
have outgrown their infant carrier but are still
less than at least two years old. Children should
remain rearward-facing until they reach the
highest weight or height allowed by their con-
vertible child seat. Both types of child restraints
are held in the vehicle by the lap/shoulder belt
or the ISOFIX child restraint anchor system.
Refer to “ISOFIX — Child Seat Anchorage
System”.
When using certain Child Restraint Systems
with rigid attachments ISOFIX and foot stands
extending to the vehicle floor, remove the ve-
hicle floor mat prior to installation to ensure a
secure fit. Refer to the Child Restraint Owner’s
Manual for additional information.
49
Page 54 of 380
WARNING!
•Rearward-facing child seats must never be
used in the front seat of a vehicle with the
front passenger air bag unless the air bag
is turned off. An air bag deployment could
cause severe injury or death to infants in
this position.
• Improper installation can lead to failure of
an infant or child restraint. It could come
loose in a collision. The child could be
badly injured or killed. Follow the manufac-
turer’s directions exactly when installing an
infant or child restraint.
• A rearward-facing infant restraint should
only be used in a rear seat. A rearward-
facing infant restraint in the front seat may
be struck by a deploying passenger air bag
which may cause severe or fatal injury to
the infant.
Here are some tips for getting the most out of
your child restraint:
• Before buying any restraint system, make
sure that it has a label certifying that it meets all applicable Safety Standards. Chrysler
Group LLC also recommends that you try a
child restraint in the vehicle seats where you
will use it before you buy it.
• The restraint must be appropriate for your
child’s weight and height. Check the label on
the restraint for weight and height limits.
• Carefully follow the instructions that come
with the restraint. If you install the restraint
improperly, it may not work when you need it.
• Buckle the child into the restraint exactly as
the manufacturer’s instructions tell you.
WARNING!
When your child restraint is not in use, secure
it in the vehicle with the seat belt or remove it
from the vehicle. Do not leave it loose in the
vehicle. In a sudden stop or accident, it could
strike the occupants or seatbacks and cause
serious personal injury. Older Children And Child Restraints
Children who are two years old or who have
outgrown their rear-facing convertible child seat
can ride forward-facing in the vehicle. Forward-
facing child seats and convertible child seats
used in the forward-facing direction are for
children who are over two years old or who have
outgrown the rear-facing weight or height limit of
their rear-facing convertible child seat. Children
should remain in a forward-facing child seat
with a harness for as long as possible, up to the
highest weight or height allowed by the child
seat. These child seats are also held in the
vehicle by the lap/shoulder belt or the ISOFIX
child restraint anchorage system. Refer to “ISO-
FIX — Child Seat Anchorage System”.
All children whose weight or height is above the
forward-facing limit for the child seat should
use a belt-positioning booster seat until the
vehicle’s seat belts fit properly. If the child
cannot sit with knees bent over the vehicle’s
seat cushion while the child’s back is against
the seatback, they should use a belt-
positioning booster seat. The child and belt-
positioning booster seat are held in the vehicle
by the lap/shoulder belt.
50
Page 55 of 380
Children Too Large For Booster Seats
Children who are large enough to wear the
shoulder belt comfortably, and whose legs are
long enough to bend over the front of the seat
when their back is against the seatback, should
use the lap/shoulder belt in a rear seat.
•Make sure that the child is upright in the seat.
• The lap portion should be low on the hips
and as snug as possible.
• Check belt fit periodically. A child’s squirm-
ing or slouching can move the belt out of
position.
• If the shoulder belt contacts the face or neck,
move the child closer to the center of the
vehicle. Never allow a child to put the shoul-
der belt under an arm or behind the back.
ISOFIX — Child Seat Anchorage System
Your vehicle’s rear seat is equipped with the
child restraint anchorage system called ISO-
FIX. The ISOFIX system provides for the instal-
lation of the child restraint without using the
vehicle’s seat belts, instead securing the child
restraint using lower anchorages and upper
tether straps from the child restraint to the
vehicle structure. ISOFIX-compatible child restraint systems are
now available. Child restraints having tether
straps and hooks for connection to the top
tether anchorages have been available for
some time. You are urged to take advantage of
all the available attachments provided with your
child restraint in any vehicle.
NOTE:
When using the ISOFIX attaching system to
install a child restraint, please ensure that
all seat belts not being used for occupant
restraints are stowed and out of reach of
children. Remind all children in the vehicle
that the seat belts are not toys and should
not be played with, and never leave your
child unattended in the vehicle.
The two outboard rear seating positions have
anchorages, child seats with fixed lower at-
tachments must be installed in the outboard
positions only. Regardless of the specific type
of lower attachment, never install ISOFIX-
compatible child seats such that two seats
share a common lower anchorage.
If you are installing ISOFIX-compatible child
restraints in adjacent rear seating positions,
you can use the ISOFIX anchors or the vehi-
cle’s seat belt for the outboard position, but you
must use the vehicle’s seat belt at the center
position. If your child restraints are not ISOFIX-
compatible, you can only install the child re-
straints using the vehicle’s seat belts. For typi-
cal installation instructions, refer to “Installing
The ISOFIX-Compatible Child Restraint Sys-
tem”.
Installing The ISOFIX-Compatible Child
Restraint System
We urge you to carefully follow the directions of
the manufacturer when installing your child
restraint. Not all child restraint systems will be
installed as described here. Again, carefully
follow the installation instructions that were pro-
vided with the child restraint system.
51
Page 56 of 380

The rear seat lower anchorages are round bars,
located at the rear of the seat cushion where it
meets the seatback, and are just visible when
you lean into the rear seat to install the child
restraint. You will easily feel them if you run your
finger along the intersection of the seatback
and seat cushion surfaces.
In addition, there are top tether strap anchor-
ages behind each rear seating position located
on the back of the outboard seats. To access
the top tether strap anchorages behind the rear
seat, pull the carpeted floor panel away from
the seat back, this will expose the top tether
strap anchorages.WARNING!
Do not use the cargo tie downs located on the
load floor. Improper usage of the tether can
lead to a failure of an infant or child restraint.
The child could be badly injured or killed.
Many, but not all, restraint systems will be
equipped with separate straps on each side,
with each having a hook or connector for
attachment to the lower anchorage and a
means of adjusting the tension in the strap.
Forward-facing toddler restraints and some
rear-facing infant restraints will also be
equipped with a tether strap, a hook for attach-
ment to the tether strap anchorage and a
means of adjusting the tension of the strap.
First, loosen the child seat adjusters on the
lower straps and on the tether strap so that you
can more easily attach the hooks or connectors
to the vehicle anchorages. Next, attach the
lower hooks or connectors over the top of the
anchorage bars, pushing aside the seat cover
material. Then, locate the tether anchorage
directly behind the seat where you are placing
the child restraint and attach the tether strap to
ISOFIX Anchorages
Pulling Down The Carpet Floor Panel To Access Top Tether Strap
Top Tether Strap Anchorage(Located on Seatback)
52
Page 57 of 380
the anchorage, being careful to route the tether
strap to provide the most direct path between
the anchor and the child restraint.There are
two top tether anchorages located on the
back of the seat, behind the gap panel. They
are not visible until you fold the gap panel
down. Do not use the cargo tie down hooks
located on the floor behind the seat. Finally,
tighten both straps as you push the child
restraint rearward and downward into the seat,
removing slack in the straps according to the
child restraint manufacturer’s instructions.
WARNING!
Improper installation of a child restraint to the
ISOFIX anchorages can lead to failure of an
infant or child restraint. The child could be
badly injured or killed. Follow the manufactur-
er’s directions exactly when installing an in-
fant or child restraint. Installing Child Restraints Using The
Vehicle Seat Belts
The seat belts in the passenger seating posi-
tions are equipped with an Automatic Locking
Retractor (ALR to secure a Child Restraint
System (CRS). These types of seat belts are
designed to keep the lap portion of the seat
belt tight around the child restraint so that it is
not necessary to use a locking clip. The ALR
will make a ratcheting noise if you extract the
entire belt from the retractor and then allow the
belt to retract into the retractor. For additional
information on ALR, refer to “Automatic Locking
Mode” description under “Seat Belts in Passen-
ger Seating Positions” section. The chart below
defines the seating positions with an Automatic
Locking Retractor (ALR) or a cinching latch
plate.
Driver Center Passen-
ger
First Row N/A N/A N/A Second Row ALR ALR ALR
Third Row N/A N/A N/A
• N/A — Not Applicable
• ALR — Automatic Locking Retractor
Installing a Child Restraint with an ALR:
1. To install a child restraint with ALR, first, pull
enough of the seat belt webbing from the
retractor to route it through the belt path of the
child restraint. Slide the latch plate into the
buckle until you hear a “click.” Next, extract all
the seat belt webbing out of the retractor and
then allow the belt to retract into the retractor.
As the belt retracts, you will hear a ratcheting
sound. This indicates the safety belt is now in
the Automatic Locking mode.
2. Finally, pull on any excess webbing to
tighten the lap portion around the child re-
straint. Any seat belt system will loosen with
time, so check the belt occasionally, and pull it
tight if necessary.
53