JEEP GRAND CHEROKEE 2013 Owner handbook (in English)
Manufacturer: JEEP, Model Year: 2013, Model line: GRAND CHEROKEE, Model: JEEP GRAND CHEROKEE 2013Pages: 408, PDF Size: 3.21 MB
Page 151 of 408
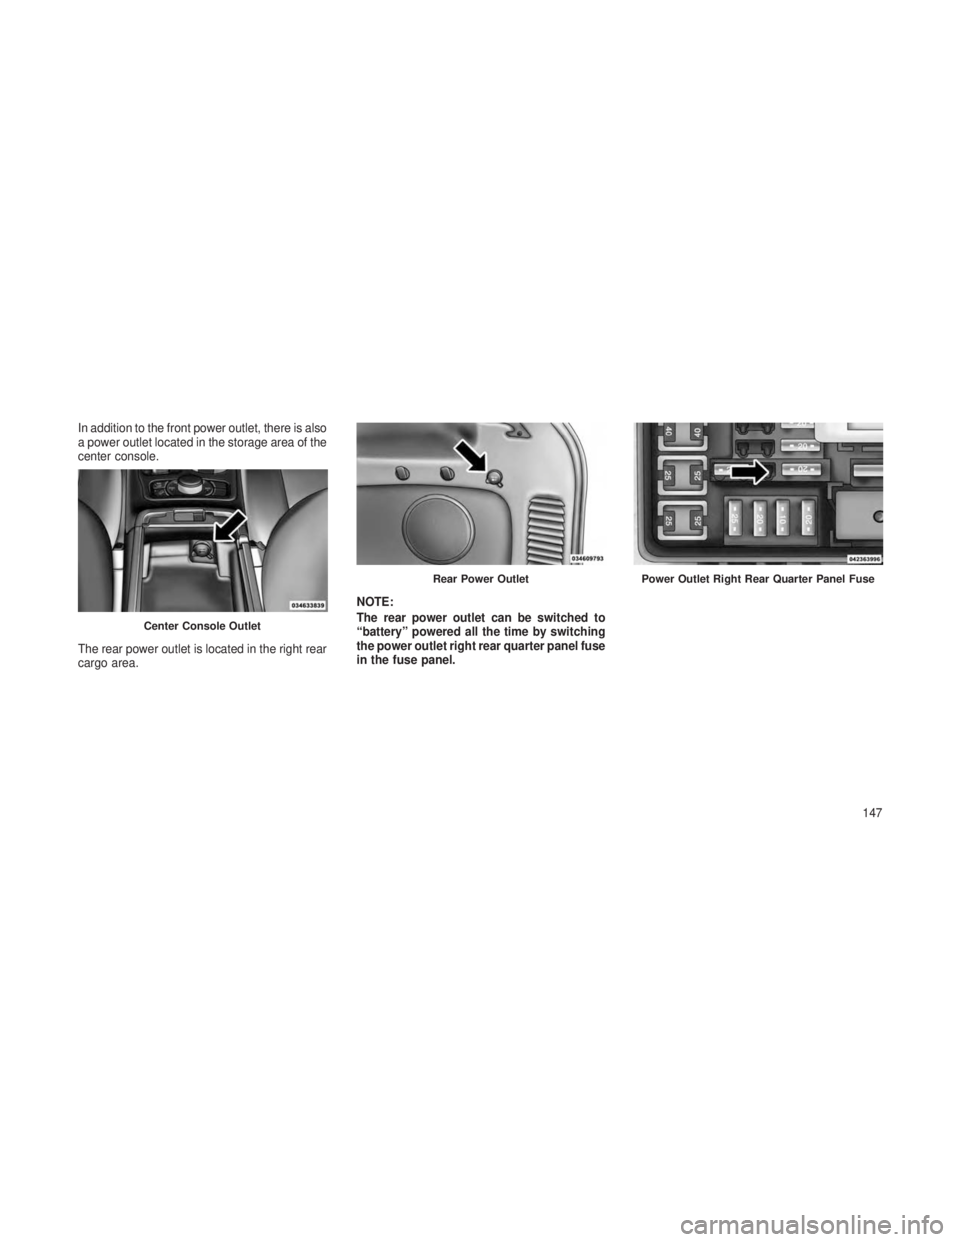
In addition to the front power outlet, there is also
a power outlet located in the storage area of the
center console.
The rear power outlet is located in the right rear
cargo area.NOTE:
The rear power outlet can be switched to
“battery” powered all the time by switching
the power outlet right rear quarter panel fuse
in the fuse panel.
Center Console Outlet
Rear Power OutletPower Outlet Right Rear Quarter Panel Fuse
147
Page 152 of 408
WARNING!
To avoid serious injury or death:
•Only devices designed for use in this type
of outlet should be inserted into any 12 Volt
outlet.
• Do not touch with wet hands.
• Close the lid when not in use and while
driving the vehicle.
• If this outlet is mishandled, it may cause an
electric shock and failure.
CAUTION!
•Many accessories that can be plugged in
draw power from the vehicle’s battery,
even when not in use (i.e., cellular phones,
etc.). Eventually, if plugged in long enough,
the vehicle’s battery will discharge suffi-
ciently to degrade battery life and/or pre-
vent the engine from starting.
(Continued)
CAUTION!(Continued)
•Accessories that draw higher power (i.e.,
coolers, vacuum cleaners, lights, etc.) will
degrade the battery even more quickly.
Only use these intermittently and with
greater caution.
• After the use of high power draw accesso-
ries, or long periods of the vehicle not
being started (with accessories still
plugged in), the vehicle must be driven a
sufficient length of time to allow the gen-
erator to recharge the vehicle’s battery.
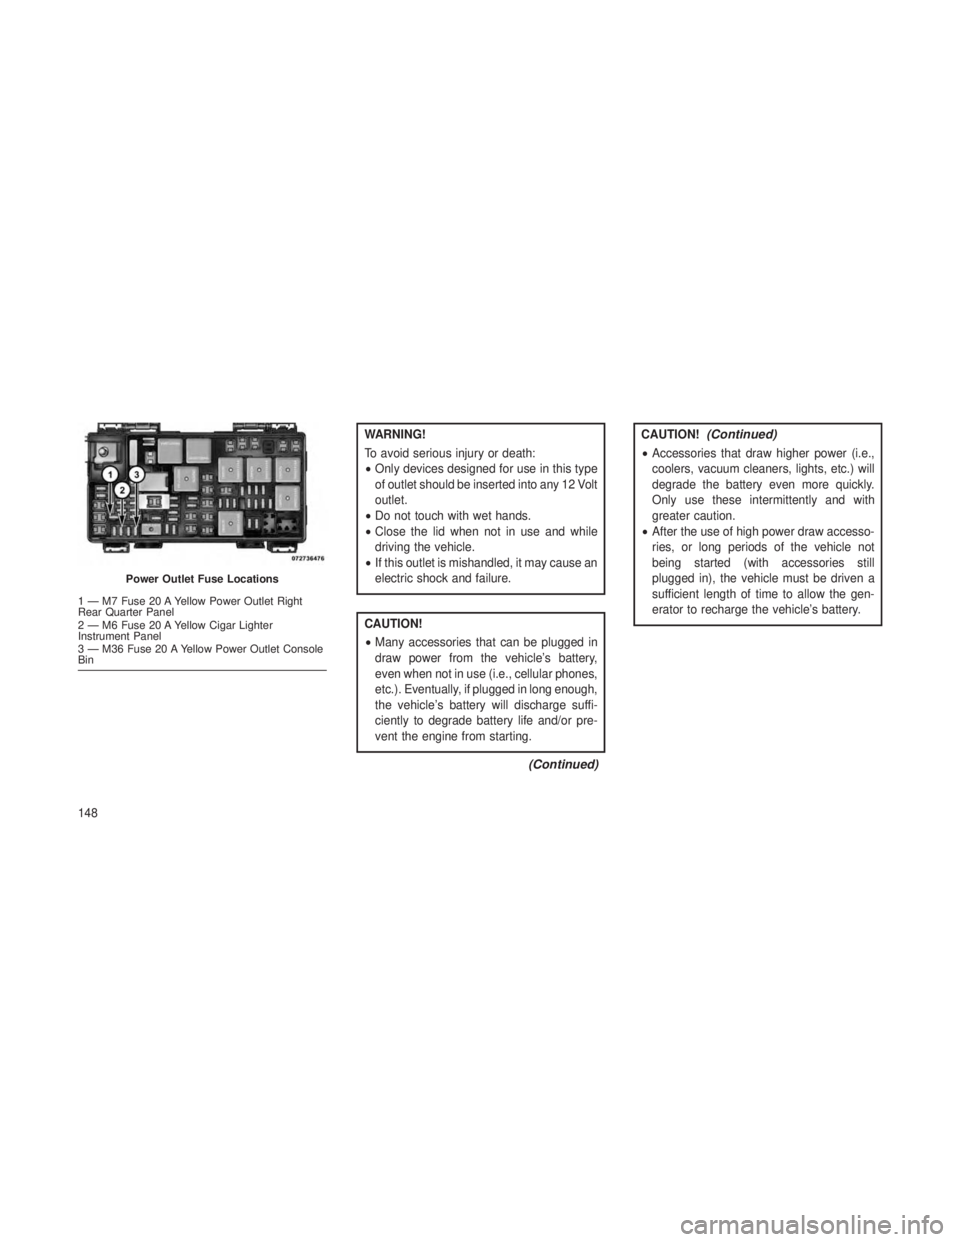
Power Outlet Fuse Locations
1 — M7 Fuse 20 A Yellow Power Outlet Right
Rear Quarter Panel
2 — M6 Fuse 20 A Yellow Cigar Lighter
Instrument Panel
3 — M36 Fuse 20 A Yellow Power Outlet Console
Bin
148
Page 153 of 408
CUPHOLDERS
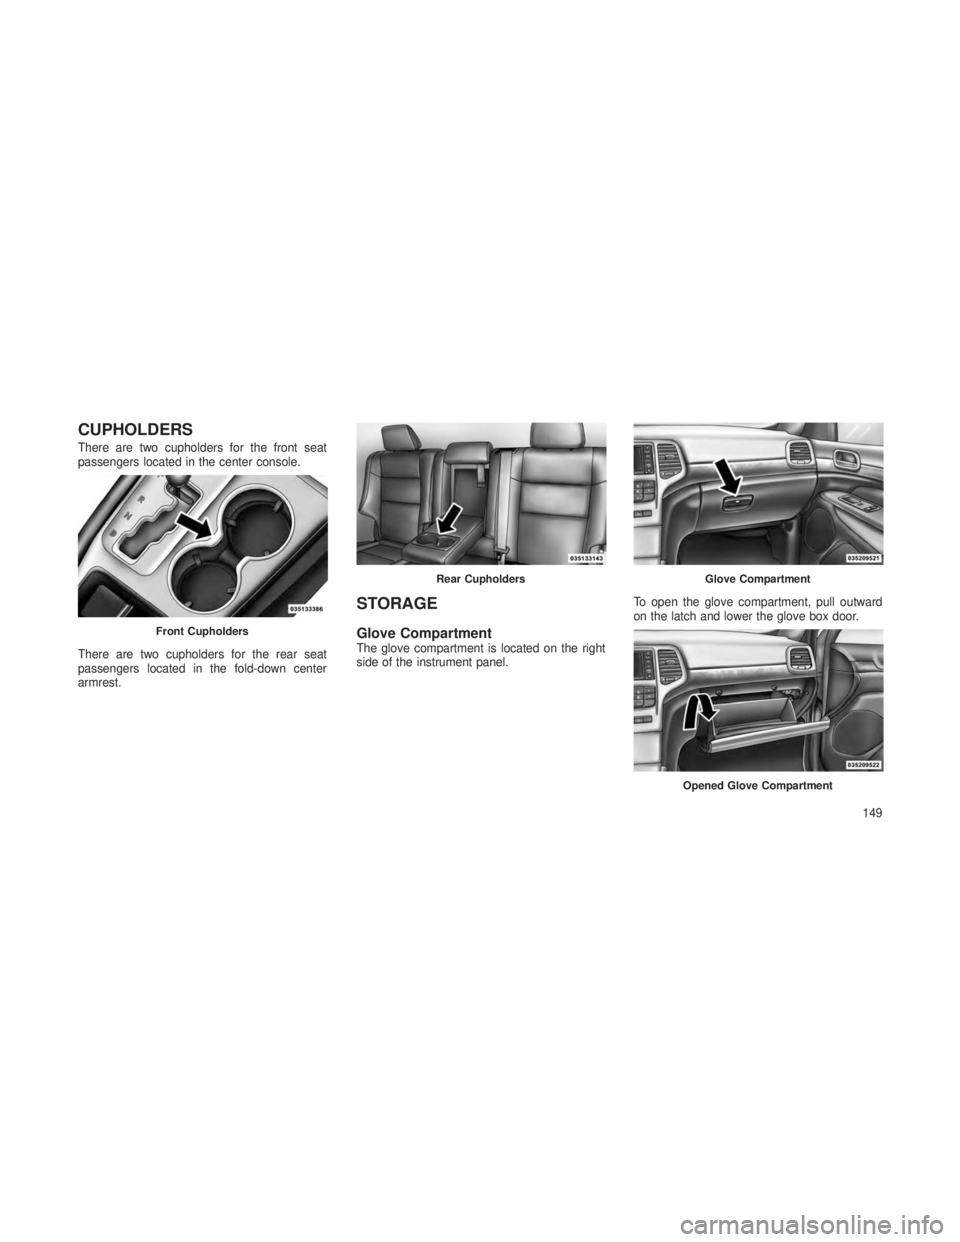
There are two cupholders for the front seat
passengers located in the center console.
There are two cupholders for the rear seat
passengers located in the fold-down center
armrest.
STORAGE
Glove CompartmentThe glove compartment is located on the right
side of the instrument panel.To open the glove compartment, pull outward
on the latch and lower the glove box door.
Front Cupholders
Rear CupholdersGlove Compartment
Opened Glove Compartment
149
Page 154 of 408
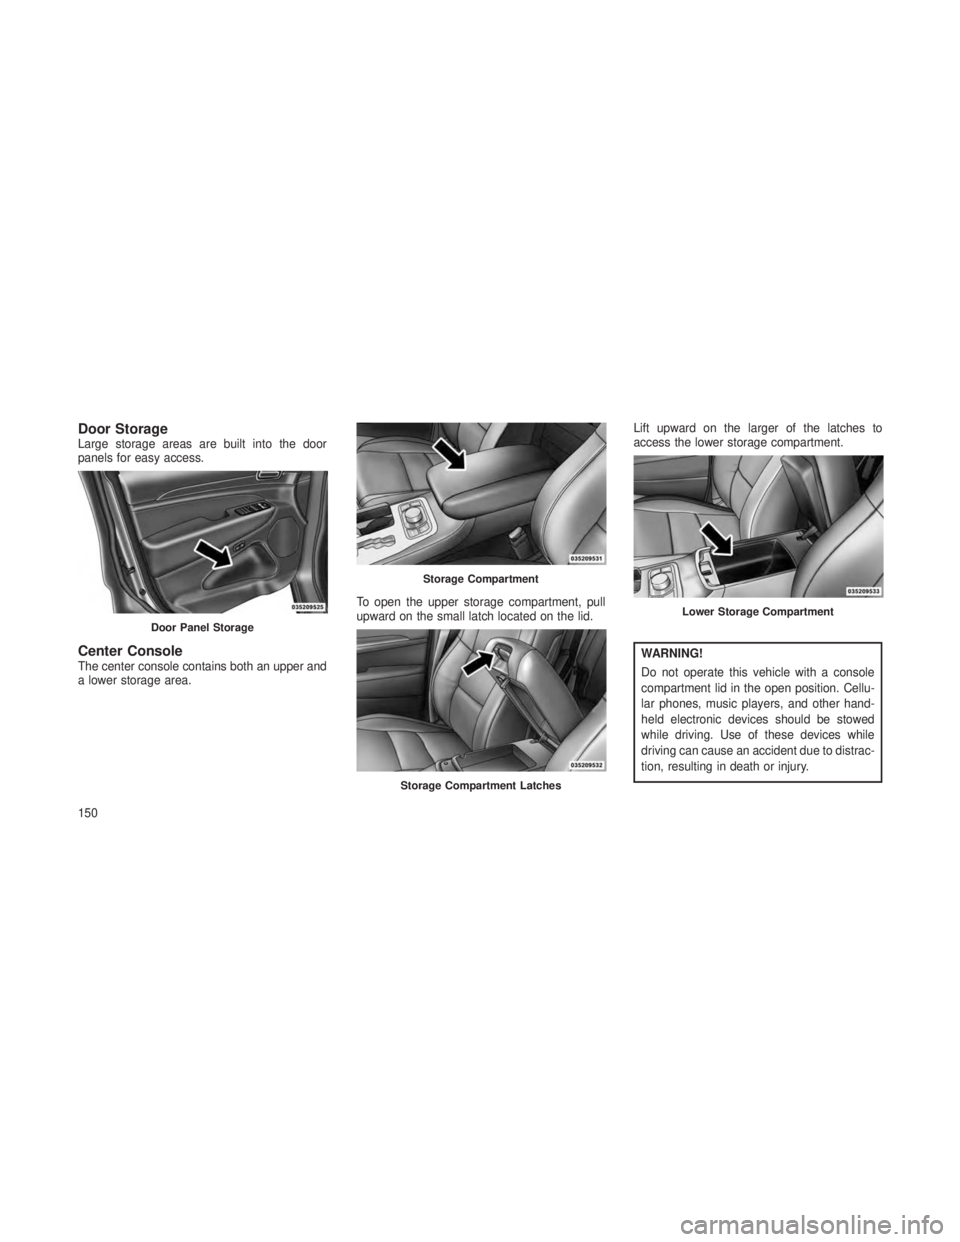
Door StorageLarge storage areas are built into the door
panels for easy access.
Center ConsoleThe center console contains both an upper and
a lower storage area.To open the upper storage compartment, pull
upward on the small latch located on the lid.Lift upward on the larger of the latches to
access the lower storage compartment.WARNING!
Do not operate this vehicle with a console
compartment lid in the open position. Cellu-
lar phones, music players, and other hand-
held electronic devices should be stowed
while driving. Use of these devices while
driving can cause an accident due to distrac-
tion, resulting in death or injury.
Door Panel Storage
Storage Compartment
Storage Compartment Latches
Lower Storage Compartment
150
Page 155 of 408
CARGO AREA FEATURES
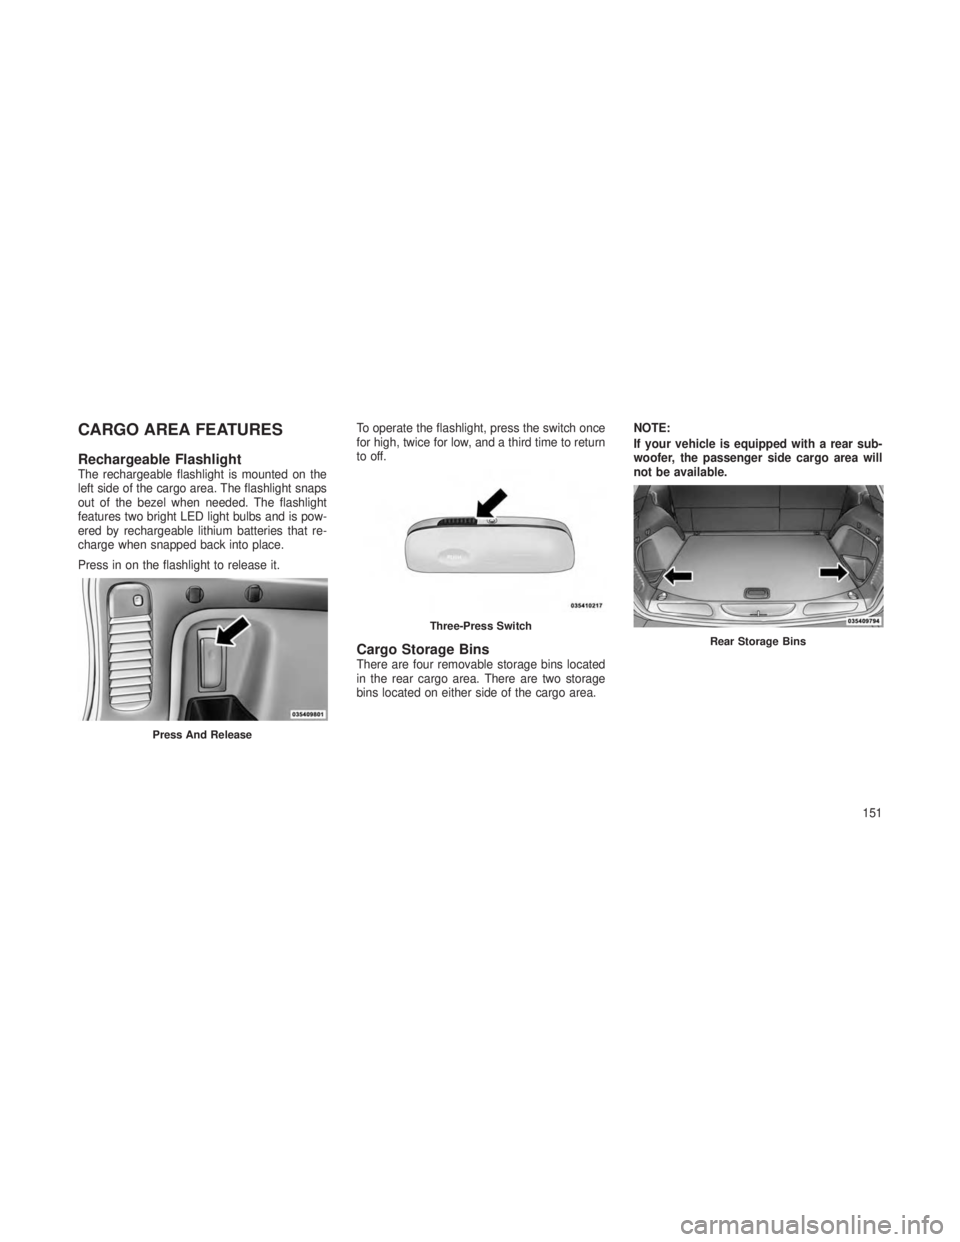
Rechargeable FlashlightThe rechargeable flashlight is mounted on the
left side of the cargo area. The flashlight snaps
out of the bezel when needed. The flashlight
features two bright LED light bulbs and is pow-
ered by rechargeable lithium batteries that re-
charge when snapped back into place.
Press in on the flashlight to release it.To operate the flashlight, press the switch once
for high, twice for low, and a third time to return
to off.
Cargo Storage BinsThere are four removable storage bins located
in the rear cargo area. There are two storage
bins located on either side of the cargo area.NOTE:
If your vehicle is equipped with a rear sub-
woofer, the passenger side cargo area will
not be available.
Press And Release
Three-Press SwitchRear Storage Bins
151
Page 156 of 408
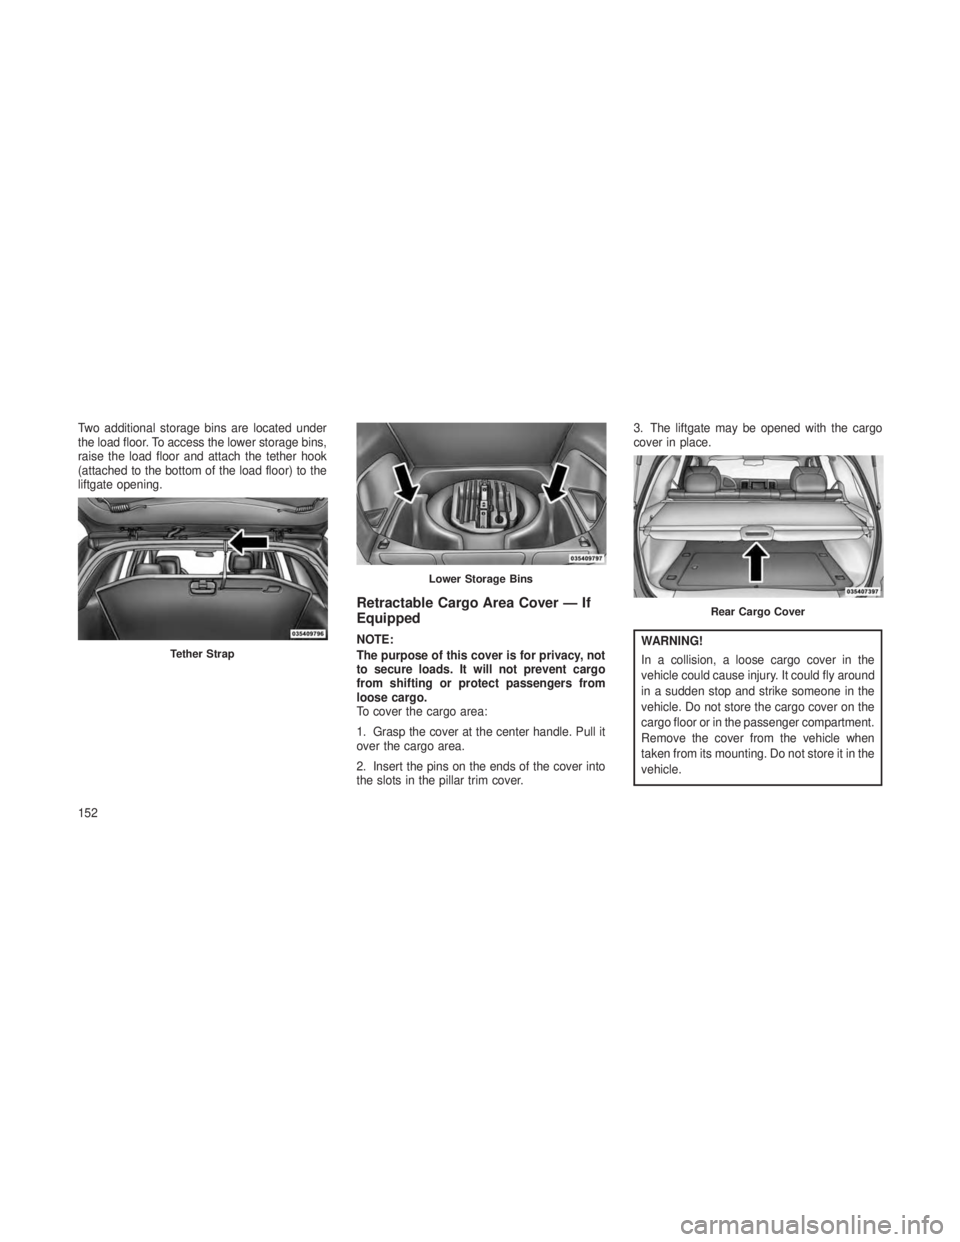
Two additional storage bins are located under
the load floor. To access the lower storage bins,
raise the load floor and attach the tether hook
(attached to the bottom of the load floor) to the
liftgate opening.
Retractable Cargo Area Cover — If
Equipped
NOTE:
The purpose of this cover is for privacy, not
to secure loads. It will not prevent cargo
from shifting or protect passengers from
loose cargo.
To cover the cargo area:
1. Grasp the cover at the center handle. Pull it
over the cargo area.
2. Insert the pins on the ends of the cover into
the slots in the pillar trim cover.3. The liftgate may be opened with the cargo
cover in place.WARNING!
In a collision, a loose cargo cover in the
vehicle could cause injury. It could fly around
in a sudden stop and strike someone in the
vehicle. Do not store the cargo cover on the
cargo floor or in the passenger compartment.
Remove the cover from the vehicle when
taken from its mounting. Do not store it in the
vehicle.Tether Strap
Lower Storage Bins
Rear Cargo Cover
152
Page 157 of 408
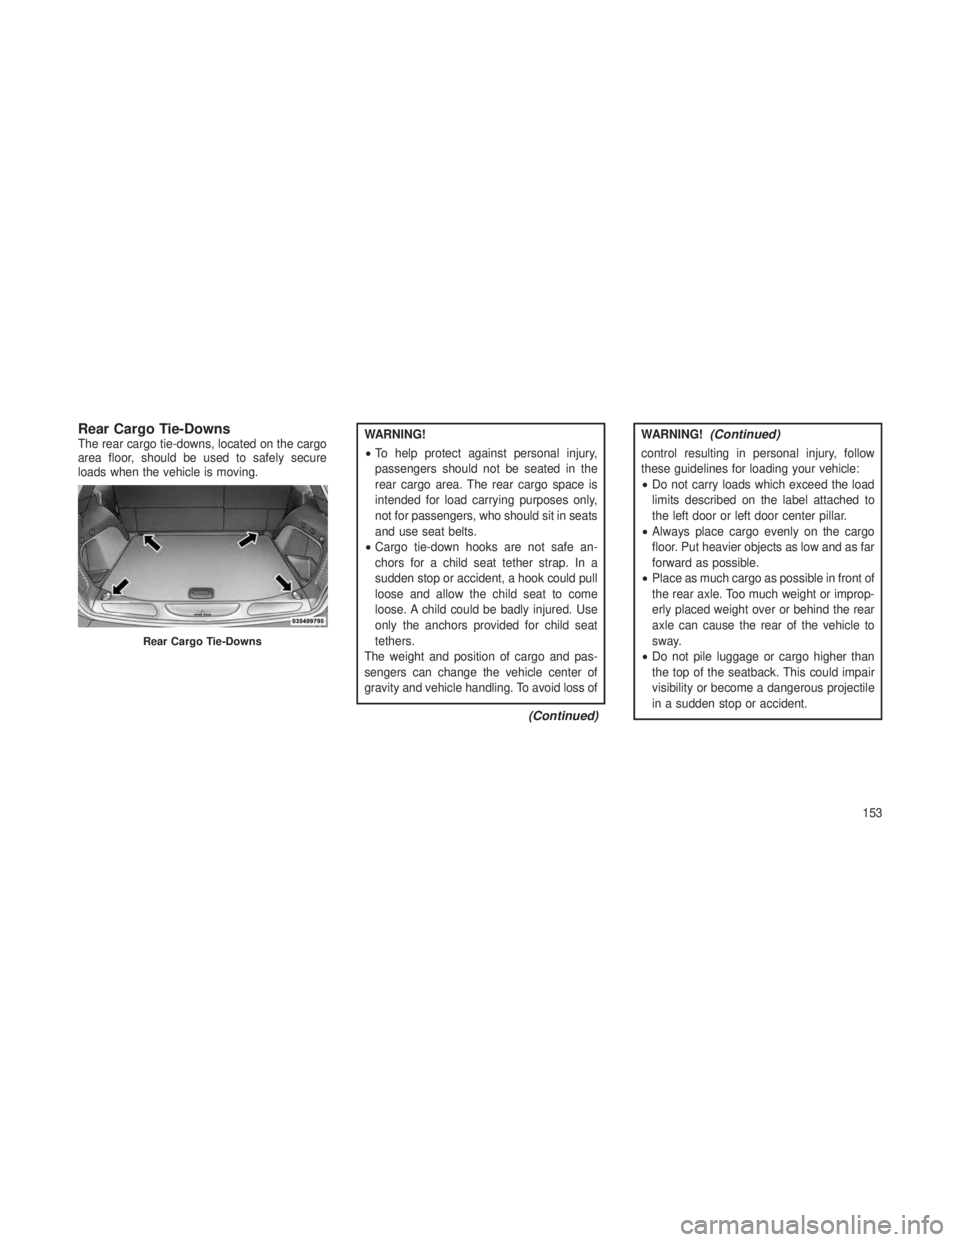
Rear Cargo Tie-DownsThe rear cargo tie-downs, located on the cargo
area floor, should be used to safely secure
loads when the vehicle is moving.WARNING!
•To help protect against personal injury,
passengers should not be seated in the
rear cargo area. The rear cargo space is
intended for load carrying purposes only,
not for passengers, who should sit in seats
and use seat belts.
• Cargo tie-down hooks are not safe an-
chors for a child seat tether strap. In a
sudden stop or accident, a hook could pull
loose and allow the child seat to come
loose. A child could be badly injured. Use
only the anchors provided for child seat
tethers.
The weight and position of cargo and pas-
sengers can change the vehicle center of
gravity and vehicle handling. To avoid loss of
(Continued)
WARNING!(Continued)
control resulting in personal injury, follow
these guidelines for loading your vehicle:
• Do not carry loads which exceed the load
limits described on the label attached to
the left door or left door center pillar.
• Always place cargo evenly on the cargo
floor. Put heavier objects as low and as far
forward as possible.
• Place as much cargo as possible in front of
the rear axle. Too much weight or improp-
erly placed weight over or behind the rear
axle can cause the rear of the vehicle to
sway.
• Do not pile luggage or cargo higher than
the top of the seatback. This could impair
visibility or become a dangerous projectile
in a sudden stop or accident.
Rear Cargo Tie-Downs
153
Page 158 of 408
REAR WINDOW FEATURES
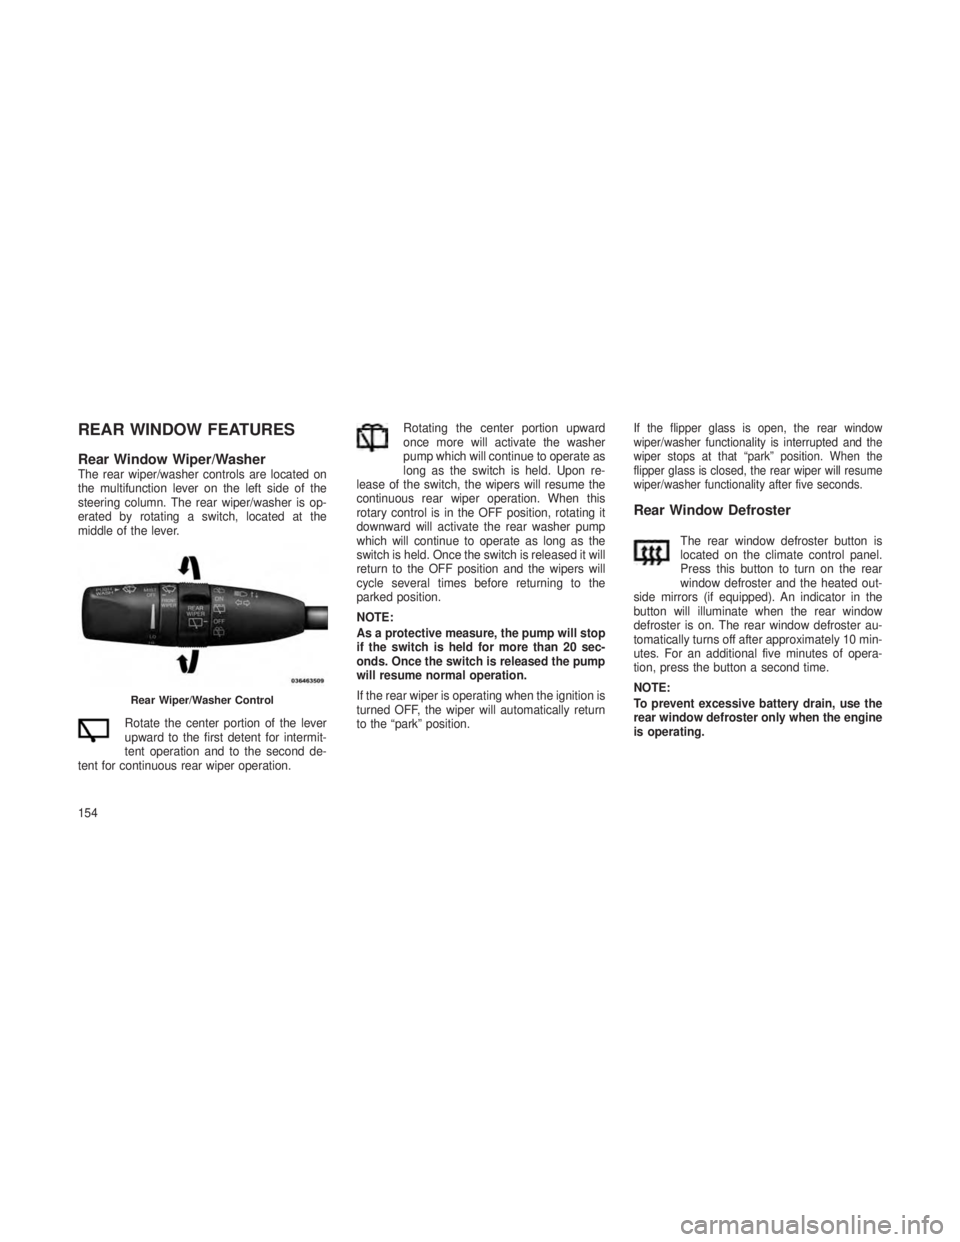
Rear Window Wiper/WasherThe rear wiper/washer controls are located on
the multifunction lever on the left side of the
steering column. The rear wiper/washer is op-
erated by rotating a switch, located at the
middle of the lever.Rotate the center portion of the lever
upward to the first detent for intermit-
tent operation and to the second de-
tent for continuous rear wiper operation. Rotating the center portion upward
once more will activate the washer
pump which will continue to operate as
long as the switch is held. Upon re-
lease of the switch, the wipers will resume the
continuous rear wiper operation. When this
rotary control is in the OFF position, rotating it
downward will activate the rear washer pump
which will continue to operate as long as the
switch is held. Once the switch is released it will
return to the OFF position and the wipers will
cycle several times before returning to the
parked position.
NOTE:
As a protective measure, the pump will stop
if the switch is held for more than 20 sec-
onds. Once the switch is released the pump
will resume normal operation.
If the rear wiper is operating when the ignition is
turned OFF, the wiper will automatically return
to the “park” position.
If the flipper glass is open, the rear window
wiper/washer functionality is interrupted and the
wiper stops at that “park” position. When the
flipper glass is closed, the rear wiper will resume
wiper/washer functionality after five seconds.
Rear Window Defroster
The rear window defroster button is
located on the climate control panel.
Press this button to turn on the rear
window defroster and the heated out-
side mirrors (if equipped). An indicator in the
button will illuminate when the rear window
defroster is on. The rear window defroster au-
tomatically turns off after approximately 10 min-
utes. For an additional five minutes of opera-
tion, press the button a second time.
NOTE:
To prevent excessive battery drain, use the
rear window defroster only when the engine
is operating.
Rear Wiper/Washer Control
154
Page 159 of 408
CAUTION!
Failure to follow these cautions can cause
damage to the heating elements:
•Use care when washing the inside of the
rear window. Do not use abrasive window
cleaners on the interior surface of the
window. Use a soft cloth and a mild wash-
ing solution, wiping parallel to the heating
elements. Labels can be peeled off after
soaking with warm water.
• Do not use scrapers, sharp instruments, or
abrasive window cleaners on the interior
surface of the window.
• Keep all objects a safe distance from the
window.ROOF LUGGAGE RACK — IF
EQUIPPED
The crossbars and siderails are designed to
carry the weight on vehicles equipped with a
luggage rack. The load must not exceed 150 lbs
(68 kg), and should be uniformly distributed
over the luggage rack crossbars.
NOTE:
If not equipped with crossbars, your autho-
rized dealer can order and install MOPAR®
crossbars built specifically for this roof rack
system.
Distribute cargo weight evenly on the roof rack
crossbars. The roof rack does not increase the
total load carrying capacity of the vehicle. Be
sure the total load of cargo inside the vehicle
plus that on the external rack does not exceed
the maximum vehicle load capacity.
To move the crossbars, loosen the attachments,
located at the upper edge of each crossbar,
approximately eight turns using the anti-theft
wrench provided with the MOPAR® crossbars. Then, move the crossbar to the desired posi-
tion, keeping the crossbars parallel to the rack
frame. Once the crossbar is in the desired
position, retighten the with the wrench to lock
the crossbar into position.
NOTE:
•
To help control wind noise when the
crossbars are not in use, place the front
and rear crossbars approximately 24 in
(61 cm) apart. Optimal noise reduction
can then be achieved by adjusting the
front crossbar forward or aft using incre-
ments of 1 in (2.5 cm).
• If the rear crossbar (or any metallic ob-
ject) is placed over the satellite radio
antenna (if equipped), you may experi-
ence interruption of satellite radio recep-
tion. For improved satellite radio recep-
tion, avoid placing the rear crossbar over
the satellite radio antenna.
• The grab handles on the back of the
vehicle (if equipped) are not to be used as
a towing feature.
155
Page 160 of 408
CAUTION!
•To prevent damage to the roof of your
vehicle, do not carry any loads on the roof
rack without the crossbars installed. The
load should be secured and placed on top
of the crossbars, not directly on the roof. If
it is necessary to place the load on the
roof, place a blanket or some other protec-
tion between the load and the roof surface.
• To avoid damage to the roof rack and
vehicle, do not exceed the maximum roof
rack load capacity of 150 lb (68 kg). Al-
ways distribute heavy loads as evenly as
possible and secure the load appropriately.
• Long loads which extend over the wind-
shield, such as wood panels or surfboards,
or loads with large frontal area should be
secured to both the front and rear of the
vehicle.
(Continued)
CAUTION!(Continued)
•Travel at reduced speeds and turn corners
carefully when carrying large or heavy
loads on the roof rack. Wind forces, due to
natural causes or nearby truck traffic, can
add sudden upward lift to a load. This is
especially true on large flat loads and may
result in damage to the cargo or your
vehicle.
WARNING!
Cargo must be securely tied before driving
your vehicle. Improperly secured loads can
fly off the vehicle, particularly at high speeds,
resulting in personal injury or property dam-
age. Follow the roof rack cautions when
carrying cargo on your roof rack.
156