JEEP GRAND CHEROKEE 2016 WK2 / 4.G User Guide
Manufacturer: JEEP, Model Year: 2016, Model line: GRAND CHEROKEE, Model: JEEP GRAND CHEROKEE 2016 WK2 / 4.GPages: 276, PDF Size: 10.84 MB
Page 211 of 276
CAUTION!
Do not run the booster vehicle engine above 2000 rpm since it provides no
charging benefit, wastes fuel and can damage booster vehicle engine.
6. Once the engine is started, remove the jumper cables in the reverse sequence:
Disconnecting The Jumper Cables
1. Disconnect the negative (-)end of the jumper cable from the remote negative (-)
post of the discharged vehicle.
2. Disconnect the opposite end of the negative (-)jumper cable from the negative (-)
post of the booster battery.
3. Disconnect the positive (+)end of the jumper cable from the positive (+)post of
the booster battery.
4. Disconnect the opposite end of the positive (+)jumper cable from the remote
positive (+)post of the discharged vehicle.
5. Reinstall the protective cover over the remote positive (+)post of the discharged
vehicle.
If frequent jump-starting is required to start your vehicle you should have the battery
and charging system tested at your authorized dealer.
CAUTION!
Accessories plugged into the vehicle power outlets draw power from the vehicle’s
battery, even when not in use (i.e., cellular devices, etc.). Eventually, if plugged in
long enough without engine operation, the vehicle’s battery will discharge suffi-
ciently to degrade battery life and/or prevent the engine from starting.
EMERGENCY TOW HOOKS — IF EQUIPPED
If your vehicle is equipped with tow hooks, there will be one in the rear and two
mounted on the front of the vehicle. The rear hook will be located on the driver's side
of the vehicle.
NOTE:
For off-road recovery, it is recommended to use both of the front tow hooks to
minimize the risk of damage to the vehicle.
WARNING!
• Do not use a chain for freeing a stuck vehicle. Chains may break, causing serious injury or death.
• Stand clear of vehicles when pulling with tow hooks. Tow straps may become
disengaged, causing serious injury.
WHAT TO DO IN EMERGENCIES
209
Page 212 of 276
CAUTION!
Tow hooks are for emergency use only, to rescue a vehicle stranded off road. Do not
use tow hooks for tow truck hookup or highway towing. You could damage your
vehicle.
MANUAL PARK RELEASE
WARNING!
Always secure your vehicle by fully applying the parking brake, before activating
the Manual Park Release. Activating the Manual Park Release will allow your
vehicle to roll away if it is not secured by the parking brake or by proper connection
to a tow vehicle. Activating the Manual Park Release on an unsecured vehicle
could lead to serious injury or death for those in or around the vehicle.
In order to move the vehicle in cases where the transmission will not shift out of
PARK (such as a dead battery), a Manual Park Release is available.
Follow these steps to use the Manual Park Release:
1. Firmly apply the parking brake.
2. Open the center console and locate the Manual Park Release cover, remove it by snapping the cover away from the console hinges.
3. Using a screwdriver or similar tool, push the metal latch in towards the
tether strap.
Manual Park Release Cover Removed
WHAT TO DO IN EMERGENCIES
210
Page 213 of 276
4. While the metal latch is in the open position, simultaneously pull upwards on thetether strap until the lever clicks and latches in the released position. The
transmission is now out of PARK and the vehicle can be moved.
CAUTION!
Closing the armrest while the Manual Park Release is activated may damage the
Manual Park Release mechanism, the transmission, and/or the armrest.
NOTE:
To prevent the vehicle from rolling unintentionally, firmly apply the parking brake.
To Disengage the Manual Park Release Lever:
1. To disengage the Manual Park Release apply tension upward while pushing the release latch towards the tether to unlock the lever.
2. Once the tension has been released and the lever has been unlocked be sure it is stowed properly and locks into position.
NOTE:
Be sure to replace the cover by snapping it back in place.
Released Position
WHAT TO DO IN EMERGENCIES
211
Page 214 of 276
TOWING A DISABLED VEHICLE
This section describes procedures for towing a disabled vehicle using a commercial
towing service. If the transmission and drivetrain are operable, disabled vehicles may
also be towed as described under “Recreational Towing” in the “Starting and
Operating” section in the Owners Manual on the DVD.
NOTE:
Vehicles equipped with Quadra-Lift must be placed in Transport mode, before tying
them down (from the body) on a trailer or flatbed truck. Refer to the section on
Quadra-Lift for more information. If the vehicle cannot be placed in Transport mode
(for example, engine will not run), tie-downs must be fastened to the axles (not to the
body). Failure to follow these instructions may cause fault codes to be set and/or
cause loss of proper tie-down tension.
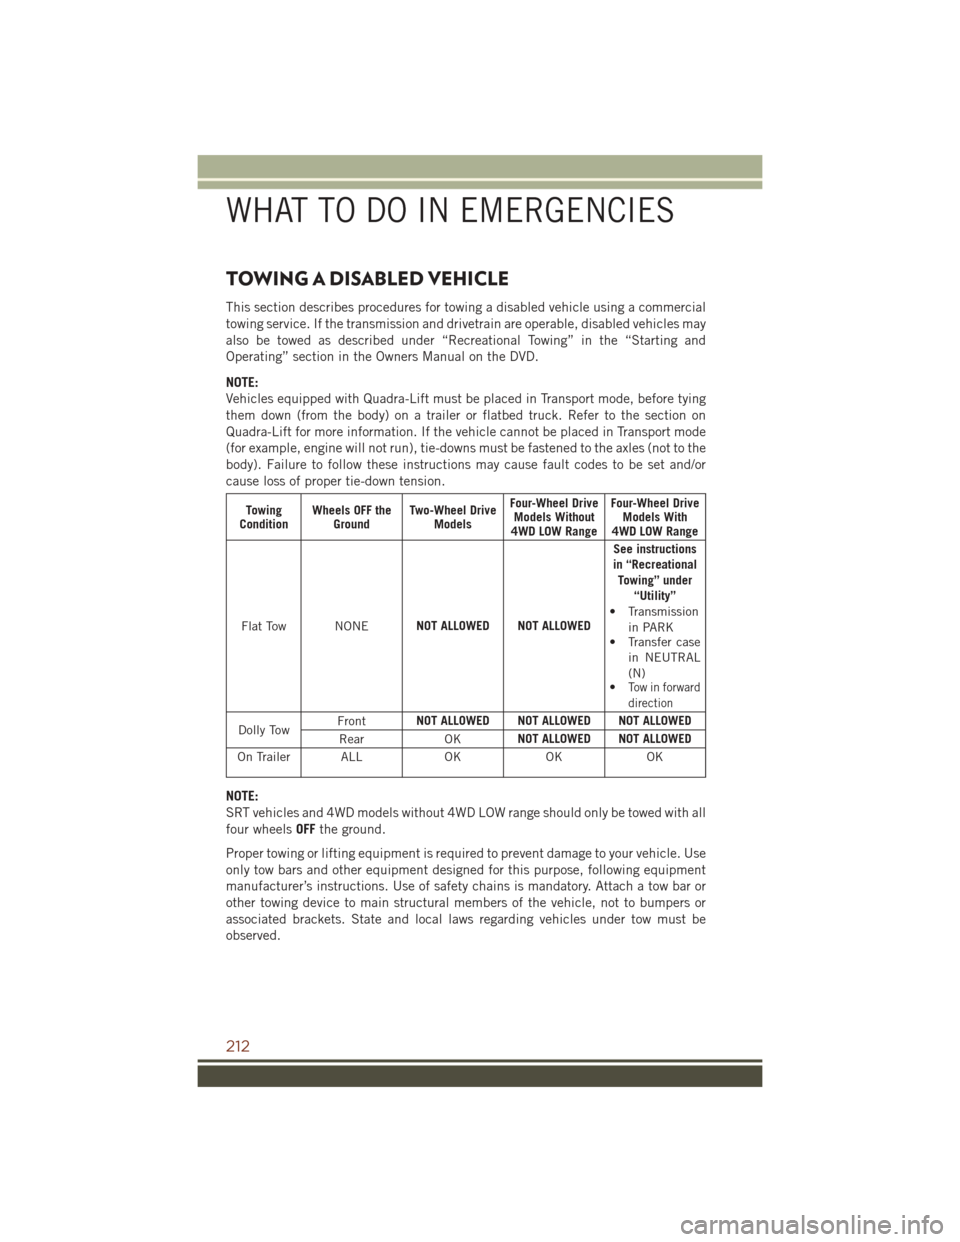
Towing
Condition Wheels OFF the
Ground Two-Wheel Drive
Models Four-Wheel Drive
Models Without
4WD LOW Range Four-Wheel Drive
Models With
4WD LOW Range
Flat Tow NONE NOT ALLOWED NOT ALLOWED See instructions
in “Recreational Towing” under “Utility”
• Transmission
in PARK
• Transfer case
in NEUTRAL
(N)
•
Tow in forward
direction
Dolly Tow Front
NOT ALLOWED NOT ALLOWED NOT ALLOWED
Rear OKNOT ALLOWED NOT ALLOWED
On Trailer ALL OKOKOK
NOTE:
SRT vehicles and 4WD models without 4WD LOW range should only be towed with all
four wheelsOFFthe ground.
Proper towing or lifting equipment is required to prevent damage to your vehicle. Use
only tow bars and other equipment designed for this purpose, following equipment
manufacturer’s instructions. Use of safety chains is mandatory. Attach a tow bar or
other towing device to main structural members of the vehicle, not to bumpers or
associated brackets. State and local laws regarding vehicles under tow must be
observed.
WHAT TO DO IN EMERGENCIES
212
Page 215 of 276
If you must use the accessories (wipers, defrosters, etc.) while being towed, the
ignition must be in the ON/RUN position, not the ACC position.
If the key fob is unavailable, or the vehicle's battery is discharged, refer to “Manual
Park Release” in this section for instructions on shifting the transmission out of
PARK for towing.
CAUTION!
• Do not use sling type equipment when towing. Vehicle damage may occur.
• When securing the vehicle to a flat bed truck, do not attach to front or rearsuspension components. Damage to your vehicle may result from improper
towing.
Two-Wheel Drive Models
The manufacturer recommends towing your vehicle with all four wheels OFFthe
ground using a flatbed.
If flatbed equipment is not available, and the transmission is operable, the vehicle
may be towed (with rear wheels on the ground) under the following conditions:
• The transmission must be in NEUTRAL. Refer to "Manual Park Release" in this section for instructions on shifting the transmission to NEUTRAL when the engine
is off.
• The towing speed must not exceed 30 mph (48 km/h).
• The towing distance must not exceed 30 miles (48 km).
If the transmission is not operable, or the vehicle must be towed faster than 30 mph
(48 km/h) or farther than 30 miles (48 km), tow with the rear wheels OFFthe ground.
Acceptable methods are to tow the vehicle on a flatbed, or with the front wheels
raised and the rear wheels on a towing dolly, or (when using a suitable steering wheel
stabilizer to hold the front wheels in the straight position) with the rear wheels raised
and the front wheels on the ground.
CAUTION!
Towing faster than 30 mph (48 km/h) or farther than 30 miles (48 km) with rear
wheels on the ground can cause severe transmission damage. Damage from
improper towing is not covered under the New Vehicle Limited Warranty.
WHAT TO DO IN EMERGENCIES
213
Page 216 of 276
Four-Wheel Drive Models
The manufacturer recommends towing with all wheelsOFFthe ground. Acceptable
methods are to tow the vehicle on a flatbed or with one end of vehicle raised and the
opposite end on a towing dolly.
If flatbed equipment is not available, and the transfer case is operable, vehicles with
a two-speed transfer case may be towed (in the forward direction, with ALLwheels on
the ground), IFthe transfer case is in NEUTRAL (N) and the transmission is in PARK.
Refer to “Recreational Towing” in “Starting And Operating” in the Owner’s Manual
on the DVD for detailed instructions.
Vehicles equipped with a single-speed transfer case have no NEUTRAL position, and
therefore mustbe towed with all four wheels OFFthe ground.
CAUTION!
• Front or rear wheel lifts must not be used. Internal damage to the transmission
or transfer case will occur if a front or rear wheel lift is used when towing.
• Towing this vehicle in violation of the above requirements can cause severe
transmission and/or transfer case damage. Damage from improper towing is
not covered under the New Vehicle Limited Warranty.
FREEING A STUCK VEHICLE
If your vehicle becomes stuck in mud, sand or snow, it can often be moved using a
rocking motion. Turn the steering wheel right and left to clear the area around the
front wheels. Push and hold the lock button on the gear selector. Then shift back and
forth between DRIVE and REVERSE while gently pressing the accelerator.
NOTE:
Shifts between DRIVE and REVERSE can only be achieved at wheel speeds of 5 mph
(8 km/h) or less. Whenever the transmission remains in NEUTRAL for more than two
seconds, you must push the brake pedal to engage DRIVE or REVERSE.
Use the least amount of accelerator pedal pressure that will maintain the rocking
motion without spinning the wheels or racing the engine.
WHAT TO DO IN EMERGENCIES
214
Page 217 of 276
NOTE:
Push the "ESC Off" switch (if necessary), to place the Electronic Stability Control
(ESC) system in "Partial Off" mode, before rocking the vehicle. Refer to “Electronic
Brake Control” in “Starting And Operating” in the Owners Manual on the DVD for
further information. Once the vehicle has been freed, push the "ESC Off" switch
again to restore "ESC On" mode.
CAUTION!
Racing the engine or spinning the wheels may lead to transmission overheating
and failure. Allow the engine to idle with the transmission in NEUTRAL for at least
one minute after every five rocking-motion cycles. This will minimize overheating
and reduce the risk of transmission failure during prolonged efforts to free a stuck
vehicle.
WARNING!
Fast spinning tires can be dangerous. Forces generated by excessive wheel speeds
may cause damage, or even failure, of the axle and tires. A tire could explode and
injure someone. Do not spin your vehicle's wheels faster than 30 mph (48 km/h)
or for longer than 30 seconds continuously without stopping when you are stuck
and do not let anyone near a spinning wheel, no matter what the speed.
CAUTION!
• When “rocking” a stuck vehicle by shifting between DRIVE and REVERSE, donot spin the wheels faster than 15 mph (24 km/h), or drivetrain damage may
result.
• Revving the engine or spinning the wheels too fast may lead to transmission
overheating and failure. It can also damage the tires. Do not spin the wheels
above 30 mph (48 km/h) while in gear (no transmission shifting occurring).
WHAT TO DO IN EMERGENCIES
215
Page 218 of 276
CAP-LESS FUEL FILL FUNNEL
The funnel for the Cap-Less Fuel System is located on top of the spare tire or in the
storage tub if not equipped with a spare tire. If your vehicle is out of fuel and an
auxiliary fuel can is needed, insert the funnel into the filler neck and proceed to fill
the vehicle.
ENHANCED ACCIDENT RESPONSE SYSTEM (EARS)
This vehicle is equipped with an Enhanced Accident Response System.
Please refer to “Supplemental Restraint System (SRS) — Air Bags” in “Getting
Started” in this guide for further information on the Enhanced Accident Response
System (EARS) function.
EVENT DATA RECORDER (EDR)
This vehicle is equipped with an event data recorder (EDR). The main purpose of an
EDR is to record, in certain crash or near crash-like situations, such as an air bag
deployment or hitting a road obstacle, data that will assist in understanding how a
vehicle’s systems performed.
Please refer to “Supplemental Restraint System (SRS) — Air Bags” in “Getting
Started” in this guide for further information on the Event Data Recorder (EDR).
WHAT TO DO IN EMERGENCIES
216
Page 219 of 276
OPENING THE HOOD
1. Pull the hood release lever locatedbelow the steering wheel at the base
of the instrument panel.
2. Reach into the opening beneath the center of the hood and move the
safety latch lever while lifting the
hood at the same time.
WARNING!
Be sure the hood is fully latched before driving your vehicle. If the hood is not fully
latched, it could open when the vehicle is in motion and block your vision. Failure
to follow this warning could result in serious injury or death.
Hood Release Lever
MAINTAINING YOUR VEHICLE
217
Page 220 of 276
ENGINE COMPARTMENT
ENGINE COMPARTMENT — 3.6L
1. Remote Jump Start Positive Terminal
2. Engine Oil Dipstick
3. Power Distribution Center (Fuses)
4. Engine Coolant Reservoir Pressure Cap
5. Remote Jump Start Negative Terminal
MAINTAINING YOUR VEHICLE
218