lock JEEP GRAND CHEROKEE 2020 Owner handbook (in English)
[x] Cancel search | Manufacturer: JEEP, Model Year: 2020, Model line: GRAND CHEROKEE, Model: JEEP GRAND CHEROKEE 2020Pages: 378, PDF Size: 6.88 MB
Page 234 of 378
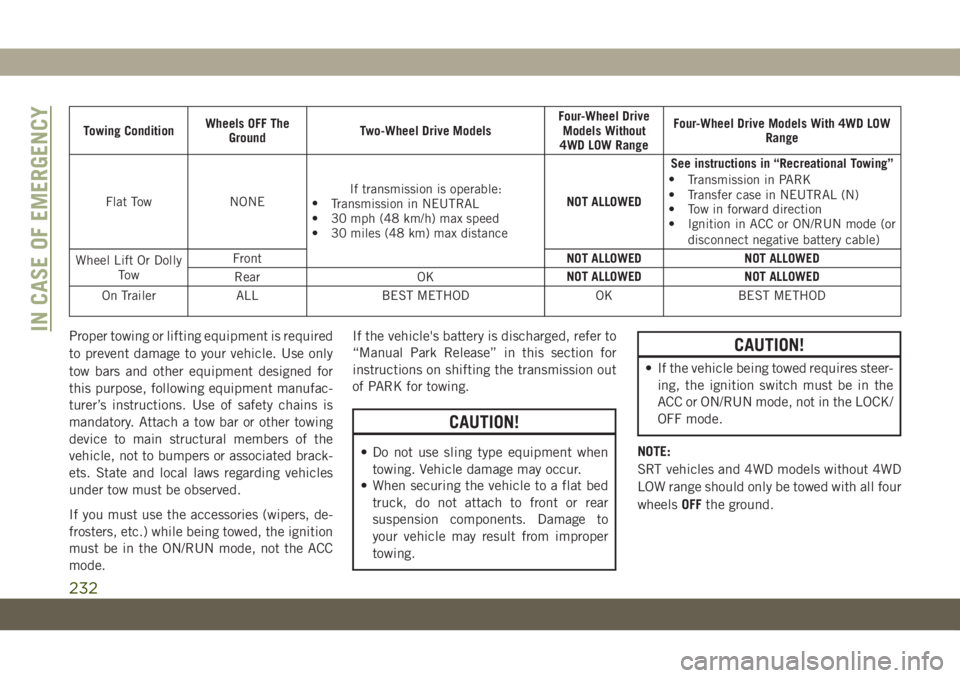
Towing ConditionWheels OFF The
GroundTwo-Wheel Drive ModelsFour-Wheel Drive
Models Without
4WD LOW RangeFour-Wheel Drive Models With 4WD LOW
Range
Flat Tow NONEIf transmission is operable:
•
Transmission in NEUTRAL
• 30 mph (48 km/h) max speed
• 30 miles (48 km) max distanceNOT ALLOWEDSee instructions in “Recreational Towing”
•
Transmission in PARK
• Transfer case in NEUTRAL (N)
• Tow in forward direction
• Ignition in ACC or ON/RUN mode (or
disconnect negative battery cable)
Wheel Lift Or Dolly
To wFrontNOT ALLOWED NOT ALLOWED
Rear OKNOT ALLOWED NOT ALLOWED
On Trailer ALL BEST METHOD OK BEST METHOD
Proper towing or lifting equipment is required
to prevent damage to your vehicle. Use only
tow bars and other equipment designed for
this purpose, following equipment manufac-
turer’s instructions. Use of safety chains is
mandatory. Attach a tow bar or other towing
device to main structural members of the
vehicle, not to bumpers or associated brack-
ets. State and local laws regarding vehicles
under tow must be observed.
If you must use the accessories (wipers, de-
frosters, etc.) while being towed, the ignition
must be in the ON/RUN mode, not the ACC
mode.If the vehicle's battery is discharged, refer to
“Manual Park Release” in this section for
instructions on shifting the transmission out
of PARK for towing.
CAUTION!
• Do not use sling type equipment when
towing. Vehicle damage may occur.
• When securing the vehicle to a flat bed
truck, do not attach to front or rear
suspension components. Damage to
your vehicle may result from improper
towing.
CAUTION!
• If the vehicle being towed requires steer-
ing, the ignition switch must be in the
ACC or ON/RUN mode, not in the LOCK/
OFF mode.
NOTE:
SRT vehicles and 4WD models without 4WD
LOW range should only be towed with all four
wheelsOFFthe ground.
IN CASE OF EMERGENCY
232
Page 235 of 378
Without The Key Fob
Special care must be taken when the vehicle
is towed with the ignition in the LOCK/OFF
mode. The only approved method of towing
without the key fob is with a flatbed truck.
Proper towing equipment is necessary to pre-
vent damage to the vehicle.
Two-Wheel Drive Models
The manufacturer recommends towing your
vehicle with all four wheelsOFFthe ground
using a flatbed.
If flatbed equipment is not available, and the
transmission is operable, the vehicle may be
towed (with rear wheels on the ground) under
the following conditions:
• The transmission must be in NEUTRAL.
Refer to "Manual Park Release" in this sec-
tion for instructions on shifting the trans-
mission to NEUTRAL when the engine is
off.
• The towing speed must not exceed 30 mph
(48 km/h).
• The towing distance must not exceed
30 miles (48 km).If the transmission is not operable, or the
vehicle must be towed faster than 30 mph
(48 km/h) or farther than 30 miles (48 km),
tow with the rear wheelsOFFthe ground.
Acceptable methods are to tow the vehicle on
a flatbed, or with the front wheels raised and
the rear wheels on a towing dolly, or (when
using a suitable steering wheel stabilizer to
hold the front wheels in the straight position)
with the rear wheels raised and the front
wheels on the ground.
CAUTION!
• Towing faster than 30 mph (48 km/h) or
farther than 30 miles (48 km) with rear
wheels on the ground can cause severe
transmission damage. Damage from im-
proper towing is not covered under the
New Vehicle Limited Warranty.
Four-Wheel Drive Models
The manufacturer recommends towing with
all wheelsOFFthe ground. Acceptable meth-
ods are to tow the vehicle on a flatbed or with
one end of vehicle raised and the opposite
end on a towing dolly.
If flatbed equipment is not available, and the
transfer case is operable, vehicles may be
towed (in the forward direction, withALL
wheels on the ground),IFthe transfer case is
in NEUTRAL (N) and the transmission is in
PARK. Refer to “Recreational Towing” in
“Starting And Operating” in the Owner’s
Manual for detailed instructions.
Vehicles equipped with a single-speed trans-
fer case have no NEUTRAL position, and
thereforemustbe towed with all four wheels
OFFthe ground.
CAUTION!
• Front or rear wheel lifts must not be used
(if the remaining wheels are on the
ground). Internal damage to the trans-
mission or transfer case will occur if a
233
Page 261 of 378
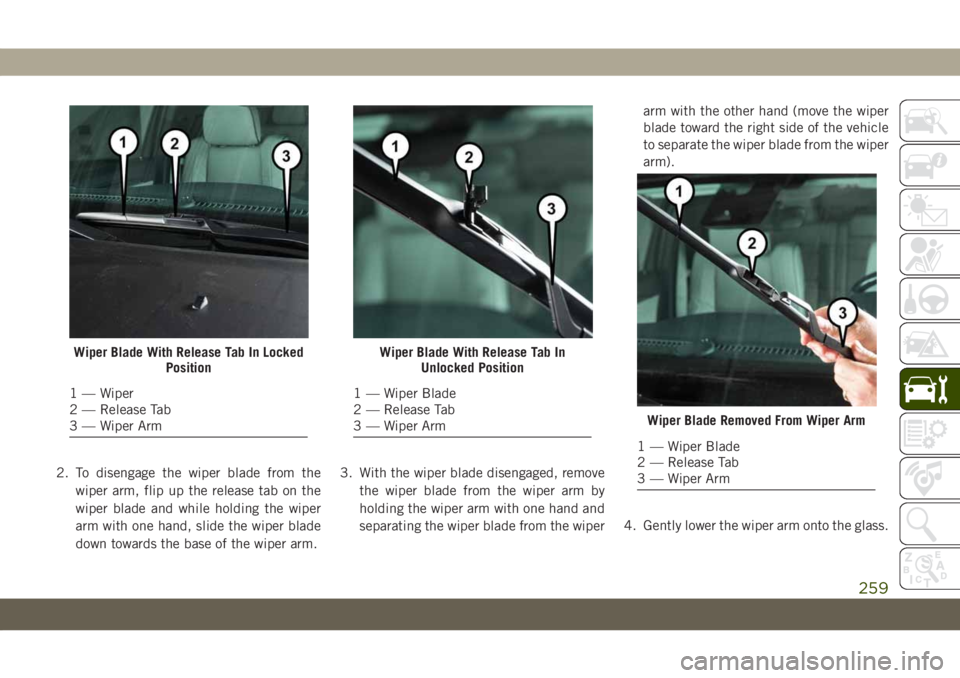
2. To disengage the wiper blade from the
wiper arm, flip up the release tab on the
wiper blade and while holding the wiper
arm with one hand, slide the wiper blade
down towards the base of the wiper arm.3. With the wiper blade disengaged, remove
the wiper blade from the wiper arm by
holding the wiper arm with one hand and
separating the wiper blade from the wiperarm with the other hand (move the wiper
blade toward the right side of the vehicle
to separate the wiper blade from the wiper
arm).
4. Gently lower the wiper arm onto the glass.
Wiper Blade With Release Tab In Locked
Position
1 — Wiper
2 — Release Tab
3 — Wiper Arm
Wiper Blade With Release Tab In
Unlocked Position
1 — Wiper Blade
2 — Release Tab
3 — Wiper Arm
Wiper Blade Removed From Wiper Arm
1 — Wiper Blade
2 — Release Tab
3 — Wiper Arm
259
Page 262 of 378
Installing The Front Wipers
1. Lift the wiper arm off of the glass, until
the wiper arm is in the full up position.
2. Position the wiper blade near the hook on
the tip of the wiper arm with the wiper
release tab open and the blade side of the
wiper facing up and away from the
windshield.
3. Insert the hook on the tip of the arm
through the opening in the wiper blade
under the release tab.
4. Slide the wiper blade up into the hook on
the wiper arm and rotate the wiper blade
until it is flush against the wiper arm. Fold
down the latch release tab and snap it into
its locked position. Latch engagement will
be accompanied by an audible click.
5. Gently lower the wiper blade onto the
glass.
Rear Wiper Blade Removal/Installation
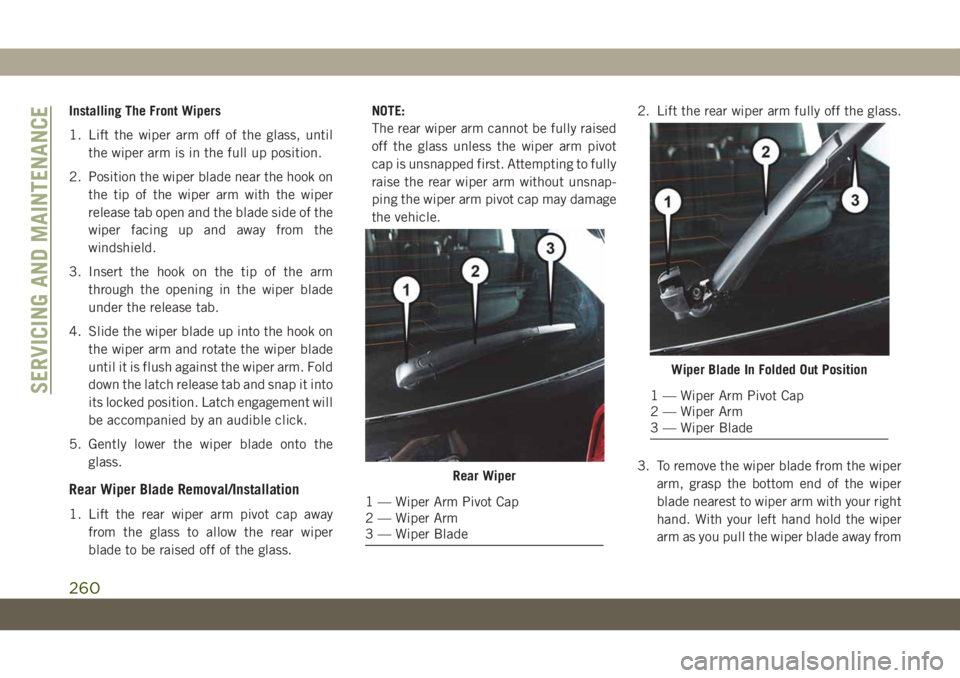
1. Lift the rear wiper arm pivot cap away
from the glass to allow the rear wiper
blade to be raised off of the glass.NOTE:
The rear wiper arm cannot be fully raised
off the glass unless the wiper arm pivot
cap is unsnapped first. Attempting to fully
raise the rear wiper arm without unsnap-
ping the wiper arm pivot cap may damage
the vehicle.2. Lift the rear wiper arm fully off the glass.
3. To remove the wiper blade from the wiper
arm, grasp the bottom end of the wiper
blade nearest to wiper arm with your right
hand. With your left hand hold the wiper
arm as you pull the wiper blade away from
Rear Wiper
1 — Wiper Arm Pivot Cap
2 — Wiper Arm
3 — Wiper Blade
Wiper Blade In Folded Out Position
1 — Wiper Arm Pivot Cap
2 — Wiper Arm
3 — Wiper BladeSERVICING AND MAINTENANCE
260
Page 303 of 378
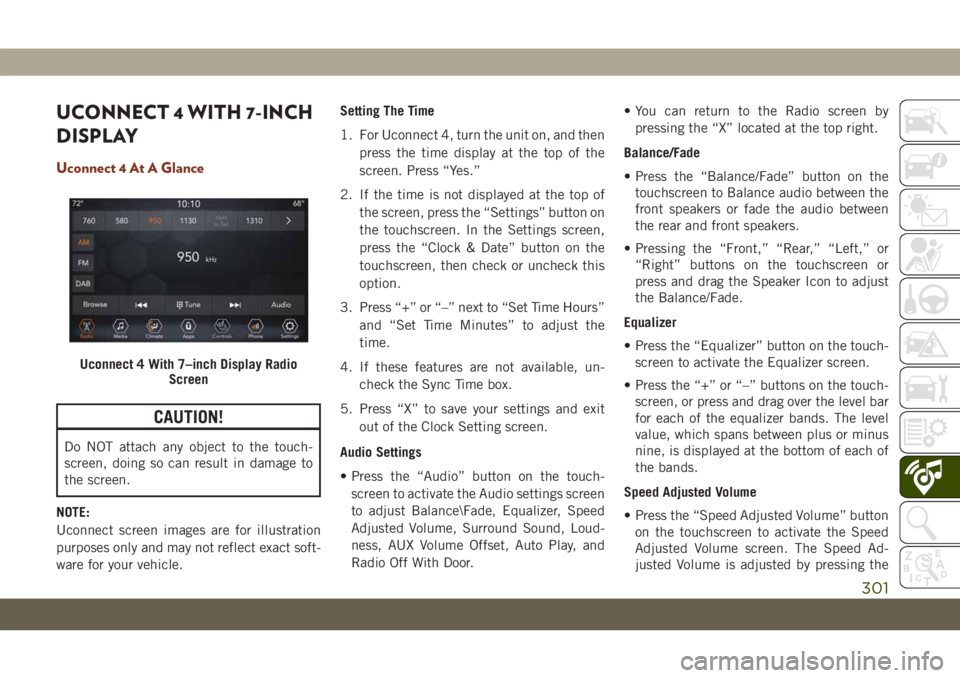
UCONNECT 4 WITH 7-INCH
DISPLAY
Uconnect 4 At A Glance
CAUTION!
Do NOT attach any object to the touch-
screen, doing so can result in damage to
the screen.
NOTE:
Uconnect screen images are for illustration
purposes only and may not reflect exact soft-
ware for your vehicle.Setting The Time
1. For Uconnect 4, turn the unit on, and then
press the time display at the top of the
screen. Press “Yes.”
2. If the time is not displayed at the top of
the screen, press the “Settings” button on
the touchscreen. In the Settings screen,
press the “Clock & Date” button on the
touchscreen, then check or uncheck this
option.
3. Press “+” or “–” next to “Set Time Hours”
and “Set Time Minutes” to adjust the
time.
4. If these features are not available, un-
check the Sync Time box.
5. Press “X” to save your settings and exit
out of the Clock Setting screen.
Audio Settings
• Press the “Audio” button on the touch-
screen to activate the Audio settings screen
to adjust Balance\Fade, Equalizer, Speed
Adjusted Volume, Surround Sound, Loud-
ness, AUX Volume Offset, Auto Play, and
Radio Off With Door.• You can return to the Radio screen by
pressing the “X” located at the top right.
Balance/Fade
• Press the “Balance/Fade” button on the
touchscreen to Balance audio between the
front speakers or fade the audio between
the rear and front speakers.
• Pressing the “Front,” “Rear,” “Left,” or
“Right” buttons on the touchscreen or
press and drag the Speaker Icon to adjust
the Balance/Fade.
Equalizer
• Press the “Equalizer” button on the touch-
screen to activate the Equalizer screen.
• Press the “+” or “–” buttons on the touch-
screen, or press and drag over the level bar
for each of the equalizer bands. The level
value, which spans between plus or minus
nine, is displayed at the bottom of each of
the bands.
Speed Adjusted Volume
• Press the “Speed Adjusted Volume” button
on the touchscreen to activate the Speed
Adjusted Volume screen. The Speed Ad-
justed Volume is adjusted by pressing the
Uconnect 4 With 7–inch Display Radio
Screen
301
Page 308 of 378
Uconnect works seamlessly with Apple Car-
Play, the smarter, more secure way to use
your iPhone in the car, and stay focused on
the road. Use your Uconnect Touchscreen
display, the vehicle's knobs and controls, and
your voice with Siri to get access to Apple
Music, Maps, Messages, and more.
To use CarPlay, make sure you are using
iPhone 5 or later, have Siri enabled in Set-
tings, that your iPhone is unlocked for the
very first connection only, and then use the
following procedure:
1. Connect your iPhone to one of the media
USB ports in your vehicle.
NOTE:
Be sure to use the factory-provided Light-
ning cable that came with your phone, as
aftermarket cables may not work.
2. Once the device is connected and recog-
nized, CarPlay should automatically
launch, but you can also launch it by
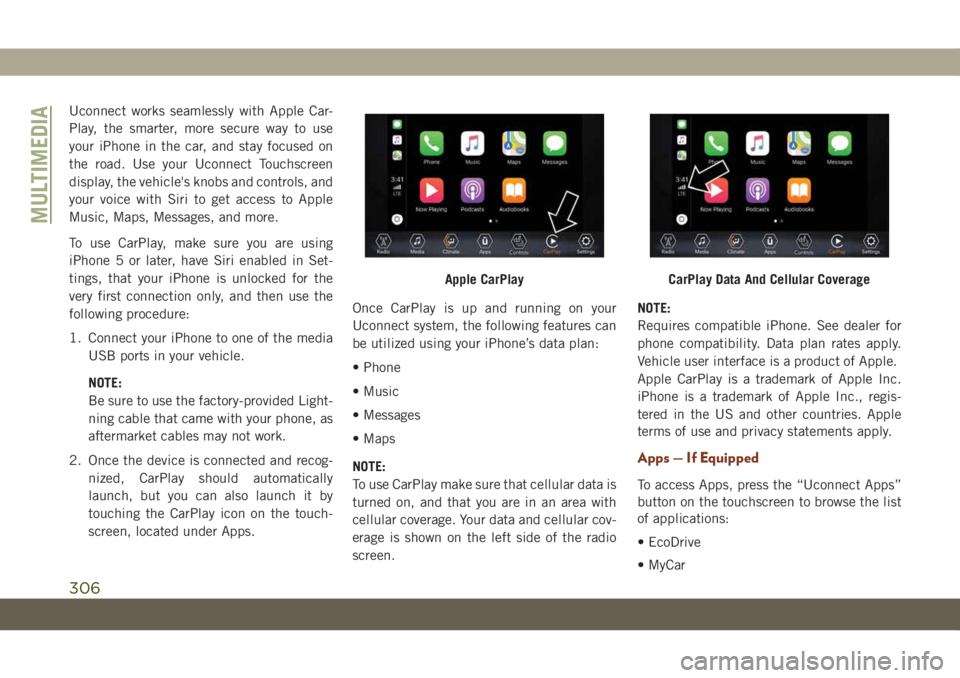
touching the CarPlay icon on the touch-
screen, located under Apps.Once CarPlay is up and running on your
Uconnect system, the following features can
be utilized using your iPhone’s data plan:
• Phone
• Music
• Messages
• Maps
NOTE:
To use CarPlay make sure that cellular data is
turned on, and that you are in an area with
cellular coverage. Your data and cellular cov-
erage is shown on the left side of the radio
screen.NOTE:
Requires compatible iPhone. See dealer for
phone compatibility. Data plan rates apply.
Vehicle user interface is a product of Apple.
Apple CarPlay is a trademark of Apple Inc.
iPhone is a trademark of Apple Inc., regis-
tered in the US and other countries. Apple
terms of use and privacy statements apply.
Apps — If Equipped
To access Apps, press the “Uconnect Apps”
button on the touchscreen to browse the list
of applications:
• EcoDrive
• MyCar
Apple CarPlayCarPlay Data And Cellular Coverage
MULTIMEDIA
306
Page 309 of 378
• TuneIn
• Deezer
• Reuters
• Twitter
• Facebook Check-In
• Apple CarPlay
• Android Auto, and many more.
UCONNECT 4C/4C NAV
WITH 8.4-INCH DISPLAY
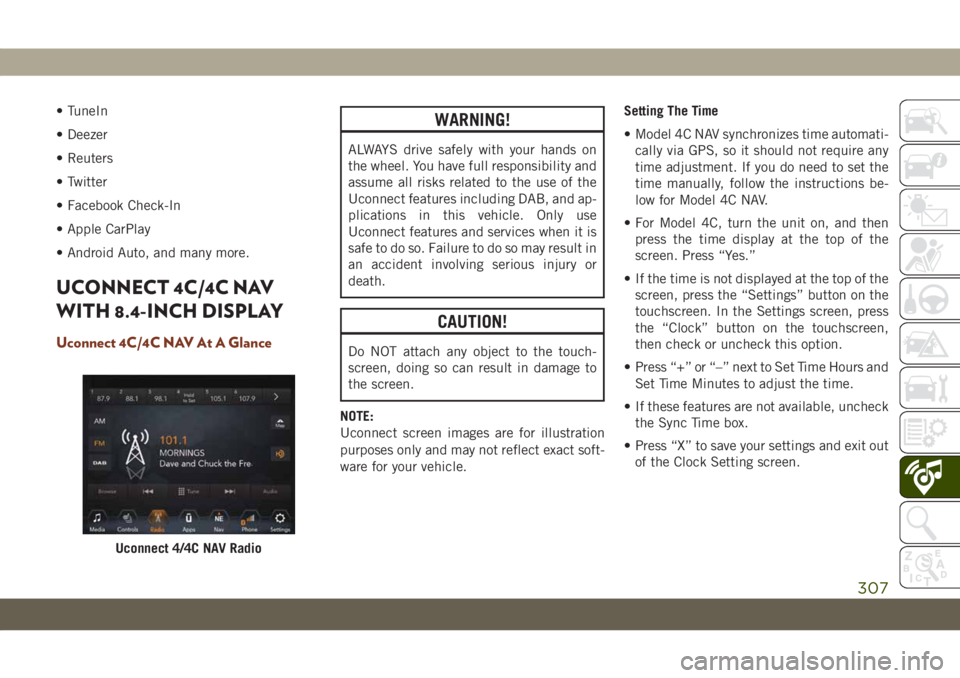
Uconnect 4C/4C NAV At A Glance
WARNING!
ALWAYS drive safely with your hands on
the wheel. You have full responsibility and
assume all risks related to the use of the
Uconnect features including DAB, and ap-
plications in this vehicle. Only use
Uconnect features and services when it is
safe to do so. Failure to do so may result in
an accident involving serious injury or
death.
CAUTION!
Do NOT attach any object to the touch-
screen, doing so can result in damage to
the screen.
NOTE:
Uconnect screen images are for illustration
purposes only and may not reflect exact soft-
ware for your vehicle.Setting The Time
• Model 4C NAV synchronizes time automati-
cally via GPS, so it should not require any
time adjustment. If you do need to set the
time manually, follow the instructions be-
low for Model 4C NAV.
• For Model 4C, turn the unit on, and then
press the time display at the top of the
screen. Press “Yes.”
• If the time is not displayed at the top of the
screen, press the “Settings” button on the
touchscreen. In the Settings screen, press
the “Clock” button on the touchscreen,
then check or uncheck this option.
• Press “+” or “–” next to Set Time Hours and
Set Time Minutes to adjust the time.
• If these features are not available, uncheck
the Sync Time box.
• Press “X” to save your settings and exit out
of the Clock Setting screen.
Uconnect 4/4C NAV Radio
307
Page 316 of 378
Apple CarPlay Integration — If Equipped
NOTE:
Feature availability depends on your carrier
and mobile phone manufacturer. Some Apple
CarPlay features may or may not be available
in every region and/or language.
Uconnect works seamlessly with Apple Car-
Play, the smarter, more secure way to use
your iPhone in the car, and stay focused on
the road. Use your Uconnect Touchscreen
display, the vehicle's knobs and controls, and
your voice with Siri to get access to Apple
Music, Maps, Messages, and more.
To use CarPlay, make sure you are using
iPhone 5 or later, have Siri enabled in Set-
tings, that your iPhone is unlocked for the
very first connection only, and then use the
following procedure:
1. Connect your iPhone to one of the media
USB ports in your vehicle.
NOTE:
Be sure to use the factory-provided Light-
ning cable that came with your phone, as
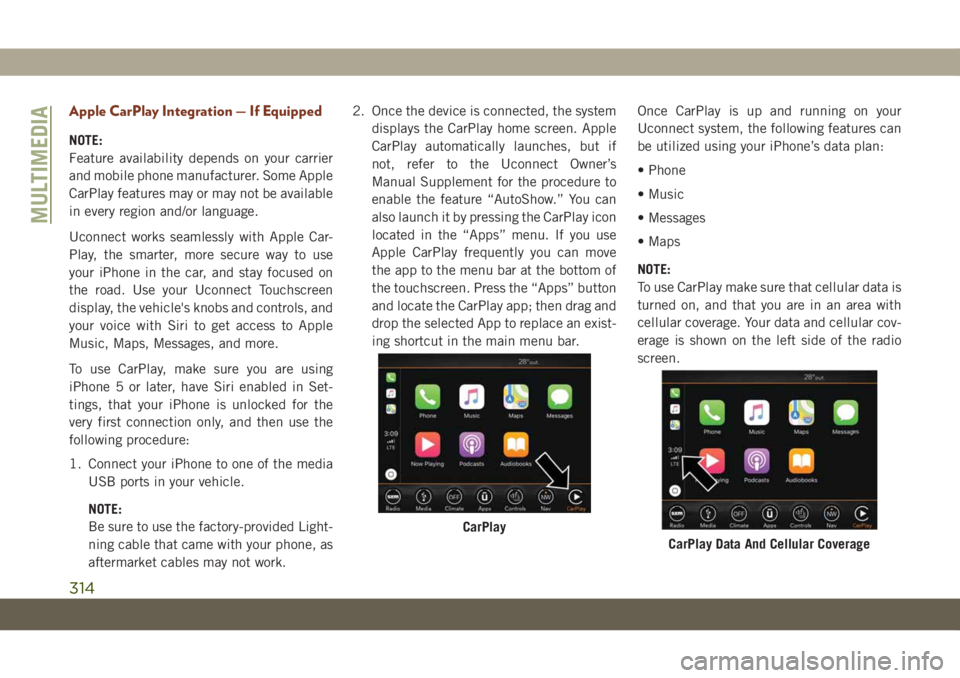
aftermarket cables may not work.2. Once the device is connected, the system
displays the CarPlay home screen. Apple
CarPlay automatically launches, but if
not, refer to the Uconnect Owner’s
Manual Supplement for the procedure to
enable the feature “AutoShow.” You can
also launch it by pressing the CarPlay icon
located in the “Apps” menu. If you use
Apple CarPlay frequently you can move
the app to the menu bar at the bottom of
the touchscreen. Press the “Apps” button
and locate the CarPlay app; then drag and
drop the selected App to replace an exist-
ing shortcut in the main menu bar.Once CarPlay is up and running on your
Uconnect system, the following features can
be utilized using your iPhone’s data plan:
• Phone
• Music
• Messages
• Maps
NOTE:
To use CarPlay make sure that cellular data is
turned on, and that you are in an area with
cellular coverage. Your data and cellular cov-
erage is shown on the left side of the radio
screen.
CarPlay
CarPlay Data And Cellular Coverage
MULTIMEDIA
314
Page 318 of 378
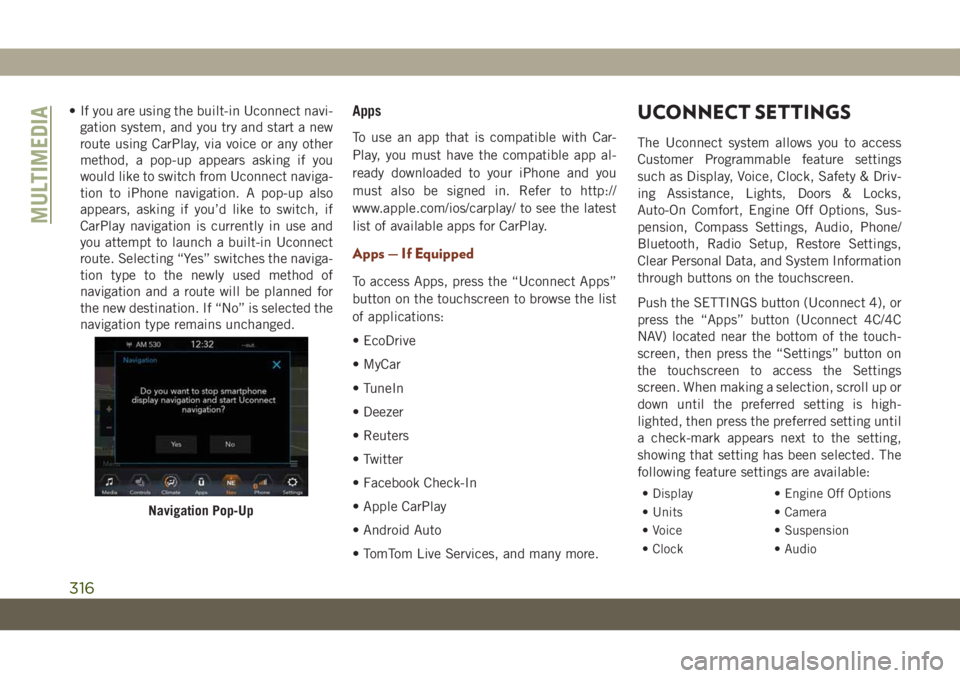
• If you are using the built-in Uconnect navi-
gation system, and you try and start a new
route using CarPlay, via voice or any other
method, a pop-up appears asking if you
would like to switch from Uconnect naviga-
tion to iPhone navigation. A pop-up also
appears, asking if you’d like to switch, if
CarPlay navigation is currently in use and
you attempt to launch a built-in Uconnect
route. Selecting “Yes” switches the naviga-
tion type to the newly used method of
navigation and a route will be planned for
the new destination. If “No” is selected the
navigation type remains unchanged.Apps
To use an app that is compatible with Car-
Play, you must have the compatible app al-
ready downloaded to your iPhone and you
must also be signed in. Refer to http://
www.apple.com/ios/carplay/ to see the latest
list of available apps for CarPlay.
Apps — If Equipped
To access Apps, press the “Uconnect Apps”
button on the touchscreen to browse the list
of applications:
• EcoDrive
• MyCar
• TuneIn
• Deezer
• Reuters
• Twitter
• Facebook Check-In
• Apple CarPlay
• Android Auto
• TomTom Live Services, and many more.
UCONNECT SETTINGS
The Uconnect system allows you to access
Customer Programmable feature settings
such as Display, Voice, Clock, Safety & Driv-
ing Assistance, Lights, Doors & Locks,
Auto-On Comfort, Engine Off Options, Sus-
pension, Compass Settings, Audio, Phone/
Bluetooth, Radio Setup, Restore Settings,
Clear Personal Data, and System Information
through buttons on the touchscreen.
Push the SETTINGS button (Uconnect 4), or
press the “Apps” button (Uconnect 4C/4C
NAV) located near the bottom of the touch-
screen, then press the “Settings” button on
the touchscreen to access the Settings
screen. When making a selection, scroll up or
down until the preferred setting is high-
lighted, then press the preferred setting until
a check-mark appears next to the setting,
showing that setting has been selected. The
following feature settings are available:
• Display • Engine Off Options
• Units • Camera
• Voice • Suspension
• Clock • Audio
Navigation Pop-Up
MULTIMEDIA
316
Page 319 of 378
• Safety & Driving
Assistance• Phone/Bluetooth
• Mirrors & Wipers • Accessibility
• Lights • Radio Setup
• Doors & Locks • Restore Settings
• Auto-On Comfort &
Remote Start• Clear Personal Data
• Compass –
If Equipped• System Information
NOTE:
Depending on the vehicles options, feature
settings may vary.
Refer to “Uconnect Settings” in “Multime-
dia” in the Owner’s Manual for further infor-
mation.
OFF ROAD PAGES — IF
EQUIPPED
Your vehicle is equipped with Off Road
Pages, which provides the vehicle status
while operating on off road conditions. It
supplies information relating to the vehicle
ride height, the status of the transfer case,
the pitch and roll of the vehicle (if equipped),
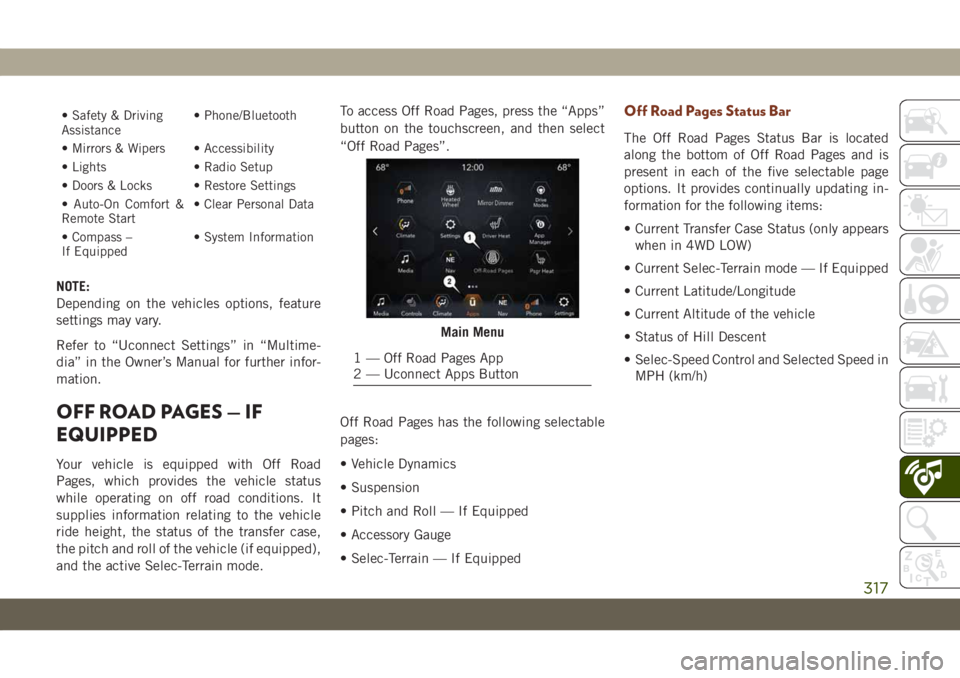
and the active Selec-Terrain mode.To access Off Road Pages, press the “Apps”
button on the touchscreen, and then select
“Off Road Pages”.
Off Road Pages has the following selectable
pages:
• Vehicle Dynamics
• Suspension
• Pitch and Roll — If Equipped
• Accessory Gauge
• Selec-Terrain — If Equipped
Off Road Pages Status Bar
The Off Road Pages Status Bar is located
along the bottom of Off Road Pages and is
present in each of the five selectable page
options. It provides continually updating in-
formation for the following items:
• Current Transfer Case Status (only appears
when in 4WD LOW)
• Current Selec-Terrain mode — If Equipped
• Current Latitude/Longitude
• Current Altitude of the vehicle
• Status of Hill Descent
• Selec-Speed Control and Selected Speed in
MPH (km/h)
Main Menu
1 — Off Road Pages App
2 — Uconnect Apps Button
317