JEEP GRAND CHEROKEE 2021 Owner handbook (in English)
Manufacturer: JEEP, Model Year: 2021, Model line: GRAND CHEROKEE, Model: JEEP GRAND CHEROKEE 2021Pages: 378, PDF Size: 6.88 MB
Page 231 of 378
CAUTION!
Driving with a hot cooling system could
damage your vehicle. If the temperature
gauge reads HOT (H), pull over and stop
the vehicle. Idle the vehicle with the air
conditioner turned off until the pointer
drops back into the normal range. If the
pointer remains on HOT (H), and you hear
continuous chimes, turn the engine off
immediately and call for service.
MANUAL PARK RELEASE
WARNING!
Always secure your vehicle by fully apply-
ing the parking brake before activating the
Manual Park Release. In addition, you
should be seated in the driver’s seat with
your foot firmly on the brake pedal when
activating the Manual Park Release. Acti-
vating the Manual Park Release will allow
your vehicle to roll away if it is not secured
by the parking brake, or by proper connec-
tion to a tow vehicle. Activating the
WARNING!
Manual Park Release on an unsecured
vehicle could lead to serious injury or
death for those in or around the vehicle.
In order to move the vehicle in cases where
the transmission will not shift out of PARK
(such as a dead battery), a Manual Park
Release is available.
Follow these steps to use the Manual Park
Release:
1. Firmly apply the parking brake.
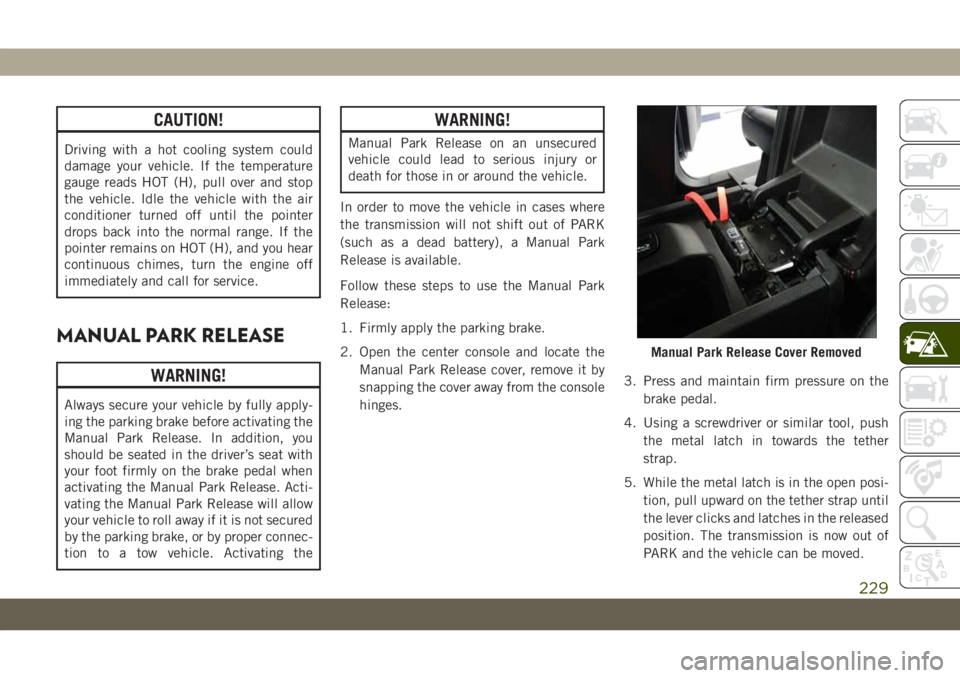
2. Open the center console and locate the
Manual Park Release cover, remove it by
snapping the cover away from the console
hinges.3. Press and maintain firm pressure on the
brake pedal.
4. Using a screwdriver or similar tool, push
the metal latch in towards the tether
strap.
5. While the metal latch is in the open posi-
tion, pull upward on the tether strap until
the lever clicks and latches in the released
position. The transmission is now out of
PARK and the vehicle can be moved.
Manual Park Release Cover Removed
229
Page 232 of 378
CAUTION!
Closing the armrest while the Manual Park
Release is activated may damage the
Manual Park Release mechanism, the
transmission, and/or the armrest.
NOTE:
To prevent the vehicle from rolling uninten-
tionally, firmly apply the parking brake.To Disengage The Manual Park Release Le-
ver:
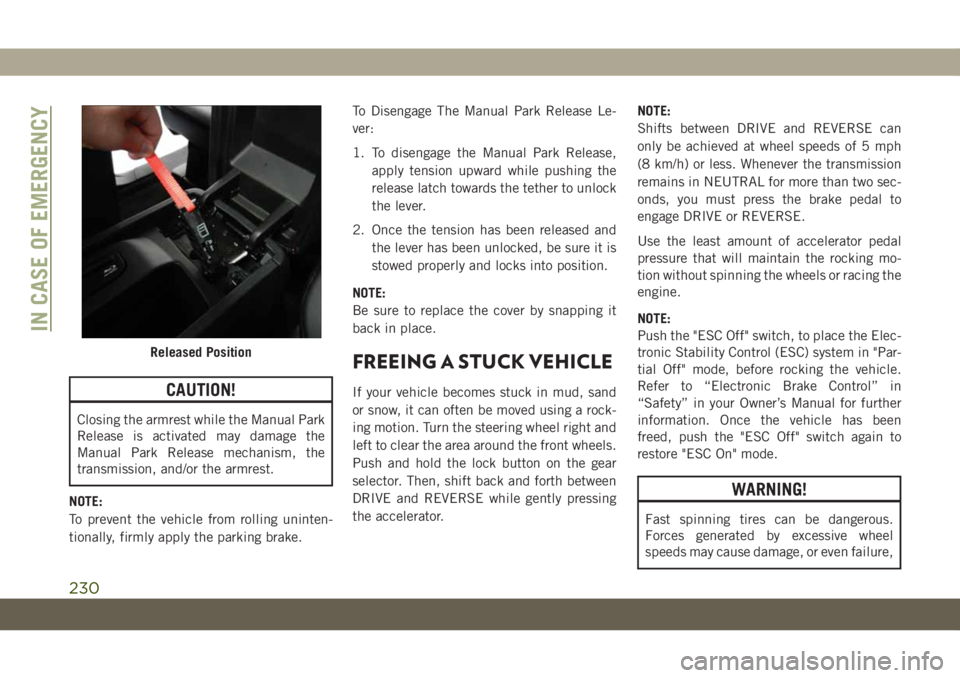
1. To disengage the Manual Park Release,
apply tension upward while pushing the
release latch towards the tether to unlock
the lever.
2. Once the tension has been released and
the lever has been unlocked, be sure it is
stowed properly and locks into position.
NOTE:
Be sure to replace the cover by snapping it
back in place.
FREEING A STUCK VEHICLE
If your vehicle becomes stuck in mud, sand
or snow, it can often be moved using a rock-
ing motion. Turn the steering wheel right and
left to clear the area around the front wheels.
Push and hold the lock button on the gear
selector. Then, shift back and forth between
DRIVE and REVERSE while gently pressing
the accelerator.NOTE:
Shifts between DRIVE and REVERSE can
only be achieved at wheel speeds of 5 mph
(8 km/h) or less. Whenever the transmission
remains in NEUTRAL for more than two sec-
onds, you must press the brake pedal to
engage DRIVE or REVERSE.
Use the least amount of accelerator pedal
pressure that will maintain the rocking mo-
tion without spinning the wheels or racing the
engine.
NOTE:
Push the "ESC Off" switch, to place the Elec-
tronic Stability Control (ESC) system in "Par-
tial Off" mode, before rocking the vehicle.
Refer to “Electronic Brake Control” in
“Safety” in your Owner’s Manual for further
information. Once the vehicle has been
freed, push the "ESC Off" switch again to
restore "ESC On" mode.
WARNING!
Fast spinning tires can be dangerous.
Forces generated by excessive wheel
speeds may cause damage, or even failure,
Released Position
IN CASE OF EMERGENCY
230
Page 233 of 378
WARNING!
of the axle and tires. A tire could explode
and injure someone. Do not spin your
vehicle's wheels faster than 30 mph
(48 km/h) or for longer than 30 seconds
continuously without stopping when you
are stuck and do not let anyone near a
spinning wheel, no matter what the speed.
CAUTION!
• Racing the engine or spinning the
wheels may lead to transmission over-
heating and failure. Allow the engine to
idle with the transmission in NEUTRAL
for at least one minute after every five
rocking-motion cycles. This will mini-
mize overheating and reduce the risk of
transmission failure during prolonged
efforts to free a stuck vehicle.
CAUTION!
• When “rocking” a stuck vehicle by shift-
ing between DRIVE and REVERSE, do
not spin the wheels faster than 15 mph
(24 km/h), or drivetrain damage may
result.
• Revving the engine or spinning the
wheels too fast may lead to transmission
overheating and failure. It can also dam-
age the tires. Do not spin the wheels
above 30 mph (48 km/h) while in gear
(no transmission shifting occurring).
TOWING A DISABLED
VEHICLE
This section describes procedures for towing
a disabled vehicle using a commercial towing
service. If the transmission and drivetrain are
operable, disabled vehicles may also be
towed as described under “Recreational Tow-
ing” in the “Starting And Operating” section
of the Owner’s Manual.
NOTE:
Vehicles equipped with Quadra-Lift must be
placed in Transport mode, before tying them
down (from the body) on a trailer or flatbed
truck. Refer to the section on Quadra-Lift for
more information. If the vehicle cannot be
placed in Transport mode (for example, en-
gine will not run), tie-downs should be fas-
tened over the tires using specific tire tie-
down nets. Failure to follow these
instructions may cause fault codes to be set
and/or cause loss of proper tie-down tension.
231
Page 234 of 378
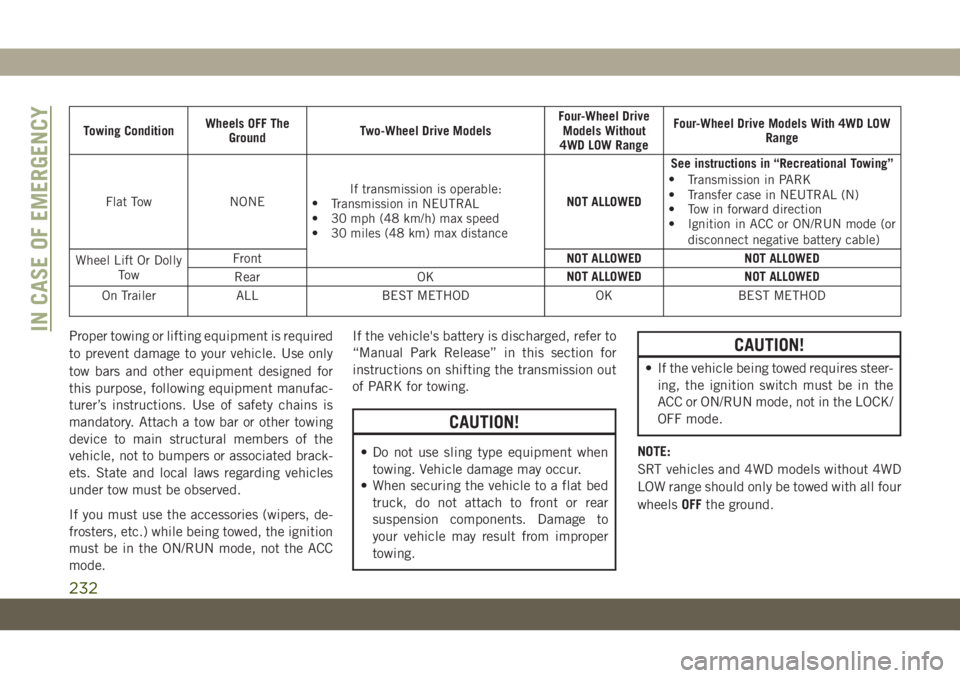
Towing ConditionWheels OFF The
GroundTwo-Wheel Drive ModelsFour-Wheel Drive
Models Without
4WD LOW RangeFour-Wheel Drive Models With 4WD LOW
Range
Flat Tow NONEIf transmission is operable:
•
Transmission in NEUTRAL
• 30 mph (48 km/h) max speed
• 30 miles (48 km) max distanceNOT ALLOWEDSee instructions in “Recreational Towing”
•
Transmission in PARK
• Transfer case in NEUTRAL (N)
• Tow in forward direction
• Ignition in ACC or ON/RUN mode (or
disconnect negative battery cable)
Wheel Lift Or Dolly
To wFrontNOT ALLOWED NOT ALLOWED
Rear OKNOT ALLOWED NOT ALLOWED
On Trailer ALL BEST METHOD OK BEST METHOD
Proper towing or lifting equipment is required
to prevent damage to your vehicle. Use only
tow bars and other equipment designed for
this purpose, following equipment manufac-
turer’s instructions. Use of safety chains is
mandatory. Attach a tow bar or other towing
device to main structural members of the
vehicle, not to bumpers or associated brack-
ets. State and local laws regarding vehicles
under tow must be observed.
If you must use the accessories (wipers, de-
frosters, etc.) while being towed, the ignition
must be in the ON/RUN mode, not the ACC
mode.If the vehicle's battery is discharged, refer to
“Manual Park Release” in this section for
instructions on shifting the transmission out
of PARK for towing.
CAUTION!
• Do not use sling type equipment when
towing. Vehicle damage may occur.
• When securing the vehicle to a flat bed
truck, do not attach to front or rear
suspension components. Damage to
your vehicle may result from improper
towing.
CAUTION!
• If the vehicle being towed requires steer-
ing, the ignition switch must be in the
ACC or ON/RUN mode, not in the LOCK/
OFF mode.
NOTE:
SRT vehicles and 4WD models without 4WD
LOW range should only be towed with all four
wheelsOFFthe ground.
IN CASE OF EMERGENCY
232
Page 235 of 378
Without The Key Fob
Special care must be taken when the vehicle
is towed with the ignition in the LOCK/OFF
mode. The only approved method of towing
without the key fob is with a flatbed truck.
Proper towing equipment is necessary to pre-
vent damage to the vehicle.
Two-Wheel Drive Models
The manufacturer recommends towing your
vehicle with all four wheelsOFFthe ground
using a flatbed.
If flatbed equipment is not available, and the
transmission is operable, the vehicle may be
towed (with rear wheels on the ground) under
the following conditions:
• The transmission must be in NEUTRAL.
Refer to "Manual Park Release" in this sec-
tion for instructions on shifting the trans-
mission to NEUTRAL when the engine is
off.
• The towing speed must not exceed 30 mph
(48 km/h).
• The towing distance must not exceed
30 miles (48 km).If the transmission is not operable, or the
vehicle must be towed faster than 30 mph
(48 km/h) or farther than 30 miles (48 km),
tow with the rear wheelsOFFthe ground.
Acceptable methods are to tow the vehicle on
a flatbed, or with the front wheels raised and
the rear wheels on a towing dolly, or (when
using a suitable steering wheel stabilizer to
hold the front wheels in the straight position)
with the rear wheels raised and the front
wheels on the ground.
CAUTION!
• Towing faster than 30 mph (48 km/h) or
farther than 30 miles (48 km) with rear
wheels on the ground can cause severe
transmission damage. Damage from im-
proper towing is not covered under the
New Vehicle Limited Warranty.
Four-Wheel Drive Models
The manufacturer recommends towing with
all wheelsOFFthe ground. Acceptable meth-
ods are to tow the vehicle on a flatbed or with
one end of vehicle raised and the opposite
end on a towing dolly.
If flatbed equipment is not available, and the
transfer case is operable, vehicles may be
towed (in the forward direction, withALL
wheels on the ground),IFthe transfer case is
in NEUTRAL (N) and the transmission is in
PARK. Refer to “Recreational Towing” in
“Starting And Operating” in the Owner’s
Manual for detailed instructions.
Vehicles equipped with a single-speed trans-
fer case have no NEUTRAL position, and
thereforemustbe towed with all four wheels
OFFthe ground.
CAUTION!
• Front or rear wheel lifts must not be used
(if the remaining wheels are on the
ground). Internal damage to the trans-
mission or transfer case will occur if a
233
Page 236 of 378
CAUTION!
front or rear wheel lift is used when
towing.
• Towing this vehicle in violation of the
above requirements can cause severe
transmission and/or transfer case dam-
age. Damage from improper towing is
not covered under the New Vehicle Lim-
ited Warranty.
Tow Eye Usage — If Equipped
Your vehicle is equipped with a tow eye that
can be used to move a disabled vehicle.
When using a tow eye be sure to follow the
“Tow Eye Usage Precautions” and the “Tow-
ing A Disabled Vehicle” instructions in this
section.Tow Eye Usage Precautions
CAUTION!
• The tow eye must only be used for road-
side emergencies. Use with an appropri-
ate device in accordance with highway
code (a rigid bar) to maneuver the ve-
hicle in preparation for transport via a
tow truck.
• The tow eye must not be used to move
the vehicle off the road or where there
are obstacles.
• Do not use the tow eyes for tow truck
hookup or highway towing.
• Do not use the tow eye to free a stuck
vehicle. Refer to the “Freeing A Stuck
Vehicle” section for further information.
• Please refer to the “Towing A Disabled
Vehicle” section for detailed instruc-
tions. Damage to your vehicle may occur
if these guidelines are not followed.
WARNING!
Stand clear of vehicles when pulling with
tow eyes.
• Do not use a chain with a tow eye.
Chains may break, causing serious in-
jury or death.
• Do not use a tow strap with a tow eye.
Tow straps may break or become disen-
gaged, causing serious injury or death.
• Failure to follow proper tow eye usage
may cause components to break result-
ing in serious injury or death.
• The brake and steering power assist sys-
tems will not function while the vehicle
is being towed. You will, therefore, need
to apply more force on the brake pedal
and steering wheel. Do not use flexible
ropes when towing, and avoid jerky
Tow Eye
Tow Eye Warning Label
IN CASE OF EMERGENCY
234
Page 237 of 378
WARNING!
movements. Do not start the engine
while towing the car. Before tightening
the ring, clean the threaded housing
thoroughly. Make sure that the ring is
fully screwed into the housing before
towing the car.
Front Tow Eye Installation
The front tow eye receptacle is located be-
hind a door on the front bumper fascia.
To install the tow eye, open the door using the
vehicle key or a small screwdriver, and thread
the tow eye into the receptacle.
Insert the flat end of the jack handle through
the tow eye and tighten, refer to “Jacking And
Tire Changing” in this section for further
information. The tow eye must be fully seated
to the attaching bracket through the lower
front fascia. If the tow eye is not fully seated
to the attaching bracket, the vehicle should
not be moved.
Emergency Tow Hooks — If Equipped
If your vehicle is equipped with tow hooks,
there will be one in the rear and two mounted
on the front of the vehicle. The rear hook will
be located on the driver's side of the vehicle.
NOTE:
For off-road recovery, it is recommended to
use both of the front tow hooks to minimize
the risk of damage to the vehicle.
WARNING!
• Do not use a chain for freeing a stuck
vehicle. Chains may break, causing seri-
ous injury or death.
• Stand clear of vehicles when pulling
with tow hooks. Tow straps may become
disengaged, causing serious injury.
CAUTION!
Tow hooks are for emergency use only, to
rescue a vehicle stranded off road. Do not
use tow hooks for tow truck hookup or
highway towing. You could damage your
vehicle.
ENHANCED ACCIDENT
RESPONSE SYSTEM (EARS)
This vehicle is equipped with an Enhanced
Accident Response System.
Please refer to “Occupant Restraint Sys-
tems” in “Safety” for further information on
the Enhanced Accident Response System
(EARS) function.
EVENT DATA RECORDER
(EDR)
This vehicle is equipped with an Event Data
Recorder (EDR). The main purpose of an EDR
is to record data that will assist in under-
standing how a vehicle’s systems performed
under certain crash or near crash-like situa-
tions, such as an air bag deployment or hit-
ting a road obstacle.
Please refer to “Occupant Restraint Sys-
tems” in “Safety” for further information on
the Event Data Recorder (EDR).
235
Page 238 of 378
SCHEDULED SERVICING
Scheduled Servicing — Non SRT
Correct servicing is crucial for guaranteeing a
long life for the car under the best conditions.
For this reason, Jeep has planned a series of
checks and services at fixed distance inter-
vals and, where provided, at fixed time inter-
vals, as described in the Scheduled Servicing
plan. To keep the car’s efficiency in tip-top
condition, in the following Scheduled Service
plan pages a few additional checks are listed
that should be carried out more frequently
with respect to the normal coupon redemp-
tion schedule. Scheduled Servicing is offered
by all authorized dealerships according to
fixed time or mileage intervals. If, during
each operation, in addition to the ones
scheduled, the need arises for further re-
placements or repairs, these may be carried
out with the owner's explicit agreement only.
The technicians at your dealership know your
vehicle best, and have access to factory
trained information, genuine Mopar parts,
and specially designed electronic and me-
chanical tools that can help prevent futurecostly repairs. If your car is used frequently
for towing, the interval between one sched-
uled servicing operation and the next should
be reduced. More frequent maintenance may
be needed for vehicles in severe operating
conditions, such as dusty areas and very
short trip driving.
NOTE:
Scheduled Servicing interventions are set out
by the Manufacturer. Failure to have them
carried out may invalidate the warranty. It is
advised to inform an authorized dealership of
any small operating irregularities without
waiting for the next service.
The oil change indicator system will remind
you that it is time to take your vehicle in for
scheduled maintenance.
In the instrument cluster an “Oil Change
Required” message will be displayed and a
single chime will sound, indicating that an oil
change is necessary.The oil change indicator message will illumi-
nate approximately 7,000 miles
(11,200 km) after the most recent oil change
was performed. Have your vehicle serviced as
soon as possible, within 500 miles (800 km).
NOTE:
• The oil change indicator message will not
monitor the time since the last oil change.
Change your vehicles oil if it has been
12 months since your last oil change even
if the oil change indicator message is NOT
illuminated.
• Change your engine oil more often if you
drive your vehicle off-road for an extended
period of time.
• Under no circumstances should oil change
intervals exceed 7,500 miles (12,000 km)
or 12 months, whichever comes first.
Your authorized dealer will reset the oil
change indicator message after completing
the scheduled oil change. If this scheduled
oil change is performed by someone other
than your authorized dealer the message can
SERVICING AND MAINTENANCE
236
Page 239 of 378
be reset by referring to the steps described
under ”Instrument Cluster Display” in “Get-
ting To Know Your Instrument Panel” for
further information.
At Each Stop for Fuel
• Check the engine oil level about 5 minutes
after a fully warmed engine is shut off.
Checking the oil level while the vehicle is
on level ground will improve the accuracy of
the oil level reading. Add oil only when the
level is at or below the ADD or MIN mark.
• Check the windshield washer solvent and
add if required.
Once a Month
• Check tire pressure and look for unusual
wear or damage. Rotate tires at the first
sign of irregular wear.
• Inspect the battery and clean and tighten
the terminals as required.
• Check the fluid levels of the coolant reser-
voir, and brake master cylinder; add fluid as
needed.
• Check all lights and other electrical items
for correct operation.At Each Oil Change
• Check tire pressure and look for unusual
wear or damage. Rotate tires at the first
sign of irregular wear, even if it occurs
before the oil indicator system turns on.
• Change the engine oil filter.
• Inspect the brake hoses and lines.
CAUTION!
Failure to perform the required mainte-
nance items may result in damage to the
vehicle.
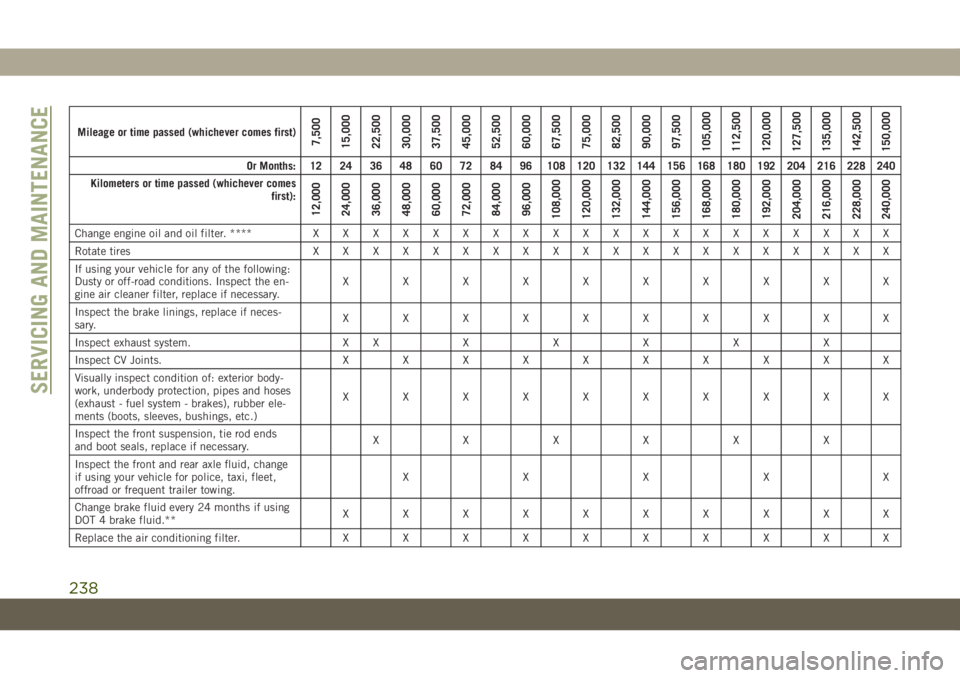
Maintenance Plan — Gasoline Engine
NOTE:
Once you have carried out the last interven-
tion in the table, continue with the scheduled
servicing, maintaining the frequency indi-
cated in the plan by marking each operation
with a dot or dedicated note. Simply restart-
ing the maintenance from the start of the
plan may cause the allowed interval to be
exceeded for some operations.
237
Page 240 of 378
Mileage or time passed (whichever comes first)7,500
15,000
22,500
30,000
37,500
45,000
52,500
60,000
67,500
75,000
82,500
90,000
97,500
105,000
112,500
120,000
127,500
135,000
142,500
150,000
Or Months: 12 24 36 48 60 72 84 96 108 120 132 144 156 168 180 192 204 216 228 240
Kilometers or time passed (whichever comes
first):
12,000
24,000
36,000
48,000
60,000
72,000
84,000
96,000
108,000
120,000
132,000
144,000
156,000
168,000
180,000
192,000
204,000
216,000
228,000
240,000
Change engine oil and oil filter. ****XXXXXXXXXXXXXXXXXXXX
Rotate tiresXXXXXXXXXXXXXXXXXXXX
If using your vehicle for any of the following:
Dusty or off-road conditions. Inspect the en-
gine air cleaner filter, replace if necessary.XXXXXXXXXX
Inspect the brake linings, replace if neces-
sary.XXXXXXXXXX
Inspect exhaust system. XXXXXXX
Inspect CV Joints.XXXXXXXXXX
Visually inspect condition of: exterior body-
work, underbody protection, pipes and hoses
(exhaust - fuel system - brakes), rubber ele-
ments (boots, sleeves, bushings, etc.)XXXXXXXXXX
Inspect the front suspension, tie rod ends
and boot seals, replace if necessary.XXXXXX
Inspect the front and rear axle fluid, change
if using your vehicle for police, taxi, fleet,
offroad or frequent trailer towing.XXXXX
Change brake fluid every 24 months if using
DOT 4 brake fluid.**XXXXXXXXXX
Replace the air conditioning filter.XXXXXXXXXX
SERVICING AND MAINTENANCE
238