JEEP GRAND CHEROKEE 2021 Owner handbook (in English)
Manufacturer: JEEP, Model Year: 2021, Model line: GRAND CHEROKEE, Model: JEEP GRAND CHEROKEE 2021Pages: 378, PDF Size: 6.88 MB
Page 271 of 378
Compact Spare Tire — If Equipped
The compact spare is for temporary emer-
gency use only. You can identify if your ve-
hicle is equipped with a compact spare by
looking at the spare tire description on the
Tire and Loading Information Placard located
on the driver’s side door opening or on the
sidewall of the tire. Compact spare tire de-
scriptions begin with the letter “T” or “S”
preceding the size designation. Example:
T145/80D18 103M.
T,S=Temporary Spare Tire
Since this tire has limited tread life, the
original equipment tire should be repaired (or
replaced) and reinstalled on your vehicle at
the first opportunity.
Do not install a wheel cover or attempt to
mount a conventional tire on the compact
spare wheel, since the wheel is designed
specifically for the compact spare tire. Do not
install more than one compact spare tire and
wheel on the vehicle at any given time.WARNING!
Compact and collapsible spares are for
temporary emergency use only. With these
spares, do not drive more than 50 mph
(80 km/h). Temporary use spares have lim-
ited tread life. When the tread is worn to
the tread wear indicators, the temporary
use spare tire needs to be replaced. Be
sure to follow the warnings, which apply to
your spare. Failure to do so could result in
spare tire failure and loss of vehicle con-
trol.
Collapsible Spare Tire — If Equipped
The collapsible spare is for temporary emer-
gency use only. You can identify if your ve-
hicle is equipped with a collapsible spare by
looking at the spare tire description on the
Tire and Loading Information Placard located
on the driver’s side door opening or on the
sidewall of the tire.
Collapsible spare tire description example:
165/80-17 101P.Since this tire has limited tread life, the
original equipment tire should be repaired (or
replaced) and reinstalled on your vehicle at
the first opportunity.
Inflate collapsible tire only after the wheel is
properly installed to the vehicle. Inflate the
collapsible tire using the electric air pump
before lowering the vehicle.
Do not install a wheel cover or attempt to
mount a conventional tire on the collapsible
spare wheel, since the wheel is designed
specifically for the collapsible spare tire.WARNING!
Compact and Collapsible spares are for
temporary emergency use only. With these
spares, do not drive more than 50 mph
(80 km/h). Temporary use spares have lim-
ited tread life. When the tread is worn to
the tread wear indicators, the temporary
use spare tire needs to be replaced. Be
sure to follow the warnings, which apply to
your spare. Failure to do so could result in
spare tire failure and loss of vehicle
control.
269
Page 272 of 378
Full Size Spare — If Equipped
The full size spare is for temporary emer-
gency use only. This tire may look like the
originally equipped tire on the front or rear
axle of your vehicle, but it is not. This spare
tire may have limited tread life. When the
tread is worn to the tread wear indicators, the
temporary use full size spare tire needs to be
replaced. Since it is not the same as your
original equipment tire, replace (or repair)
the original equipment tire and reinstall on
the vehicle at the first opportunity.
Limited Use Spare — If Equipped
The limited use spare tire is for temporary
emergency use only. This tire is identified by
a label located on the limited use spare
wheel. This label contains the driving limita-
tions for this spare. This tire may look like the
original equipped tire on the front or rear axle
of your vehicle, but it is not. Installation of
this limited use spare tire affects vehicle
handling. Since it is not the same as your
original equipment tire, replace (or repair)
the original equipment tire and reinstall on
the vehicle at the first opportunity.
WARNING!
Limited use spares are for emergency use
only. Installation of this limited use spare
tire affects vehicle handling. With this tire,
do not drive more than the speed listed on
the limited use spare wheel. Keep inflated
to the cold tire inflation pressures listed on
your Tire and Loading Information Placard
located on the driver’s side B-Pillar or the
rear edge of the driver’s side door. Replace
(or repair) the original equipment tire at
the first opportunity and reinstall it on your
vehicle. Failure to do so could result in
loss of vehicle control.
Wheel And Wheel Trim Care
All wheels and wheel trim, especially alumi-
num and chrome plated wheels, should be
cleaned regularly using mild (neutral Ph)
soap and water to maintain their luster and to
prevent corrosion. Wash wheels with the
same soap solution recommended for the
body of the vehicle and remember to always
wash when the surfaces are not hot to the
touch.Your wheels are susceptible to deterioration
caused by salt, sodium chloride, magnesium
chloride, calcium chloride, etc., and other
road chemicals used to melt ice or control
dust on dirt roads. Use a soft cloth or sponge
and mild soap to wipe away promptly. Do not
use harsh chemicals or a stiff brush. They
can damage the wheel’s protective coating
that helps keep them from corroding and
tarnishing.
CAUTION!
Avoid products or automatic car washes
that use acidic solutions or strong alkaline
additives or harsh brushes. Many aftermar-
ket wheel cleaners and automatic car
washes may damage the wheel's protective
finish. Such damage is not covered by the
New Vehicle Limited Warranty. Only car
wash soap is recommended.
When cleaning extremely dirty wheels includ-
ing excessive brake dust, care must be taken
in the selection of tire and wheel cleaning
SERVICING AND MAINTENANCE
270
Page 273 of 378
chemicals and equipment to prevent damage
to the wheels. Select a non-abrasive, non-
acidic cleaner for aluminum or chrome
wheels.
CAUTION!
Do not use scouring pads, steel wool, a
bristle brush, metal polishes or oven
cleaner. These products may damage the
wheel's protective finish. Such damage is
not covered by the New Vehicle Limited
Warranty. Only car wash soap is recom-
mended.
NOTE:
If you intend parking or storing your vehicle
for an extended period after cleaning the
wheels with wheel cleaner, drive your vehicle
and apply the brakes to remove the water
droplets from the brake components. This
activity will remove the red rust on the brake
rotors and prevent vehicle vibration when
braking.Dark Vapor Chrome, Black Satin Chrome, or Low
Gloss Clear Coat Wheels
CAUTION!
If your vehicle is equipped with these
specialty wheels, DO NOT USE wheel
cleaners, abrasives, or polishing com-
pounds. They will permanently damage
this finish and such damage is not covered
by the New Vehicle Limited Warranty.
HAND WASH ONLY USING MILD SOAP
AND WATER WITH A SOFT CLOTH. Used
on a regular basis; this is all that is re-
quired to maintain this finish.
Tire Chains (Traction Devices) — Non-SRT
Use of traction devices require sufficient tire-
to-body clearance. Follow these recommen-
dations to guard against damage.
• Traction device must be of proper size for
the tire, as recommended by the traction
device manufacturer.
• Install on Rear Tires Only• Due to limited clearance, use reduced size
snow chains or traction devices with a maxi-
mum projection of 12 mm beyond the tire
profile on 265/60R18 and
265/50R20 tires.
WARNING!
Using tires of different size and type (M+S,
Snow) between front and rear axles can
cause unpredictable handling. You could
lose control and have a collision.
CAUTION!
To avoid damage to your vehicle or tires,
observe the following precautions:
• Because of restricted traction device
clearance between tires and other sus-
pension components, it is important that
only traction devices in good condition
are used. Broken devices can cause se-
rious damage. Stop the vehicle immedi-
ately if noise occurs that could indicate
device breakage. Remove the damaged
parts of the device before further use.
271
Page 274 of 378
CAUTION!
• Install device as tightly as possible and
then retighten after driving about ½ mile
(0.8 km).
• Do not exceed 30 mph (48 km/h).
• Drive cautiously and avoid severe turns
and large bumps, especially with a
loaded vehicle.
• Do not drive for a prolonged period on
dry pavement.
• Observe the traction device manufactur-
er’s instructions on the method of instal-
lation, operating speed, and conditions
for use. Always use the suggested oper-
ating speed of the device manufacturer’s
if it is less than 30 mph (48 km/h).
• Do not use traction devices on a com-
pact spare tire.
Tire Chains (Traction Devices) — SRT
Use of traction devices require sufficient tire-
to-body clearance. Follow these recommen-
dations to guard against damage.
• Traction device must be of proper size for
the tire, as recommended by the traction
device manufacturer.• Install on Rear Tires Only
• Due to limited clearance, RUD-GRIP
4X4 or Equivalent is recommended on
295/45ZR20 tires.
WARNING!
Using tires of different size and type
(M+S, Snow) between front and rear axles
can cause unpredictable handling. You
could lose control and have a collision.
CAUTION!
To avoid damage to your vehicle or tires,
observe the following precautions:
• Because of restricted traction device
clearance between tires and other sus-
pension components, it is important
that only traction devices in good condi-
tion are used. Broken devices can cause
serious damage. Stop the vehicle imme-
diately if noise occurs that could indi-
cate device breakage. Remove the dam-
aged parts of the device before further
use.
CAUTION!
• Install device as tightly as possible and
then retighten after driving about ½ mile
(0.8 km).
• Do not exceed 30 mph (48 km/h).
• Drive cautiously and avoid severe turns
and large bumps, especially with a
loaded vehicle.
• Do not drive for a prolonged period on
dry pavement.
• Observe the traction device manufactur-
er’s instructions on the method of instal-
lation, operating speed, and conditions
for use. Always use the suggested oper-
ating speed of the device manufacturer’s
if it is less than 30 mph (48 km/h).
• Do not use traction devices on a com-
pact spare tire.
Tire Rotation Recommendations
The tires on the front and rear of your vehicle
operate at different loads and perform differ-
ent steering, handling, and braking func-
tions. For these reasons, they wear at unequal
rates.
SERVICING AND MAINTENANCE
272
Page 275 of 378
These effects can be reduced by timely rota-
tion of tires. The benefits of rotation are
especially worthwhile with aggressive tread
designs such as those on On/Off-Road type
tires. Rotation will increase tread life, help to
maintain mud, snow, and wet traction levels,
and contribute to a smooth, quiet ride.
Refer to the “Maintenance Plan” for the
proper maintenance intervals. More frequent
rotation is permissible if desired. The reasons
for any rapid or unusual wear should be
corrected prior to rotation being performed.
NOTE:
The premium Tire Pressure Monitor System
will automatically locate the pressure values
displayed in the correct vehicle position fol-
lowing a tire rotation.
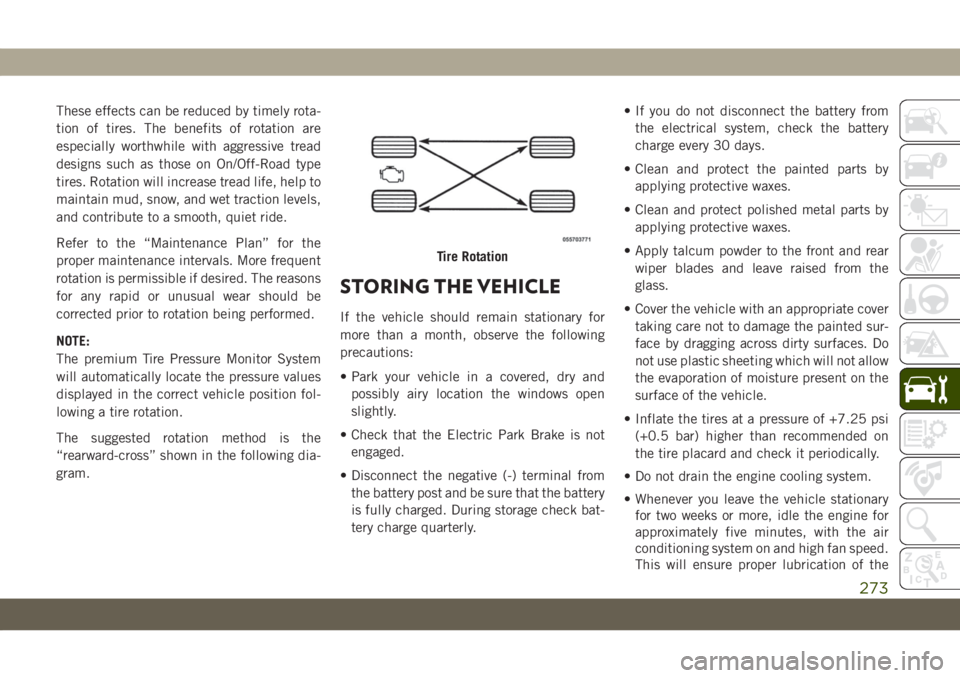
The suggested rotation method is the
“rearward-cross” shown in the following dia-
gram.
STORING THE VEHICLE
If the vehicle should remain stationary for
more than a month, observe the following
precautions:
• Park your vehicle in a covered, dry and
possibly airy location the windows open
slightly.
• Check that the Electric Park Brake is not
engaged.
• Disconnect the negative (-) terminal from
the battery post and be sure that the battery
is fully charged. During storage check bat-
tery charge quarterly.• If you do not disconnect the battery from
the electrical system, check the battery
charge every 30 days.
• Clean and protect the painted parts by
applying protective waxes.
• Clean and protect polished metal parts by
applying protective waxes.
• Apply talcum powder to the front and rear
wiper blades and leave raised from the
glass.
• Cover the vehicle with an appropriate cover
taking care not to damage the painted sur-
face by dragging across dirty surfaces. Do
not use plastic sheeting which will not allow
the evaporation of moisture present on the
surface of the vehicle.
• Inflate the tires at a pressure of +7.25 psi
(+0.5 bar) higher than recommended on
the tire placard and check it periodically.
• Do not drain the engine cooling system.
• Whenever you leave the vehicle stationary
for two weeks or more, idle the engine for
approximately five minutes, with the air
conditioning system on and high fan speed.
This will ensure proper lubrication of the
Tire Rotation
273
Page 276 of 378
system, thus minimizing the possibility of
damage to the compressor when the vehicle
is put back into operation.
NOTE:
When the vehicle has not been started or
driven for at least 30 days, an Extended Park
Start Procedure is required to start the ve-
hicle.
Refer to “Starting The Engine” in “Starting
And Operating” for further information.
CAUTION!
Before removal of the positive and nega-
tive terminals to the battery, wait at least a
minute with ignition switch in the OFF
position and close the driver’s door. When
reconnecting the positive and negative ter-
minals to the battery be sure the ignition
switch is in the OFF position and the
driver’s door is closed.
BODYWORK
Preserving The Bodywork
Washing
• Wash your vehicle regularly. Always wash
your vehicle in the shade using a mild car
wash soap, and rinse the panels completely
with clear water.
• If insects, tar, or other similar deposits have
accumulated on your vehicle, use a specific
detergent to remove.
• Use a high quality cleaner wax to remove
road film, stains and to protect your paint
finish. Take care never to scratch the paint.
• Avoid using abrasive compounds and power
buffing that may diminish the gloss or thin
out the paint finish.
CAUTION!
• Do not use abrasive or strong cleaning
materials such as steel wool or scouring
powder that will scratch metal and
painted surfaces.
CAUTION!
• Use of power washers exceeding
1,200 psi (8,274 kPa) can result in
damage or removal of paint and decals.
Special Care
• If you drive on salted or dusty roads or if you
drive near the ocean, hose off the undercar-
riage at least once a month.
• It is important that the drain holes in the
lower edges of the doors, rocker panels, and
trunk be kept clear and open.
• If you detect any stone chips or scratches in
the paint, touch them up immediately. The
cost of such repairs is considered the re-
sponsibility of the owner.
• If your vehicle is damaged due to a collision
or similar cause that destroys the paint and
protective coating, have your vehicle re-
paired as soon as possible. The cost of such
repairs is considered the responsibility of
the owner.
SERVICING AND MAINTENANCE
274
Page 277 of 378
• If you carry special cargo such as chemi-
cals, fertilizers, de-icer salt, etc., be sure
that such materials are well packaged and
sealed.
• If a lot of driving is done on gravel roads,
consider mud or stone shields behind each
wheel.
• Touch up the scratches as soon as possible.
An authorized dealer has touch up paint to
match the color of your vehicle.
Some parts of the vehicle may be painted
with a matte paintwork which requires spe-
cial care for its preservation
CAUTION!
Avoid washing with rollers and/or brushes
in washing stations. Wash the vehicle only
by hand using neutral pH detergents; dry it
with a wet chamois leather. Abrasive prod-
ucts and/or polishes should not be used for
cleaning the car. Bird droppings must be
washed off immediately and thoroughly as
the acid they contain is particularly ag-
gressive. Avoid (if at all possible) parking
the vehicle under trees; remove vegetable
CAUTION!
resins immediately as, when dried, it may
only be possible to remove them with abra-
sive products and/or polishes, which is
highly inadvisable as they could alter the
typical opaqueness of the paint. Do not
use pure windshield washer fluid for clean-
ing the front windshield and rear window;
dilute it min. 50% with water. Only use
pure windshield washer fluid when strictly
necessary due to outside temperature con-
ditions.
INTERIORS
Seats And Fabric Parts
Use a specific product to clean fabric uphol-
stery and carpeting.
WARNING!
Do not use volatile solvents for cleaning
purposes. Many are potentially flammable,
and if used in closed areas they may cause
respiratory harm.
Seat Belt Maintenance
Do not bleach, dye or clean the belts with
chemical solvents or abrasive cleaners. This
will weaken the fabric. Sun damage can also
weaken the fabric.
If the belts need cleaning, use a mild soap
solution or lukewarm water. Do not remove
the belts from the vehicle to wash them. Dry
with a soft cloth.
Replace the belts if they appear frayed or
worn or if the buckles do not work properly.
WARNING!
A frayed or torn belt could rip apart in a
collision and leave you with no protection.
Inspect the belt system periodically,
checking for cuts, frays, or loose parts.
Damaged parts must be replaced immedi-
ately. Do not disassemble or modify the
system. Seat belt assemblies must be re-
placed after a collision if they have been
damaged (i.e., bent retractor, torn web-
bing, etc.).
275
Page 278 of 378
Plastic And Coated Parts
Use a specific product to clean vinyl
upholstery.
CAUTION!
• Direct contact of air fresheners, insect
repellents, suntan lotions, or hand sani-
tizers to the plastic, painted, or deco-
rated surfaces of the interior may cause
permanent damage. Wipe away
immediately.
• Damage caused by these type of prod-
ucts may not be covered by your New
Vehicle Limited Warranty.
Cleaning Plastic Instrument Cluster Lenses
The lenses in front of the instruments in this
vehicle are molded in clear plastic. When
cleaning the lenses, care must be taken to
avoid scratching the plastic.1. Clean with a wet soft cloth. A mild soap
solution may be used, but do not use high
alcohol content or abrasive cleaners. If
soap is used, wipe clean with a clean
damp cloth.
2. Dry with a soft cloth.
Leather Parts
Your leather upholstery can be best preserved
by regular cleaning with a damp soft cloth.
Small particles of dirt can act as an abrasive
and damage the leather upholstery and
should be removed promptly with a damp
cloth. Care should be taken to avoid soaking
your leather upholstery with any liquid.
Please do not use polishes, oils, cleaning
fluids, solvents, detergents, or ammonia-
based cleaners to clean your leather uphol-
stery. Application of a leather conditioner is
not required to maintain the original condi-
tion.
NOTE:
If equipped with light colored leather, it
tends to show any foreign material, dirt, and
fabric dye transfer more so than darker col-
ors. The leather is designed for easy cleaning.
CAUTION!
Do not use Alcohol and Alcohol-based
and/or Ketone based cleaning products to
clean leather upholstery, as damage to the
upholstery may result.
Glass Surfaces
All glass surfaces should be cleaned on a
regular basis with any commercial
household-type glass cleaner. Never use an
abrasive type cleaner. Use caution when
cleaning the inside rear window equipped
with electric defrosters or windows equipped
with radio antennas. Do not use scrapers or
other sharp instruments that may scratch the
elements.
When cleaning the rear view mirror, spray
cleaner on the towel or cloth that you are
using. Do not spray cleaner directly on the
mirror.
SERVICING AND MAINTENANCE
276
Page 279 of 378
IDENTIFICATION DATA
Vehicle Identification Number
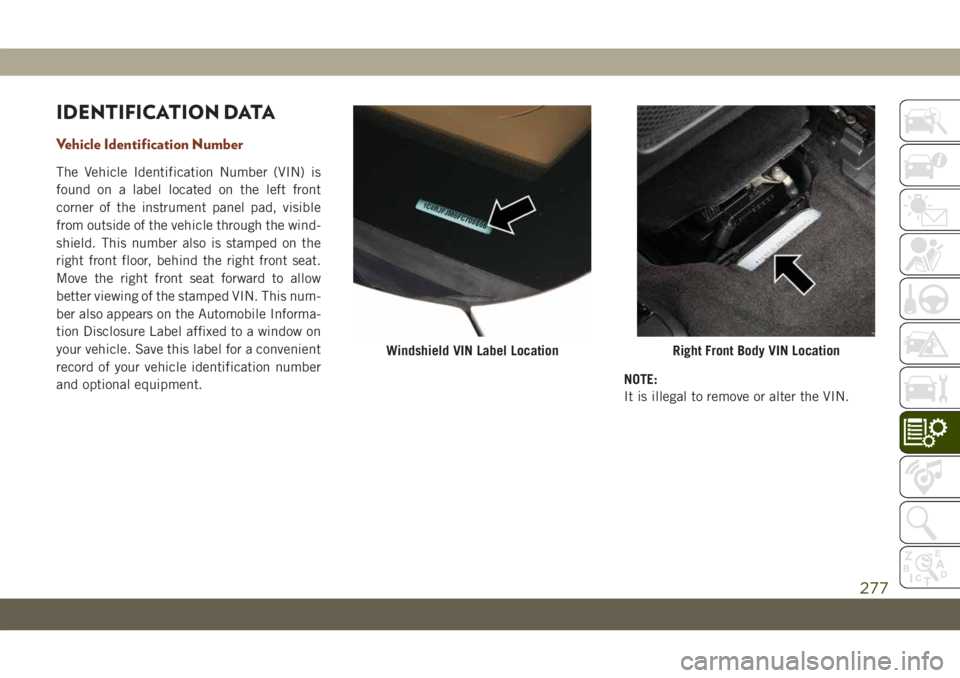
The Vehicle Identification Number (VIN) is
found on a label located on the left front
corner of the instrument panel pad, visible
from outside of the vehicle through the wind-
shield. This number also is stamped on the
right front floor, behind the right front seat.
Move the right front seat forward to allow
better viewing of the stamped VIN. This num-
ber also appears on the Automobile Informa-
tion Disclosure Label affixed to a window on
your vehicle. Save this label for a convenient
record of your vehicle identification number
and optional equipment.NOTE:
It is illegal to remove or alter the VIN.
Windshield VIN Label LocationRight Front Body VIN Location
277
Page 280 of 378
WHEEL AND TIRE TORQUE
SPECIFICATIONS
Proper lug nut/bolt torque is very important to
ensure that the wheel is properly mounted to
the vehicle. Any time a wheel has been re-
moved and reinstalled on the vehicle, the lug
nuts/bolts should be torqued using a properly
calibrated torque wrench using a high quality
six sided (hex) deep wall socket.
Torque Specifications
Base Model Vehicle
Lug Nut/Bolt
Torque**Lug Nut/Bolt
SizeLug Nut/Bolt
Socket Size
130 Ft-Lbs
(176 N·m)M14 x 1.50 22 mm
SRT Model Vehicle
Lug Nut/Bolt
Torque**Lug Nut/Bolt
SizeLug Nut/Bolt
Socket Size
110 Ft-Lbs
(149 N·m)M14 x 1.50 22 mm
**Use only your authorized dealer recom-
mended lug nuts/bolts and clean or remove
any dirt or oil before tightening.Inspect the wheel mounting surface prior to
mounting the tire and remove any corrosion
or loose particles.
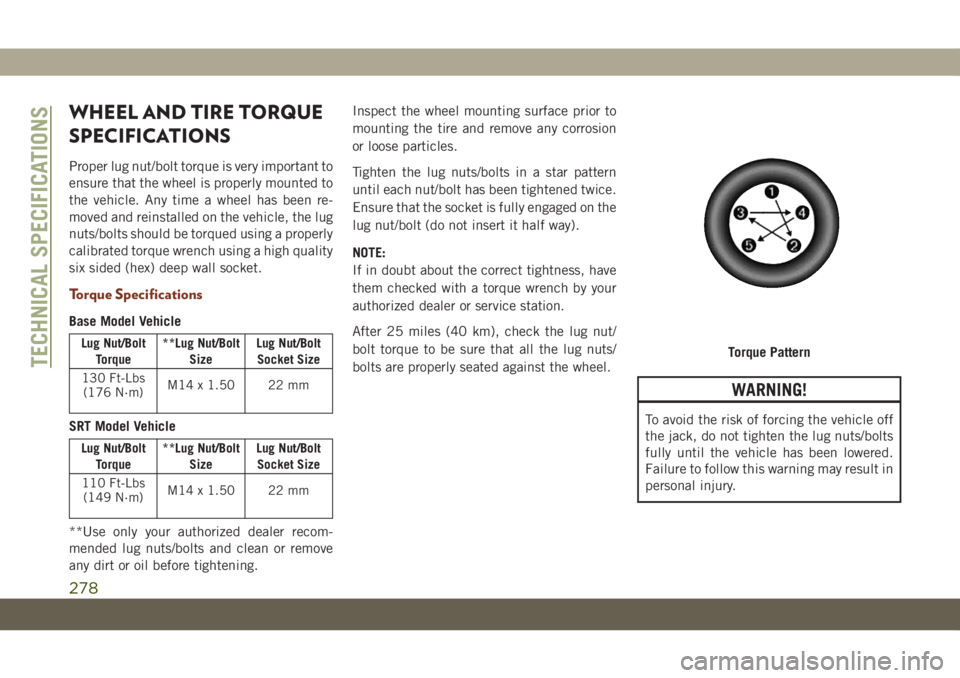
Tighten the lug nuts/bolts in a star pattern
until each nut/bolt has been tightened twice.
Ensure that the socket is fully engaged on the
lug nut/bolt (do not insert it half way).
NOTE:
If in doubt about the correct tightness, have
them checked with a torque wrench by your
authorized dealer or service station.
After 25 miles (40 km), check the lug nut/
bolt torque to be sure that all the lug nuts/
bolts are properly seated against the wheel.
WARNING!
To avoid the risk of forcing the vehicle off
the jack, do not tighten the lug nuts/bolts
fully until the vehicle has been lowered.
Failure to follow this warning may result in
personal injury.
Torque PatternTECHNICAL SPECIFICATIONS
278