stop start JEEP GRAND CHEROKEE 2023 Workshop Manual
[x] Cancel search | Manufacturer: JEEP, Model Year: 2023, Model line: GRAND CHEROKEE, Model: JEEP GRAND CHEROKEE 2023Pages: 424, PDF Size: 15.48 MB
Page 199 of 424
STARTING AND OPERATING197
Shifting Into Transfer Case N (NEUTRAL)
Use the following procedure to prepare your
vehicle for recreational towing:
1. Bring the vehicle to a complete stop on level
ground, with the engine running.
2. Press and hold the brake pedal.
3. Shift the transmission into NEUTRAL. 4. If vehicle is equipped with Quadra-Lift air
suspension, ensure the vehicle is set to
Normal Ride Height with the Auto Entry/Exit
setting deselected.
NOTE:
Steps 1 through 4 are requirements that
must be met before pushing the N
(NEUTRAL) button, and must continue to be
met until the shift has been completed. If
any of these requirements are not met
before pushing the N (NEUTRAL) button or
are no longer met during the shift, then the
N (NEUTRAL) indicator light will flash contin -
uously until all requirements are met or until
the N (NEUTRAL) button is released.
The ignition must be in the ON/RUN position
for a shift to take place and for the position
indicator lights to be operable. If the ignition
is not in the ON/RUN position, the shift will
not take place and no position indicator
lights will be on or flashing.
A flashing N (NEUTRAL) position indicator
light indicates that shift requirements have
not been met.
CAUTION!
DO NOT dolly tow any 4WD vehicle. Towing
with only one set of wheels on the ground
(front or rear) will cause severe transmission
and/or transfer case damage. Tow with all
four wheels either ON the ground, or OFF the
ground (using a vehicle trailer).
Tow only in a forward direction. Towing this
vehicle backwards can cause severe damage
to the transfer case.
The transmission must be in PARK for recre -
ational towing.
Before recreational towing, perform the proce -
dure outlined under “Shifting into N
(NEUTRAL)” to be certain that the transfer
case is fully in N (NEUTRAL). Otherwise,
internal damage will result.
Towing this vehicle in violation of the above
requirements can cause severe transmission
and/or transfer case damage. Damage from
improper towing is not covered under the New
Vehicle Limited Warranty.
Do not use a bumper-mounted clamp-on tow
bar on your vehicle. The bumper face bar will
be damaged.
WARNING!
You or others could be injured or killed if you
leave the vehicle unattended with the transfer
case in the N (NEUTRAL) position without first
fully engaging the Electric Park Brake. The
transfer case N (NEUTRAL) position disengages
both the front and rear driveshafts from the
powertrain and will allow the vehicle to roll, even
if the transmission is in PARK. The Electric Park
Brake should always be applied when the driver
is not in the vehicle.
CAUTION!
It is necessary to follow these steps to be certain
that the transfer case is fully in N (NEUTRAL)
before recreational towing to prevent damage to
internal parts.
4
23_WL_OM_EN_USC_t.book Page 197
Page 200 of 424
198STARTING AND OPERATING
If the vehicle is equipped with Quadra-Lift
air suspension, the engine should be
started and left running for a minimum of
60 seconds (with all the doors closed) at
least once every 24 hours. This process
allows the air suspension to adjust the
vehicle’s ride height to compensate for
temperature effects.
Engaging/disengaging of the Electric Park
Brake requires the ignition to be in the ON/
RUN position.
If shift conditions/interlocks are not met, a
“4WD Shift Canceled” or a “4WD Shift
Aborted/ Retry Shift” message will be
displayed on the instrument cluster. To reat -
tempt shift, put the transmission in
NEUTRAL (N) and push and hold the 4WD
LOW button.
If shift conditions/interlocks are not met, a
“To Complete 4WD Shift Put Transmission
In Neutral” or a “To Complete 4WD Shift
Speed Must Be Below 3 MPH” or a “To
Complete 4WD Shift Allow Engine To Return
To Idle” message will flash from the instru -
ment cluster display Ú page 98.
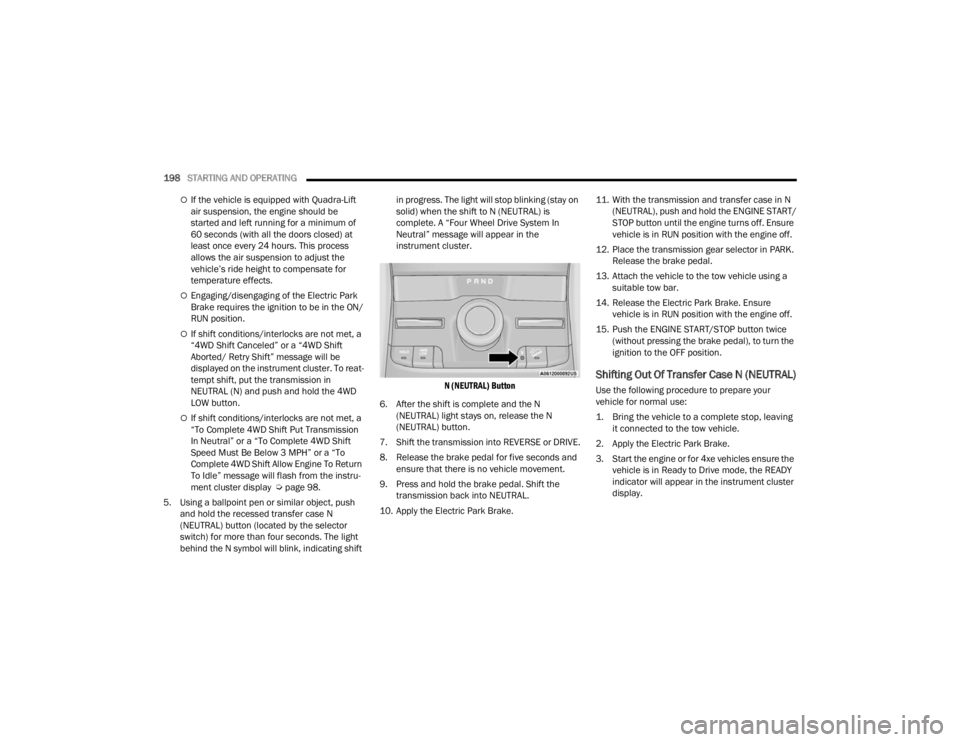
5. Using a ballpoint pen or similar object, push and hold the recessed transfer case N
(NEUTRAL) button (located by the selector
switch) for more than four seconds. The light
behind the N symbol will blink, indicating shift in progress. The light will stop blinking (stay on
solid) when the shift to N (NEUTRAL) is
complete. A “Four Wheel Drive System In
Neutral” message will appear in the
instrument cluster.
N (NEUTRAL) Button
6. After the shift is complete and the N (NEUTRAL) light stays on, release the N
(NEUTRAL) button.
7. Shift the transmission into REVERSE or DRIVE.
8. Release the brake pedal for five seconds and ensure that there is no vehicle movement.
9. Press and hold the brake pedal. Shift the transmission back into NEUTRAL.
10. Apply the Electric Park Brake. 11. With the transmission and transfer case in N
(NEUTRAL), push and hold the ENGINE START/
STOP button until the engine turns off. Ensure
vehicle is in RUN position with the engine off.
12. Place the transmission gear selector in PARK. Release the brake pedal.
13. Attach the vehicle to the tow vehicle using a suitable tow bar.
14. Release the Electric Park Brake. Ensure vehicle is in RUN position with the engine off.
15. Push the ENGINE START/STOP button twice (without pressing the brake pedal), to turn the
ignition to the OFF position.
Shifting Out Of Transfer Case N (NEUTRAL)
Use the following procedure to prepare your
vehicle for normal use:
1. Bring the vehicle to a complete stop, leaving it connected to the tow vehicle.
2. Apply the Electric Park Brake.
3. Start the engine or for 4xe vehicles ensure the vehicle is in Ready to Drive mode, the READY
indicator will appear in the instrument cluster
display.
23_WL_OM_EN_USC_t.book Page 198
Page 203 of 424
STARTING AND OPERATING201
Standing Water
Avoid driving in standing water deeper than
24 inches (61 cm) with air suspension or
21 inches (53 cm) without air suspension, and
reduce speed appropriately to minimize wave
effects. Maximum speed is 5 mph (8 km/h).
Maintenance
After driving through deep water, inspect your
vehicle fluids and lubricants (engine oil,
transmission oil, axle, transfer case) to ensure the
fluids have not been contaminated. Contaminated
fluid (milky, foamy in appearance) should be
flushed/changed as soon as possible to prevent
component damage.
Driving In Snow, Mud And Sand
In heavy snow, when pulling a load, or for
additional control at slower speeds, shift the
transmission to a low gear and shift the transfer
case to 4WD LOW if necessary Ú page 131. Only
shift into a lower gear to maintain forward motion.
Over-revving the engine can spin the wheels and
traction will be lost.
Avoid abrupt downshifts on icy or slippery roads,
because engine braking may cause skidding and
loss of control.
Hill Climbing
NOTE:Before attempting to climb a hill, determine the
conditions at the crest and/or on the other side.
Before climbing a steep hill, shift the transmission
to a lower gear and shift the transfer case to 4WD
LOW. Use FIRST gear and 4WD LOW for very steep
hills.
If you stall or begin to lose forward motion while
climbing a steep hill, allow your vehicle to come to
a stop and immediately apply the brakes. Restart
the engine, and shift into REVERSE (R). Back slowly
down the hill, allowing the compression braking of
the engine to help regulate your speed. If the
brakes are required to control vehicle speed, apply
them lightly and avoid locking or skidding the tires. Remember, never drive diagonally across a hill.
Always drive straight up or down.
If the wheels start to slip as you approach the crest
of a hill, ease off the accelerator and maintain
forward motion by turning the front wheels slowly.
This may provide a fresh “bite” into the surface and
will usually provide traction to complete the climb.
Traction Downhill
When descending mountains or hills, use Hill
Descent Control or Selec-Speed Control to avoid
repeated heavy braking.
If not equipped with Hill Descent Control or
Selec-Speed Control use the following procedure:
Shift the transmission into a low gear, and the
transfer case into 4WD LOW range. Let the vehicle
go slowly down the hill with all four wheels turning
against engine compression drag. This will permit
you to control the vehicle speed and direction.
When descending mountains or hills, repeated
braking can cause brake fade with loss of braking
control. Avoid repeated heavy braking by
downshifting the transmission whenever possible.
WARNING!
If the engine stalls, you lose forward motion, or
cannot make it to the top of a steep hill or grade,
never attempt to turn around. To do so may
result in tipping and rolling the vehicle. Always
back carefully straight down a hill in REVERSE
gear. Never back down a hill in NEUTRAL using
only the brake.
4
23_WL_OM_EN_USC_t.book Page 201
Page 250 of 424

248 (Continued)
SAFETY
SAFETY FEATURES
ANTI-LOCK BRAKE SYSTEM (ABS)
The ABS provides increased vehicle stability and
brake performance under most braking conditions.
The system automatically prevents wheel lock and
enhances vehicle control during braking.
The ABS performs a self-check cycle to ensure that
the ABS is working properly each time the vehicle
is started and driven. During this self-check, you
may hear a slight clicking sound as well as some
related motor noises.
The ABS is activated during braking when the
system detects one or more wheels are beginning
to lock. Road conditions such as ice, snow, gravel,
bumps, railroad tracks, loose debris, or panic stops
may increase the likelihood of ABS activation(s).
You also may experience the following normal
characteristics when the ABS activates:
ABS motor noise or clicking sounds (you may
continue to hear for a short time after the stop)
Brake pedal pulsations
A slight drop of the brake pedal at the end of the
stopThe ABS is designed to function with the Original
Equipment Manufacturer (OEM) tires. Modification
may result in degraded ABS performance.
Anti-Lock Brake System (ABS) Warning
Light
The yellow ABS Warning Light will turn on when the
ignition is placed in the ON/RUN mode and may
stay on for as long as four seconds.
If the ABS Warning Light remains on or comes on
while driving, it indicates that the anti-lock portion
of the brake system is not functioning and that
service is required. However, the conventional
brake system will continue to operate normally if
the ABS Warning Light is on.
WARNING!
The ABS contains sophisticated electronic
equipment that may be susceptible to interfer
-
ence caused by improperly installed or high
output radio transmitting equipment. This
interference can cause possible loss of
anti-lock braking capability. Installation of
such equipment should be performed by qual -
ified professionals.
Pumping of the Anti-Lock Brakes will diminish
their effectiveness and may lead to a collision.
Pumping makes the stopping distance longer.
Just press firmly on your brake pedal when you
need to slow down or stop.
The ABS cannot prevent the natural laws of
physics from acting on the vehicle, nor can it
increase braking or steering efficiency beyond
that afforded by the condition of the vehicle
brakes and tires or the traction afforded.
The ABS cannot prevent collisions, including
those resulting from excessive speed in turns,
following another vehicle too closely, or hydro -
planing.
The capabilities of an ABS equipped vehicle
must never be exploited in a reckless or
dangerous manner that could jeopardize the
user’s safety or the safety of others.
WARNING!
23_WL_OM_EN_USC_t.book Page 248
Page 252 of 424

250SAFETY
ELECTRONIC BRAKE CONTROL (EBC)
S
YSTEM
If applicable, refer to the “Hybrid Supplement” for
additional information.
Your vehicle is equipped with an advanced EBC
system. This system includes the Anti-Lock Brake
System (ABS), Brake Assist System (BAS),
Electronic Brake Force Distribution (EBD), Electronic Roll Mitigation (ERM), Electronic
Stability Control (ESC), Hill Start Assist (HSA), and
Traction Control System (TCS). These systems work
together to enhance both vehicle stability and
control in various driving conditions.
Your vehicle may also be equipped with Dynamic
Steering Torque (DST), Rain Brake Support (RBS),
Ready Alert Braking (RAB), and Trailer Sway
Control (TSC).
Brake Assist System (BAS)
The BAS is designed to optimize the vehicle’s
braking capability during emergency braking
maneuvers. The system detects an emergency
braking situation by sensing the rate and amount
of brake application and then applies optimum
pressure to the brakes. This can help reduce
braking distances. The BAS complements the
Anti-Lock Brake System (ABS). Applying the brakes
very quickly results in the best BAS assistance. To
receive the benefit of the system, you must apply
continuous braking pressure during the stopping
sequence (do not “pump” the brakes). Do not
reduce brake pedal pressure unless braking is no
longer desired. Once the brake pedal is released,
the BAS is deactivated.
Brake System Warning Light
The red Brake System Warning Light will turn on
when the ignition is placed in the ON/RUN mode
and may stay on for as long as four seconds.
If the Brake System Warning Light remains on or
comes on while driving, it indicates that the brake
system is not functioning properly and that
immediate service is required. If the Brake System
Warning Light does not come on when the ignition
is placed in the ON/RUN mode, have the light
repaired as soon as possible.
WARNING!
Before exiting a vehicle, always come to a
complete stop, then shift the automatic trans
-
mission into PARK and apply the parking
brake.
Always make sure the keyless ignition node is
in the OFF position, key fob is removed from
the vehicle and vehicle is locked.
Never leave children alone in a vehicle, or with
access to an unlocked vehicle. Leaving chil -
dren in a vehicle unattended is dangerous for
a number of reasons. A child or others could
be seriously or fatally injured. Children should
be warned not to touch the parking brake,
brake pedal or the gear selector.
Do not leave children or animals inside parked
vehicles in hot weather. Interior heat buildup
may cause serious injury or death.
WARNING!
The Brake Assist System (BAS) cannot prevent
the natural laws of physics from acting on the
vehicle, nor can it increase the traction afforded
by prevailing road conditions. BAS cannot
prevent collisions, including those resulting from
excessive speed in turns, driving on very slippery
surfaces, or hydroplaning. The capabilities of a
BAS-equipped vehicle must never be exploited in
a reckless or dangerous manner, which could
jeopardize the user's safety or the safety of
others.
23_WL_OM_EN_USC_t.book Page 250
Page 255 of 424
SAFETY253
The ESC Activation/Malfunction Indicator Light
starts to flash as soon as the tires lose traction and
the ESC system becomes active. The ESC
Activation/Malfunction Indicator Light also flashes
when TCS is active. If the ESC Activation/
Malfunction Indicator Light begins to flash during
acceleration, ease up on the accelerator and apply
as little throttle as possible. Be sure to adapt your
speed and driving to the prevailing road conditions. The ESC OFF Indicator Light indicates the
customer has elected to have the
Electronic Stability Control (ESC) in a
reduced mode.
NOTE:
The ESC Activation/Malfunction Indicator Light
and the ESC OFF Indicator Light come on
momentarily each time the ignition is placed in
the ON/RUN mode.
Each time the ignition is placed in the ON/RUN
mode, the ESC system will be on even if it was
turned off previously.
The ESC system will make buzzing or clicking
sounds when it is active. This is normal; the
sounds will stop when ESC becomes inactive
following the maneuver that caused the ESC
activation.
Hill Descent Control (HDC) — If Equipped
HDC is intended for low speed off-road
driving while in 4WD Low. HDC maintains
vehicle speed while descending hills
during various driving situations. HDC
controls vehicle speed by actively controlling the
brakes.
HDC Has Three States:
1. Off (feature is not enabled and will not activate).
2. Enabled (feature is enabled and ready but activation conditions are not met, or driver is
actively overriding with brake or throttle
application).
3. Active (feature is enabled and actively controlling vehicle speed).
Enabling HDC
HDC is enabled by pushing the HDC switch, but the
following conditions must also be met to enable
HDC:
The driveline is in 4WD Low.
The vehicle speed is below 5 mph (8 km/h).
The parking brake is released.
The driver door is closed. Activating HDC
Once HDC is enabled it will activate automatically
if driven down a grade of sufficient magnitude. The
set speed for HDC is selectable by the driver, and
can be adjusted by using the gear shift +/-. The
following summarizes the HDC set speeds:
HDC Target Set Speeds
P = No set speed. HDC may be enabled but will
not activate.
R = 0.6 mph (1 km/h)
N = 1.2 mph (2 km/h)
D = 0.6 mph (1 km/h)
1st = 0.6 mph (1 km/h)
2nd = 1.2 mph (2 km/h)
3rd = 1.8 mph (3 km/h)
4th = 2.5 mph (4 km/h)
5th = 3.1 mph (5 km/h)
6th = 3.7 mph (6 km/h)
7th = 4.3 mph (7 km/h)
8th = 5.0 mph (8 km/h)
NOTE:During HDC the +/- shifter input is used for HDC
target speed selection, but will not affect the gear
chosen by the transmission. When actively
controlling HDC the transmission will shift appro
-
priately for the driver-selected set speed and corre -
sponding driving conditions.
6
23_WL_OM_EN_USC_t.book Page 253
Page 256 of 424
254SAFETY
Driver Override
The driver may override HDC activation with
throttle or brake application at any time.
Deactivating HDC
HDC will be deactivated but remain available if any
of the following conditions occur:
The driver overrides HDC set speed with throttle
or brake application.
The vehicle speed exceeds 20 mph (32 km/h)
but remains below 40 mph (64 km/h).
The vehicle is on a downhill grade of insufficient
magnitude, is on level ground, or is on an uphill
grade.
The vehicle is shifted to PARK.
Disabling HDC
HDC will be deactivated and disabled if any of the
following conditions occur:
The driver pushes the HDC switch.
The driveline is shifted out of 4WD Low.
The parking brake is applied.
The driver door opens.
The vehicle is driven greater than 20 mph
(32 km/h) for greater than 70 seconds.
The vehicle is driven greater than 40 mph
(64 km/h) (HDC exits immediately).
HDC detects excessive brake temperature. Feedback To The Driver
The instrument cluster has an HDC icon and the
HDC switch has an LED icon, which offers feedback
to the driver about the state HDC is in.
The cluster icon and switch light will illuminate
and remain on solid when HDC is enabled or
activated. This is the normal operating condition
for HDC.
The cluster icon and switch light will flash for
several seconds, then extinguish when the
driver pushes the HDC switch but enable condi
-
tions are not met.
The cluster icon and switch light will flash for
several seconds, then extinguish when HDC
disables due to excess speed.
The cluster icon and switch light will flash when
HDC deactivates due to overheated brakes. The
flashing will stop and HDC will activate again
once the brakes have cooled sufficiently.
Hill Start Assist (HSA)
HSA is designed to mitigate roll back from a
complete stop while on an incline. If the driver
releases the brake while stopped on an incline,
HSA will continue to hold the brake pressure for a
short period. If the driver does not apply the
throttle before this time expires, the system will
release brake pressure and the vehicle will roll
down the hill as normal.
The following conditions must be met in order for
HSA to activate:
The feature must be enabled.
The vehicle must be stopped.
The parking brake must be off.
The driver door must be closed.
The vehicle must be on a sufficient grade.
The gear selection must match vehicle uphill
direction (i.e., vehicle facing uphill is in forward
gear; vehicle backing uphill is in REVERSE (R)
gear).
HSA will work in REVERSE gear and all forward
gears. The system will not activate if the trans -
mission is in PARK (P) or NEUTRAL (N). For vehi -
cles equipped with a manual transmission, if
the clutch is pressed, HSA will remain active.
WARNING!
HDC is only intended to assist the driver in
controlling vehicle speed when descending hills.
The driver must remain attentive to the driving
conditions and is responsible for maintaining a
safe vehicle speed.
23_WL_OM_EN_USC_t.book Page 254
Page 257 of 424
SAFETY255
Disabling And Enabling HSA
This feature can be turned on or turned off. To
change the current setting, proceed as follows:
If disabling HSA using your instrument cluster
display, see Ú page 98 for further information.
If disabling HSA using Uconnect Settings, see
Úpage 204 for further information.
Towing With HSA
HSA will also provide assistance to mitigate roll
back while towing a trailer.
Rain Brake Support (RBS)
RBS may improve braking performance in wet
conditions. It will periodically apply a small amount
of brake pressure to remove any water buildup on
the front brake rotors. It functions when the
windshield wipers are in LO or HI speed. When RBS
is active, there is no notification to the driver and
no driver interaction is required.
Ready Alert Braking (RAB)
RAB may reduce the time required to reach full
braking during emergency braking situations. It
anticipates when an emergency braking situation
may occur by monitoring how fast the throttle is
released by the driver. The Electronic Brake
Controller (EBC) will prepare the brake system for
a panic stop.
Selec-Speed Control (SSC) — If Equipped
SSC is intended for off-road driving in
4WD Low only. SSC maintains vehicle
speed by actively controlling engine
torque and brakes.
SSC has three states:
1. Off (feature is not enabled and will not activate)
2. Enabled (feature is enabled and ready but activation conditions are not met, or driver is
actively overriding with brake or throttle
application)
3. Active (feature is enabled and actively controlling vehicle speed)
WARNING!
There may be situations where the Hill Start
Assist (HSA) will not activate and slight rolling
may occur, such as on minor hills or with a
loaded vehicle, or while pulling a trailer. HSA is
not a substitute for active driving involvement. It
is always the driver’s responsibility to be
attentive to distance to other vehicles, people,
and objects, and most importantly brake
operation to ensure safe operation of the vehicle
under all road conditions. Your complete
attention is always required while driving to
maintain safe control of your vehicle. Failure to
follow these warnings can result in a collision or
serious personal injury.
WARNING!
If you use a trailer brake controller with your
trailer, the trailer brakes may be activated and
deactivated with the brake switch. If so, there
may not be enough brake pressure to hold
both the vehicle and the trailer on a hill when
the brake pedal is released. In order to avoid
rolling down an incline while resuming accel -
eration, manually activate the trailer brake or
apply more vehicle brake pressure prior to
releasing the brake pedal.
HSA is not a parking brake. Always apply the
parking brake fully when exiting your vehicle.
Also, be certain to place the transmission in
PARK.
Failure to follow these warnings can result in a
collision or serious personal injury.
6
23_WL_OM_EN_USC_t.book Page 255
Page 273 of 424
SAFETY271
(Continued)
(Continued)
outboard front passenger seat is unoccupied). The
BeltAlert warning sequence starts by blinking the
Seat Belt Reminder Light and sounding an
intermittent chime. Once the BeltAlert warning
sequence has completed, the Seat Belt Reminder
Light will remain on until the seat belts are
buckled. The BeltAlert warning sequence may
repeat based on vehicle speed until the driver and
occupied outboard front seat passenger seat belts
are buckled. The driver should instruct all
occupants to buckle their seat belts.
Change Of Status
If the driver or outboard front seat passenger (if
equipped with outboard front passenger seat
BeltAlert) unbuckles their seat belt while the
vehicle is traveling, the BeltAlert warning sequence
will begin until the seat belts are buckled again.
The outboard front passenger seat BeltAlert is not
active when the outboard front passenger seat is
unoccupied. BeltAlert may be triggered when an
animal or other items are placed on the outboard
front passenger seat or when the seat is folded flat
(if equipped). It is recommended that pets be
restrained in the rear seat (if equipped) in pet
harnesses or pet carriers that are secured by seat
belts, and cargo is properly stowed.
BeltAlert can be activated or deactivated by an
authorized dealer. FCA US LLC does not
recommend deactivating BeltAlert.
NOTE:If BeltAlert has been deactivated and the driver or
outboard front seat passenger (if equipped with
outboard front passenger seat BeltAlert) is
unbuckled the Seat Belt Reminder Light will turn
on and remain on until the driver and outboard
front seat passenger seat belts are buckled.
Lap/Shoulder Belts
All seating positions in your vehicle are equipped
with lap/shoulder belts.
The seat belt webbing retractor will lock only during
very sudden stops or collisions. This feature allows
the shoulder part of the seat belt to move freely
with you under normal conditions. However, in a
collision the seat belt will lock and reduce your risk
of striking the inside of the vehicle or being thrown
out of the vehicle.
WARNING!
Relying on the air bags alone could lead to
more severe injuries in a collision. The air
bags work with your seat belt to restrain you
properly. In some collisions, the air bags won’t
deploy at all. Always wear your seat belt even
though you have air bags.
In a collision, you and your passengers can
suffer much greater injuries if you are not
properly buckled up. You can strike the inte
-
rior of your vehicle or other passengers, or you
can be thrown out of the vehicle. Always be
sure you and others in your vehicle are
buckled up properly.
It is dangerous to ride in a cargo area, inside
or outside of a vehicle. In a collision, people
riding in these areas are more likely to be seri -
ously injured or killed.
Do not allow people to ride in any area of your
vehicle that is not equipped with seats and
seat belts.
Be sure everyone in your vehicle is in a seat
and using a seat belt properly. Occupants,
including the driver, should always wear their
seat belts whether or not an air bag is also
provided at their seating position to minimize
the risk of severe injury or death in the event
of a crash.
WARNING!
6
23_WL_OM_EN_USC_t.book Page 271
Page 289 of 424
SAFETY287
As the air bags deflate, you may see some
smoke-like particles. The particles are a normal
by-product of the process that generates the
non-toxic gas used for air bag inflation. These
airborne particles may irritate the skin, eyes,
nose, or throat. If you have skin or eye irritation,
rinse the area with cool water. For nose or throat
irritation, move to fresh air. If the irritation
continues, see your doctor. If these particles
settle on your clothing, follow the garment
manufacturer’s instructions for cleaning.
Do not drive your vehicle after the air bags have
deployed. If you are involved in another collision,
the air bags will not be in place to protect you.
NOTE:
Air bag covers may not be obvious in the interior
trim, but they will open during air bag deploy -
ment.
After any collision, the vehicle should be taken
to an authorized dealer immediately.
Enhanced Accident Response System
In the event of an impact, if the communication
network remains intact, and the power remains
intact, depending on the nature of the event, the
Occupant Restraint Controller (ORC) will determine
whether to have the Enhanced Accident Response
System perform the following functions:
Cut off fuel to the engine (if equipped)
Cut off battery power to the electric motor (if
equipped)
Flash hazard lights as long as the battery has
power
Turn on the interior lights, which remain on as
long as the battery has power or for 15 minutes
from the intervention of the Enhanced Accident
Response System
Unlock the power door locks
Your vehicle may also be designed to perform any
of these other functions in response to the
Enhanced Accident Response System:
Turn off the Fuel Filter Heater, Turn off the HVAC
Blower Motor, Close the HVAC Circulation Door
Cut off battery power to the:
Engine
Electric Motor (if equipped)
Electric power steering
Brake booster
Electric park brake
Automatic transmission gear selector
Horn
Front wiper
NOTE:After an accident, remember to cycle the ignition to
the STOP (OFF/LOCK) position and remove the key
from the ignition switch to avoid draining the
battery. Carefully check the vehicle for fuel leaks in
the engine compartment and on the ground near
the engine compartment and fuel tank before
resetting the system and starting the engine. If
there are no fuel leaks or damage to the vehicle
electrical devices (e.g. headlights) after an
accident, reset the system by following the
procedure described here. If you have any doubt,
contact an authorized dealer.
Enhanced Accident Response System
Reset Procedure
If Applicable, refer to the “Hybrid Supplement” for
additional information.
In order to reset the Enhanced Accident Response
System functions after an event, the ignition switch
must be changed from ignition START or ON/RUN
to ignition OFF. Carefully check the vehicle for fuel
leaks in the engine compartment and on the
ground near the engine compartment and fuel
tank before resetting the system and starting the
engine.
WARNING!
Deployed air bags and seat belt pretensioners
cannot protect you in another collision. Have the air
bags, seat belt pretensioners, and the seat belt
retractor assemblies replaced by an authorized
dealer immediately. Also, have the Occupant
Restraint Controller System serviced as well.
6
23_WL_OM_EN_USC_t.book Page 287