JEEP PATRIOT 2020 Owner handbook (in English)
Manufacturer: JEEP, Model Year: 2020, Model line: PATRIOT, Model: JEEP PATRIOT 2020Pages: 332, PDF Size: 1.99 MB
Page 91 of 332
Disc Mode
To switch to the disc mode, say “Disc.” In this
mode, you may say the following commands:
•“Track” (#) (to change the track)
•“Next Track” (to play the next track)
•“Previous Track” (to play the previous track)
•“Main Menu” (to switch to the main menu)
USB Mode
To switch to USB mode, say “USB.” In this
mode, you may say the following commands:
•“Next Track” (to play the next track)
•“Previous Track” (to play the previous track)
•“Play” (to play an Artist Name, Playlist Name,
Album Name, Track Name, etc.)
Bluetooth Streaming (BT) Mode
To switch to Bluetooth Streaming (BT) mode,
say “Bluetooth Streaming.” In this mode, you
may say the following commands:
•“Play” (to play the current track)
•“Pause” (to pause the current track)
•“Next Track” (to play the next track)•“Previous Track” (to play the previous track)
Memo Mode
To switch to the voice recorder mode, say
“Memo.” In this mode, you may say the follow-
ing commands:
•“New Memo” (to record a new memo) —
During the recording, you may push the
Voice Command
button to stop recording.
You proceed by saying one of the following
commands:
– “Save” (to save the memo)
– “Continue” (to continue recording)
– “Delete” (to delete the recording)
•“Play Memos” (to play previously recorded
memos) — During the playback you may
push the Voice Command
button to stop
playing memos. You proceed by saying one
of the following commands:
– “Repeat” (to repeat a memo)
– “Next” (to play the next memo)
– “Previous” (to play the previous memo)
– “Delete” (to delete a memo)
– “Delete All” (to delete all memos)System Setup
To switch to system setup, you may say one of
the following:
•“Change to system setup”
•“Main menu system setup”
•“Switch to system setup”
•“Change to setup”
•“Main menu setup” or
•“Switch to setup”
In this mode, you may say the following com-
mands:
•“Language English”
•“Language French”
•“Language Spanish”
•“Language Dutch”
•“Language Deutsch”
•“Language Italian”
•“Tutorial”
•“Voice Training”
87
Page 92 of 332
NOTE:
Keep in mind that you have to push the
Voice Command
button first and wait for
the beep before speaking the “Barge In”
commands.
Voice TrainingFor users experiencing difficulty with the system
recognizing their voice commands or numbers
the Uconnect Voice “Voice Training” feature
may be used.
1. Push the Voice Command
button, say
“System Setup” and once you are in that
menu then say “Voice Training.”
•This will train your own voice to the system
and will improve recognition.
2. Repeat the words and phrases when
prompted by Uconnect Voice.
•For best results, the Voice Training ses-
sion should be completed when the ve-
hicle is parked, engine running, all win-
dows closed, and the blower fan switchedoff. This procedure may be repeated with a
new user. The system will adapt to the last
trained voice only.
SEATS
Seats are a part of the Occupant Restraint
System of the vehicle.
WARNING!
•It is dangerous to ride in a cargo area,
inside or outside of a vehicle. In a collision,
people riding in these areas are more likely
to be seriously injured or killed.
•Do not allow people to ride in any area of
your vehicle that is not equipped with seats
and seat belts. In a collision, people riding
in these areas are more likely to be seri-
ously injured or killed.
•Be sure everyone in your vehicle is in a
seat and using a seat belt properly.
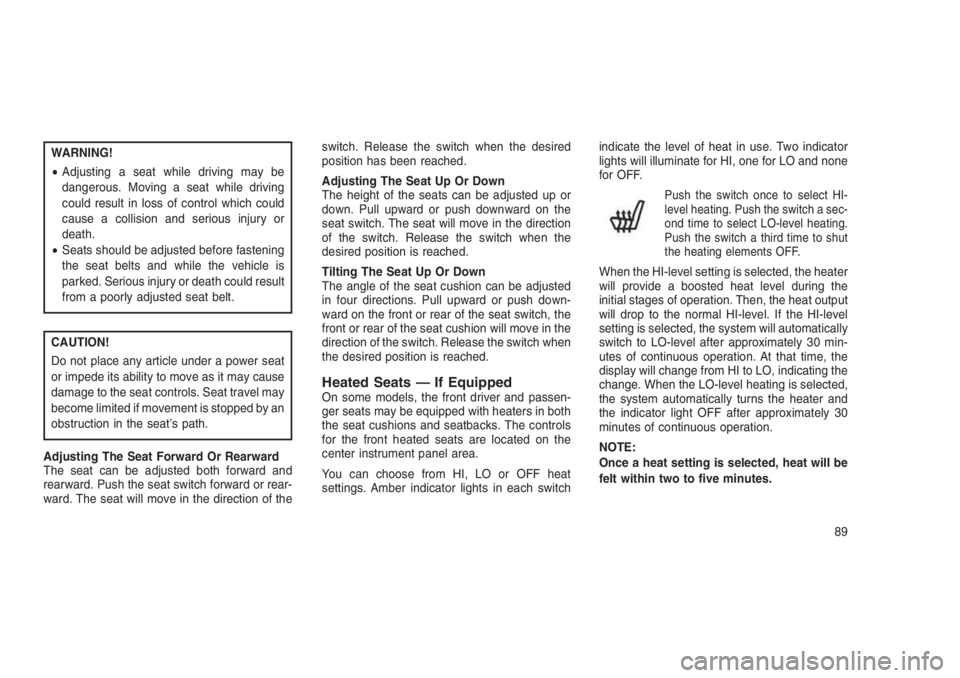
Power Seats — If EquippedSome models may be equipped with a power
driver’s seat. The power seat switch is located
on the outboard side of the seat near the floor.
Use the switch to move the seat up, down,
forward, rearward, or to tilt the seat.
Power Seat Switch
88
Page 93 of 332
WARNING!
•Adjusting a seat while driving may be
dangerous. Moving a seat while driving
could result in loss of control which could
cause a collision and serious injury or
death.
•Seats should be adjusted before fastening
the seat belts and while the vehicle is
parked. Serious injury or death could result
from a poorly adjusted seat belt.
CAUTION!
Do not place any article under a power seat
or impede its ability to move as it may cause
damage to the seat controls. Seat travel may
become limited if movement is stopped by an
obstruction in the seat’s path.
Adjusting The Seat Forward Or Rearward
The seat can be adjusted both forward and
rearward. Push the seat switch forward or rear-
ward. The seat will move in the direction of theswitch. Release the switch when the desired
position has been reached.
Adjusting The Seat Up Or Down
The height of the seats can be adjusted up or
down. Pull upward or push downward on the
seat switch. The seat will move in the direction
of the switch. Release the switch when the
desired position is reached.
Tilting The Seat Up Or Down
The angle of the seat cushion can be adjusted
in four directions. Pull upward or push down-
ward on the front or rear of the seat switch, the
front or rear of the seat cushion will move in the
direction of the switch. Release the switch when
the desired position is reached.
Heated Seats — If EquippedOn some models, the front driver and passen-
ger seats may be equipped with heaters in both
the seat cushions and seatbacks. The controls
for the front heated seats are located on the
center instrument panel area.
You can choose from HI, LO or OFF heat
settings. Amber indicator lights in each switchindicate the level of heat in use. Two indicator
lights will illuminate for HI, one for LO and none
for OFF.
Push the switch once to select HI-
level heating. Push the switch a sec-
ond time to select LO-level heating.
Push the switch a third time to shut
the heating elements OFF.
When the HI-level setting is selected, the heater
will provide a boosted heat level during the
initial stages of operation. Then, the heat output
will drop to the normal HI-level. If the HI-level
setting is selected, the system will automatically
switch to LO-level after approximately 30 min-
utes of continuous operation. At that time, the
display will change from HI to LO, indicating the
change. When the LO-level heating is selected,
the system automatically turns the heater and
the indicator light OFF after approximately 30
minutes of continuous operation.
NOTE:
Once a heat setting is selected, heat will be
felt within two to five minutes.
89
Page 94 of 332
WARNING!
•Persons who are unable to feel pain to the
skin because of advanced age, chronic
illness, diabetes, spinal cord injury, medi-
cation, alcohol use, exhaustion or other
physical condition must exercise care
when using the seat heater. It may cause
burns even at low temperatures, especially
if used for long periods of time.
•Do not place anything on the seat or
seatback that insulates against heat, such
as a blanket or cushion. This may cause
the seat heater to overheat. Sitting in a
seat that has been overheated could
cause serious burns due to the increased
surface temperature of the seat.
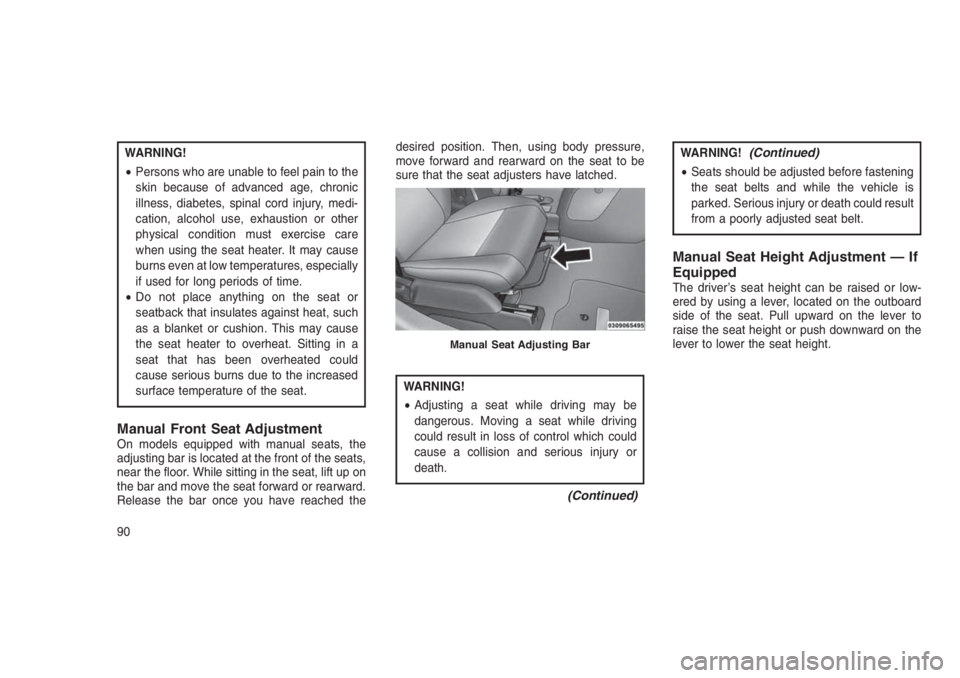
Manual Front Seat AdjustmentOn models equipped with manual seats, the
adjusting bar is located at the front of the seats,
near the floor. While sitting in the seat, lift up on
the bar and move the seat forward or rearward.
Release the bar once you have reached thedesired position. Then, using body pressure,
move forward and rearward on the seat to be
sure that the seat adjusters have latched.
WARNING!
•Adjusting a seat while driving may be
dangerous. Moving a seat while driving
could result in loss of control which could
cause a collision and serious injury or
death.
(Continued)
WARNING!(Continued)
•Seats should be adjusted before fastening
the seat belts and while the vehicle is
parked. Serious injury or death could result
from a poorly adjusted seat belt.
Manual Seat Height Adjustment — If
Equipped
The driver’s seat height can be raised or low-
ered by using a lever, located on the outboard
side of the seat. Pull upward on the lever to
raise the seat height or push downward on the
lever to lower the seat height.
Manual Seat Adjusting Bar
90
Page 95 of 332
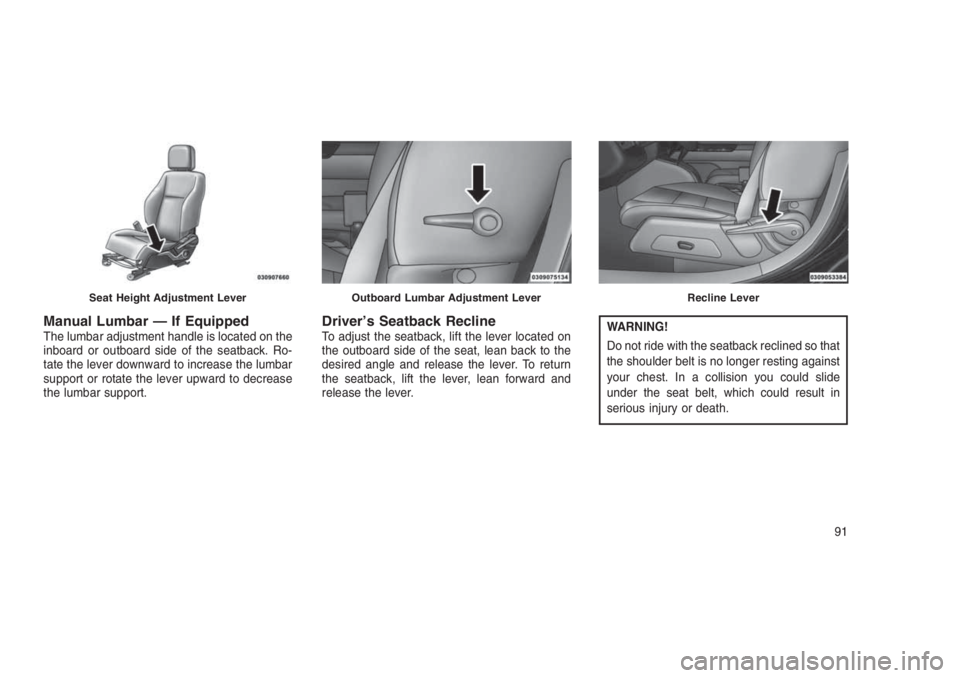
Manual Lumbar — If EquippedThe lumbar adjustment handle is located on the
inboard or outboard side of the seatback. Ro-
tate the lever downward to increase the lumbar
support or rotate the lever upward to decrease
the lumbar support.Driver’s Seatback ReclineTo adjust the seatback, lift the lever located on
the outboard side of the seat, lean back to the
desired angle and release the lever. To return
the seatback, lift the lever, lean forward and
release the lever.WARNING!
Do not ride with the seatback reclined so that
the shoulder belt is no longer resting against
your chest. In a collision you could slide
under the seat belt, which could result in
serious injury or death.
Seat Height Adjustment LeverOutboard Lumbar Adjustment LeverRecline Lever
91
Page 96 of 332
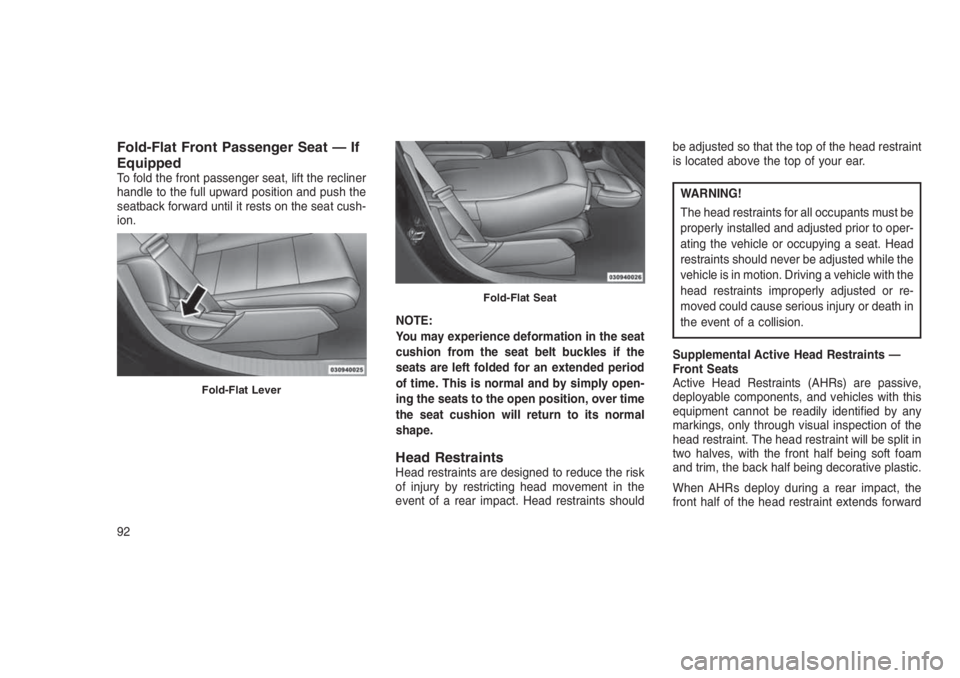
Fold-Flat Front Passenger Seat — If
Equipped
To fold the front passenger seat, lift the recliner
handle to the full upward position and push the
seatback forward until it rests on the seat cush-
ion.
NOTE:
You may experience deformation in the seat
cushion from the seat belt buckles if the
seats are left folded for an extended period
of time. This is normal and by simply open-
ing the seats to the open position, over time
the seat cushion will return to its normal
shape.
Head RestraintsHead restraints are designed to reduce the risk
of injury by restricting head movement in the
event of a rear impact. Head restraints shouldbe adjusted so that the top of the head restraint
is located above the top of your ear.
WARNING!
The head restraints for all occupants must be
properly installed and adjusted prior to oper-
ating the vehicle or occupying a seat. Head
restraints should never be adjusted while the
vehicle is in motion. Driving a vehicle with the
head restraints improperly adjusted or re-
moved could cause serious injury or death in
the event of a collision.
Supplemental Active Head Restraints —
Front Seats
Active Head Restraints (AHRs) are passive,
deployable components, and vehicles with this
equipment cannot be readily identified by any
markings, only through visual inspection of the
head restraint. The head restraint will be split in
two halves, with the front half being soft foam
and trim, the back half being decorative plastic.
When AHRs deploy during a rear impact, the
front half of the head restraint extends forward
Fold-Flat Lever
Fold-Flat Seat
92
Page 97 of 332
to minimize the gap between the back of the
occupant’s head and the AHR. This system is
designed to help prevent or reduce the extent of
injuries to the driver and front passenger in
certain types of rear impacts. Refer to “Occu-
pant Restraints” in “Things To Know Before
Starting Your Vehicle” for further information.
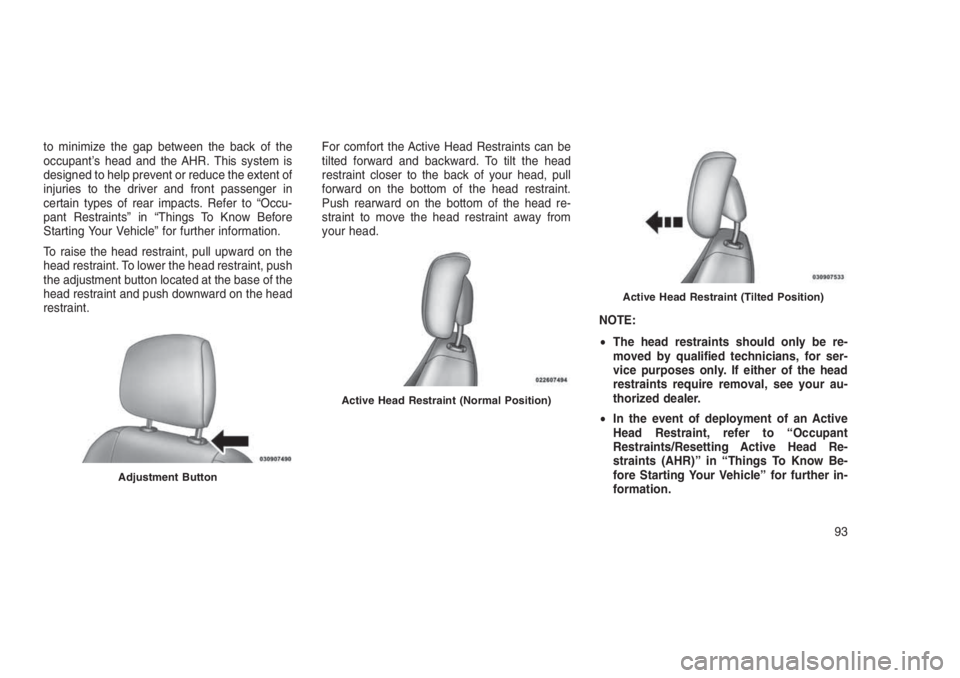
To raise the head restraint, pull upward on the
head restraint. To lower the head restraint, push
the adjustment button located at the base of the
head restraint and push downward on the head
restraint.For comfort the Active Head Restraints can be
tilted forward and backward. To tilt the head
restraint closer to the back of your head, pull
forward on the bottom of the head restraint.
Push rearward on the bottom of the head re-
straint to move the head restraint away from
your head.
NOTE:
•The head restraints should only be re-
moved by qualified technicians, for ser-
vice purposes only. If either of the head
restraints require removal, see your au-
thorized dealer.
•In the event of deployment of an Active
Head Restraint, refer to “Occupant
Restraints/Resetting Active Head Re-
straints (AHR)” in “Things To Know Be-
fore Starting Your Vehicle” for further in-
formation.
Adjustment Button
Active Head Restraint (Normal Position)
Active Head Restraint (Tilted Position)
93
Page 98 of 332
WARNING!
•All occupants, including the driver, should
not operate a vehicle or sit in a vehicle’s
seat until the head restraints are placed in
their proper positions in order to minimize
the risk of neck injury in the event of a
collision.
•
Do not place items over the top of the Active
Head Restraint, such as coats, seat covers
or portable DVD players. These items may
interfere with the operation of the Active
Head Restraint in the event of a collision and
could result in serious injury or death.
•Active Head Restraints may be deployed if
they are struck by an object such as a hand,
foot or loose cargo. To avoid accidental
deployment of the Active Head Restraint
ensure that all cargo is secured, as loose
cargo could contact the Active Head Re-
straint during sudden stops. Failure to follow
this warning could cause personal injury if
the Active Head Restraint is deployed.
Rear Head Restraints
The head restraints in the rear are non adjust-
able. Refer to “Occupant Restraints” in “Things
To Know Before Starting Your Vehicle” for infor-
mation on Tether routing.
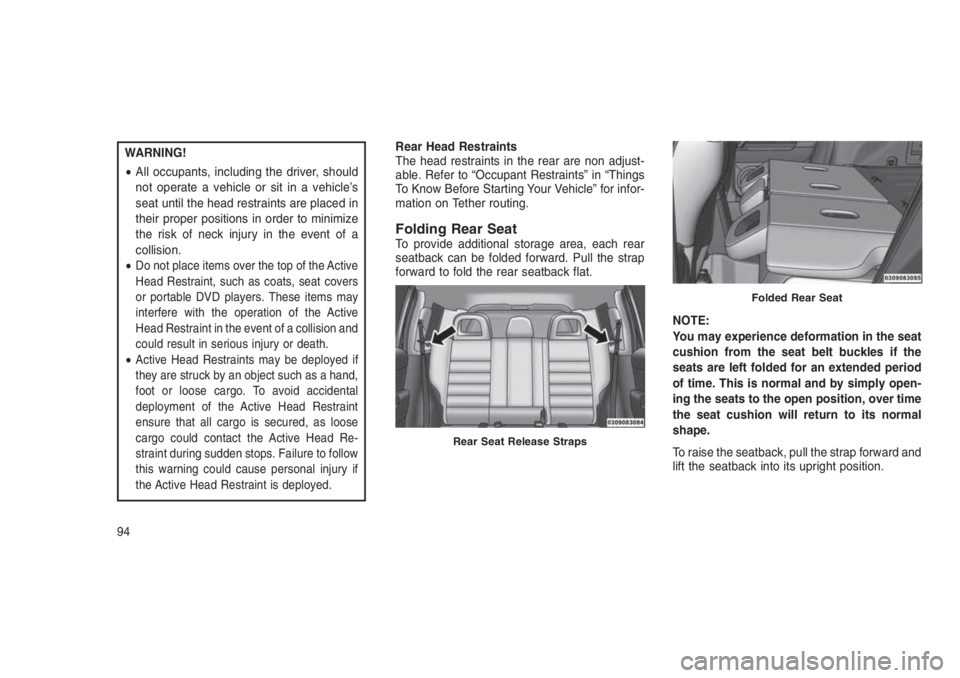
Folding Rear SeatTo provide additional storage area, each rear
seatback can be folded forward. Pull the strap
forward to fold the rear seatback flat.
NOTE:
You may experience deformation in the seat
cushion from the seat belt buckles if the
seats are left folded for an extended period
of time. This is normal and by simply open-
ing the seats to the open position, over time
the seat cushion will return to its normal
shape.
To raise the seatback, pull the strap forward and
lift the seatback into its upright position.
Rear Seat Release Straps
Folded Rear Seat
94
Page 99 of 332
WARNING!
Be certain that the seatback is securely
locked into position. If the seatback is not
securely locked into position the seat will not
provide the proper stability for child seats
and/or passengers. An improperly latched
seat could cause serious injury.
Reclining Rear Seat — If EquippedFor additional comfort, pull the strap forward
just enough to release the seatback latch. Then
push the seatback to a reclined position, ap-
proximately 35 degrees maximum, and release
the strap.
WARNING!
Do not ride with the seatback reclined so that
the shoulder belt is no longer resting against
your chest. In a collision you could slide
under the seat belt and be seriously or even
fatally injured. Use the recliner only when the
vehicle is parked.
TO OPEN AND CLOSE THE
HOOD
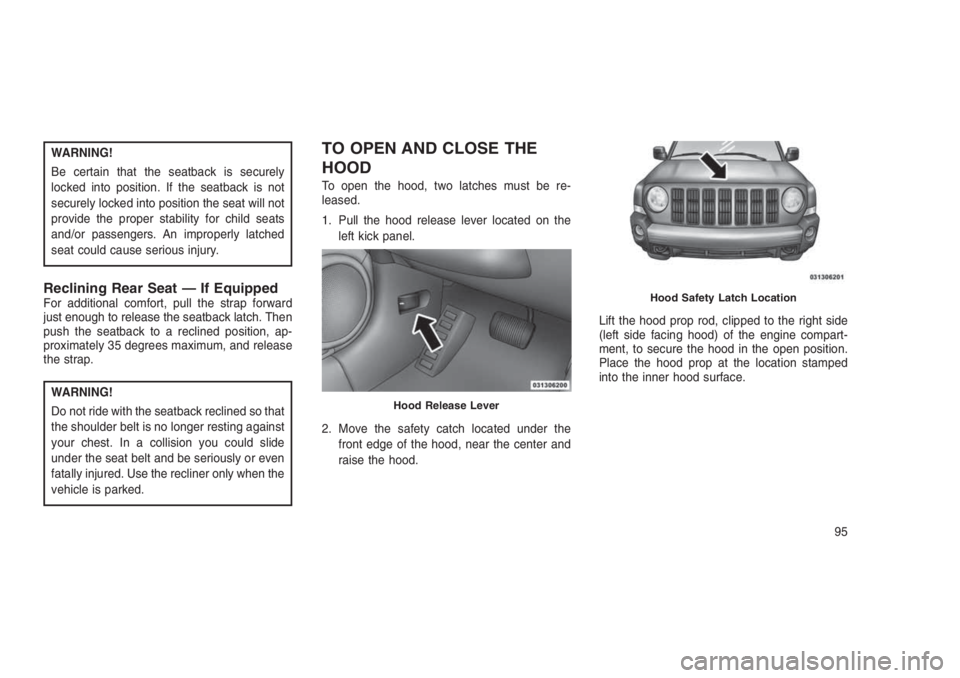
To open the hood, two latches must be re-
leased.
1. Pull the hood release lever located on the
left kick panel.
2. Move the safety catch located under the
front edge of the hood, near the center and
raise the hood.Lift the hood prop rod, clipped to the right side
(left side facing hood) of the engine compart-
ment, to secure the hood in the open position.
Place the hood prop at the location stamped
into the inner hood surface.
Hood Release Lever
Hood Safety Latch Location
95
Page 100 of 332

CAUTION!
To prevent possible damage:
•Before closing hood, make sure the hood
prop rod is fully seated into its storage
retaining clips.
•
Do not slam the hood to close it. Use a firm
downward push at the center front edge of the
hood to ensure that both latches engage.
Never drive your vehicle unless the hood is
fully closed, with both latches engaged.
WARNING!
Be sure the hood is fully latched before
driving your vehicle. If the hood is not fully
latched, it could open when the vehicle is in
motion and block your vision. Failure to
follow this warning could result in serious
injury or death.
LIGHTS
Multifunction LeverThe multifunction lever controls the operation of
the headlights, position lights, side marker
lights, turn signals, headlight beam selection,
instrument panel light dimming, interior lights,
the passing lights and fog lights. The lever is
located on the left side of the steering column.Headlights And Parking LightsTurn the end of the multifunction lever to the first
detent to activate parking lights. Turn to the
second detent for headlight operation.
Prop Rod LocationMultifunction Lever
96