JEEP RENEGADE 2015 1.G Owners Manual
Manufacturer: JEEP, Model Year: 2015, Model line: RENEGADE, Model: JEEP RENEGADE 2015 1.GPages: 678, PDF Size: 29.84 MB
Page 631 of 678
•Sound Horn With Lock
When this feature is selected, the horn will sound when
the door locks are activated. To make your selection,
press the “Sound Horn With Remote Lock” button on the
touchscreen, then choose “1st Press” “2nd Press” or
“Off.” The button will highlight indicating that the
setting has been selected. Press the back arrow/Done
button on the touchscreen to return to the previous
menu.
•Sound Horn With Remote Start
When this feature is selected, the horn will sound when
the Remote Start is activated. To make your selection,
press the “Sound Horn With Remote Start” button on the
touchscreen, then choose “On” or “Off.” The button will
highlight indicating that the setting has been selected.
Press the back arrow/Done button on the touchscreen to
return to the previous menu.
•Remote Door Unlock
This feature will allow you to program your remote door
locks to open “All” or only the “Driver” with the first
push of the Remote Keyless Entry (RKE) transmitter or
grabbing the Passive Entry door handle. To make your
selection, press the “Remote Door Unlock” button on the
touchscreen and choose from “All” or “Driver.” Press the
back arrow/Done button on the touchscreen to return to
the previous menu.
NOTE:If “Driver Door” is selected, the (RKE) transmitter
will have to be pushed two times in order to unlock all
doors.
•Passive Entry
This feature allows you to lock and unlock the vehicles
door(s) without having to press the Remote Keyless
Entry (RKE) transmitter lock or unlock buttons. To make
your selection, press the “Passive Entry” button on the11
MULTIMEDIA 629
Page 632 of 678
touchscreen, then choose “On” or “Off.” The button will
highlight indicating that the setting has been selected.
Press the back arrow/Done button on the touchscreen to
return to the previous menu.
•Memory Linked To Key Fob — If Equipped
This feature provides automatic driver seat positioning to
enhance driver mobility when entering and exiting the
vehicle. To make your selection, press the “Memory
Linked To Key Fob” button on the touchscreen and select
from “On” or “Off.” Press the back arrow button on the
touchscreen to return to the previous menu.
NOTE:The seat will return to the memorized seat
location (if Recall Memory with Remote Key Unlock is set
to ON) when the Remote Keyless Entry (RKE) transmitter
is used to unlock the door.
Engine Off Options
After pressing the “Engine Off Options” button on the
touchscreen the following settings will be available:
•Radio Off Delay
When this feature is selected, the radio will stay on for a
preset time after the ignition key is turned to STOP/OFF.
To change the Radio Off Delay status, press the “0 MIN”
or “20 MIN” button on the touchscreen to select your
desired time interval. Press the back arrow button on the
touchscreen to return to the previous menu.
•Headlight Off Delay — If Equipped
When this feature is selected, the driver can choose to
have the headlights remain on for 0, 30, 60, or 90 seconds
when exiting the vehicle. To change the Headlight Off
630 MULTIMEDIA
Page 633 of 678
Delay status press the “+” or “–” button on the touch-
screen to select your desired time interval. Press the back
arrow button on the touchscreen to return to the previous
menu.
•Engine Off Power Delay — If Equipped
When this feature is selected, the power window
switches, radio, Uconnect® phone system (if equipped),
DVD video system (if equipped), power sunroof (if
equipped), and power outlets will remain active for up to
10 minutes after the ignition is cycled to OFF. Opening
either front door will cancel this feature. To change the
Engine Off Power Delay status press the “0 seconds,” “45
seconds,” “5 minutes” or “10 minutes” button on the
touchscreen. Press the back arrow button on the touch-
screen to return to the previous menu.
Audio
After pressing the “Audio” button on the touchscreen the
following settings will be available:
•Balance/Fade
When in this display you may adjust the Balance and
Fade settings. Press and drag the speaker icon, use the
arrows to adjust, or tap the speaker icon to readjust to the
center.
•Equalizer
When in this display you may adjust the Bass, Mid and
Treble settings. Adjust the settings with the “+” and “–”
buttons on the touchscreen or by selecting any point on
the scale between the “+” and “–” buttons on the
touchscreen. Then press the back arrow button on the
touchscreen.
NOTE:Bass/Mid/Treble allow you to simply slide your
finger up or down to change the setting as well as press
directly on the desired setting.
11
MULTIMEDIA 631
Page 634 of 678
•Speed Adjusted Volume
This feature increases or decreases volume relative to
vehicle speed. To change the Speed Adjusted Volume
press the “Off,” “1,” “2” or ”3” button on the touchscreen.
Then press the back arrow button on the touchscreen.
•Surround Sound — If Equipped
This feature provides simulated surround sound mode.
To make your selection, press the “Surround Sound”
button on the touchscreen, select On or Off followed by
pressing the back arrow button on the touchscreen.
•AUX Volume Offset — If Equipped
This feature provides the ability to tune the audio level
for portable devices connected through the AUX input.
To make your selection, press the “AUX Volume Offset”
button on the touchscreen, select any point on the scale
between the “+” and “–” buttons on the touchscreen
followed by pressing the back arrow button on the
touchscreen.
•Auto-On Radio
The Radio automatically turns on when vehicle is in run
or will recall whether it was on or off at last ignition off.
To make your selection, press the “Loudness” button on
the touchscreen, select “On,” “Off” or “Recall Last”
followed by pressing the back arrow button on the
touchscreen.
Phone/Bluetooth®
After pressing the “Phone/Bluetooth®” button on the
touchscreen the following settings will be available:
•Paired Phones
This feature shows which mobile phones are paired to the
Phone/Bluetooth® system.
632 MULTIMEDIA
Page 635 of 678
•Paired Audio Sources
This feature shows which audio devices are paired to the
Phone/Bluetooth® system.
SiriusXM Setup — If Equipped
After pressing the “SiriusXM Setup” button on the touch-
screen, the following settings will be available:
•Channel Skip
SiriusXM can be programmed to designate a group of
channels that are the most desirable to listen to or to
exclude undesirable channels while scanning. To make
your selection, press the “Channel Skip” button on the
touchscreen, select the channels you would like to skip
followed by pressing the back arrow button on the
touchscreen.
•Subscription Information
New vehicle purchasers or lessees will receive a free
limited time subscription to SiriusXM Satellite Radio
with your radio. Following the expiration of the free
services, it will be necessary to access the information on
the Subscription Information screen to re-subscribe.
Press the “Subscription Info” button on the touchscreen
to access the Subscription Information screen.
Write down the SIRIUS ID numbers for your receiver. To
reactivate your service, either call the number listed on
the screen or visit the provider online.
NOTE:SiriusXM Travel Link is a separate subscription
and is available for U.S. residents only.
11
MULTIMEDIA 633
Page 636 of 678
Restore Settings Defaults
After pressing the “Restore Settings Defaults” button on
the touchscreen the following settings will be available:
•Restore Settings
When this feature is selected it will reset Display, Clock,
Audio, and Radio Settings to their default. Once in the
desired mode, press and release the preferred setting and
make your selection. Press the back arrow button on the
touchscreen.
Clear Personal Data
After pressing the “Clear Personal Data Settings” button
on the touchscreen the following settings will be avail-
able:
•Clear Personal Data
When this feature is selected it will remove personal data
including Bluetooth® devices and presets. To Clear Personal
Data press the “Yes” or “No” button on the touchscreen.
Press the back arrow button on the touchscreen.
Uconnect® RADIOS
For detailed information about your Uconnect® radio,
refer to your Uconnect® Supplement Manual.
634 MULTIMEDIA
Page 637 of 678
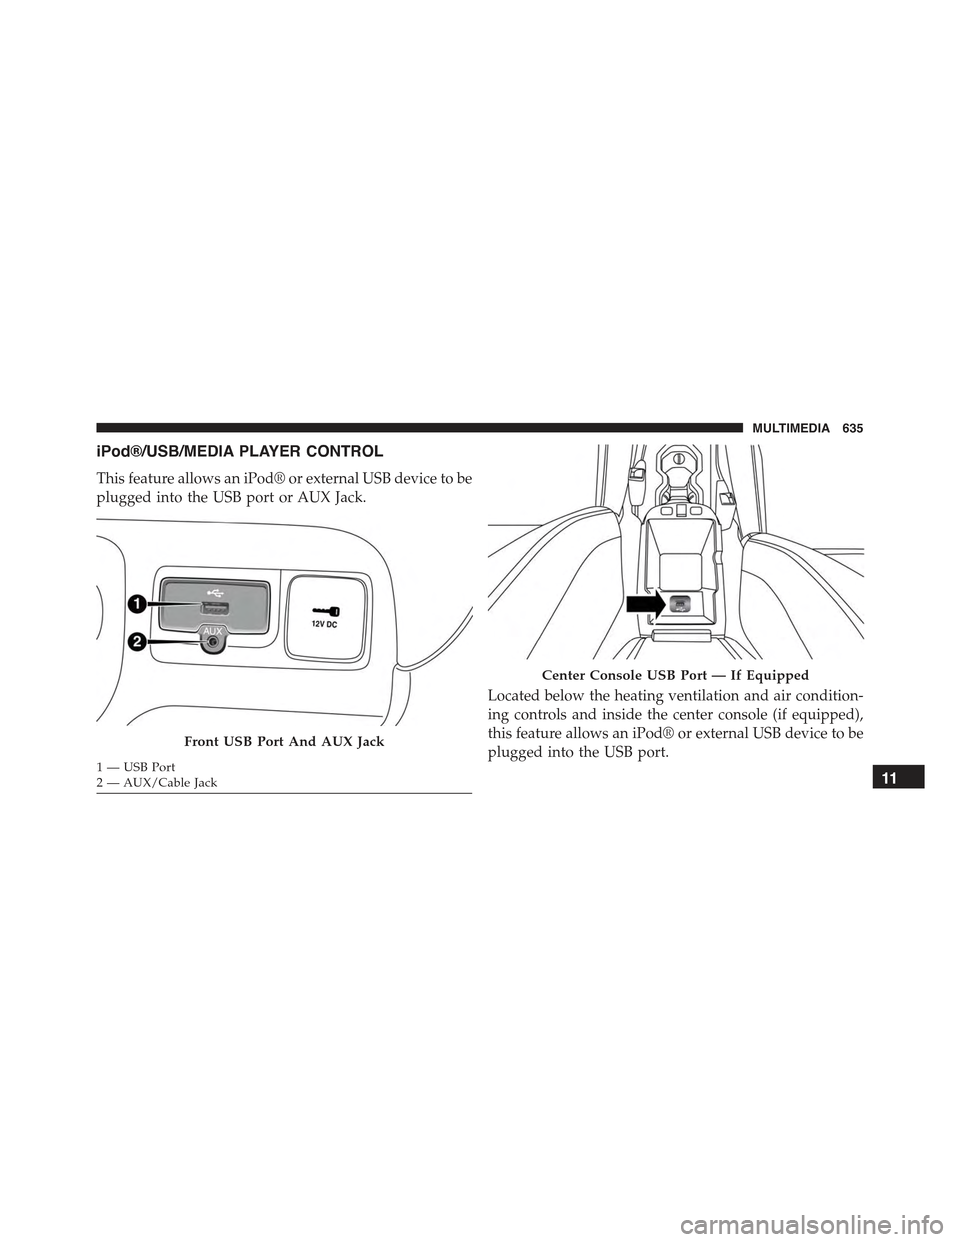
iPod®/USB/MEDIA PLAYER CONTROL
This feature allows an iPod® or external USB device to be
plugged into the USB port or AUX Jack.
Located below the heating ventilation and air condition-
ing controls and inside the center console (if equipped),
this feature allows an iPod® or external USB device to be
plugged into the USB port.Front USB Port And AUX Jack
1—USBPort2—AUX/CableJack
Center Console USB Port — If Equipped
11
MULTIMEDIA 635
Page 638 of 678
iPod® control supports Mini, 4G, Photo, Nano, 5G iPod®
and iPhone® devices. Some iPod® software versions
may not fully support the iPod® control features. Please
visit Apple’s website for software updates.
Refer to the Uconnect® 5.0/6.5 User’s Manual for iPod®
and external USB support capability.
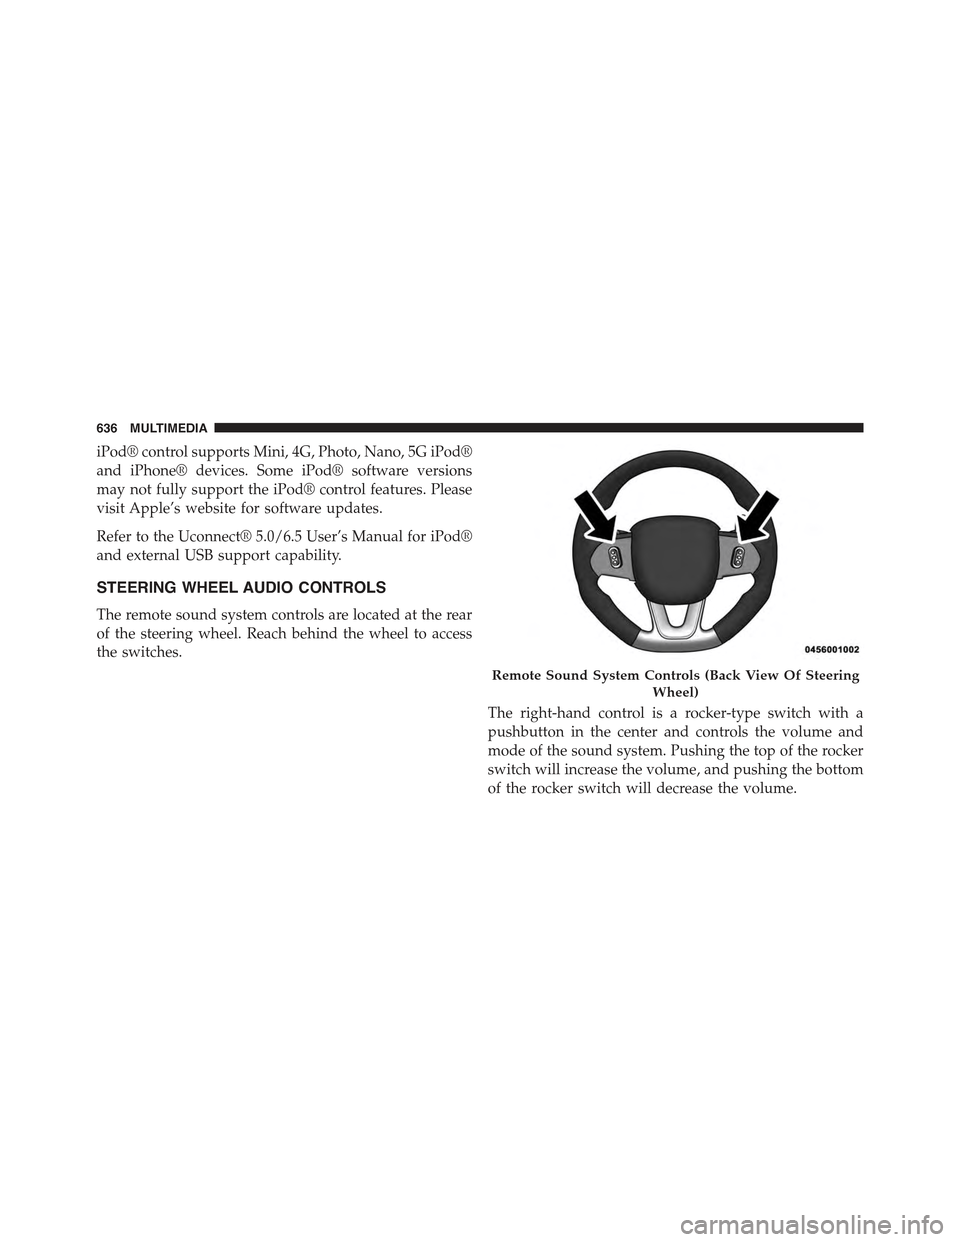
STEERING WHEEL AUDIO CONTROLS
The remote sound system controls are located at the rear
of the steering wheel. Reach behind the wheel to access
the switches.
The right-hand control is a rocker-type switch with a
pushbutton in the center and controls the volume and
mode of the sound system. Pushing the top of the rocker
switch will increase the volume, and pushing the bottom
of the rocker switch will decrease the volume.
Remote Sound System Controls (Back View Of Steering
Wheel)
636 MULTIMEDIA
Page 639 of 678
Pushing the center button will make the radio switch
between the various modes available (AM/FM/SAT/
AUX/Media Player, etc.) and can also be used to select/
enter an item while scrolling through menu.
The left-hand control is a rocker-type switch with a
pushbutton in the center. The function of the left-hand
control is different depending on which mode you are in.
The following describes the left-hand control operation in
each mode.
Radio Operation
Pushing the top of the switch will “Seek” up for the next
listenable station and pushing the bottom of the switch
will “Seek” down for the next listenable station.
The button located in the center of the left-hand control
will tune to the next preset station that you have pro-
grammed in the radio preset button.
Media Mode
Pushing the top of the switch once will go to the next
track on the selected media (AUX/USB, Bluetooth®).
Pushing the bottom of the switch once will go to the
beginning of the current track, or to the beginning of the
previous track if it is within eight seconds after the
current track begins to play.
If you push the switch up or down twice, it plays the
second track; three times, it will play the third, etc.
RADIO OPERATION AND MOBILE PHONES
Under certain conditions, the mobile phone being on in
your vehicle can cause erratic or noisy performance from
your radio. This condition may be lessened or eliminated
by relocating the mobile phone antenna. This condition is
not harmful to the radio. If your radio performance does
not satisfactorily “clear” by the repositioning of the11
MULTIMEDIA 637
Page 640 of 678
antenna, it is recommended that the radio volume be
turned down or off during mobile phone operation when
not using Uconnect® (if equipped).
Regulatory And Safety Information
USA/CANADA
Exposure to Radio Frequency Radiation
The radiated output power of the internal wireless radio
is far below the FCC radio frequency exposure limits.
Nevertheless, the wireless radio will be used in such a
manner that the radio is 20 cm or further from the human
body.
The internal wireless radio operates within guidelines
found in radio frequency safety standards and recom-
mendations, which reflect the consensus of the scientific
community.
The radio manufacturer believes the internal wireless
radio is safe for use by consumers. The level of energy
emitted is far less than the electromagnetic energy emit-
ted by wireless devices such as mobile phones. However,
the use of wireless radios may be restricted in some
situations or environments, such as aboard airplanes. If
you are unsure of restrictions, you are encouraged to ask
for authorization before turning on the wireless radio.
This device complies with Part 15 of the FCC Rules and
with Industry Canada license-exempt RSS standard(s).
Operation is subject to the following two conditions:
1. This device may not cause harmful interference.
2. This device must accept any interference received,
including interference that may cause undesired op-
eration.
Le présent appareil est conforme aux CNR d’Industrie
Canada applicables aux appareils radio exempts de li-
cence. L’exploitation est autorisée aux deux conditions
suivantes: (1) l’appareil ne doit pas produire de brouil-
lage, et (2) l’utilisateur de l’appareil doit accepter tout
638 MULTIMEDIA