door JEEP RENEGADE 2015 1.G Owner's Manual
[x] Cancel search | Manufacturer: JEEP, Model Year: 2015, Model line: RENEGADE, Model: JEEP RENEGADE 2015 1.GPages: 220, PDF Size: 34.11 MB
Page 164 of 220
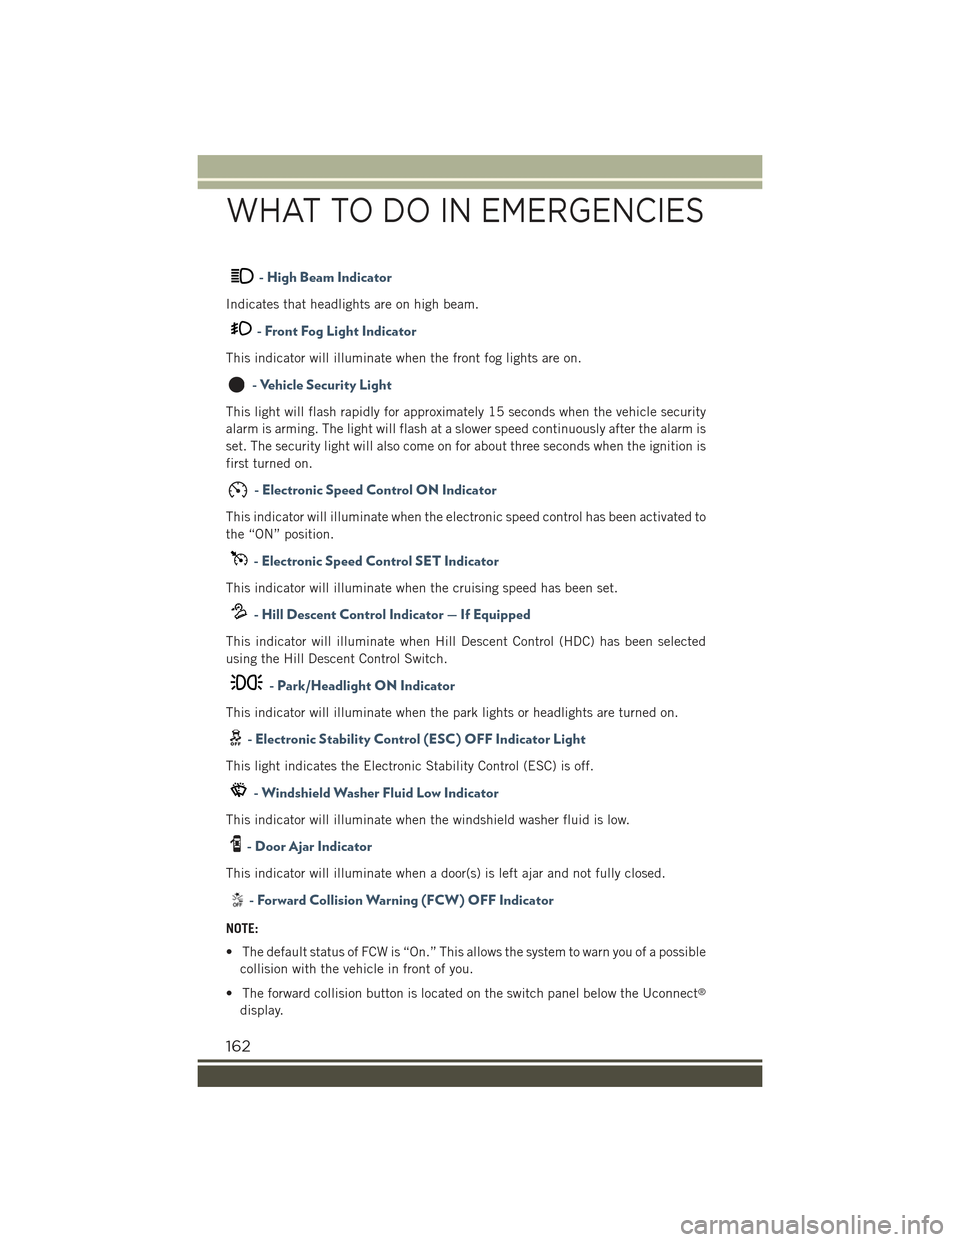
- High Beam Indicator
Indicates that headlights are on high beam.
- Front Fog Light Indicator
This indicator will illuminate when the front fog lights are on.
- Vehicle Security Light
This light will flash rapidly for approximately 15 seconds when the vehicle security
alarm is arming. The light will flash at a slower speed continuously after the alarm is
set. The security light will also come on for about three seconds when the ignition is
first turned on.
- Electronic Speed Control ON Indicator
This indicator will illuminate when the electronic speed control has been activated to
the “ON” position.
- Electronic Speed Control SET Indicator
This indicator will illuminate when the cruising speed has been set.
- Hill Descent Control Indicator — If Equipped
This indicator will illuminate when Hill Descent Control (HDC) has been selected
using the Hill Descent Control Switch.
- Park/Headlight ON Indicator
This indicator will illuminate when the park lights or headlights are turned on.
- Electronic Stability Control (ESC) OFF Indicator Light
This light indicates the Electronic Stability Control (ESC) is off.
- Windshield Washer Fluid Low Indicator
This indicator will illuminate when the windshield washer fluid is low.
- Door Ajar Indicator
This indicator will illuminate when a door(s) is left ajar and not fully closed.
- Forward Collision Warning (FCW) OFF Indicator
NOTE:
• The default status of FCW is “On.” This allows the system to warn you of a possible
collision with the vehicle in front of you.
• The forward collision button is located on the switch panel below the Uconnect®
display.
WHAT TO DO IN EMERGENCIES
162
Page 179 of 220
CAUTION!
• Racing the engine or spinning the wheels may lead to transmission overheatingand failure. Allow the engine to idle with the transmission in NEUTRAL for atleast one minute after every five rocking-motion cycles. This will minimizeoverheating and reduce the risk of clutch or transmission failure duringprolonged efforts to free a stuck vehicle.
• When “rocking” a stuck vehicle by shifting between DRIVE/2nd gear and
REVERSE, do not spin the wheels faster than 15 mph (24 km/h), or drivetrain
damage may result.
• Revving the engine or spinning the wheels too fast may lead to transmission
overheating and failure. It can also damage the tires. Do not spin the wheels
above 30 mph (48 km/h) while in gear (no transmission shifting occurring).
WARNING!
Fast spinning tires can be dangerous. Forces generated by excessive wheel speeds
may cause damage, or even failure, of the axle and tires. A tire could explode and
injure someone. Do not spin your vehicle's wheels faster than 30 mph (48 km/h)
or for longer than 30 seconds continuously without stopping when you are stuck
and do not let anyone near a spinning wheel, no matter what the speed.
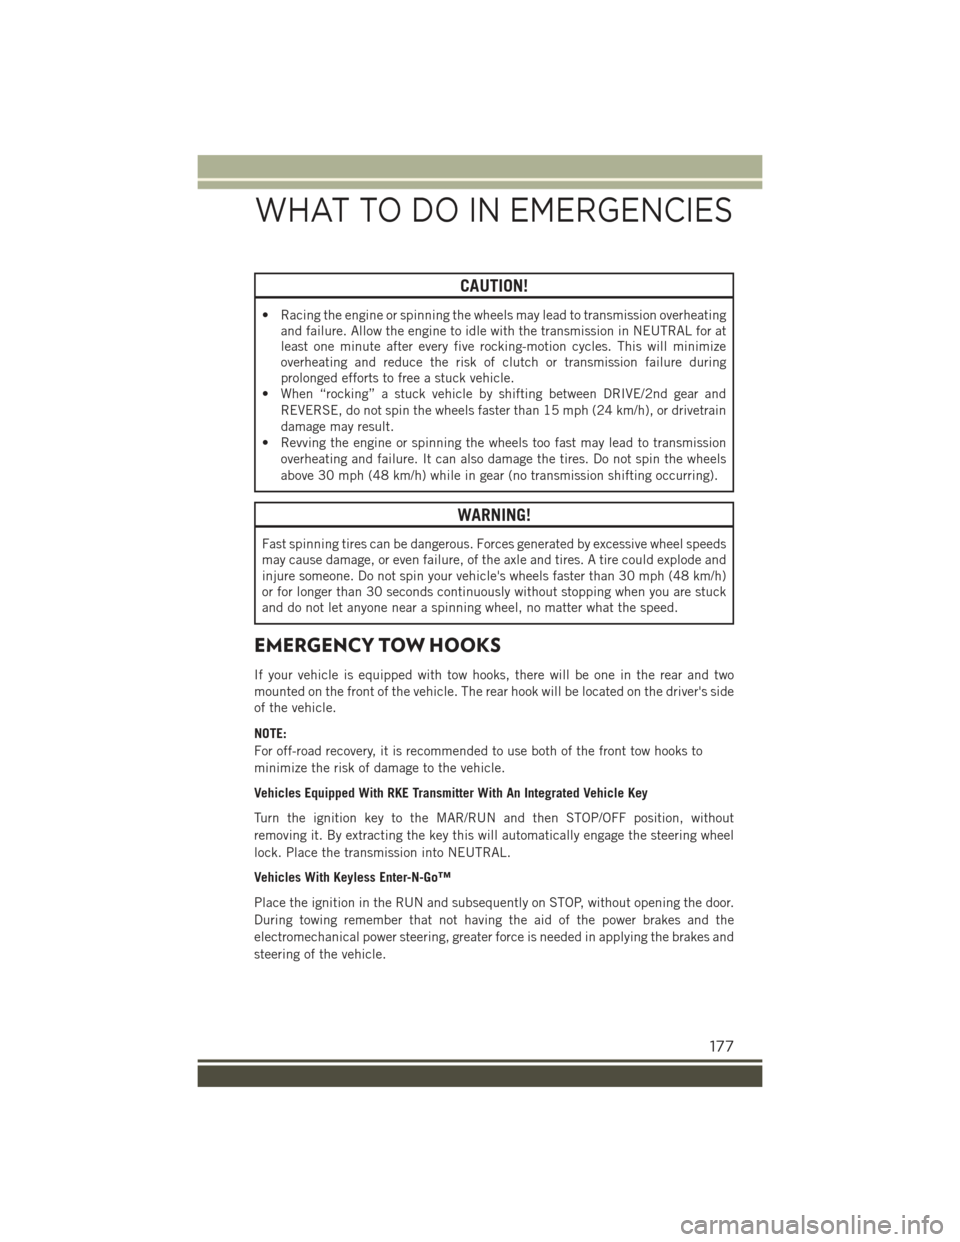
EMERGENCY TOW HOOKS
If your vehicle is equipped with tow hooks, there will be one in the rear and two
mounted on the front of the vehicle. The rear hook will be located on the driver's side
of the vehicle.
NOTE:
For off-road recovery, it is recommended to use both of the front tow hooks to
minimize the risk of damage to the vehicle.
Vehicles Equipped With RKE Transmitter With An Integrated Vehicle Key
Turn the ignition key to the MAR/RUN and then STOP/OFF position, without
removing it. By extracting the key this will automatically engage the steering wheel
lock. Place the transmission into NEUTRAL.
Vehicles With Keyless Enter-N-Go™
Place the ignition in the RUN and subsequently on STOP, without opening the door.
During towing remember that not having the aid of the power brakes and the
electromechanical power steering, greater force is needed in applying the brakes and
steering of the vehicle.
WHAT TO DO IN EMERGENCIES
177
Page 189 of 220
E85 FLEXIBLE FUEL — 2.4L ENGINE ONLY
Refer to your Owner's Manual on the DVD for further details.
CAUTION!
Only vehicles with the E-85 fuel filler door label or a yellow gas cap can operate on
E-85.
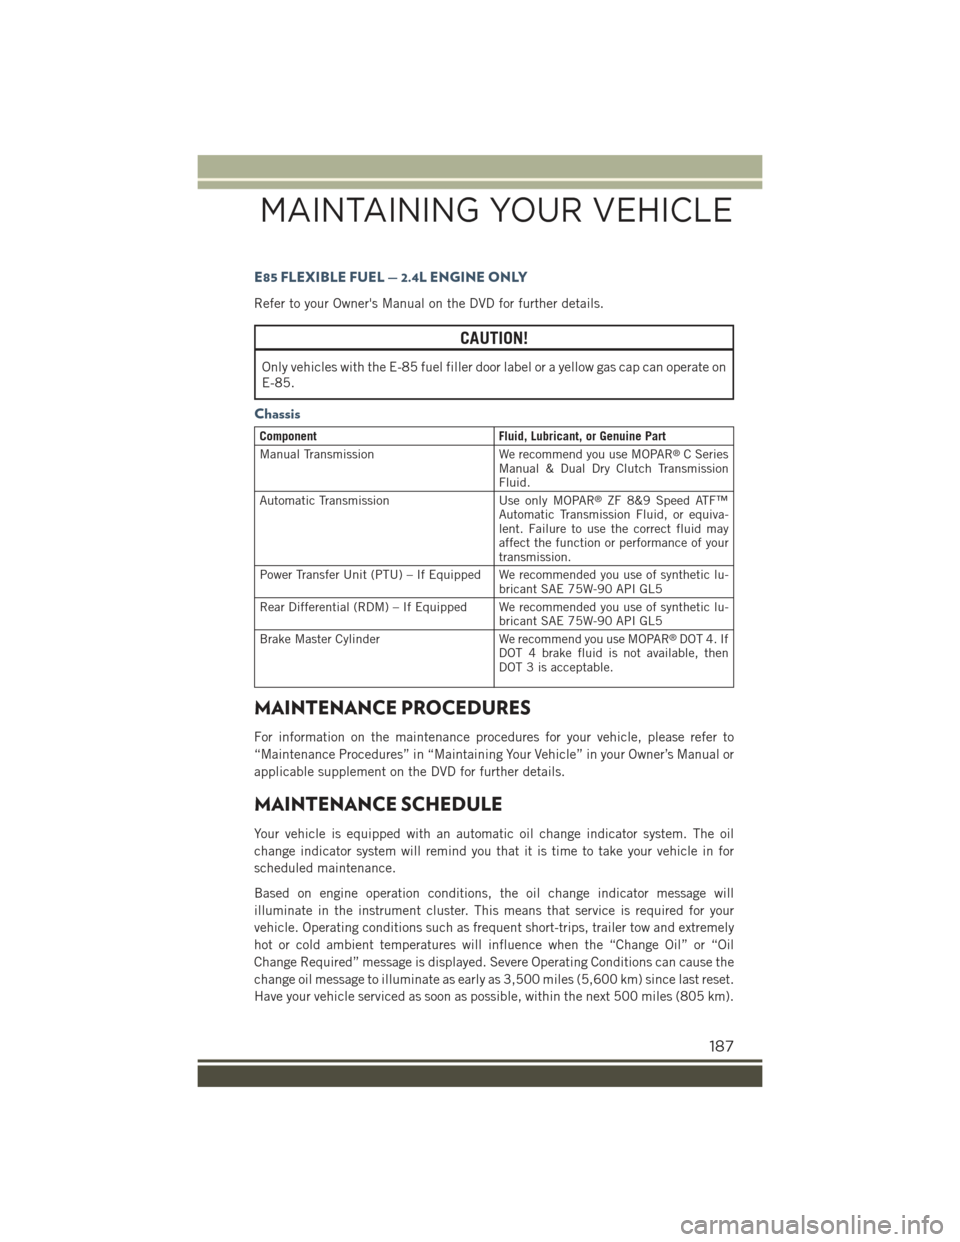
Chassis
ComponentFluid, Lubricant, or Genuine Part
Manual TransmissionWe recommend you use MOPAR®C SeriesManual & Dual Dry Clutch TransmissionFluid.
Automatic TransmissionUse only MOPAR®ZF 8&9 Speed ATF™Automatic Transmission Fluid, or equiva-lent. Failure to use the correct fluid mayaffect the function or performance of yourtransmission.
Power Transfer Unit (PTU) – If Equipped We recommended you use of synthetic lu-bricant SAE 75W-90 API GL5
Rear Differential (RDM) – If Equipped We recommended you use of synthetic lu-bricant SAE 75W-90 API GL5
Brake Master CylinderWe recommend you use MOPAR®DOT 4. IfDOT 4 brake fluid is not available, thenDOT 3 is acceptable.
MAINTENANCE PROCEDURES
For information on the maintenance procedures for your vehicle, please refer to
“Maintenance Procedures” in “Maintaining Your Vehicle” in your Owner’s Manual or
applicable supplement on the DVD for further details.
MAINTENANCE SCHEDULE
Your vehicle is equipped with an automatic oil change indicator system. The oil
change indicator system will remind you that it is time to take your vehicle in for
scheduled maintenance.
Based on engine operation conditions, the oil change indicator message will
illuminate in the instrument cluster. This means that service is required for your
vehicle. Operating conditions such as frequent short-trips, trailer tow and extremely
hot or cold ambient temperatures will influence when the “Change Oil” or “Oil
Change Required” message is displayed. Severe Operating Conditions can cause the
change oil message to illuminate as early as 3,500 miles (5,600 km) since last reset.
Have your vehicle serviced as soon as possible, within the next 500 miles (805 km).
MAINTAINING YOUR VEHICLE
187
Page 200 of 220
Rear Cargo Fuse/Relay Distribution Unit
To access the fuses, remove the access door from the left rear panel of the rear cargo
area.
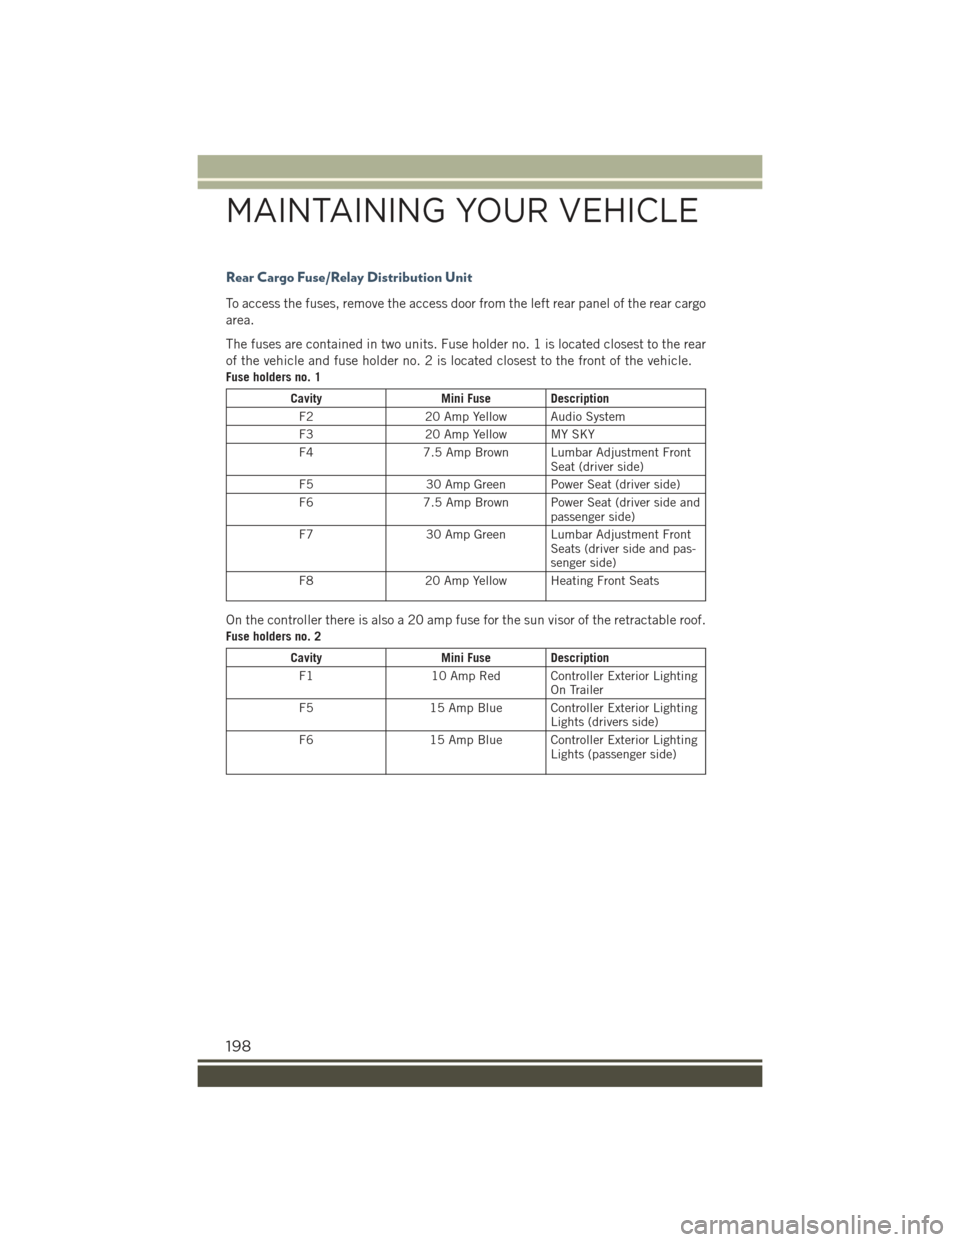
The fuses are contained in two units. Fuse holder no. 1 is located closest to the rear
of the vehicle and fuse holder no. 2 is located closest to the front of the vehicle.
Fuse holders no. 1
CavityMini Fuse Description
F220 Amp Yellow Audio System
F320 Amp Yellow MY SKY
F47.5 Amp Brown Lumbar Adjustment FrontSeat (driver side)
F530 Amp Green Power Seat (driver side)
F67.5 Amp Brown Power Seat (driver side andpassenger side)
F730 Amp Green Lumbar Adjustment FrontSeats (driver side and pas-senger side)
F820 Amp Yellow Heating Front Seats
On the controller there is also a 20 amp fuse for the sun visor of the retractable roof.
Fuse holders no. 2
CavityMini Fuse Description
F110 Amp Red Controller Exterior LightingOn Trailer
F515 Amp Blue Controller Exterior LightingLights (drivers side)
F615 Amp Blue Controller Exterior LightingLights (passenger side)
MAINTAINING YOUR VEHICLE
198
Page 201 of 220
ADDING FUEL
The Capless Fuel System uses a flapper placed at the filler pipe of the fuel tank; it
opens and closes automatically upon insertion/extraction of the fuel nozzle.
The Capless Fuel System is designed so that it prevents the filling of an incorrect type
of fuel.
Opening The Door
For filling proceed as follows:
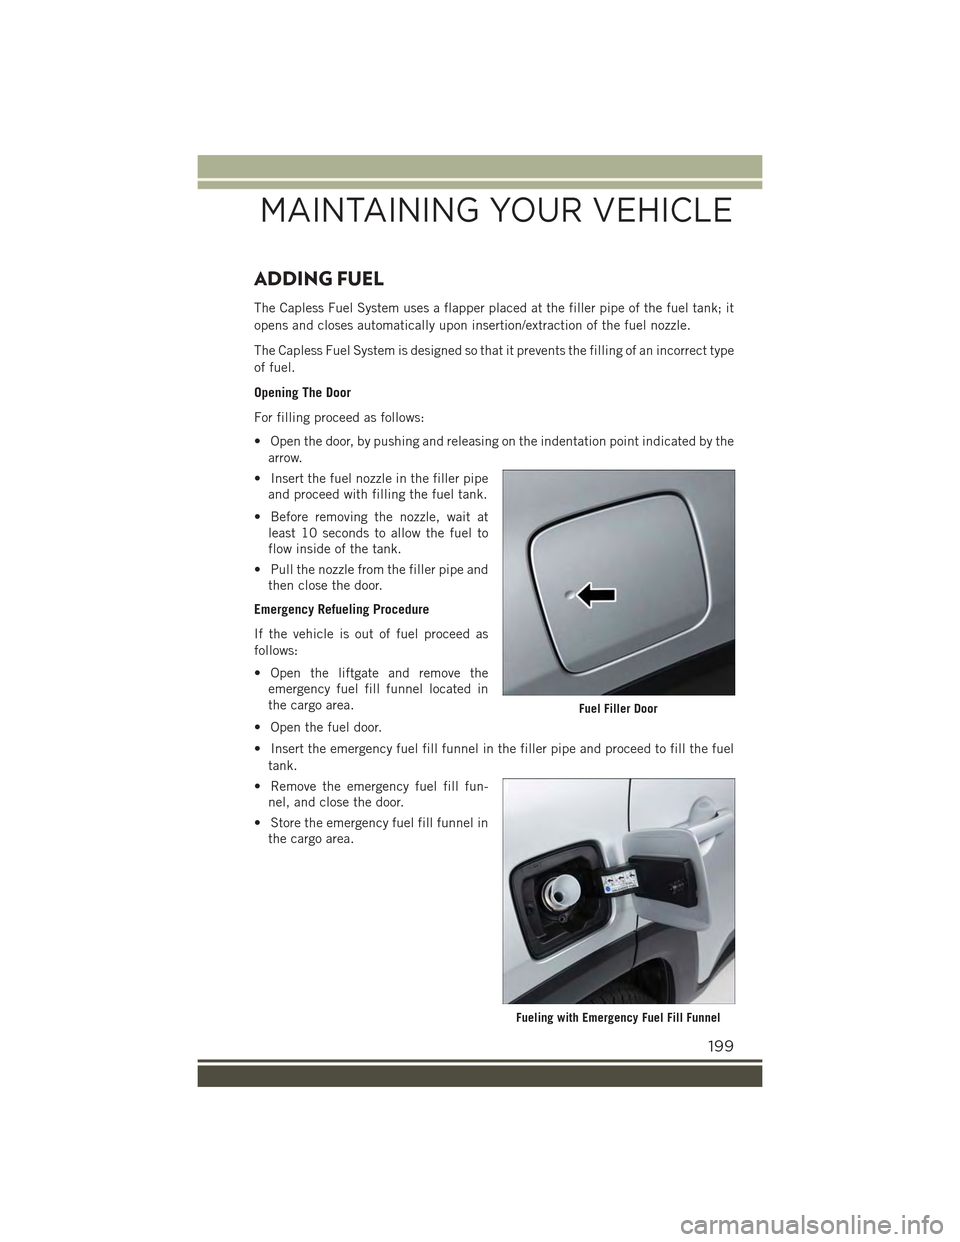
• Open the door, by pushing and releasing on the indentation point indicated by the
arrow.
• Insert the fuel nozzle in the filler pipe
and proceed with filling the fuel tank.
• Before removing the nozzle, wait at
least 10 seconds to allow the fuel to
flow inside of the tank.
• Pull the nozzle from the filler pipe and
then close the door.
Emergency Refueling Procedure
If the vehicle is out of fuel proceed as
follows:
• Open the liftgate and remove the
emergency fuel fill funnel located in
the cargo area.
• Open the fuel door.
• Insert the emergency fuel fill funnel in the filler pipe and proceed to fill the fuel
tank.
• Remove the emergency fuel fill fun-
nel, and close the door.
• Store the emergency fuel fill funnel in
the cargo area.
Fuel Filler Door
Fueling with Emergency Fuel Fill Funnel
MAINTAINING YOUR VEHICLE
199
Page 202 of 220
WARNING!
• Do not to affix objects/plugs to the end of the filler neck other than is provided
on the car.
• The use of objects/plugs do not comply with the vehicle and may cause
pressure increases inside the tank, creating dangerous conditions.
• Do not approach the neck of the tank with open flames or lit cigarettes its an
extreme fire hazard. Also, avoid close contact with the filler pipe with your face,
do not inhale harmful vapors.
• Do not use your mobile phone in the vicinity of the pump fuel nozzle, it can be
a possible risk of fire.
TIRE PRESSURES
Check the inflation pressure of each tire, including the spare tire (if equipped), at
least monthly and inflate to the recommended pressure for your vehicle.
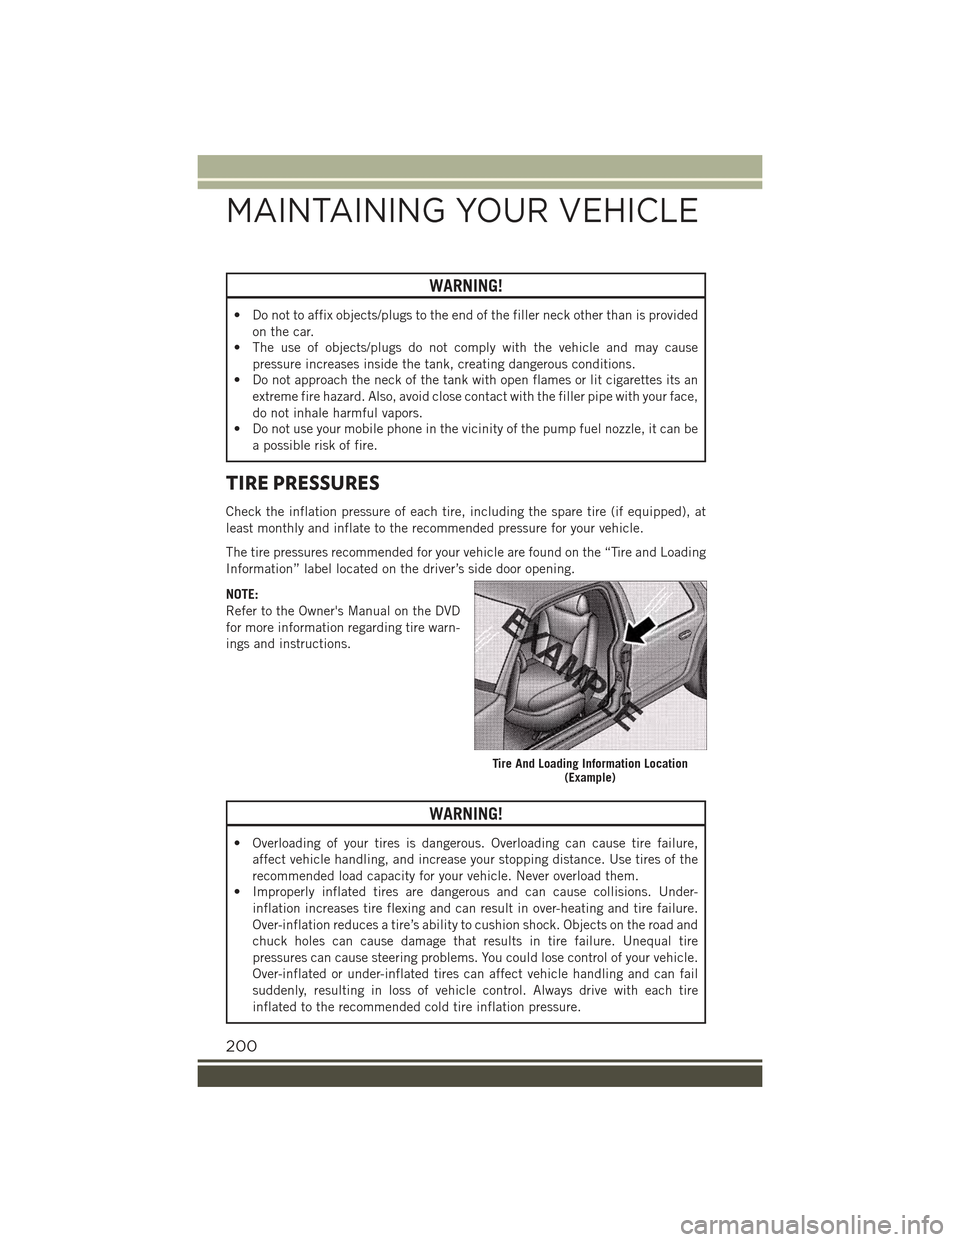
The tire pressures recommended for your vehicle are found on the “Tire and Loading
Information” label located on the driver’s side door opening.
NOTE:
Refer to the Owner's Manual on the DVD
for more information regarding tire warn-
ings and instructions.
WARNING!
• Overloading of your tires is dangerous. Overloading can cause tire failure,
affect vehicle handling, and increase your stopping distance. Use tires of the
recommended load capacity for your vehicle. Never overload them.
• Improperly inflated tires are dangerous and can cause collisions. Under-
inflation increases tire flexing and can result in over-heating and tire failure.
Over-inflation reduces a tire’s ability to cushion shock. Objects on the road and
chuck holes can cause damage that results in tire failure. Unequal tire
pressures can cause steering problems. You could lose control of your vehicle.
Over-inflated or under-inflated tires can affect vehicle handling and can fail
suddenly, resulting in loss of vehicle control. Always drive with each tire
inflated to the recommended cold tire inflation pressure.
Tire And Loading Information Location(Example)
MAINTAINING YOUR VEHICLE
200
Page 203 of 220
SPARE TIRES — IF EQUIPPED
NOTE:
For vehicles equipped with Tire Service Kit instead of a spare tire, please refer to “Tire
Service Kit” in “What To Do In Emergencies” on your DVD for further information.
CAUTION!
Because of the reduced ground clearance, do not take your vehicle through an
automatic car wash with a compact or limited-use temporary spare installed.
Damage to the vehicle may result.
Spare Tire Matching Original Equipped Tire And Wheel — If Equipped
Your vehicle may be equipped with a spare tire and wheel equivalent in look and
function to the original equipment tire and wheel found on the front or rear axle of
your vehicle. This spare tire may be used in the tire rotation for your vehicle. If your
vehicle has this option, refer to an authorized tire dealer for the recommended tire
rotation pattern.
Compact Spare Tire — If Equipped
The compact spare is for temporary emergency use only. You can identify if your
vehicle is equipped with a compact spare by looking at the spare tire description on
the Tire and Loading Information Placard located on the driver’s side door opening or
on the sidewall of the tire. Compact spare tire descriptions begin with the letter “T”
or “S” preceding the size designation. Example: T145/80D18 103M.
T, S = Temporary Spare Tire
Since this tire has limited tread life, the original equipment tire should be repaired
(or replaced) and reinstalled on your vehicle at the first opportunity.
Do not install a wheel cover or attempt to mount a conventional tire on the compact
spare wheel, since the wheel is designed specifically for the compact spare tire. Do
not install more than one compact spare tire and wheel on the vehicle at any given
time.
WARNING!
Compact spares are for temporary emergency use only. With these spares, do not
drive more than 50 mph (80 km/h). Temporary use spares have limited tread life.
When the tread is worn to the tread wear indicators, the temporary use spare tire
needs to be replaced. Be sure to follow the warnings, which apply to your spare.
Failure to do so could result in spare tire failure and loss of vehicle control.
MAINTAINING YOUR VEHICLE
201
Page 204 of 220
Full Size Spare — If Equipped
The full size spare is for temporary emergency use only. This tire may look like the
originally equipped tire on the front or rear axle of your vehicle, but it is not. This
spare tire may have limited tread life. When the tread is worn to the tread wear
indicators, the temporary use full size spare tire needs to be replaced. Since it is not
the same as your original equipment tire, replace (or repair) the original equipment
tire and reinstall on the vehicle at the first opportunity.
Limited-Use Spare — If Equipped
The limited-use spare tire is for temporary emergency use only. This tire is identified
by a label located on the limited-use spare wheel. This label contains the driving
limitations for this spare. This tire may look like the original equipped tire on the front
or rear axle of your vehicle, but it is not. Installation of this limited-use spare tire
affects vehicle handling. Since it is not the same as your original equipment tire,
replace (or repair) the original equipment tire and reinstall on the vehicle at the first
opportunity.
WARNING!
Limited-use spares are for emergency use only. Installation of this limited-use
spare tire affects vehicle handling. With this tire, do not drive more than the speed
listed on the limit-use spare wheel. Keep inflated to the cold tire inflation
pressures listed on your Tire and Loading Information Placard located on the
driver’s side B-Pillar or the rear edge of the driver’s side door. Replace (or repair)
the original equipment tire at the first opportunity and reinstall it on your vehicle.
Failure to do so could result in loss of vehicle control.
WHEEL AND WHEEL TRIM CARE
All wheels and wheel trim, especially aluminum and chrome plated wheels, should
be cleaned regularly with a mild soap and water to prevent corrosion.
To remove heavy soil and/or excessive brake dust, use MOPAR®Wheel Cleaner or
equivalent or select a non-abrasive, non-acidic cleaner.
CAUTION!
Do not use scouring pads, steel wool, a bristle brush, or metal polishes. Do not use
oven cleaner. These products may damage the wheel's protective finish. Avoid
automatic car washes that use acidic solutions or harsh brushes that may damage
the wheel's protective finish. Only MOPAR®Wheel Cleaner or equivalent is
recommended.
MAINTAINING YOUR VEHICLE
202
Page 208 of 220
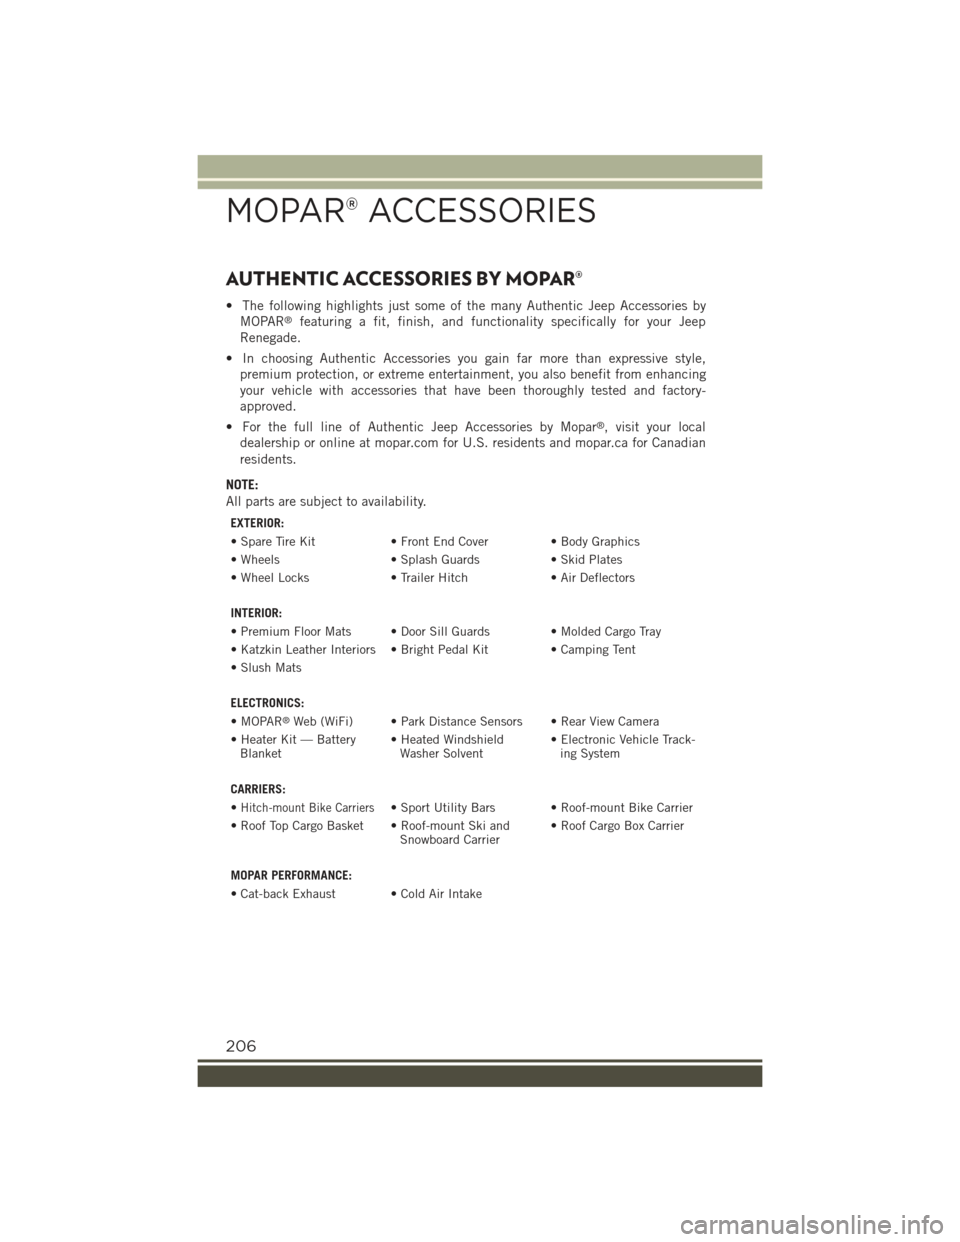
AUTHENTIC ACCESSORIES BY MOPAR®
• The following highlights just some of the many Authentic Jeep Accessories by
MOPAR®featuring a fit, finish, and functionality specifically for your Jeep
Renegade.
• In choosing Authentic Accessories you gain far more than expressive style,
premium protection, or extreme entertainment, you also benefit from enhancing
your vehicle with accessories that have been thoroughly tested and factory-
approved.
• For the full line of Authentic Jeep Accessories by Mopar®, visit your local
dealership or online at mopar.com for U.S. residents and mopar.ca for Canadian
residents.
NOTE:
All parts are subject to availability.
EXTERIOR:
• Spare Tire Kit• Front End Cover • Body Graphics
• Wheels• Splash Guards• Skid Plates
• Wheel Locks• Trailer Hitch• Air Deflectors
INTERIOR:
• Premium Floor Mats • Door Sill Guards • Molded Cargo Tray
• Katzkin Leather Interiors • Bright Pedal Kit • Camping Tent
• Slush Mats
ELECTRONICS:
•MOPAR®Web (WiFi) • Park Distance Sensors • Rear View Camera
• Heater Kit — BatteryBlanket• Heated WindshieldWasher Solvent• Electronic Vehicle Track-ing System
CARRIERS:
•Hitch-mount Bike Carriers• Sport Utility Bars • Roof-mount Bike Carrier
• Roof Top Cargo Basket • Roof-mount Ski andSnowboard Carrier• Roof Cargo Box Carrier
MOPAR PERFORMANCE:
• Cat-back Exhaust • Cold Air Intake
MOPAR® ACCESSORIES
206