display JEEP RENEGADE 2018 Owner handbook (in English)
[x] Cancel search | Manufacturer: JEEP, Model Year: 2018, Model line: RENEGADE, Model: JEEP RENEGADE 2018Pages: 356, PDF Size: 6.11 MB
Page 145 of 356
112)If the ignition device is at MAR, even
if the engine is switched off, airbags may
be deployed when the vehicle is stationary
and hit by another vehicle. Therefore,
even if the vehicle is stationary, when an
active front passenger airbag is fitted, DO
NOT install rearward facing child restraint
systems on the front passenger seat.
Deployment of the airbag following an
impact could cause fatal injuries to the
child. Therefore, always deactivate the
passenger side airbag when a rearward
facing child restraint system is installed
on the front passenger seat. The front
passenger seat must also be positioned
back as far as possible in order to prevent
the child restraint system from coming
into contact with the dashboard.
Immediately reactivate the passenger
airbag as soon as the child restraint
system has been removed. Also remember
that, if the ignition device is set to STOP,
none of the safety devices (airbags or
pretensioners) will be deployed in the
event of collision. Non-deployment in
such cases does not indicate a system
malfunction.113)Malfunction of the airbag failure
warning light is indicated by the activation
of an airbag failure icon and a dedicated
message on the instrument panel display.
The pyrotechnic charges are not disabled.
Before continuing, contact a Jeep
Dealership immediately to have the
system checked.
114)The airbag deployment threshold is
higher than that of the pretensioners. For
collisions in the range between the two
thresholds, it is normal for only the
pretensioners to be activated.
115)The airbag does not replace seat
belts but increases their efficiency.
Because front airbags are not deployed for
low-speed crashes, side collisions,
rear-end shunts or rollovers, occupants are
protected, in addition to any side bags,
only by their seat belts, which must
therefore always be fastened.
143
Page 148 of 356
STARTING THE ENGINE
116) 117) 118)44) 45) 46) 47)
Before starting the engine, adjust the
seat, the interior rear view mirrors, the
door mirrors and fasten the seat belt
correctly.
Never press the accelerator pedal for
starting the engine.
If necessary, messages indicating the
starting procedure can be shown on the
display.
LPG versions
The engine always starts up on petrol
independently of the previously selected
mode.
There must therefore always be some
petrol in the tank to protect the petrol
pump and to guarantee temporary
switching from Methane or LPG to petrol
operation, if high performance is
required.
PROCEDURE FOR VERSIONS
WITH MANUAL GEARBOX
Proceed as follows:engage the electric parking brake and
place the gear lever in neutral;
bring the ignition device to MAR. On
Diesel versions, waning lightlights upin the instrument panel: wait for the
warning light to switch off;
fully depress the clutch pedal without
touching the accelerator;
turn the ignition device to AVV and
release it as soon as the engine starts;
if the engine does not start within
10 seconds, bring the ignition device
back to STOP and wait for
10-15 seconds before repeating the
starting procedure.
PROCEDURE FOR VERSIONS
WITH AUTOMATIC
TRANSMISSION
Proceed as follows:engage the electric parking brake and
place the gear lever to P (Park) or N
(Neutral);
fully depress the brake pedal without
touching the accelerator;
place the ignition device to AVV;if the engine does not start, bring the
ignition device back to STOP and wait for
10-15 seconds before repeating the
starting procedure.
IMPORTANT If, with the ignition
device at MAR, thesymbol on the
instrument panel stays on together
with warning light
, turn the
ignition device to STOP and then back
to MAR. If the warning light (or thesymbol on the display) remains on, try
with the other keys provided with the
vehicle. Contact a Jeep Dealership if
the engine still does not start.
ENGINE STARTING FAILURE
Starting the engine with electronic key
battery (Keyless Enter-N-Go) run down or
flat
If the ignition device does not respond
when the relevant button is pressed the
electronic key battery might be run down
or flat. Therefore, the system does not
detect the presence of the electronic key
on board the vehicle and displays a
dedicated message.
In this case, rest the rounded edge of the
electronic key (the side opposite the
metal insert) on the ignition device and
press the button by the electronic key.
The ignition device is thus activated and
the engine can be started.
STOPPING THE ENGINE
Proceed as follows:park the car in a position that is not
dangerous for oncoming traffic; engage a
gear (versions with manual gearbox) or
position the gear lever to P (Parking)
(versions with automatic transmission);
turn the ignition device to STOP with
the engine idling.
146
STARTING AND DRIVING
Page 149 of 356
Cars equipped with electronic key (Keyless
Enter-N-Go):at a car speed over 8 km/h
(5 mph) it is possible to switch the
engine off, also with automatic
transmission lever in a position other
than P (Parking). To switch off the engine
in this situation, hold down the ignition
device button for a while or press it
3 times in a row within a few seconds. In
this case the engine will stop and the
ignition device will switch to MAR.
WARNING
116)It is dangerous to run the engine in
enclosed areas. The engine takes in
oxygen and releases carbon dioxide,
carbon monoxide and other toxic gases.
117)The brake servo is not active until
the engine is started, so you would need
to apply much more force than usual to
the brake pedal.
118)Do not start the engine by pushing,
towing or driving downhill. These
manoeuvres may damage the catalytic
converter.
IMPORTANT
44)We recommend that during the initial
period, or during the first 1600 km
(1000 miles), you do not drive to full car
performance (e.g. excessive acceleration,
long journeys at top speed, sharp braking,
etc.).
45)When the engine is switched off never
leave the ignition device in the MAR
position to prevent useless current
absorption from draining the battery.
46)A quick burst on the accelerator before
turning off the engine serves absolutely no
practical purpose; it wastes fuel and is
damaging for the engine.
47)Warning light
will flash after
starting or during prolonged cranking to
indicate a fault with the glow plug heating
system. If the engine starts, the vehicle
can be regularly used, but a Jeep
Dealership must be contacted as soon as
possible.
PARKING THE VEHICLE
Always remove the ignition key when
leaving the car.
When parking and leaving the car,
proceed as follows:
engage a gear (1st gear if facing uphill
or reverse if facing downhill) and leave
the wheels turned;
stop the engine and engage the
handbrake.
Block the wheels with a wedge or a stone
if the car is parked on a steep slope.
On versions equipped with automatic
transmission or dual clutch automatic
transmission, wait for the letter P to be
displayed before releasing the brake
pedal.
IMPORTANT NEVER leave the car with
the gearbox in neutral (or, on versions
equipped with automatic transmission
or dual clutch automatic transmission,
before putting the shift lever in the P
position).
147
Page 154 of 356

The gear engaged is shown on the
display.
The lever has a button A fig. 106, which
must be pressed to move the lever to P or
R.
If the transmission is used in "sequential"
mode, which is activated moving the
lever from D (Drive) to the left, the
various positions can be reached towards
+ or –. These positions are unstable.
To exit from the P (Park) position, or to
pass from the N (Neutral) position to the
D (Drive) or R (Reverse) position when
the car is stopped or is moving at a low
speed, the brake pedal must also be
pressed (see "Gear engagement disabling
system with brake engaged" in this
chapter).
IMPORTANT DO NOT accelerate while
shifting from position P (or N) to
another position.
IMPORTANT After selecting a gear,
wait a few seconds before accelerating.
This precaution is particularly
important with a cold engine.
AutoStick - Sequential shifting mode
In the case of frequent gearshiftings (e.g.
when the vehicle is driven with a heavy
load, on slopes, with strong headwind or
when towing heavy trailers), it is
recommended to use the AutoStick
(sequential shifting) mode to select and
keep a lower fixed ratio.
It is possible to shift from position D
(Drive) to the sequential mode regardless
of car speed.
Activation
With gear lever in position D (Drive), to
activate the sequential drive mode, move
the lever to the left (– and + indication of
the panel). The gear engaged will be
shown on the display. Gearshifting is
made by moving the gear lever forwards,
towards symbol – or backwards, towards
symbol +.
Deactivation
Bring the gear lever back in position D
(Drive) ("automatic" driving mode).
TRANSMISSION EMERGENCY
FUNCTION
(where provided)
Transmission operation is constantly
monitored to detect any fault. If a
condition that might damage the
transmission is detected, the
"transmission emergency" function is
activated.
In this condition, the transmission stays
in 4th gear, regardless of the selected
gear.
Positions P (Parking), R (Reverse) e N
(Neutral) still work. Icon
might light
up in the display
In the event of a "transmission
emergency" immediately contact the
nearest Jeep Dealership.
Temporary failure
In the event of a temporary failure, the
transmission correct operation can be
restored for all the forwards gears by
proceeding as follows:
stop the vehicle;bring the transmission lever to P
(Park).
bring the ignition device to STOP;wait for about 10 seconds, then restart
the engine;
select the desired gear: if the problem
is not detected anymore the transmission
correct operation is restored.
106J0A0924C
152
STARTING AND DRIVING
Page 157 of 356
available and restart the engine, using
the gear lever as described previously.
MOVING THE CAR
To move the car, from P press the brake
pedal and, using the button on the gear
lever, move the lever to the desired
position (D, R or "Sequential mode"). The
display will show the gear engaged.
When the brake pedal is released, the car
starts moving forwards or backwards, as
soon as the manoeuvre is activated
("creeping" effect). The accelerator
should not be pressed in this case.
IMPORTANT The inconsistency
between the speed actually engaged
(shown on the display) and the
position of the gear lever is indicated
by the letter corresponding to the
position of the lever flashing on the
trim (also accompanied by an acoustic
signal).
This condition should not be interpreted
as an operational fault, but simply as a
request by the system to repeat the
manoeuvre.
IMPORTANT With engine running and
car stationary, in "Sequential mode",
the request for engaging 2
ndgear is
not accepted by the system (whether
the brake pedal is pressed or not).
If, with 1stgear or reverse (R) engaged,
the following conditions occur:
road slope over 5%;clutch overheated;engine torque constant for a given
period (e.g. if the car hits the pavement
or is parked downhill/uphill);
car movement is achieved by pressing
the accelerator pedal.
IMPORTANT With the electric parking
brake released and brake pedal
released, engine at idling speed and
gear lever in position D, R or
sequential, pay the utmost care
because the car can move even
without the operation of the
accelerator pedal. This condition can
be used with the car on a level surface
during tight parking manoeuvres using
the brake pedal only.
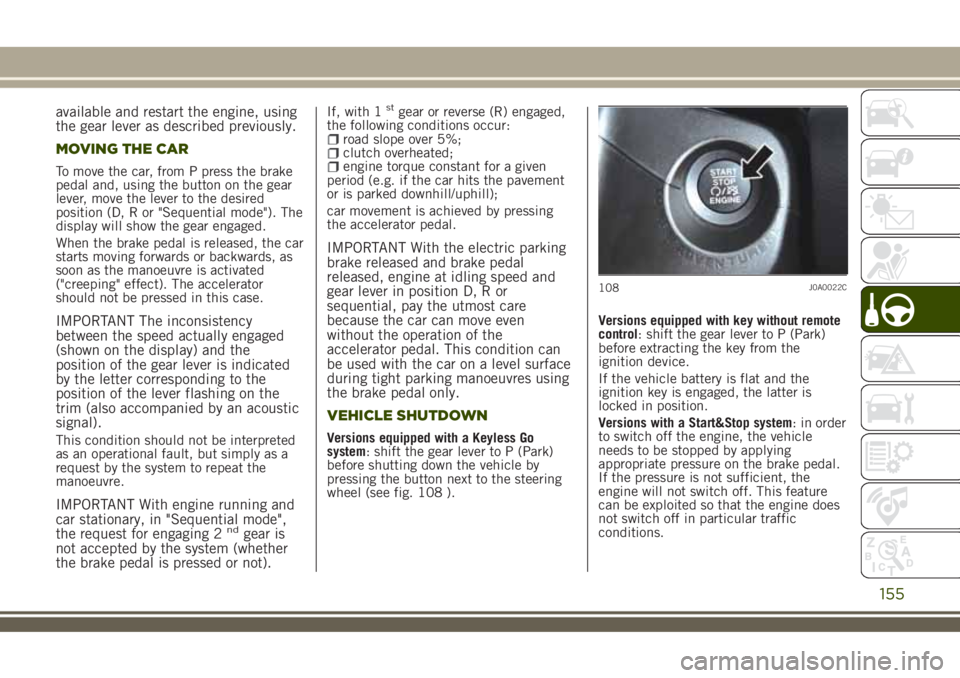
VEHICLE SHUTDOWN
Versions equipped with a Keyless Go
system: shift the gear lever to P (Park)
before shutting down the vehicle by
pressing the button next to the steering
wheel (see fig. 108 ).Versions equipped with key without remote
control: shift the gear lever to P (Park)
before extracting the key from the
ignition device.
If the vehicle battery is flat and the
ignition key is engaged, the latter is
locked in position.
Versions with a Start&Stop system: in order
to switch off the engine, the vehicle
needs to be stopped by applying
appropriate pressure on the brake pedal.
If the pressure is not sufficient, the
engine will not switch off. This feature
can be exploited so that the engine does
not switch off in particular traffic
conditions.
108J0A0022C
155
Page 158 of 356
Ignition key removal
The ignition key can be removed only if
the gear lever is in position P:
if the engine is switched off with the
gear lever in position P: the ignition key
can be removed within 30 seconds;
if the engine is switched off with the
gear lever in position other than P:move
the lever to P within 5 seconds. Once
this operation is completed, it will be
possible, for about 30 seconds, to extract
the ignition key.
In both cases, if the described conditions
and times are not respected, the ignition
key will be automatically locked.
To remove the key, turn it to MAR and
then to STOP, repeating the procedure
described above.
"RECOVERY" FUNCTIONS
In case of a gear lever failure, the
instrument panel display could show a
dedicated message recommending that
the driver continues driving without
shifting the lever to the P position.
In this case, the transmission will
maintain the forward gear (with reduced
performance) even if the lever is
positioned at R or N.
Once the lever is positioned at P, or after
shutting down the vehicle, selecting R or
any other forward gear will no longer be
possible. In this case, contact a Jeep
Dealership.WARNING
128)Never leave children unattended in
the car. Always remove the ignition key
when leaving the car and take the key with
you.
IMPORTANT
49)If the car is on a gradient, always
engage the electric parking brake BEFORE
placing the gear lever in P.
50)Engage reverse only with the car
stationary, engine at idling speed and
accelerator pedal fully released.
156
STARTING AND DRIVING
Page 160 of 356
On some versions, with mode engaged,
the display shows "4WD LOW". The LED
on theSelec-Terrain™device may flash
until the end of the engagement.
4WD LOW mode release
The release can occur at any speed
ranging from 0 to 120 km/h.
On some versions, "4WD LOW" on the
display switches off at the end of the
release procedure.
In this case, the LED on the 4WD LOW
button is off.
IMPORTANT
51)The correct operation of the 4WD
function depends on the tyres: all of them
must have the same size, the same type
and the same circumference. Using tyres
with different sizes has negative effects on
the gear change and damages the
components of the transmission.
52)Do not drive at speeds exceeding those
that the road conditions allow for.
SELEC-TERRAIN
DRIVING MODE SELECTION
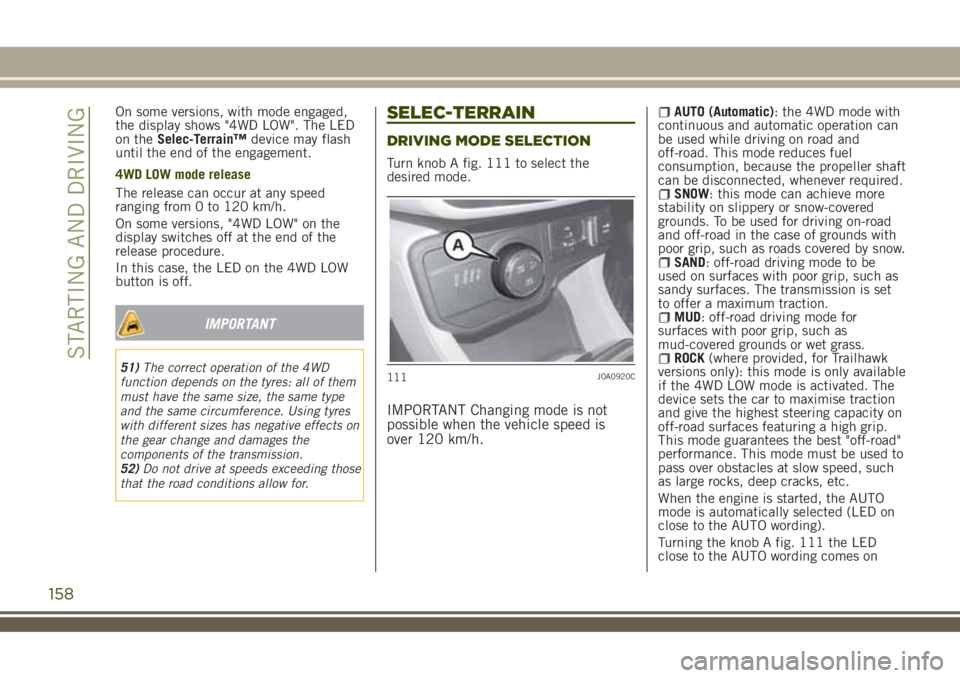
Turn knob A fig. 111 to select the
desired mode.
IMPORTANT Changing mode is not
possible when the vehicle speed is
over 120 km/h.
AUTO (Automatic): the 4WD mode with
continuous and automatic operation can
be used while driving on road and
off-road. This mode reduces fuel
consumption, because the propeller shaft
can be disconnected, whenever required.
SNOW: this mode can achieve more
stability on slippery or snow-covered
grounds. To be used for driving on-road
and off-road in the case of grounds with
poor grip, such as roads covered by snow.
SAND: off-road driving mode to be
used on surfaces with poor grip, such as
sandy surfaces. The transmission is set
to offer a maximum traction.
MUD: off-road driving mode for
surfaces with poor grip, such as
mud-covered grounds or wet grass.
ROCK(where provided, for Trailhawk
versions only): this mode is only available
if the 4WD LOW mode is activated. The
device sets the car to maximise traction
and give the highest steering capacity on
off-road surfaces featuring a high grip.
This mode guarantees the best "off-road"
performance. This mode must be used to
pass over obstacles at slow speed, such
as large rocks, deep cracks, etc.
When the engine is started, the AUTO
mode is automatically selected (LED on
close to the AUTO wording).
Turning the knob A fig. 111 the LED
close to the AUTO wording comes on
111J0A0920C
158
STARTING AND DRIVING
Page 163 of 356
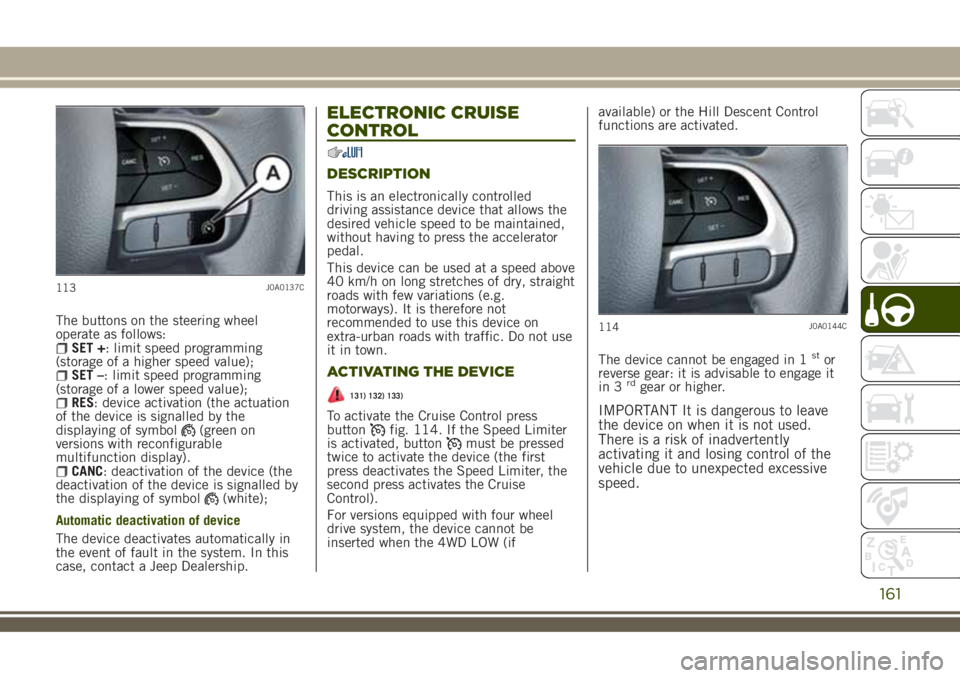
The buttons on the steering wheel
operate as follows:
SET +: limit speed programming
(storage of a higher speed value);
SET –: limit speed programming
(storage of a lower speed value);
RES: device activation (the actuation
of the device is signalled by the
displaying of symbol
(green on
versions with reconfigurable
multifunction display).
CANC: deactivation of the device (the
deactivation of the device is signalled by
the displaying of symbol
(white);
Automatic deactivation of device
The device deactivates automatically in
the event of fault in the system. In this
case, contact a Jeep Dealership.
ELECTRONIC CRUISE
CONTROL
DESCRIPTION
This is an electronically controlled
driving assistance device that allows the
desired vehicle speed to be maintained,
without having to press the accelerator
pedal.
This device can be used at a speed above
40 km/h on long stretches of dry, straight
roads with few variations (e.g.
motorways). It is therefore not
recommended to use this device on
extra-urban roads with traffic. Do not use
it in town.
ACTIVATING THE DEVICE
131) 132) 133)
To activate the Cruise Control press
buttonfig. 114. If the Speed Limiter
is activated, buttonmust be pressed
twice to activate the device (the first
press deactivates the Speed Limiter, the
second press activates the Cruise
Control).
For versions equipped with four wheel
drive system, the device cannot be
inserted when the 4WD LOW (ifavailable) or the Hill Descent Control
functions are activated.
The device cannot be engaged in 1
stor
reverse gear: it is advisable to engage it
in 3
rdgear or higher.
IMPORTANT It is dangerous to leave
the device on when it is not used.
There is a risk of inadvertently
activating it and losing control of the
vehicle due to unexpected excessive
speed.
113J0A0137C
114J0A0144C
161
Page 165 of 356

ADAPTIVE CRUISE
CONTROL (ACC)
(where provided)
134) 135) 136) 137) 138) 139)
54) 55) 56) 57) 58) 59) 60)
DESCRIPTION
The Adaptive Cruise Control (ACC) is a
driver assist device which combines the
Cruise Control functions with one for
controlling the distance from the vehicle
ahead.
The Adaptive Cruise Control (ACC) uses a
radar sensor, located behind the front
bumper fig. 115 and a camera, located
in the middle of the windscreen fig. 116,
to detect the presence of a vehicle close
ahead.
There are two operating modes:
“Adaptive Cruise Control”mode to
maintain an adequate distance between
vehicles (the message “Adaptive CruiseControl” is shown on the instrument
panel display);
electronic “Cruise Control” modeto hold the vehicle at a constant
preset speed.
To change the operation mode, use the
button on the steering wheel (see that
described on the following pages).
ADAPTIVE CRUISE CONTROL
ACTIVATION/DEACTIVATION
Activation
To activate the device, press and release
the
button. fig. 117
The device cannot be activated when
4WD LOW is engaged.115J0A0334C
116J0A0241C117J0A0917C
163
Page 166 of 356
IMPORTANT It is dangerous to leave
the device activated when it is not
used. There is a risk of inadvertently
activating it and losing control of the
vehicle due to unexpected excessive
speed.
Deactivation
With the device active, to deactivate it
press and release the
button. The
display will show a dedicated message.
SETTING THE DESIRED SPEED
The device can be set only with speeds
above 30 km/h (or 20 mph for markets
with instrument panels giving mph) and
under 160 km/h (or 100 mph for
markets with instrument panels
giving mph).
When the vehicle reaches the desired
speed, press and release the button SET
+ or SET to set the speed to the current
speed. The display will show the set
speed. Then take your foot off the
accelerator pedal.
The system cannot be set
when pressing the brake pedal;when the brakes are overheated;when the electric parking brake is
engaged;
when the shift lever is in the P (park),
R (reverse) or N (neutral) positions
(versions with automatic transmission orautomatic transmission with double
clutch);
when the shift lever is in the R
(reverse), neutral or in 1st (first gear
engaged) positions (versions with manual
transmission);
when the clutch is pressed (versions
with manual transmission);
when the engine speed exceeds a
maximum threshold (versions with
manual transmission and versions with
automatic transmission/automatic
transmission with double clutch) or goes
below a minimum threshold (only
versions with manual transmission);
when the car speed is not within the
settable speed range;
when the ESC (or ABS or other
stability control systems) are operating or
have just operated;
when the ESC system is off;during automatic braking by the
Forward Collision Warning Plus system
(where provided);
when the Speed Limiter is active;when the electronic Cruise Control is
active;
in case of failure of the device;when the engine is off;in case of obstruction of the radar
sensor (in this case the bumper area
where it is located must be cleaned).
IMPORTANT The device does not
deactivate on reaching speeds higher
than those that can be set (160 km/h
or 100 mph for instrument panel set
to mph) with the accelerator pedal
pressed. In these conditions, the
device may not work correctly and it is
advisable to deactivate it.
CHANGING SPEED
Speed increase
After having set the device, the stored
speed can be stored by holding the SET
+ button pressed.
Press the SET + button once: the set
speed will increase by 1 km/h (or by
1 mph when the measurement unit is set
to mph). Each touch of the button once
will increase the speed by 1 km/h (or by
1 mph, the latter for instrument panels
set to miles per hour).
Hold the SET + button pressed: the set
speed will increase in 10 km/h steps (or
in 5 mph steps when the measurement
unit is set to mph) until the button is
released. The set speed increase is
shown on the display.
Decreasing speed
After having set the device, the stored
speed can be reduced by holding the
SET – button pressed.
164
STARTING AND DRIVING