display JEEP RENEGADE 2018 Owner handbook (in English)
[x] Cancel search | Manufacturer: JEEP, Model Year: 2018, Model line: RENEGADE, Model: JEEP RENEGADE 2018Pages: 356, PDF Size: 6.11 MB
Page 182 of 356
SYMBOLS AND MESSAGES ON
THE DISPLAY
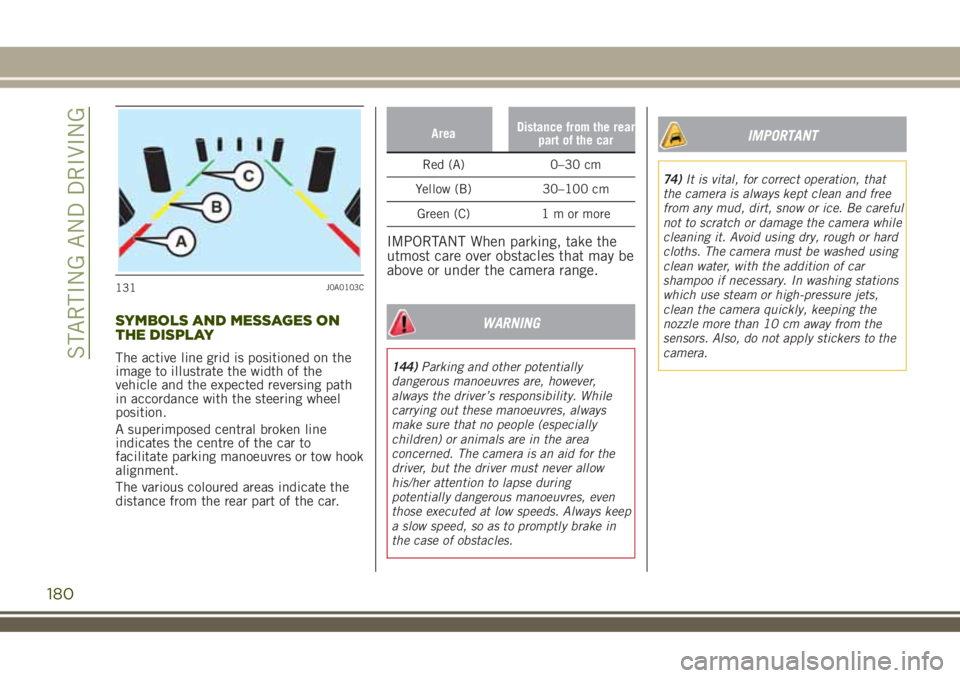
The active line grid is positioned on the
image to illustrate the width of the
vehicle and the expected reversing path
in accordance with the steering wheel
position.
A superimposed central broken line
indicates the centre of the car to
facilitate parking manoeuvres or tow hook
alignment.
The various coloured areas indicate the
distance from the rear part of the car.
AreaDistance from the rear
part of the car
Red (A) 0–30 cm
Yellow (B) 30–100 cm
Green (C) 1 m or more
IMPORTANT When parking, take the
utmost care over obstacles that may be
above or under the camera range.
WARNING
144)Parking and other potentially
dangerous manoeuvres are, however,
always the driver’s responsibility. While
carrying out these manoeuvres, always
make sure that no people (especially
children) or animals are in the area
concerned. The camera is an aid for the
driver, but the driver must never allow
his/her attention to lapse during
potentially dangerous manoeuvres, even
those executed at low speeds. Always keep
a slow speed, so as to promptly brake in
the case of obstacles.
IMPORTANT
74)It is vital, for correct operation, that
the camera is always kept clean and free
from any mud, dirt, snow or ice. Be careful
not to scratch or damage the camera while
cleaning it. Avoid using dry, rough or hard
cloths. The camera must be washed using
clean water, with the addition of car
shampoo if necessary. In washing stations
which use steam or high-pressure jets,
clean the camera quickly, keeping the
nozzle more than 10 cm away from the
sensors. Also, do not apply stickers to the
camera.
131J0A0103C
180
STARTING AND DRIVING
Page 222 of 356
FUEL CUT-OFF SYSTEM
173)
This intervenes in the case of an impact
causing:
the interruption of the fuel supply with
the engine consequently cutting out;
the automatic unlocking of the doors;turning on the lights inside the car;deactivation of climate control system
ventilation;
switching on the hazard warning lights
(to disable the lights, perform the “reset”
procedure as described below).
On some versions, the intervention of the
system is indicated by a message shown
on the display. In the same way, a
dedicated message on the display warns
the driver if system operation is
compromised.
IMPORTANT Carefully check the
vehicle for fuel leaks, for instance in
the engine compartment, under the
vehicle or near the tank area. After a
collision, bring the ignition device to
STOP to prevent the battery from
running down.
Reset procedure
To restore correct operation of the
vehicle, carry out the following procedure(this procedure must be started and
completed within less than one minute):
bring the ignition device to MAR;turn on the direction indicators on the
right, then on the left, then again on the
right and again on the left;
now deactivate the direction indicators
on the left;
bring the ignition device to STOP;move the ignition device to MAR.
LPG versions
In case of collision, the petrol feed is
immediately closed, the LPG safety
solenoid valves are closed and injection
is interrupted to stop the engine.
WARNING
173)If, after an impact, you smell fuel or
notice leaks from the fuel system, do not
reactivate the system to avoid the risk of
fire.
AUTOMATIC
TRANSMISSION GEAR
LEVER UNLOCKING
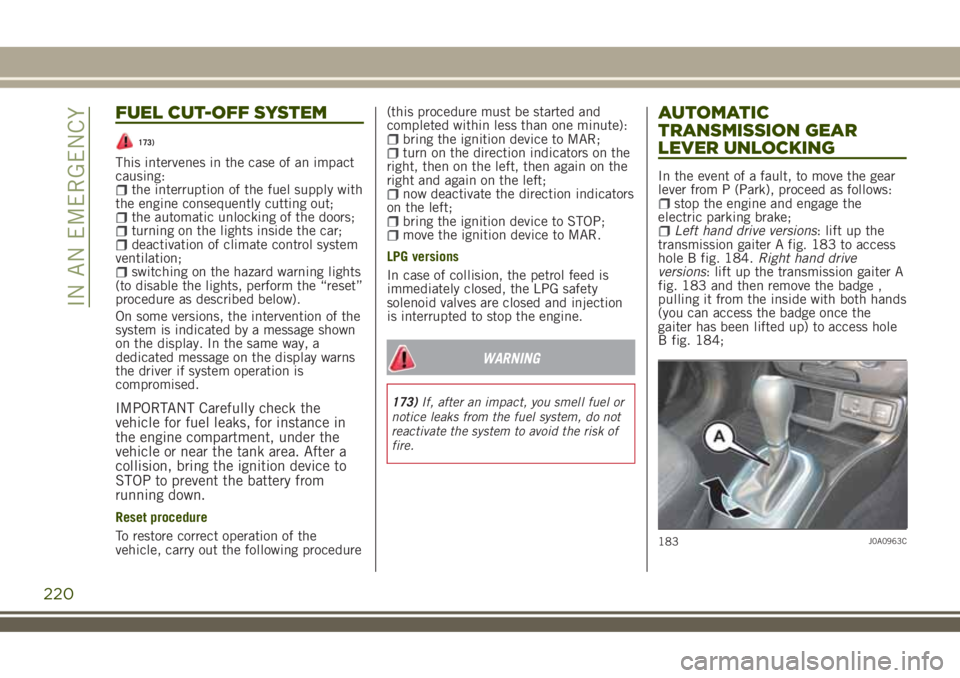
In the event of a fault, to move the gear
lever from P (Park), proceed as follows:
stop the engine and engage the
electric parking brake;
Left hand drive versions: lift up the
transmission gaiter A fig. 183 to access
hole B fig. 184.Right hand drive
versions: lift up the transmission gaiter A
fig. 183 and then remove the badge ,
pulling it from the inside with both hands
(you can access the badge once the
gaiter has been lifted up) to access hole
B fig. 184;
183J0A0963C
220
IN AN EMERGENCY
Page 296 of 356
TIPS, CONTROLS AND
GENERAL INFORMATION
196) 197)
105) 106)
ROAD SAFETY
Learn how to use the various system
functions before setting off.
Read the instructions for the system
carefully before setting off.
RECEPTION CONDITIONS
Reception conditions change constantly
while driving. Reception may be
interfered with by the presence of
mountains, buildings or bridges,
especially when you are far away from
the broadcaster.
IMPORTANT The volume may be
increased when receiving traffic
information and news.
CARE AND MAINTENANCE
Observe the following precautions to
ensure the system is fully operational:
the display lens should not come into
contact with pointed or rigid objects
which could damage its surface; use a
soft, dry anti-static cloth to clean and do
not press.
never use alcohol, petrols and
derivatives to clean the display lens.
Prevent any liquid from entering the
system: this could damage it beyond
repair.
MULTIMEDIA DEVICES
IMPORTANT Some multimedia player
devices may not be compatible with the
Uconnect™system.
Only use devices (e.g. USB flash drives)
from safe sources on the car. Devices
from unknown sources could contain
software infected by viruses which, if
installed on the car, could increase the
vulnerability of the car's electric/
electronic systems to hacking.
ANTITHEFT PROTECTION
The system is equipped with an
anti-theft protection system based on the
exchange of information with the
electronic control unit (Body Computer)
on the vehicle.
This guarantees maximum safety and
prevents the secret code from being
entered after the power supply has been
disconnected.
If the check has a positive outcome, the
system will start to operate, whereas if
the comparison codes are not the same
or if the electronic control unit (Body
Computer) is replaced, the system willask the user to enter the secret code
according to the procedure described in
the paragraph below.
Entering the secret code
(excluding the versions with a Uconnect
7” HD Nav LIVE system)
When the system is switched on, if the
code is requested, the display will show
“Please enter Anti-Theft Code” followed
by the screen showing a keypad to enter
the secret code.
The secret code has four numbers from
0 to 9: to insert the code numbers, rotate
the BROWSE/ENTER dial and press to
confirm.
After entering the fourth digit, the system
begins operating.
If an incorrect code is entered, the
system displays “Incorrect Code” to
notify the user of the need to enter the
correct code.
After the 3 available attempts to enter
the code, the system displays “Incorrect
Code. Radio locked. Wait for
30 minutes”. After the text has
disappeared it is possible to start the
code entering procedure again.
Vehicle radio passport
(excluding the versions with a Uconnect
7” HD Nav LIVE system)
This document certifies ownership of the
294
MULTIMEDIA
Page 297 of 356
system. The vehicle radio passport shows
the system model, serial number and
secret code.
In case you lose the radio passport,
please go to Jeep Assistance Network
with an ID and the car papers.
IMPORTANT Keep the vehicle radio
passport in a safe place so that you
can give the information to the
relevant authorities if the system is
stolen.
IMPORTANT
In the event of a fault, the system must
only be checked and repaired by a Jeep
Dealership.
If the temperature is particularly low, the
display may take a while to reach
optimum brightness.
If the vehicle is stopped for a while and
the external temperature is very high, the
system may go into “thermal protection”
mode, suspending operation until the
radio temperature returns to acceptable
levels.Look at the screen only when it is
necessary and safe. If you need to look at
the screen for a long time, pull over to a
safe place so as not to be distracted
while driving.
Immediately stop using the system in the
event of a fault. Otherwise the system
might be damaged. Contact a Jeep
Dealership as soon as possible to have
the system repaired.
WARNING
196)Follow the safety rules here below:
otherwise serious injuries may occur to the
occupants or the system may be damaged.
197)If the volume is too loud this can be
dangerous. Adjust the volume so that you
can still hear background noises (e.g.
horns, ambulances, police vehicles, etc.).
IMPORTANT
105)Only clean the front panel and the
display with a soft, clean, dry, anti-static
cloth. Cleaning and polishing products
may damage the surface. Do not use
alcohol or similar products to clean the
panel or the display.106)Do not use the display as a base for
supports with suction pads or adhesives
for external navigators or smartphones or
similar devices.
295
Page 299 of 356
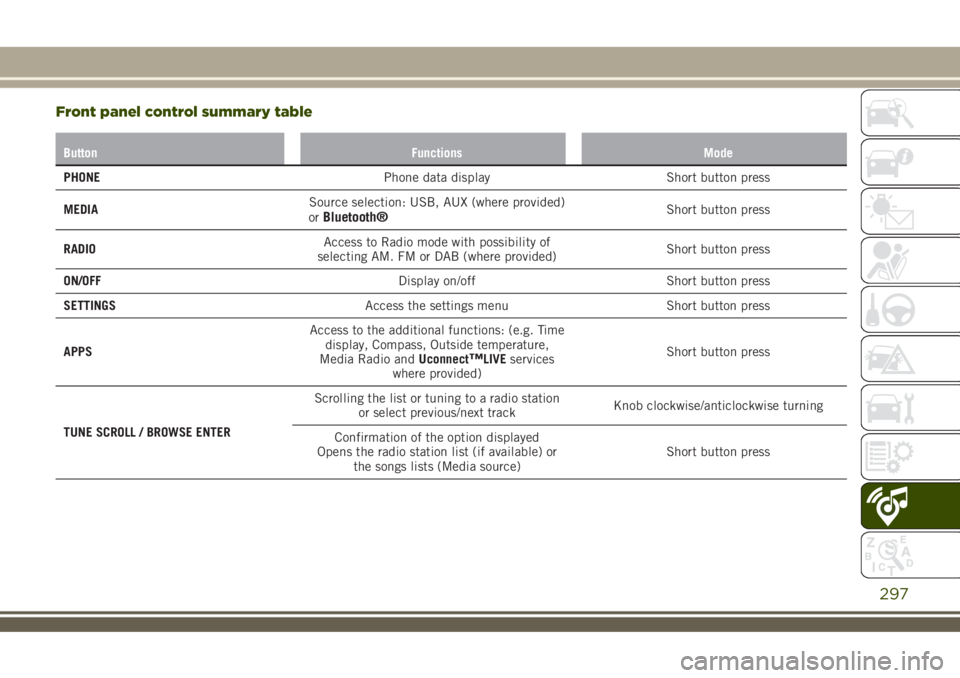
Front panel control summary table
Button Functions Mode
PHONEPhone data display Short button press
MEDIASource selection: USB, AUX (where provided)
or
Bluetooth®Short button press
RADIOAccess to Radio mode with possibility of
selecting AM. FM or DAB (where provided)Short button press
ON/OFFDisplay on/off Short button press
SETTINGSAccess the settings menu Short button press
APPSAccess to the additional functions: (e.g. Time
display, Compass, Outside temperature,
Media Radio andUconnect
™LIVEservices
where provided)Short button press
TUNE SCROLL / BROWSE ENTERScrolling the list or tuning to a radio station
or select previous/next trackKnob clockwise/anticlockwise turning
Confirmation of the option displayed
Opens the radio station list (if available) or
the songs lists (Media source)Short button press
297
Page 302 of 356
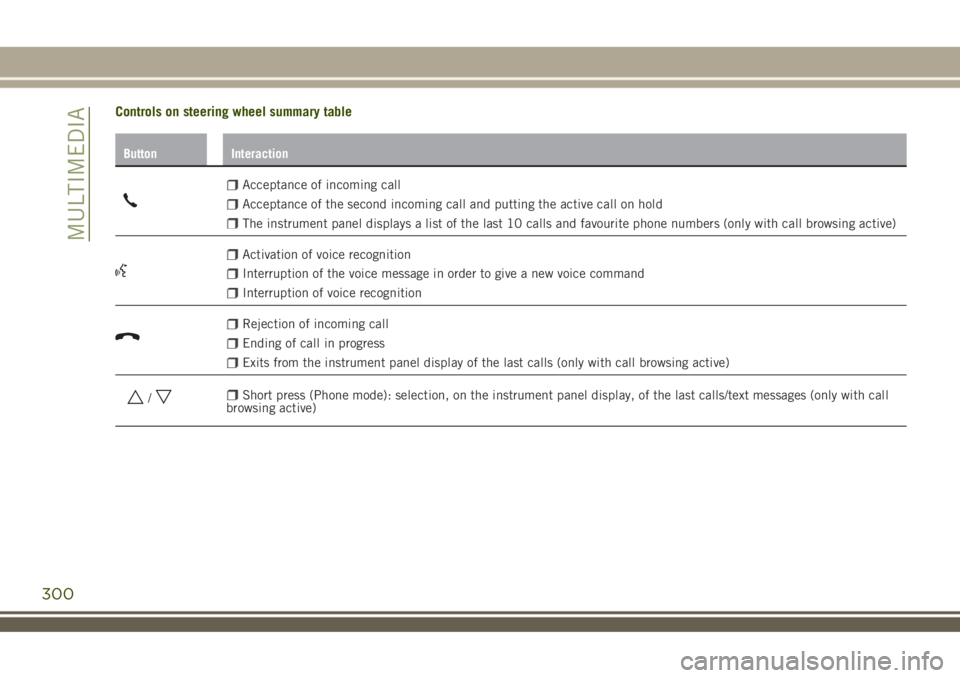
Controls on steering wheel summary table
Button Interaction
Acceptance of incoming call
Acceptance of the second incoming call and putting the active call on hold
The instrument panel displays a list of the last 10 calls and favourite phone numbers (only with call browsing active)
Activation of voice recognition
Interruption of the voice message in order to give a new voice command
Interruption of voice recognition
Rejection of incoming call
Ending of call in progress
Exits from the instrument panel display of the last calls (only with call browsing active)
/Short press (Phone mode): selection, on the instrument panel display, of the last calls/text messages (only with call
browsing active)
300
MULTIMEDIA
Page 304 of 356
"TOUCH SCREEN" FUNCTION
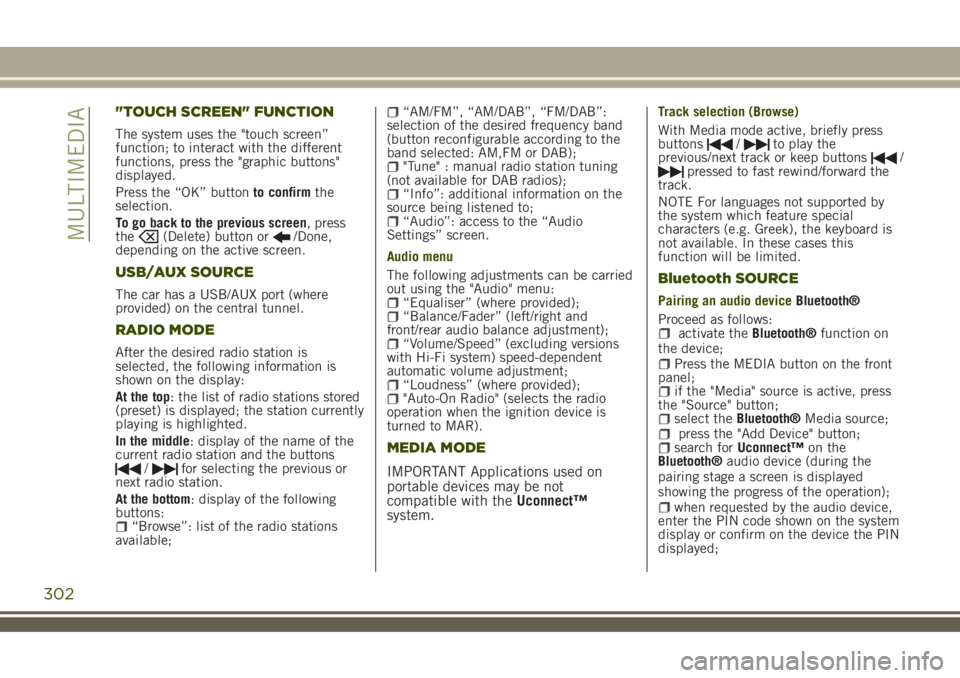
The system uses the "touch screen”
function; to interact with the different
functions, press the "graphic buttons"
displayed.
Press the “OK” buttonto confirmthe
selection.
To go back to the previous screen, press
the
(Delete) button or/Done,
depending on the active screen.
USB/AUX SOURCE
The car has a USB/AUX port (where
provided) on the central tunnel.
RADIO MODE
After the desired radio station is
selected, the following information is
shown on the display:
At the top: the list of radio stations stored
(preset) is displayed; the station currently
playing is highlighted.
In the middle: display of the name of the
current radio station and the buttons
/for selecting the previous or
next radio station.
At the bottom: display of the following
buttons:
“Browse”: list of the radio stations
available;
“AM/FM”, “AM/DAB”, “FM/DAB”:
selection of the desired frequency band
(button reconfigurable according to the
band selected: AM,FM or DAB);
"Tune" : manual radio station tuning
(not available for DAB radios);
“Info”: additional information on the
source being listened to;
“Audio”: access to the “Audio
Settings” screen.
Audio menu
The following adjustments can be carried
out using the "Audio" menu:
“Equaliser” (where provided);“Balance/Fader” (left/right and
front/rear audio balance adjustment);
“Volume/Speed” (excluding versions
with Hi-Fi system) speed-dependent
automatic volume adjustment;
“Loudness” (where provided);"Auto-On Radio" (selects the radio
operation when the ignition device is
turned to MAR).
MEDIA MODE
IMPORTANT Applications used on
portable devices may be not
compatible with theUconnect™
system.
Track selection (Browse)
With Media mode active, briefly press
buttons
/to play the
previous/next track or keep buttons/pressed to fast rewind/forward the
track.
NOTE For languages not supported by
the system which feature special
characters (e.g. Greek), the keyboard is
not available. In these cases this
function will be limited.
Bluetooth SOURCE
Pairing an audio deviceBluetooth®
Proceed as follows:
activate theBluetooth®function on
the device;
Press the MEDIA button on the front
panel;
if the "Media" source is active, press
the "Source" button;
select theBluetooth®Media source;press the "Add Device" button;search forUconnect™on the
Bluetooth®audio device (during the
pairing stage a screen is displayed
showing the progress of the operation);
when requested by the audio device,
enter the PIN code shown on the system
display or confirm on the device the PIN
displayed;
302
MULTIMEDIA
Page 305 of 356
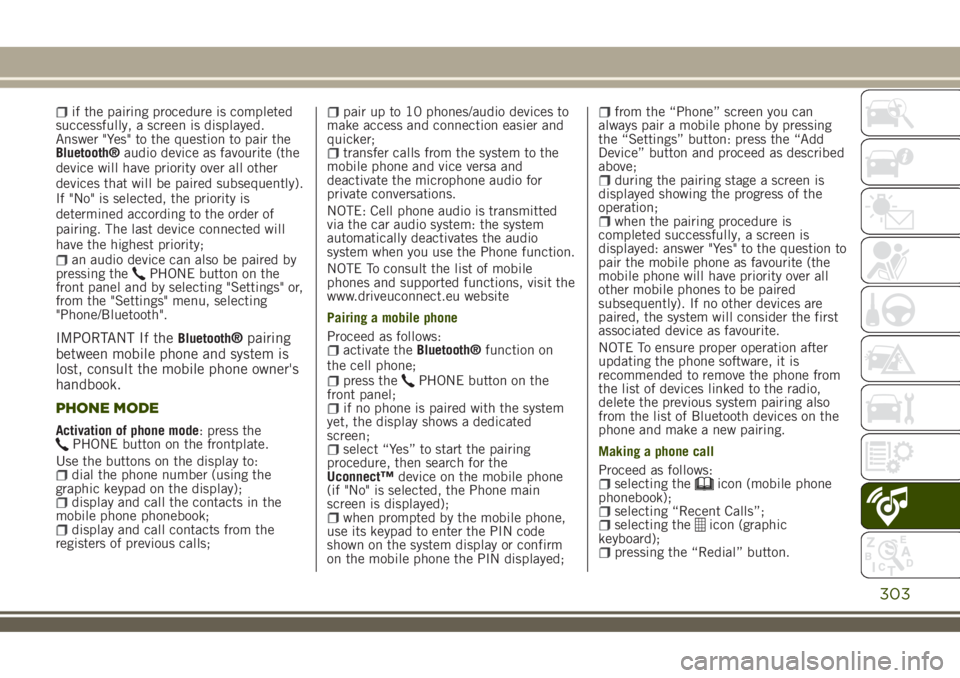
if the pairing procedure is completed
successfully, a screen is displayed.
Answer "Yes" to the question to pair the
Bluetooth®audio device as favourite (the
device will have priority over all other
devices that will be paired subsequently).
If "No" is selected, the priority is
determined according to the order of
pairing. The last device connected will
have the highest priority;
an audio device can also be paired by
pressing thePHONE button on the
front panel and by selecting "Settings" or,
from the "Settings" menu, selecting
"Phone/Bluetooth".
IMPORTANT If theBluetooth®pairing
between mobile phone and system is
lost, consult the mobile phone owner's
handbook.
PHONE MODE
Activation of phone mode: press thePHONE button on the frontplate.
Use the buttons on the display to:
dial the phone number (using the
graphic keypad on the display);
display and call the contacts in the
mobile phone phonebook;
display and call contacts from the
registers of previous calls;
pair up to 10 phones/audio devices to
make access and connection easier and
quicker;
transfer calls from the system to the
mobile phone and vice versa and
deactivate the microphone audio for
private conversations.
NOTE: Cell phone audio is transmitted
via the car audio system: the system
automatically deactivates the audio
system when you use the Phone function.
NOTE To consult the list of mobile
phones and supported functions, visit the
www.driveuconnect.eu website
Pairing a mobile phone
Proceed as follows:
activate theBluetooth®function on
the cell phone;
press thePHONE button on the
front panel;
if no phone is paired with the system
yet, the display shows a dedicated
screen;
select “Yes” to start the pairing
procedure, then search for the
Uconnect™device on the mobile phone
(if "No" is selected, the Phone main
screen is displayed);
when prompted by the mobile phone,
use its keypad to enter the PIN code
shown on the system display or confirm
on the mobile phone the PIN displayed;
from the “Phone” screen you can
always pair a mobile phone by pressing
the “Settings” button: press the “Add
Device” button and proceed as described
above;
during the pairing stage a screen is
displayed showing the progress of the
operation;
when the pairing procedure is
completed successfully, a screen is
displayed: answer "Yes" to the question to
pair the mobile phone as favourite (the
mobile phone will have priority over all
other mobile phones to be paired
subsequently). If no other devices are
paired, the system will consider the first
associated device as favourite.
NOTE To ensure proper operation after
updating the phone software, it is
recommended to remove the phone from
the list of devices linked to the radio,
delete the previous system pairing also
from the list of Bluetooth devices on the
phone and make a new pairing.
Making a phone call
Proceed as follows:
selecting theicon (mobile phone
phonebook);
selecting “Recent Calls”;selecting theicon (graphic
keyboard);
pressing the “Redial” button.
303
Page 306 of 356
Call browsing
(where provided)
Using the
/steering wheel
controls, you can view and manage your
latest calls on the instrument panel
display.
Pressing the
steering wheel command
button will display the last 10 calls
(missed/received/made).
Using the
/steering wheel
controls, you can select the desired
number from the last 10 calls and call
back by pressing the
button again
To exit the menu and/or terminate the
ongoing call, press the "handset down"
steering wheel command button.
NOTE: the operations described above
are accessible only if supported by the
cell phone in use.
Text message reader
The system can read the messages
received by the mobile phone. To use this
function the mobile phone must support
the SMS exchange function through
Bluetooth®.
If this function is not supported by the
phone, the corresponding
button is
deactivated (greyed out).
When a text message is received, thedisplay will show a screen where the
options "Listen", "Call" or "Ignore" can be
selected.
You can access the SMS message list
received by the cell by pressing the
graphic
button (the list shows a
maximum of 60 received messages).
NOTE On some mobile phones, to make
the SMS voice reading function
available, the SMS notification option on
the phone must be enabled; this option
is usually available on the phone, in the
Bluetooth®connections menu for a
device registered asUconnect™. After
enabling this function on your phone, you
need to disconnect and reconnect the
phone using theUconnect™system to
effect enabling.
IMPORTANT Some mobile phones may
not take the SMS delivery confirmation
settings into account when interfacing
withUconnect™. If an SMS message is
sent viaUconnect™, the user could
face an additional cost, without any
warning, due to the SMS delivery
confirmation request sent by the
phone. For any problems related to the
above, contact your telephone service
provider.
SMS message options
Default SMS messages are stored in the
system memory and can be sent to
answer a received message or as a new
message.
Ye sNoOkayI can't talk right nowCall meI'll call you laterI'm on my wayThanksI'll be lateStuck in trafficStart without meWhere are you?Are you there yet?I need directionsI'm lostSee you laterI will be 5 (or 10, 15, 20, 25, 30, 45,
60) (*) minutes late
See you in 5 (or 10, 15, 20, 25, 30,
45, 60) (*) minutes
(*) Only use the numbers listed,
otherwise the system will not take the
message.
NOTE For details on how to send an SMS
using the voice commands, refer to the
dedicated paragraph.
304
MULTIMEDIA
Page 307 of 356
Uconnect™LIVE SERVICES(where fitted)
Pressing the APPS button you get to the
menu where all the system's application
functions are, such as: Settings,
Compass (if available in the navigation
system),Uconnect™LIVEapplications.
If theUconnect™icon is there, the
system is prepared for services linked to
the use of applications for more efficient
and evolved use of the car, directly from
the radio. The application functions are
present according to the vehicle
configuration and to the market.
To use theUconnect™LIVEservices, you
need to:
download theApp Uconnect™LIVE
from: The "App Store" or "Google play" on
your compatible smart phone, making
sure you have the enabled information
register using theApp Uconnect™LIVE,
from the www.driveuconnect.eu site or
the www.jeep-official.it site.
startApp Uconnect™LIVEon your
smart phone and enter your credentials.
For more information relating to the
services available on the market, consult
the www.driveucoinnect.eu site.
First access to the vehicle
After startingApp Uconnect™LIVEand
entering your credentials, to access the
App Uconnect™LIVEservices in the caryou needBluetooth®coupling between
your smart phone and the system as
described in the "Registering your cell
phone" chapter. The list of supported
mobile phones is available on
www.driveuconnect.eu.
Once coupling is done, press the
Uconnect™icon on the screen will let
you access the connected services.
A dedicated message will appear on the
display when the activation process has
been completed. In the case of services
that require a personal profile, you can
connect your own account throughApp
Uconnect™LIVEor in the reserved area on
the www.driveuconnect.eu site.
The presence of the application my:Car
does not replace the information
described in the car's Use and
Maintenance Handbook.
User not connected
If theBluetooth®coupling has not been
effected, by pressing theUconnect™
button, the system menu shows the
disabled icons, with the exception of the
eco:Drive™. Further information about
theeco:Drive™functions is available in
the dedicated chapter.Settings for Uconnect LIVE managed
through the radio.
Through the Radio menu dedicated for
theUconnect™LIVEservices you can
access the "Settings" section by pressing
the
icon. In this section you can check
the system options and change them
according to your preferences.
System updating
In case a system update is available for
Uconnect™during use of the
Uconnect™LIVEservices, a message to
this effect will appear on the screen.
The update provides downloading the
new software version forUconnect™LIVE
services management. Updating is
effected when using the traffic data from
the coupled smart phone: the amount of
traffic generated will be communicated
to the driver.
In order not to compromise the proper
functioning of theUconnect™during
installation, do not carry out any other
operations but wait until it is finished.
305