key JEEP RENEGADE 2023 User Guide
[x] Cancel search | Manufacturer: JEEP, Model Year: 2023, Model line: RENEGADE, Model: JEEP RENEGADE 2023Pages: 364, PDF Size: 18.65 MB
Page 22 of 364

20 GETTING TO KNOW YOUR VEHICLE
Manual Temperature Control (MTC) — If Equipped
In ambient temperatures at 40°F (4.4°C) or
below, the climate settings will default to
maximum heat, with fresh air entering the
cabin. If the front defrost timer expires, the
vehicle will enter Mix Mode.
In ambient temperatures from 40°F (4.4°C) to
78°F (26°C), the climate settings will be based
on the last settings selected by the driver.
In ambient temperatures at 78°F (26°C) or
above, the climate settings will default to MAX
A/C, Bi-Level Mode, with Recirculation on.
For more information on ATC, MTC, and climate
control
settings, see Ú page 44.
NOTE:
These features will stay on through the duration of
Remote
Start until the ignition is placed in the ON/
RUN position. The climate control settings will
change if manually adjusted by the driver while the
vehicle is in Remote Start mode, and exit auto -
matic override. This includes the OFF button on the
clima t
e controls, which will turn the system off.
REMOTE START WINDSHIELD WIPER
D
E–ICER ACTIVATION — IF EQUIPPED
When Remote Start Is active and the outside
ambient temperature is less than 40°F (4.4°C),
the Windshield Wiper De-Icer will activate. Exiting
Remote Start will resume its previous operation. If the Windshield Wiper De-Icer was active, the timer
and operation will continue
Ú page 349.
REMOTE START CANCEL MESSAGE —
I
F EQUIPPED
The following messages will display in the
instrument cluster display if the vehicle fails to
remote start or exits Remote Start prematurely:
Remote Start Cancelled — Door Open
Remote Start Cancelled — Hood Open
Remote Start Cancelled — Fuel Low
Remote Start Cancelled — Liftgate Open
Remote Start Cancelled — Too Cold
Remote Start Cancelled — Time Expired
Remote Start Disabled — Start Vehicle To Reset
The message will stay active until the ignition is
p la
ce
d
in the ON/RUN position.
VEHICLE SECURITY SYSTEM — IF EQUIPPED
The Vehicle Security system monitors the vehicle
doors, hood, liftgate, and the Keyless Enter ‘n Go™
Ignition for unauthorized operation. While the
Vehicle Security system is armed, interior switches
for door locks and liftgate release are disabled. If
something triggers the system, the Vehicle Security
system will provide the following audible and
visible signals:
The horn will pulse
The turn signals will flash
The Vehicle Security Light in the instrument
cluster will flash
NOTE:
The Vehicle Security system is factory adjusted
to standards from different countries.
The Vehicle Security system is a complementary
security system developed to hinder the occur -
rence of vehicle theft and prevent vandalism. It
does not
prevent the theft of your vehicle; the
system is a deterrent.
The Vehicle Security system does not monitor
glass breakage or the movement of objects or
people inside the vehicle. The alarm does not
intervene in the case of vehicle tilt variations
when it is parked.
TO ARM THE SYSTEM
Follow these steps to arm the Vehicle Security
system:
1. Make sure the vehicle’s ignition is placed in the OF
F position.
2. Perform one of the following methods to lock the v
ehicle:
Push the lock button on the interior power
door lock switch with the driver and/or
passenger door open.
Page 23 of 364
GETTING TO KNOW YOUR VEHICLE 21
(Continued)
Push the lock button on the exterior Passive
Entry door handle with a valid key fob avail -
able in the same exterior zone Ú page 22.
Push the lock button on the key fob.
3. If any doors are open, close them.
TO DISARM THE SYSTEM
The Vehicle Security system can be disarmed using
any of the following methods:
Push the unlock button on the key fob.
Grab the Passive Entry door handle to unlock
the door Ú page 22.
Cycle the ignition out of the OFF position to
disarm the system.
NOTE:
The driver's door key cylinder cannot arm or
disarm the Vehicle Security system.
When the Vehicle Security system is armed, the
interior power door lock switches will not unlock
the doors.
The Vehicle Security system is designed to protect
your v e
hicle. However, you can create conditions
where the system will give you a false alarm. If one
of the previously described arming sequences has
occurred, the Vehicle Security system will arm
regardless of whether you are in the vehicle or not.
If you remain in the vehicle and open a door, the alarm will sound. If this occurs, disarm the Vehicle
Security system.
If the Vehicle Security system is armed and the
batte
r
y becomes disconnected, the Vehicle
Security system will remain armed when the
battery is reconnected; the exterior lights will flash,
and the horn will sound. If this occurs, disarm the
Vehicle Security system.
To completely disable the alarm (e.g. in the case of
long in
activity of the vehicle), lock the doors by
turning the emergency key in the exterior door lock
cylinder.
NOTE:
If the batteries in the key fob discharge in the event
of a f a
ilure to the system, place the ignition in the
ON/RUN position to turn the alarm off.
DOORS
MANUAL DOOR LOCKS
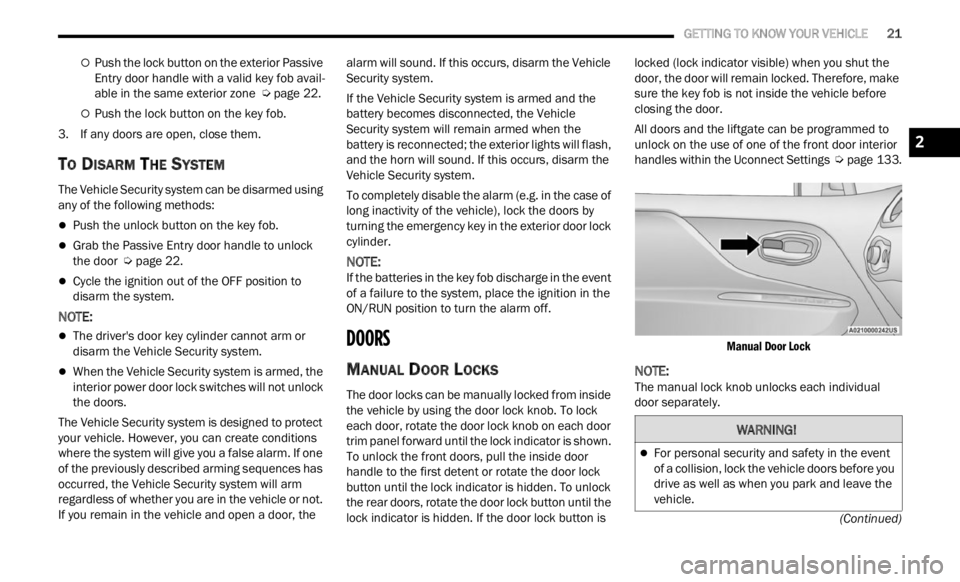
The door locks can be manually locked from inside
the vehicle by using the door lock knob. To lock
each door, rotate the door lock knob on each door
trim panel forward until the lock indicator is shown.
To unlock the front doors, pull the inside door
handle to the first detent or rotate the door lock
button until the lock indicator is hidden. To unlock
the rear doors, rotate the door lock button until the
lock indicator is hidden. If the door lock button is locked (lock indicator visible) when you shut the
door, the door will remain locked. Therefore, make
sure the key fob is not inside the vehicle before
closing the door.
All doors and the liftgate can be programmed to
unlock
on the use of one of the front door interior
handles within the Uconnect Settings Ú page 133.
Manual Door Lock
NOTE:
The manual lock knob unlocks each individual
door se p
arately.
WARNING!
For personal security and safety in the event
of a collision, lock the vehicle doors before you
drive as well as when you park and leave the
vehicle.
2
Page 24 of 364
22 GETTING TO KNOW YOUR VEHICLE
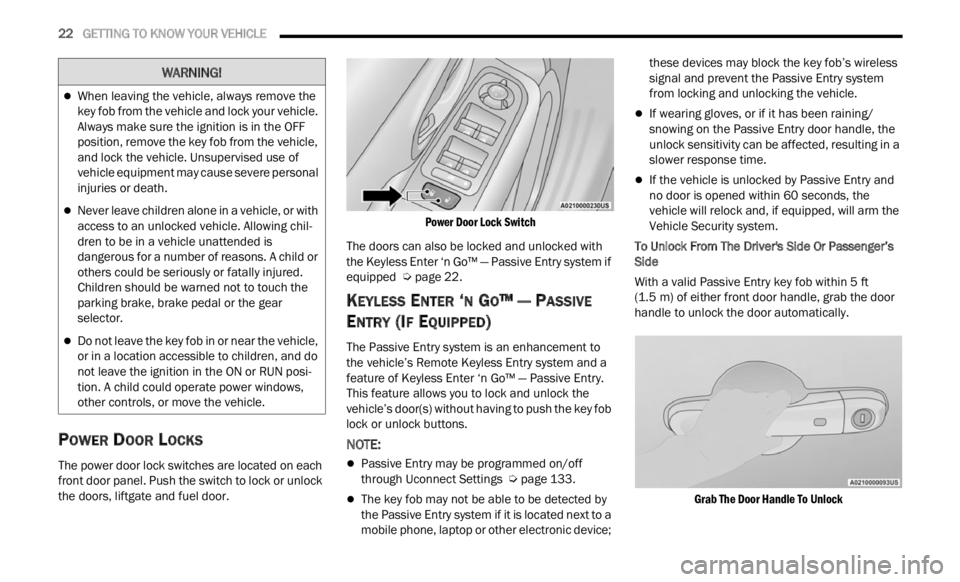
POWER DOOR LOCKS
The power door lock switches are located on each
front door panel. Push the switch to lock or unlock
the doors, liftgate and fuel door.
Power Door Lock Switch
The doors can also be locked and unlocked with
the K e
yless Enter ‘n Go™ — Passive Entry system if
equipped Ú page 22.
KEYLESS ENTER ‘N GO™ — PASSIVE
E
NTRY (IF EQUIPPED)
The Passive Entry system is an enhancement to
the vehicle’s Remote Keyless Entry system and a
feature of Keyless Enter ‘n Go™ — Passive Entry.
This feature allows you to lock and unlock the
vehicle’s door(s) without having to push the key fob
lock or unlock buttons.
NOTE:
Passive Entry may be programmed on/off
through Uconnect Settings Ú page 133.
The key fob may not be able to be detected by
the Passive Entry system if it is located next to a
mobile phone, laptop or other electronic device; these devices may block the key fob’s wireless
signal and prevent the Passive Entry system
from locking and unlocking the vehicle.
If wearing gloves, or if it has been raining/
snowing on the Passive Entry door handle, the
unlock sensitivity can be affected, resulting in a
slower response time.
If the vehicle is unlocked by Passive Entry and
no door is opened within 60 seconds, the
vehicle will relock and, if equipped, will arm the
Vehicle Security system.
To Unlock From The Driver's Side Or Passenger’s
Side
Wit
h a valid Passive Entry key fob within 5 ft
(1.5 m)
of either front door handle, grab the door
handl e
to unlock the door automatically.
Grab The Door Handle To Unlock
When leaving the vehicle, always remove the
key fob from the vehicle and lock your vehicle.
Always make sure the ignition is in the OFF
position, remove the key fob from the vehicle,
and lock the vehicle. Unsupervised use of
vehicle equipment may cause severe personal
injuries or death.
Never leave children alone in a vehicle, or with
access to an unlocked vehicle. Allowing chil -
dren to be in a vehicle unattended is
d anger
ous for a number of reasons. A child or
others could be seriously or fatally injured.
Children should be warned not to touch the
parking brake, brake pedal or the gear
selector.
Do not leave the key fob in or near the vehicle,
or in a location accessible to children, and do
not leave the ignition in the ON or RUN posi -
tion. A child could operate power windows,
other c
ontrols, or move the vehicle.
WARNING!
Page 25 of 364
GETTING TO KNOW YOUR VEHICLE 23
NOTE:
Either the driver door only or all doors will unlock
when you grab hold of the front driver’s door
handle, depending on the selected setting in the
Uconnect system
Ú page 133.
All doors will unlock when the front passenger
door handle is grabbed regardless of the
driver’s door unlock preference setting.
Frequency Operated Button Integrated Key
(FOBI K
-Safe)
To minimize the possibility of unintentionally
locking
a Passive Entry key fob inside your vehicle,
the Passive Entry system is equipped with an
automatic door unlock feature which will function if
the ignition switch is in the OFF position.
There are three situations that trigger a
FOBIK -
Safe search in any Passive Entry vehicle:
A lock request is made by a valid Passive Entry
key fob while a door is open.
A lock request is made by the Passive Entry door
handle while a door is open.
A lock request is made by the door panel switch
while the door is open.
When any of these situations occur, after all open
doors ar
e shut, the FOBIK-Safe search will be
executed. If it detects a Passive Entry key fob inside the vehicle and it does not detect any
Passive Entry key fobs outside the vehicle, then the
vehicle will unlock and alert the customer.
NOTE:
The vehicle will only unlock the doors when a valid
Passi v
e Entry key fob is detected inside the
vehicle. The vehicle will not unlock the doors when
any of the following conditions are true:
The doors are manually locked using the door
lock knobs.
Three attempts are made to lock the doors
using the door panel switch and then the doors
are closed.
There is a valid Passive Entry key fob outside the
vehicle and within 5 ft (1.5 m) of either Passive
Entry
door handle.
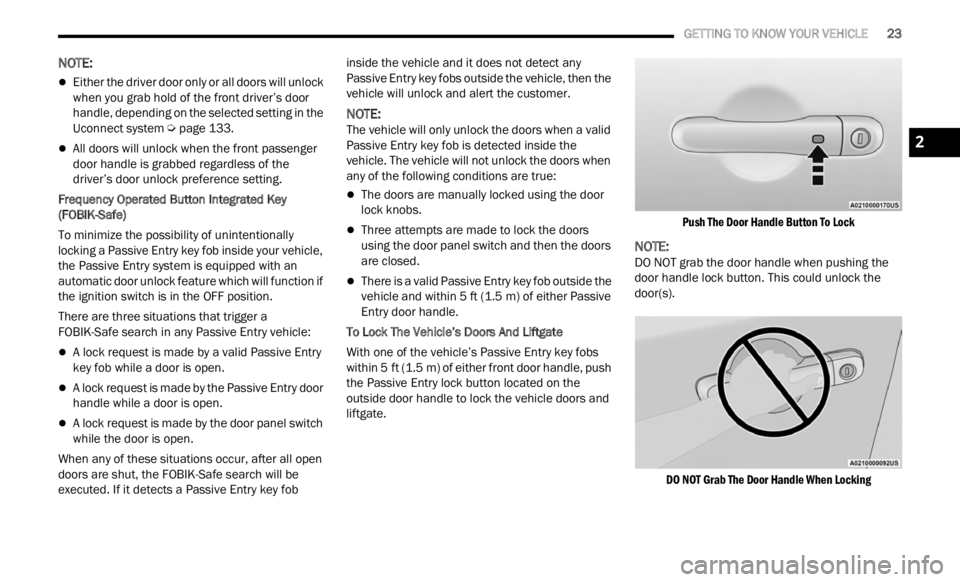
To Lock The Vehicle’s Doors And Liftgate
With one of the vehicle’s Passive Entry key fobs
withi n
5 ft (1.5 m) of either front door handle, push
the P a
ssive Entry lock button located on the
outside door handle to lock the vehicle doors and
liftgate.
Push The Door Handle Button To Lock
NOTE:
DO NOT grab the door handle when pushing the
door ha n
dle lock button. This could unlock the
door(s).
DO NOT Grab The Door Handle When Locking
2
Page 26 of 364
24 GETTING TO KNOW YOUR VEHICLE
NOTE:
After pushing the door handle button, you must
wait two seconds before you can lock or unlock
the doors, using either Passive Entry door
handle. This is done to allow you to check if the
vehicle is locked by pulling the door handle
without the vehicle unlocking.
The Passive Entry system will not operate if the
key fob battery is depleted.
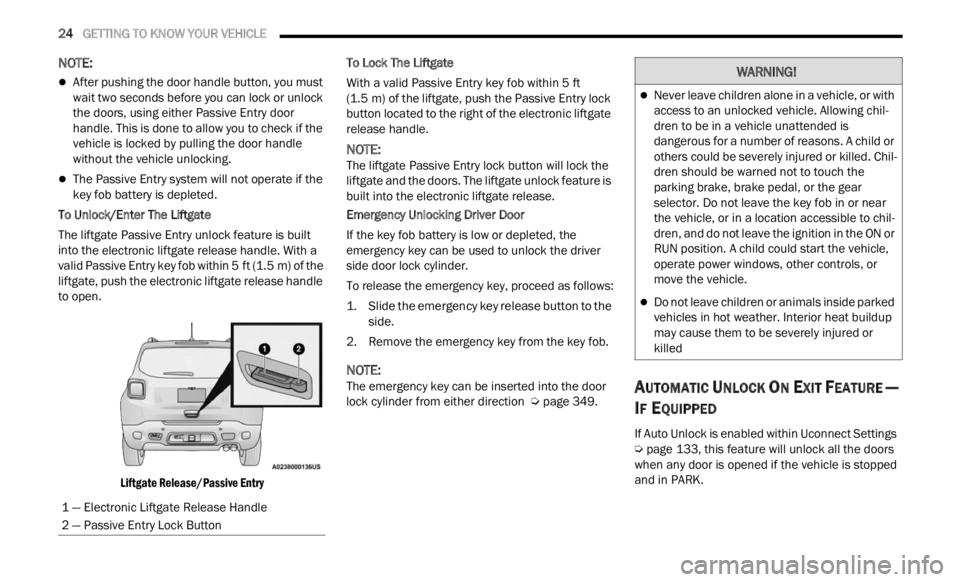
To Unlock/Enter The Liftgate
The liftgate Passive Entry unlock feature is built
into t h
e electronic liftgate release handle. With a
valid Passive Entry key fob within 5 ft (1.5 m) of the
liftga
te, push the electronic liftgate release handle
to open.
Liftgate Release/Passive Entry
To Lock The Liftgate
With a valid Passive Entry key fob within 5
ft
(1.5 m)
of the liftgate, push the Passive Entry lock
button
located to the right of the electronic liftgate
release handle.
NOTE:
The liftgate Passive Entry lock button will lock the
liftg a
te and the doors. The liftgate unlock feature is
built into the electronic liftgate release.
Emergency Unlocking Driver Door
If the key fob battery is low or depleted, the
e merge
ncy key can be used to unlock the driver
side door lock cylinder.
To release the emergency key, proceed as follows:
1. S lide the emergency key release button to the
side.
2
. Remove the emergency key from the key fob.
NOTE:
The emergency key can be inserted into the door
lock c y
linder from either direction Ú page 349.
AUTOMATIC UNLOCK ON EXIT FEATURE —
I
F EQUIPPED
If Auto Unlock is enabled within Uconnect Settings
Ú page 133, this feature will unlock all the doors
when any door is opened if the vehicle is stopped
a nd in
PARK.
1 — Electronic Liftgate Release Handle
2 — Passive Entry Lock Button
WARNING!
Never leave children alone in a vehicle, or with
access to an unlocked vehicle. Allowing chil -
dren to be in a vehicle unattended is
d anger
ous for a number of reasons. A child or
others could be severely injured or killed. Chil -
dren should be warned not to touch the
p arki
n
g brake, brake pedal, or the gear
selector. Do not leave the key fob in or near
the vehicle, or in a location accessible to chil -
dren, and do not leave the ignition in the ON or
R UN pos
ition. A child could start the vehicle,
operate power windows, other controls, or
move the vehicle.
Do not leave children or animals inside parked
vehicles in hot weather. Interior heat buildup
may cause them to be severely injured or
killed
Page 27 of 364
GETTING TO KNOW YOUR VEHICLE 25
DEAD LOCK DEVICE — IF EQUIPPED
The Dead Lock Device is a safety device that
prevents the use of the internal door handles of
the vehicle and the power door lock switch.
This device prevents the doors from opening within
the p a
ssenger compartment.
Arming The Dead Lock Device
The device works on all doors and requires two
pushes of the lock button on the key fob. For
vehicles equipped with Passive Entry, the device
will also work by pushing the lock button on the
driver’s or passenger’s side exterior door
handle.
The arming of the device is indicated by three
flashes of the turn signals.
The device does not operate if one or more
doors are not properly closed.
Disarming The Device
The device will automatically disarm by pushing
the unlock button on the key fob. For vehicles
equipped with Passive Entry, the device will also
disarm by using the driver or passenger Passive
Entry door handle to unlock and open the door.
Placing the ignition in the ON/RUN position.
CHILD LOCKS
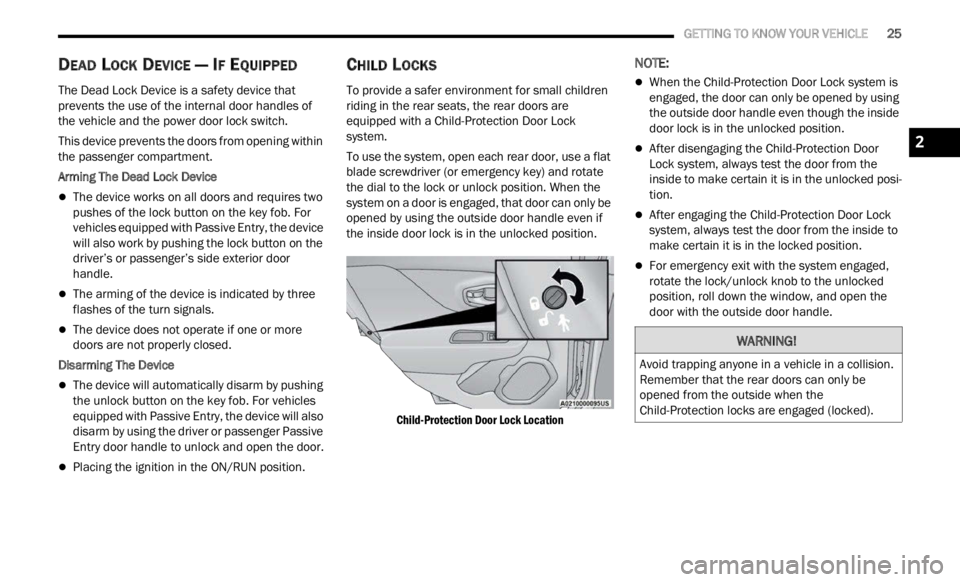
To provide a safer environment for small children
riding in the rear seats, the rear doors are
equipped with a Child-Protection Door Lock
system.
To use the system, open each rear door, use a flat
blade
screwdriver (or emergency key) and rotate
the dial to the lock or unlock position. When the
system on a door is engaged, that door can only be
opened by using the outside door handle even if
the inside door lock is in the unlocked position.
Child-Protection Door Lock Location
NOTE:
When the Child-Protection Door Lock system is
engaged, the door can only be opened by using
the outside door handle even though the inside
door lock is in the unlocked position.
After disengaging the Child-Protection Door
Lock system, always test the door from the
inside to make certain it is in the unlocked posi -
tion.
After engaging the Child-Protection Door Lock
system, always test the door from the inside to
make certain it is in the locked position.
For emergency exit with the system engaged,
rotate the lock/unlock knob to the unlocked
position, roll down the window, and open the
door with the outside door handle.
WARNING!
Avoid trapping anyone in a vehicle in a collision.
Remember that the rear doors can only be
opened from the outside when the
Child-Protection locks are engaged (locked).
2
Page 35 of 364
GETTING TO KNOW YOUR VEHICLE 33
UCONNECT VOICE RECOGNITION
INTRODUCING VOICE RECOGNITION
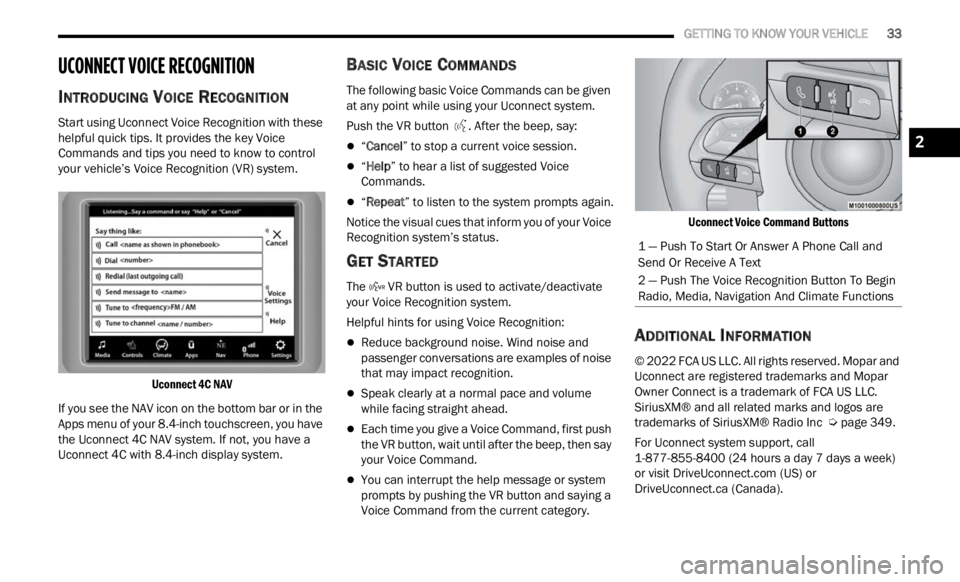
Start using Uconnect Voice Recognition with these
helpful quick tips. It provides the key Voice
Commands and tips you need to know to control
your vehicle’s Voice Recognition (VR) system.
Uconnect 4C NAV
If you see the NAV icon on the bottom bar or in the
Apps m
enu of your 8.4-inch touchscreen, you have
the Uconnect 4C NAV system. If not, you have a
Uconnect 4C with 8.4-inch display system.
BASIC VOICE COMMANDS
The following basic Voice Commands can be given
at any point while using your Uconnect system.
Push the VR button . After the beep, say:
“Cancel ” to stop a current voice session.
“Help ” to hear a list of suggested Voice
Commands.
“ Repeat ” to listen to the system prompts again.
Notice the visual cues that inform you of your Voice
Recogn i
tion system’s status.
GET STARTED
The VR button is used to activate/deactivate
your Voice Recognition system.
Helpful hints for using Voice Recognition:
Reduce background noise. Wind noise and
passenger conversations are examples of noise
that may impact recognition.
Speak clearly at a normal pace and volume
while facing straight ahead.
Each time you give a Voice Command, first push
the VR button, wait until after the beep, then say
your Voice Command.
You can interrupt the help message or system
prompts by pushing the VR button and saying a
Voice Command from the current category.
Uconnect Voice Command Buttons
ADDITIONAL INFORMATION
© 2022 FCA US LLC. All rights reserved. Mopar and
Uconnect are registered trademarks and Mopar
Owner Connect is a trademark of FCA US LLC.
SiriusXM® and all related marks and logos are
trademarks of SiriusXM® Radio Inc
Ú page 349.
For Uconnect system support, call
1-877 -
855-8400 (24 hours a day 7 days a week)
or visit DriveUconnect.com (US) or
DriveUconnect.ca (Canada).
1 — Push To Start Or Answer A Phone Call and
Send Or Receive A Text
2 — Push The Voice Recognition Button To Begin
Radio, Media, Navigation And Climate Functions
2
Page 41 of 364
GETTING TO KNOW YOUR VEHICLE 39
again. The front fog lights are deactivated each
time the parking or low beam lights are
deactivated or the ignition is placed in the OFF
position.
An indicator light in the instrument cluster
illumi
nates when the fog lights are turned on.
NOTE:
The fog lights will operate with the low beam head -
lights or parking lights on. Selecting the high beam
h eadl i
ghts will turn off the fog lights.
Cornering Lights
The cornering lights are a feature to improve
visib i
lity at night while turning the vehicle. When
activated, a light incorporated in the front fog light
will illuminate on the side of the vehicle the
steering wheel is rotated or the turn signal
indicator is on. It can be activated through the
Uconnect system Ú page 133.
TURN SIGNALS
Move the multifunction lever up or down to
activate the turn signals. The arrows on each side
of the instrument cluster display flash to show
proper operation.
LANE CHANGE ASSIST
Lightly push the multifunction lever up or down,
without moving beyond the detent, and the turn
signal will flash five times then automatically turn
off.
COURTESY LIGHTS
The courtesy lights feature allows you to activate
the low beam, parking lights, and sidemarker lights
for 25 seconds when the vehicle is unlocked
(through the key fob or the Passive Entry door
handles [if equipped]). The courtesy lights feature
can be activated or deactivated through the
Uconnect Settings. When a door is open with the
feature active, the activation of the lights is
extended for five seconds. The feature is disabled
when the vehicle is locked or when the ignition is
placed in the ON/RUN position.
INTERIOR LIGHTS
FRONT MAP/READING LIGHTS
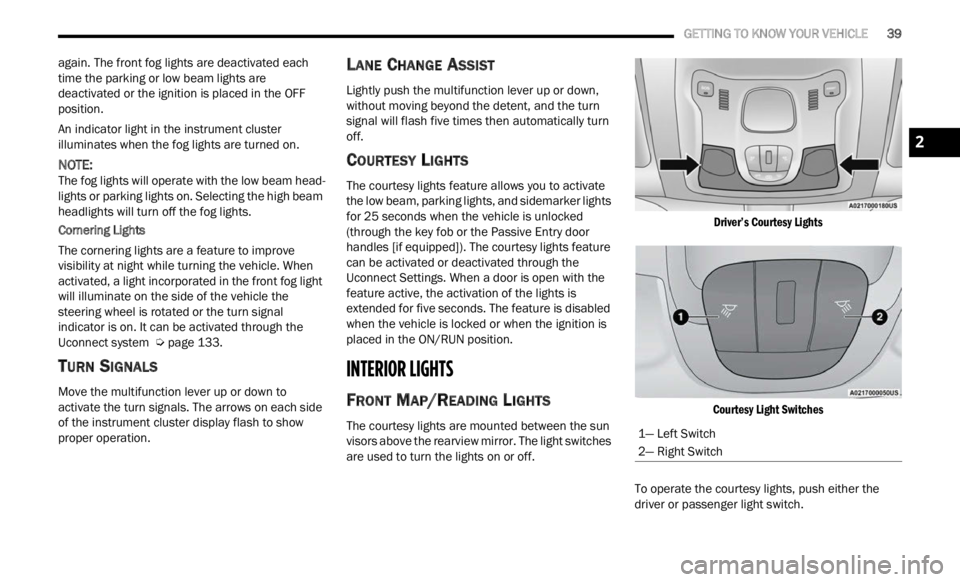
The courtesy lights are mounted between the sun
visors above the rearview mirror. The light switches
are used to turn the lights on or off.
Driver’s Courtesy Lights
Courtesy Light Switches
To operate the courtesy lights, push either the
d rive
r
or passenger light switch.
1— Left Switch
2— Right Switch
2
Page 43 of 364

GETTING TO KNOW YOUR VEHICLE 41
To operate the rear dome light, proceed as follows:
Push the switch to the on/right position from its
center position and the lights are always on.
Push the switch to the off/left position from its
center position and the lights are always off.
Leave the switch in the center position, and the
lights are turned on and off when the doors are
opened or closed.
DOME LIGHT TIMING
The dome light will automatically illuminate when
the doors are unlocked, the doors are opened or
after the doors are closed.
Timing Entering The Vehicle
The dome lights illuminate in the following ways:
When the doors are unlocked, the dome light
will illuminate for approximately 27 seconds.
When one of the doors is opened, the dome light
will illuminate for approximately three minutes.
When the doors are closed, the dome light will
automatically shut off after approximately 27
seconds.
The timing stops once the ignition is placed in the
ON/RU N
position. The dome light will turn off under any of the
follow
i
ng conditions:
The dome light is disabled when the ignition is
placed in the ON/RUN position.
The dome lights will turn off automatically when
the doors are locked.
The dome lights will automatically turn off after
approximately 15 minutes of inactivity to
prese r
ve the battery.
Timing Exiting The Vehicle
The dome light will illuminate under the following
condit i
ons when the ignition is placed to the OFF
position and the key is removed:
The dome light will illuminate for 27 seconds
after the ignition is placed in the OFF position.
The opening of one of the doors (approximately
three minutes).
After closing a door (approximately 27 seconds).
The dome light timing is disabled when the doors
a re
l
oc
ked.
WINDSHIELD WIPERS AND WASHERS
The windshield wiper/washer controls are located
on the windshield wiper/washer lever on the right
side of the steering column. The front wipers are
operated by rotating a switch, located on the end of
the lever.
Windshield Wiper Lever
1 — Push Forward For Rear Washer
2 — Rotate For Rear Wiper Operation
3 — Rotate For Front Wiper Operation
4 — Pull For Front Washer
5 — Push Up For Mist
CAUTION!
Always remove any buildup of snow that
prevents the windshield wiper blades from
returning to the “park” position. If the windshield
wiper switch is turned off, and the blades cannot
return to the “park” position, damage to the
wiper motor may occur.
2
Page 50 of 364

48 GETTING TO KNOW YOUR VEHICLE
leaves. Leaves collected in the air intake may
reduce airflow, and if they enter the air distribution
box, they could plug the water drains. In Winter
months, make sure the air intake is clear of ice,
slush, and snow.
Cabin Air Filter
The Climate Control system filters out dust and
pollen from the air. Contact an authorized dealer to
service your cabin air filter, and to have it replaced
when needed.
NOTE:
In the Red Special Series models, the cabin air
filte r
was treated with a biocide substance having
antibacterial and antiviral properties based on the
active ingredient, citric acid.
Stop/Start System — If Equipped
While in an Autostop, the Climate Control system
may automatically adjust airflow to maintain cabin
comfort. Customer settings will be maintained
upon return to an engine running condition.
Windshield Wiper De-Icer — If Equipped
The windshield wiper de-icer is a heating element
located at the base of the windshield.
It operates automatically once the following
conditi
ons are met:
Activation By Front Defrost
The wiper de-icer activates automatically during
a cold
weather manual start with full defrost,
and when the ambient temperature is below
40°F (4.4°C) .
Activation By Rear Defrost
The wiper de-icer activates automatically when
the R e
ar Defrost is operating and the ambient
temperature is below 40°F (4.4°C) .
Activation By Remote Start Operation
When Remote Start is active and the outside
ambient temperature is less than 40°F (4.4°C),
the Windshield Wiper De-Icer will activate.
Exiting Remote Start will resume its previous
operation. If the Windshield Wiper De-Icer was
active, the timer and operation will continue.
Operating Tips Chart
NOTE:
The following chart is for Manual Override Oper -
ation, otherwise run in AUTO.INTERIOR STORAGE AND EQUIPMENT
STORAGE
Glove Compartment
The glove compartment is located on the
passenger’s side of the instrument panel.
To open the glove compartment proceed as
follows:
1
. Unlock the compartment using the vehicle emerge
ncy key.
WEATHER CONTROL SETTINGS
Hot Weather And
Vehicle Interior Is Very Hot Set the mode control to
(Panel Mode), (A/C) on,
and blower on high. Roll
d own th
e windows for a
minute to flush out the hot
air. Adjust the controls as
needed to achieve comfort.
Warm WeatherTurn (A/C) on and set
the mode control to
(Panel Mode).
Cool Sunny Operate in
(Bi-Level
Mode).
Cool & Humid Condit i
ons Set the mode control to
(Floor Mode) and turn
(A/C) on to keep windows
c le
ar
.
C
old Weather Set the mode control to
(Floor Mode). If windshield
f ogging
starts to occur,
move the control to (Mix
Mode).
WEATHER CONTROL SETTINGS