key JEEP WRANGLER UNLIMITED 2020 Owner handbook (in English)
[x] Cancel search | Manufacturer: JEEP, Model Year: 2020, Model line: WRANGLER UNLIMITED, Model: JEEP WRANGLER UNLIMITED 2020Pages: 330, PDF Size: 9.16 MB
Page 130 of 330
SAFETY
128
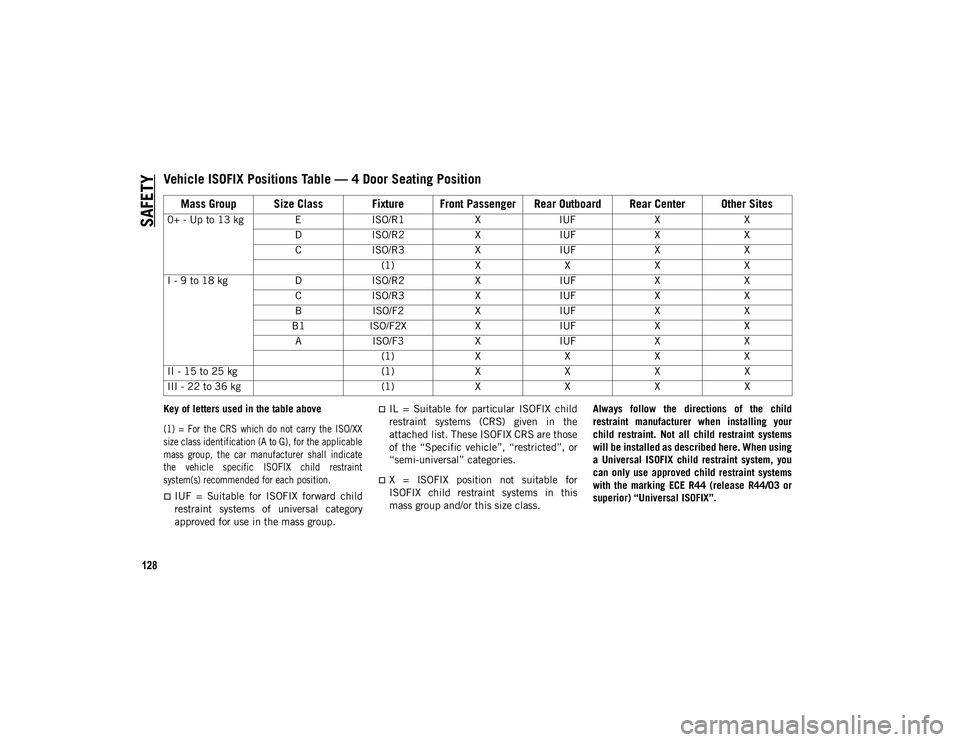
Key of letters used in the table above
(1) = For the CRS which do not carry the ISO/XX
size class identification (A to G), for the applicable
mass group, the car manufacturer shall indicate
the vehicle specific ISOFIX child restraint
system(s) recommended for each position.
IUF = Suitable for ISOFIX forward child
restraint systems of universal category
approved for use in the mass group.
IL = Suitable for particular ISOFIX child
restraint systems (CRS) given in the
attached list. These ISOFIX CRS are those
of the “Specific vehicle”, “restricted”, or
“semi-universal” categories.
X = ISOFIX position not suitable for
ISOFIX child restraint systems in this
mass group and/or this size class.Always follow the directions of the child
restraint manufacturer when installing your
child restraint. Not all child restraint systems
will be installed as described here. When using
a Universal ISOFIX child restraint system, you
can only use approved child restraint systems
with the marking ECE R44 (release R44/03 or
superior) “Universal ISOFIX”.
0+ - Up to 13 kg E
ISO/R1XIUF XX
D ISO/R2 XIUF XX
C ISO/R3 XIUF XX
(1) XXXX
I - 9 to 18 kg DISO/R2 XIUF XX
C ISO/R3 XIUF XX
B ISO/F2 XIUF XX
B1 ISO/F2X XIUF XX
A ISO/F3 XIUF XX
(1) XXXX
II - 15 to 25 kg (1)XXXX
III - 22 to 36 kg (1)XXXX
Vehicle ISOFIX Positions Table — 4 Door Seating Position
Mass Group Size Class Fixture Front Passenger Rear Outboard Rear Center Other Sites
2020_JEEP_JL_WRANGLER_UG_RHD_UK.book Page 128
Page 133 of 330
131
Suitability of Passenger Seats for i-Size
Child Restraint System Use
The rear outboard seats of the vehicle are
type-approved to house the state-of-the-art
i-Size child restraint systems.
These child restraint systems, built and
type-approved according to the i-Size (ECE
R129) standard, ensure better safety condi-
tions to carry children on board a vehicle:
The child must be transported rearward
facing until 15 months:
Child restraint system protection is
increased in the event of a side collision:
The use of the ISOFIX system is promoted
to avoid faulty installation of the child
restraint system:
Efficiency in the choice of the child
restraint system, which isn't made
according to weight anymore but
according to the child's height, is
increased:
Compatibility between the vehicle seats
and the child restraint systems is better:
the i-Size child restraint systems can be
considered as "Super ISOFIX"; this means
that they can be perfectly fitted in
type-approved i-Size seats, but can also be
fitted in ISOFIX (ECE R44) type-approved
seats.
NOTE:
The vehicle seats, i-Size type-approved, are
marked by the symbol shown in Figure XX. The following table, according to European
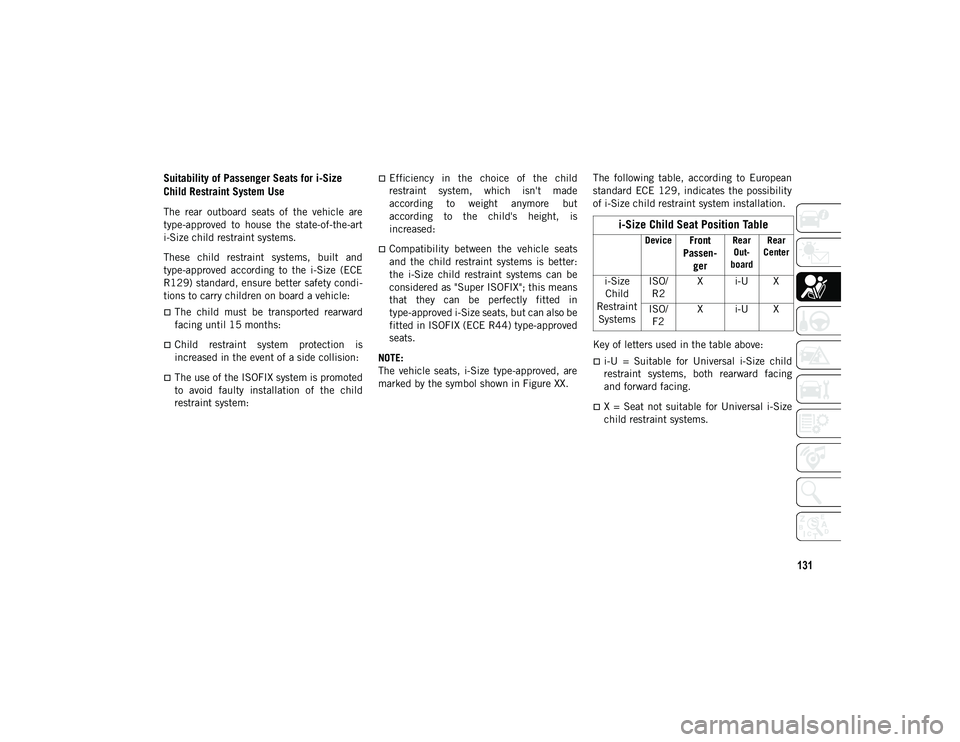
standard ECE 129, indicates the possibility
of i-Size child restraint system installation.
Key of letters used in the table above:
i-U = Suitable for Universal i-Size child
restraint systems, both rearward facing
and forward facing.
X = Seat not suitable for Universal i-Size
child restraint systems.
i-Size Child Seat Position Table
DeviceFront
Passen -
gerRear
Out -
board Rear
Center
i-Size Child
Restraint Systems ISO/
R2 X i-U X
ISO/ F2 X i-U X
2020_JEEP_JL_WRANGLER_UG_RHD_UK.book Page 131
Page 139 of 330
137
(Continued)
Periodic Safety Checks You Should Make
Outside The Vehicle
Tires
Examine tires for excessive tread wear and uneven
wear patterns. Check for stones, nails, glass, or
other objects lodged in the tread or sidewall.
Inspect the tread for cuts and cracks. Inspect side-
walls for cuts, cracks, and bulges. Check the wheel
nuts for tightness. Check the tires (including spare)
for proper cold inflation pressure.
Lights
Have someone observe the operation of brake
lights and exterior lights while you work the
controls. Check turn signal and high beam indi -
cator lights on the instrument panel.
Door Latches
Check for proper closing, latching, and
locking.
Fluid Leaks
Check area under vehicle after overnight
parking for fuel, coolant, oil, or other fluid
leaks. Also, if gasoline fumes are detected or
if fuel, or brake fluid leaks are suspected, the
cause should be located and corrected
immediately.
ALWAYS REMOVE THE EXISTING
FLOOR MAT FROM THE VEHICLE
before installing any other floor mat.
NEVER install or stack an additional
floor mat on top of an existing floor mat.
ONLY install floor mats designed to fit
your vehicle. NEVER install a floor mat
that cannot be properly attached and
secured to your vehicle. If a floor mat
needs to be replaced, only use a FCA
approved floor mat for the specific make,
model, and year of your vehicle.
ONLY use the driver’s side floor mat on
the driver’s side floor area. To check for
interference, with the vehicle properly
parked with the engine off, fully depress
the accelerator, the brake, and the
clutch pedal (if present) to check for
interference. If your floor mat interferes
with the operation of any pedal, or is not
secure to the floor, remove the floor mat
from the vehicle and place the floor mat
in your trunk.
ONLY use the passenger’s side floor mat
on the passenger’s side floor area.
WARNING! (Continued)
ALWAYS make sure objects cannot fall
or slide into the driver’s side floor area
when the vehicle is moving. Objects can
become trapped under accelerator,
brake, or clutch pedals and could cause
a loss of vehicle control.
NEVER place any objects under the floor
mat (e.g., towels, keys, etc.). These
objects could change the position of the
floor mat and may cause interference
with the accelerator, brake, or clutch
pedals.
If the vehicle carpet has been removed
and re-installed, always properly attach
carpet to the floor and check the floor
mat fasteners are secure to the vehicle
carpet. Fully depress each pedal to
check for interference with the acceler -
ator, brake, or clutch pedals then
re-install the floor mats.
It is recommended to only use mild soap
and water to clean your floor mats. After
cleaning, always check your floor mat
has been properly installed and is
secured to your vehicle using the floor
mat fasteners by lightly pulling mat.
WARNING! (Continued)
2020_JEEP_JL_WRANGLER_UG_RHD_UK.book Page 137
Page 140 of 330
138
STARTING AND OPERATING
STARTING THE ENGINE
Before starting your vehicle, adjust your seat,
adjust both inside and outside mirrors, and
fasten your seat belts.
Normal Starting — Gasoline Engine
To Turn On The Engine Using The ENGINE
START/STOP Button
1. The transmission must be in PARK (P) orNEUTRAL (N).
2. Press and hold the brake pedal while pushing the ENGINE START/STOP
button once.
3. The system takes over and attempts to start the vehicle. If the vehicle fails to
start, the starter will disengage automat -
ically after 10 seconds.
4. If you wish to stop the cranking of the engine prior to the engine starting, push
the ENGINE START/STOP button again.
NOTE:
Normal starting of either a cold or a warm
engine is obtained without pumping or
pressing the accelerator pedal.
To Turn Off The Engine Using ENGINE START/
STOP Button
1. Place the gear selector in PARK, then push and release the ENGINE START/
STOP button. 2. The ignition will return to the OFF mode.
3. If the gear selector is not in PARK (with
vehicle stopped) and the ENGINE
START/STOP button is pushed once, the
transmission will automatically select
PARK and the engine will turn off,
however the ignition will remain in the
ACC mode (NOT the OFF mode). Never
leave a vehicle out of the PARK position,
or it could roll.
4. If the gear selector is in NEUTRAL, and the vehicle speed is below 5 mph (8 km/h),
pushing the ENGINE START/STOP button
once will turn the engine off. The ignition
will remain in the ACC mode.
5. If the vehicle speed is above 5 mph (8 km/h), the ENGINE START/STOP
button must be held for two seconds (or
three short pushes in a row) to turn the
engine off. The ignition will remain in the
ACC mode (NOT the OFF mode) if the
engine is turned off when the transmis -
sion is not in PARK.
WARNING!
When exiting the vehicle, always remove
the key fob from the ignition and lock
your vehicle.
Never leave children alone in a vehicle,
or with access to an unlocked vehicle.
Allowing children to be in a vehicle unat -
tended is dangerous for a number of
reasons. A child or others could be seri -
ously or fatally injured. Children should
be warned not to touch the parking
brake, brake pedal or the gear selector.
Do not leave the key fob in or near the
vehicle, or in a location accessible to
children. A child could operate power
windows, other controls, or move the
vehicle.
Do not leave children or animals inside
parked vehicles in hot weather. Interior
heat build-up may cause serious injury or
death.
2020_JEEP_JL_WRANGLER_UG_RHD_UK.book Page 138
Page 141 of 330
139
NOTE:
The system will automatically time out and
the ignition will cycle to the OFF mode after
30 minutes of inactivity if the ignition is left
in the ACC or RUN (engine not running)
mode and the transmission is in PARK.
ENGINE START/STOP Button Functions — With
Driver’s Foot OFF The Brake Pedal (In PARK Or
NEUTRAL Position)
The ENGINE START/STOP button operates
similar to an ignition switch. It has three
modes: OFF, ACC, and RUN. To change the
ignition modes without starting the vehicle
and use the accessories, follow these steps:
1. Starting with the ignition in the OFF mode,
2. Push the ENGINE START/STOP button onceto place the ignition to the ACC mode (instru -
ment cluster will display “ACC”),
3. Push the ENGINE START/STOP button a second time to place the ignition to the
RUN mode (instrument cluster will
display “ON/RUN”),
4. Push the ENGINE START/STOP button a third time to return the ignition to the
OFF mode (instrument cluster will
display “OFF”).AutoPark
AutoPark is a supplemental feature to assist
in placing the vehicle in PARK should the
situations on the following pages occur. It is
a back up system and should not be relied
upon as the primary method by which the
driver shifts the vehicle into PARK.
The conditions under which AutoPark will
engage are outlined on the following pages. If the vehicle is not in PARK and the driver turns
off the engine, the vehicle may AutoPark.
AutoPark will engage when all of these
conditions are met:
Vehicle is equipped with an 8-speed trans-
mission
Driver’s door is ajar or in conditions where
driver door is removed an additional
trigger would be if the driver is off the seat
(seat pad sensor detects driver missing).
Vehicle is not in PARK
Vehicle speed is 0 mph (0 km/h)
Ignition switched from RUN to OFF
NOTE:
For Keyless Enter-N-Go equipped vehicles,
The engine will turn off and the ignition
switch will change to ACC mode. After
30 minutes the ignition switches to OFF
automatically, unless the driver turns the
ignition switch OFF.
WARNING!
Driver inattention could lead to failure to
place the vehicle in PARK. ALWAYS DO
A VISUAL CHECK that your vehicle is in
PARK by verifying that a solid (not
blinking) “P” is indicated in the instru -
ment cluster display and on the gear
selector. If the "P" indicator is blinking,
your vehicle is not in PARK. As an added
precaution, always apply the parking
brake when exiting the vehicle.
AutoPark is a supplemental feature. It is
not designed to replace the need to shift
your vehicle into PARK. It is a back up
system and should not be relied upon as
the primary method by which the driver
shifts the vehicle into PARK.
2020_JEEP_JL_WRANGLER_UG_RHD_UK.book Page 139
Page 146 of 330
STARTING AND OPERATING
144
(Continued)
Ignition Park Interlock
This vehicle is equipped with an Ignition
Park Interlock which requires the transmis-
sion to be in PARK before the ignition can be
turned to the OFF mode. This helps the
driver avoid inadvertently leaving the vehicle
without placing the transmission in PARK.
This system also locks the transmission in
PARK whenever the ignition is in the OFF
mode. NOTE:
The transmission is NOT locked in PARK
when the ignition is in the ACC mode (even
though the engine will be off). Ensure that
the transmission is in PARK, and the ignition
is
OFF (not in ACC mode) before exiting the
vehicle.
Brake/Transmission Shift Interlock
System
This vehicle is equipped with a Brake Trans -
mission Shift Interlock system (BTSI) that
holds the transmission gear selector in PARK
unless the brakes are applied. To shift the
transmission out of PARK, the engine must
be running and the brake pedal must be
pressed. The brake pedal must also be
pressed to shift from NEUTRAL into DRIVE
or REVERSE when the vehicle is stopped or
moving at low speeds.
It is dangerous to shift out of PARK or
NEUTRAL if the engine speed is higher
than idle speed. If your foot is not firmly
pressing the brake pedal, the vehicle
could accelerate quickly forward or in
reverse. You could lose control of the
vehicle and hit someone or something.
Only shift into gear when the engine is
idling normally and your foot is firmly
pressing the brake pedal.
Unintended movement of a vehicle could
injure those in or near the vehicle. As
with all vehicles, you should never exit a
vehicle while the engine is running.
Before exiting a vehicle, always come to
a complete stop, then apply the parking
brake, shift the transmission into PARK,
and turn the ignition OFF. When the igni -
tion is in the OFF mode, the transmis-
sion is locked in PARK, securing the
vehicle against unwanted movement.
When exiting the vehicle, always make
sure the ignition is in the OFF mode,
remove the key fob from the vehicle, and
lock the vehicle.
WARNING! (Continued)
Never leave children alone in a vehicle,
or with access to an unlocked vehicle.
Allowing children to be in a vehicle unat -
tended is dangerous for a number of
reasons. A child or others could be seri -
ously or fatally injured. Children should
be warned not to touch the parking
brake, brake pedal or the transmission
gear selector.
Do not leave the key fob in or near the
vehicle (or in a location accessible to
children), and do not leave the ignition
in the ACC or ON/RUN mode. A child
could operate power windows, other
controls, or move the vehicle.
WARNING! (Continued)
2020_JEEP_JL_WRANGLER_UG_RHD_UK.book Page 144
Page 184 of 330
IN CASE OF EMERGENCY
182
Halogen Front Fog Lamp
NOTE:
We advise referring to an authorized dealer
for service.
1. Reach under the vehicle to access theback of the front fog lamp.
2. Disconnect the wire harness connector from the front fog lamp connector recep -
tacle.
3. Firmly grasp the bulb by the two latch features and squeeze them together to
unlock the bulb from the back of the
front fog lamp housing.
4. Pull the bulb straight out from the keyed opening in the housing and then connect
the replacement bulb. LED Front Fog Lamp
Please see an authorized dealer for service.
Rear Tail, Stop, Turn Signal, And Backup
Lamp
1. Remove interior trim panel cap to access
single retaining screw for tail lamp
assembly.
Trim Cap
2. Remove retaining screw and disconnect electrical connector, then remove tail
lamp assembly from the vehicle.
NOTE:
If necessary, push in on the assembly tab
located inboard behind the lamp housing. Retaining Screw
3. Remove the three screws from assembly bracket to access bulb sockets.
Assembly Bracket
4. Rotate the appropriate socket a quarter turn counterclockwise, then remove it
from the housing.
5. Pull the bulb straight from the socket to replace.
CAUTION!
Do not touch the new bulb with your
fingers. Oil contamination will severely
shorten bulb life. If the bulb comes in
contact with any oily surface, clean the
bulb with rubbing alcohol.
2020_JEEP_JL_WRANGLER_UG_RHD_UK.book Page 182
Page 185 of 330
183
(Continued)
Center High Mounted Stop Lamp (CHMSL)
Please see an authorized dealer for service.
License Plate Lamps
1. Reach under the vehicle to access theback of the lamp.
2. Firmly grasp the bulb by the two latch features and squeeze them together to
unlock the bulb from the back of the
lamp housing.
Rear Fog Lamp
NOTE:
We advise referring to an authorized dealer
for service.
1. Reach under the vehicle to access theback of the fog lamp.
2. Disconnect the wire harness connector from the fog lamp connector receptacle.
3. Rotate the socket a quarter turn counter -
clockwise, then remove it from the
housing.
4. Pull the bulb straight out from the keyed opening in the housing and then connect
the replacement bulb and reassemble.
FUSES
General Information
The fuses protect electrical systems against
excessive current.
When a device does not work, you must
check the fuse element inside the blade fuse
for a break/melt.
Also, please be aware that when using power
outlets for extended periods of time with the
engine off may result in vehicle battery
discharge.
CAUTION!
Do not touch the new bulb with your
fingers. Oil contamination will severely
shorten bulb life. If the bulb comes in
contact with any oily surface, clean the
bulb with rubbing alcohol.
WARNING!
When replacing a blown fuse, always use
an appropriate replacement fuse with
the same amp rating as the original fuse.
Never replace a fuse with another fuse of
higher amp rating. Never replace a blown
fuse with metal wires or any other mate-
rial. Failure to use proper fuses may
result in serious personal injury, fire and/
or property damage.
Before replacing a fuse, make sure that
the ignition is off and that all the other
services are switched off and/or disen -
gaged.
If the replaced fuse blows again, contact
an authorized dealer.
If a general protection fuse for safety
systems (air bag system, braking
system), power unit systems (engine
system, gearbox system) or steering
system blows, contact an authorized
dealer.
CAUTION!
If it is necessary to wash the engine
compartment, take care not to directly hit
the fuse box, and the windshield wiper
motors with water.
WARNING! (Continued)
2020_JEEP_JL_WRANGLER_UG_RHD_UK.book Page 183
Page 187 of 330
185
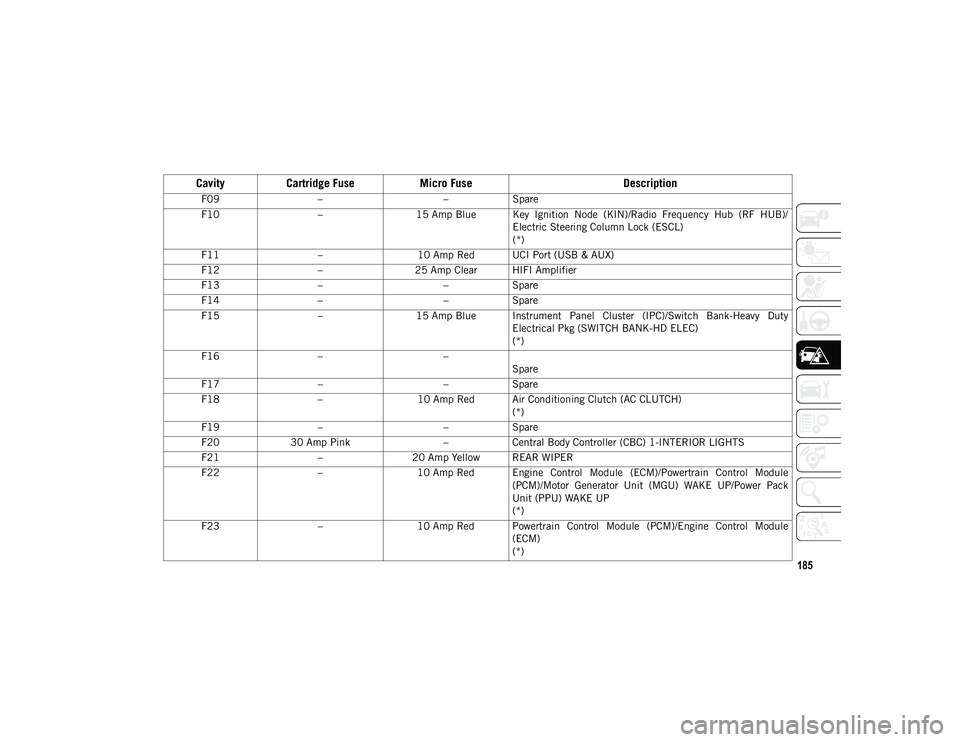
F09– –Spare
F10 –15 Amp Blue Key Ignition Node (KIN)/Radio Frequency Hub (RF HUB)/
Electric Steering Column Lock (ESCL)
(*)
F11 –10 Amp Red UCI Port (USB & AUX)
F12 –25 Amp Clear HIFI Amplifier
F13 – –Spare
F14 – –Spare
F15 –15 Amp Blue Instrument Panel Cluster (IPC)/Switch Bank-Heavy Duty
Electrical Pkg (SWITCH BANK-HD ELEC)
(*)
F16 – –
Spare
F17 – –Spare
F18 –10 Amp Red Air Conditioning Clutch (AC CLUTCH)
(*)
F19 – –Spare
F20 30 Amp Pink –Central Body Controller (CBC) 1-INTERIOR LIGHTS
F21 –20 Amp Yellow REAR WIPER
F22 –10 Amp Red Engine Control Module (ECM)/Powertrain Control Module
(PCM)/Motor Generator Unit (MGU) WAKE UP/Power Pack
Unit (PPU) WAKE UP
(*)
F23 –10 Amp Red Powertrain Control Module (PCM)/Engine Control Module
(ECM)
(*)
CavityCartridge Fuse Micro Fuse Description
2020_JEEP_JL_WRANGLER_UG_RHD_UK.book Page 185
Page 196 of 330
IN CASE OF EMERGENCY
194
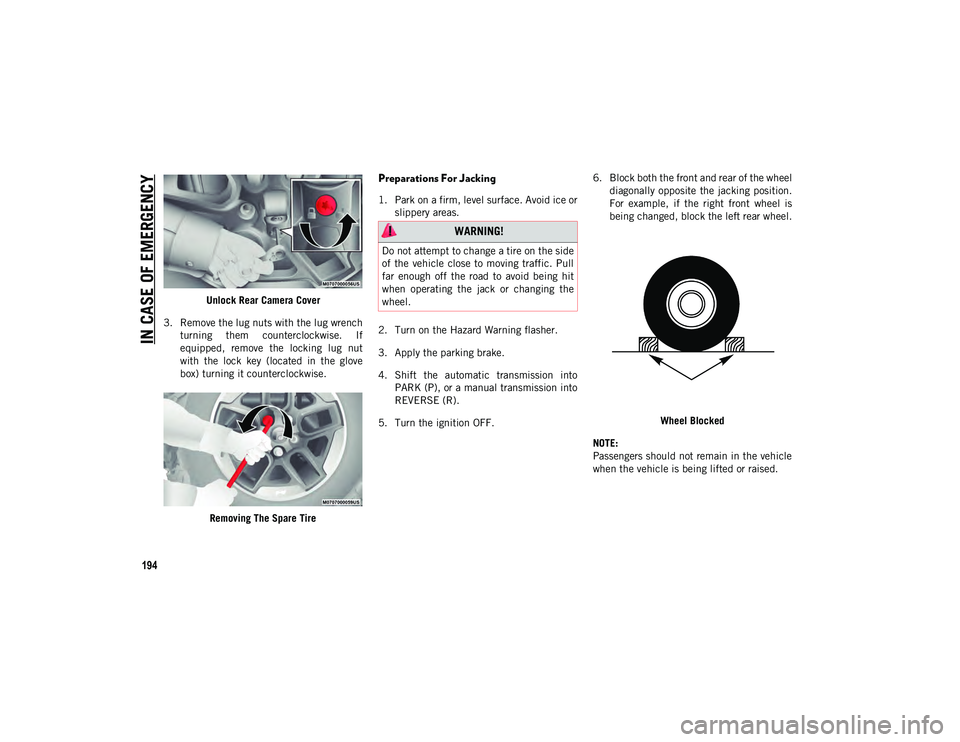
Unlock Rear Camera Cover
3. Remove the lug nuts with the lug wrench turning them counterclockwise. If
equipped, remove the locking lug nut
with the lock key (located in the glove
box) turning it counterclockwise.
Removing The Spare Tire
Preparations For Jacking
1. Park on a firm, level surface. Avoid ice orslippery areas.
2. Turn on the Hazard Warning flasher.
3. Apply the parking brake.
4. Shift the automatic transmission into PARK (P), or a manual transmission into
REVERSE (R).
5. Turn the ignition OFF. 6. Block both the front and rear of the wheel
diagonally opposite the jacking position.
For example, if the right front wheel is
being changed, block the left rear wheel.
Wheel Blocked
NOTE:
Passengers should not remain in the vehicle
when the vehicle is being lifted or raised.
WARNING!
Do not attempt to change a tire on the side
of the vehicle close to moving traffic. Pull
far enough off the road to avoid being hit
when operating the jack or changing the
wheel.
2020_JEEP_JL_WRANGLER_UG_RHD_UK.book Page 194