JEEP XJ 1995 Service And Repair Manual
Manufacturer: JEEP, Model Year: 1995, Model line: XJ, Model: JEEP XJ 1995Pages: 2158, PDF Size: 81.9 MB
Page 1941 of 2158
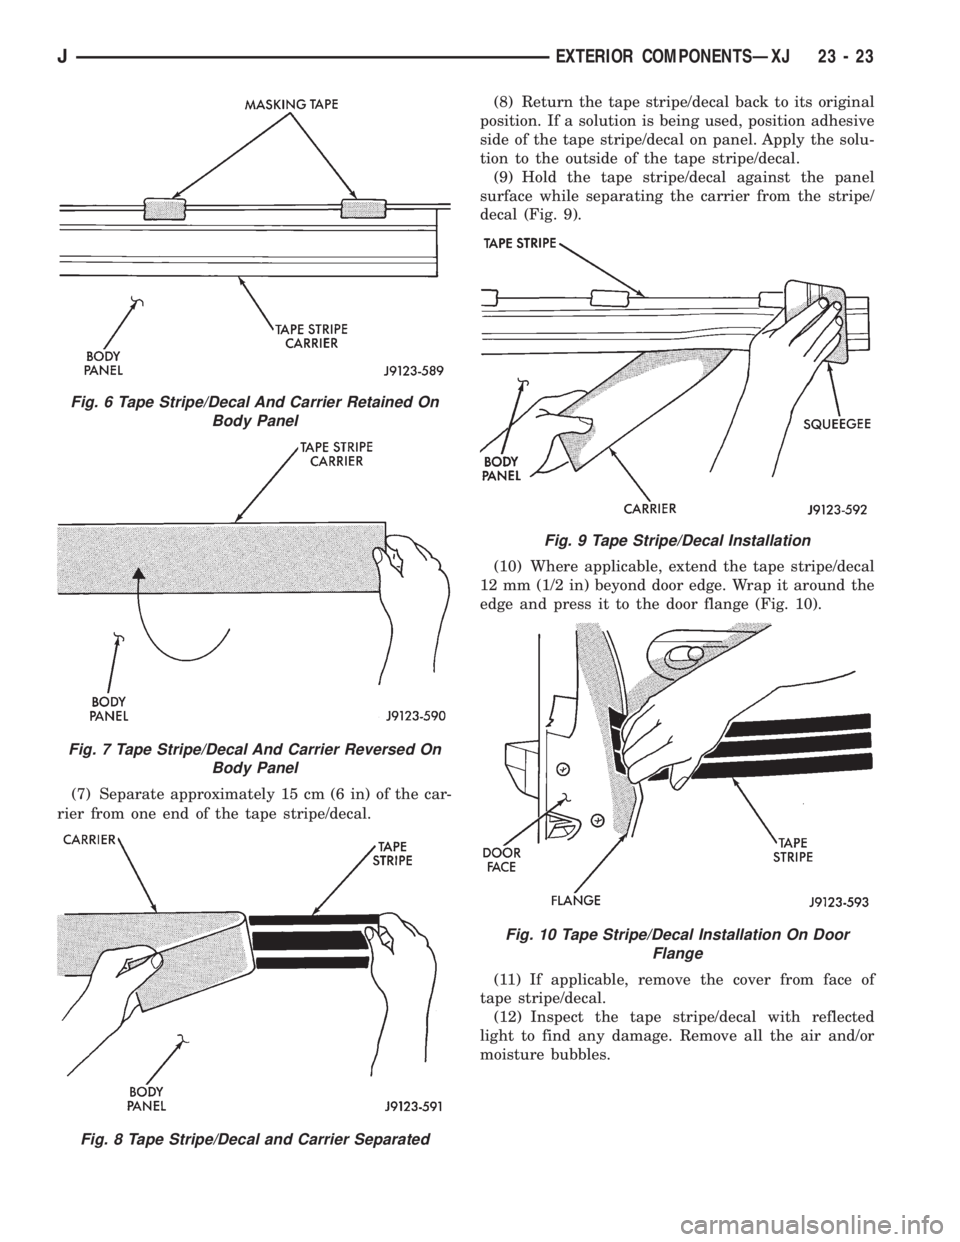
(7) Separate approximately 15 cm (6 in) of the car-
rier from one end of the tape stripe/decal.(8) Return the tape stripe/decal back to its original
position. If a solution is being used, position adhesive
side of the tape stripe/decal on panel. Apply the solu-
tion to the outside of the tape stripe/decal.
(9) Hold the tape stripe/decal against the panel
surface while separating the carrier from the stripe/
decal (Fig. 9).
(10) Where applicable, extend the tape stripe/decal
12 mm (1/2 in) beyond door edge. Wrap it around the
edge and press it to the door flange (Fig. 10).
(11) If applicable, remove the cover from face of
tape stripe/decal.
(12) Inspect the tape stripe/decal with reflected
light to find any damage. Remove all the air and/or
moisture bubbles.
Fig. 6 Tape Stripe/Decal And Carrier Retained On
Body Panel
Fig. 7 Tape Stripe/Decal And Carrier Reversed On
Body Panel
Fig. 8 Tape Stripe/Decal and Carrier Separated
Fig. 9 Tape Stripe/Decal Installation
Fig. 10 Tape Stripe/Decal Installation On Door
Flange
JEXTERIOR COMPONENTSÐXJ 23 - 23
Page 1942 of 2158
COMPLETE REPLACEMENT
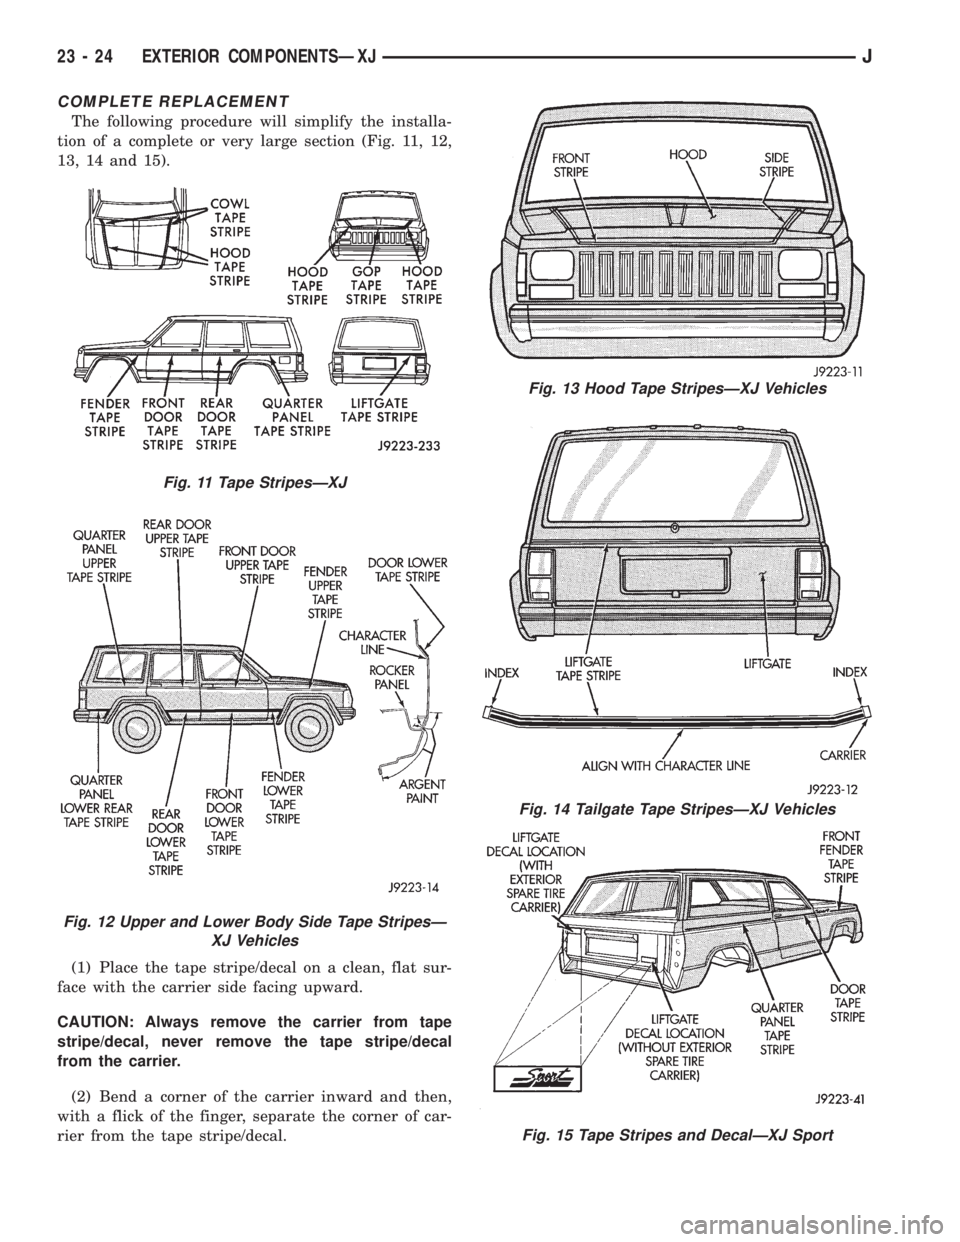
The following procedure will simplify the installa-
tion of a complete or very large section (Fig. 11, 12,
13, 14 and 15).
(1) Place the tape stripe/decal on a clean, flat sur-
face with the carrier side facing upward.
CAUTION: Always remove the carrier from tape
stripe/decal, never remove the tape stripe/decal
from the carrier.
(2) Bend a corner of the carrier inward and then,
with a flick of the finger, separate the corner of car-
rier from the tape stripe/decal.
Fig. 11 Tape StripesÐXJ
Fig. 12 Upper and Lower Body Side Tape StripesÐ
XJ Vehicles
Fig. 13 Hood Tape StripesÐXJ Vehicles
Fig. 14 Tailgate Tape StripesÐXJ Vehicles
Fig. 15 Tape Stripes and DecalÐXJ Sport
23 - 24 EXTERIOR COMPONENTSÐXJJ
Page 1943 of 2158
(3) Retain the tape stripe/decal firmly against flat
surface and separate the carrier from tape stripe/de-
cal.
(4) Use a sponge and apply solution to the tape
stripe/decal adhesive and to panel surface.
(5) Position the adhesive side of tape stripe/decal
on the panel with the bottom aligned with the char-
acter line.
²Align the end of the replacement tape stripe/decal
with the end of existing tape stripe/decal.
²Correctly align the index darts and index notches.
(6) If a complete replacement tape stripe/decal is
not being installed:
²Position the replacement tape stripe/decal section
at the center of the repair area.
²Align it with the existing tape stripe/decal.
²Allow at least 12 mm (1/2 in) of the tape stripe/de-
cal section to overlap the tape stripe/decal edges.
(7) Apply the wetting solution to the outer side of
the tape stripe/decal.
CAUTION: Avoid unnecessary pulling and stretch-
ing at the ends.
(8) Slide a squeegee from the center to the ends of
the tape stripe/decal. Use firm strokes to remove all
of the air bubbles.
(9) If a wrinkle is trapped in the tape stripe/decal
stop immediately. Lift the wrinkled area and re-align
it with the character line to remove the wrinkle.Do
not lift the tape stripe/decal if only a few air
bubbles exist.
(10) Where applicable, allow 12 mm (1/2 in) extra
tape stripe/decal to extend beyond edges.
(11) Fold the excess tape onto the inside flange and
adhere it with finger pressure.
(12) Inspect the tape stripe/decal installation with
the reflected light to find any damage.
(13) Remove all the air and moisture bubbles from
the tape stripe/decal with a needle or pin.
(14) Install any removed components and clean the
vehicle as necessary.
QUARTER WINDOW APPLIQUEÐXJ
REMOVAL/INSTALLATION
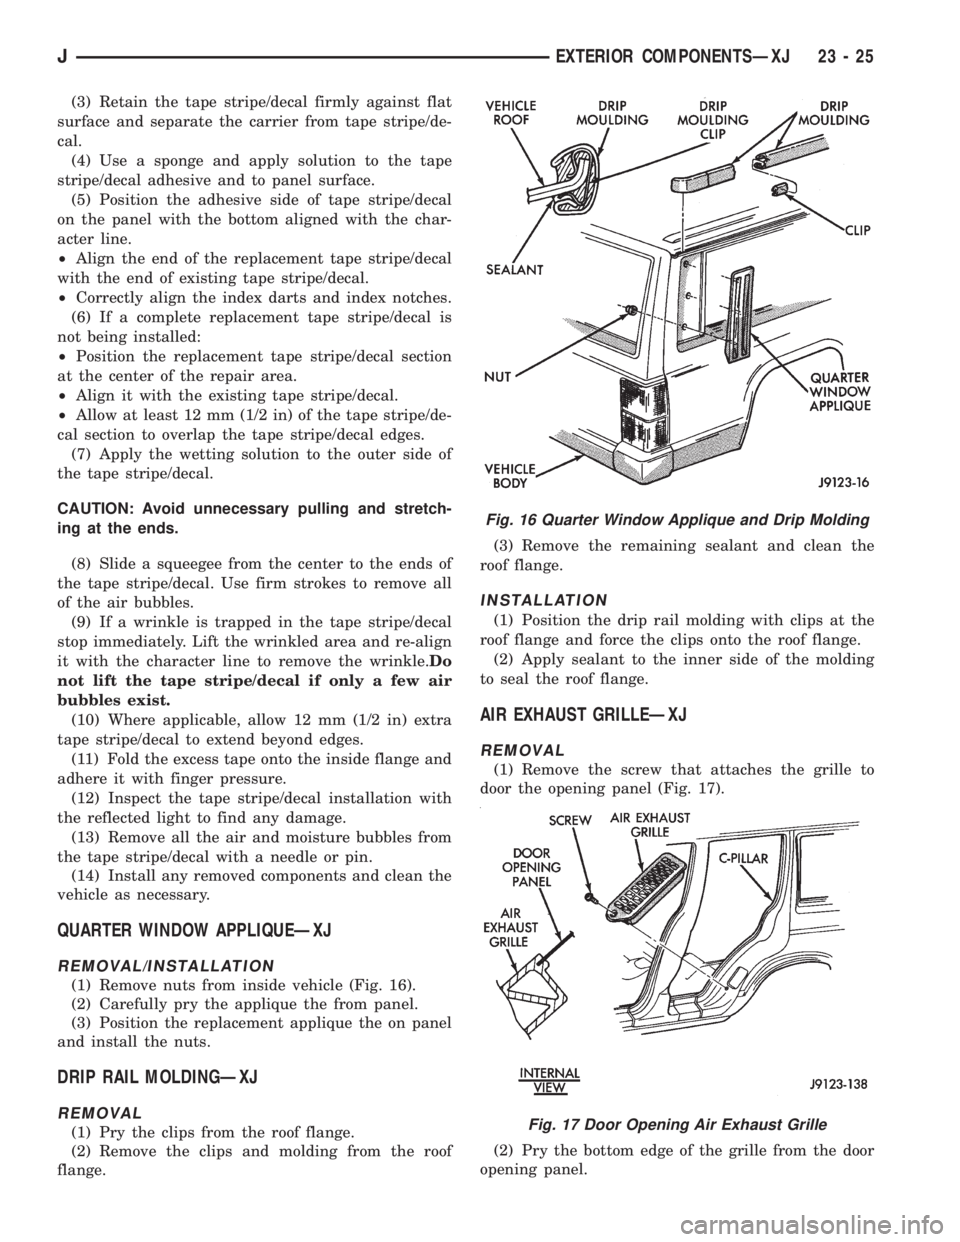
(1) Remove nuts from inside vehicle (Fig. 16).
(2) Carefully pry the applique the from panel.
(3) Position the replacement applique the on panel
and install the nuts.
DRIP RAIL MOLDINGÐXJ
REMOVAL
(1) Pry the clips from the roof flange.
(2) Remove the clips and molding from the roof
flange.(3) Remove the remaining sealant and clean the
roof flange.
INSTALLATION
(1) Position the drip rail molding with clips at the
roof flange and force the clips onto the roof flange.
(2) Apply sealant to the inner side of the molding
to seal the roof flange.
AIR EXHAUST GRILLEÐXJ
REMOVAL
(1) Remove the screw that attaches the grille to
door the opening panel (Fig. 17).
(2) Pry the bottom edge of the grille from the door
opening panel.
Fig. 16 Quarter Window Applique and Drip Molding
Fig. 17 Door Opening Air Exhaust Grille
JEXTERIOR COMPONENTSÐXJ 23 - 25
Page 1944 of 2158
(3) Pull downward and remove the grille from ex-
haust port in the door opening panel.
INSTALLATION
(1) Position the slot located in the upper end of re-
placement grille at the exhaust port and insert edge
in the slot.
(2) Push inward and seat the grille in the exhaust
port.
(3) Install the screw to attach the grille to the door
opening panel.
EXTERIOR NAMEPLATESÐXJ
SERVICE INFORMATION
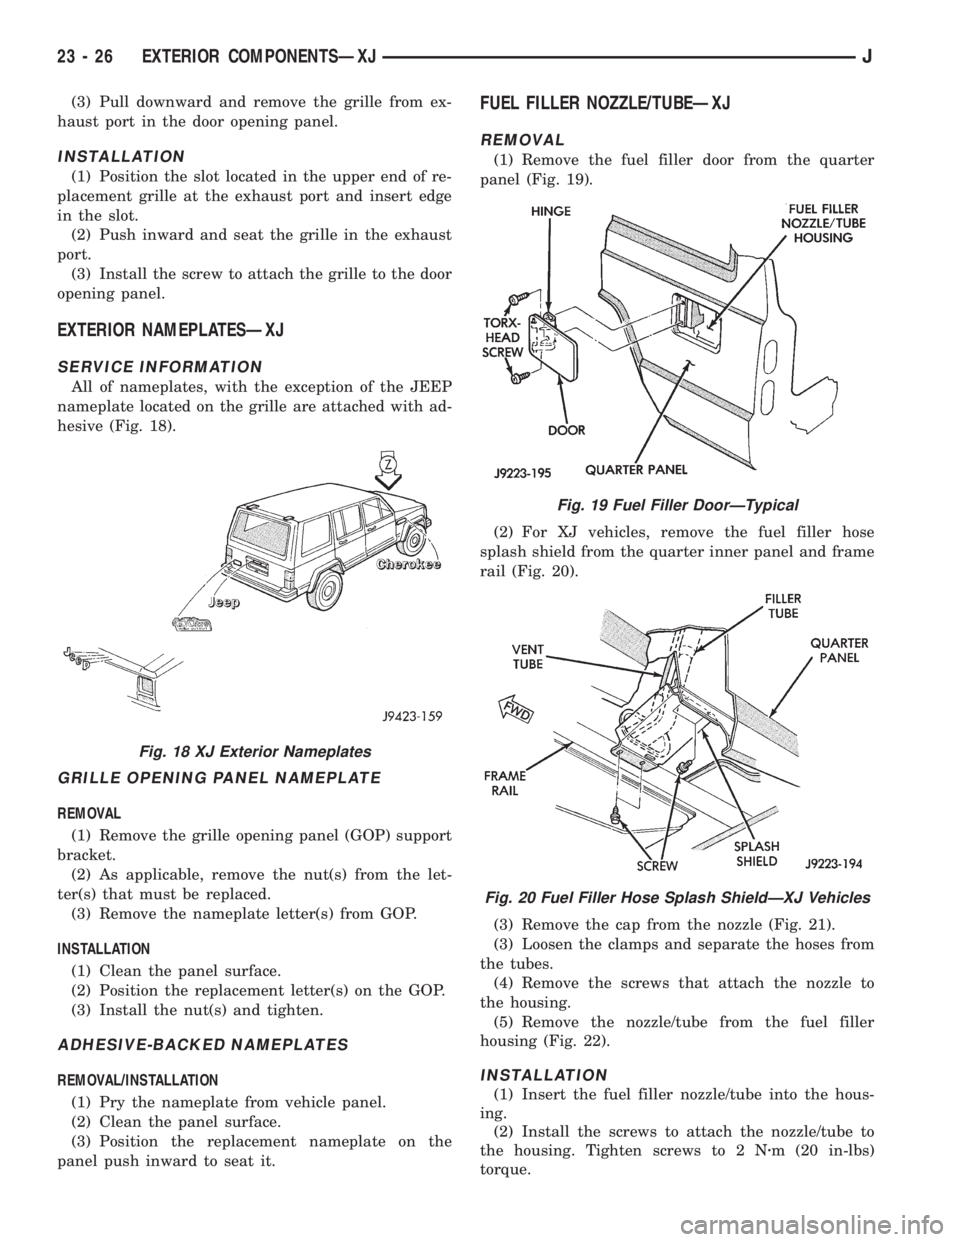
All of nameplates, with the exception of the JEEP
nameplate located on the grille are attached with ad-
hesive (Fig. 18).
GRILLE OPENING PANEL NAMEPLATE
REMOVAL
(1) Remove the grille opening panel (GOP) support
bracket.
(2) As applicable, remove the nut(s) from the let-
ter(s) that must be replaced.
(3) Remove the nameplate letter(s) from GOP.
INSTALLATION
(1) Clean the panel surface.
(2) Position the replacement letter(s) on the GOP.
(3) Install the nut(s) and tighten.
ADHESIVE-BACKED NAMEPLATES
REMOVAL/INSTALLATION
(1) Pry the nameplate from vehicle panel.
(2) Clean the panel surface.
(3) Position the replacement nameplate on the
panel push inward to seat it.
FUEL FILLER NOZZLE/TUBEÐXJ
REMOVAL
(1) Remove the fuel filler door from the quarter
panel (Fig. 19).
(2) For XJ vehicles, remove the fuel filler hose
splash shield from the quarter inner panel and frame
rail (Fig. 20).
(3) Remove the cap from the nozzle (Fig. 21).
(3) Loosen the clamps and separate the hoses from
the tubes.
(4) Remove the screws that attach the nozzle to
the housing.
(5) Remove the nozzle/tube from the fuel filler
housing (Fig. 22).
INSTALLATION
(1) Insert the fuel filler nozzle/tube into the hous-
ing.
(2) Install the screws to attach the nozzle/tube to
the housing. Tighten screws to 2 Nzm (20 in-lbs)
torque.
Fig. 18 XJ Exterior Nameplates
Fig. 19 Fuel Filler DoorÐTypical
Fig. 20 Fuel Filler Hose Splash ShieldÐXJ Vehicles
23 - 26 EXTERIOR COMPONENTSÐXJJ
Page 1945 of 2158
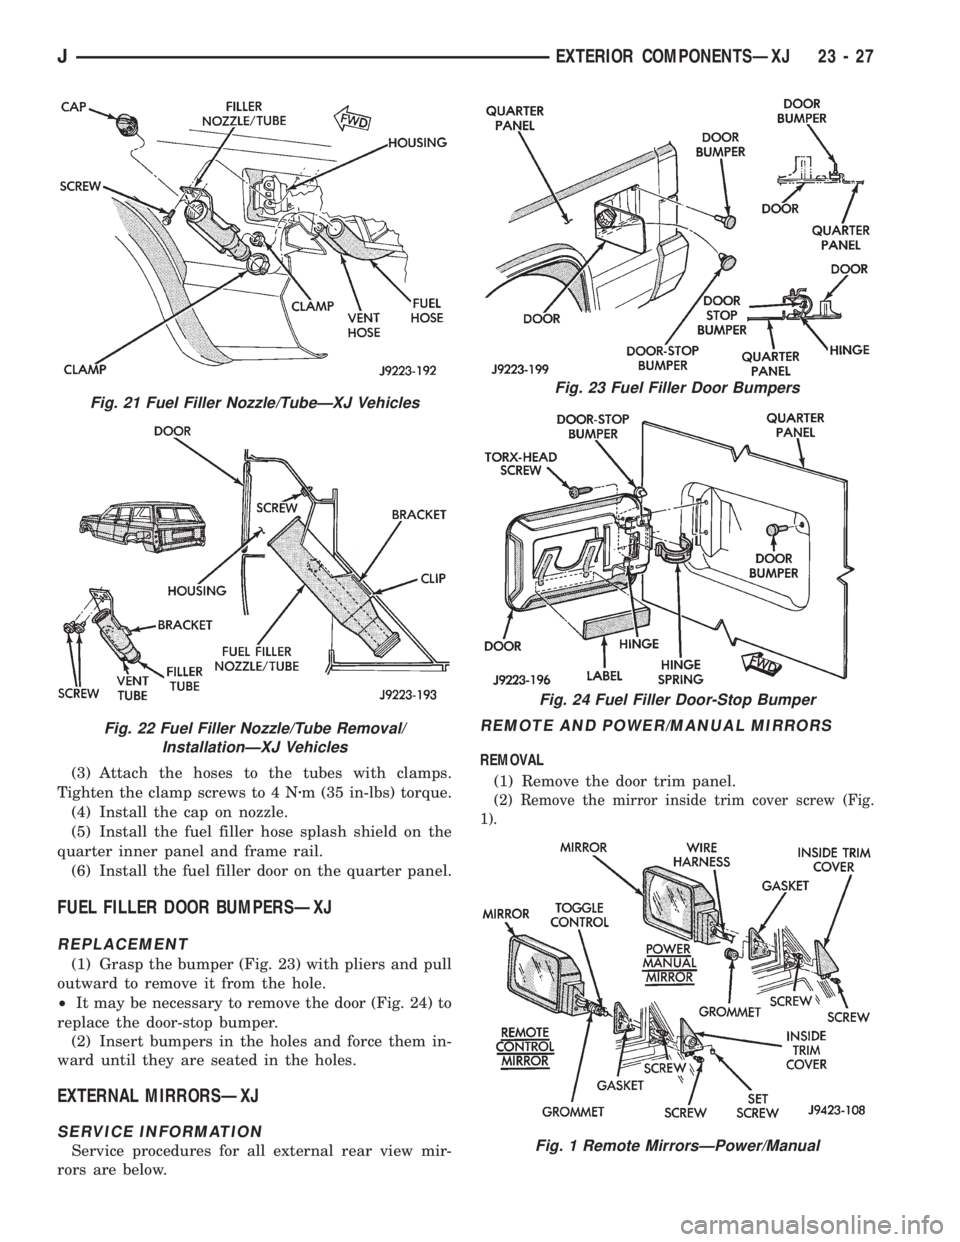
(3) Attach the hoses to the tubes with clamps.
Tighten the clamp screws to 4 Nzm (35 in-lbs) torque.
(4) Install the cap on nozzle.
(5) Install the fuel filler hose splash shield on the
quarter inner panel and frame rail.
(6) Install the fuel filler door on the quarter panel.
FUEL FILLER DOOR BUMPERSÐXJ
REPLACEMENT
(1) Grasp the bumper (Fig. 23) with pliers and pull
outward to remove it from the hole.
²It may be necessary to remove the door (Fig. 24) to
replace the door-stop bumper.
(2) Insert bumpers in the holes and force them in-
ward until they are seated in the holes.
EXTERNAL MIRRORSÐXJ
SERVICE INFORMATION
Service procedures for all external rear view mir-
rors are below.
REMOTE AND POWER/MANUAL MIRRORS
REMOVAL
(1) Remove the door trim panel.
(2) Remove the mirror inside trim cover screw (Fig.
1).
Fig. 21 Fuel Filler Nozzle/TubeÐXJ Vehicles
Fig. 22 Fuel Filler Nozzle/Tube Removal/
InstallationÐXJ Vehicles
Fig. 23 Fuel Filler Door Bumpers
Fig. 24 Fuel Filler Door-Stop Bumper
Fig. 1 Remote MirrorsÐPower/Manual
JEXTERIOR COMPONENTSÐXJ 23 - 27
Page 1946 of 2158
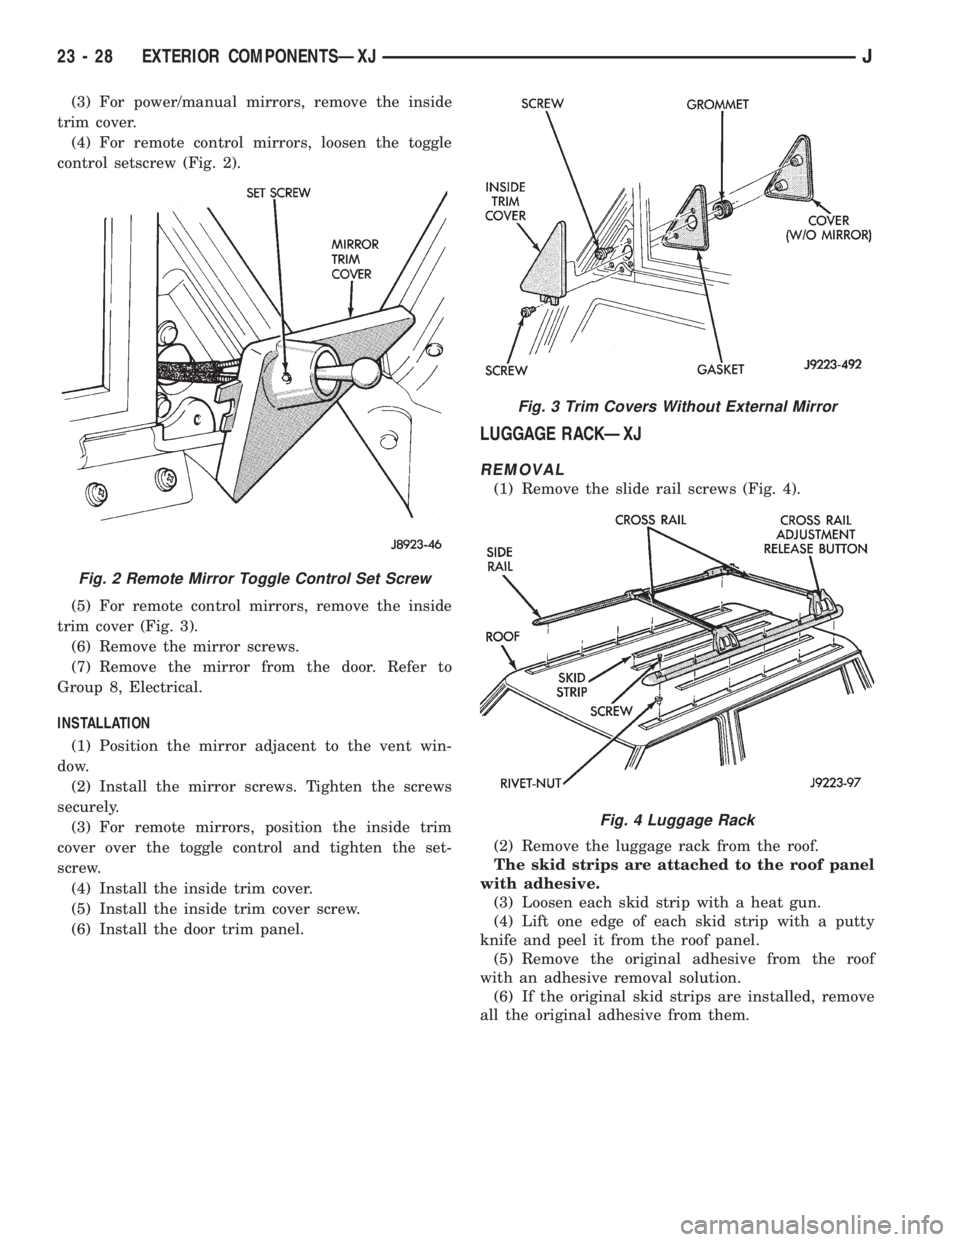
(3) For power/manual mirrors, remove the inside
trim cover.
(4) For remote control mirrors, loosen the toggle
control setscrew (Fig. 2).
(5) For remote control mirrors, remove the inside
trim cover (Fig. 3).
(6) Remove the mirror screws.
(7) Remove the mirror from the door. Refer to
Group 8, Electrical.
INSTALLATION
(1) Position the mirror adjacent to the vent win-
dow.
(2) Install the mirror screws. Tighten the screws
securely.
(3) For remote mirrors, position the inside trim
cover over the toggle control and tighten the set-
screw.
(4) Install the inside trim cover.
(5) Install the inside trim cover screw.
(6) Install the door trim panel.
LUGGAGE RACKÐXJ
REMOVAL
(1) Remove the slide rail screws (Fig. 4).
(2) Remove the luggage rack from the roof.
The skid strips are attached to the roof panel
with adhesive.
(3) Loosen each skid strip with a heat gun.
(4) Lift one edge of each skid strip with a putty
knife and peel it from the roof panel.
(5) Remove the original adhesive from the roof
with an adhesive removal solution.
(6) If the original skid strips are installed, remove
all the original adhesive from them.
Fig. 2 Remote Mirror Toggle Control Set Screw
Fig. 3 Trim Covers Without External Mirror
Fig. 4 Luggage Rack
23 - 28 EXTERIOR COMPONENTSÐXJJ
Page 1947 of 2158
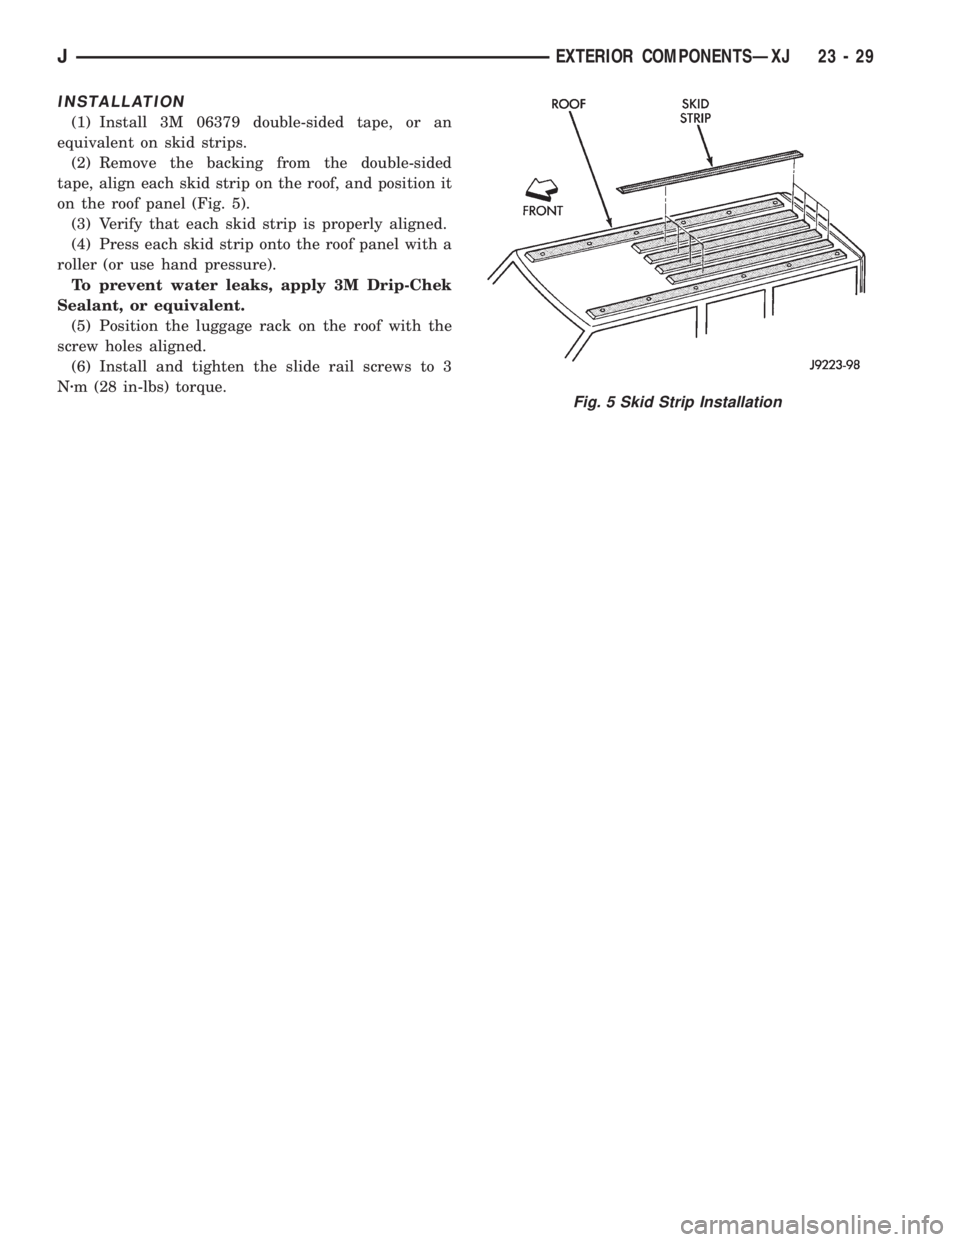
INSTALLATION
(1) Install 3M 06379 double-sided tape, or an
equivalent on skid strips.
(2) Remove the backing from the double-sided
tape, align each skid strip on the roof, and position it
on the roof panel (Fig. 5).
(3) Verify that each skid strip is properly aligned.
(4) Press each skid strip onto the roof panel with a
roller (or use hand pressure).
To prevent water leaks, apply 3M Drip-Chek
Sealant, or equivalent.
(5) Position the luggage rack on the roof with the
screw holes aligned.
(6) Install and tighten the slide rail screws to 3
Nzm (28 in-lbs) torque.
Fig. 5 Skid Strip Installation
JEXTERIOR COMPONENTSÐXJ 23 - 29
Page 1948 of 2158
DOORS
INDEX
page page
Door Alignment AdjustmentÐMajor............ 41
Door Alignment AdjustmentÐMinor............ 37
Door Edge Guard/Edge Protector StripÐXJ...... 54
Door External HandleÐXJ................... 48
Door Hinge/Hinge Pin ReplacementÐXJ........ 52
Door Inside Latch Release and Lock RodsÐXJ . . . 50
Door Key Lock CylinderÐXJ................. 47
Door Latch AdjustmentÐXJ.................. 48
Door LatchÐXJ.......................... 49
Door Removal/InstallationÐXJ............... 35
Door Restraint ReplacementÐXJ............. 41
Door Trim PanelÐXJ...................... 31
Door Window Exterior MoldingsÐXJ........... 54
Door Window Glass and Door Opening
Weatherstrip SealsÐXJ................... 55
Front Door Spacer BlocksÐTwo-Door Vehicles . . . 53
Front Door Window Glass RegulatorÐXJ........ 42Front Door Window GlassÐXJ............... 43
Liftgate AdjustmentÐXJ.................... 63
Liftgate HingeÐXJ........................ 60
Liftgate Latch/Key Lock Cylinder/StrikerÐXJ..... 61
Liftgate License Plate Lamp HousingÐXJ....... 65
Liftgate License Plate Screw Anchor and BumperÐXJ.65
Liftgate Opening Weatherstrip SealÐXJ........ 64
Liftgate Support Rod Ball Stud ReplacementÐXJ . 63
Liftgate Support Rod Cylinder DisposalÐXJ...... 63
Liftgate Support Rod CylinderÐXJ............. 62
Liftgate Trim PanelÐXJ..................... 59
LiftgateÐXJ............................. 58
Rear Door Stationary Window GlassÐXJ........ 46
Rear Door Window Glass RegulatorÐXJ........ 44
Rear Door Window GlassÐXJ................ 45
Service Information........................ 30
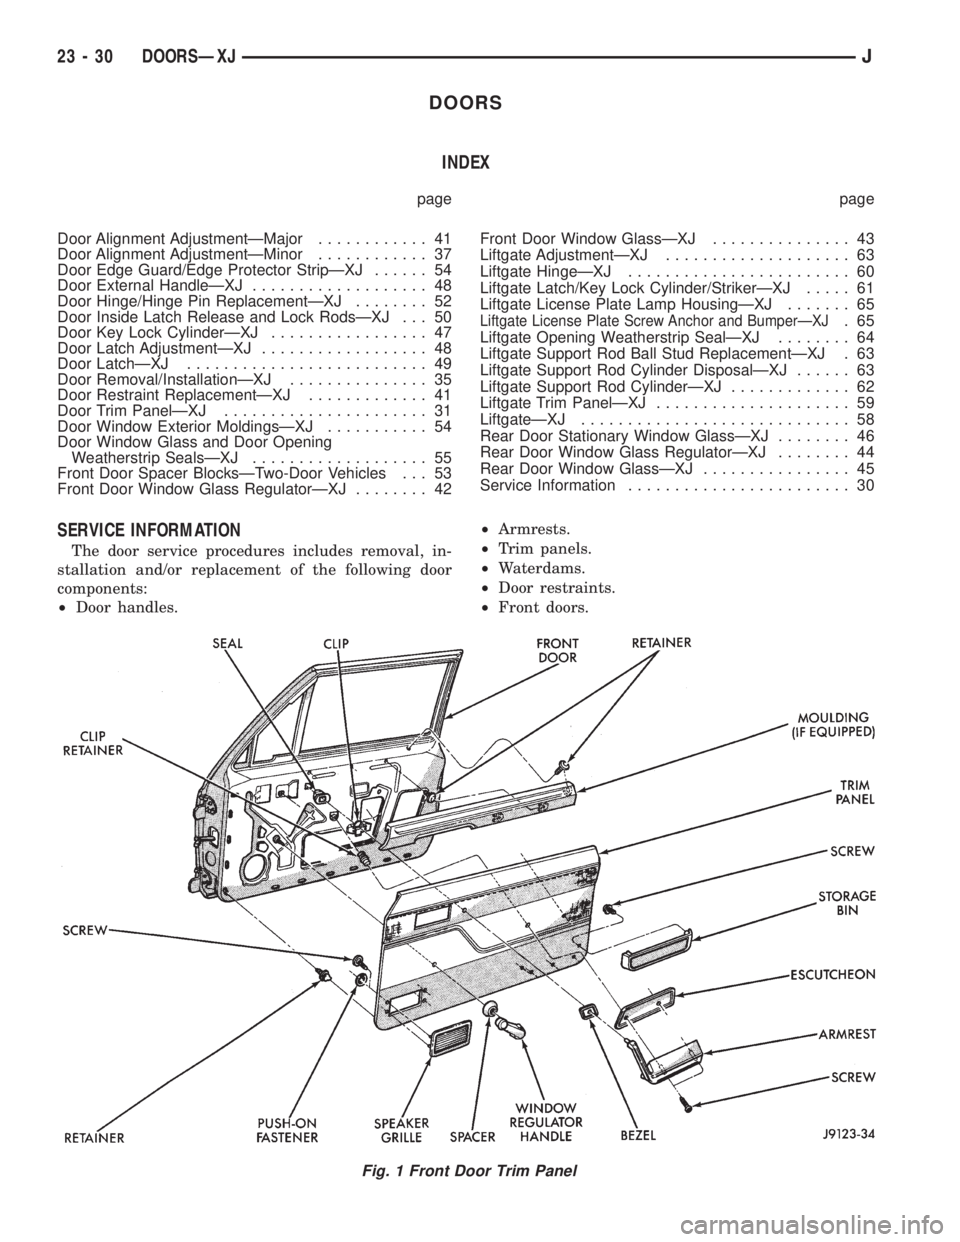
SERVICE INFORMATION
The door service procedures includes removal, in-
stallation and/or replacement of the following door
components:
²Door handles.²Armrests.
²Trim panels.
²Waterdams.
²Door restraints.
²Front doors.
Fig. 1 Front Door Trim Panel
23 - 30 DOORSÐXJJ
Page 1949 of 2158
²Rear doors.
²Window glass regulators.
²Key lock cylinders.
²Door half-hinges.
²Liftgate.
²Liftgate hinges.
²Liftgate gas support rod cylinders.
²Rocker panel seals.
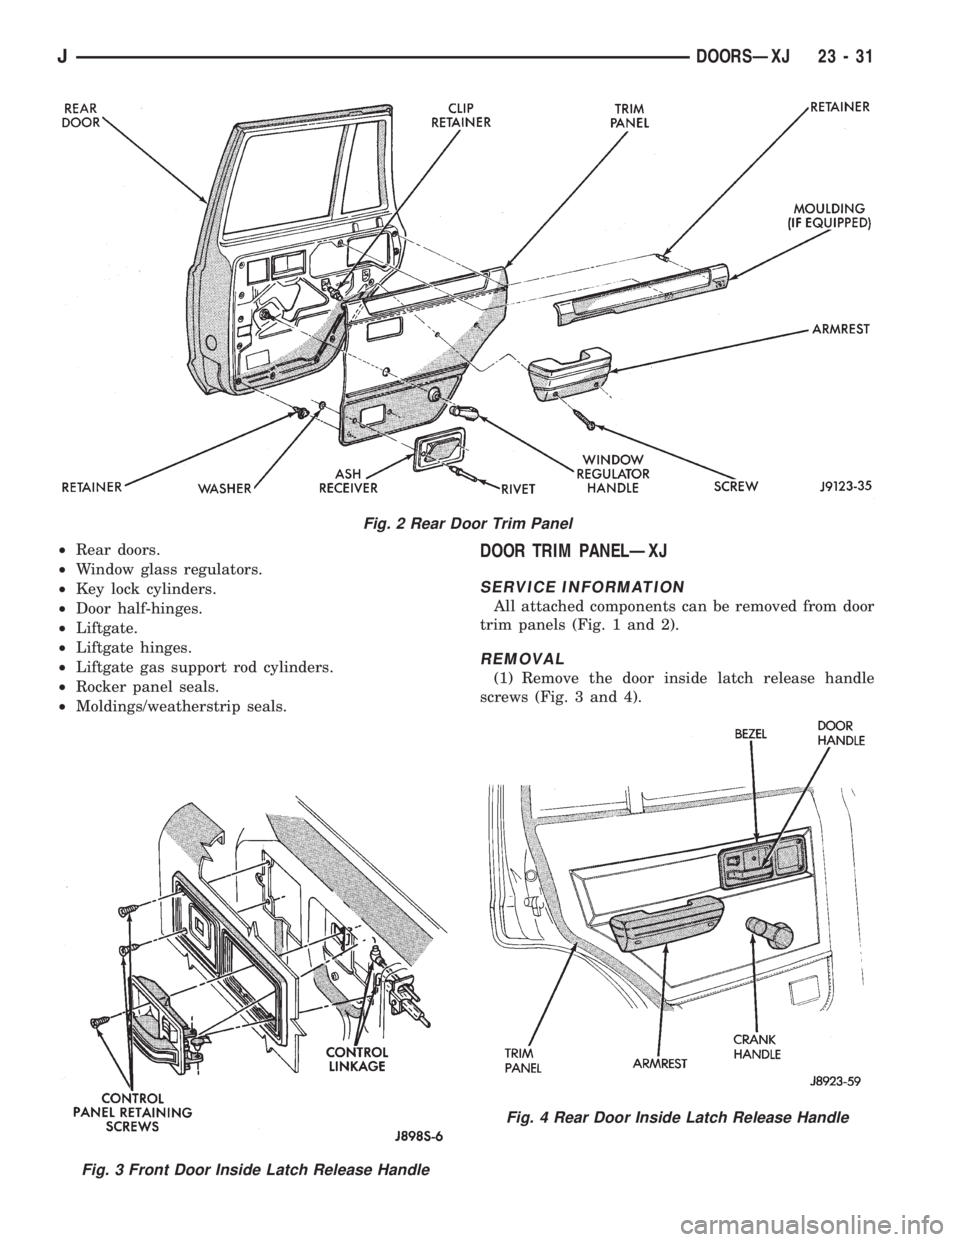
²Moldings/weatherstrip seals.DOOR TRIM PANELÐXJ
SERVICE INFORMATION
All attached components can be removed from door
trim panels (Fig. 1 and 2).
REMOVAL
(1) Remove the door inside latch release handle
screws (Fig. 3 and 4).
Fig. 2 Rear Door Trim Panel
Fig. 3 Front Door Inside Latch Release Handle
Fig. 4 Rear Door Inside Latch Release Handle
JDOORSÐXJ 23 - 31
Page 1950 of 2158
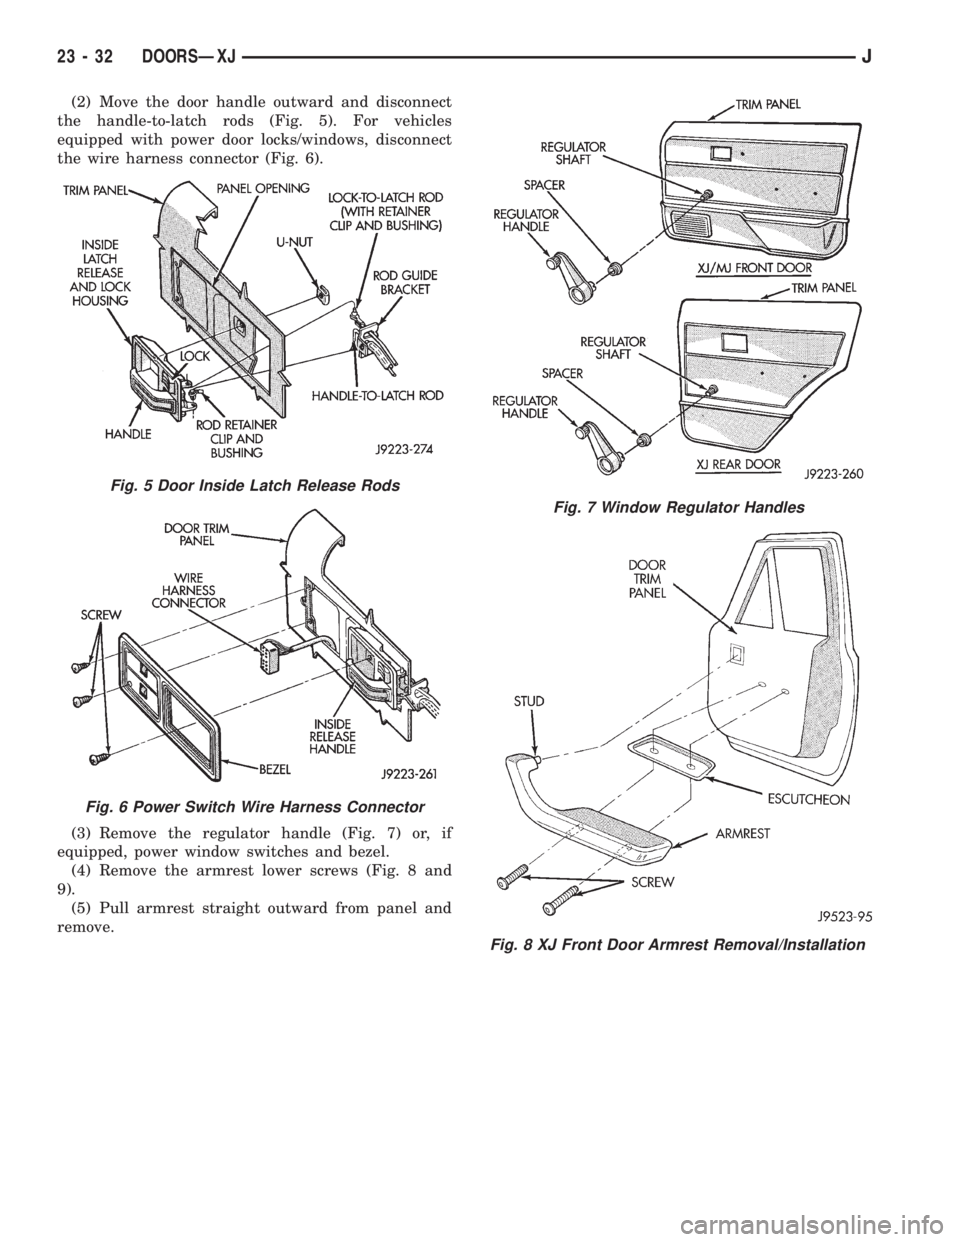
(2) Move the door handle outward and disconnect
the handle-to-latch rods (Fig. 5). For vehicles
equipped with power door locks/windows, disconnect
the wire harness connector (Fig. 6).
(3) Remove the regulator handle (Fig. 7) or, if
equipped, power window switches and bezel.
(4) Remove the armrest lower screws (Fig. 8 and
9).
(5) Pull armrest straight outward from panel and
remove.
Fig. 5 Door Inside Latch Release Rods
Fig. 6 Power Switch Wire Harness Connector
Fig. 7 Window Regulator Handles
Fig. 8 XJ Front Door Armrest Removal/Installation
23 - 32 DOORSÐXJJ