JEEP XJ 1995 Service And Repair Manual
Manufacturer: JEEP, Model Year: 1995, Model line: XJ, Model: JEEP XJ 1995Pages: 2158, PDF Size: 81.9 MB
Page 1971 of 2158
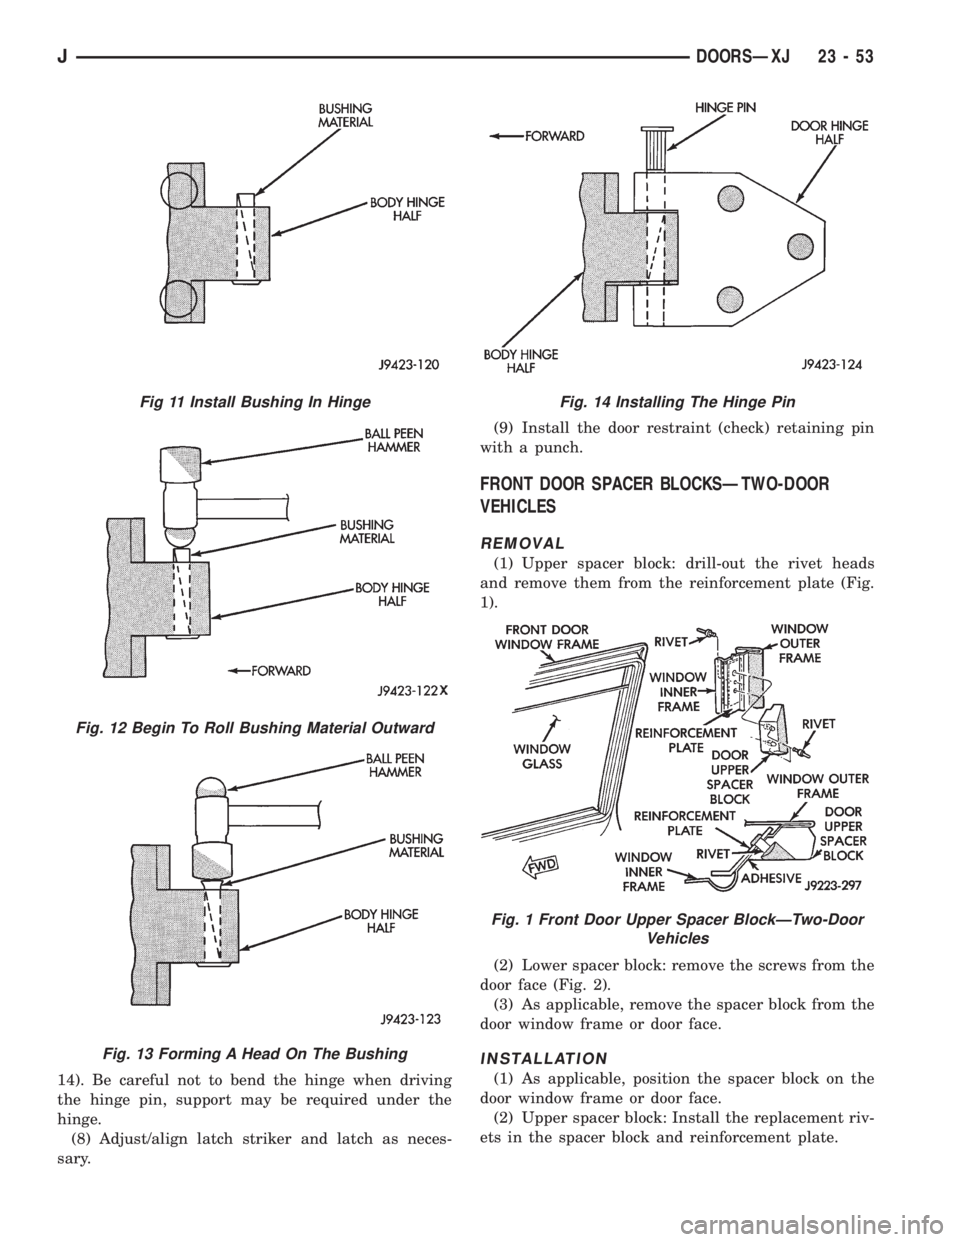
14). Be careful not to bend the hinge when driving
the hinge pin, support may be required under the
hinge.
(8) Adjust/align latch striker and latch as neces-
sary.(9) Install the door restraint (check) retaining pin
with a punch.
FRONT DOOR SPACER BLOCKSÐTWO-DOOR
VEHICLES
REMOVAL
(1) Upper spacer block: drill-out the rivet heads
and remove them from the reinforcement plate (Fig.
1).
(2) Lower spacer block: remove the screws from the
door face (Fig. 2).
(3) As applicable, remove the spacer block from the
door window frame or door face.
INSTALLATION
(1) As applicable, position the spacer block on the
door window frame or door face.
(2) Upper spacer block: Install the replacement riv-
ets in the spacer block and reinforcement plate.
Fig 11 Install Bushing In Hinge
Fig. 12 Begin To Roll Bushing Material Outward
Fig. 13 Forming A Head On The Bushing
Fig. 14 Installing The Hinge Pin
Fig. 1 Front Door Upper Spacer BlockÐTwo-Door
Vehicles
JDOORSÐXJ 23 - 53
Page 1972 of 2158
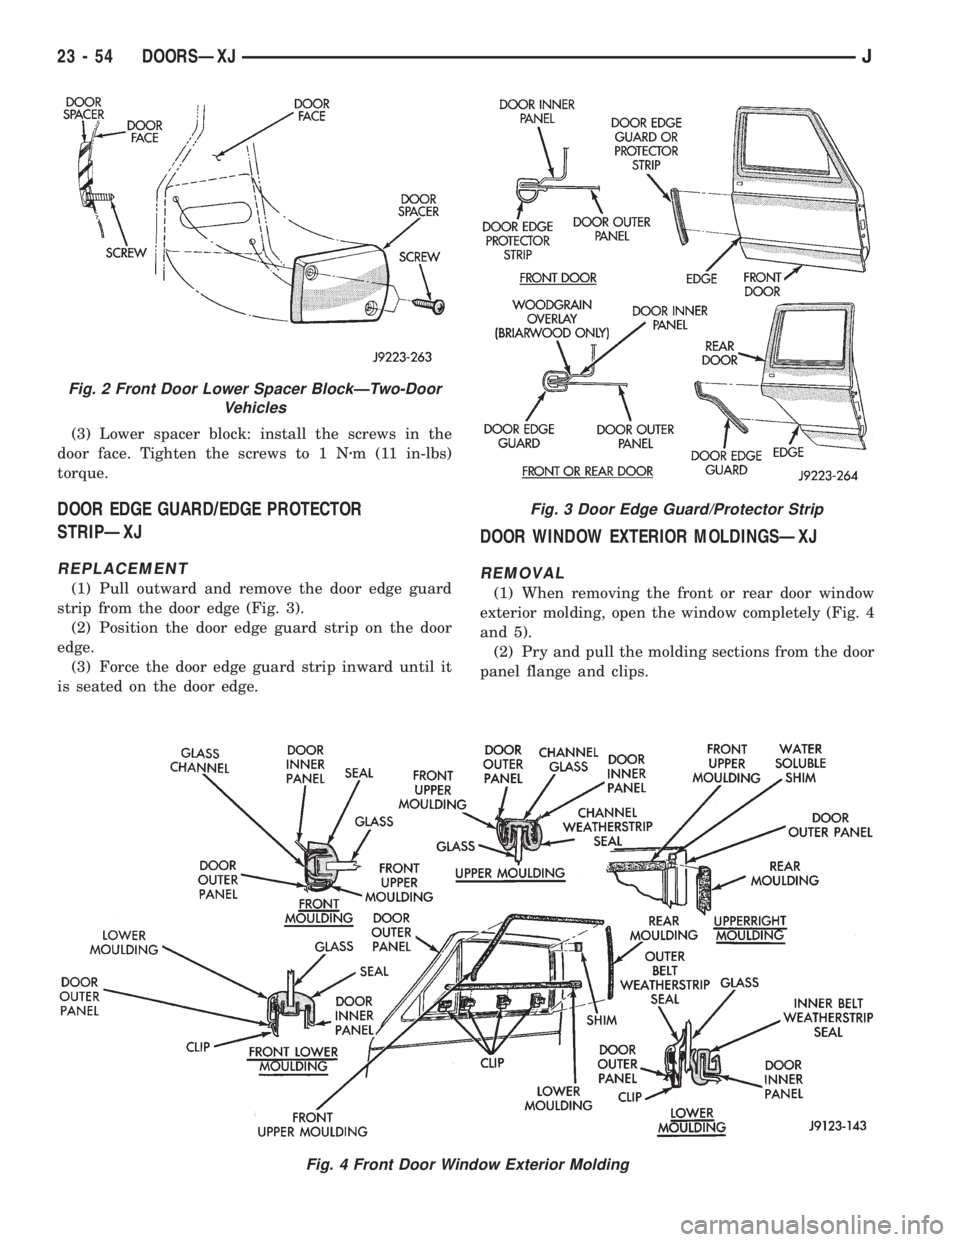
(3) Lower spacer block: install the screws in the
door face. Tighten the screws to 1 Nzm (11 in-lbs)
torque.
DOOR EDGE GUARD/EDGE PROTECTOR
STRIPÐXJ
REPLACEMENT
(1) Pull outward and remove the door edge guard
strip from the door edge (Fig. 3).
(2) Position the door edge guard strip on the door
edge.
(3) Force the door edge guard strip inward until it
is seated on the door edge.
DOOR WINDOW EXTERIOR MOLDINGSÐXJ
REMOVAL
(1) When removing the front or rear door window
exterior molding, open the window completely (Fig. 4
and 5).
(2) Pry and pull the molding sections from the door
panel flange and clips.
Fig. 3 Door Edge Guard/Protector Strip
Fig. 4 Front Door Window Exterior Molding
Fig. 2 Front Door Lower Spacer BlockÐTwo-Door
Vehicles
23 - 54 DOORSÐXJJ
Page 1973 of 2158
INSTALLATION
(1) When installing window moldings, start at the
forward end of the upper molding.
(2) Force the molding onto the door panel and con-
tinue rearward until it is completely seated on the
flange.
(3) Mate the rear molding with the upper molding
and force the molding edge inward.
(4) Continue pressing and moving downward to
complete the installation.
(5) Position the lower molding on the clips and
force it downward.
DOOR WINDOW GLASS AND DOOR OPENING
WEATHERSTRIP SEALSÐXJ
REMOVAL
When removing the front or rear door window glass
weatherstrip seals, open the window.
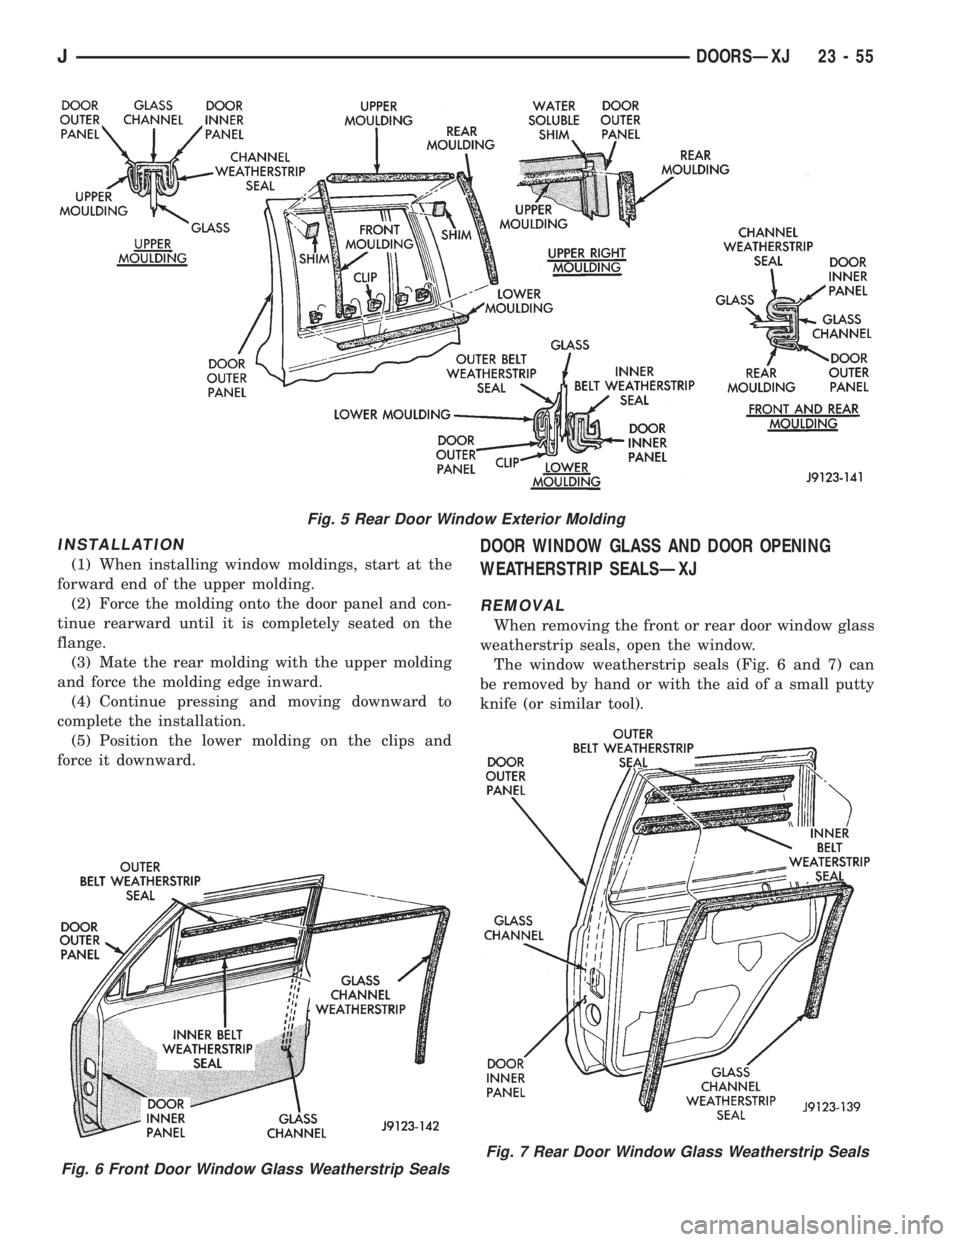
The window weatherstrip seals (Fig. 6 and 7) can
be removed by hand or with the aid of a small putty
knife (or similar tool).
Fig. 6 Front Door Window Glass Weatherstrip Seals
Fig. 5 Rear Door Window Exterior Molding
Fig. 7 Rear Door Window Glass Weatherstrip Seals
JDOORSÐXJ 23 - 55
Page 1974 of 2158
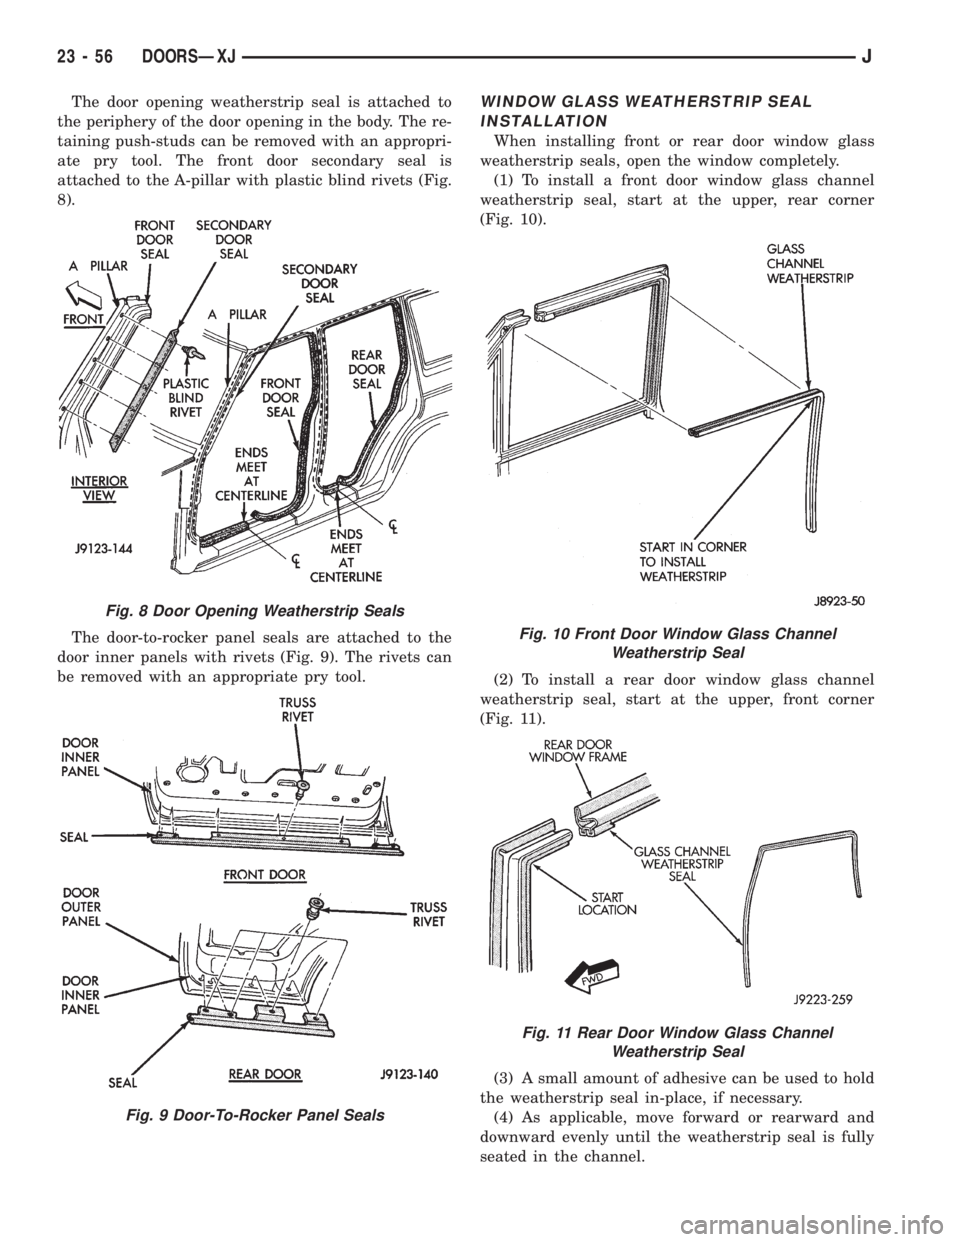
The door opening weatherstrip seal is attached to
the periphery of the door opening in the body. The re-
taining push-studs can be removed with an appropri-
ate pry tool. The front door secondary seal is
attached to the A-pillar with plastic blind rivets (Fig.
8).
The door-to-rocker panel seals are attached to the
door inner panels with rivets (Fig. 9). The rivets can
be removed with an appropriate pry tool.WINDOW GLASS WEATHERSTRIP SEAL
INSTALLATION
When installing front or rear door window glass
weatherstrip seals, open the window completely.
(1) To install a front door window glass channel
weatherstrip seal, start at the upper, rear corner
(Fig. 10).
(2) To install a rear door window glass channel
weatherstrip seal, start at the upper, front corner
(Fig. 11).
(3) A small amount of adhesive can be used to hold
the weatherstrip seal in-place, if necessary.
(4) As applicable, move forward or rearward and
downward evenly until the weatherstrip seal is fully
seated in the channel.
Fig. 8 Door Opening Weatherstrip Seals
Fig. 9 Door-To-Rocker Panel Seals
Fig. 10 Front Door Window Glass Channel
Weatherstrip Seal
Fig. 11 Rear Door Window Glass Channel
Weatherstrip Seal
23 - 56 DOORSÐXJJ
Page 1975 of 2158
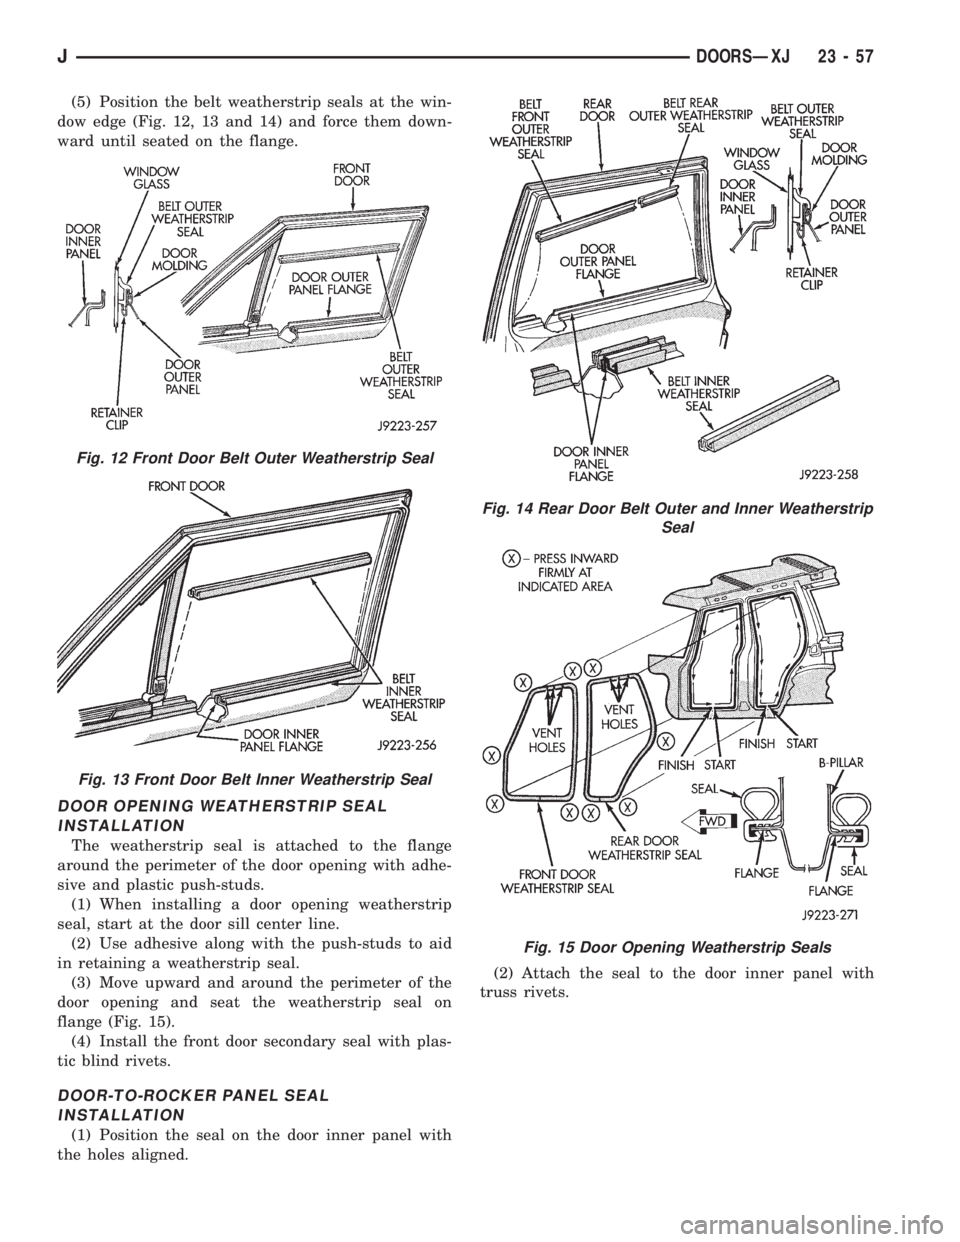
(5) Position the belt weatherstrip seals at the win-
dow edge (Fig. 12, 13 and 14) and force them down-
ward until seated on the flange.
DOOR OPENING WEATHERSTRIP SEAL
INSTALLATION
The weatherstrip seal is attached to the flange
around the perimeter of the door opening with adhe-
sive and plastic push-studs.
(1) When installing a door opening weatherstrip
seal, start at the door sill center line.
(2) Use adhesive along with the push-studs to aid
in retaining a weatherstrip seal.
(3) Move upward and around the perimeter of the
door opening and seat the weatherstrip seal on
flange (Fig. 15).
(4) Install the front door secondary seal with plas-
tic blind rivets.
DOOR-TO-ROCKER PANEL SEAL
INSTALLATION
(1) Position the seal on the door inner panel with
the holes aligned.(2) Attach the seal to the door inner panel with
truss rivets.
Fig. 12 Front Door Belt Outer Weatherstrip Seal
Fig. 13 Front Door Belt Inner Weatherstrip Seal
Fig. 14 Rear Door Belt Outer and Inner Weatherstrip
Seal
Fig. 15 Door Opening Weatherstrip Seals
JDOORSÐXJ 23 - 57
Page 1976 of 2158
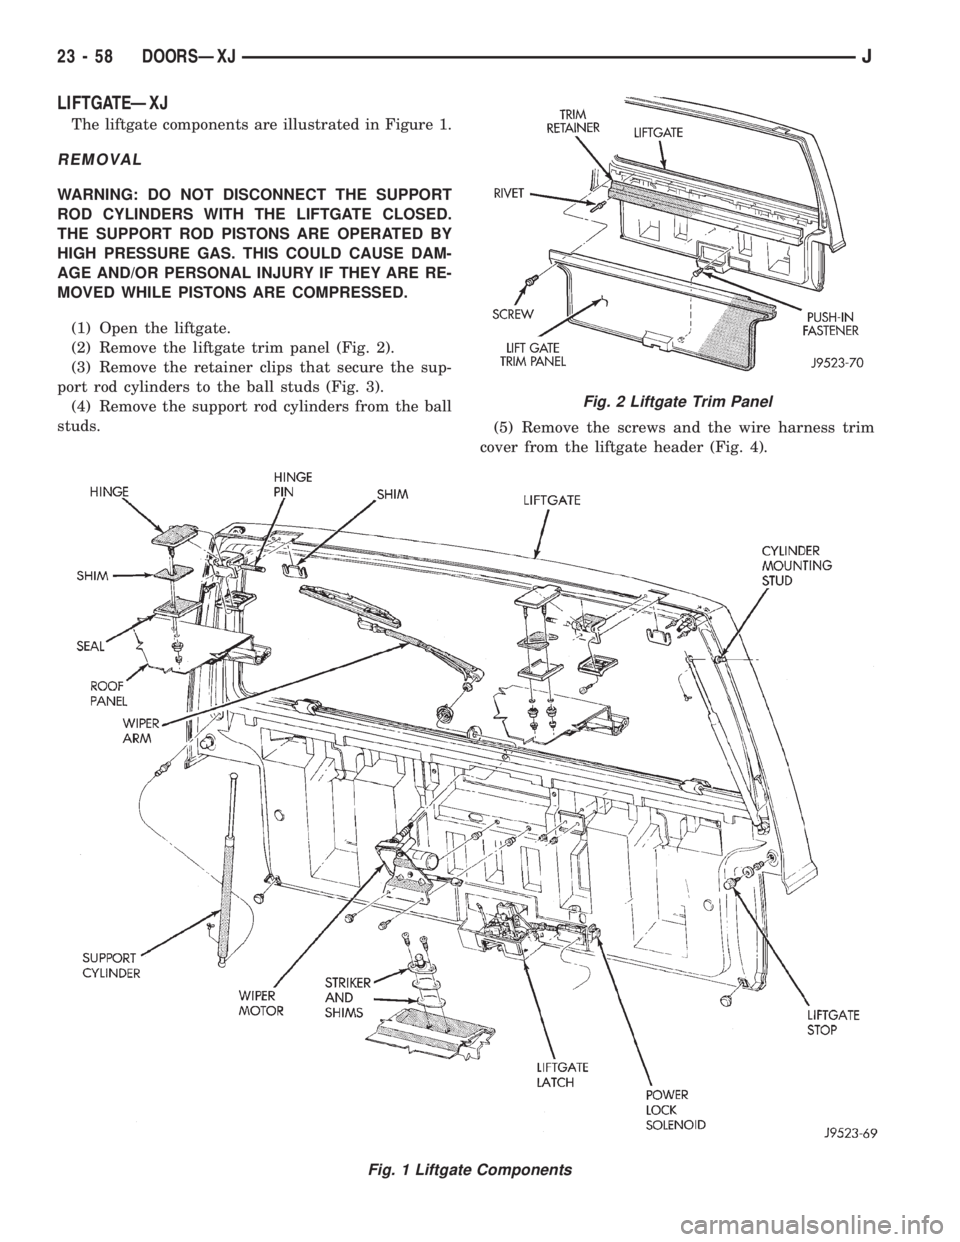
LIFTGATEÐXJ
The liftgate components are illustrated in Figure 1.
REMOVAL
WARNING: DO NOT DISCONNECT THE SUPPORT
ROD CYLINDERS WITH THE LIFTGATE CLOSED.
THE SUPPORT ROD PISTONS ARE OPERATED BY
HIGH PRESSURE GAS. THIS COULD CAUSE DAM-
AGE AND/OR PERSONAL INJURY IF THEY ARE RE-
MOVED WHILE PISTONS ARE COMPRESSED.
(1) Open the liftgate.
(2) Remove the liftgate trim panel (Fig. 2).
(3) Remove the retainer clips that secure the sup-
port rod cylinders to the ball studs (Fig. 3).
(4) Remove the support rod cylinders from the ball
studs.
(5) Remove the screws and the wire harness trim
cover from the liftgate header (Fig. 4).
Fig. 1 Liftgate Components
Fig. 2 Liftgate Trim Panel
23 - 58 DOORSÐXJJ
Page 1977 of 2158
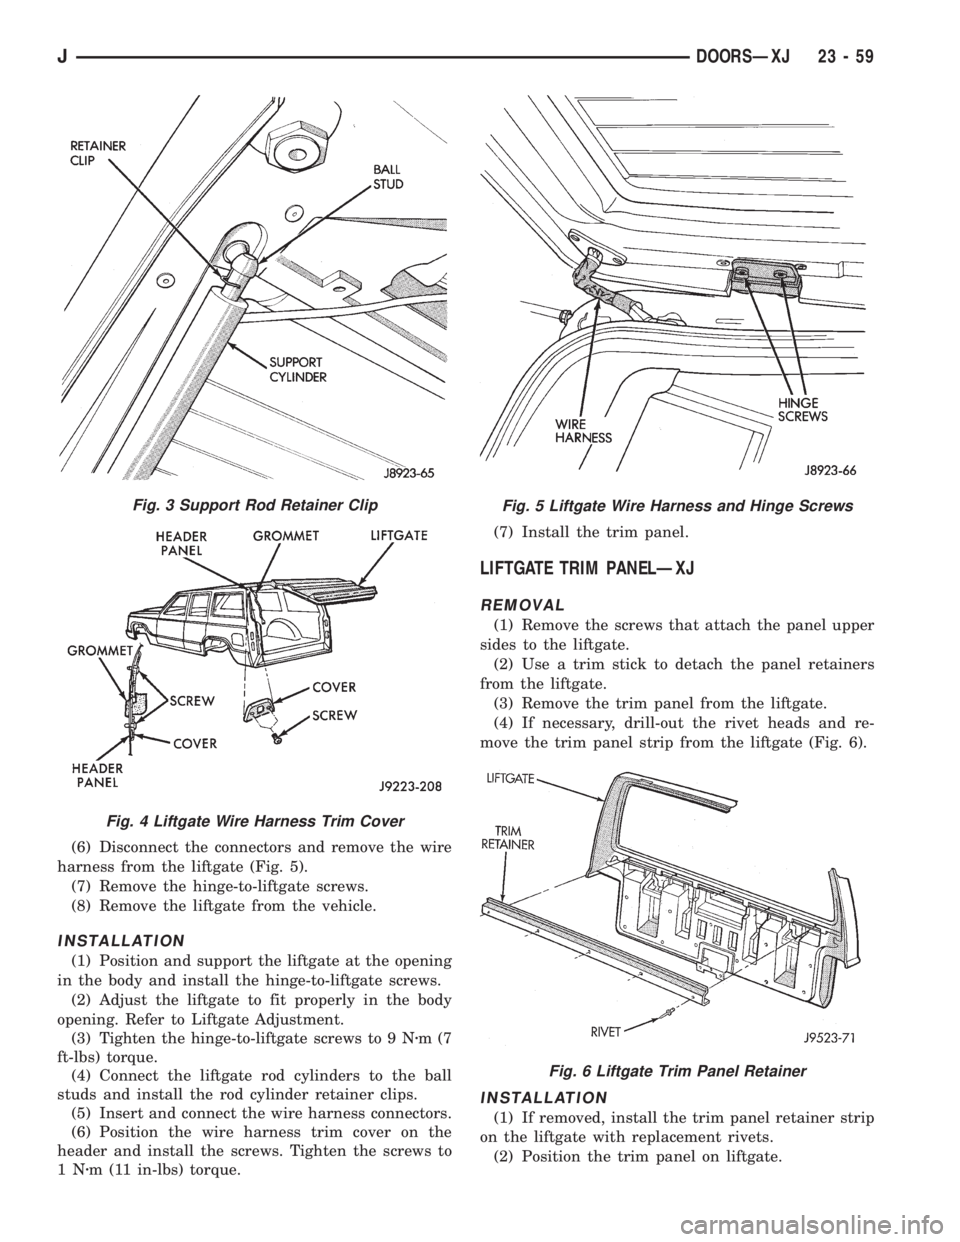
(6) Disconnect the connectors and remove the wire
harness from the liftgate (Fig. 5).
(7) Remove the hinge-to-liftgate screws.
(8) Remove the liftgate from the vehicle.
INSTALLATION
(1) Position and support the liftgate at the opening
in the body and install the hinge-to-liftgate screws.
(2) Adjust the liftgate to fit properly in the body
opening. Refer to Liftgate Adjustment.
(3) Tighten the hinge-to-liftgate screws to 9 Nzm(7
ft-lbs) torque.
(4) Connect the liftgate rod cylinders to the ball
studs and install the rod cylinder retainer clips.
(5) Insert and connect the wire harness connectors.
(6) Position the wire harness trim cover on the
header and install the screws. Tighten the screws to
1Nzm (11 in-lbs) torque.(7) Install the trim panel.
LIFTGATE TRIM PANELÐXJ
REMOVAL
(1) Remove the screws that attach the panel upper
sides to the liftgate.
(2) Use a trim stick to detach the panel retainers
from the liftgate.
(3) Remove the trim panel from the liftgate.
(4) If necessary, drill-out the rivet heads and re-
move the trim panel strip from the liftgate (Fig. 6).
INSTALLATION
(1) If removed, install the trim panel retainer strip
on the liftgate with replacement rivets.
(2) Position the trim panel on liftgate.
Fig. 3 Support Rod Retainer Clip
Fig. 4 Liftgate Wire Harness Trim Cover
Fig. 5 Liftgate Wire Harness and Hinge Screws
Fig. 6 Liftgate Trim Panel Retainer
JDOORSÐXJ 23 - 59
Page 1978 of 2158
(3) Align the trim panel retainers with the holes in
the liftgate inner panel and force the trim panel in-
ward.
(4) Install the screws to attach the panel upper
sides to the liftgate.
LIFTGATE HINGEÐXJ
REMOVAL
It is not necessary to remove the liftgate to replace
one or both hinges.
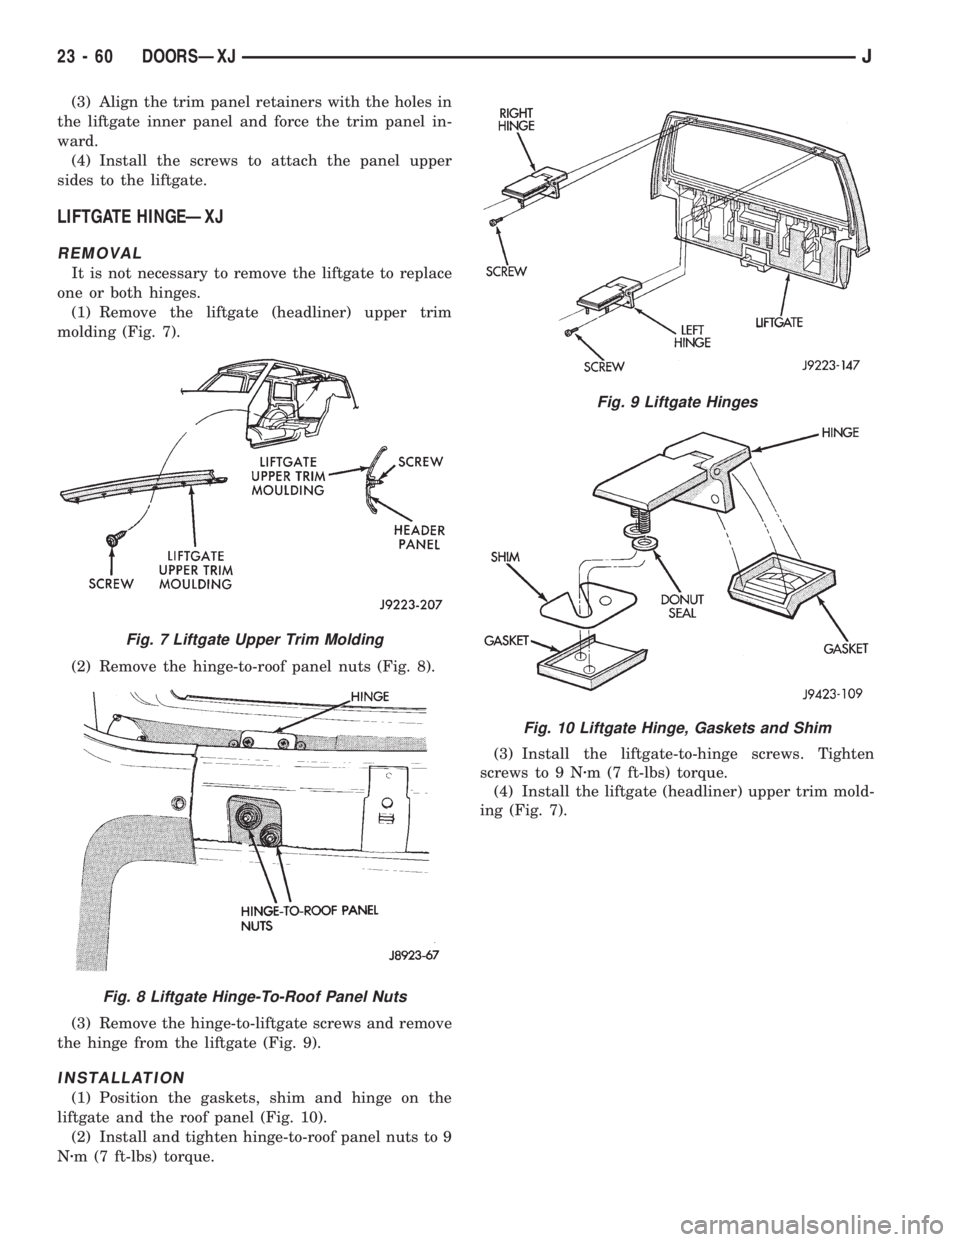
(1) Remove the liftgate (headliner) upper trim
molding (Fig. 7).
(2) Remove the hinge-to-roof panel nuts (Fig. 8).
(3) Remove the hinge-to-liftgate screws and remove
the hinge from the liftgate (Fig. 9).
INSTALLATION
(1) Position the gaskets, shim and hinge on the
liftgate and the roof panel (Fig. 10).
(2) Install and tighten hinge-to-roof panel nuts to 9
Nzm (7 ft-lbs) torque.(3) Install the liftgate-to-hinge screws. Tighten
screws to 9 Nzm (7 ft-lbs) torque.
(4) Install the liftgate (headliner) upper trim mold-
ing (Fig. 7).
Fig. 7 Liftgate Upper Trim Molding
Fig. 8 Liftgate Hinge-To-Roof Panel Nuts
Fig. 9 Liftgate Hinges
Fig. 10 Liftgate Hinge, Gaskets and Shim
23 - 60 DOORSÐXJJ
Page 1979 of 2158
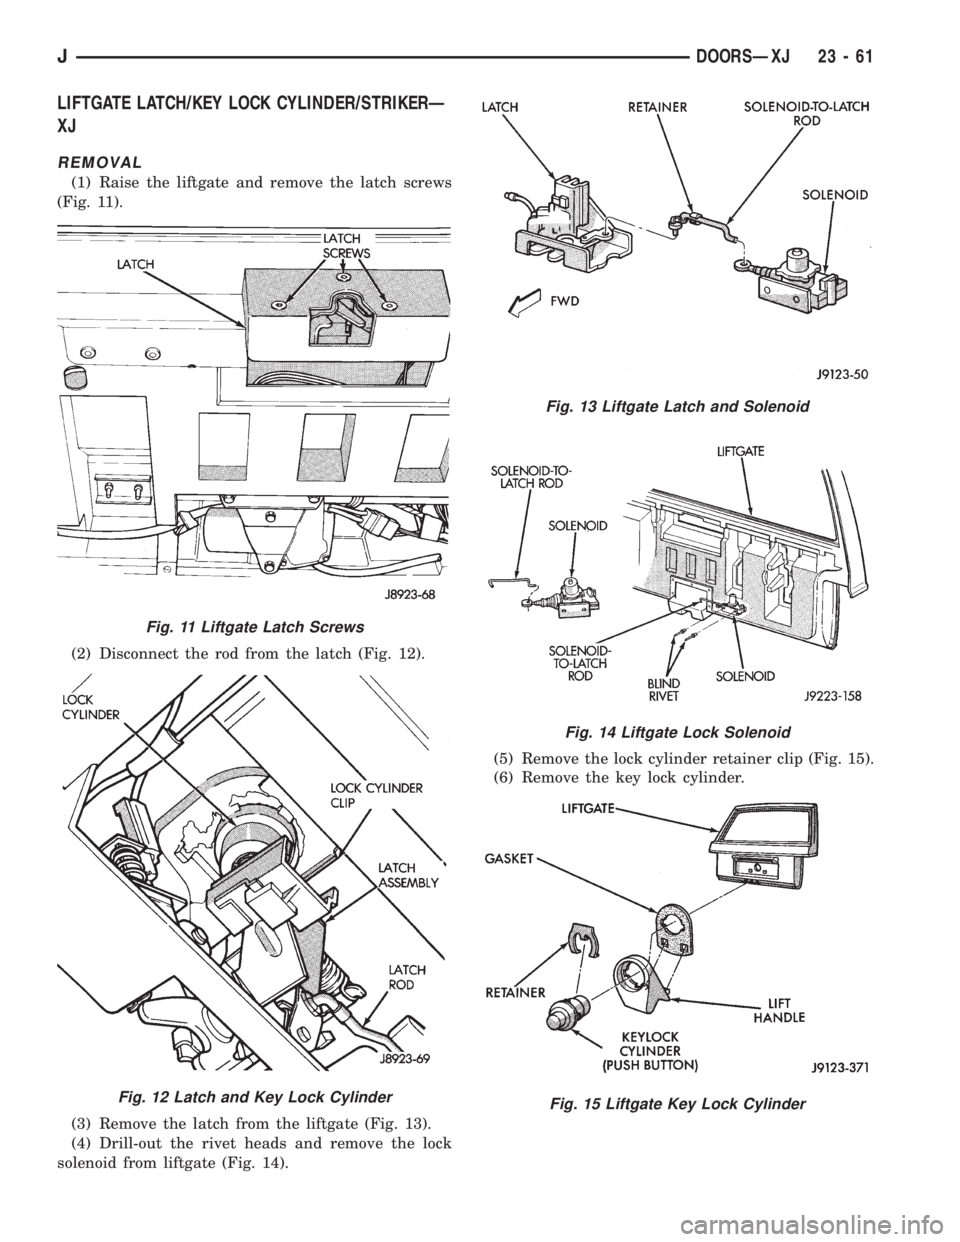
LIFTGATE LATCH/KEY LOCK CYLINDER/STRIKERÐ
XJ
REMOVAL
(1) Raise the liftgate and remove the latch screws
(Fig. 11).
(2) Disconnect the rod from the latch (Fig. 12).
(3) Remove the latch from the liftgate (Fig. 13).
(4) Drill-out the rivet heads and remove the lock
solenoid from liftgate (Fig. 14).(5) Remove the lock cylinder retainer clip (Fig. 15).
(6) Remove the key lock cylinder.
Fig. 11 Liftgate Latch Screws
Fig. 12 Latch and Key Lock Cylinder
Fig. 13 Liftgate Latch and Solenoid
Fig. 14 Liftgate Lock Solenoid
Fig. 15 Liftgate Key Lock Cylinder
JDOORSÐXJ 23 - 61
Page 1980 of 2158
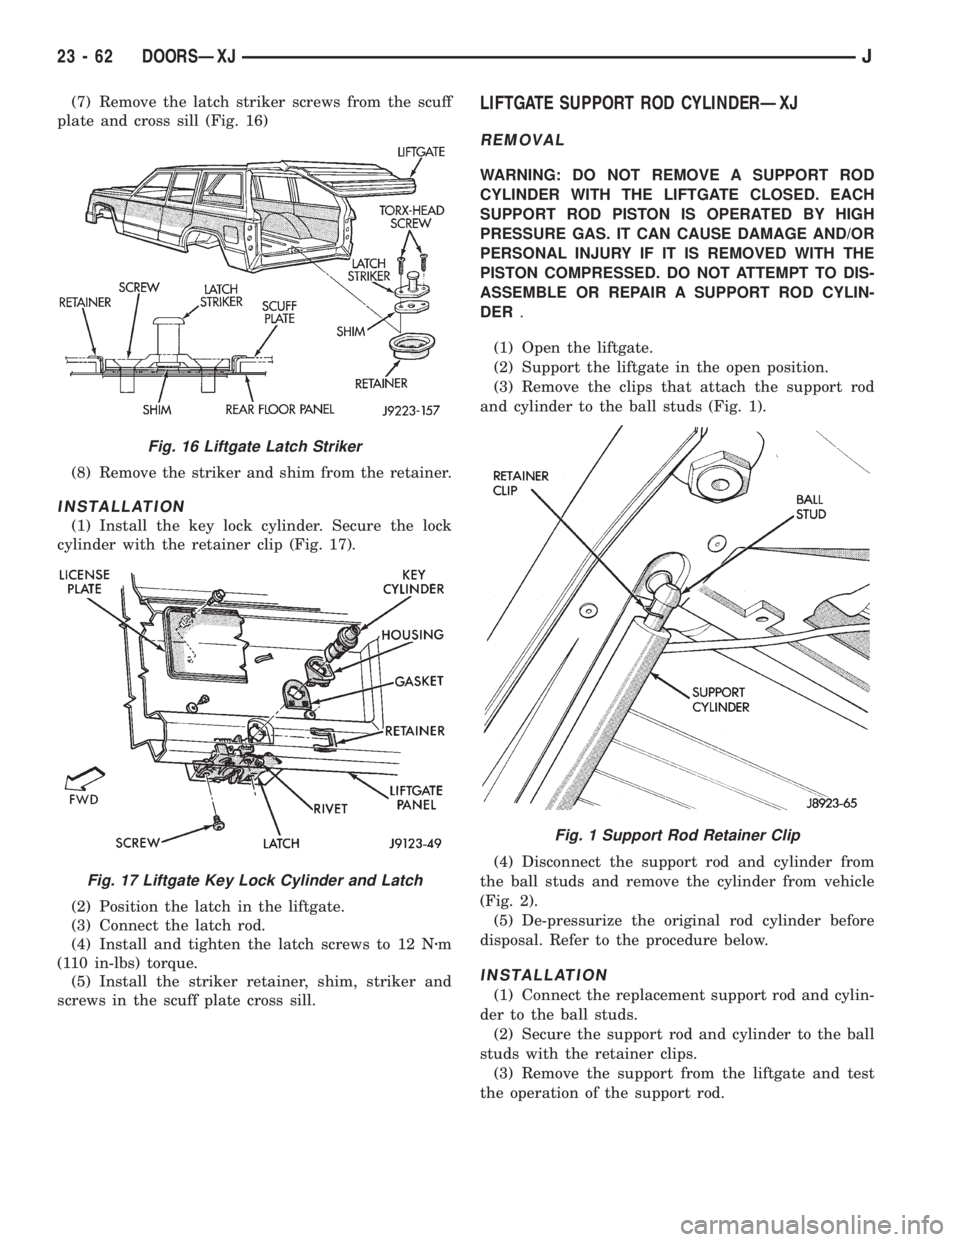
(7) Remove the latch striker screws from the scuff
plate and cross sill (Fig. 16)
(8) Remove the striker and shim from the retainer.
INSTALLATION
(1) Install the key lock cylinder. Secure the lock
cylinder with the retainer clip (Fig. 17).
(2) Position the latch in the liftgate.
(3) Connect the latch rod.
(4) Install and tighten the latch screws to 12 Nzm
(110 in-lbs) torque.
(5) Install the striker retainer, shim, striker and
screws in the scuff plate cross sill.
LIFTGATE SUPPORT ROD CYLINDERÐXJ
REMOVAL
WARNING: DO NOT REMOVE A SUPPORT ROD
CYLINDER WITH THE LIFTGATE CLOSED. EACH
SUPPORT ROD PISTON IS OPERATED BY HIGH
PRESSURE GAS. IT CAN CAUSE DAMAGE AND/OR
PERSONAL INJURY IF IT IS REMOVED WITH THE
PISTON COMPRESSED. DO NOT ATTEMPT TO DIS-
ASSEMBLE OR REPAIR A SUPPORT ROD CYLIN-
DER.
(1) Open the liftgate.
(2) Support the liftgate in the open position.
(3) Remove the clips that attach the support rod
and cylinder to the ball studs (Fig. 1).
(4) Disconnect the support rod and cylinder from
the ball studs and remove the cylinder from vehicle
(Fig. 2).
(5) De-pressurize the original rod cylinder before
disposal. Refer to the procedure below.
INSTALLATION
(1) Connect the replacement support rod and cylin-
der to the ball studs.
(2) Secure the support rod and cylinder to the ball
studs with the retainer clips.
(3) Remove the support from the liftgate and test
the operation of the support rod.
Fig. 16 Liftgate Latch Striker
Fig. 17 Liftgate Key Lock Cylinder and Latch
Fig. 1 Support Rod Retainer Clip
23 - 62 DOORSÐXJJ