KIA CARENS RHD 2017 Repair Manual
Manufacturer: KIA, Model Year: 2017, Model line: CARENS RHD, Model: KIA CARENS RHD 2017Pages: 723, PDF Size: 40.8 MB
Page 61 of 723
343
Safety features of your vehicle
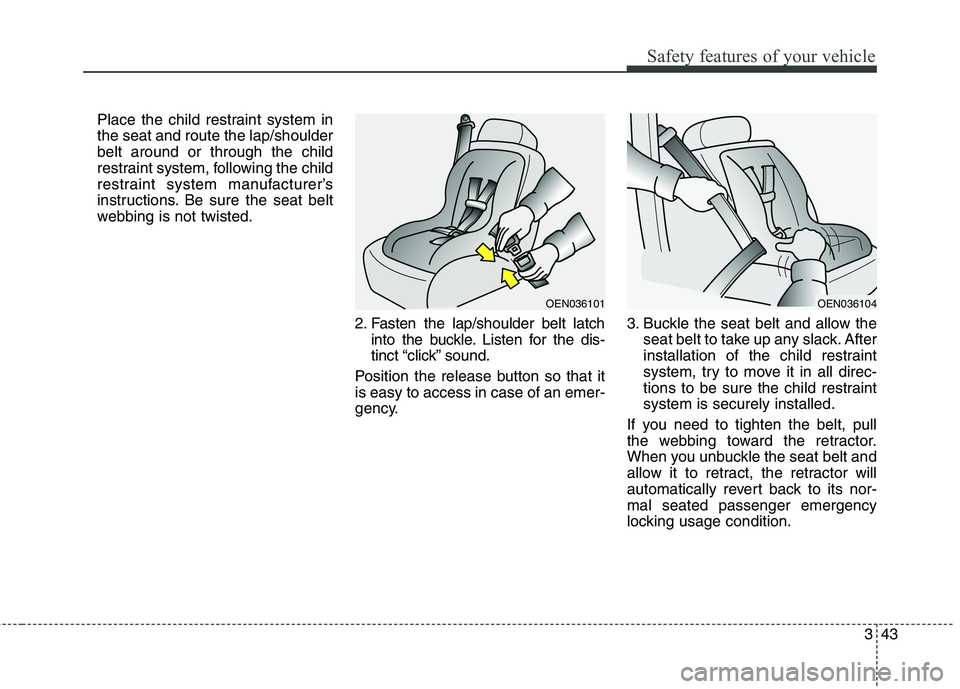
Place the child restraint system in the seat and route the lap/shoulderbelt around or through the child
restraint system, following the child
restraint system manufacturer’s
instructions. Be sure the seat belt
webbing is not twisted.2. Fasten the lap/shoulder belt latchinto the buckle. Listen for the dis-
tinct “click” sound.
Position the release button so that itis easy to access in case of an emer-
gency. 3. Buckle the seat belt and allow the
seat belt to take up any slack. After
installation of the child restraint
system, try to move it in all direc-
tions to be sure the child restraintsystem is securely installed.
If you need to tighten the belt, pull
the webbing toward the retractor.
When you unbuckle the seat belt and
allow it to retract, the retractor will
automatically revert back to its nor-mal seated passenger emergency
locking usage condition.
OEN036101OEN036104
Page 62 of 723
Safety features of your vehicle
44
3
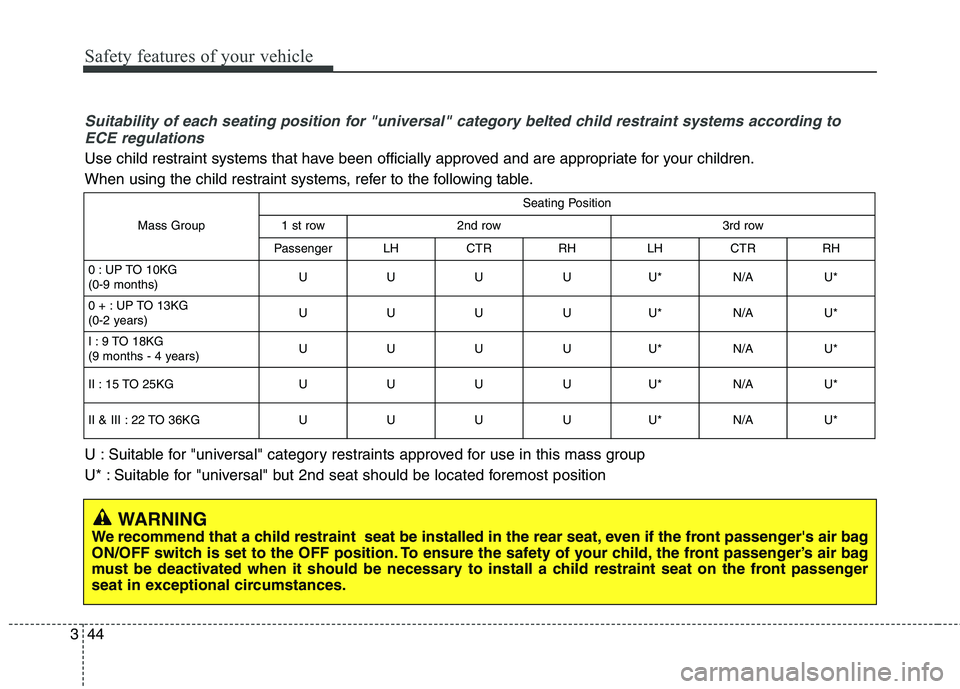
Suitability of each seating position for "universal" category belted child restraint systems according to
ECE regulations
Use child restraint systems that have been officially approved and are appropriate for your children.
When using the child restraint systems, refer to the following table.
Mass Group
Seating Position
1 st row2nd row3rd row
PassengerLHCTRRHLHCTRRH
0 : UP TO 10KG (0-9 months)UUUUU*N/AU*
0 + : UP TO 13KG
(0-2 years)UUUUU*N/AU*
I : 9 TO 18KG
(9 months - 4 years)UUUUU*N/AU*
II : 15 TO 25KGUUUUU*N/AU*
II & III : 22 TO 36KGUUUUU*N/AU*
WARNING
We recommend that a child restraint seat be installed in the rear seat, even if the front passenger's air bag
ON/OFF switch is set to the OFF position. To ensure the safety of your child, the front passenger’s air bag
must be deactivated when it should be necessary to install a child restraint seat on the front passenger
seat in exceptional circumstances.
U : Suitable for "universal" category restraints approved for use in this mass group
U* : Suitable for "universal" but 2nd seat should be located foremost position
Page 63 of 723
345
Safety features of your vehicle
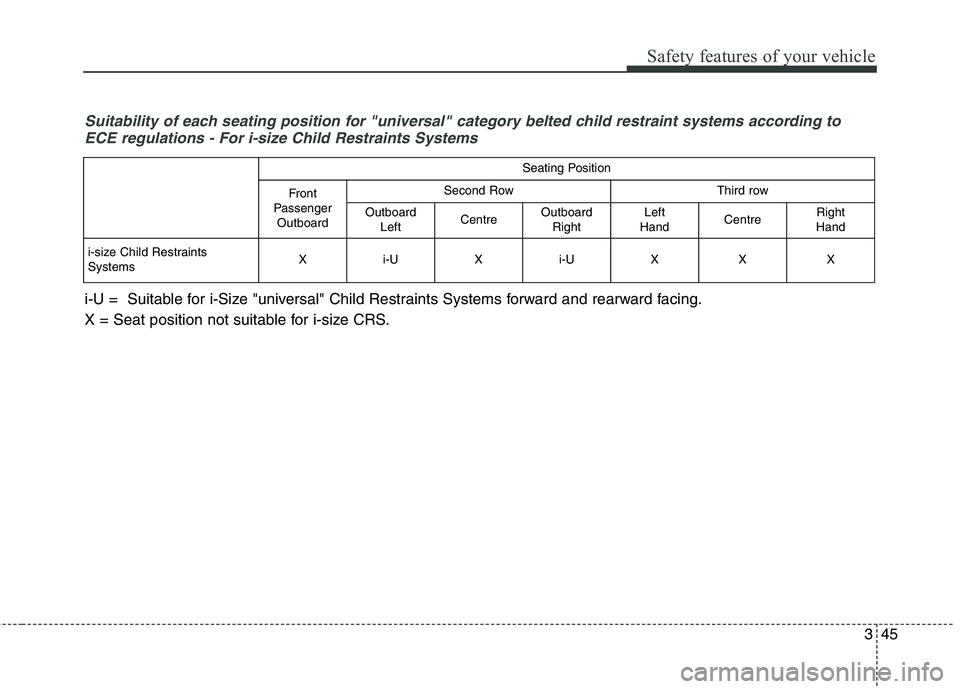
Suitability of each seating position for "universal" category belted child restraint systems according toECE regulations - For i-size Child Restraints Systems
Seating Position
Front
Passenger OutboardSecond RowThird row
Outboard LeftCentreOutboardRightLeft
HandCentreRight
Hand
i-size Child Restraints SystemsXi-UXi-UXXX
i-U = Suitable for i-Size "universal" Child Restraints Systems forward and rearward facing.
X = Seat position not suitable for i-size CRS.
Page 64 of 723
Safety features of your vehicle
46
3
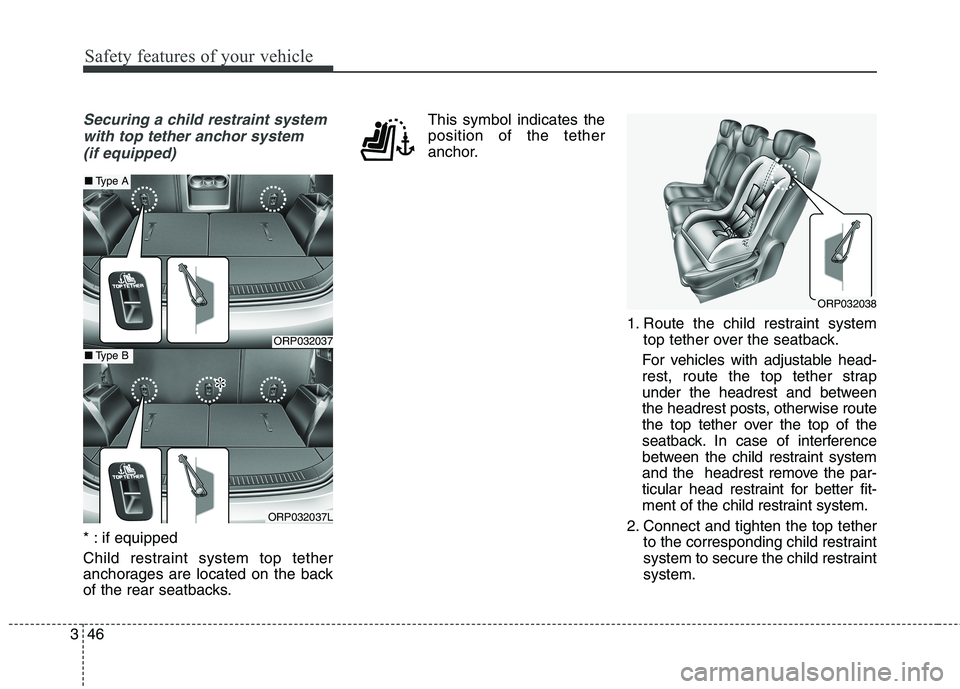
Securing a child restraint system
with top tether anchor system (if equipped)
* : if equipped
Child restraint system top tether
anchorages are located on the back
of the rear seatbacks. This symbol indicates the position of the tether
anchor.
1. Route the child restraint systemtop tether over the seatback.
For vehicles with adjustable head-
rest, route the top tether strap
under the headrest and between
the headrest posts, otherwise route
the top tether over the top of the
seatback. In case of interference
between the child restraint system
and the headrest remove the par-
ticular head restraint for better fit-
ment of the child restraint system.
2. Connect and tighten the top tether to the corresponding child restraint
system to secure the child restraintsystem.
ORP032038
ORP032037
ORP032037L
■Type A
■Type B
Page 65 of 723
347
Safety features of your vehicle
WARNING - Child
restraint system check
Check that the child restraint
system is secure by pushing
and pulling it in different direc-
tions. Incorrectly fitted child
restraint systems may swing,
twist, tip or separate causing
death or serious injury.
WARNING - Child
restraint system anchorage
Child restraint anchorages are designed to withstand only
those loads imposed by cor-
rectly fitted child restraints.
Under no circumstances are
they to be used for adult seat
belts, harnesses, or for attach-ing other items or equipment
to the vehicle.
The top tether may not work properly if attached some-where other than the correct
tether anchor.WARNING - Top tether
Never mount more than one
child restraint system to a sin-gle top tether or to a single top
tether anchorage point. The
increased load caused by multi-
ple child restraint system may
cause the top tethers or anchor-
age points to break, causing
serious injury or death.
WARNING
A child can be seriously injured
or killed in a collision if the child
restraint system is not properly
anchored to the car and the
child is not properly restrained
in the child restraint system.
Always follow the child restraint
system manufacturer’s instruc-
tions for installation and use.
WARNING - Australian
design rule
Child restraint anchorages are
designed to withstand only
those loads imposed by cor-
rectly fitted child restraints.
Under no circumstances are
they to be used for adult seat
belts, harnesses, or for attach-ing other items or equipment to
the vehicle.
Page 66 of 723
Safety features of your vehicle
48
3
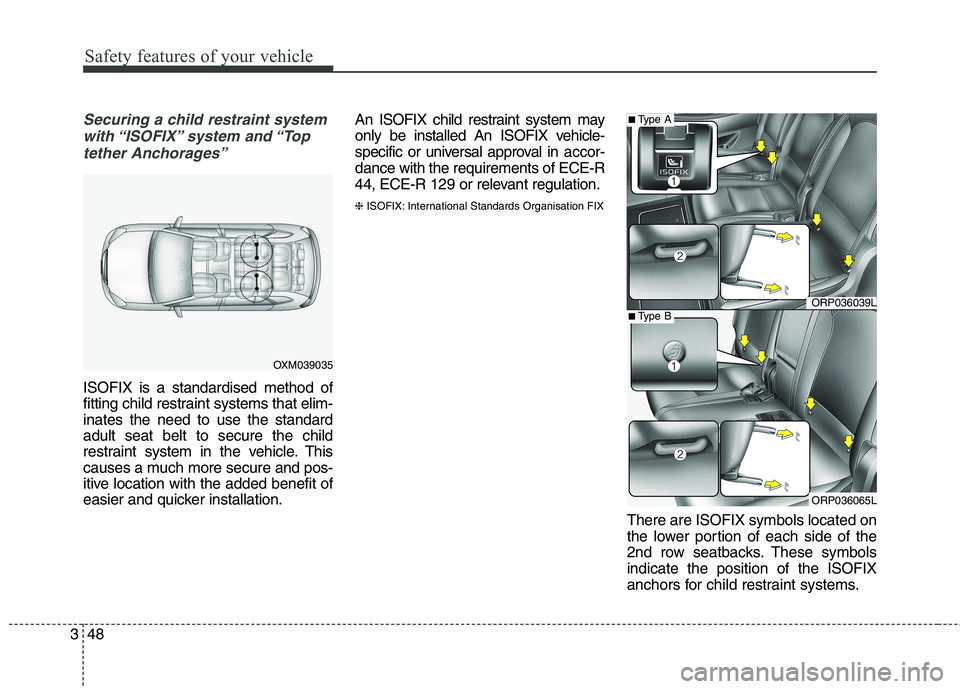
Securing a child restraint system
with “ISOFIX” system and “Top tether Anchorages”
ISOFIX is a standardised method of
fitting child restraint systems that elim-inates the need to use the standardadult seat belt to secure the child
restraint system in the vehicle. This
causes a much more secure and pos-
itive location with the added benefit of
easier and quicker installation. An ISOFIX child restraint system may
only be installed An ISOFIX vehicle-
specific or universal approval in
accor-
dance with the requirements of ECE-R
44, ECE-R 129 or relevant regulation. ❈ ISOFIX: International Standards Organisation FIX
There are ISOFIX symbols located on
the lower portion of each side of the
2nd row seatbacks. These symbolsindicate the position of the ISOFIX
anchors for child restraint systems.
ORP036039L
ORP036065L
■Type A
■Type B
OXM039035
Page 67 of 723
349
Safety features of your vehicle
Both rear outboard seats are equipped with a pair of ISOFIX
anchorages as well as a correspon-
ding top tether anchorage on the
back side of the back rest. The
ISOFIX anchorages are located
between seat cushion and back rest,
marked with the ISOFIX icon.
For installation, child restraint system
ISOFIX connectors have to engage
with the vehicles ISOFIX anchorages
(listen for a CLICK, check potential
visual indicators on the child restraint
system and cross-check by pulling).
Child restraint systems with universal
approval to ECE-R 44, ECE-R 129 or
relevant regulation need to be fixed
additionally with a top tether strap con-nected to the corresponding top tether
anchorage point in the back rest. The installation and the use of a child
restraint system has to be done
according to the installation manual,
which is provided with the ISOFIX
child restraint system. ❈(1) : ISOFIX Anchor Position Indicator
(Type A- ,Type B- )
(2) : ISOFIX Anchor For stable and safe installation of
child restraint system, adjust the seat
position (seat-back angle and/or seat
forward and backward) so that your
child can fit in the child restraint sys-
tem in a comfortable manner.
WARNING
Install the child restraint seat
after reclining the seatback.
Reclined 10 clicks (slightly pull
up the recline lever) rearward
from the first locked position. ❈
❈ first locked position :
Is a position when the seatback
is unfold to the first locked posi-
tion from the fully folded seat-
back position (almost theupright position).
WARNING
When using the vehicle's "ISOFIX" system to install a
child restraint system in the
rear seat, all unused vehicle
rear seat belt metal latch plates
or tabs must be latched
securely in their seat belt buck-les and the seat belt webbing
must be retracted behind the
child restraint system to pre-
vent the child from reachingand taking hold of unretracted
seat belts. Unlatched metal
latch plates or tabs may allow
the child to reach the unretract-
ed seat belts which may resultin strangulation and a serious
injury or death to the child in
the child restraint system.
Do not place anything around the lower anchors. Also makesure that the seat belt is not
caught in the lower anchors.
Page 68 of 723
Safety features of your vehicle
50
3
To secure the child restraint system
1. To engage the child restraint sys-
tem to the ISOFIX anchor, insert
the child restraint system latch into
the ISOFIX anchor. Listen for the
audible “click” sound.
2. Connect the top tether strap to the corresponding top tether anchor-
age and tighten it. (Refer to the
previous page.)
CAUTION
Do not allow the rear seat belt
webbing to get scratched orpinched by the ISOFIX-seat latch and ISOFIX anchor duringinstallation.
WARNING
Do not install a child restraint system at the centre of the rear
seat using the vehicle's ISOFIX
anchors. The ISOFIX anchors
are only provided for the left
and right outboard rear seatingpositions. Do not misuse the ISOFIX
anchors by attempting to
attach a child restraint system
in the middle of the rear seat to
the ISOFIX anchors.
In a crash, the child restraint
system ISOFIX attachments
may not be strong enough to
secure the child restraint sys-
tem properly in the centre of the
rear seat and may break, caus-
ing serious injury or death.
(Continued)(Continued)
Do not mount more than onechild restraint system to an
ISOFIX anc horage point. The
improper increased load may
cause the anchorage points or
top tether anchor to break,
causing serious injury or death.
Attach the ISOFIX or ISOFIX- compatible child restraint sys-
tem only to the appropriate
locations shown in the illus-tration.
Always follow the installation and use instructions provided
by the manufacturer of the
child restraint system.
Page 69 of 723
351
Safety features of your vehicle
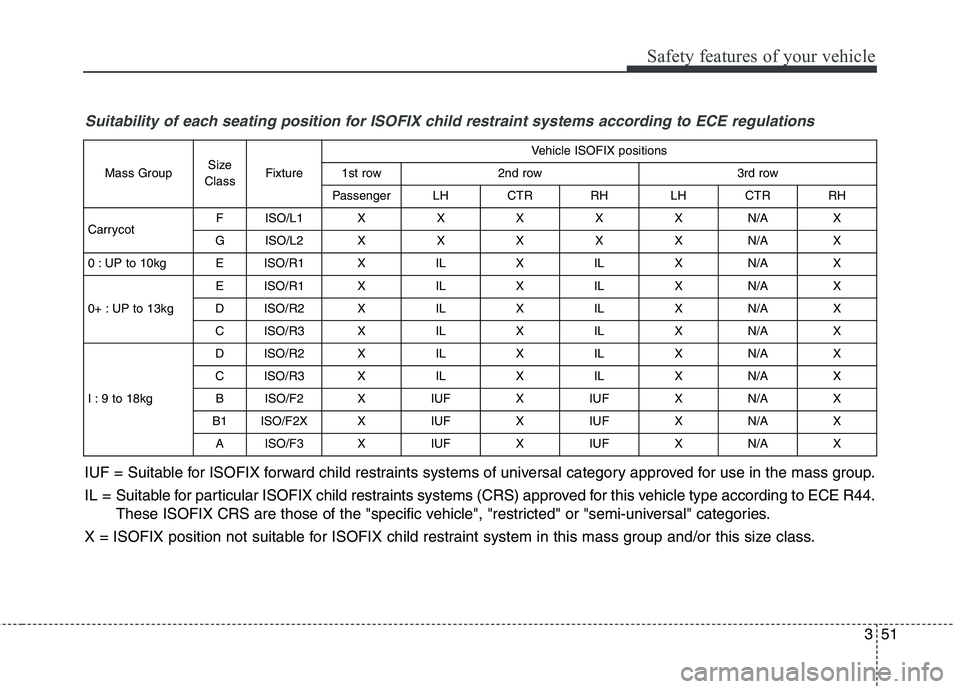
Suitability of each seating position for ISOFIX child restraint systems according to ECE regulations
IUF = Suitable for ISOFIX forward child restraints systems of universal category approved for use in the mass group.
IL = Suitable for particular ISOFIX child restraints systems (CRS) approved for this vehicle type according to ECE R44.These ISOFIX CRS are those of the "specific vehicle", "restricted" or "semi-universal" categories.
X = ISOFIX position not suitable for ISOFIX child restraint system in this mass group and/or this size class.
Mass GroupSize
ClassFixture
Vehicle ISOFIX positions
1st row2nd row3rd row
PassengerLHCTRRHLHCTRRH
CarrycotFISO/L1XXXXXN/AX
GISO/L2XXXXXN/AX
0 : UP to 10kgEISO/R1XILXILXN/AX
0+ : UP to 13kg
EISO/R1XILXILXN/AX
DISO/R2XILXILXN/AX
CISO/R3XILXILXN/AX
I : 9 to 18kg
DISO/R2XILXILXN/AX
CISO/R3XILXILXN/AX
BISO/F2XIUFXIUFXN/AX
B1ISO/F2XXIUFXIUFXN/AX
AISO/F3XIUFXIUFXN/AX
Page 70 of 723
Safety features of your vehicle
52
3
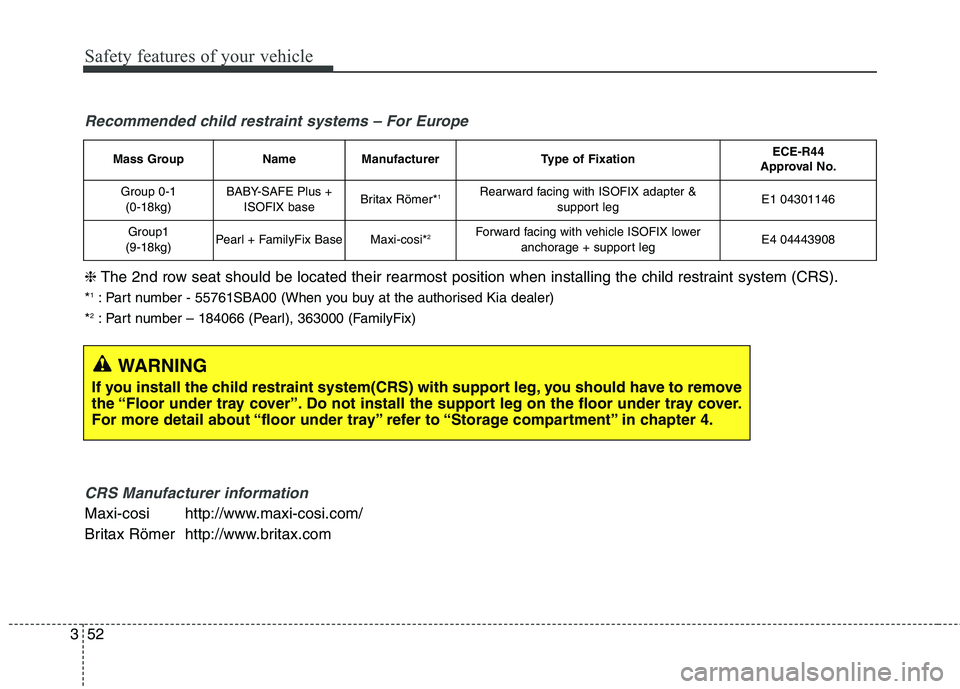
Mass GroupNameManufacturerType of FixationECE-R44
Approval No.
Group 0-1
(0-18kg)BABY-SAFE Plus + ISOFIX baseBritax Römer* 1Rearward facing with ISOFIX adapter &
support legE1 04301146
Group1
(9-18kg)Pearl + FamilyFix BaseMaxi-cosi* 2Forward facing with vehicle ISOFIX lower
anchorage + support legE4 04443908
Recommended child restraint systems – For Europe
CRS Manufacturer information
Maxi-cosi http://www.maxi-cosi.com/
Britax Römer http://www.britax.com
❈
The 2nd row seat should be located their rearmost position when installing the child restraint system (CRS).
* 1
: Part number - 55761SBA00 (When you buy at the authorised Kia dealer)
* 2
: Part number – 184066 (Pearl), 363000 (FamilyFix)
WARNING
If you install the child restraint system(CRS) with support leg, you should have to remove
the “Floor under tray cover”. Do not install the support leg on the floor under tray cover.
For more detail about “floor under tray” refer to “Storage compartment” in chapter 4.