display KIA K900 2015 1.G Owner's Manual
[x] Cancel search | Manufacturer: KIA, Model Year: 2015, Model line: K900, Model: KIA K900 2015 1.GPages: 522, PDF Size: 7.92 MB
Page 15 of 522
2-6
Your vehicle at a glance
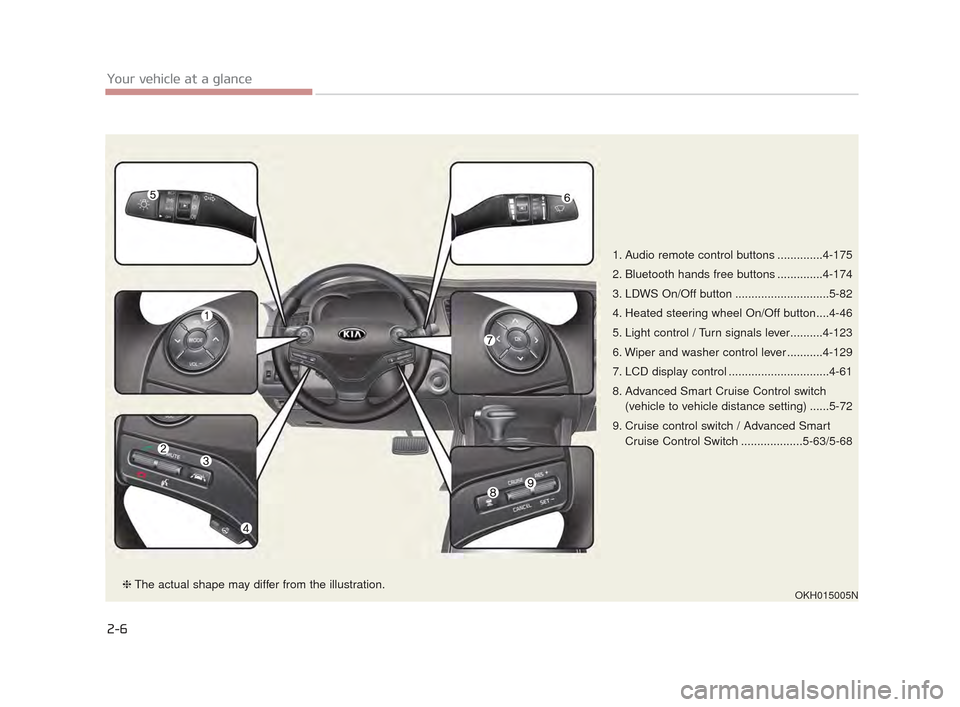
1. Audio remote control buttons ..............4-175
2. Bluetooth hands free buttons ..............4-174
3. LDWS On/Off button .............................5-82
4. Heated steering wheel On/Off button....4-46
5. Light control / Turn signals lever..........4-123
6. Wiper and washer control lever ...........4-129
7. LCD display control ...............................4-61
8. Advanced Smart Cruise Control switch(vehicle to vehicle distance setting) ......5-72
9. Cruise control switch / Advanced Smart Cruise Control Switch ...................5-63/5-68
OKH015005N❈The actual shape may differ from the illustration.
KH CAN (ENG) 2:2015 3/24/2015 10:38 AM Page 6
Page 24 of 522
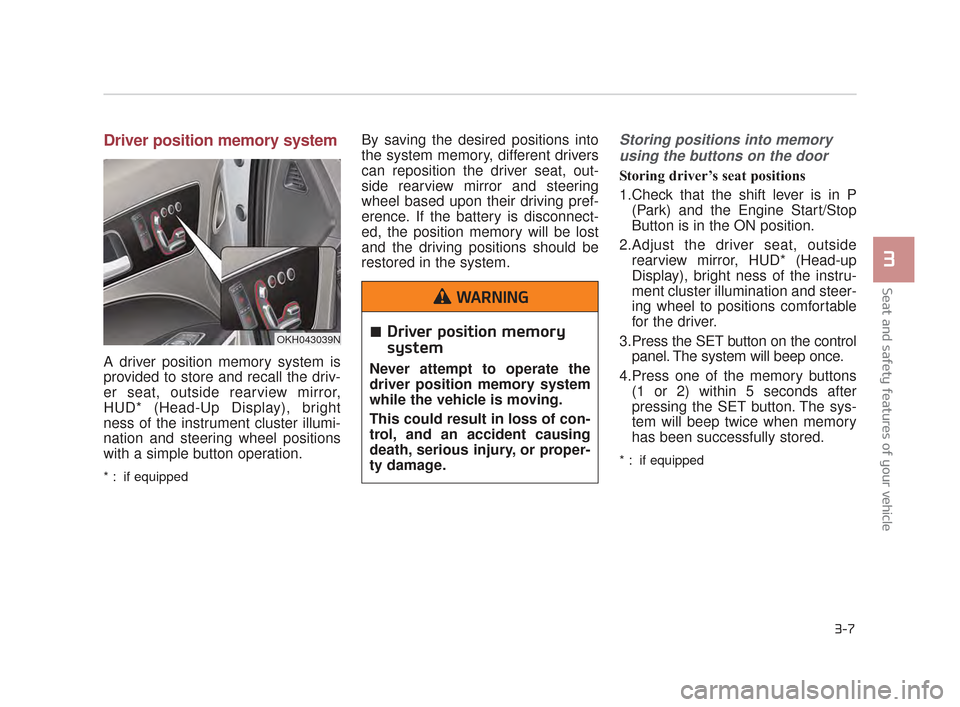
Driver position memory system
A driver position memory system is
provided to store and recall the driv-
er seat, outside rearview mirror,
HUD* (Head-Up Display), bright
ness of the instrument cluster illumi-
nation and steering wheel positions
with a simple button operation.
* : if equipped
By saving the desired positions into
the system memory, different drivers
can reposition the driver seat, out-
side rearview mirror and steering
wheel based upon their driving pref-
erence. If the battery is disconnect-
ed, the position memory will be lost
and the driving positions should be
restored in the system.Storing positions into memoryusing the buttons on the door
Storing driver’s seat positions
1.Check that the shift lever is in P (Park) and the Engine Start/Stop
Button is in the ON position.
2.Adjust the driver seat, outside rearview mirror, HUD* (Head-up
Display), bright ness of the instru-
ment cluster illumination and steer-
ing wheel to positions comfortable
for the driver.
3.Press the SET button on the control panel. The system will beep once.
4.Press one of the memory buttons (1 or 2) within 5 seconds after
pressing the SET button. The sys-
tem will beep twice when memory
has been successfully stored.
* : if equipped
OKH043039N
Seat and safety features of your vehicle
3
3-7
Driver position memory
system
Never attempt to operate the
driver position memory system
while the vehicle is moving.
This could result in loss of con-
trol, and an accident causing
death, serious injury, or proper-
ty damage.
WARNING
KH CAN (ENG) 3:2015 3/26/2015 6:07 AM Page 7
Page 81 of 522
...............................................4-61
..................................................................4-62
.........................................4-65
LCD display.......................................................4-66
...........................................................4-66
.......................................4-68
...............................................4-68
..............................................................4-68
..................................................4-69
...............................................4-71
Trip computer ....................................................4-89
...............................................................4-89
........................................................4-89
..................................................................4-91
Warning and indicator lights .............................4-93
.....................................................4-102
Head up display (HUD) ...................................4-108
..........................................................4-108
..............................4-109
.....................................4-110
Parking Assist System ....................................4-111
.............4-111
System ..............................................................4-113
......................................................4-115
Rear Camera Display .....................................4-116
Parking Guide System ....................................4-117
.................4-117
...................................4-118
Front Blind Spot Monitoring System ...............4-119
360° camera monitoring system .....................4-120
Welcome system.............................................4-121
........................................................4-121
.............................................................4-121
.........................................................4-121
Lighting ...........................................................4-122
.........................................4-122
....................................4-122
..........................................4-123
....................................................4-123
...........................................4-125
.................4-126
......................................................4-127
Wipers and washers .......................................4-129
Interior light .....................................................4-132
..................................4-132
4
KH CAN (ENG) 4:2015 3/26/2015 10:36 AM Page 2
Page 99 of 522
Features of your vehicle
4-20
Impact sensing door unlock
system
All doors will automatically unlock
when an impact causes the air bags
to deploy.
Auto door lock/unlock feature
You can activate or deactivate the
auto door lock/unlock features in the
vehicle. Refer to "LCD display" in this
chapter.
Child-protector rear door lock
The child safety lock is provided to
help prevent children seated in the
rear from accidentally opening the
rear doors. The rear door safety locks
should be used whenever children
are in the vehicle.
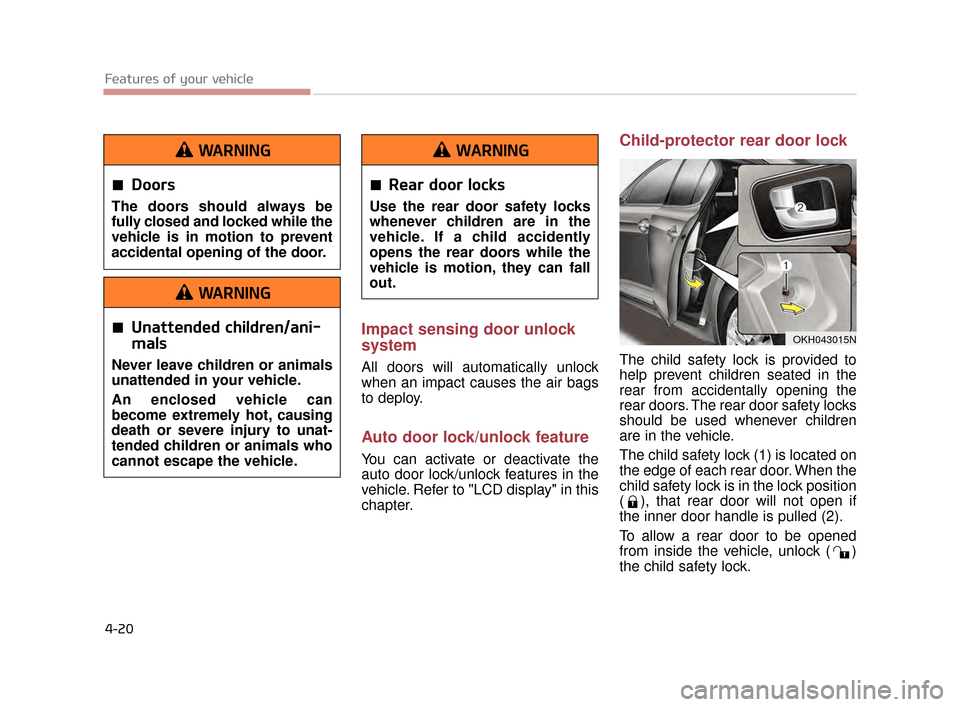
The child safety lock (1) is located on
the edge of each rear door. When the
child safety lock is in the lock position
( ), that rear door will not open if
the inner door handle is pulled (2).
To allow a rear door to be opened
from inside the vehicle, unlock ( )
the child safety lock.
OKH043015N
Doors
The doors should always be
fully closed and locked while the
vehicle is in motion to prevent
accidental opening of the door.
WARNING
Unattended children/ani-
mals
Never leave children or animals
unattended in your vehicle.
An enclosed vehicle can
become extremely hot, causing
death or severe injury to unat-
tended children or animals who
cannot escape the vehicle.
WARNING
Rear door locks
Use the rear door safety locks
whenever children are in the
vehicle. If a child accidently
opens the rear doors while the
vehicle is motion, they can fall
out.
WARNING
KH CAN (ENG) 4:2015 3/26/2015 10:36 AM Page 20
Page 107 of 522
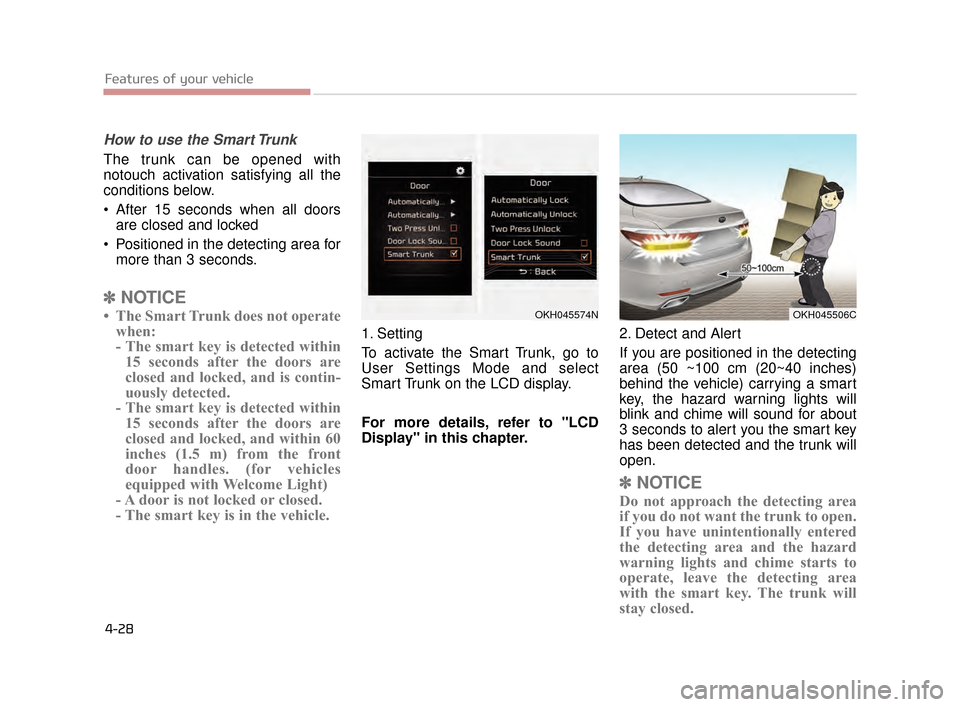
How to use the Smart Trunk
The trunk can be opened with
notouch activation satisfying all the
conditions below.
After 15 seconds when all doorsare closed and locked
Positioned in the detecting area for more than 3 seconds.
✽ NOTICE
• The Smart Trunk does not operate
when:
- The smart key is detected within15 seconds after the doors are
closed and locked, and is contin-
uously detected.
- The smart key is detected within 15 seconds after the doors are
closed and locked, and within 60
inches (1.5 m) from the front
door handles. (for vehicles
equipped with Welcome Light)
- A door is not locked or closed.
- The smart key is in the vehicle.
1. Setting
To activate the Smart Trunk, go to
User Settings Mode and select
Smart Trunk on the LCD display.
For more details, refer to "LCD
Display" in this chapter. 2. Detect and Alert
If you are positioned in the detecting
area (50 ~100 cm (20~40 inches)
behind the vehicle) carrying a smart
key, the hazard warning lights will
blink and chime will sound for about
3 seconds to alert you the smart key
has been detected and the trunk will
open.
✽
NOTICE
Do not approach the detecting area
if you do not want the trunk to open.
If you have unintentionally entered
the detecting area and the hazard
warning lights and chime starts to
operate, leave the detecting area
with the smart key. The trunk will
stay closed.
Features of your vehicle
4-28
OKH045574NOKH045506C
KH CAN (ENG) 4:2015 3/26/2015 10:37 AM Page 28
Page 119 of 522
Features of your vehicle
4-40
PANORAMIC SUNROOF (IF EQUIPPED)
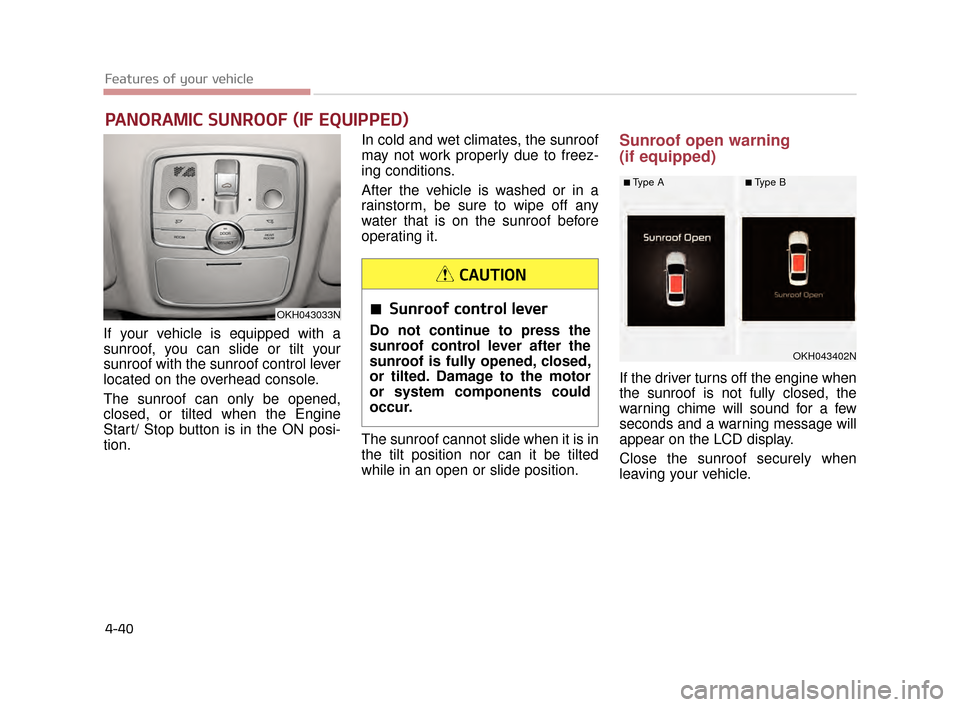
If your vehicle is equipped with a
sunroof, you can slide or tilt your
sunroof with the sunroof control lever
located on the overhead console.
The sunroof can only be opened,
closed, or tilted when the Engine
Start/ Stop button is in the ON posi-
tion.In cold and wet climates, the sunroof
may not work properly due to freez-
ing conditions.
After the vehicle is washed or in a
rainstorm, be sure to wipe off any
water that is on the sunroof before
operating it.
The sunroof cannot slide when it is in
the tilt position nor can it be tilted
while in an open or slide position.
Sunroof open warning
(if equipped)
If the driver turns off the engine when
the sunroof is not fully closed, the
warning chime will sound for a few
seconds and a warning message will
appear on the LCD display.
Close the sunroof securely when
leaving your vehicle.
OKH043033N
OKH043402N
■Type A■Type B
Sunroof control lever
Do not continue to press the
sunroof control lever after the
sunroof is fully opened, closed,
or tilted. Damage to the motor
or system components could
occur.
CAUTION
KH CAN (ENG) 4:2015 3/26/2015 10:38 AM Page 40
Page 125 of 522
Features of your vehicle
4-46
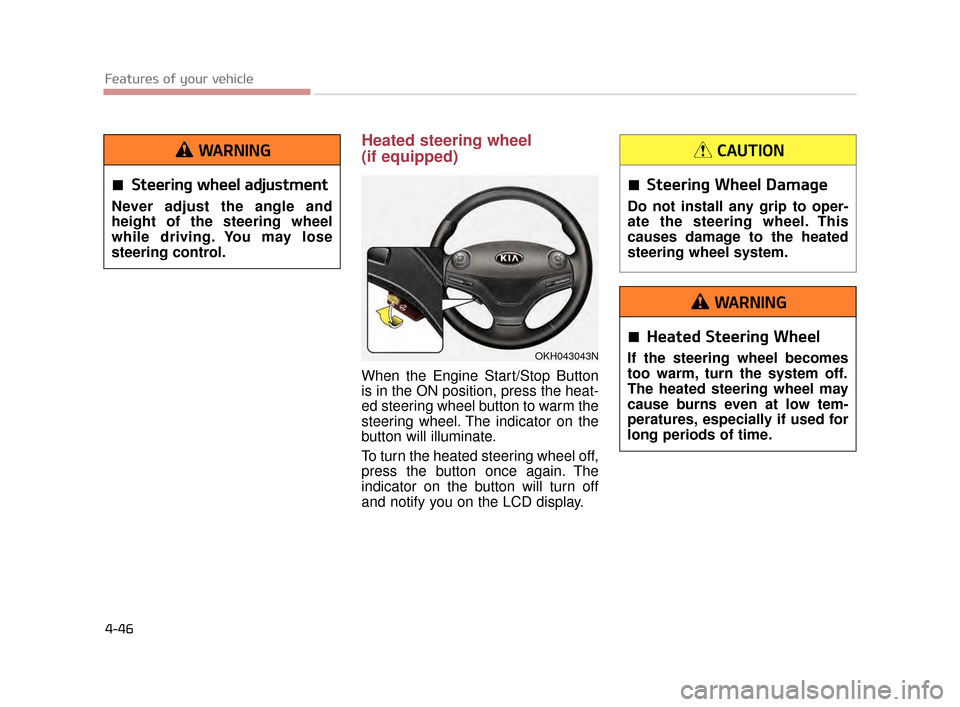
Heated steering wheel
(if equipped)
When the Engine Start/Stop Button
is in the ON position, press the heat-
ed steering wheel button to warm the
steering wheel. The indicator on the
button will illuminate.
To turn the heated steering wheel off,
press the button once again. The
indicator on the button will turn off
and notify you on the LCD display.
OKH043043N
Steering wheel adjustment
Never adjust the angle and
height of the steering wheel
while driving. You may lose
steering control.
WARNING
Steering Wheel Damage
Do not install any grip to oper-
ate the steering wheel. This
causes damage to the heated
steering wheel system.
CAUTION
Heated Steering Wheel
If the steering wheel becomes
too warm, turn the system off.
The heated steering wheel may
cause burns even at low tem-
peratures, especially if used for
long periods of time.
WARNING
KH CAN (ENG) 4:2015 3/26/2015 10:38 AM Page 46
Page 127 of 522
Features of your vehicle
4-48
MIRRORS
Inside rearview mirror
Adjust the rearview mirror so that the
center view through the rear window
is seen. Make this adjustment before
you start driving.
Do not place objects in the rear seat
which would interfere with your vision
through the rear window.
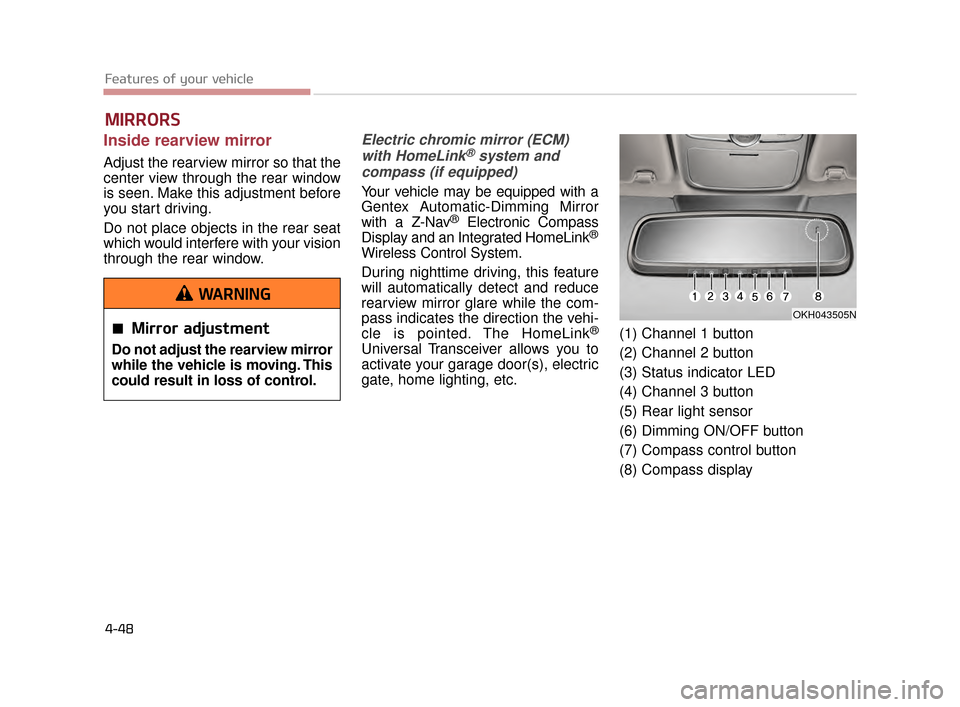
Electric chromic mirror (ECM)with HomeLink®system and
compass (if equipped)
Your vehicle may be equipped with a
Gentex Automatic-Dimming Mirror
with a Z-Nav
®Electronic Compass
Display and an Integrated HomeLink®
Wireless Control System.
During nighttime driving, this feature
will automatically detect and reduce
rearview mirror glare while the com-
pass indicates the direction the vehi-
cle is pointed. The HomeLink
®
Universal Transceiver allows you to
activate your garage door(s), electric
gate, home lighting, etc. (1) Channel 1 button
(2) Channel 2 button
(3) Status indicator LED
(4) Channel 3 button
(5) Rear light sensor
(6) Dimming ON/OFF button
(7) Compass control button
(8) Compass display
OKH043505N
Mirror adjustment
Do not adjust the rearview mirror
while the vehicle is moving. This
could result in loss of control.
WARNING
KH CAN (ENG) 4:2015 3/26/2015 10:38 AM Page 48
Page 128 of 522
Features of your vehicle
4
4-49
Automatic-Dimming Night Vision
Safety™(NVS®) Mirror
The NVS
®Mirror in your vehicle is
the most advanced way to reduce
annoying glare in the rearview mirror
during any driving situation. For more
information regarding NVS
®mirrors
and other applications, please refer
to the Gentex website:
www.gentex.com
❈ Night Vision Safety™ is a regis-
tered trademark of Gentex
Corporation.
✽ NOTICE
The NVS® Mirror automatically
reduces glare during driving condi-
tions based upon light levels moni-
tored in front of the vehicle and
from the rear of the vehicle. These
light sensors are visible through
openings in the front and rear of the
mirror case. Any object that
obstructs either light sensor will
degrade the automatic dimming
control feature.
Automatic-dimming function
Your mirror will automatically dim
upon detecting glare from the vehi-
cles traveling behind you. The auto-
dimming function can be controlled
by the Dimming ON/OFF Button:
1.Pressing the button turns the
auto-dimming function OFF which
is indicated by the green Status
Indicator LED turning off.
2.Pressing the button again turns the auto-dimming function ON
which is indicated by the green
Status Indicator LED turning on.✽ NOTICE
The mirror defaults to the ON posi-
tion each time the vehicle is started.
Z-Nav™ Compass Display
The NVS
®Mirror in your vehicle is
also equipped with a Z-NAV™
Compass that shows the vehicle
Compass heading in the Display
Window using the 8 basic cardinal
headings (N, NE, E, SE, etc.).
❈ Z-Nav™ is a registered trademark
of Gentex Corporation.
KH CAN (ENG) 4:2015 3/26/2015 10:38 AM Page 49
Page 129 of 522
Features of your vehicle
4-50
Compass function
The Compass can be turned ON and
OFF and will remember the last state
when the ignition is cycled. To turn
the display feature ON/OFF:
1.Press and release the button toturn the display feature OFF.
2.Press and release the button again to turn the display back ON.
Additional options can be set with
press and hold sequences of the
button and are detailed below.
There is a difference between mag-
netic north and true north. The com-
pass in the mirror can compensate
for this difference when it knows the
Magnetic Zone in which it is operat-
ing. This is set either by the dealer or
by the user. The operating Zone
Numbers for North America are
shown in the figure on the following
section.
B520C05NF
KH CAN (ENG) 4:2015 3/26/2015 10:38 AM Page 50