display KIA K900 2020 Manual PDF
[x] Cancel search | Manufacturer: KIA, Model Year: 2020, Model line: K900, Model: KIA K900 2020Pages: 593, PDF Size: 14.99 MB
Page 422 of 593

Driving your vehicle
156
5
If any of these conditions occur, the
light on the BCW switch and the sys-
tem will turn off automatically.
When the BCW canceled warning
message is displayed in the cluster,
check to make sure that the rear
bumper is free from any dirt or snow
in the areas where the sensor is
located. Remove any dirt, snow, or
foreign material that could interfere
with the radar sensors.
After any dirt or debris is removed,
RCCA system should operate nor-
mally after about 10 minutes of driv-
ing the vehicle.
If the system still does not operate
normally, have your vehicle inspect-
ed by an authorized K900 Kia dealer. Turn off the BCW, BCA and RCCW
system (if equipped) when a trailer or
carrier is installed.
- Press the BCW/BCA button (the
indicator on the button extinguish)
- Deactivate the RCCW system by deselecting
“AVN →Setup →Vehicle →Driver
Assistance →Blind-Spot Safety →
Rear Cross-Traffic Collision
Warning” (if equipped)
If you use BCW, BCA and RCCW
system, remove a trailer or carrier. Check Blind-Spot Collision Warning
(BCW) system
If there is a problem with BCW sys-
tem, a warning message will appear
and the light on the switch will turn off.
The system will turn off automatically.
RCCW and RCCA system will not
operate also if BCW system turns off
due to malfunction. We recommend
that you have your vehicle inspected
by an authorized K900 Kia dealer.
ORJ058184L
Page 450 of 593
What to do in an emergency
86
TIRE PRESSURE MONITORING SYSTEM (TPMS)
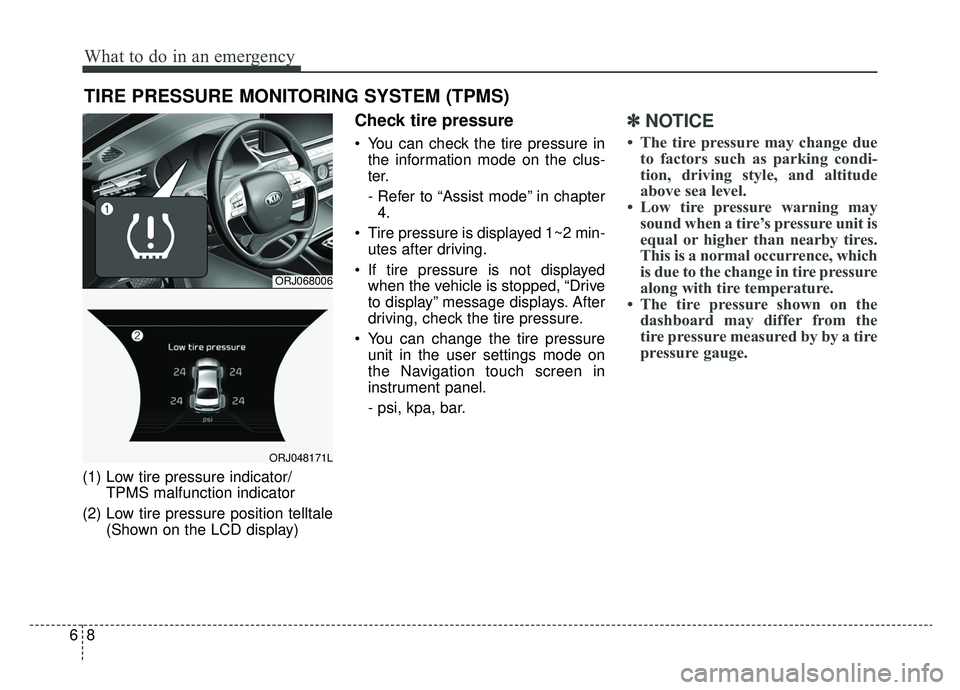
(1) Low tire pressure indicator/TPMS malfunction indicator
(2) Low tire pressure position telltale (Shown on the LCD display)
Check tire pressure
You can check the tire pressure inthe information mode on the clus-
ter.
- Refer to “Assist mode” in chapter4.
Tire pressure is displayed 1~2 min- utes after driving.
If tire pressure is not displayed when the vehicle is stopped, “Drive
to display” message displays. After
driving, check the tire pressure.
You can change the tire pressure unit in the user settings mode on
the Navigation touch screen in
instrument panel.
- psi, kpa, bar.
✽ ✽ NOTICE
• The tire pressure may change due
to factors such as parking condi-
tion, driving style, and altitude
above sea level.
• Low tire pressure warning may sound when a tire’s pressure unit is
equal or higher than nearby tires.
This is a normal occurrence, which
is due to the change in tire pressure
along with tire temperature.
• The tire pressure shown on the dashboard may differ from the
tire pressure measured by by a tire
pressure gauge.
ORJ068006
ORJ048171L
Page 515 of 593
745
Maintenance
3. Checking tire life (TIN : TireIdentification Number)
Any tires that are over 6 years old,
based on the manufacturing date,
(including the spare tire) should be
replaced by new ones. You can find
the manufacturing date on the tire
sidewall (possibly on the inside of the
wheel), displaying the DOT Code.
The DOT Code is a series of num-
bers on a tire consisting of numbers
and English letters. The manufactur-
ing date is designated by the last four
digits (characters) of the DOT code.
DOT : XXXX XXXX OOOO
The front part of the DOT means a
plant code number, tire size and
tread pattern and the last four num-
bers indicate week and year manu-
factured.
For example:
DOT XXXX XXXX 1619 represents
that the tire was produced in the 16th
week of 2019.
4. Tire ply composition and mate-rial
The number of layers or plies of rub-
ber-coated fabric in the tire. Tire
manufacturers also must indicate the
materials in the tire, which include
steel, nylon, polyester, and others.
The letter "R" means radial ply con-
struction; the letter "D" means diago-
nal or bias ply construction; and the
letter "B" means belted-bias ply con-
struction.
5. Maximum permissible inflationpressure
This number is the greatest amount of
air pressure that should be put in the
tire. Do not exceed the maximum per-
missible inflation pressure. Refer to
the Tire and Loading Information label
for recommended inflation pressure.
6. Maximum load rating
This number indicates the maximum
load in kilograms and pounds that can
be carried by the tire. When replacing
the tires on the vehicle, always use a
tire that has the same load rating as
the factory installed tire.
7. Uniform tire quality grading
Quality grades can be found where
applicable on the tire sidewall
between tread shoulder and maxi-
mum section width.
For example:
TREADWEAR 440
TRACTION A
TEMPERATURE A
WARNING - Tire age
Replace tires within the recom-
mended time frame. Failure to
replace tires as recommended
can result in sudden tire failure,
which could lead to a loss of
control and an accident.
Page 525 of 593
755
Maintenance
✽ ✽NOTICE- Remodeling
Prohibited
Do not rewire your vehicle in any
way as doing so may affect the per-
formance of several safety features
in your vehicle. Rewiring your vehi-
cle may also void your warranty and
cause you to be responsible for any
subsequent vehicle damage which
may result.
✽ ✽ NOTICE- Window tinting pre-
caution
Window tint (especially metallic
film) might cause communication
errors or poor radio reception, and a
malfunctioning automatic lighting
system due to reflections from the
mirror tint inside the vehicle. The
tint installation solution used might
also leak into the electronic compo-
nents, causing malfunctions or dam-
age.
Inner panel fuse replacement
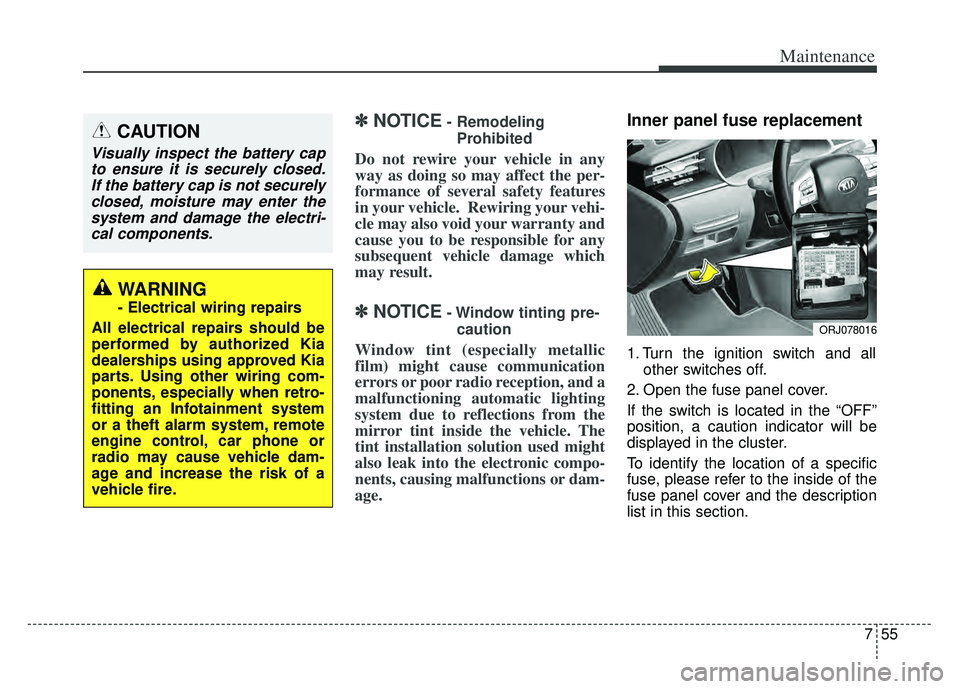
1. Turn the ignition switch and all other switches off.
2. Open the fuse panel cover.
If the switch is located in the “OFF”
position, a caution indicator will be
displayed in the cluster.
To identify the location of a specific
fuse, please refer to the inside of the
fuse panel cover and the description
list in this section.
CAUTION
Visually inspect the battery cap to ensure it is securely closed.If the battery cap is not securelyclosed, moisture may enter thesystem and damage the electri-cal components.
WARNING
- Electrical wiring repairs
All electrical repairs should be
performed by authorized Kia
dealerships using approved Kia
parts. Using other wiring com-
ponents, especially when retro-
fitting an Infotainment system
or a theft alarm system, remote
engine control, car phone or
radio may cause vehicle dam-
age and increase the risk of a
vehicle fire.
ORJ078016
Page 532 of 593
Maintenance
62
7
Fuse NameFuse ratingCircuit Protected
MULTI MEDIA215AAudio/Video & Navigation Head Unit
MULTI MEDIA130AFuse - MULTI MEDIA2, MULTI MEDIA4, MULTI MEDIA3
AIR BAG115ASRS (Supplemental Restraint System) Control Module
INTERIOR LAMP10AOverhead Console Lamp, Room Lamp, Glove Box Lamp, Front Foot Lamp Left Handle side/Right Handle
side, Luggage Lamp Left Handle side/Right Handle side, Driver/Passenger Door Foot Lamp, Rear Door
Foot Lamp Left Handle side/Right Handle side, Driver/Passenger Seat Foot Lamp
BRAKE SWITCH10AIBU (Integrated Body Control Unit), Stop Lamp Switch
CLUSTER10AInstrument Cluster, Head-Up Display
AFS10A[Auto Dynamic] AFS (Adaptive Front Lighting System) Control Unit, Head Lamp Left Handle side/Right
Handle side
PRESAFETY
SEAT BELT10APre-Safe Seat Belt Control Unit
MULTI MEDIA410ARear Seat USB Jack, Instrument Cluster
MULTI MEDIA310ADIS (Driver Information System)
Instrument panel (Driver’s side fuse panel)
Page 533 of 593
763
Maintenance
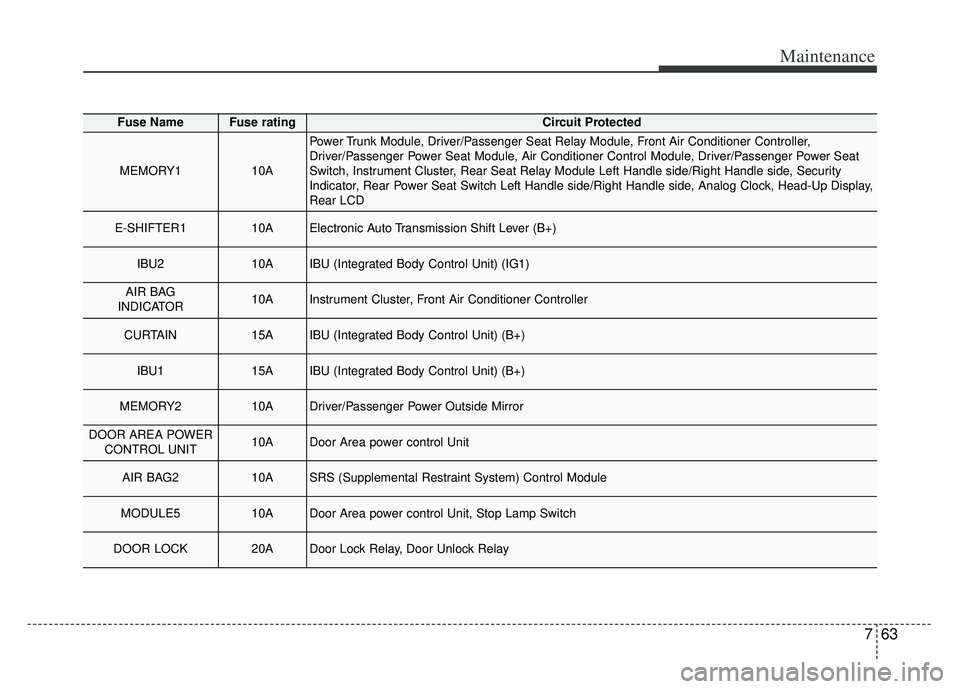
Fuse NameFuse ratingCircuit Protected
MEMORY110A
Power Trunk Module, Driver/Passenger Seat Relay Module, Front Air Conditioner Controller,
Driver/Passenger Power Seat Module, Air Conditioner Control Module, Driver/Passenger Power Seat
Switch, Instrument Cluster, Rear Seat Relay Module Left Handle side/Right Handle side, Security
Indicator, Rear Power Seat Switch Left Handle side/Right Handle side, Analog Clock, Head-Up Display,
Rear LCD
E-SHIFTER110AElectronic Auto Transmission Shift Lever (B+)
IBU210AIBU (Integrated Body Control Unit) (IG1)
AIR BAG
INDICATOR10AInstrument Cluster, Front Air Conditioner Controller
CURTAIN15AIBU (Integrated Body Control Unit) (B+)
IBU115AIBU (Integrated Body Control Unit) (B+)
MEMORY210ADriver/Passenger Power Outside Mirror
DOOR AREA POWER CONTROL UNIT10ADoor Area power control Unit
AIR BAG210ASRS (Supplemental Restraint System) Control Module
MODULE510ADoor Area power control Unit, Stop Lamp Switch
DOOR LOCK20ADoor Lock Relay, Door Unlock Relay
Page 574 of 593
89
Specifications, Consumer information, Reporting safety defects
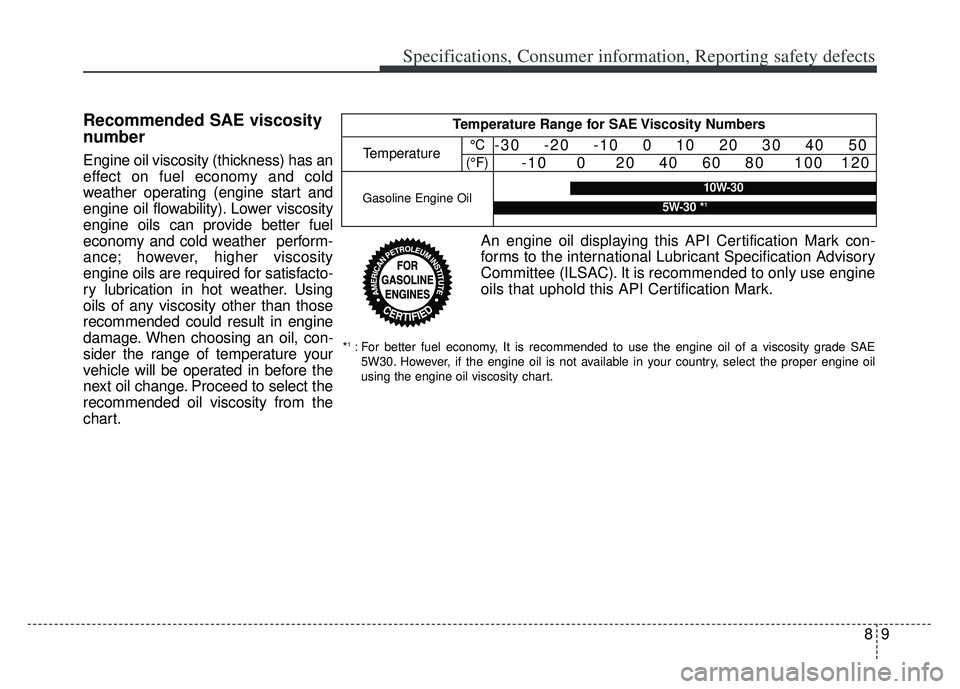
Recommended SAE viscosity
number
Engine oil viscosity (thickness) has an
effect on fuel economy and cold
weather operating (engine start and
engine oil flowability). Lower viscosity
engine oils can provide better fuel
economy and cold weather perform-
ance; however, higher viscosity
engine oils are required for satisfacto-
ry lubrication in hot weather. Using
oils of any viscosity other than those
recommended could result in engine
damage. When choosing an oil, con-
sider the range of temperature your
vehicle will be operated in before the
next oil change. Proceed to select the
recommended oil viscosity from the
chart.
An engine oil displaying this API Certification Mark con-
forms to the international Lubricant Specification Advisory
Committee (ILSAC). It is recommended to only use engine
oils that uphold this API Certification Mark.
Temperature Range for SAE Viscosity Numbers
Temperature°C
(°F)-30 -20 -10 0 10 20 30 40 50 -10 0 20 40 60 80 100 120
Gasoline Engine Oil10W-30
5W-30 *1
*1: For better fuel economy, It is recommended to use the engine oil of a viscosity grade SAE
5W30. However, if the engine oil is not available in your country, select the proper engine oil
using the engine oil viscosity chart.
Page 583 of 593
Index
2I
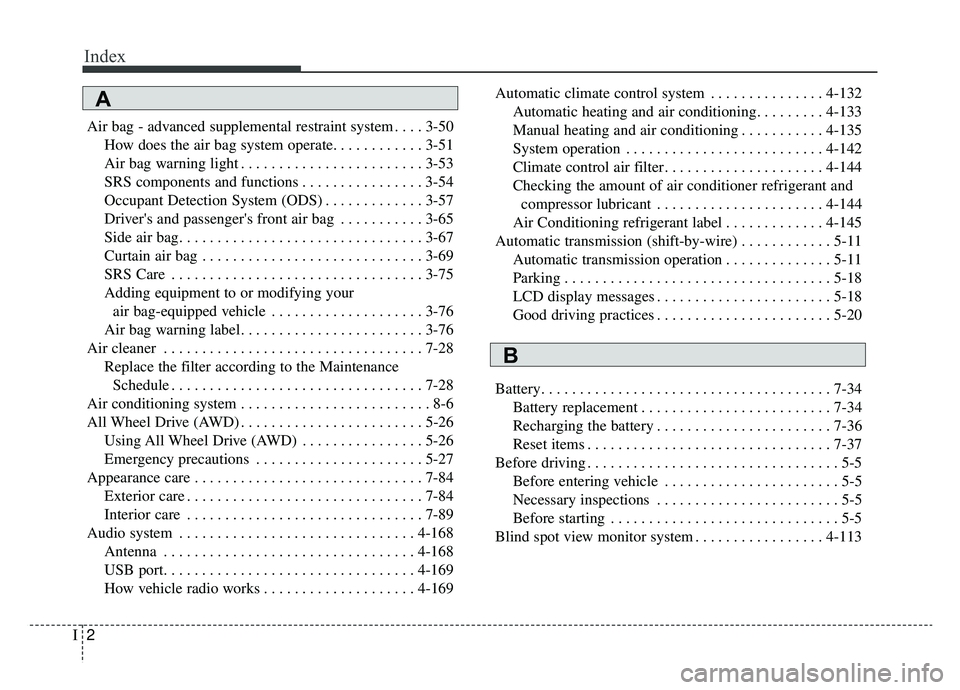
Air bag - advanced supplemental restraint system . . . . 3-50How does the air bag system operate. . . . . . . . . . . . 3-51
Air bag warning light . . . . . . . . . . . . . . . . . . . . . . . . 3-53
SRS components and functions . . . . . . . . . . . . . . . . 3-54
Occupant Detection System (ODS) . . . . . . . . . . . . . 3-57
Driver's and passenger's front air bag . . . . . . . . . . . 3-65
Side air bag. . . . . . . . . . . . . . . . . . . . . . . . . . . . . . . . 3-67
Curtain air bag . . . . . . . . . . . . . . . . . . . . . . . . . . . . . 3-69
SRS Care . . . . . . . . . . . . . . . . . . . . . . . . . . . . . . . . . 3-75
Adding equipment to or modifying your air bag-equipped vehicle . . . . . . . . . . . . . . . . . . . . 3-76
Air bag warning label. . . . . . . . . . . . . . . . . . . . . . . . 3-76
Air cleaner . . . . . . . . . . . . . . . . . . . . . . . . . . . . . . . . . . 7-28\
Replace the filter according to the Maintenance Schedule . . . . . . . . . . . . . . . . . . . . . . . . . . . . . . . . . 7-28
Air conditioning system . . . . . . . . . . . . . . . . . . . . . . . . . 8-6
All Wheel Drive (AWD) . . . . . . . . . . . . . . . . . . . . . . . . 5-26 Using All Wheel Drive (AWD) . . . . . . . . . . . . . . . . 5-26
Emergency precautions . . . . . . . . . . . . . . . . . . . . . . 5-27
Appearance care . . . . . . . . . . . . . . . . . . . . . . . . . . . . . . 7-84 Exterior care . . . . . . . . . . . . . . . . . . . . . . . . . . . . . . . 7-84
Interior care . . . . . . . . . . . . . . . . . . . . . . . . . . . . . . . 7-89
Audio system . . . . . . . . . . . . . . . . . . . . . . . . . . . . . . . 4-168 Antenna . . . . . . . . . . . . . . . . . . . . . . . . . . . . . . . . . 4-168
USB port. . . . . . . . . . . . . . . . . . . . . . . . . . . . . . . . . 4-169
How vehicle radio works . . . . . . . . . . . . . . . . . . . . 4-169 Automatic climate control system . . . . . . . . . . . . . . . 4-132
Automatic heating and air conditioning. . . . . . . . . 4-133
Manual heating and air conditioning . . . . . . . . . . . 4-135
System operation . . . . . . . . . . . . . . . . . . . . . . . . . . 4-142
Climate control air filter. . . . . . . . . . . . . . . . . . . . . 4-144
Checking the amount of air conditioner refrigerant and compressor lubricant . . . . . . . . . . . . . . . . . . . . . . 4-144
Air Conditioning refrigerant label . . . . . . . . . . . . . 4-145
Automatic transmission (shift-by-wire) . . . . . . . . . . . . 5-11 Automatic transmission operation . . . . . . . . . . . . . . 5-11
Parking . . . . . . . . . . . . . . . . . . . . . . . . . . . . . . . . . . . 5-\
18
LCD display messages . . . . . . . . . . . . . . . . . . . . . . . 5-18
Good driving practices . . . . . . . . . . . . . . . . . . . . . . . 5-20
Battery. . . . . . . . . . . . . . . . . . . . . . . . . . . . . . . . . . . . \
. . 7-34 Battery replacement . . . . . . . . . . . . . . . . . . . . . . . . . 7-34
Recharging the battery . . . . . . . . . . . . . . . . . . . . . . . 7-36
Reset items . . . . . . . . . . . . . . . . . . . . . . . . . . . . . . . . 7-37
Before driving . . . . . . . . . . . . . . . . . . . . . . . . . . . . . . . . . 5-5 Before entering vehicle . . . . . . . . . . . . . . . . . . . . . . . 5-5
Necessary inspections . . . . . . . . . . . . . . . . . . . . . . . . 5-5
Before starting . . . . . . . . . . . . . . . . . . . . . . . . . . . . . . 5-5
Blind spot view monitor system . . . . . . . . . . . . . . . . . 4-113
A
B
Page 586 of 593

I5
Index
Forward Collision-Avoidance Assist (FCA) system - sensor fusion type (front camera + front radar) . . 5-53
System setting and activation . . . . . . . . . . . . . . . . . . 5-53
FCA warning message and system control . . . . . . . 5-55
FCA sensor . . . . . . . . . . . . . . . . . . . . . . . . . . . . . . . . 5-58
System malfunction . . . . . . . . . . . . . . . . . . . . . . . . . 5-60
Limitations of the system . . . . . . . . . . . . . . . . . . . . . 5-62
Recognizing pedestrians or cyclists . . . . . . . . . . . . . 5-66
Forward Collision-Avoidance Assist-Lane-Change Oncoming function (FCA-LO) . . . . . . . . . . . . . . . . 5-69
Function operation . . . . . . . . . . . . . . . . . . . . . . . . . . 5-69
Warning message and function control . . . . . . . . . . 5-69
Limitations . . . . . . . . . . . . . . . . . . . . . . . . . . . . . . . . 5-70
Fuel filler lid . . . . . . . . . . . . . . . . . . . . . . . . . . . . . . . . . 4-44 Opening the fuel filler lid. . . . . . . . . . . . . . . . . . . . . 4-44
Closing the fuel filler lid . . . . . . . . . . . . . . . . . . . . . 4-44
Emergency fuel filler lid release . . . . . . . . . . . . . . . 4-45
Fuel requirements . . . . . . . . . . . . . . . . . . . . . . . . . . . . . . 1-3
Fuses . . . . . . . . . . . . . . . . . . . . . . . . . . . . . . . . . . . . \
. . . 7-53 Inner panel fuse replacement . . . . . . . . . . . . . . . . . . 7-55
Engine compartment fuse replacement . . . . . . . . . . 7-57
Fuse/relay panel description. . . . . . . . . . . . . . . . . . . 7-59
Gross vehicle weight. . . . . . . . . . . . . . . . . . . . . . . . . . . . 8-6 Head Up Display (HUD) . . . . . . . . . . . . . . . . . . . . . . 4-104
Description . . . . . . . . . . . . . . . . . . . . . . . . . . . . . . . 4-104
Head Up Display On/Off . . . . . . . . . . . . . . . . . . . . 4-105
Head Up Display information . . . . . . . . . . . . . . . . 4-105
Head Up Display setting . . . . . . . . . . . . . . . . . . . . 4-105
Highway Driving Assist (HDA) system . . . . . . . . . . . 5-142 Setting and activating HDA system . . . . . . . . . . . . 5-143
Operating conditions . . . . . . . . . . . . . . . . . . . . . . . 5-143
HDA system operation . . . . . . . . . . . . . . . . . . . . . . 5-143
Warning related to steering wheel . . . . . . . . . . . . . 5-144
When the hands-off warning lasts for a certain period of time . . . . . . . . . . . . . . . . . . . . . . . . . . . . 5-145
HDA malfunction . . . . . . . . . . . . . . . . . . . . . . . . . . 5-146
Radio frequency radiation exposure information. . 5-148
Hood . . . . . . . . . . . . . . . . . . . . . . . . . . . . . . . . . . . . \
. . . 4-42 Opening the hood . . . . . . . . . . . . . . . . . . . . . . . . . . . 4-42
Closing the hood . . . . . . . . . . . . . . . . . . . . . . . . . . . 4-43
How to use this manual . . . . . . . . . . . . . . . . . . . . . . . . . 1-2
If the engine overheats . . . . . . . . . . . . . . . . . . . . . . . . . . 6-7
If the engine will not start . . . . . . . . . . . . . . . . . . . . . . . 6-4 If engine doesn't turn over or turns over slowly . . . . 6-4
If engine turns over normally but does not start . . . . 6-4
F
G
H
I