battery KIA OPTIMA 2020 Features and Functions Guide
[x] Cancel search | Manufacturer: KIA, Model Year: 2020, Model line: OPTIMA, Model: KIA OPTIMA 2020Pages: 591, PDF Size: 14.1 MB
Page 105 of 591

415
Features of your vehicle
Battery replacement
A smart key battery should last for
several years, but if the smart key is
not working properly, try replacing
the battery with a new one. If you are
unsure how to use your smart key or
replace the battery, contact an
authorized Kia dealer.
1. Remove the mechanical key.
2. Pry open the rear cover.
3. Replace the battery with a newbattery (CR2032). When replacing
the battery, make sure the battery
is in the correct position. 4. Install the battery in the reverse
order of removal.
you years of trouble-free use, how-
ever it can malfunction if exposed
to moisture or static electricity. If
you are unsure how to use or
replace the battery, contact an
authorized Kia dealer.
the smart key to malfunction. Be
sure to use the correct battery.
don't drop it, get it wet, or expose it
to heat or sunlight.
An inappropriately dis- posed battery can be harm-
ful to the environment and
human health. Dispose the
battery according to your
local law(s) or regulations.
Smart key immobilizer system
Your vehicle is equipped with an
electronic engine immobilizer system
to reduce the risk of unauthorized
vehicle use.
Your immobilizer system is com-
prised of a small transponder in the
smart key and electronic devices
inside the vehicle.
With the immobilizer system, when-
ever you turn the engine start/stop
button to the ON position by pressing
the button while carrying the smart
key, it verifies if the smart key is valid.
If the key is determined to be valid,
the engine will start.
If the key is determined to be invalid,
the engine will not start.
OJF045400L
CAUTION - Smart key
damage
Do not drop, get wet or expose
the smart key to heat or sun-light, or it will be damaged.
JFa PE USA 4.qxp 5/15/2019 3:17 PM Page 15
Page 137 of 591
447
Features of your vehicle
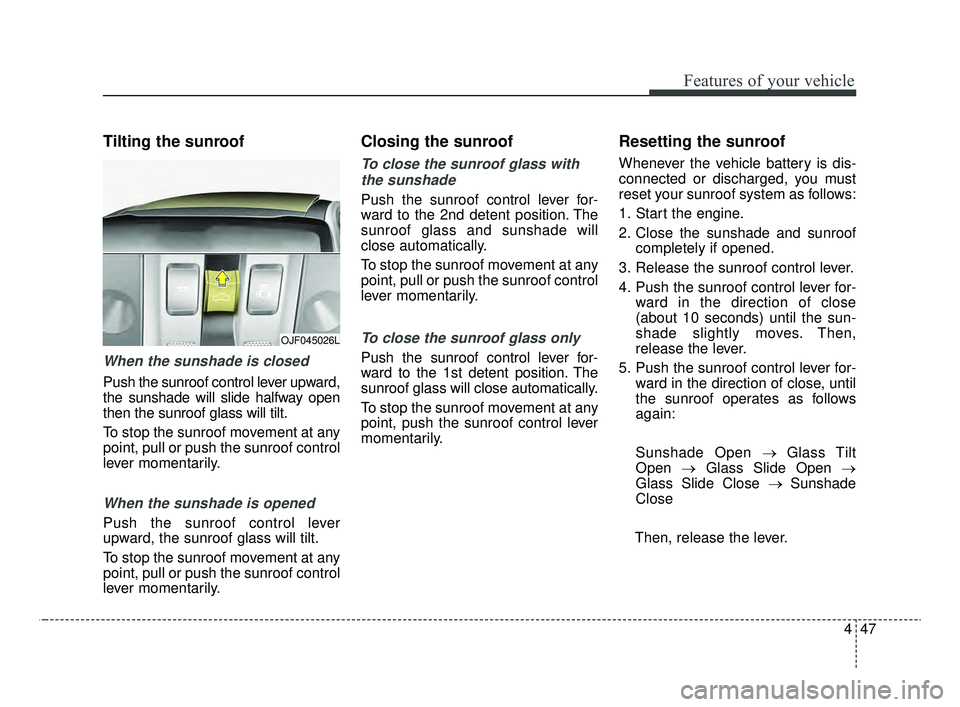
Tilting the sunroof
When the sunshade is closed
Push the sunroof control lever upward,
the sunshade will slide halfway open
then the sunroof glass will tilt.
To stop the sunroof movement at any
point, pull or push the sunroof control
lever momentarily.
When the sunshade is opened
Push the sunroof control lever
upward, the sunroof glass will tilt.
To stop the sunroof movement at any
point, pull or push the sunroof control
lever momentarily.
Closing the sunroof
To close the sunroof glass withthe sunshade
Push the sunroof control lever for-
ward to the 2nd detent position. The
sunroof glass and sunshade will
close automatically.
To stop the sunroof movement at any
point, pull or push the sunroof control
lever momentarily.
To close the sunroof glass only
Push the sunroof control lever for-
ward to the 1st detent position. The
sunroof glass will close automatically.
To stop the sunroof movement at any
point, push the sunroof control lever
momentarily.
Resetting the sunroof
Whenever the vehicle battery is dis-
connected or discharged, you must
reset your sunroof system as follows:
1. Start the engine.
2. Close the sunshade and sunroof completely if opened.
3. Release the sunroof control lever.
4. Push the sunroof control lever for- ward in the direction of close
(about 10 seconds) until the sun-
shade slightly moves. Then,
release the lever.
5. Push the sunroof control lever for- ward in the direction of close, until
the sunroof operates as follows
again:
Sunshade Open → Glass Tilt
Open →Glass Slide Open →
Glass Slide Close → Sunshade
Close
Then, release the lever.
OJF045026L
JFa PE USA 4.qxp 5/17/2019 4:28 PM Page 47
Page 148 of 591
Features of your vehicle
58
4
✽ ✽
NOTICE - Electric type out-
side rearview mirror
The electric type outside rearview
mirror operates even though the
engine start/stop button is in the
OFF position. However, to prevent
unnecessary battery discharge, do
not adjust the mirrors longer than
necessary while the engine is not
running. Do not fold an electric type
outside rearview mirror by hand.
This could cause motor failure.
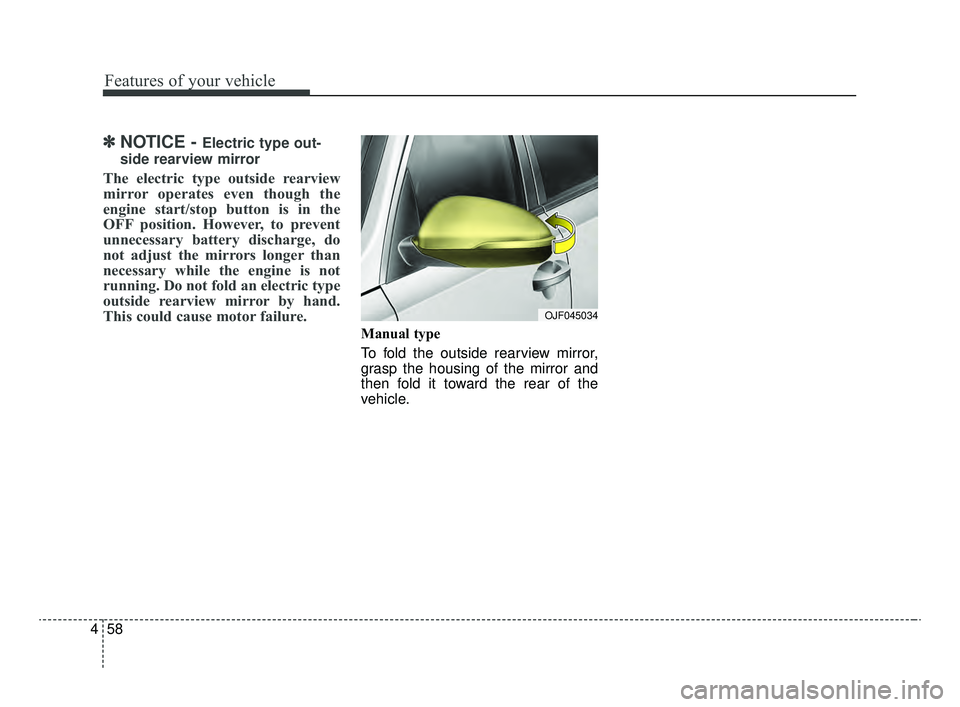
Manual type
To fold the outside rearview mirror,
grasp the housing of the mirror and
then fold it toward the rear of the
vehicle.
OJF045034
JFa PE USA 4.qxp 5/15/2019 3:19 PM Page 58
Page 157 of 591
467
Features of your vehicle
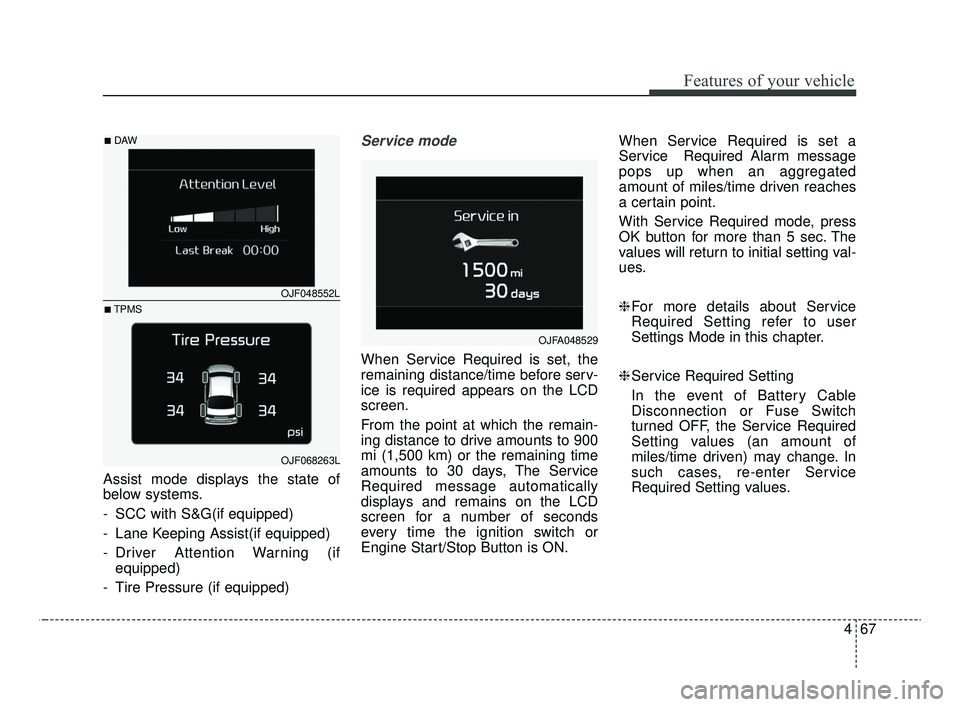
Assist mode displays the state of
below systems.
- SCC with S&G(if equipped)
- Lane Keeping Assist(if equipped)
- Driver Attention Warning (ifequipped)
- Tire Pressure (if equipped)
Service mode
When Service Required is set, the
remaining distance/time before serv-
ice is required appears on the LCD
screen.
From the point at which the remain-
ing distance to drive amounts to 900
mi (1,500 km) or the remaining time
amounts to 30 days, The Service
Required message automatically
displays and remains on the LCD
screen for a number of seconds
every time the ignition switch or
Engine Start/Stop Button is ON. When Service Required is set a
Service Required Alarm message
pops up when an aggregated
amount of miles/time driven reaches
a certain point.
With Service Required mode, press
OK button for more than 5 sec. The
values will return to initial setting val-
ues.
❈
For more details about Service
Required Setting refer to user
Settings Mode in this chapter.
❈ Service Required Setting
In the event of Battery Cable
Disconnection or Fuse Switch
turned OFF, the Service Required
Setting values (an amount of
miles/time driven) may change. In
such cases, re-enter Service
Required Setting values.
OJFA048529
OJF048552L
OJF068263L
■DAW
■TPMS
JFa PE USA 4.qxp 5/15/2019 3:20 PM Page 67
Page 164 of 591
Features of your vehicle
74
4
The trip computer is a microcomput-
er-controlled driver information sys-
tem that displays information related
to driving.
✽ ✽
NOTICE
Some driving information stored in
the trip computer (for example
Average Vehicle Speed) resets if the
battery is disconnected.
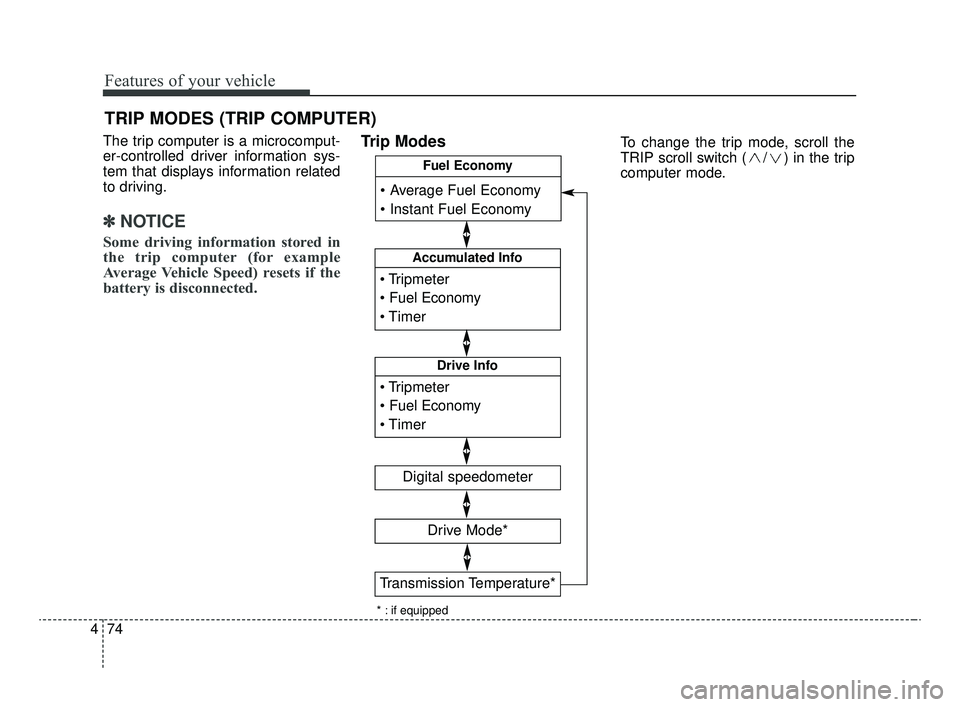
Trip Modes
TRIP MODES (TRIP COMPUTER)
To change the trip mode, scroll the
TRIP scroll switch ( / ) in the trip
computer mode.
Accumulated Info
Digital speedometer
Drive Info
Fuel Economy
Drive Mode*
* : if equipped
Transmission Temperature*
JFa PE USA 4.qxp 5/15/2019 3:20 PM Page 74
Page 168 of 591

Features of your vehicle
78
4
Smart Shift (if equipped)
This mode displays the currently
selected drive mode.
Transmission Temperature
(for dual clutch transmission,if equipped)
This mode displays the temperature
of the dual clutch transmission.
Warning Messages
Shift to P position (for smart key system)
This warning message illuminates if you try to turn off the engine without
the shift lever in P (Park) position.
At this time, the Engine Start/Stop Button turns to the ACC position (If
you press the Engine Start/Stop
Button once more, it will turn to the
ON position).
Low Key Battery
(for smart key system)
This warning message illuminates if the battery of the smart key is
discharged when the Engine
Start/Stop Button changes to the
OFF position.OJF048577L
OJF048558L
JFa PE USA 4.qxp 5/15/2019 3:20 PM Page 78
Page 174 of 591
Features of your vehicle
84
4
Device in wireless charger
(if equipped)
Warning message will illuminate when the vehicle engine start/stop
button is in OFF and the smart
phone is on the wireless charging
pad in two situations.
1. When the driver or passenger door is opened
2. When one minute has passed after the engine start/stop button
has been turned OFF (and the
door has not been opened for
more than one minute)
❈ For more details, refer to "Smart
Phone Wireless Charger" in this
chapter.
Battery discharging due to exter-
nal electrical devices(if equipped)
This message is displayed when an excessive current draw is being
detected. Be aware that battery
discharge may occur if aftermarket
accessories are installed (i.e.
device charging adapters, vehicle
locators, video players, etc.).
If aftermarket devices are not
installed or have been removed
and the warning message remains,
have your vehicle inspected by an
authorized Kia dealer.
JFa PE USA 4.qxp 5/15/2019 3:20 PM Page 84
Page 184 of 591

Features of your vehicle
94
4
Immobilizer Indicator
Light (With Smart Key) (if equipped)
This indicator light illuminates for up
to 30 seconds:
When the vehicle detects the appropriate smart key with immo-
bilizer in your vehicle while the
Engine Start/Stop Button is ACC or
ON.
- At this time, you can start theengine.
- The indicator light goes off after starting the engine.
This indicator light blinks for a few
seconds:
When the smart key is not in the vehicle.
- At this time, you can not start theengine. This indicator light illuminates for 2
seconds and goes off:
When the vehicle can not detect
the smart key which is in the vehi-
cle while the Engine Start/Stop
Button is ON.
In this case, have your vehicle
inspected by an authorized Kia
dealer.
This indicator light blinks:
When the battery of the smart key is weak.
- At this time, you can not start theengine. However, you can start the
engine if you press the Engine
Start/Stop Button with the smart
key. (For more details, refer to
“Starting the Engine” in chapter 5).
When there is a malfunction with the immobilizer system.
In this case, have your vehicle
inspected by an authorized Kia
dealer.
Turn Signal Indicator
Light
This indicator light blinks:
When you turn the turn signal light on.
If any of the following occurs, there
may be a malfunction with the turn
signal system. In this case, have your
vehicle inspected by an authorized
Kia dealer. - The indicator light does not blinkbut illuminates.
- The indicator light blinks more rapidly.
- The indicator light does not illumi- nate at all.
JFa PE USA 4.qxp 5/15/2019 3:20 PM Page 94
Page 193 of 591

4103
Features of your vehicle
Battery saver function
The purpose of this feature is toprevent the battery from being dis-
charged if the lights are left in the
ON position. The system automati-
cally shuts off the parking lights 30
seconds after the ignition key is
removed and the driver’s door is
opened and closed.
With this feature, the parking lights will turn off automatically if the driver
parks on the side of the road at night
and opens the driver’s side door.
If necessary, to keep the parking
lights on when the ignition key is
removed, perform the following:
1) Open the driver-side door.
2) Turn the parking lights OFF and ON again using the light switch
on the steering column.
Daytime running light
(if equipped)
The Daytime Running Lights (DRL)
can make it easier for others to see
the front of your vehicle during the
day. DRL can be helpful in many dif-
ferent driving conditions, and it is
especially helpful after dawn and
before sunset.
The DRL system turns OFF when:
1. The headlight switch is ON.
2. The engine is OFF.
3. The parking brake is engaged.
Lighting control
The light switch has a Headlight and
a Parking light position.
To operate the lights, turn the knob at
the end of the control lever to one of
the following positions:
(1) OFF position
(2) Auto light position
(3) Parking & Tail light
(4) Headlight position
LIGHTING
OUM044053
JFa PE USA 4.qxp 5/15/2019 3:21 PM Page 103
Page 195 of 591

4105
Features of your vehicle
High beam operation
To turn on the high beam headlamp,
push the lever away from you. The
lever will return to its original position.
To turn off the high beam headlamps,
pull the lever towards you. It will return
to the normal (low beam) position
when released.
The high beam indicator will light
when the headlight high beams are
switched on. To prevent the battery
from being discharged, do not leave
the lights on for a prolonged time while
the engine is not running.
WARNING - High beams
Do not use high beam when
there are other vehicles in front
of your vehicle. Using high
beam could obstruct the other
driver’s vision.
OJF045054
CAUTION
Never put anything over the light sensor (1). This willimpede operation of the auto-light system control.
Do not clean the sensor using a window cleaner as the clean-er may leave a light film whichcould interfere with the sen-sor's operation.
If your vehicle has window tint or other types of metallic coat-ing on the front windshield,the Auto light system may notwork properly.
JFa PE USA 4.qxp 5/15/2019 3:21 PM Page 105