KIA OPTIMA 2020 Features and Functions Guide
Manufacturer: KIA, Model Year: 2020, Model line: OPTIMA, Model: KIA OPTIMA 2020Pages: 591, PDF Size: 14.1 MB
Page 531 of 591

Maintenance
78
7
Light bulb position (Front) (1) Front turn signal lamp (bulb type)
(2) Headlamp (Low) (bulb type)
(3) Headlamp (High) (bulb type)
(4) Day time running lamp/
Position lamp (LED type)
(5) Side marker (LED type)
(6) Headlamp (Low) (LED type)
(7) Headlamp (High) (LED type)
(8) Front fog lamp (bulb type)
(9) Front fog lamp (LED type)
OJFA078237
OJFA078238
OJFA078223
■ Head lamp - Type A
■ Front turn signal lamp (Head lamp - Type A)
■Head lamp - Type B
OJFA078239
OJFA078240
■Front fog lamp - Type A
■Front fog lamp - Type B
JFa PE USA 7.qxp 5/15/2019 3:15 PM Page 78
Page 532 of 591

779
Maintenance
Light bulb position (Rear)
(1) Rear turn signal lamp (bulb type)
(2) Back-up lamp (bulb type)
(3) Stop and tail lamp (bulb type)
(4) Tail lamp (bulb type)
(5) Side marker (bulb type)(6) Stop and tail lamp (LED type)
(7) Stop and tail lamp (LED type)
(8) Side marker (LED type)
(9) License plate lamp (bulb type)
(10) High mounted stop lamp (LED
type)
OJFA078092
OJFA078040
OJFA078241
■Rear combination lamp - Type A
■Rear combination lamp - Type B
■Rear combination lamp - Type C
OJFA078131
OJFA078132
■License plate lamp
■High mounted stop lamp
JFa PE USA 7.qxp 5/15/2019 3:15 PM Page 79
Page 533 of 591
Maintenance
80
7
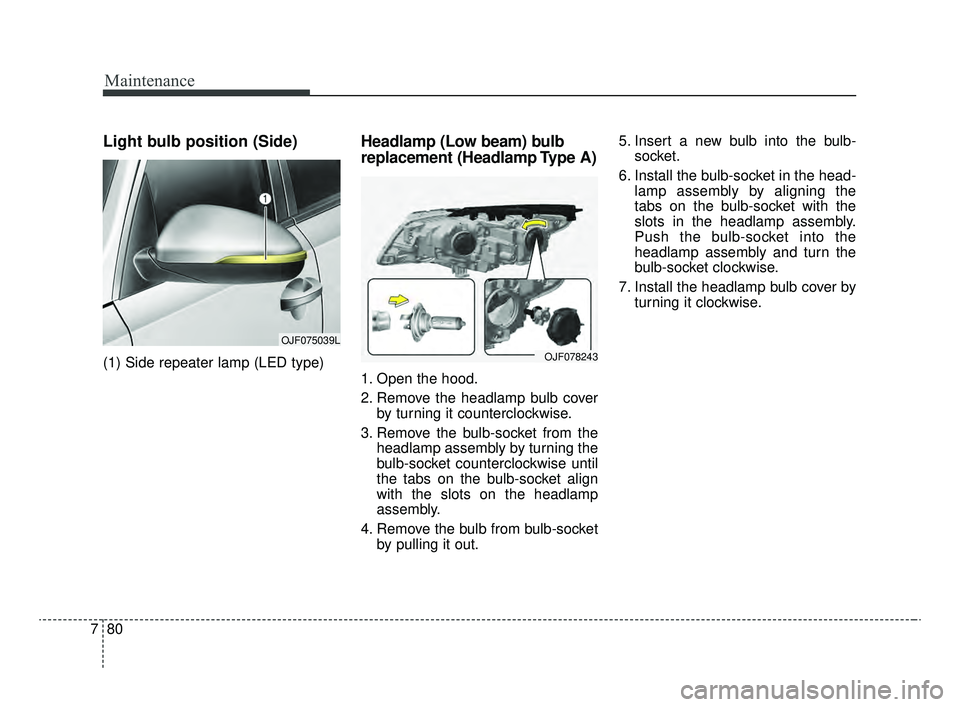
Light bulb position (Side)
(1) Side repeater lamp (LED type)
Headlamp (Low beam) bulb
replacement (Headlamp Type A)
1. Open the hood.
2. Remove the headlamp bulb cover
by turning it counterclockwise.
3. Remove the bulb-socket from the headlamp assembly by turning the
bulb-socket counterclockwise until
the tabs on the bulb-socket align
with the slots on the headlamp
assembly.
4. Remove the bulb from bulb-socket by pulling it out. 5. Insert a new bulb into the bulb-
socket.
6. Install the bulb-socket in the head- lamp assembly by aligning the
tabs on the bulb-socket with the
slots in the headlamp assembly.
Push the bulb-socket into the
headlamp assembly and turn the
bulb-socket clockwise.
7. Install the headlamp bulb cover by turning it clockwise.
OJF075039L
OJF078243
JFa PE USA 7.qxp 5/15/2019 3:15 PM Page 80
Page 534 of 591
781
Maintenance
Headlamp bulbHeadlamp (High beam) bulb
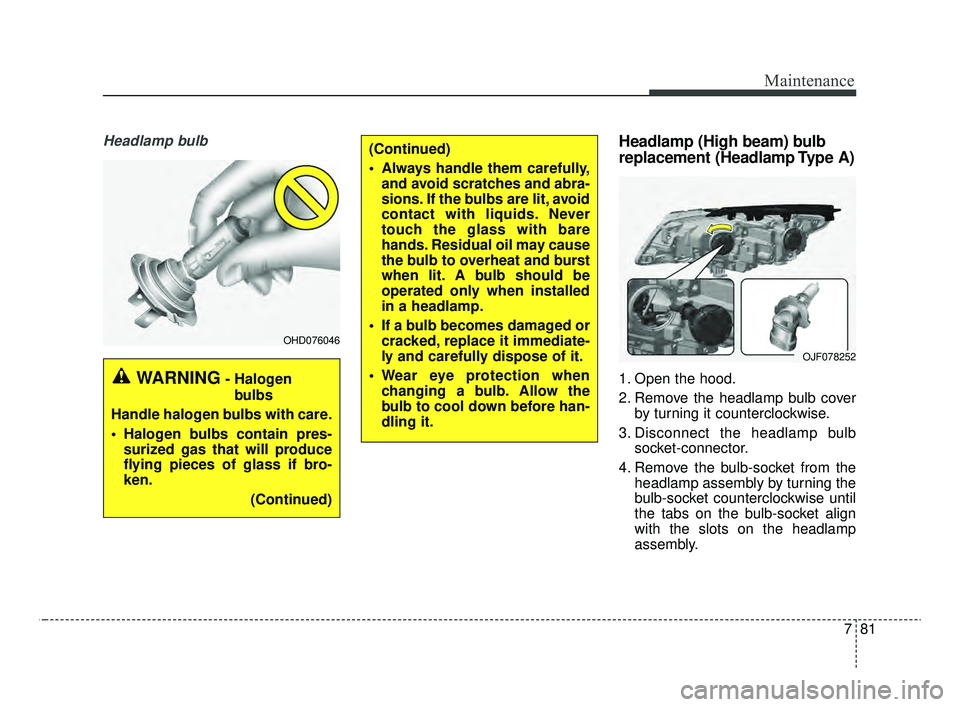
replacement (Headlamp Type A)
1. Open the hood.
2. Remove the headlamp bulb coverby turning it counterclockwise.
3. Disconnect the headlamp bulb socket-connector.
4. Remove the bulb-socket from the headlamp assembly by turning the
bulb-socket counterclockwise until
the tabs on the bulb-socket align
with the slots on the headlamp
assembly.WARNING- Halogen
bulbs
Handle halogen bulbs with care.
Halogen bulbs contain pres- surized gas that will produce
flying pieces of glass if bro-
ken.
(Continued)
OHD076046
(Continued)
Always handle them carefully,and avoid scratches and abra-
sions. If the bulbs are lit, avoid
contact with liquids. Never
touch the glass with bare
hands. Residual oil may cause
the bulb to overheat and burst
when lit. A bulb should be
operated only when installed
in a headlamp.
If a bulb becomes damaged or cracked, replace it immediate-
ly and carefully dispose of it.
Wear eye protection when changing a bulb. Allow the
bulb to cool down before han-
dling it.
OJF078252
JFa PE USA 7.qxp 5/15/2019 3:15 PM Page 81
Page 535 of 591
Maintenance
82
7
5. Install a new bulb-socket assem-
bly in the headlamp assembly by
aligning the tabs on the bulb-sock-
et with the slots in the headlamp
assembly. Push the bulb-socket
into the headlamp assembly and
turn the bulb-socket clockwise.
6. Install the headlamp bulb cover by turning it clockwise.Front turn signal lamp bulb
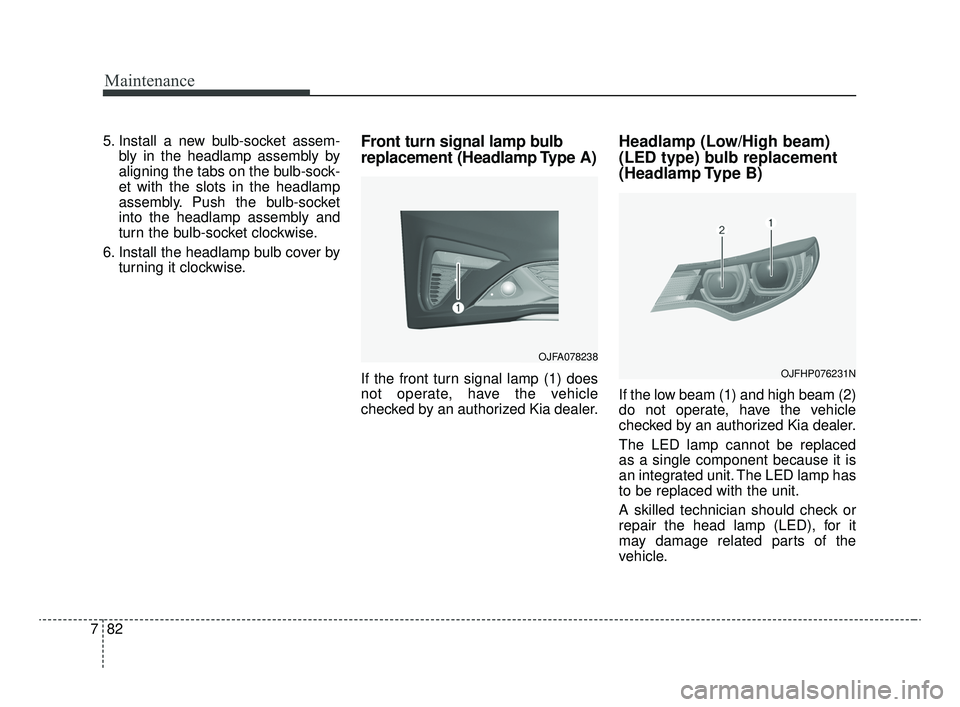
replacement (Headlamp Type A)
If the front turn signal lamp (1) does
not operate, have the vehicle
checked by an authorized Kia dealer.
Headlamp (Low/High beam)
(LED type) bulb replacement
(Headlamp Type B)
If the low beam (1) and high beam (2)
do not operate, have the vehicle
checked by an authorized Kia dealer.
The LED lamp cannot be replaced
as a single component because it is
an integrated unit. The LED lamp has
to be replaced with the unit.
A skilled technician should check or
repair the head lamp (LED), for it
may damage related parts of the
vehicle.
OJFHP076231N
OJFA078238
JFa PE USA 7.qxp 5/15/2019 3:15 PM Page 82
Page 536 of 591
783
Maintenance
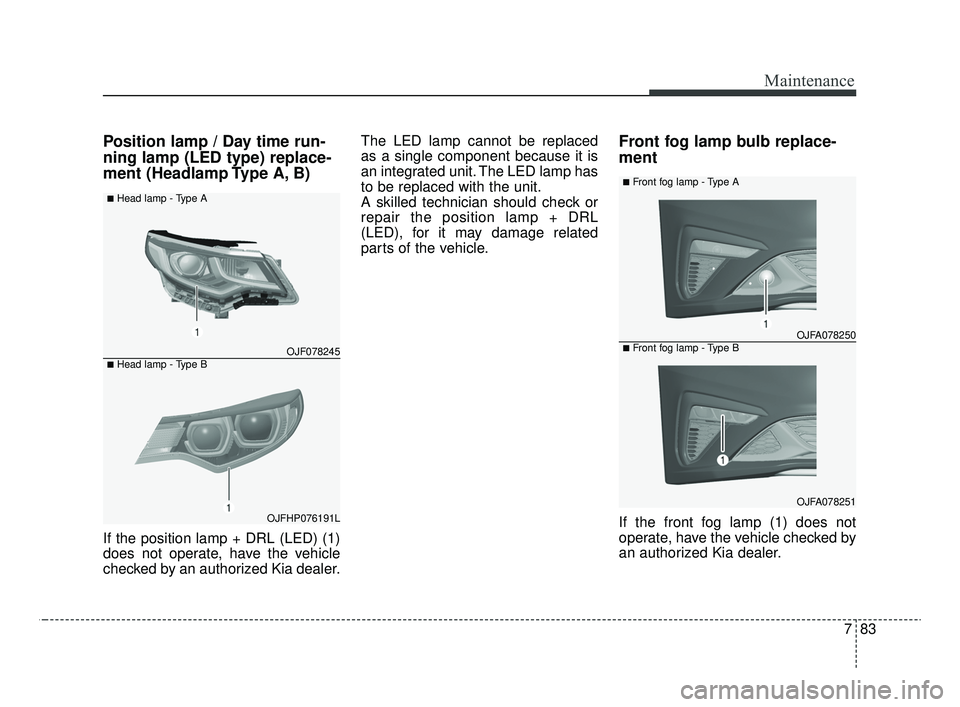
Position lamp / Day time run-
ning lamp (LED type) replace-
ment (Headlamp Type A, B)
If the position lamp + DRL (LED) (1)
does not operate, have the vehicle
checked by an authorized Kia dealer.The LED lamp cannot be replaced
as a single component because it is
an integrated unit. The LED lamp has
to be replaced with the unit.
A skilled technician should check or
repair the position lamp + DRL
(LED), for it may damage related
parts of the vehicle.
Front fog lamp bulb replace-
ment
If the front fog lamp (1) does not
operate, have the vehicle checked by
an authorized Kia dealer.
OJF078245
OJFHP076191L
■Head lamp - Type A
■Head lamp - Type B
OJFA078250
OJFA078251
■Front fog lamp - Type A
■Front fog lamp - Type B
JFa PE USA 7.qxp 5/15/2019 3:15 PM Page 83
Page 537 of 591

Maintenance
84
7
Side repeater lamp (LED type)
bulb replacement
If the side repeater lamp (LED) does
not operate, have the vehicle
checked by an authorized Kia dealer.
The LED lamp cannot be replaced
as a single component because it is
an integrated unit. The LED lamp has
to be replaced with the unit.
A skilled technician should check or
repair the side repeater lamp (LED),
for it may damage related parts of
the vehicle.
Rear turn signal lamp bulb
replacement
1. Open the trunk lid.
2. Open the service cover. 3. Remove the nuts from the vehicle.
4. Disconnect the rear combination
lamp connector.
OJF075039OJF075041
OJF075042
JFa PE USA 7.qxp 5/15/2019 3:15 PM Page 84
Page 538 of 591
785
Maintenance
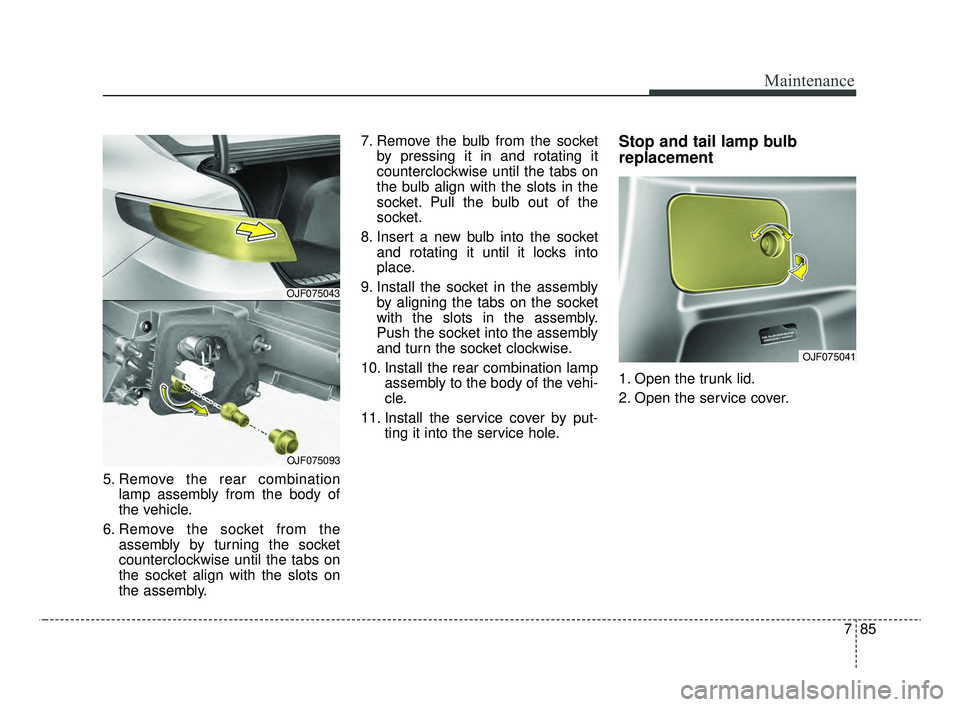
5. Remove the rear combinationlamp assembly from the body of
the vehicle.
6. Remove the socket from the assembly by turning the socket
counterclockwise until the tabs on
the socket align with the slots on
the assembly. 7. Remove the bulb from the socket
by pressing it in and rotating it
counterclockwise until the tabs on
the bulb align with the slots in the
socket. Pull the bulb out of the
socket.
8. Insert a new bulb into the socket and rotating it until it locks into
place.
9. Install the socket in the assembly by aligning the tabs on the socket
with the slots in the assembly.
Push the socket into the assembly
and turn the socket clockwise.
10. Install the rear combination lamp assembly to the body of the vehi-
cle.
11. Install the service cover by put- ting it into the service hole.
Stop and tail lamp bulb
replacement
1. Open the trunk lid.
2. Open the service cover.
OJF075043
OJF075093
OJF075041
JFa PE USA 7.qxp 5/15/2019 3:15 PM Page 85
Page 539 of 591
Maintenance
86
7
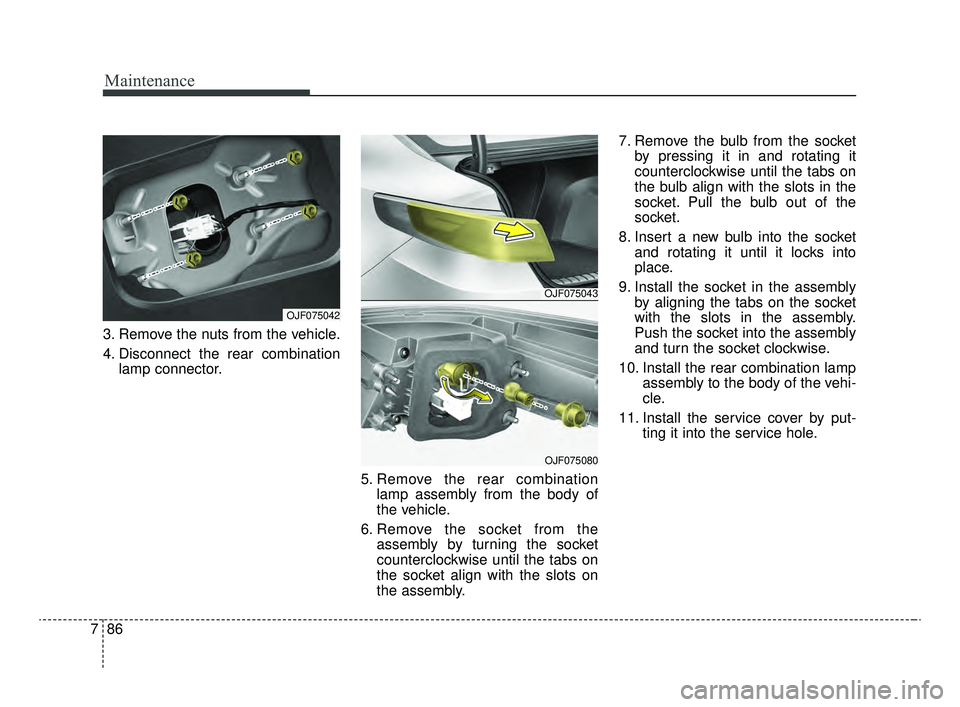
3. Remove the nuts from the vehicle.
4. Disconnect the rear combination
lamp connector.
5. Remove the rear combinationlamp assembly from the body of
the vehicle.
6. Remove the socket from the assembly by turning the socket
counterclockwise until the tabs on
the socket align with the slots on
the assembly. 7. Remove the bulb from the socket
by pressing it in and rotating it
counterclockwise until the tabs on
the bulb align with the slots in the
socket. Pull the bulb out of the
socket.
8. Insert a new bulb into the socket and rotating it until it locks into
place.
9. Install the socket in the assembly by aligning the tabs on the socket
with the slots in the assembly.
Push the socket into the assembly
and turn the socket clockwise.
10. Install the rear combination lamp assembly to the body of the vehi-
cle.
11. Install the service cover by put- ting it into the service hole.
OJF075042
OJF075043
OJF075080
JFa PE USA 7.qxp 5/15/2019 3:15 PM Page 86
Page 540 of 591
787
Maintenance
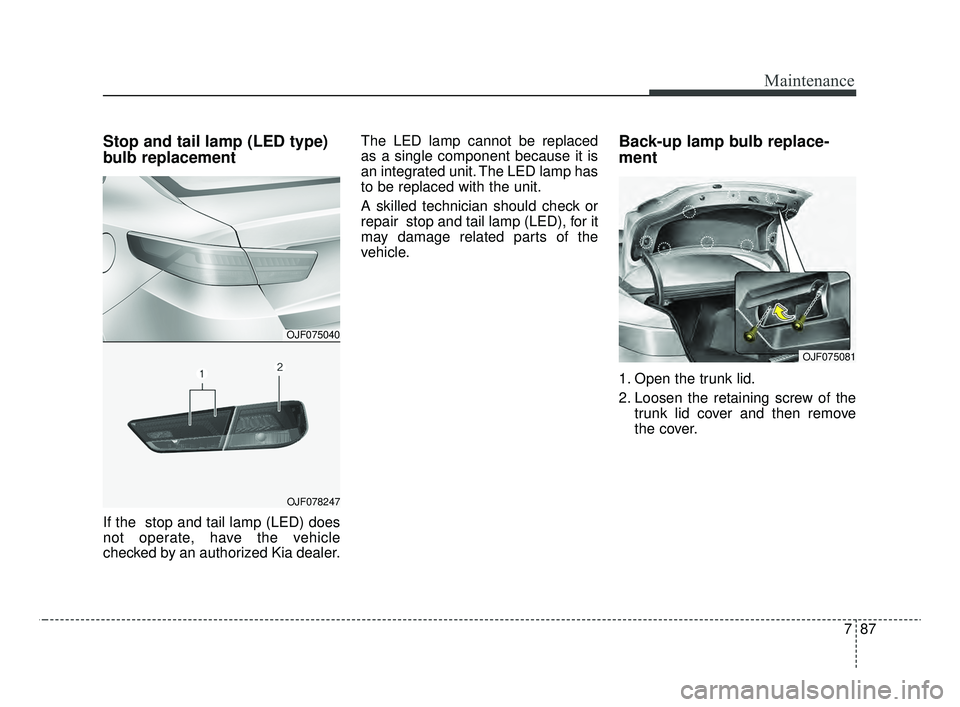
Stop and tail lamp (LED type)
bulb replacement
If the stop and tail lamp (LED) does
not operate, have the vehicle
checked by an authorized Kia dealer.The LED lamp cannot be replaced
as a single component because it is
an integrated unit. The LED lamp has
to be replaced with the unit.
A skilled technician should check or
repair stop and tail lamp (LED), for it
may damage related parts of the
vehicle.
Back-up lamp bulb replace-
ment
1. Open the trunk lid.
2. Loosen the retaining screw of the
trunk lid cover and then remove
the cover.
OJF075040
OJF078247
OJF075081
JFa PE USA 7.qxp 5/15/2019 3:16 PM Page 87