torque KIA SOUL 2019 Owners Manual
[x] Cancel search | Manufacturer: KIA, Model Year: 2019, Model line: SOUL, Model: KIA SOUL 2019Pages: 564, PDF Size: 14.2 MB
Page 127 of 564
441
Features of your vehicle
Electric power steering (EPS)
The power steering uses a motor to
assist you in steering the vehicle. If
the engine is off or if the power steer-
ing system becomes inoperative, the
vehicle may still be steered, but it will
require increased steering effort.
The motor driven power steering is
controlled by a power steering con-
trol unit which senses the steering
wheel torque and vehicle speed to
command the motor.
The steering becomes heavier as
the vehicle’s speed increases and
becomes lighter as the vehicle’s
speed decreases for optimum steer-
ing control.
Should you notice any change in the
effort required to steer during normal
vehicle operation, have the power
steering checked by an authorized
Kia dealer. If the Electric Power Steering System
does not operate normally, the warn-
ing light will illuminate on the instru-
ment cluster. The steering wheel may
require increased steering effort.
Take your vehicle to an authorized
Kia dealer and have the vehicle
checked as soon as possible.
When you operate the steering wheel in low temperature, noise
may occur. If temperature rises, the
noise will likely disappear. This is a
normal condition.
When the vehicle is stationary, when the steering wheel is turned
all the way to the left or right con-
tinuously, the steering wheel
becomes harder to turn. The power
assist is limited to protect the
motor from overheating.
As time passes, the steering wheel
return to its normal condition.
✽ ✽ NOTICE
The following symptoms may occur
during normal vehicle operation:
• The EPS warning light does not
illuminate.
• The steering gets heavy immedi- ately after turning the ignition
switch on. This happens as the sys-
tem performs the EPS system
diagnostics. When the diagnostics
are completed, the steering wheel
will return to its normal condition.
• A click noise may be heard from the EPS relay after the ignition
switch is turned to the ON or
LOCK (OFF) position.
• A motor noise may be heard when the vehicle is at a stop or at a low
driving speed.
• If the Electric Power Steering System does not operate normally,
the warning light will illuminate on
the instrument cluster. The steer-
ing wheel may become difficult to
control or operate abnormally.
Take your vehicle to an authorized
Kia dealer and have the vehicle
checked as soon as possible. (Continued)
STEERING WHEEL
Page 317 of 564
627
Driving your vehicle
The dual clutch transmission canbe thought of as an automatically
shifting manual transaxle. It gives
the driving feel of a manual
transaxle, yet provides the ease of
a fully automatic transaxle.
When D (Drive) is selected, the transmission will automatically shift
through the gears similar to a con-
ventional automatic transaxle.
Unlike a traditional automatic
transaxle, the gear shifting can
sometimes be felt and heard as the
actuators engage the clutches and
the gears are selected.
The dual clutch transmission adopts a dry-type dual clutch,
which is different from the torque
converter of the automatic
transaxle. It shows better accelera-
tion performance and increased
fuel efficiency while driving but ini-
tial launch might be little bit slower
than the automatic transaxle.
WARNING
To reduce the risk of serious
injury or death:
ALWAYS check the surround-ing areas near your vehicle for
people, especially children,
before shifting a vehicle into
D (Drive) or R (Reverse).
Before leaving the driver’s seat, always make sure the
shift lever is in the P (Park)
position, then set the parking
brake, and place the ignition
switch in the LOCK/OFF posi-
tion. Unexpected and sudden
vehicle movement can occur
if this procedure is not fol-
lowed.
Do not use engine braking (shifting from a high gear to
lower gear) rapidly on slip-
pery roads. The vehicle may
slip causing an accident.
CAUTION
To avoid damage to yourtransaxle, do not try to acceler-ate in R (Reverse) or any for-ward gear position with thebrakes on.
Page 318 of 564
Driving your vehicle
28
6
As a result, gear shifts are some-
times more noticeable than a con-
ventional automatic transmission
and a light vibration during launch-
ing can be felt as the transmission
speed is matched with the engine
speed. This is a normal condition of
the dual clutch transmission.
The dry-type clutch transfers torque more directly and provides
a direct drive feeling which may
feel different from a conventional
automatic transaxle with a torque
converter. This may be more
noticeable when launching the
vehicle from a stop or when travel-
ing at low, stop-and-go vehicle
speeds.
When rapidly accelerating at low speeds, the engine could rev at a
high rpm depending on the driving
conditions.
For smooth launch uphill, press down the accelerator pedal
smoothly depending on the current
conditions. If you release your foot from the
accelerator pedal at low vehicle
speed, you may feel strong engine
braking, which is similar to manual
transaxle.
When driving downhill, you may use Sports Mode or press the pad-
dle shifters (if equipped) to down-
shift to a lower gear in order to con-
trol your speed without using the
brake pedal excessively.
When you turn the engine on and off, you may hear clicking sounds
as the system goes through a self-
test. This is a normal sound for the
Dual Clutch Transmission.
During the first 1,500 km (1,000 miles), you may feel that the vehi-
cle may not be smooth when accel-
erating at low speed. During this
break-in period, the shift quality
and performance of your new vehi-
cle is continuously optimized.✽ ✽ NOTICE
If your transmission should fail,
your gear shift lever may not move
and the position indicator (D, R, N,
etc.) will blink on the cluster. If this
occurs, have the system checked by
an authorized Kia dealership.
Page 377 of 564
687
Driving your vehicle
When Active ECO is activated:
The acceleration may slightly bereduced even though you depress
the accelerator fully.
The air conditioner performance may be limited
The shift pattern of the automatic transaxle may change.
The engine noise may get louder.
The above situations are normal
conditions when the active eco sys-
tem is activated to improve fuel effi-
ciency. Limitation of Active ECO operation:
If the following conditions occur while
Active ECO is operating, the system
operation is limited even though there
is no change in the ECO indicator.
When the coolant temperature is
low:
The system will be limited until
engine performance becomes nor-
mal.
When driving up a hill: The system will be limited to gain
power when driving uphill because
the engine torque is restricted.
When using manual mode: The system will be limited accord-
ing to the shift location.
When the accelerator pedal is deeply depressed for a few seconds:
The system will be limited, judging
that the driver wants to speed up.SPORT mode
SPORT mode focuses on dynamic
driving by automatically controlling
the steering wheel, engine and
transaxle system.
When the DRIVE MODE button ispressed and the SPORT mode is
selected, the SPORT indicator
(yellow) will illuminate.
Whenever the hybrid system is restarted, the Drive Mode will revert
back to ECO mode. If SPORT mode
is desired, re-select SPORT mode
from the DRIVE MODE button
If the system is activated: - After speeding, it maintains thegear and RPM for some time
even though the accelerator
pedal is not depressed.
- Up-shifting is delayed.
✽ ✽
NOTICE
In Sport drive mode, the fuel effi-
ciency may decrease.
Page 421 of 564
713
What to do in an emergency
Wheels may have sharp edges.
Handle them carefully to avoid possi-
ble severe injury. Before putting the
wheel into place, be sure that there
is nothing on the hub or wheel (such
as mud, tar, gravel, etc.) that pre-
vents the wheel from fitting solidly
against the hub.10. To install the wheel, hold it on the
studs, put the wheel nuts on the
studs and tighten them finger
tight. Jiggle the tire to be sure it is
completely seated, then tighten
the nuts as much as possible
with your fingers again.
11. Insert the wrench into the jack and lower the vehicle to the
ground by turning the wheel nut
wrench counterclockwise.
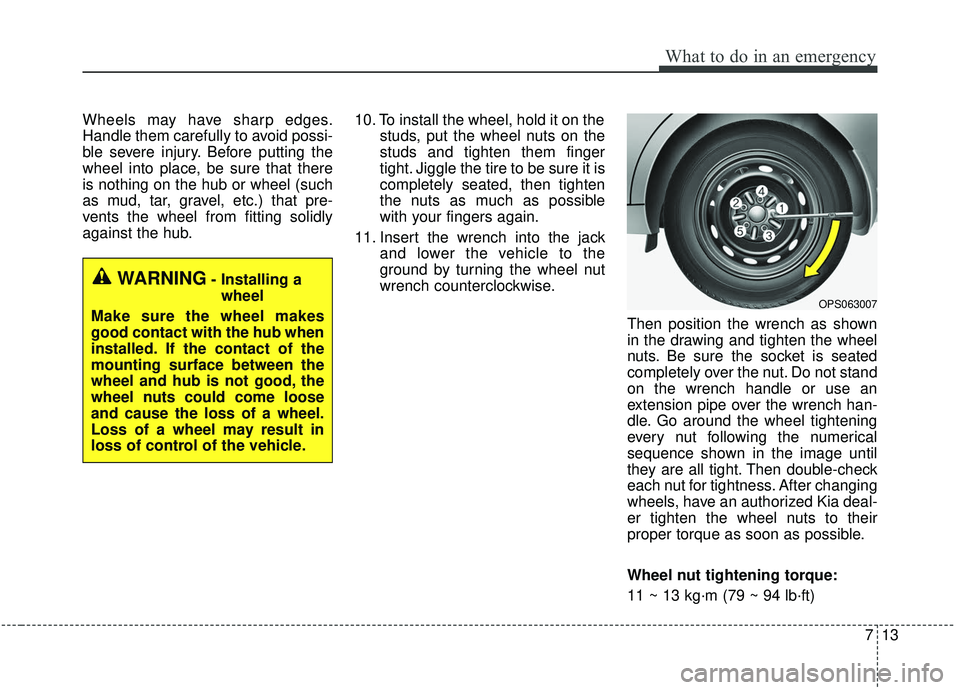
Then position the wrench as shown
in the drawing and tighten the wheel
nuts. Be sure the socket is seated
completely over the nut. Do not stand
on the wrench handle or use an
extension pipe over the wrench han-
dle. Go around the wheel tightening
every nut following the numerical
sequence shown in the image until
they are all tight. Then double-check
each nut for tightness. After changing
wheels, have an authorized Kia deal-
er tighten the wheel nuts to their
proper torque as soon as possible.
Wheel nut tightening torque:
11 ~ 13 kg·m (79 ~ 94 lb·ft)
WARNING- Installing awheel
Make sure the wheel makes
good contact with the hub when
installed. If the contact of the
mounting surface between the
wheel and hub is not good, the
wheel nuts could come loose
and cause the loss of a wheel.
Loss of a wheel may result in
loss of control of the vehicle.
OPS063007
Page 463 of 564
825
Maintenance
Brake/clutch (if equipped) fluid
Check the brake fluid level in the
brake fluid reservoir. The level should
be between “MIN” and “MAX” marks
on the side of the reservoir. Use only
hydraulic brake fluid conforming to
DOT 3 or DOT 4 specification.
Parking brake
Inspect the parking brake system
including the parking brake lever (or
pedal) and cables.
Brake discs, pads, calipers
and rotors
Check the pads for excessive wear,
discs for run out and wear, and
calipers for fluid leakage.
Exhaust pipe and muffler
Visually inspect the exhaust pipes,
muffler and hangers for cracks, dete-
rioration, or damage. Start the
engine and listen carefully for any
exhaust gas leakage. Tighten con-
nections or replace parts as neces-
sary.
Suspension mounting bolts
Check the suspension connections
for looseness or damage. Retighten
to the specified torque.
Steering gear box, linkage &
boots/lower arm ball joint
With the vehicle stopped and engine
off, check for excessive free-play in
the steering wheel.
Check the linkage for bends or dam-
age. Check the dust boots and ball
joints for deterioration, cracks, or
damage. Replace any damaged
parts.
Page 548 of 564
95
Specifications & Consumer information
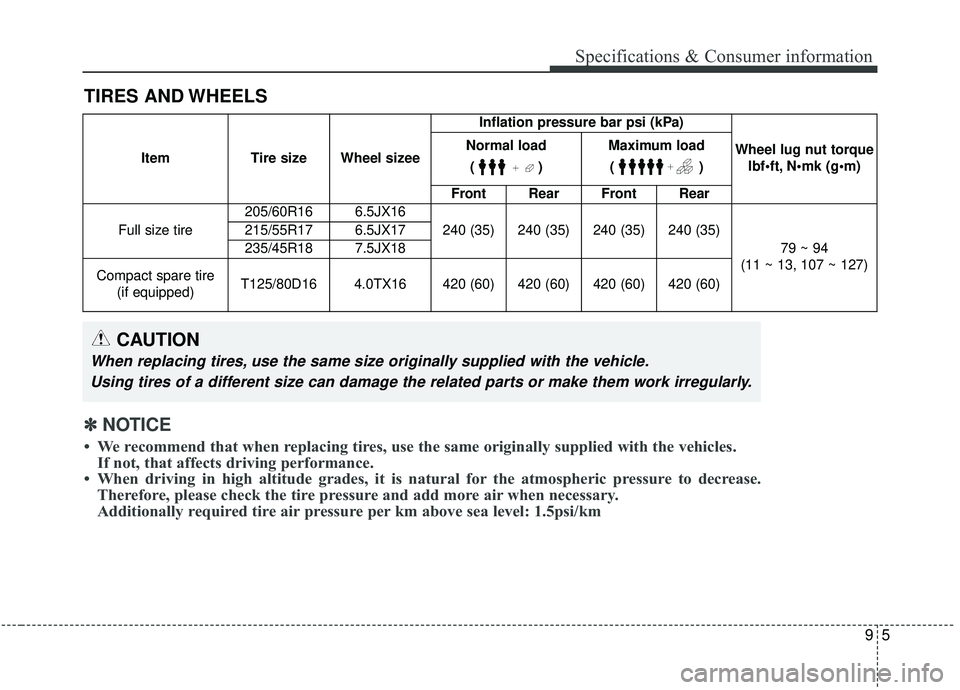
TIRES AND WHEELS
ItemTire size Wheel sizee Inflation pressure bar psi (kPa)
Wheel lug nut torque lbf•ft,
Normal load
()Maximum load()
Front Rear Front Rear
Full size tire 205/60R16 6.5JX16
240 (35) 240 (35) 240 (35) 240 (35)
79 ~ 94
(11 ~ 13, 107 ~ 127)
215/55R17 6.5JX17
235/45R18 7.5JX18
Compact spare tire (if equipped) T125/80D16 4.0TX16 420 (60) 420 (60) 420 (60) 420 (60)
CAUTION
When replacing tires, use the same size originally supplied with the vehicle.
Using tires of a different size can damage the related parts or make them work irregularly.
✽ ✽ NOTICE
• We recommend that when replacing tires, use the same originally supplied with the vehicles.
If not, that affects driving performance.
• When driving in high altitude grades, it is natural for the atmospheric pressure to decrease. Therefore, please check the tire pressure and add more air when necessary.
Additionally required tire air pressure per km above sea level: 1.5psi/km