ignition KIA SPORTAGE 2020 Features and Functions Guide
[x] Cancel search | Manufacturer: KIA, Model Year: 2020, Model line: SPORTAGE, Model: KIA SPORTAGE 2020Pages: 52, PDF Size: 3.87 MB
Page 8 of 52
6SPORTAGE FEATURES & FUNCTIONS GUIDE
INSTRUMENT CLUSTER
*IF EQUIPPED †LEGAL DISCL AIMERS ON BACK INSIDE COVER
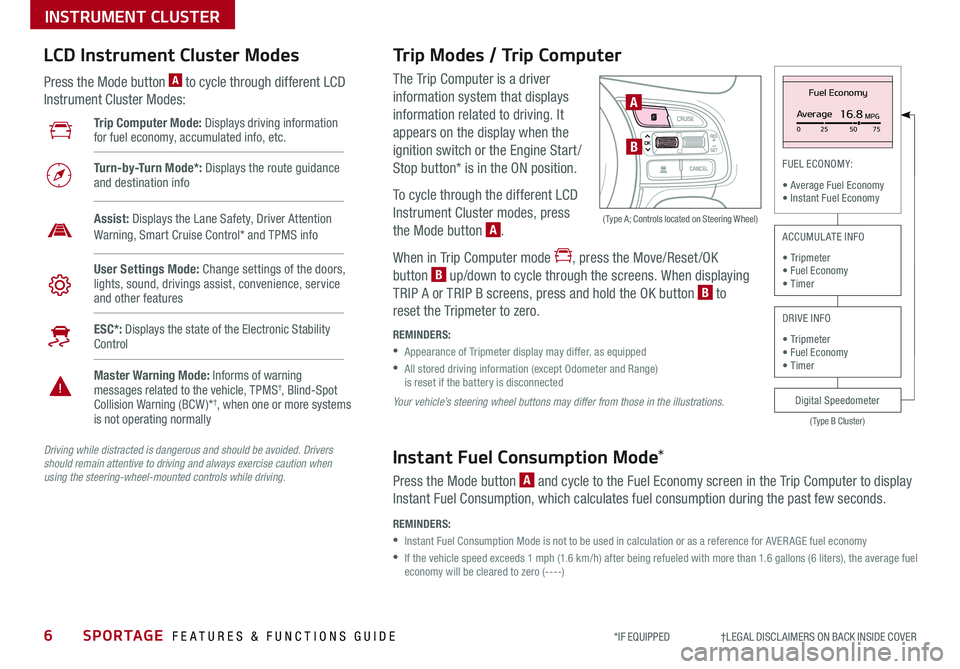
The Trip Computer is a driver
information system that displays
information related to driving It
appears on the display when the
ignition switch or the Engine Start /
Stop button* is in the ON position
To cycle through the different LCD
Instrument Cluster modes, press
the Mode button A
When in Trip Computer mode , press the Move/Reset /OK
button B up/down to cycle through the screens When displaying
TRIP A or TRIP B screens, press and hold the OK button B to
reset the Tripmeter to zero
REMINDERS:
•
Appearance of Tripmeter display may differ, as equipped
•
All stored driving information (except Odometer and Range) is reset if the battery is disconnected
OK
Trip Modes / Trip Computer LCD Instrument Cluster Modes
Press the Mode button A to cycle through different LCD
Instrument Cluster Modes:
Your vehicle’s steering wheel buttons may differ from those in the illustrations.
Driving while distracted is dangerous and should be avoided. Drivers should remain attentive to driving and always exercise caution when using the steering-wheel-mounted controls while driving.
A
B
( Type A; Controls located on Steering Wheel)
Instant Fuel Consumption Mode*
Press the Mode button A and cycle to the Fuel Economy screen in the Trip Computer to display
Instant Fuel Consumption, which calculates fuel consumption during the past few seconds
REMINDERS:
•
Instant Fuel Consumption Mode is not to be used in calculation or as a reference for AVER AGE fuel economy
•
If the vehicle speed exceeds 1 mph (1 6 km/h) after being refueled with more than 1 6 gallons (6 liters), the average fuel economy will be cleared to zero (----)
Trip Computer Mode: Displays driving information for fuel economy, accumulated info, etc
Turn-by-Turn Mode*: Displays the route guidance and destination info
User Settings Mode: Change settings of the doors, lights, sound, drivings assist, convenience, service and other features
Master Warning Mode: Informs of warning messages related to the vehicle, TPMS†, Blind-Spot Collision Warning (BCW )*†, when one or more systems is not operating normally
ESC*: Displays the state of the Electronic Stability Control
Assist: Displays the Lane Safety, Driver Attention Warning, Smart Cruise Control* and TPMS info
Fuel Economy
Average16.8MPG025 5075
(Type B Cluster)
FUEL ECONOMY:
• Average Fuel Economy• Instant Fuel Economy
Digital Speedometer
ACCUMULATE INFO
• Tripmeter• Fuel Economy• Timer
DRIVE INFO
• Tripmeter • Fuel Economy • Timer
Page 10 of 52
8*IF EQUIPPED SPORTAGE FEATURES & FUNCTIONS GUIDE
INSTRUMENT CLUSTER / DRIVER’S PANEL
Active ECO is designed to help improve fuel economy by
controlling several vehicle components When activated,
it helps optimize drivetrain operations such as engine
power and transmission to help improve fuel economy
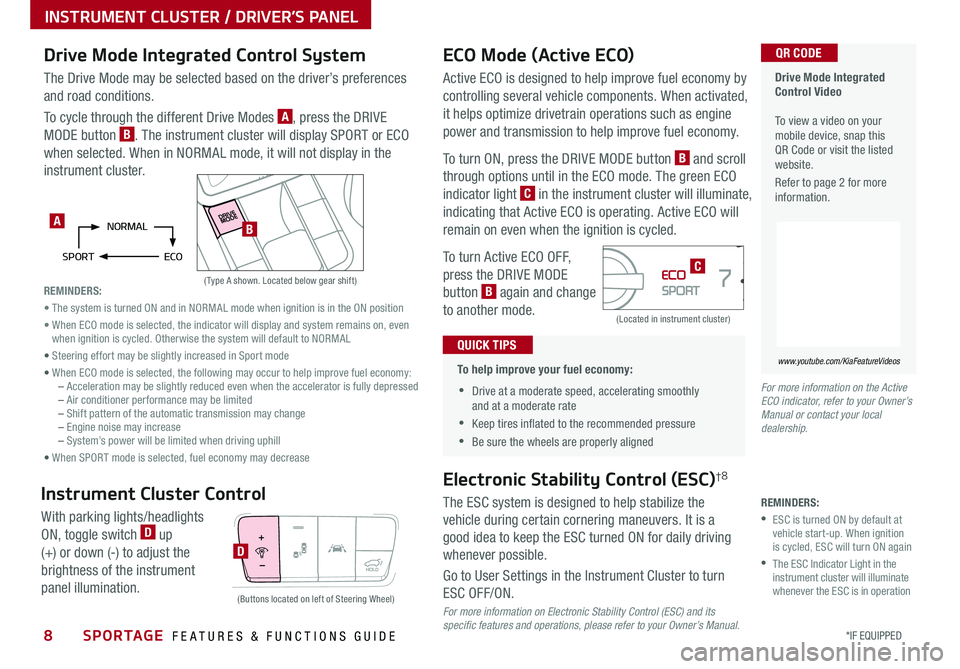
To turn ON, press the DRIVE MODE button B and scroll
through options until in the ECO mode The green ECO
indicator light C in the instrument cluster will illuminate,
indicating that Active ECO is operating Active ECO will
remain on even when the ignition is cycled
To turn Active ECO OFF,
press the DRIVE MODE
button B again and change
to another mode
Drive Mode Integrated Control SystemECO Mode (Active ECO)
(Type A shown Located below gear shift)
(Located in instrument cluster)
The Drive Mode may be selected based on the driver’s preferences
and road conditions
To cycle through the different Drive Modes A, press the DRIVE
MODE button B The instrument cluster will display SPORT or ECO
when selected When in NORMAL mode, it will not display in the
instrument cluster
•
To help improve your fuel economy:
•Drive at a moderate speed, accelerating smoothly and at a moderate rate
•Keep tires inflated to the recommended pressure
•Be sure the wheels are properly aligned
QUICK TIPS
Drive Mode Integrated Control Video To view a video on your mobile device, snap this QR Code or visit the listed website
Refer to page 2 for more information
www.youtube.com/KiaFeatureVideos
QR CODE
For more information on the Active ECO indicator, refer to your Owner’s Manual or contact your local dealership.
NORMAL
SPORT ECOA
C
REMINDERS:
• The system is turned ON and in NORMAL mode when ignition is in the ON position
• When ECO mode is selected, the indicator will display and system remains on, even when ignition is cycled Otherwise the system will default to NORMAL
• Steering effort may be slightly increased in Sport mode
• When ECO mode is selected, the following may occur to help improve fuel economy: – Acceleration may be slightly reduced even when the accelerator is fully depressed – Air conditioner performance may be limited – Shift pattern of the automatic transmission may change – Engine noise may increase – System’s power will be limited when driving uphill
• When SPORT mode is selected, fuel economy may decrease
B
Electronic Stability Control (ESC)†8
The ESC system is designed to help stabilize the
vehicle during certain cornering maneuvers It is a
good idea to keep the ESC turned ON for daily driving
whenever possible
Go to User Settings in the Instrument Cluster to turn
ESC OFF/ON
D
(Buttons located on left of Steering Wheel)
Instrument Cluster Control
With parking lights/headlights
ON, toggle switch D up
(+) or down (-) to adjust the
brightness of the instrument
panel illumination
For more information on Electronic Stability Control (ESC) and its specific features and operations, please refer to your Owner’s Manual.
REMINDERS:
•
ESC is turned ON by default at vehicle start-up When ignition is cycled, ESC will turn ON again
•
The ESC Indicator Light in the instrument cluster will illuminate whenever the ESC is in operation
Page 12 of 52
DRIVER'S PANEL
10SPORTAGE FEATURES & FUNCTIONS GUIDE*IF EQUIPPED †LEGAL DISCL AIMERS ON BACK INSIDE COVER
Lane Keeping Assist (LKA)†6 / Lane Departure Warning (LDW)*†6
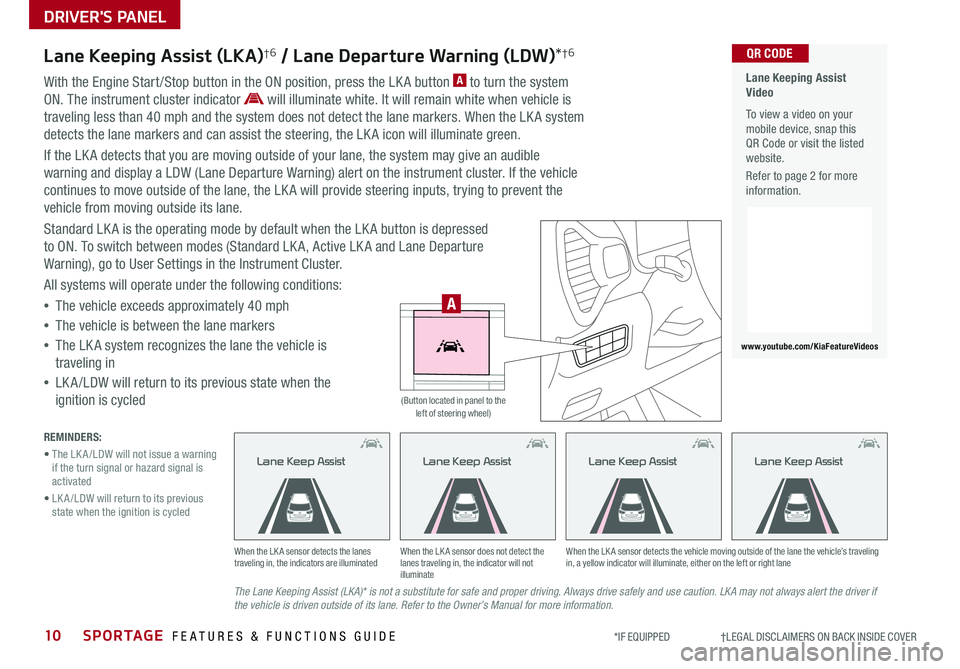
With the Engine Start /Stop button in the ON position, press the LK A button A to turn the system
ON The instrument cluster indicator will illuminate white It will remain white when vehicle is
traveling less than 40 mph and the system does not detect the lane markers When the LK A system
detects the lane markers and can assist the steering, the LK A icon will illuminate green
If the LK A detects that you are moving outside of your lane, the system may give an audible
warning and display a LDW (Lane Departure Warning) alert on the instrument cluster If the vehicle
continues to move outside of the lane, the LK A will provide steering inputs, trying to prevent the
vehicle from moving outside its lane
Standard LK A is the operating mode by default when the LK A button is depressed
to ON To switch between modes (Standard LK A, Active LK A and Lane Departure
Warning), go to User Settings in the Instrument Cluster
All systems will operate under the following conditions:
•The vehicle exceeds approximately 40 mph
•The vehicle is between the lane markers
•The LK A system recognizes the lane the vehicle is
traveling in
•
LK A /LDW will return to its previous state when the
ignition is cycled
The Lane Keeping Assist (LKA)* is not a substitute for safe and proper driving. Always drive safely and use caution. LKA may not always alert the driver if the vehicle is driven outside of its lane. Refer to the Owner’s Manual for more information.
When the LK A sensor detects the lanes traveling in, the indicators are illuminatedWhen the LK A sensor does not detect the lanes traveling in, the indicator will not illuminate
When the LK A sensor detects the vehicle moving outside of the lane the vehicle’s traveling in, a yellow indicator will illuminate, either on the left or right lane
Lane Keep AssistLane Keep AssistLane Keep AssistLane Keep Assist
REMINDERS:
• The LK A /LDW will not issue a warning if the turn signal or hazard signal is activated
• LK A /LDW will return to its previous state when the ignition is cycled
Lane Keeping Assist Video
To view a video on your mobile device, snap this QR Code or visit the listed website
Refer to page 2 for more information
www.youtube.com/KiaFeatureVideos
QR CODE
HUD
i...
P
A
(Button located in panel to the left of steering wheel)
Page 16 of 52
STEERING WHEEL CONTROLS
14*IF EQUIPPED SPORTAGE FEATURES & FUNCTIONS GUIDE
Headlights & High Beams
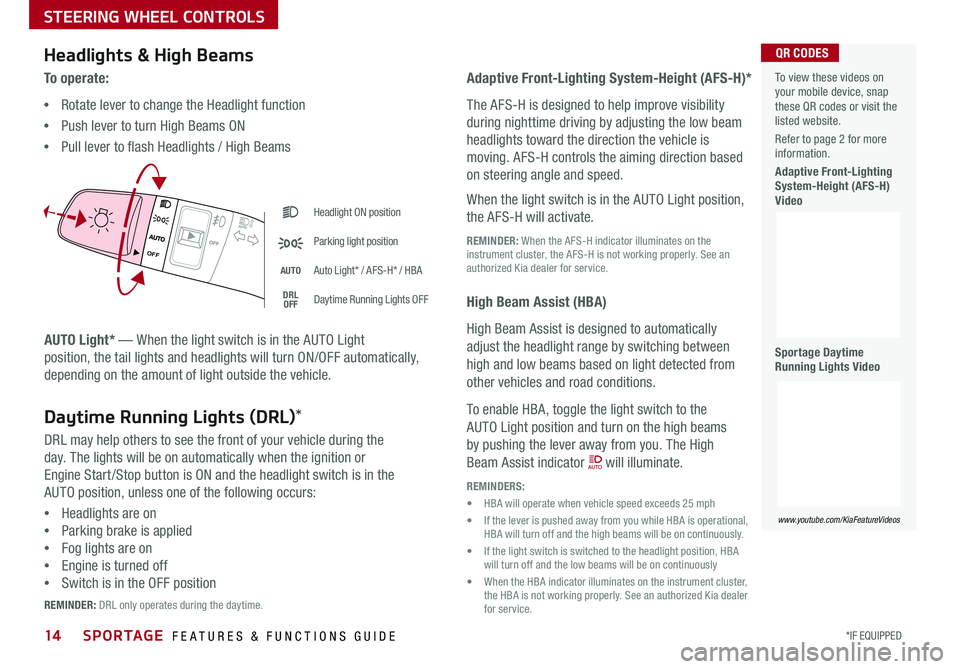
AUTO Light* — When the light switch is in the AUTO Light
position, the tail lights and headlights will turn ON/OFF automatically,
depending on the amount of light outside the vehicle
To o p e r a t e :
•Rotate lever to change the Headlight function
•Push lever to turn High Beams ON
•Pull lever to flash Headlights / High Beams
Adaptive Front-Lighting System-Height (AFS-H)*
The AFS-H is designed to help improve visibility
during nighttime driving by adjusting the low beam
headlights toward the direction the vehicle is
moving AFS-H controls the aiming direction based
on steering angle and speed
When the light switch is in the AUTO Light position,
the AFS-H will activate
REMINDER: When the AFS-H indicator illuminates on the instrument cluster, the AFS-H is not working properly See an authorized Kia dealer for service
High Beam Assist (HBA)
High Beam Assist is designed to automatically
adjust the headlight range by switching between
high and low beams based on light detected from
other vehicles and road conditions
To enable HBA, toggle the light switch to the
AUTO Light position and turn on the high beams
by pushing the lever away from you The High
Beam Assist indicator will illuminate
REMINDERS:
• HBA will operate when vehicle speed exceeds 25 mph
• If the lever is pushed away from you while HBA is operational, HBA will turn off and the high beams will be on continuously
• If the light switch is switched to the headlight position, HBA will turn off and the low beams will be on continuously
• When the HBA indicator illuminates on the instrument cluster, the HBA is not working properly See an authorized Kia dealer for service
Headlight ON position
Parking light position
AUTOAuto Light* / AFS-H* / HBA
DRLOFFDaytime Running Lights OFF
AUTO
OF F
OFF
Daytime Running Lights (DRL)*
DRL may help others to see the front of your vehicle during the
day The lights will be on automatically when the ignition or
Engine Start /Stop button is ON and the headlight switch is in the
AUTO position, unless one of the following occurs:
•Headlights are on
•Parking brake is applied
•Fog lights are on
•Engine is turned off
•Switch is in the OFF position
REMINDER: DRL only operates during the daytime
To view these videos on your mobile device, snap these QR codes or visit the listed website
Refer to page 2 for more information
Adaptive Front-Lighting System-Height (AFS-H) Video
Sportage Daytime Running Lights Video
www.youtube.com/KiaFeatureVideos
QR CODES
Page 18 of 52
SPORTAGE FEATURES & FUNCTIONS GUIDE
STEERING WHEEL CONTROLS
16*IF EQUIPPED †LEGAL DISCL AIMERS ON BACK INSIDE COVER
OK
Images are for illustrative purposes only and may vary on actual vehicle.
60
60
60
60
Smart Cruise ControlCancelledEG
( Type B; buttons located on right side of Steering Wheel)
A
B
DF
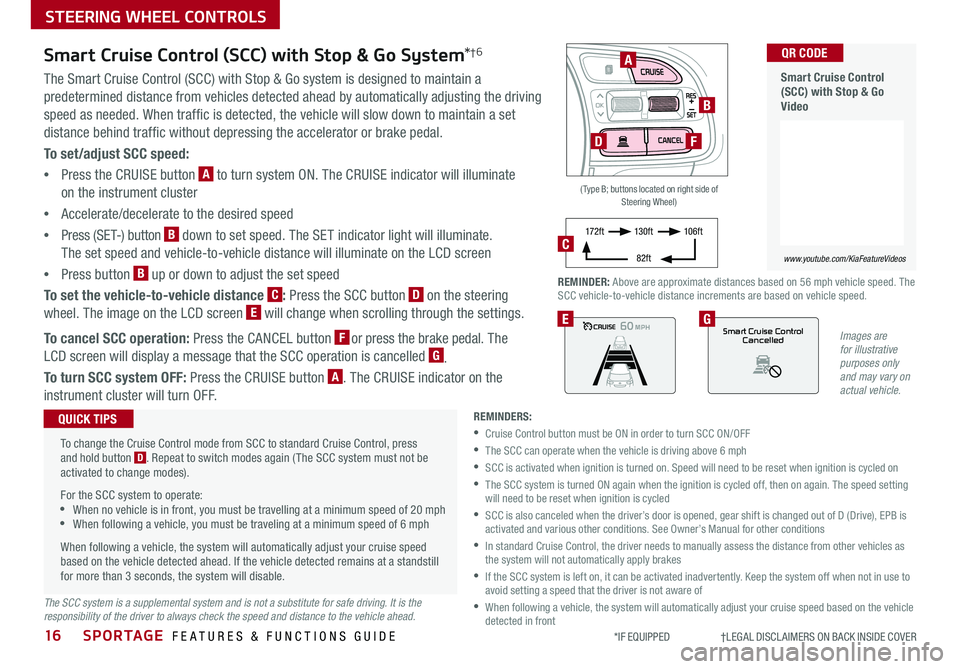
REMINDER: Above are approximate distances based on 56 mph vehicle speed The SCC vehicle-to-vehicle distance increments are based on vehicle speed
17 2 f t13 0 f t
82ft
10 6 f tC
Smart Cruise Control (SCC) with Stop & Go System*†6
The Smart Cruise Control (SCC) with Stop & Go system is designed to maintain a
predetermined distance from vehicles detected ahead by automatically adjusting the driving
speed as needed When traffic is detected, the vehicle will slow down to maintain a set
distance behind traffic without depressing the accelerator or brake pedal
To set/adjust SCC speed:
•Press the CRUISE button A to turn system ON The CRUISE indicator will illuminate
on the instrument cluster
•Accelerate/decelerate to the desired speed
•Press (SET-) button B down to set speed The SET indicator light will illuminate
The set speed and vehicle-to-vehicle distance will illuminate on the LCD screen
•Press button B up or down to adjust the set speed
To set the vehicle-to-vehicle distance C: Press the SCC button D on the steering
wheel The image on the LCD screen E will change when scrolling through the settings
To cancel SCC operation: Press the CANCEL button F or press the brake pedal The
LCD screen will display a message that the SCC operation is cancelled G
To turn SCC system OFF: Press the CRUISE button A The CRUISE indicator on the
instrument cluster will turn OFF
REMINDERS:
•Cruise Control button must be ON in order to turn SCC ON/OFF
•The SCC can operate when the vehicle is driving above 6 mph
•
SCC is activated when ignition is turned on Speed will need to be reset when ignition is cycled on
•
The SCC system is turned ON again when the ignition is cycled off, then on again The speed setting will need to be reset when ignition is cycled
•
SCC is also canceled when the driver’s door is opened, gear shift is changed out of D (Drive), EPB is activated and various other conditions See Owner’s Manual for other conditions
•
In standard Cruise Control, the driver needs to manually assess the distance from other vehicles as the system will not automatically apply brakes
•
If the SCC system is left on, it can be activated inadvertently Keep the system off when not in use to avoid setting a speed that the driver is not aware of
•
When following a vehicle, the system will automatically adjust your cruise speed based on the vehicle detected in front
To change the Cruise Control mode from SCC to standard Cruise Control, press and hold button D Repeat to switch modes again ( The SCC system must not be activated to change modes)
For the SCC system to operate: •When no vehicle is in front, you must be travelling at a minimum speed of 20 mph •When following a vehicle, you must be traveling at a minimum speed of 6 mph
When following a vehicle, the system will automatically adjust your cruise speed based on the vehicle detected ahead If the vehicle detected remains at a standstill for more than 3 seconds, the system will disable
QUICK TIPS
The SCC system is a supplemental system and is not a substitute for safe driving. It is the responsibility of the driver to always check the speed and distance to the vehicle ahead.
Smart Cruise Control (SCC) with Stop & Go Video
QR CODE
www.youtube.com/KiaFeatureVideos
Page 19 of 52
17
STEERING WHEEL CONTROLS
ALWAYS CHECK THE OWNER’S MANUAL FOR COMPLETE OPER ATING INFORMATION AND SAFET Y WARNINGS *IF EQUIPPED †LEGAL DISCL AIMERS ON BACK INSIDE COVER
OK
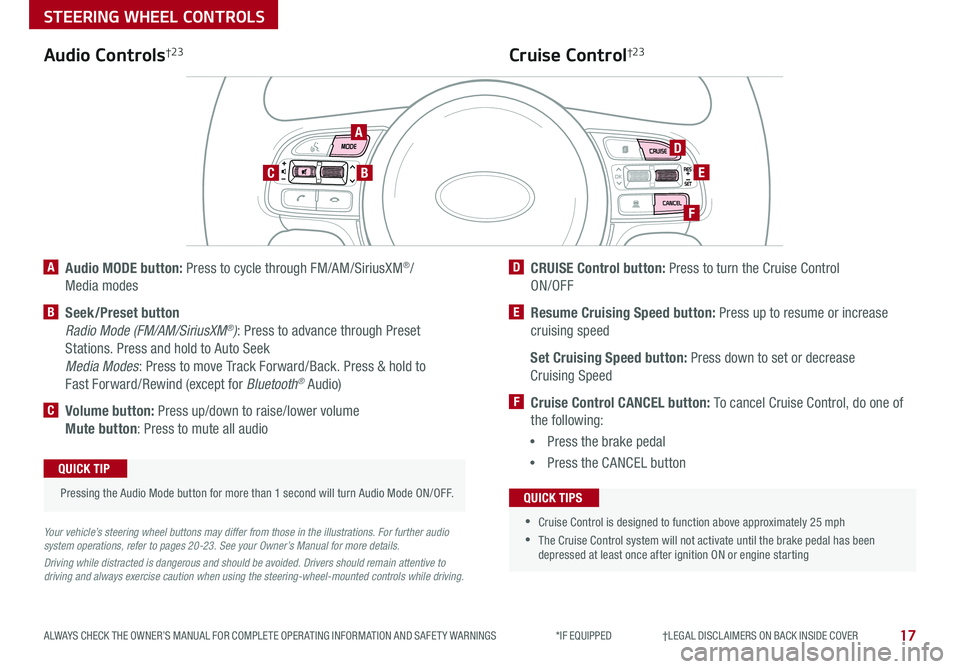
A Audio MODE button: Press to cycle through FM/AM/SiriusXM®/
Media modes
B Seek/Preset button
Radio Mode (FM/AM/SiriusXM®): Press to advance through Preset
Stations Press and hold to Auto Seek
Media Modes: Press to move Track Forward/Back Press & hold to
Fast Forward/Rewind (except for Bluetooth® Audio)
C Volume button: Press up/down to raise/lower volume
Mute button: Press to mute all audio
D CRUISE Control button: Press to turn the Cruise Control
ON/OFF
E Resume Cruising Speed button: Press up to resume or increase
cruising speed
Set Cruising Speed button: Press down to set or decrease
Cruising Speed
F Cruise Control CANCEL button: To cancel Cruise Control, do one of
the following:
•Press the brake pedal
•Press the CANCEL button
Cruise Control†2 3Audio Controls†2 3
Your vehicle’s steering wheel buttons may differ from those in the illustrations. For further audio system operations, refer to pages 20-23. See your Owner’s Manual for more details.
Driving while distracted is dangerous and should be avoided. Drivers should remain attentive to driving and always exercise caution when using the steering-wheel-mounted controls while driving.
Pressing the Audio Mode button for more than 1 second will turn Audio Mode ON/OFF
QUICK TIP
•
•Cruise Control is designed to function above approximately 25 mph
•The Cruise Control system will not activate until the brake pedal has been depressed at least once after ignition ON or engine starting
QUICK TIPS
A
BC
D
E
F
Page 27 of 52
25ALWAYS CHECK THE OWNER’S MANUAL FOR COMPLETE OPER ATING INFORMATION AND SAFET Y WARNINGS *IF EQUIPPED
CENTER PANEL
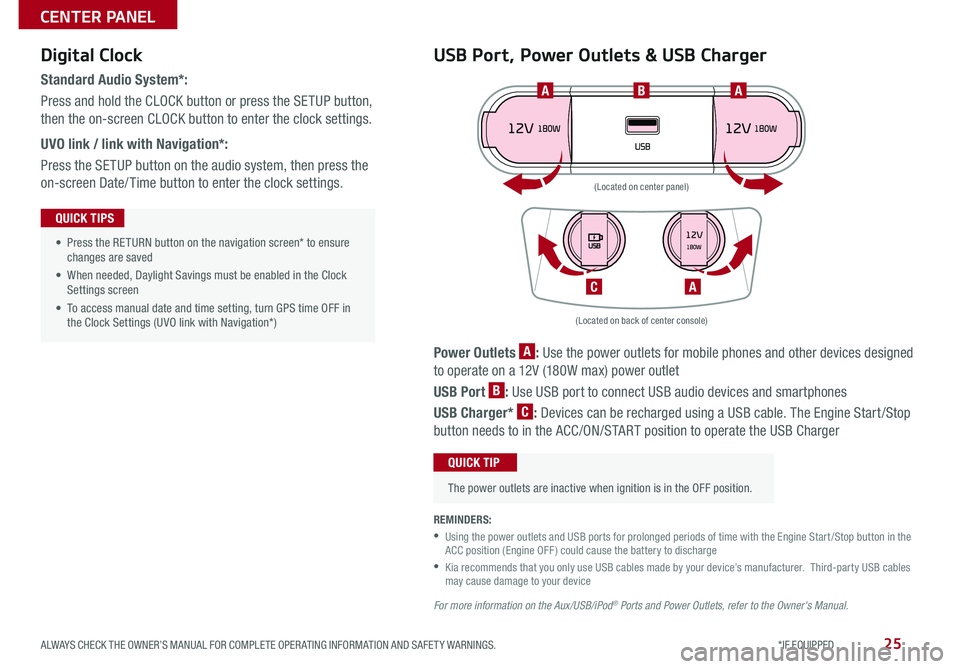
Power Outlets A: Use the power outlets for mobile phones and other devices designed
to operate on a 12V (180W max) power outlet
USB Port B: Use USB port to connect USB audio devices and smartphones
USB Charger* C: Devices can be recharged using a USB cable The Engine Start /Stop
button needs to in the ACC/ON/START position to operate the USB Charger
• Press the RETURN button on the navigation screen* to ensure changes are saved
• When needed, Daylight Savings must be enabled in the Clock Settings screen
• To access manual date and time setting, turn GPS time OFF in the Clock Settings (UVO link with Navigation*)
QUICK TIPS
REMINDERS:
•
Using the power outlets and USB ports for prolonged periods of time with the Engine Start /Stop button in the ACC position (Engine OFF ) could cause the battery to discharge
•
Kia recommends that you only use USB cables made by your device’s manufacturer Third-party USB cables may cause damage to your device
For more information on the Aux/USB/iPod® Ports and Power Outlets, refer to the Owner's Manual.
(Located on back of center console)
(Located on center panel)
BAA
AC
Digital Clock
Standard Audio System*:
Press and hold the CLOCK button or press the SETUP button,
then the on-screen CLOCK button to enter the clock settings
UVO link / link with Navigation*:
Press the SETUP button on the audio system, then press the
on-screen Date/ Time button to enter the clock settings
USB Port, Power Outlets & USB Charger
The power outlets are inactive when ignition is in the OFF position
QUICK TIP
Page 29 of 52
*IF EQUIPPED 27ALWAYS CHECK THE OWNER’S MANUAL FOR COMPLETE OPER ATING INFORMATION AND SAFET Y WARNINGS
CENTER PANEL
Sportage Automatic Defog System Video To view a video on your mobile device, snap this QR Code or visit the listed website
Refer to page 2 for more information
www.KuTechVideos.com/ql13/2018
QR CODE
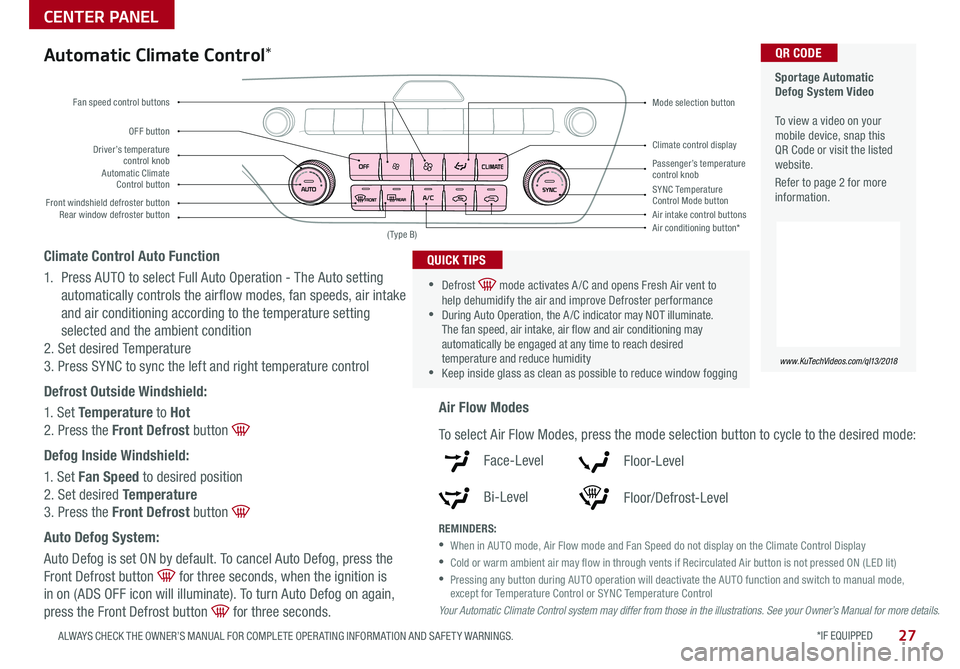
Driver’s temperature control knobPassenger’s temperature control knobAutomatic Climate Control button
Front windshield defroster button
Mode selection button
Air conditioning button*
SYNC Temperature Control Mode buttonRear window defroster buttonAir intake control buttons
Climate control display
Fan speed control buttons
OFF button
Your Automatic Climate Control system may differ from those in the illustrations. See your Owner’s Manual for more details.
( Type B)
Automatic Climate Control*
Climate Control Auto Function
1 Press AUTO to select Full Auto Operation - The Auto setting
automatically controls the airflow modes, fan speeds, air intake
and air conditioning according to the temperature setting
selected and the ambient condition
2 Set desired Temperature
3 Press SYNC to sync the left and right temperature control
Defrost Outside Windshield:
1 Set Temperature to Hot
2 Press the Front Defrost button
Defog Inside Windshield:
1 Set Fan Speed to desired position
2 Set desired Temperature
3 Press the Front Defrost button
Auto Defog System:
Auto Defog is set ON by default To cancel Auto Defog, press the
Front Defrost button for three seconds, when the ignition is
in on (ADS OFF icon will illuminate) To turn Auto Defog on again,
press the Front Defrost button for three seconds
•
•Defrost mode activates A /C and opens Fresh Air vent to help dehumidify the air and improve Defroster performance •During Auto Operation, the A /C indicator may NOT illuminate The fan speed, air intake, air flow and air conditioning may automatically be engaged at any time to reach desired temperature and reduce humidity •Keep inside glass as clean as possible to reduce window fogging
QUICK TIPS
Air Flow Modes
To select Air Flow Modes, press the mode selection button to cycle to the desired mode:
Face-Level
Bi-Level
F lo o r- L evel
Floor/Defrost-Level
REMINDERS:
•
When in AUTO mode, Air Flow mode and Fan Speed do not display on the Climate Control Display
•Cold or warm ambient air may flow in through vents if Recirculated Air button is not pressed ON (LED lit)
•
Pressing any button during AUTO operation will deactivate the AUTO function and switch to manual mode, except for Temperature Control or SYNC Temperature Control
Page 32 of 52
30SPORTAGE FEATURES & FUNCTIONS GUIDE
CENTER PANEL
*IF EQUIPPED †LEGAL DISCL AIMERS ON BACK INSIDE COVER
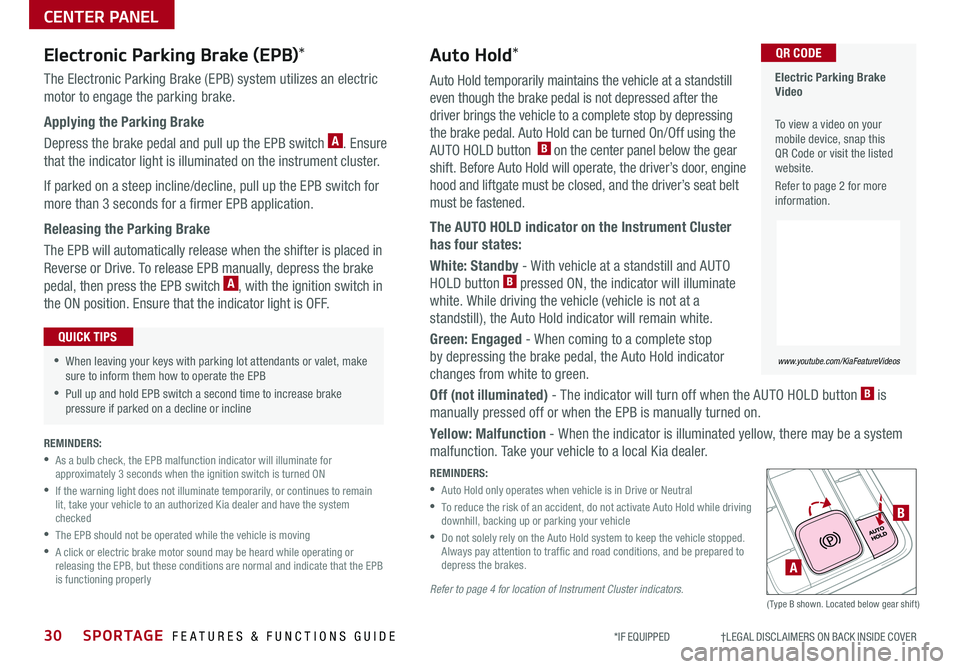
Auto Hold temporarily maintains the vehicle at a standstill
even though the brake pedal is not depressed after the
driver brings the vehicle to a complete stop by depressing
the brake pedal Auto Hold can be turned On/Off using the
AUTO HOLD button B on the center panel below the gear
shift Before Auto Hold will operate, the driver’s door, engine
hood and liftgate must be closed, and the driver’s seat belt
must be fastened
The AUTO HOLD indicator on the Instrument Cluster
has four states:
White: Standby - With vehicle at a standstill and AUTO
HOLD button B pressed ON, the indicator will illuminate
white While driving the vehicle (vehicle is not at a
standstill), the Auto Hold indicator will remain white
Green: Engaged - When coming to a complete stop
by depressing the brake pedal, the Auto Hold indicator
changes from white to green
Off (not illuminated) - The indicator will turn off when the AUTO HOLD button B is
manually pressed off or when the EPB is manually turned on
Yellow: Malfunction - When the indicator is illuminated yellow, there may be a system
malfunction Take your vehicle to a local Kia dealer
REMINDERS:
•
Auto Hold only operates when vehicle is in Drive or Neutral
•
To reduce the risk of an accident, do not activate Auto Hold while driving downhill, backing up or parking your vehicle
•
Do not solely rely on the Auto Hold system to keep the vehicle stopped Always pay attention to traf fic and road conditions, and be prepared to depress the brakes
Refer to page 4 for location of Instrument Cluster indicators.(Type B shown Located below gear shift)
Electronic Parking Brake (EPB)*
The Electronic Parking Brake (EPB) system utilizes an electric
motor to engage the parking brake
Applying the Parking Brake
Depress the brake pedal and pull up the EPB switch A Ensure
that the indicator light is illuminated on the instrument cluster
If parked on a steep incline/decline, pull up the EPB switch for
more than 3 seconds for a firmer EPB application
Releasing the Parking Brake
The EPB will automatically release when the shifter is placed in
Reverse or Drive To release EPB manually, depress the brake
pedal, then press the EPB switch A, with the ignition switch in
the ON position Ensure that the indicator light is O F F
•When leaving your keys with parking lot attendants or valet, make sure to inform them how to operate the EPB
•Pull up and hold EPB switch a second time to increase brake pressure if parked on a decline or incline
QUICK TIPS
A
B
Electric Parking Brake Video
To view a video on your mobile device, snap this QR Code or visit the listed website
Refer to page 2 for more information
www.youtube.com/KiaFeatureVideos
QR CODEAuto Hold*
REMINDERS:
•
As a bulb check, the EPB malfunction indicator will illuminate for approximately 3 seconds when the ignition switch is turned ON
•
If the warning light does not illuminate temporarily, or continues to remain lit, take your vehicle to an authorized Kia dealer and have the system checked
•The EPB should not be operated while the vehicle is moving
•
A click or electric brake motor sound may be heard while operating or releasing the EPB, but these conditions are normal and indicate that the EPB is functioning properly
Page 33 of 52
31
CENTER PANEL
ALWAYS CHECK THE OWNER’S MANUAL FOR COMPLETE OPER ATING INFORMATION AND SAFET Y WARNINGS *IF EQUIPPED †LEGAL DISCL AIMERS ON BACK INSIDE COVER
Downhill Brake Control (DBC)†8AWD (All-Wheel Drive) Lock*
DBC helps drivers maneuver down steep hills by automatically
applying braking inputs , allowing drivers to concentrate on
steering
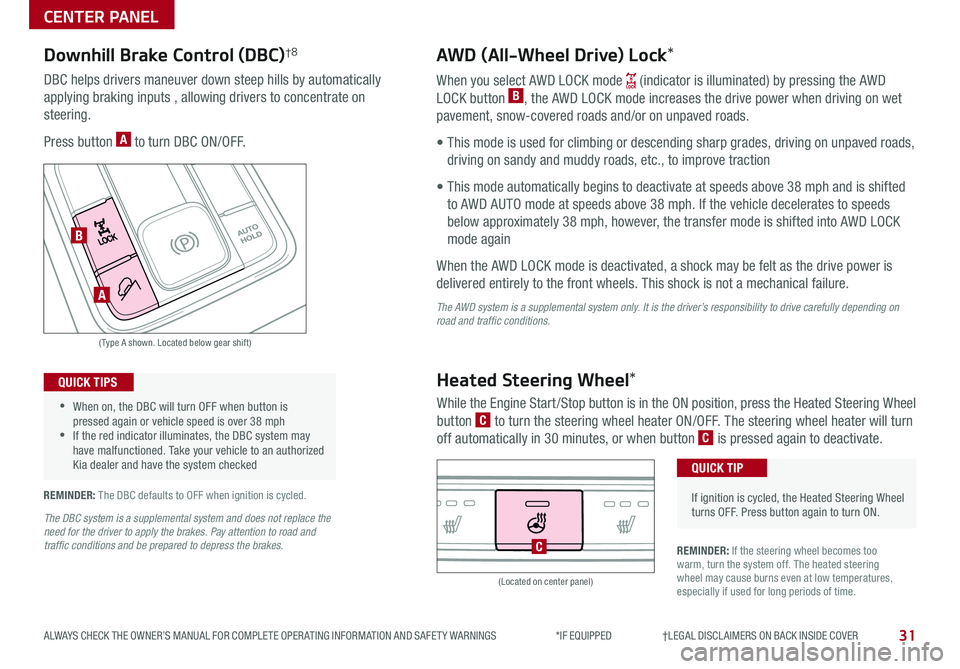
Press button A to turn DBC ON/OFF
When you select AWD LOCK mode (indicator is illuminated) by pressing the AWD
LOCK button B, the AWD LOCK mode increases the drive power when driving on wet
pavement, snow-covered roads and/or on unpaved roads
• This mode is used for climbing or descending sharp grades, driving on unpaved roads,
driving on sandy and muddy roads, etc , to improve traction
• This mode automatically begins to deactivate at speeds above 38 mph and is shifted
to AWD AUTO mode at speeds above 38 mph If the vehicle decelerates to speeds
below approximately 38 mph, however, the transfer mode is shifted into AWD LOCK
mode again
When the AWD LOCK mode is deactivated, a shock may be felt as the drive power is
delivered entirely to the front wheels This shock is not a mechanical failure
The AWD system is a supplemental system only. It is the driver’s responsibility to drive carefully depending on road and traffic conditions.
(Type A shown Located below gear shift)
(Located on center panel)
•
•When on, the DBC will turn OFF when button is pressed again or vehicle speed is over 38 mph •If the red indicator illuminates, the DBC system may have malfunctioned Take your vehicle to an authorized Kia dealer and have the system checked
QUICK TIPS
REMINDER: The DBC defaults to OFF when ignition is cycled
REMINDER: If the steering wheel becomes too warm, turn the system off The heated steering wheel may cause burns even at low temperatures, especially if used for long periods of time
Heated Steering Wheel*
While the Engine Start /Stop button is in the ON position, press the Heated Steering Wheel
button C to turn the steering wheel heater ON/OFF The steering wheel heater will turn
off automatically in 30 minutes, or when button C is pressed again to deactivate
•
If ignition is cycled, the Heated Steering Wheel turns OFF Press button again to turn ON
QUICK TIP
C
A
B
The DBC system is a supplemental system and does not replace the need for the driver to apply the brakes. Pay attention to road and traffic conditions and be prepared to depress the brakes.