open hood KIA SPORTAGE 2020 User Guide
[x] Cancel search | Manufacturer: KIA, Model Year: 2020, Model line: SPORTAGE, Model: KIA SPORTAGE 2020Pages: 624, PDF Size: 15.41 MB
Page 329 of 624
543
Driving your vehicle
(Continued)In these cases, the brake warning
light comes on, the AUTO HOLD
indicator changes from green to
white, and a warning sounds and a
message will appear to inform you
that EPB has been automatically
engaged. Before driving off again,
press foot brake pedal, check the
surrounding area near your vehi-
cle and release parking brake
manually with the EPB switch.
• If the AUTO HOLD indicator lights up yellow, the Auto Hold is
not working properly. Take your
vehicle to an authorized Kia deal-
er and have the system checked.If there is a malfunction with the dri-
ver’s door, engine hood open detec-
tion system, the Auto Hold may not
work properly.
Take your vehicle to an authorized Kia
dealer and have the system checked.
✽ ✽ NOTICE
A click or electric brake motor
whine sound may be heard while
operating or releasing the EPB, but
these conditions are normal and
indicate that the EPB is functioning
properly.
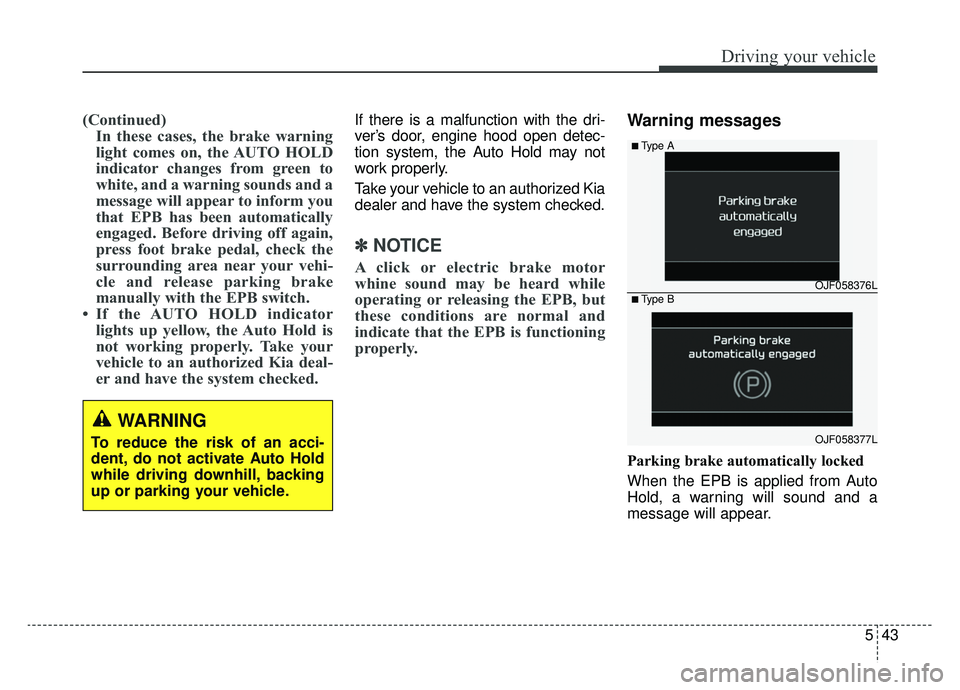
Warning messages
Parking brake automatically locked
When the EPB is applied from Auto
Hold, a warning will sound and a
message will appear.
WARNING
To reduce the risk of an acci-
dent, do not activate Auto Hold
while driving downhill, backing
up or parking your vehicle.
OJF058376L
OJF058377L
■Type A
■Type B
Page 460 of 624
67
What to do in an emergency
IF THE ENGINE OVERHEATS
If your temperature gauge indicates
overheating, you experience a loss
of power, or hear loud pinging or
knocking, the engine will probably be
too hot. If this happens, you should:
1. Pull off the road and stop as soonas it is safe to do so.
2. Place the shift lever in P (for Automatic transmission) and set
the parking brake. If the air condi-
tioning is on, turn it off.
3. If engine coolant is running out under the vehicle or steam is com-
ing out from underneath the hood,
stop the engine. Do not open the
hood until the coolant has stopped
running or the steaming has
stopped. If there is no visible loss
of engine coolant and no steam,
leave the engine running and
check to be sure the engine cool-
ing fan is operating. If the fan is not
running, turn the engine off. 4. Check to see if the water pump
drive belt is missing. If it is not
missing, check to see that it is
tight. If the drive belt seems to be
satisfactory, check for coolant
leaking from the radiator, hoses or
under the vehicle. (If the air condi-
tioning had been in use, it is nor-
mal for cold water to be draining
from it when you stop).
5. If the water pump drive belt is bro- ken or engine coolant is leaking
out, stop the engine immediately
and call the nearest authorized
Kia dealer for assistance. 6. If you cannot find the cause of the
overheating, wait until the engine
temperature has returned to nor-
mal. If coolant has been lost, care-
fully add coolant to the reservoir to
bring the fluid level in the reservoir
up to the halfway mark.
7. Proceed with caution, keeping alert for further signs of overheat-
ing. If overheating happens again,
call an authorized Kia dealer for
assistance.
Serious loss of coolant indicates
there is a leak in the cooling system
and this should be checked as soon
as possible by an authorized Kia
dealer.
WARNING - Under the hood
While the engine is running, keep hair,
hands and clothing
away from moving
parts such as the fan
and drive belts to pre-
vent injury.
WARNING - Radiator cap
Do not remove the
radiator cap when the
engine is hot. This may
result in coolant being
blown out of the open-
ing and cause serious
burns.
Page 573 of 624

783
Maintenance
Light bulb position (Side)
(if equipped)
(1) Side repeater lamp (LED type)
Headlamp (High/Low beam)
bulb replacement
1. Open the hood.
2. Remove the headlamp bulb coverby turning it counterclockwise.
3. Disconnect the headlamp bulb socket-connector.
4. Remove the bulb-socket from the headlamp assembly by turning the
bulb-socket counterclockwise until
the tabs on the bulb-socket align
with the slots on the headlamp
assembly. 5. Install a new bulb-socket assem-
bly in the headlamp assembly by
aligning the tabs on the bulb-sock-
et with the slots in the headlamp
assembly. Push the bulb-socket
into the headlamp assembly and
turn the bulb-socket clockwise.
6. Install the headlamp bulb cover by turning it clockwise.
OQL075047OQL075049
Page 574 of 624
Maintenance
84
7
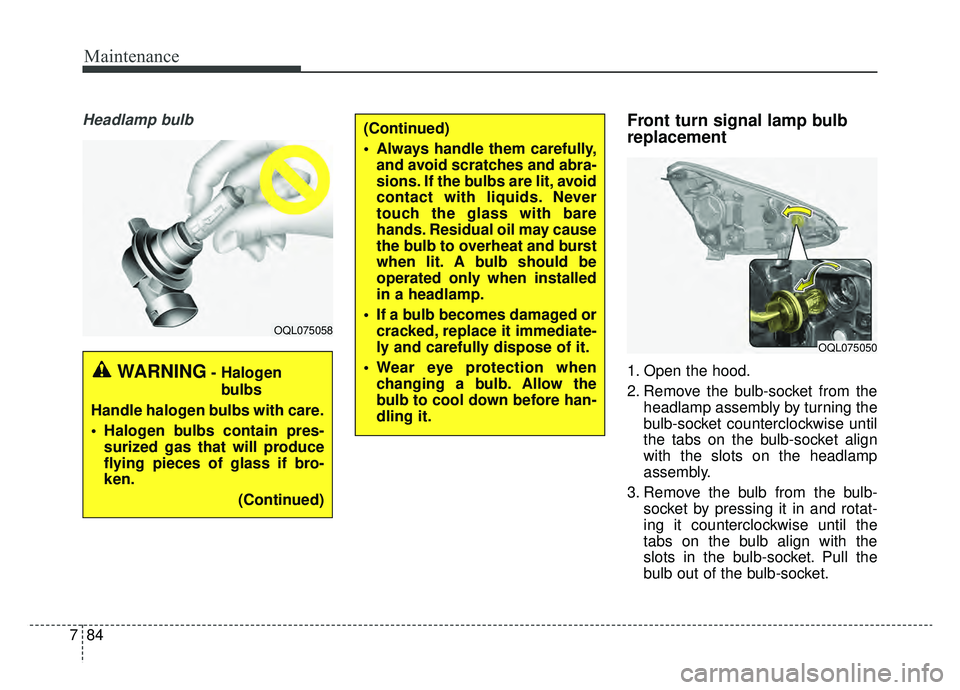
Headlamp bulbFront turn signal lamp bulb
replacement
1. Open the hood.
2. Remove the bulb-socket from the
headlamp assembly by turning the
bulb-socket counterclockwise until
the tabs on the bulb-socket align
with the slots on the headlamp
assembly.
3. Remove the bulb from the bulb- socket by pressing it in and rotat-
ing it counterclockwise until the
tabs on the bulb align with the
slots in the bulb-socket. Pull the
bulb out of the bulb-socket.
OQL075058
WARNING- Halogen
bulbs
Handle halogen bulbs with care.
Halogen bulbs contain pres- surized gas that will produce
flying pieces of glass if bro-
ken.
(Continued)
(Continued)
Always handle them carefully,and avoid scratches and abra-
sions. If the bulbs are lit, avoid
contact with liquids. Never
touch the glass with bare
hands. Residual oil may cause
the bulb to overheat and burst
when lit. A bulb should be
operated only when installed
in a headlamp.
If a bulb becomes damaged or cracked, replace it immediate-
ly and carefully dispose of it.
Wear eye protection when changing a bulb. Allow the
bulb to cool down before han-
dling it.
OQL075050
Page 575 of 624

785
Maintenance
4. Insert a new bulb by inserting itinto the bulb-socket and rotating it
until it locks into place.
5. Install the socket in the headlamp assembly by aligning the tabs on
the bulb-socket with the slots in
the assembly. Push the bulb-sock-
et into the headlamp assembly
and turn the socket clockwise.Position lamp + DRL bulb
replacement
1. Open the hood.
2. Remove the bulb-socket from theheadlamp assembly by turning the
bulb-socket counterclockwise until
the tabs on the bulb-socket align
with the slots on the headlamp
assembly.
3. Remove the bulb from the bulb- socket by pressing it in and rotat-
ing it counterclockwise until the
tabs on the bulb align with the
slots in the bulb-socket. Pull the
bulb out of the bulb-socket. 4. Insert a new bulb by inserting it
into the bulb-socket and rotating it
until it locks into place.
5. Install the socket in the headlamp assembly by aligning the tabs on
the bulb-socket with the slots in
the assembly. Push the bulb-sock-
et into the headlamp assembly
and turn the socket clockwise.
OQL075051
Page 617 of 624
I5
Index
Key operations ..............................................................4-5
Record your key number ..............................................4-5
Transmitter precautions ................................................4-7
Forward Collision-avoidance Assist (FCA) system camera type..................................................................5-54Brake operation ..........................................................5-58
FCA sensor (Front view camera)................................5-58
FCA warning message and system control ................5-56
Limitation of the system ............................................5-61
System malfunction ....................................................5-60
System setting and activation ....................................5-54
Forward Collision-avoidance Assist (FCA) system sensor fusion type (front radar+front view camera) ..............5-67Brake operation ..........................................................5-71
Downhill Brake Control (DBC)..................................5-81
FCA sensor (front radar + front view Ccamera) ........5-71
FCA warning message and system control ................5-69
Good braking practices ..............................................5-83
Limitation of the system ............................................5-75
System malfunction ....................................................5-74
System setting and activation ....................................5-67
Fuel filler lid ..................................................................4-48 Closing the fuel filler lid ............................................4-49
Opening the fuel filler lid ..........................................4-48
Fuel requirements ............................................................1-2 Do not use methanol ....................................................1-4
Fuel Additives ..............................................................1-4
Gasoline containing alcohol and methanol ..................1-3 Operation in foreign countries ......................................1-5
Fuses ........................................................................\
......7-61 Engine compartment fuse replacement ......................7-65
Fuse/relay panel description ......................................7-67
Inner panel fuse replacement ......................................7-63
Gross vehicle weight........................................................8-7\
Hood ........................................................................\
......4-46 Closing the hood ........................................................4-47
Opening the hood ........................................................4-46
How to use this manual ..................................................1-2
If the engine overheats ....................................................6-7
If the engine will not start ..............................................6-4 If engine doesn't turn over or turns over slowly ..........6-4
If engine turns over normally but does not start ..........6-4
If you have a flat tire (with spare tire) ..........................6-15 Changing tires ............................................................6-17
Jack and tools ..............................................................6-15
Removing and storing the spare tire ..........................6-16
H
G
I