ECO mode KIA SPORTAGE 2020 Owners Manual
[x] Cancel search | Manufacturer: KIA, Model Year: 2020, Model line: SPORTAGE, Model: KIA SPORTAGE 2020Pages: 611, PDF Size: 15.85 MB
Page 2 of 611
i
Thank you for choosing a Kia vehicle.
When you require service, remember that your Kia dealer
knows your vehicle best. Your dealer has factory-trained tech-
nicians, recommended special tools and genuine Kia replace-
ment parts. It is dedicated to your complete customer satisfac-
tion.
Because subsequent owners require this important information
as well, this publication should remain with the vehicle if it is
sold.
This manual will familiarize you with operational, mainte-
nance and safety information about your new vehicle. It is sup-
plemented by a Warranty and Consumer Information manual
that provides important information on all warranties regarding
your vehicle.
We urge you to read these publications carefully and follow the
recommendations to help assure enjoyable and safe operation
of your new vehicle.
Kia offers a great variety of options, components and features
for its various models. Therefore, some of the equipment
described in this manual, along with the various illustrations,
may not be applicable to your particular vehicle.
The information and specifications provided in this manual
were accurate at the time of printing. Kia reserves the right to
discontinue or change specifications or design at any time
without notice and without incurring any obligation. If you
have questions, always check with your Kia dealer.
We assure you of our continuing interest in your motoring
pleasure and satisfaction in your Kia vehicle.
© 2019 Kia Canada Inc.
All rights reserved. Reproduction by any means, electronic or
mechanical, including photocopying, recording, or by any
information storage and retrieval system or translation in
whole or part is not permitted without written authorization
from Kia Canada Inc..
Printed in Korea
Foreword
Page 60 of 611
Safety features of your vehicle
44
3
5. Remove as much slack from the
belt as possible by pushing down
on the child restraint system while
feeding the shoulder belt back into
the retractor.
6. Push and pull on the child restraint system to confirm that the seat
belt is holding it firmly in place. If it
is not, release the seat belt and
repeat steps 2 through 6.
7. Double check that the retractor is in the "Automatic Locking" mode
by attempting to pull more of the
seat belt out of the retractor. If you
cannot, the retractor is in the
"Automatic Locking" mode.
If your CRS manufacturer instructs or
recommends you to use a tether
anchor with the lap/shoulder belt,
refer to the previous pages for more
information.✽ ✽ NOTICE
When the seat belt is allowed to
retract to its fully stowed position,
the retractor will automatically
switch from the "Automatic
Locking" mode to the emergency
lock mode for normal adult usage.
To remove the child restraint, press
the release button on the buckle and
then pull the lap/shoulder belt out of
the restraint and allow the seat belt
to retract fully.
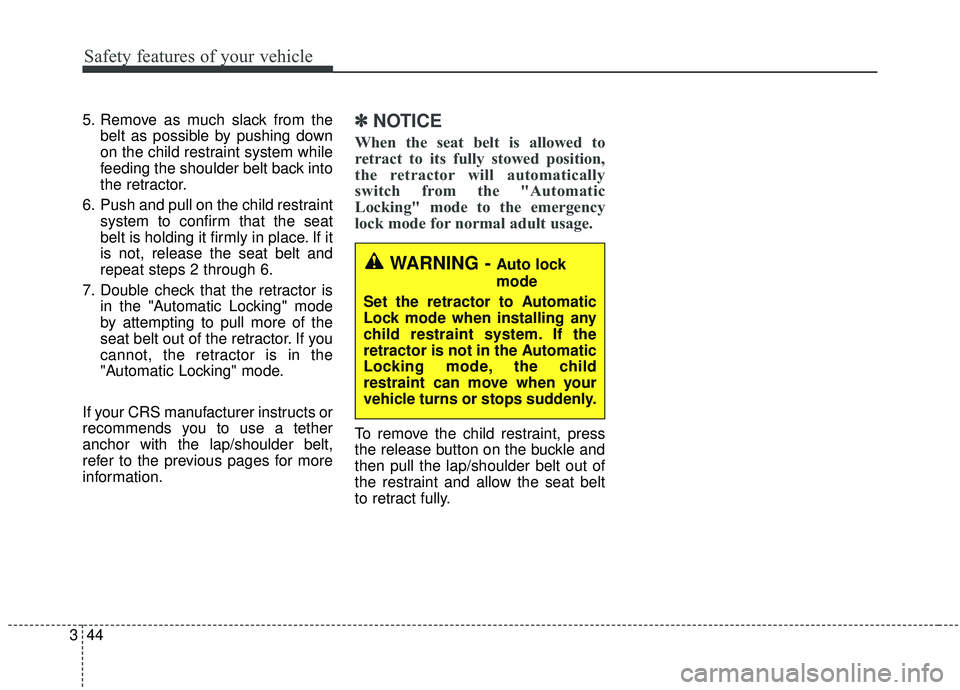
WARNING - Auto lock
mode
Set the retractor to Automatic
Lock mode when installing any
child restraint system. If the
retractor is not in the Automatic
Locking mode, the child
restraint can move when your
vehicle turns or stops suddenly.
Page 70 of 611
Safety features of your vehicle
54
3
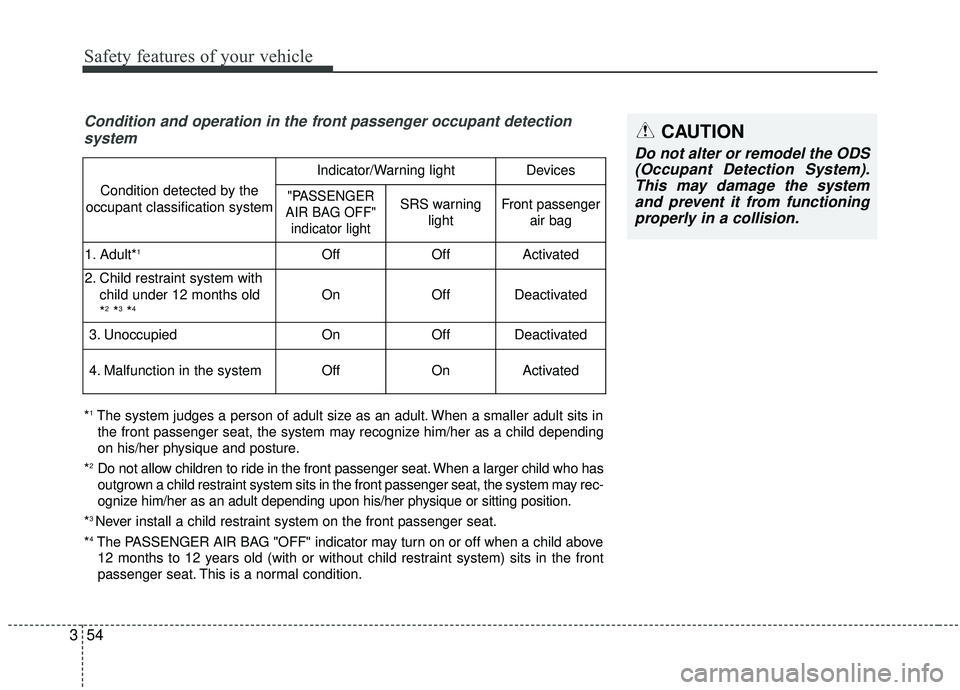
Condition and operation in the front passenger occupant detection
system
*1The system judges a person of adult size as an adult. When a smaller adult sits in
the front passenger seat, the system may recognize him/her as a child depending
on his/her physique and posture.
*
2Do not allow children to ride in the front passenger seat. When a larger child who has
outgrown a child restraint system sits in the front passenger seat, the system may rec-
ognize him/her as an adult depending upon his/her physique or sitting position.
*
3 Never install a child restraint system on the front passenger seat.
*
4The PASSENGER AIR BAG "OFF" indicator may turn on or off when a child above 12 months to 12 years old (with or without child restraint system) sits in the front
passenger seat. This is a normal condition.
Condition detected by the
occupant classification system
Indicator/Warning lightDevices
"PASSENGER
AIR BAG OFF" indicator lightSRS warning lightFront passenger air bag
1. Adult*1OffOffActivated
2. Child restraint system with
child under 12 months old
*
2*3*4OnOffDeactivated
3. Unoccupied OnOffDeactivated
4. Malfunction in the systemOffOnActivated
CAUTION
Do not alter or remodel the ODS(Occupant Detection System).This may damage the systemand prevent it from functioningproperly in a collision.
Page 76 of 611
Safety features of your vehicle
60
3
Driver's and passenger's front
air bag
Your vehicle is equipped with an
Advanced Supplemental Restraint
(Air Bag) System and lap/shoulder
belts at both the driver and passen-
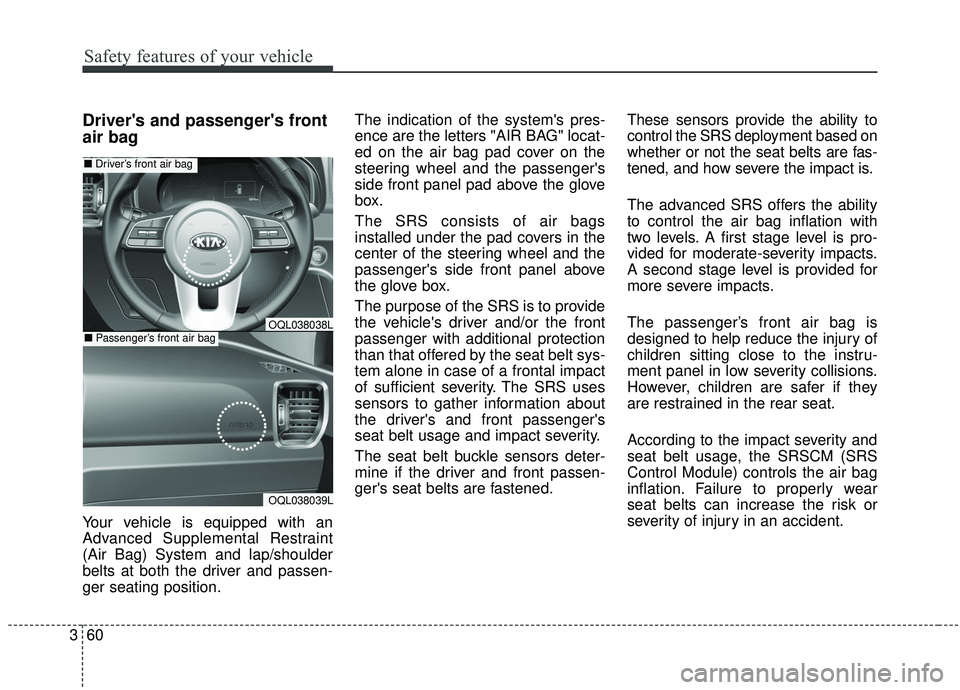
ger seating position. The indication of the system's pres-
ence are the letters "AIR BAG" locat-
ed on the air bag pad cover on the
steering wheel and the passenger's
side front panel pad above the glove
box.
The SRS consists of air bags
installed under the pad covers in the
center of the steering wheel and the
passenger's side front panel above
the glove box.
The purpose of the SRS is to provide
the vehicle's driver and/or the front
passenger with additional protection
than that offered by the seat belt sys-
tem alone in case of a frontal impact
of sufficient severity. The SRS uses
sensors to gather information about
the driver's and front passenger's
seat belt usage and impact severity.
The seat belt buckle sensors deter-
mine if the driver and front passen-
ger's seat belts are fastened.
These sensors provide the ability to
control the SRS deployment based on
whether or not the seat belts are fas-
tened, and how severe the impact is.
The advanced SRS offers the ability
to control the air bag inflation with
two levels. A first stage level is pro-
vided for moderate-severity impacts.
A second stage level is provided for
more severe impacts.
The passenger’s front air bag is
designed to help reduce the injury of
children sitting close to the instru-
ment panel in low severity collisions.
However, children are safer if they
are restrained in the rear seat.
According to the impact severity and
seat belt usage, the SRSCM (SRS
Control Module) controls the air bag
inflation. Failure to properly wear
seat belts can increase the risk or
severity of injury in an accident.
OQL038039L
■
Driver’s front air bag
■Passenger’s front air bagOQL038038L
Page 90 of 611

Steering wheel . . . . . . . . . . . . . . . . . . . . . . . . . . . . . 4-58
• Electronic Power Steering (EPS) . . . . . . . . . . . . . . . . 4-58
• Tilt and telescopic steering . . . . . . . . . . . . . . . . . . . . . 4-59
• Heated steering wheel . . . . . . . . . . . . . . . . . . . . . . . . . 4-60
• Horn . . . . . . . . . . . . . . . . . . . . . . . . . . . . . . . . . . . . \
. . . 4-61
Mirrors . . . . . . . . . . . . . . . . . . . . . . . . . . . . . . . . . . 4-62\
• Inside rearview mirror . . . . . . . . . . . . . . . . . . . . . . . . 4-62
• Outside rearview mirror. . . . . . . . . . . . . . . . . . . . . . . 4-76
Instrument cluster . . . . . . . . . . . . . . . . . . . . . . . . . 4-80
• Instrument cluster control . . . . . . . . . . . . . . . . . . . . . 4-81
• LCD display control . . . . . . . . . . . . . . . . . . . . . . . . . . 4-81
• Gauges . . . . . . . . . . . . . . . . . . . . . . . . . . . . . . . . . . . . \
. 4-82
• Transmission shift indicator . . . . . . . . . . . . . . . . . . . . 4-85
LCD display . . . . . . . . . . . . . . . . . . . . . . . . . . . . . . 4-86
• LCD modes. . . . . . . . . . . . . . . . . . . . . . . . . . . . . . . . . . 4-86\
• User settings mode. . . . . . . . . . . . . . . . . . . . . . . . . . . . 4-89
Trip modes (Trip computer) . . . . . . . . . . . . . . . . . 4-94
• Trip modes . . . . . . . . . . . . . . . . . . . . . . . . . . . . . . . . . . 4-94\
• Fuel economy . . . . . . . . . . . . . . . . . . . . . . . . . . . . . . . . 4-94
• Warning messages . . . . . . . . . . . . . . . . . . . . . . . . . . . . 4-97
Warning and indicator lights . . . . . . . . . . . . . . . 4-104
• Warning lights . . . . . . . . . . . . . . . . . . . . . . . . . . . . . . 4-104
• Indicator lights . . . . . . . . . . . . . . . . . . . . . . . . . . . . . . 4-112
Parking distance warning-reverse . . . . . . . . . . . 4-117
• Operation of the parking distance warning-reverse . 4-117
• Non-operational conditions of parking distance warning-reverse . . . . . . . . . . . . . . . . . . . . . . . . . . . . 4-118
• Parking distance warning-reverse precautions . . . 4-119
• Self-diagnosis . . . . . . . . . . . . . . . . . . . . . . . . . . . . . . . 4-120
Parking distance warning . . . . . . . . . . . . . . . . . . 4-121
• Operation of the parking distance warning . . . . . . 4-121
• Non-operational conditions of parking distance warning. . . . . . . . . . . . . . . . . . . . . . . . . . . . . . . . . . . 4-\
123
• Self-diagnosis . . . . . . . . . . . . . . . . . . . . . . . . . . . . . . . 4-125
Rear view monitor . . . . . . . . . . . . . . . . . . . . . . . . 4-126
Lighting . . . . . . . . . . . . . . . . . . . . . . . . . . . . . . . . . 4-127
• Battery saver function. . . . . . . . . . . . . . . . . . . . . . . . 4-127
• Daytime running light . . . . . . . . . . . . . . . . . . . . . . . . 4-127
• Lighting control . . . . . . . . . . . . . . . . . . . . . . . . . . . . . 4-127
• High beam operation. . . . . . . . . . . . . . . . . . . . . . . . . 4-129
• High beam assist . . . . . . . . . . . . . . . . . . . . . . . . . . . . 4-130
• Turn signals and lane change signals . . . . . . . . . . . 4-132
• Front fog light . . . . . . . . . . . . . . . . . . . . . . . . . . . . . . 4-133
• Check headlight . . . . . . . . . . . . . . . . . . . . . . . . . . . . . 4-133
• Dynamic Bending Light (DBL) . . . . . . . . . . . . . . . . 4-134
4
Page 125 of 611
437
Features of your vehicle
How to use the Smart PowerLiftgate
The liftgate can be opened with no-
touch activation satisfying all the
conditions below.
After 15 seconds when all doors are closed and locked
Positioned in the detecting area for more than 3 seconds.
✽ ✽ NOTICE
• The Smart Power Liftgate does
not operate when:
- The smart key is detected within15 seconds after the doors are
closed and locked, and is contin-
uously detected.
- The smart key is detected within 15 seconds after the doors are
closed and locked, and within
1.5 m (60 inches) from the front
door handles. (for vehicles
equipped with Welcome Light)
- A door is not locked or closed.
- The smart key is in the vehicle.
1. Setting
To activate the Smart Power Liftgate,
go to User Settings Mode and select
Smart Power Liftgate on the LCD
display.
❈ ❈ For more information, refer to
the "LCD Display" section in
this chapter.
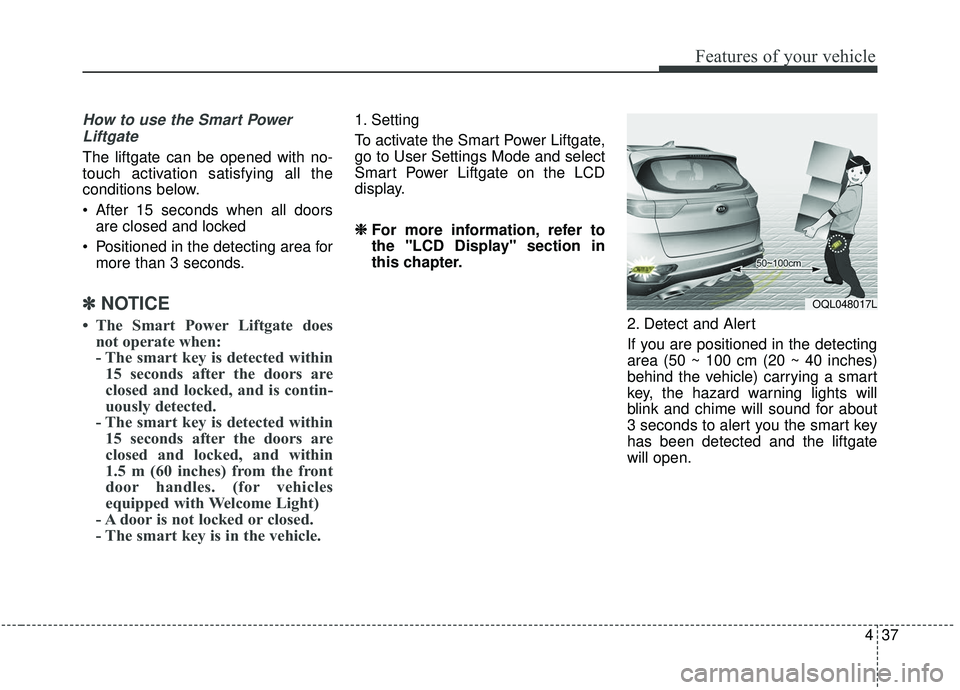
2. Detect and Alert
If you are positioned in the detecting
area (50 ~ 100 cm (20 ~ 40 inches)
behind the vehicle) carrying a smart
key, the hazard warning lights will
blink and chime will sound for about
3 seconds to alert you the smart key
has been detected and the liftgate
will open.
OQL048017L
Page 155 of 611
467
Features of your vehicle
6. Return to the vehicle and firmlypress and release the pro-
grammed HomeLink button up to
three times. The rolling code
equipped device should now rec-
ognize the HomeLink signal and
activate when the HomeLink but-
ton is pressed. The remaining two
buttons may now be programmed
if this has not previously been
done. Refer to the “Programming”
portion of this text. Operating HomeLink
To operate, simply press the
programmed HomeLink button.
Activation will now occur for the
trained product (garage door, securi-
ty system, entry door lock, estate
gate, or home or office lighting). For
convenience, the hand-held trans-
mitter of the device may also be used
at any time. The HomeLink Wireless
Controls System (once programmed)
or the original hand-held transmitter
may be used to activate the device
(e.g. garage door, entry door lock,
etc.). In the event that there are still
programming difficulties, contact
HomeLink at 1-800-355-3515 or on
the internet at www.homelink.com. Erasing programmed HomeLink
buttons
To erase the three programmed but-
tons (individual buttons cannot be
erased):
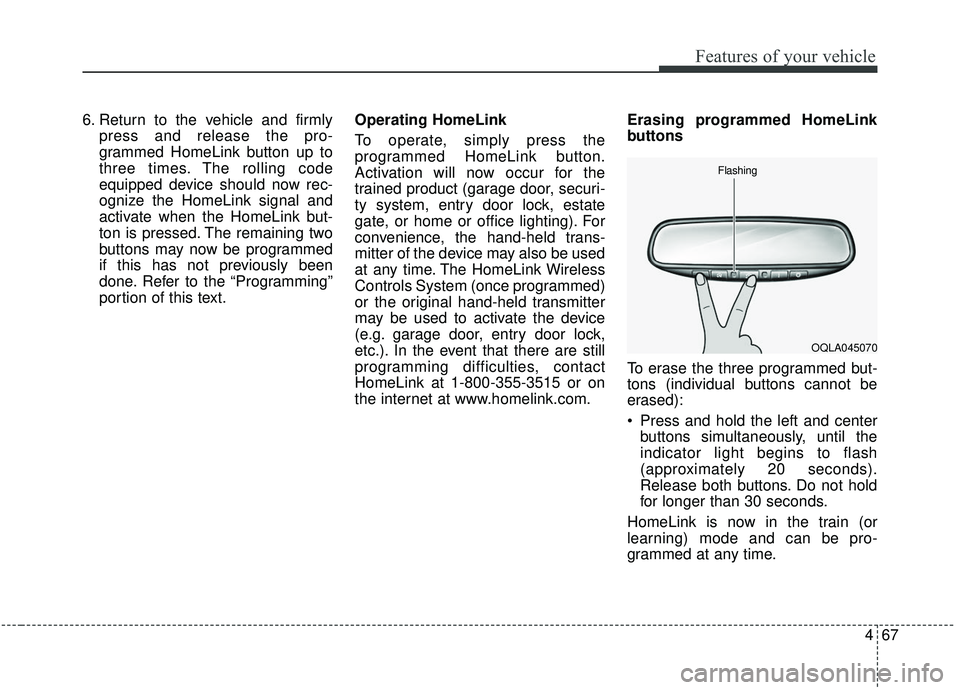
Press and hold the left and center
buttons simultaneously, until the
indicator light begins to flash
(approximately 20 seconds).
Release both buttons. Do not hold
for longer than 30 seconds.
HomeLink is now in the train (or
learning) mode and can be pro-
grammed at any time.
OQLA045070
Flashing
Page 160 of 611
Features of your vehicle
72
4
If you need to recalibrate the com-
pass:
1. Press and hold the button for
more than 9 seconds. When the
compass memory is cleared a "C"
will appear in the display.
2. Drive the vehicle in 2 complete cir- cles at less than 8 km/h (5 mph). Integrated HomeLink®Wireless
Control System
The HomeLink
®Wireless Control
System can replace up to three
hand-held radio-frequency (RF)
transmitters with a single built-in
device. This innovative feature will
learn the radio frequency codes of
most current transmitters to operate
devices such as gate operators,
garage door openers, entry door
locks, security systems, even home
lighting. Both standard and rolling
code-equipped transmitters can be
programmed by following the out-
lined procedures.
Additional HomeLink
®information
can be found at: www.homelink.com
or by calling 1-800-355-3515.
Retain the original transmitter of the
RF device you are programming for
use in other vehicles as well as for
future HomeLink
®programming. It is
also suggested that upon the sale of
the vehicle, the programmed
HomeLink
®buttons be erased for
security purposes.
WARNING
Before programming
HomeLink®to a garage door
opener or gate operator, make
sure people and objects are out
of the way of the device to pre-
vent potential harm or damage.
Do not use the HomeLink
®with
any garage door opener that
lacks the safety stop and
reverse features required by
U.S. federal safety standards
(this includes any garage door
opener model manufactured
before April 1, 1982). A garage
door that cannot detect an
object - signaling the door to
stop and reverse - does not
meet current U.S. federal safety
standards. Using a garage door
opener without these features
increases the risk of serious
injury or death.
Page 164 of 611

Features of your vehicle
76
4
Erasing HomeLink®buttons
Individual buttons cannot be erased.
However, to erase all three pro-
grammed buttons:
1. Press and hold the two outer
HomeLink
®buttons until the indi-
cator light begins to flash after 10
seconds.
2. Release both buttons. Do not hold for longer than 20 seconds.
The Integrated HomeLink
®Wireless
Control System is now in the training
(learn) mode and can be pro-
grammed at any time following the
appropriate steps in the
Programming chapters above.
NVS
®is a registered trademark and
Z-Nav™ is a trademark of the Gentex
Corporation, Zeeland, Michigan.
HomeLink
®is a registered trademark
owned by Johnson Controls,
Incorporated, Milwaukee, Wisconsin. FCC ID: NZLZTVHL3
IC: 4112A-ZTVHL3
This device complies with
Industry Canada licence-exempt
RSS standard(s).
Operation is subject to the following
two conditions:
(1) This device may not cause inter-
ference, and
(2) This device must accept any
interference, including interfer-
ence that may cause undesired
operation of the device.
Outside rearview mirror
Be sure to adjust the mirror angles
before driving.
Your vehicle is equipped with both
left-hand and right-hand outside
rearview mirrors. The mirrors can be
adjusted remotely with the remote
switch. The mirror heads can be fold-
ed back to prevent damage during an
automatic vehicle wash or when
passing through a narrow street.
The right outside rearview mirror is
convex. Objects seen in the mirror
are closer than they appear.
Use your interior rearview mirror or
direct observation to determine the
actual distance of following vehicles
when changing lanes.
Page 174 of 611
Features of your vehicle
86
4
LCD DISPLAY (IF EQUIPPED)
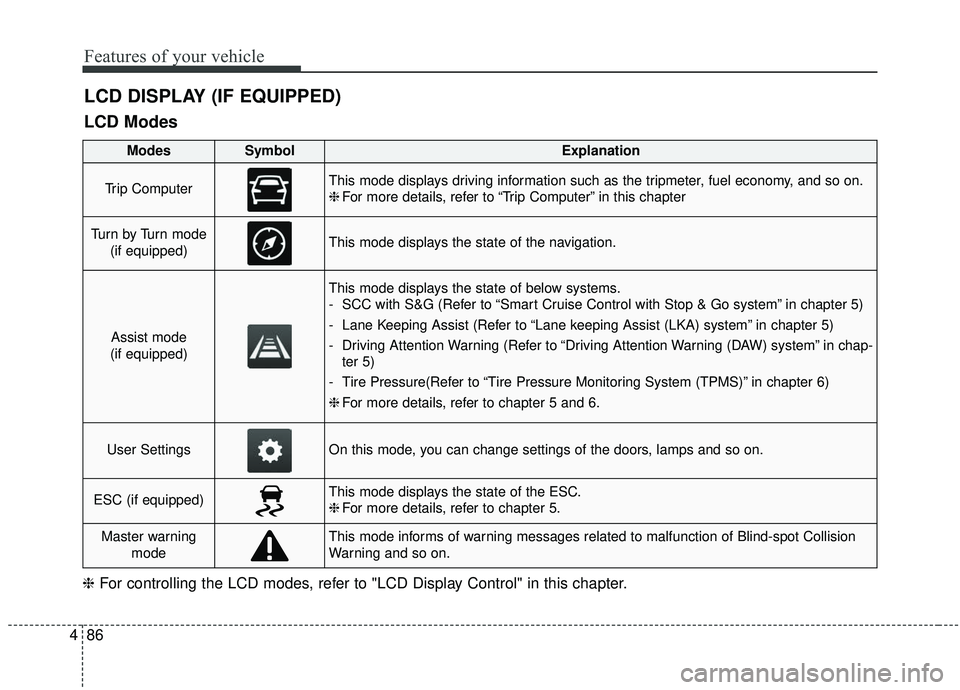
LCD Modes
❈ For controlling the LCD modes, refer to "LCD Display Control" in this chapter.
ModesSymbolExplanation
Trip ComputerThis mode displays driving information such as the tripmeter, fuel economy, and so on.
❈For more details, refer to “Trip Computer” in this chapter
Tu r n b y Tu r n m o d e
(if equipped)This mode displays the state of the navigation.
Assist mode
(if equipped)
This mode displays the state of below systems.
- SCC with S&G (Refer to “Smart Cruise Control with Stop & Go system” in chapter 5)
- Lane Keeping Assist (Refer to “Lane keeping Assist (LKA) system” in chapter 5)
- Driving Attention Warning (Refer to “Driving Attention Warning (DAW) system” in chap- ter 5)
- Tire Pressure(Refer to “Tire Pressure Monitoring System (TPMS)” in chapter 6)
❈ For more details, refer to chapter 5 and 6.
User SettingsOn this mode, you can change settings of the doors, lamps and so on.
ESC (if equipped)This mode displays the state of the ESC.
❈For more details, refer to chapter 5.
Master warning
modeThis mode informs of warning messages related to malfunction of Blind-spot Collision
Warning and so on.