warning light Lancia Delta 2010 Owner handbook (in English)
[x] Cancel search | Manufacturer: LANCIA, Model Year: 2010, Model line: Delta, Model: Lancia Delta 2010Pages: 276, PDF Size: 5.31 MB
Page 44 of 276
GETTING TO KNOW YOUR CAR43
1
VOLUME SENSING/ANTI-TILT PROTECTION
To guarantee the correct operation of the protection, close
the side windows and sunroof completely (for ver-
sions/markets, where provided).
If necessary this function can be excluded (e.g. when leav-
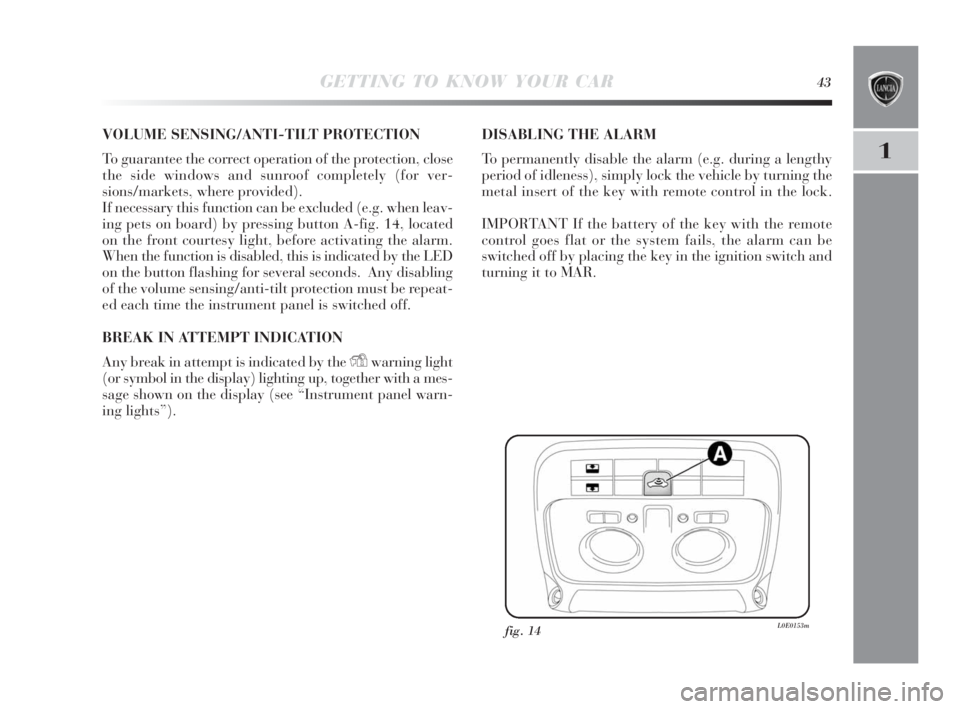
ing pets on board) by pressing button A-fig. 14, located
on the front courtesy light, before activating the alarm.
When the function is disabled, this is indicated by the LED
on the button flashing for several seconds. Any disabling
of the volume sensing/anti-tilt protection must be repeat-
ed each time the instrument panel is switched off.
BREAK IN ATTEMPT INDICATION
Any break in attempt is indicated by the
Ywarning light
(or symbol in the display) lighting up, together with a mes-
sage shown on the display (see “Instrument panel warn-
ing lights”).DISABLING THE ALARM
To permanently disable the alarm (e.g. during a lengthy
period of idleness), simply lock the vehicle by turning the
metal insert of the key with remote control in the lock.
IMPORTANT If the battery of the key with the remote
control goes flat or the system fails, the alarm can be
switched off by placing the key in the ignition switch and
turning it to MAR.
fig. 14L0E0153m
001-142 Delta 3ed gb 30-11-2009 11:21 Pagina 43
Page 63 of 276

62GETTING TO KNOW YOUR CAR
DIPPED BEAM HEADLIGHTS/SIDE LIGHTS
With the ignition key turned to MAR, turn the selector
wheel to 2. If dipped beam headlights are activated, the
daytime lights are switched off and the side lights, num-
ber plate light and dipped beam headlights are lit up. The
3warning light will come on in the instrument panel.
When the ignition key is turned to STOP or removed, and
the selector wheel is turned from
Oto2, the number plate
light and side lights are lit. The 3warning light will
come on in the instrument panel.
Parking function
With the side lights on and the ignition key turned to STOP
or removed, it is possible to light up one side of the vehi-
cle by moving the lighting lever down (left-hand side) or
up (right-hand side). In this case warning light
3on the
instrument panel will go out.
MAIN BEAM HEADLIGHTS
With the selector wheel in position 2, push the lever for-
ward toward the dashboard (stable position). The 1warn-
ing light will come on in the instrument panel. They are
switched off by pulling the lever towards the steering wheel.
Flashing the headlights
You can flash the headlights by pulling the lever towards
the wheel (unstable position). The
1warning light on the
instrument panel will come on.DIRECTION INDICATORS Fig. 28
Push the lever to (stable) position:
– up (position
a): right-hand indicator ON;
– down (position
b): left-hand indicator ON.
Warning light
¥orÎwill blink on the instrument pan-
el.. The direction indicators are switched off automatically
when the steering wheel is straightened.
fig. 28L0E0020m
001-142 Delta 3ed gb 30-11-2009 11:22 Pagina 62
Page 64 of 276
GETTING TO KNOW YOUR CAR63
1
LANE CHANGE FUNCTION
If you want to signal that you are changing lane, hold the
left-hand lever in the unstable position for less than half
a second. The direction indicator on the selected side flash-
es 5 times and then switches off automatically.
“FOLLOW ME HOME” DEVICE
This function allows the space in front of the car to be lit
up for a preset period of time.
Activation
With the ignition key on STOP or removed, pull the lever
towards the steering wheel within 2 minutes of switching
the engine off. The amount of time the lights remain on
is extended by 30 seconds at each movement of the lever,
up to a maximum of 210 seconds; after this the lights are
switched off automatically. Each time the lever is oper-
ated, the warning light on the instrument panel comes
on and the display shows how long the function will re-
main active. The warning light comes on the first time the
lever is operated, and stays on until the function is auto-
matically deactivated. Each time you operate the lever, the
amount of time the lights will remain lit up increases.
Deactivation
Keep the lever pulled towards the steering wheel for more
than 2 seconds.WINDOW WASHING
The right-hand lever fig. 29 controls windscreen
wiper/washer and heated rear window wiper/washer op-
eration.
WINDSCREEN WIPER/WASHER fig. 29
This only operates with the ignition turned to MAR.
The right-hand lever can take five different positions:
A: windscreen wiper off.
B: intermittent operation;
With the lever in position B, turn selector wheel F to se-
lect one of four different speeds for the intermittent op-
eration mode:
,= very slow intermittent operation
= slow intermittent operation.
= normal intermittent operation
= fast intermittent operation.
C: continuous slow operation;
D: continuous fast operation;
E: temporary fast operation (unstable position).
001-142 Delta 3ed gb 30-11-2009 11:22 Pagina 63
Page 68 of 276
GETTING TO KNOW YOUR CAR67
1
When travelling downhill with the device engaged, the car
speed may exceed the memorised one.
The engagement of the device is signalled by the Üwarn-
ing light lighting up in the instrument panel (together with
a message shown on the display) (see “Instrument panel
warning lights” in chapter 1).
MEMORISING VEHICLE SPEED
Proceed as follows:
❍turn selector wheel A-fig. 31 to ON and press the ac-
celerator until the vehicle reaches the desired speed;
❍turn selector wheel B to (+) for at least three seconds
and then release it: the car speed will be memorised
and the accelerator pedal may be released.
If required (e.g. for overtaking), press the accelerator ped-
al to accelerate: the car will return to the previously set
speed when the pedal is released.
RESTORING MEMORISED SPEED
If the device has been disengaged, for example by press-
ing the brake or clutch pedal, the memorised speed can
be reset as follows:
❍accelerate gradually until you reach a speed ap-
proaching the one memorised;
❍engage the gear selected at the time of speed memo-
rising (4th, 5th or 6th gear);
❍press button C-fig. 31.INCREASING THE MEMORISED SPEED
This can be carried out in two ways:
❍by pressing the accelerator and then memorising the
new speed reached;
or
❍by temporarily turning selector wheel B-fig. 31 to (+).
Each movement of the selector wheel will correspond to
a slight increase in speed (about 1 km/h), while keeping
the selector wheel turned will correspond to a continuous
speed increase.
REDUCING THE MEMORISED SPEED
This can be carried out in two ways:
❍by disengaging the device and then memorising the
new speed;
or
❍by keeping selector wheel B-fig. 31 turned to (–) un-
til the new speed is reached; it will then be memorised
automatically.
Each movement of the selector wheel will correspond to
a slight reduction in speed (about 1 km/h), while keep-
ing the selector wheel turned will correspond to a contin-
uous reduction in speed.
001-142 Delta 3ed gb 30-11-2009 11:22 Pagina 67
Page 72 of 276

GETTING TO KNOW YOUR CAR71
1
When this function is on (see“SPORT function”), the word
SPORT appears on the display. Press the button once again
to deactivate the function and return to the standard dri-
ving mode.
fig. 36L0E0028m
HAZARD WARNING LIGHTS fig. 36
These lights are switched on by pressing switch A, re-
gardless of the position of the ignition key.
Warning lights
Îand¥are lit up on the instrument pan-
el when this device is activated.. To switch off the lights,
press button A once again.
Use of the hazard warning lights is governed by the High-
way Code of the country you are in. Keep to the rules.
Emergency braking
In the event of emergency braking the hazard warning
lights come on automatically, as do the
Îand¥warn-
ing lights in the instrument panel.
The function switches off automatically when the nature
of the braking changes.
This function complies with current legislation.
On some versions, with the CITY function ac-
tivated, the SPORT function is not available.
To activate the SPORT function, deactivate the
CITY function and vice versa, because they are reci-
procally incompatible.
001-142 Delta 3ed gb 30-11-2009 11:22 Pagina 71
Page 73 of 276

72GETTING TO KNOW YOUR CAR
FRONT FOG LIGHTS fig. 37
Press button A to activate the front fog lights. When the
front fog lights are activated the
5warning light is lit
up on the instrument panel.
The front fog lights can be activated when the dipped
beam headlights are on.
REAR FOG LIGHTS fig. 37
When the dipped beam headlights are on, these can be ac-
tivated by pressing button D.
With the lights on, the
4warning light in the instrument
panel will come on at the same time. Press the button again
to turn the lights off.
fig. 38L0E0030m
AFS ADAPTIVE LIGHTS
(Adaptive Xenon Lights) fig. 38
The adaptive lights (see “Headlights” in this chapter) are
activated automatically when the vehicle is started. In this
situation the LED (amber) on button A will remain off.
Press button A to deactivate the adaptive lights (if acti-
vated); the LED on button A will light up. To reactivate
the adaptive lights: press button A once again (LED on
button is off).
In the event of a system failure, this is indicated on the in-
strument panel by the flashing of warning light
for the
fsymbol appearing on the display along with a dedicat-
ed message (for versions/markets, where provided).
fig. 37L0E0029m
001-142 Delta 3ed gb 30-11-2009 11:22 Pagina 72
Page 90 of 276
GETTING TO KNOW YOUR CAR89
1
LUGGAGE COMPARTMENT
OPENING THE TAILGATE
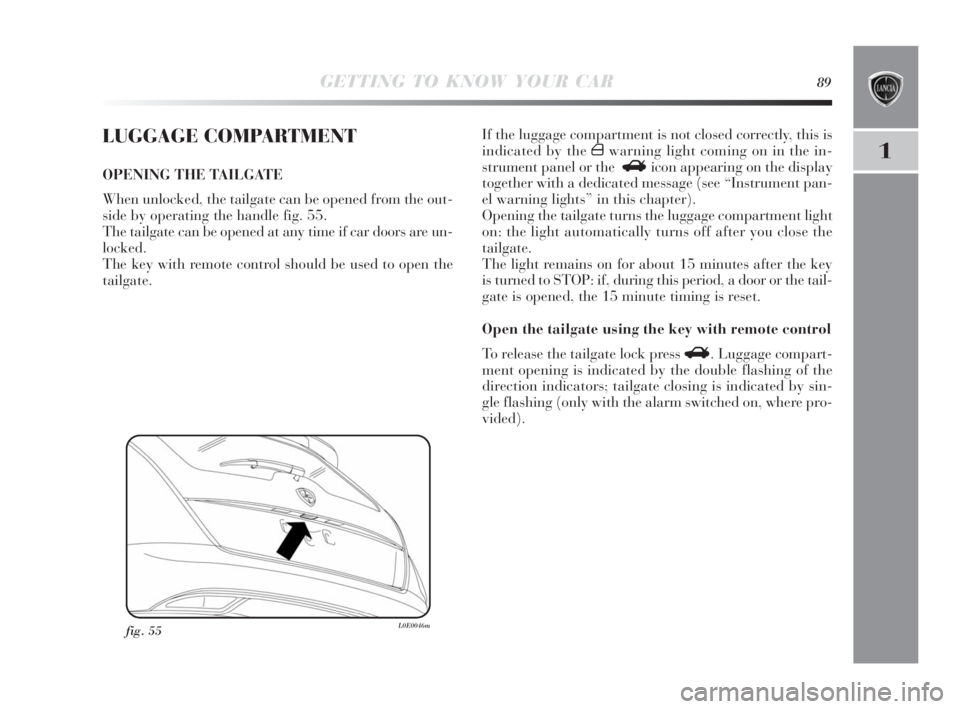
When unlocked, the tailgate can be opened from the out-
side by operating the handle fig. 55.
The tailgate can be opened at any time if car doors are un-
locked.
The key with remote control should be used to open the
tailgate.
fig. 55L0E0046m
If the luggage compartment is not closed correctly, this is
indicated by the
´warning light coming on in the in-
strument panel or the
Ricon appearing on the display
together with a dedicated message (see “Instrument pan-
el warning lights” in this chapter).
Opening the tailgate turns the luggage compartment light
on: the light automatically turns off after you close the
tailgate.
The light remains on for about 15 minutes after the key
is turned to STOP: if, during this period, a door or the tail-
gate is opened, the 15 minute timing is reset.
Open the tailgate using the key with remote control
To release the tailgate lock press R. Luggage compart-
ment opening is indicated by the double flashing of the
direction indicators; tailgate closing is indicated by sin-
gle flashing (only with the alarm switched on, where pro-
vided).
001-142 Delta 3ed gb 30-11-2009 11:22 Pagina 89
Page 102 of 276
GETTING TO KNOW YOUR CAR101
1
HEADLIGHT ALIGNMENT ADJUSTMENT
ABROAD
The factory adjustment of the dipped beam headlights de-
pends on the country where the car is purchased. When
you travel in countries with a different driving direction,
it is necessary to cover certain areas of the headlight ac-
cording to the provisions of the Highway Code of the coun-
try you are travelling in to avoid blinding the drivers trav-
elling in the opposite direction.
ADAPTIVE LIGHTS (AFS - Adaptive Xenon Light)
This is a system linked to the Xenon headlights, which
continuously and automatically adjusts the main light
beam and adapts it to the driving conditions when cor-
nering. The system directs the light beam to improve the
illumination of the road, taking into account the vehicle
speed, the cornering angle and the speed at which the
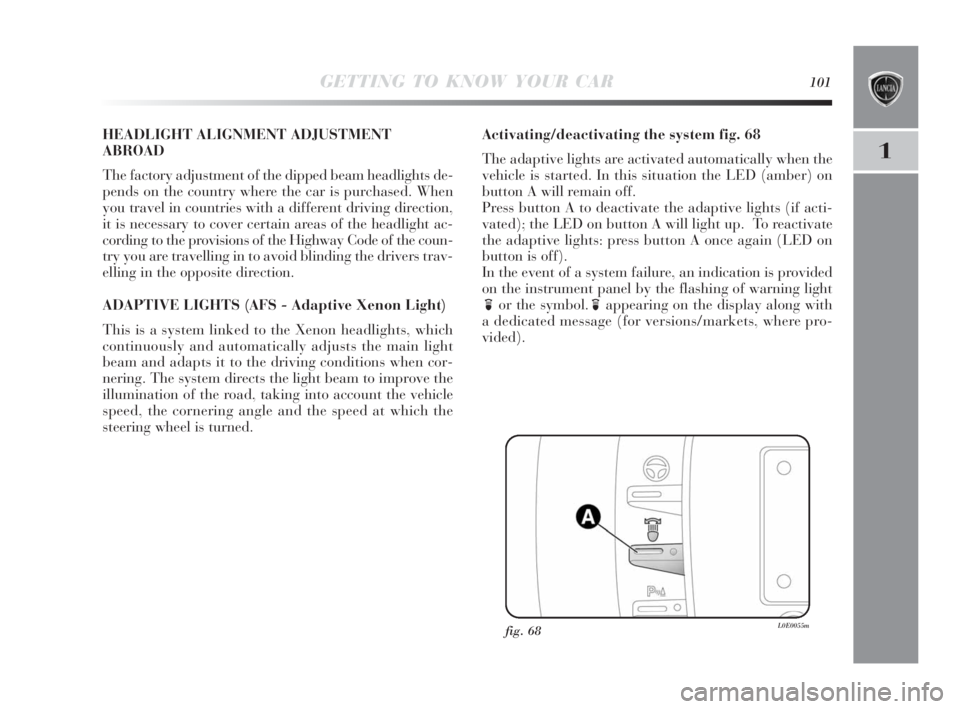
steering wheel is turned.Activating/deactivating the system fig. 68
The adaptive lights are activated automatically when the
vehicle is started. In this situation the LED (amber) on
button A will remain off.
Press button A to deactivate the adaptive lights (if acti-
vated); the LED on button A will light up. To reactivate
the adaptive lights: press button A once again (LED on
button is off).
In the event of a system failure, an indication is provided
on the instrument panel by the flashing of warning light
for the symbol.
fappearing on the display along with
a dedicated message (for versions/markets, where pro-
vided).
fig. 68L0E0055m
001-142 Delta 3ed gb 30-11-2009 11:22 Pagina 101
Page 103 of 276

102GETTING TO KNOW YOUR CAR
DST SYSTEM
(Dynamic Steering Torque)
This system is built into the advanced ESP control unit
and provides steering corrections via the electric power
steering during driving. The system applies torque to the
steering wheel, increasing the feeling of safety, maintain-
ing control and reducing the impact of advanced ESP sys-
tem intervention.
Fault signalling
In the event of any operating faults occurring, the sys-
tem switches off automatically and the èwarning light is
lit up on the display together with a dedicated message.
In this case contact a Lancia Dealership.
SPORT FUNCTION
(for versions/markets, where provided)
The vehicle can be equipped with a system that allows you
to choose between two driving modes: normal and sport.
Press the SPORT button fig. 69 to set the sport driving
mode. This is characterised by increased acceleration re-
sponse and increased force required at the steering wheel
to obtain a more sporty drive.
fig. 69L0E0058m
001-142 Delta 3ed gb 30-11-2009 11:22 Pagina 102
Page 106 of 276

GETTING TO KNOW YOUR CAR105
1
On the 1.4 Turbo Jet 150 HP version, when the SPORT
button is pressed, the turbocharger (overboost) function
is also activated; the engine management control unit, de-
pending on the
position of the accelerator pedal and, for a limited time,
allows maximum pressure leves inside the turbocharger
to be reached with a consequent increase in engine torque
compared with that that can be reached normally.
This function is particularly useful if maximum perfor-
mance is required for a short period (e.g. when overtak-
ing).
IMPORTANT When the SPORT function is used, during
acceleration shuddering of the steering may be noticed
which is typical of a sports setting.
IMPORTANT The function is activated about 5 seconds
after the SPORT button is pressed.
System failure
In the case of fault, the system notifies the driver by means
of a message on the reconfigurable multifunctional display
instrument panel and by lighting up the amber symbol
i.
In this case, go to a Lancia Dealership.
DRIVING ADVISOR
(for versions/markets, where provided)
The Driving Advisor is a warning system that notifies
the driver if they drift out of their lane because they have
been distracted.
A video sensor, fitted to the windscreen near the internal
rear-view mirror, detects the lane boundaries and the ve-
hicle’s position in respect to them.
IMPORTANT If the windscreen needs replacing on cars
fitted with a Driving Advisor system, it is advisable to go
to a Lancia Dealership. If the repair is being carried out
at a specialist window replacement centre, it is still nec-
essary to go to a Lancia Dealership to have the tv cam-
era calibrated.
001-142 Delta 3ed gb 30-11-2009 11:22 Pagina 105