boot Lancia Delta 2011 Owner handbook (in English)
[x] Cancel search | Manufacturer: LANCIA, Model Year: 2011, Model line: Delta, Model: Lancia Delta 2011Pages: 290, PDF Size: 8.36 MB
Page 6 of 290
KNOWING YOUR CAR5
1
Instrument panel ........................................ 6
Control panel and instruments ................... 7
Display ...................................................... 21
Menu items ................................................ 26
Trip Computer ........................................... 36
Symbols ..................................................... 38
Lancia Code system ................................... 39
Keys ........................................................... 40
Alarm ........................................................ 43
Ignition device ........................................... 46
Seats .......................................................... 47
Headrest .................................................... 50
Steering wheel ............................................ 51
Rear view mirrors ...................................... 51
Climatic comfort ........................................ 53
Manual climate control system ................... 54
Automatic dual zone climate control system . 56
External lights ........................................... 62
Window washing ........................................ 65
Cruise Control ............................................ 68
Roof lights ................................................. 70
Controls ..................................................... 72
Fuel cut-off system .................................... 75Interior fittings ........................................... 76
Sunroof ...................................................... 81
Doors ......................................................... 84
Power windows .......................................... 87
Boot ........................................................... 91
Bonnet ....................................................... 99
Roof rack/ski rack ..................................... 101
Headlights ................................................. 102
DST system ................................................ 104
SPORT function ......................................... 104
Reactive Suspension System ....................... 106
Driving Advisor .......................................... 107
Advanced ESP system ................................ 112
Start&Stop system ..................................... 117
EOBD system ............................................. 122
“Dualdrive” electric power steering system ... 122
TPMS system ............................................. 124
Parking sensors .......................................... 127
Magic Parking ............................................ 130
Accessories purchased by the owner ........... 144
Refuelling the car ....................................... 145
Protecting the environment ........................ 148
Page 42 of 290
1
KNOWING YOUR CAR41
fig. 11L0E0104m
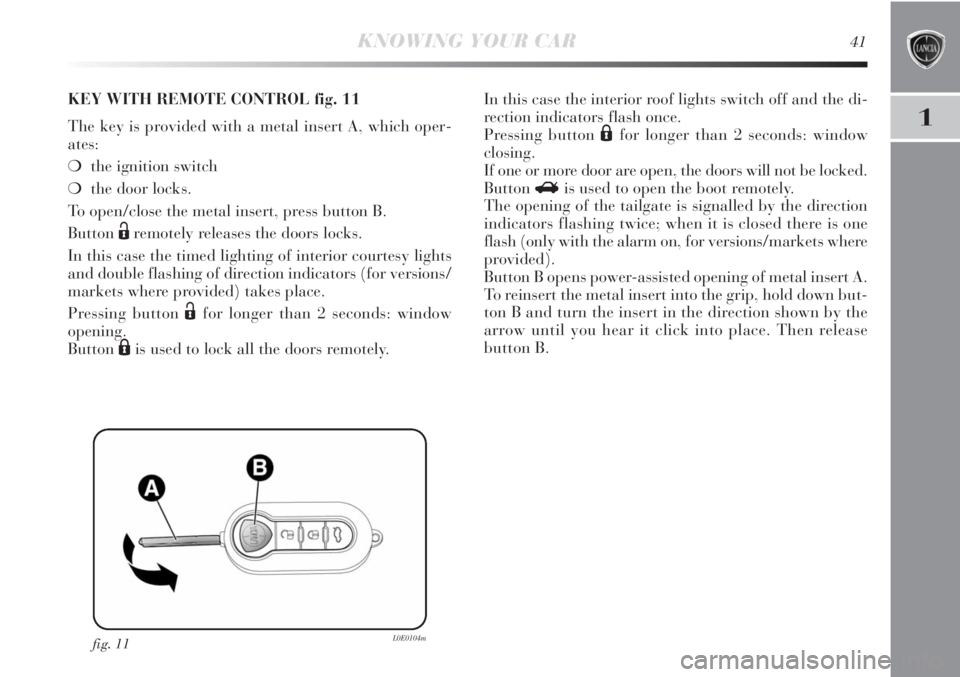
KEY WITH REMOTE CONTROL fig. 11
The key is provided with a metal insert A, which oper-
ates:
❍the ignition switch
❍the door locks.
To open/close the metal insert, press button B.
Button
Ëremotely releases the doors locks.
In this case the timed lighting of interior courtesy lights
and double flashing of direction indicators (for versions/
markets where provided) takes place.
Pressing button
Ëfor longer than 2 seconds: window
opening.
Button
Áis used to lock all the doors remotely.In this case the interior roof lights switch off and the di-
rection indicators flash once.
Pressing button
Áfor longer than 2 seconds: window
closing.
If one or more door are open, the doors will not be locked.
Button
Ris used to open the boot remotely.
The opening of the tailgate is signalled by the direction
indicators flashing twice; when it is closed there is one
flash (only with the alarm on, for versions/markets where
provided).
Button B opens power-assisted opening of metal insert A.
To reinsert the metal insert into the grip, hold down but-
ton B and turn the insert in the direction shown by the
arrow until you hear it click into place. Then release
button B.
Page 92 of 290

1
KNOWING YOUR CAR91
BOOT
OPENING THE TAILGATE
When unlocked, the luggage compartment can be opened
from the outside using the handle fig. 55.
The tailgate can be opened at any time, if the doors are
unlocked.
The key with remote control should be used to open the
tailgate.
fig. 55L0E0046m
If the luggage compartment is not closed correctly, this
is indicated by the warning light
´coming on in the in-
strument panel or the icon
Rappearing in the display
together with a dedicated message (see “Instrument panel
warning lights” paragraph in this chapter).
Opening the tailgate will switch the boot light on: the
light will go off automatically when closing the tailgate.
The light will stay on for about 15 minutes after turning
the key to STOP: if during this time, a door or the tailgate
is opened, the light will switch on again for 15 minutes.
Opening the tailgate using the key
with remote control
To release the tailgate lock press R. Luggage com-
partment opening is indicated by the double flashing of
the direction indicators; tailgate closing is indicated by
single flashing (only with the alarm switched on, where
provided).
Page 93 of 290

92KNOWING YOUR CAR
CLOSING THE TAILGATE fig. 56
To close, lower the tailgate pressing near the lock until
you hear it click. There are handles B provided inside the
tailgate to allow it to be closed more easily.
fig. 56L0E0047m
If you travel in areas with few filling stations
and you want to transport fuel in a spare
tank, comply with the regulations in force
and use only an approved, suitably secured tank. In
the event of a collision the fire risk is increased all
the same.
Take care not to knock objects on the roof rack
when opening the tailgate.
Never exceed the maximum allowed load in
the luggage compartment; see chapter 6.
Make sure that the objects are well arranged
in the boot so that they will not be projected for-
wards following sudden braking. Never travel with
the tailgate open: exhaust gases may get into the
passenger’s compartment.
Page 94 of 290
1
KNOWING YOUR CAR93
fig. 57L0E0048m
OPENING THE TAILGATE IN AN EMERGENCY
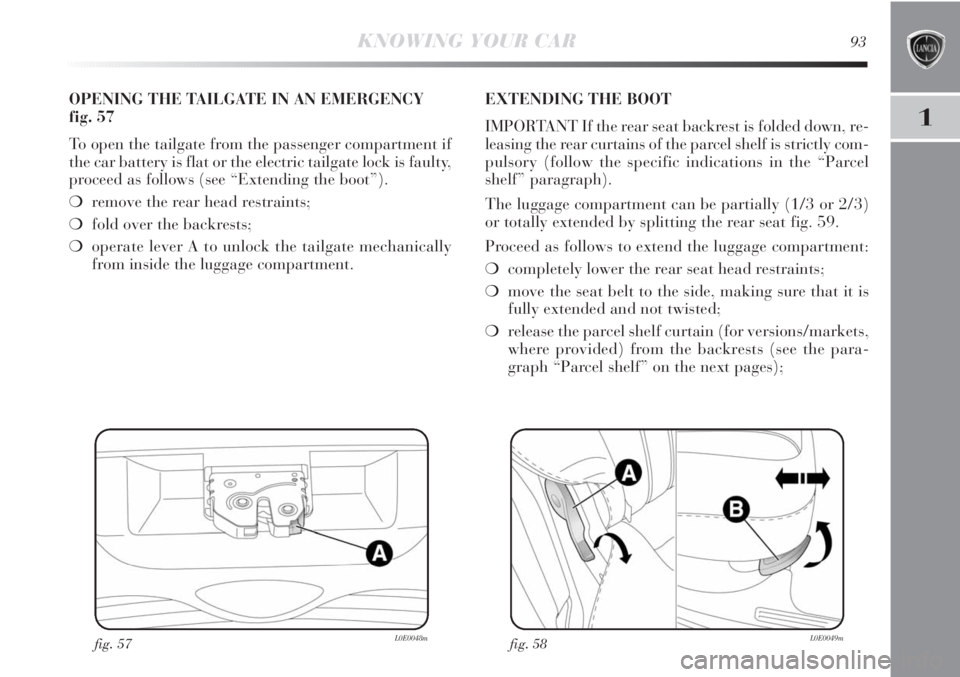
fig. 57
To open the tailgate from the passenger compartment if
the car battery is flat or the electric tailgate lock is faulty,
proceed as follows (see “Extending the boot”).
❍remove the rear head restraints;
❍fold over the backrests;
❍operate lever A to unlock the tailgate mechanically
from inside the luggage compartment.EXTENDING THE BOOT
IMPORTANT If the rear seat backrest is folded down, re-
leasing the rear curtains of the parcel shelf is strictly com-
pulsory (follow the specific indications in the “Parcel
shelf” paragraph).
The luggage compartment can be partially (1/3 or 2/3)
or totally extended by splitting the rear seat fig. 59.
Proceed as follows to extend the luggage compartment:
❍completely lower the rear seat head restraints;
❍move the seat belt to the side, making sure that it is
fully extended and not twisted;
❍release the parcel shelf curtain (for versions/markets,
where provided) from the backrests (see the para-
graph “Parcel shelf” on the next pages);
fig. 58L0E0049m
Page 97 of 290
96KNOWING YOUR CAR
MAGIC BACK BOX
(DOUBLE LOAD COMPARTMENT) fig. 63-64
(for versions/markets where provided)
The vehicle may be equipped, in addition to fold-down
seats, with a load platform with two height adjustments,
so that the load threshold can be flat and the luggage
compartment volume can be varied.
Keeping the load platform in the upper position you can
use the space under it as a further compartment to store
fragile or small items.
To access the space under the load compartment, lift shelf
A holding it with a hand and insert the desired objects.
IMPORTANT Movements of the load platform must take
place in a central position relative to the luggage com-
partment.To place shelf A at the level of the floor
(fully lowered) fig. 63:
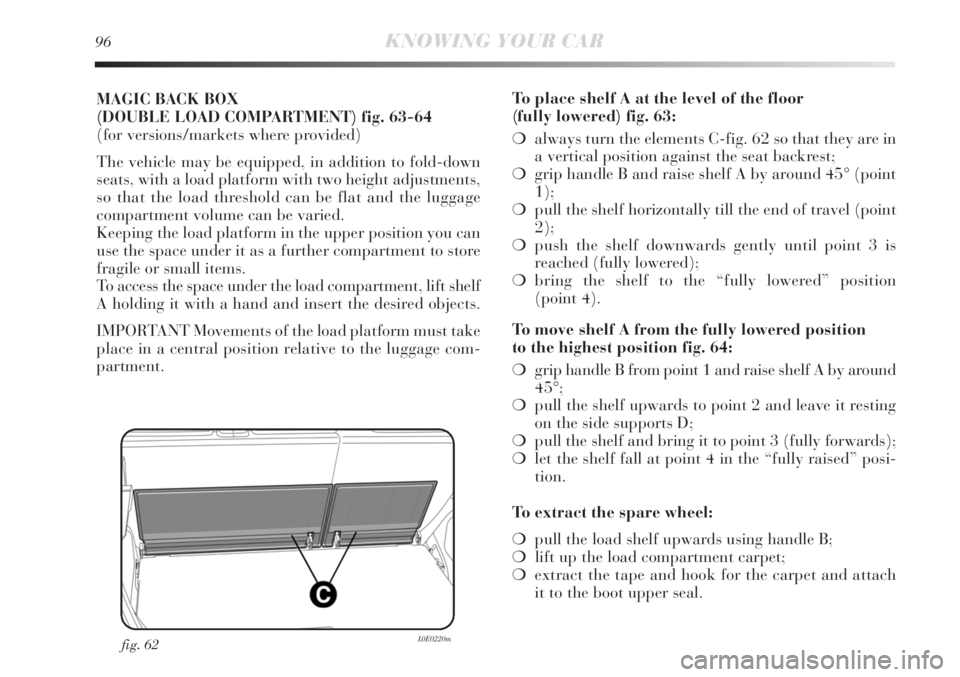
❍always turn the elements C-fig. 62 so that they are in
a vertical position against the seat backrest;
❍grip handle B and raise shelf A by around 45° (point
1);
❍pull the shelf horizontally till the end of travel (point
2);
❍push the shelf downwards gently until point 3 is
reached (fully lowered);
❍bring the shelf to the “fully lowered” position
(point 4).
To move shelf A from the fully lowered position
to the highest position fig. 64:
❍grip handle B from point 1 and raise shelf A by around
45°;
❍pull the shelf upwards to point 2 and leave it resting
on the side supports D;
❍pull the shelf and bring it to point 3 (fully forwards);
❍let the shelf fall at point 4 in the “fully raised” posi-
tion.
To extract the spare wheel:
❍pull the load shelf upwards using handle B;
❍lift up the load compartment carpet;
❍extract the tape and hook for the carpet and attach
it to the boot upper seal.
fig. 62L0E0220m
Page 103 of 290
102KNOWING YOUR CAR
HEADLIGHTS
HEADLIGHT BEAM AIMING
The correct aiming of the headlights is important for the
comfort and safety of not only the driver but all other
road users. This is also covered by a specific rule of the
highway code.
The headlights must be correctly aimed to guarantee the
best visibility conditions for all drivers while travelling
with headlights on.
Contact a Lancia Dealership to have the headlights prop-
erly adjusted.
Check beam alignment every time the load or its distri-
bution changes.
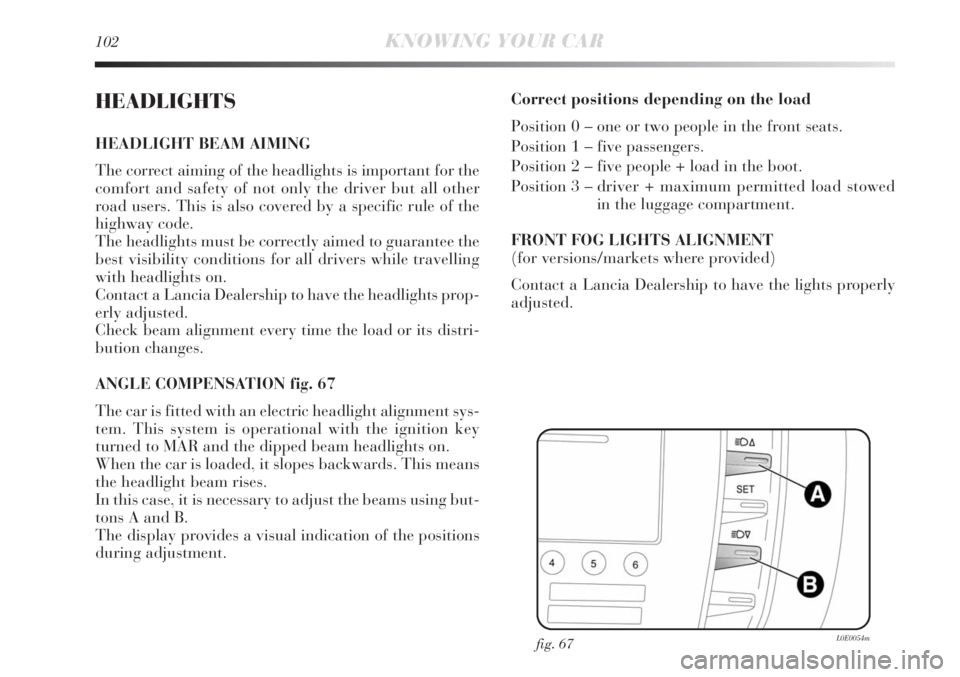
ANGLE COMPENSATION fig. 67
The car is fitted with an electric headlight alignment sys-
tem. This system is operational with the ignition key
turned to MAR and the dipped beam headlights on.
When the car is loaded, it slopes backwards. This means
the headlight beam rises.
In this case, it is necessary to adjust the beams using but-
tons A and B.
The display provides a visual indication of the positions
during adjustment.Correct positions depending on the load
Position 0 – one or two people in the front seats.
Position 1 – five passengers.
Position 2 – five people + load in the boot.
Position 3 – driver + maximum permitted load stowed
in the luggage compartment.
FRONT FOG LIGHTS ALIGNMENT
(for versions/markets where provided)
Contact a Lancia Dealership to have the lights properly
adjusted.
fig. 67L0E0054m
Page 178 of 290
3
STARTING AND DRIVING177
FUEL SAVINGS
Here are some useful tips to save fuel and minimise harm-
ful emissions of CO
2and other pollutants (nitric oxides,
unburnt hydrocarbons, fine dusts etc…).
GENERAL CONSIDERATIONS
Car maintenance
Have checks and adjustments carried out in accordance
with the “Scheduled Servicing Plan”.
Ty r e s
Check the pressure of the tyres routinely at an interval
of no more than 4 weeks: if the pressure is too low, con-
sumption levels increase as resistance to rolling is higher.
Unnecessary loads
Do not travel with an overloaded boot. The weight of the
car (especially when driving in town) and its ride greatly
affects consumption and stability.Accessories installed on longitudinal bars
Remove accessories like: roof racks, ski racks, luggage
container, etc. from the roof if they are no longer used.
These accessories lower air penetration and adversely af-
fect consumption levels. When transporting particularly
large objects, use a trailer if possible.
Electric devices
Use electric devices only for the amount of time needed.
The heated rear window, additional headlights, wind-
screen wipers and heater fan need a considerable amount
of energy, therefore a higher requirement of current in-
volves an increase of fuel consumption (up to +25%
in the urban cycle).
Climate control system
Air conditioning leads to higher fuel consumption (on av-
erage up to +20%). If the temperature outside permits,
try and use the air vents.
Devices for aerodynamic control
The use of non-certified aerodynamic items may ad-
versely affect air drag and fuel consumption levels.
Page 201 of 290
200IN AN EMERGENCY
After tyre replacement
❍Stow the space saver wheel D-fig. 10 in the space pro-
vided in the luggage compartment;
❍fit the partially open jack in its box forcing it lightly
to prevent it from vibrating when travelling;
❍put the tools back into place in the container;
❍stow the container, complete with tools, in the spare
wheel and tighten the locking device B-fig. 10;
❍reposition the boot mat correctly.
IMPORTANT Do not use inner tubes with tubeless tyres.
Check the inflation pressure of the tyres and the space-
saving wheel periodically.CHANGING A BULB
GENERAL INSTRUCTIONS
❍Before changing a bulb, check the contacts for rust-
ing;
❍burnt-out bulbs must be replaced by others of the
same type and wattage;
❍always check the alignment of the beam after chang-
ing a headlight bulb;
❍when a light is not working, check that the corre-
sponding fuse is intact before changing a bulb. For the
location of fuses, refer to the paragraph “Replacing
fuses” in this chapter.
Modifications or repairs to the electric sys-
tem that are not carried out properly or do
not take the system technical specifications
into account can cause malfunctions leading to the
risk of fire.
Various fastening bolts and space-saver
wheels, specific and differing in structural
characteristics, are used depending on the
wheel rim type (alloy or steel). Fastening bolts for
alloy rims can be identified by the presence of a per-
manent washer and a hollow side on the bolt head.
Therefore, you will need to go to a Lancia Dealer-
ship to get the correct type of fastening bolts and
space saver wheel if you change the type of wheels
fitted (alloy rims instead of steel rims, or vice
versa). Keep the bolts fitted as standard in case of
re-use of the wheels originally mounted on the car.
Page 222 of 290

IN AN EMERGENCY221
4
Battery fluid is poisonous and corrosive:
avoid contact with your skin and eyes. The
battery recharging operation must be per-
formed in a ventilated place, away from naked
flames or possible sources of sparks to avoid the
risk of explosion and fire.
Don’t try to recharge a frozen battery: If the
battery was frozen, have it inspected by
skilled personnel before recharging to check
that the internal elements are not damaged and that
the casing is not cracked, which causes the risk of
leakage of poisonous, corrosive acid.
JACKING THE CAR
If the car is to be lifted, go to a Lancia Dealership which
is equipped with the arm hoist or workshop lift.
TOWING THE CAR
The tow ring, which is provided with the car, is housed
in the tool box, under the boot mat.
FASTENING THE TOW RING fig. 44-45
Proceed as follows:
❍release cap A;
❍take the tow ring B from its housing in the tool sup-
port;
❍screw the ring onto the rear or front threaded pin.
fig. 44L0E0090m
❍connect the positive cable to the positive battery ter-
minal E and the negative terminal to the sensor D as
shown in the figure;
❍turn on the charger. Turn the device off after recharg-
ing;
❍after having disconnected the recharging device, re-
connect the connector A to the sensor C as shown in
the figure.