lights Lancia Thema 2012 Owner handbook (in English)
[x] Cancel search | Manufacturer: LANCIA, Model Year: 2012, Model line: Thema, Model: Lancia Thema 2012Pages: 316, PDF Size: 3.85 MB
Page 141 of 316

NOTE:
If snow, ice, mud, or any foreign
substance builds up on the camera
lens, clean the lens, rinse with wa-
ter, and dry with a soft cloth. Do
not cover the lens.
TURNING PARKVIEW® ON
OR OFF — WITH TOUCH
SCREEN RADIO
1. Turn the Radio on.
2. Press the “More” soft-key.
3. Press the “Settings” soft-key.
4. Press the “Safety & Driving Assis-
tance” soft-key.
5. Press the check box soft key next to
“Parkview® Backup Camera” to
enable/disable.
OVERHEAD CONSOLE
The overhead console contains
courtesy/reading lights and storage
for sunglasses. Power sunroof
switches may also be included, (for
versions/markets, where provided).FRONT MAP/READING
LIGHTS
Lights are mounted in the overhead
console. Each light can be turned on
by pressing the switch on either side of
the console. These buttons are backlit
for night time visibility.
To turn the lights off, press the switch
a second time. The lights also turn on
when a door is opened. The lights will
also turn on when the UNLOCK but-
ton on the RKE is pressed.
SUNGLASS BIN DOOR
At the front of the console a compart-
ment is provided for the storage of a
pair of sunglasses. The storage com-
partment access is a “push/push” de-
sign. Push the chrome pad on the door
to open. Push the chrome pad on the
door to close.
Overhead Console
Front Map/Reading Lights
Sunglass Bin Door
135
Page 147 of 316

WARNING!
Do not place ashes inside the cubby
bin located on the center console on
vehicle's not equipped with the ash
receiver tray. A fire leading to bodily
injury could result.
The center console outlet is powered
directly from the battery (power
available at all times). Items plugged
into this outlet may discharge the bat-
tery and/or prevent the engine from
starting.
There is also a 12 volt power outlet
located on the back of the center con-
sole for rear passengers. This power
outlet has power available only when
the ignition is placed in the ACC or
RUN position.
WARNING!
To avoid serious injury or death:
Only devices designed for use in this type of outlet should be in-
serted into any 12 Volt outlet.
Do not touch with wet hands.
Close the lid when not in use and
while driving the vehicle.
If this outlet is mishandled, it may
cause an electric shock and fail-
ure.CAUTION!
Many accessories that can beplugged in draw power from the
vehicle's battery even when not in
use (i.e., cellular phones, etc.).
Eventually, if plugged in long
enough, the vehicle's battery will
discharge sufficiently to degrade
battery life and/or prevent the en-
gine from starting.
Accessories that draw higher
power (i.e., coolers, vacuum
cleaners, lights, etc.) will degrade
the battery even more quickly.
Only use these intermittently and
with greater caution.
(Continued)
Center Console Power Outlet
Rear Center Console Power Outlet
Power Outlet Fuse Locations
1 — #12 Fuse 20 A Yellow Cigar
Lighter Instrument Panel And
Power Outlet Console Rear
2 — #38 Fuse 20 A Yellow Power
Outlet Inside Arm Rest
141
Page 149 of 316

Lighted Cupholders (for
versions/markets, where
provided)
On some vehicles the rear cupholders
are equipped with a light ring that
illuminates the cupholders for the
rear passengers. The light ring iscon-
trolled by the Dimmer Control. Refer
to “Lights” in “Understanding The
Features Of Your Vehicle” for further
information. STORAGE
GLOVEBOX STORAGE
The glovebox storage compartment is
located on the passenger side of the
instrument panel.
CONSOLE FEATURES
There is a cubby bin located forward
of the shift lever. The cubby bin is
covered with a push-push actuated
door. Push inward on the door to open
it, push the door a second time to close
it.
Two separate storage compartments
are also located underneath the center
console armrest.
Inside the center console armrest,
there is a removable upper storage
tray that can be slid forward/
rearward on rails for access to the
lower storage area. This tray has an
integrated coin holder, along with ad-
ditional area for small items like an
ipod or phone. Below the upper tray,
the lower storage compartment is
made for larger items, like CDs and
Rear Seat Cupholders
Light Ring In Rear Cupholder
Glovebox Storage Compartment
Opened Glovebox Storage
Compartment
Center Console
143
Page 160 of 316

INSTRUMENT CLUSTER
DESCRIPTIONS
1. TachometerThis gauge measures engine
revolutions-per-minute (RPM x 1000).2. Park/Headlight ON Indicator
(for versions/markets, where
provided)This indicator will illumi-
nate when the park lights or
headlights are turned on.
3. Turn Signal Indicators The arrow will flash with
the exterior turn signal
when the turn signal lever is
operated.
If the vehicle electronics sense that the
vehicle is driven more than 1.6 km
with either turn signal on, a continu-
ous chime will sound to alert you to
turn the signals off. If either indicator
flashes at a rapid rate, check for a
defective outside light bulb. 4. Front Fog Light Indicator (for
versions/markets, where provided)
This indicator will illuminate
when the front fog lights are on.
5. Rear Fog Light Indicator (for
versions/markets, where provided)
This indicator will illuminate
when the rear fog lights are on.
6. High Beam Indicator
This indicator shows that the
high beam headlights are on.
Push the multifunction lever
forward to switch the headlights to
high beam, and pull toward yourself
(normal position) to return to low
beam.
7. Odometer Display / Electronic
Vehicle Information Center (EVIC)
Display
Odometer Display
The odometer display shows the total
distance the vehicle has been driven. Electronic Vehicle Information
Center (EVIC) Display
The Electronic Vehicle Information
Center (EVIC) features a driver-
interactive display that is located in
the instrument cluster. For further in-
formation, refer to “Electronic Ve-
hicle Information Center (EVIC)”.
The Shift Lever Indicator is self-
contained within the EVIC display. It
displays the gear position of the auto-
matic transmission.
NOTE:
You must apply the brakes be-
fore shifting from PARK.
The highest available transmis-
sion gear is displayed in the
lower right corner of the Elec-
tronic Vehicle Information Cen-
ter (EVIC) whenever the Elec-
tronic Range Select (ERS)
feature is active. Use the +/- se-
lector on the shift lever to acti-
vate ERS. Refer to “Automatic
Transmission” in “Starting And
Operating” for further informa-
tion.
154
Page 167 of 316

sages of this type are then stored (as
long as the condition that activated
it remains active) and can be re-
viewed from the "Messages" main
menu item. As long as there is a
stored message, an "i" will be dis-
played in theEVIC's compass/
outside temp line. Examples of this
message type are "Right Front Turn
Signal Lamp Out" and "Low Tire
Pressure".
Unstored Messages
This message type is displayed indefi-
nitely or until the condition that acti-
vated the message is cleared. Ex-
amples of this message type are "Turn
Signal On" (if a turn signal is left on)
and "Lights On" (if driver leaves the
vehicle).
Unstored Messages Until RUN
This message type is displayed until
the ignition is in the RUN state. An
example of this message type is "Press
Brake Pedal and Push Button to
Start". Five Second Unstored Messages
When the appropriate conditions oc-
cur, this type of message takes control
of the main display area for five sec-
onds and then returns to the previous
screen. Examples of this message type
are "Memory System Unavailable -
Not in Park" and "Automatic High
Beams On".
The Reconfigurable Telltales section
is divided into the white telltales area
on the right, amber telltales in the
middle, and red telltales on the left.
EVIC WHITE TELLTALES
This area will show reconfigurable
white caution telltales. These telltales
include:
Shift Lever Status — Diesel Only
The selected AutoStick gear is dis-
played as D1, D2, D3, D4, D5 and
indicate the Electronic Range Select
(ERS) feature has been engaged and
the gear selected is displayed. For fur-
ther information on Autostick, refer
to “Starting And Operating”. Electronic Speed Control ON
This telltale will illuminate
when the electronic speed
control is ON. For further
information, refer to “Elec-
tronic Speed Control” in “Under-
standing The Features Of Your Ve-
hicle.”
Electronic Speed Control SET This telltale will illuminate
when the electronic speed
control is SET. For further
information, refer to “Elec-
tronic Speed Control” in “Under-
standing The Features Of Your Ve-
hicle.”
Adaptive Cruise Control (ACC) ON This telltale will illuminate
when the ACC is ON. For
further information, refer
to “Adaptive Cruise Control
(ACC)” in “Understanding The Fea-
tures Of Your Vehicle.”
161
Page 174 of 316
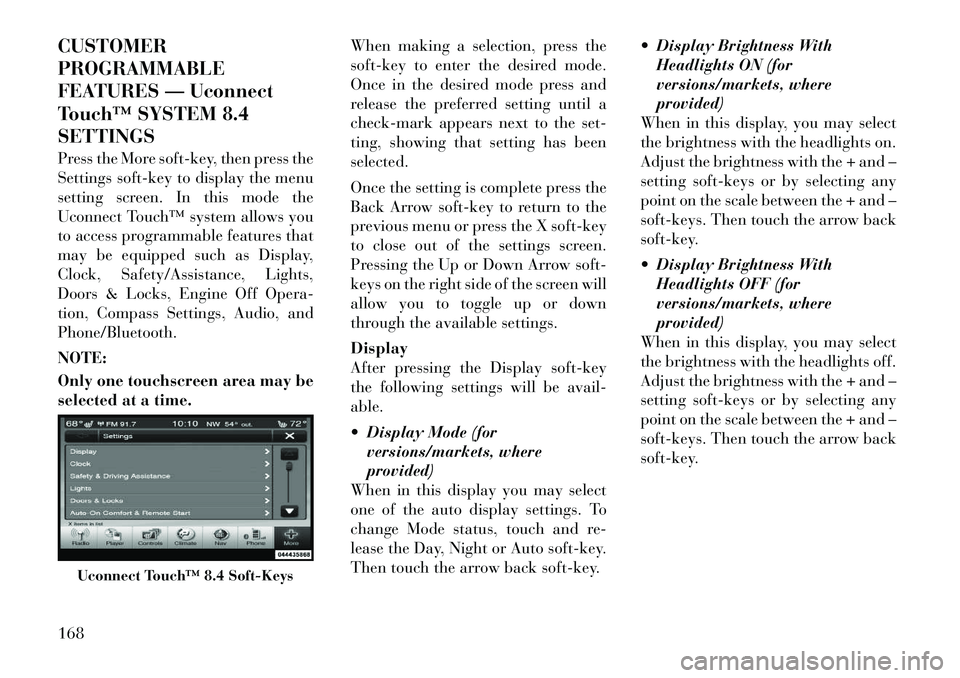
CUSTOMER
PROGRAMMABLE
FEATURES — Uconnect
Touch™ SYSTEM 8.4
SETTINGS
Press the More soft-key, then press the
Settings soft-key to display the menu
setting screen. In this mode the
Uconnect Touch™ system allows you
to access programmable features that
may be equipped such as Display,
Clock, Safety/Assistance, Lights,
Doors & Locks, Engine Off Opera-
tion, Compass Settings, Audio, and
Phone/Bluetooth.
NOTE:
Only one touchscreen area may be
selected at a time.When making a selection, press the
soft-key to enter the desired mode.
Once in the desired mode press and
release the preferred setting until a
check-mark appears next to the set-
ting, showing that setting has been
selected.
Once the setting is complete press the
Back Arrow soft-key to return to the
previous menu or press the X soft-key
to close out of the settings screen.
Pressing the Up or Down Arrow soft-
keys on the right side of the screen will
allow you to toggle up or down
through the available settings.
Display
After pressing the Display soft-key
the following settings will be avail-
able.
Display Mode (for
versions/markets, where
provided)
When in this display you may select
one of the auto display settings. To
change Mode status, touch and re-
lease the Day, Night or Auto soft-key.
Then touch the arrow back soft-key. Display Brightness With
Headlights ON (for
versions/markets, where
provided)
When in this display, you may select
the brightness with the headlights on.
Adjust the brightness with the + and –
setting soft-keys or by selecting any
point on the scale between the + and –
soft-keys. Then touch the arrow back
soft-key.
Display Brightness With Headlights OFF (for
versions/markets, where
provided)
When in this display, you may select
the brightness with the headlights off.
Adjust the brightness with the + and –
setting soft-keys or by selecting any
point on the scale between the + and –
soft-keys. Then touch the arrow back
soft-key.
Uconnect Touch™ 8.4 Soft-Keys
168
Page 177 of 316
warns you of a possible collision when
you are much closer to the vehicle in
front of you. This allows for a more
dynamic driving experience. To
change the FCW status, touch and
release the OFF, Near or Far button.
Then touch the arrow back soft-key.
For further information, refer to
“Adaptive Cruise Control (ACC)” in
“Understanding The Features Of
Your Vehicle”.
Park Assist (for versions/markets, where provided)
The Rear Park Assist system will scan
for objects behind the vehicle when
the transmission shift lever is in RE-
VERSE and the vehicle speed is less
than 11 mph (18 km/h). The system
can be enabled with Sound Only,
Sound and Display, or turned OFF. To
change the Park Assist status, touch
and release the OFF, Sound Only or
Sounds and Display button. Then
touch the arrow back soft-key. Refer
to “ParkSense® Rear Park Assist” in
“Understanding The Features Of
Your Vehicle” for system function and
operating information. Tilt Mirrors In Reverse (for
versions/markets, where
provided)
When this feature is selected, the out-
side sideview mirrors will tilt down-
ward when the ignition is in the RUN
position and the transmission shift le-
ver is in the REVERSE position. The
mirrors will move back to their previ-
ous position when the transmission is
shifted out of REVERSE. To make
your selection, touch the Tilt Mirrors
In Reverse soft-key, until a check-
mark appears next to setting, showing
that setting has been selected. Touch
the back arrow soft-key to return to
the previous menu.
Blind Spot Alert (for versions/markets, where
provided)
When this feature is selected, the
Blind Spot Alert feature can be set to
Off, Lights or Lights and Chime. The
Blind Spot Alert feature can be acti-
vated in “Lights” mode. When this
mode is selected, the Blind Spot Moni-
tor (BSM) system is activated and will
only show a visual alert in the outside
mirrors. When “Lights & Chime” mode is activated, the Blind Spot
Monitor (BSM) will show a visual
alert in the outside mirrors as well as
an audible alert when the turn signal
is on. When “Off” is selected, the
Blind Spot Monitor (BSM) system is
deactivated. To change the Blind Spot
Alert status, touch the Off, Lights or
Lights & Chime soft-key. Then touch
the arrow back soft-key.
NOTE:
If your vehicle has experienced
any damage in the area where the
sensor is located, even if the fascia
is not damaged, the sensor may
have become misaligned. Take
your vehicle to an authorized
dealer to verify sensor alignment.
Having a sensor that is misaligned
will result in the BSM not operat-
ing to specification.
171
Page 178 of 316
ParkView® Backup Camera (forversions/markets, where
provided)
Your vehicle may be equipped with
the ParkView® Rear Back Up Cam-
era that allows you to see an on-screen
image of the rear surroundings of
your vehicle whenever the shift lever
is put into REVERSE. The image will
be displayed on the radio touchscreen
display along with a caution note to
“check entire surroundings” across
the top of the screen. After five sec-
onds, this note will disappear. The
ParkView® camera is located on the
rear of the vehicle above the rear Li-
cense plate. To make your selection,
touch the ParkView® Backup Cam-
era soft-key, until a check-mark ap-
pears next to setting, showing that
setting has been selected. Touch the
back arrow soft-key to return to the
previous menu. Rain Sensing Auto Wipers (for
versions/markets, where
provided)
When this feature is selected, the sys-
tem will automatically activate the
windshield wipers if it senses moisture
on the windshield. To make your se-
lection, touch the Rain Sensing soft-
key, until a check-mark appears next
to setting, showing that setting has
been selected. Touch the back arrow
soft-key to return to the previous
menu.
Hill Start Assist (for
versions/markets, where
provided)
When this feature is selected, the Hill
Start Assist (HSA) system is active.
Refer to “Electronic Brake Control
System” in “Starting And Operating”
for system function and operating in-
formation. To make your selection,
touch the Hill Start Assist soft-key,
until a check-mark appears next to
setting, showing that setting has been
selected. Touch the back arrow soft-
key to return to the previous menu. Lights
After pressing the Lights soft-key the
following settings will be available.
Headlight Off Delay (for
versions/markets, where
provided)
When this feature is selected, the
driver can choose to have the head-
lights remain on for 0, 30, 60, or
90 seconds when exiting the vehicle.
To change the Headlight Off Delay
status touch the 0, 30, 60 or 90 soft-
key. Then touch the arrow back soft-
key.
Headlight Illumination On Approach (for versions/markets,
where provided)
When this feature is selected, the
headlights will activate and remain on
for 0, 30, 60, or 90 seconds when the
doors are unlocked with the Remote
Keyless Entry (RKE) transmitter. To
change the Illuminated Approach sta-
tus, touch the + or - soft-key to select
your desired time interval. Touch the
back arrow soft-key to return to the
previous menu.
172
Page 179 of 316
Headlights With Wipers (forversions/markets, where
provided)
When this feature is selected, and the
headlight switch is in the AUTO posi-
tion, the headlights will turn on ap-
proximately 10 seconds after the wip-
ers are turned on. The headlights will
also turn off when the wipers are
turned off if they were turned on by
this feature. To make your selection,
touch the Headlights With Wipers
soft-key, until a check-mark appears
next to setting, showing that setting
has been selected. Touch the back ar-
row soft-key to return to the previous
menu.
Auto Dim High Beams “SmartBeam™” (for
versions/markets, where
provided)
When this feature is selected, the high
beam headlights will deactivate auto-
matically under certain conditions. To
make your selection, touch the Auto
High Beams soft-key, until a check-
mark appears next to setting, showing
that setting has been selected. Touch
the back arrow soft-key to return to the previous menu. Refer to “Lights/
SmartBeam™ (for versions/markets,
where provided)” in “Understanding
The Features Of Your Vehicle” for
further information.
Daytime Running Lights (for
versions/markets, where
provided)
When this feature is selected, the
headlights will turn on whenever the
engine is running. To make your se-
lection, touch the Daytime Running
Lights soft-key, until a check-mark
appears next to setting, showing that
setting has been selected. Touch the
back arrow soft-key to return to the
previous menu.
Steering Directed Lights (for versions/markets, where
provided)
When this feature is selected, the
headlights turn relative to a change in
direction of the steering wheel. To
make your selection, touch the Steer-
ing Directed Lights soft-key, until a
check-mark appears next to setting,
showing that setting has been se-
lected. Touch the back arrow soft-key
to return to the previous menu. Doors & Locks
After pressing the Doors & Locks soft-
key the following settings will be
available.
Auto Unlock On Exit (for
versions/markets, where
provided)
When this feature is selected, all doors
will unlock when the vehicle is
stopped and the transmission is in the
PARK or NEUTRAL position and the
driver's door is opened. To make your
selection, touch the Auto Unlock On
Exit soft-key, until a check-mark ap-
pears next to setting, showing that
setting has been selected. Touch the
back arrow soft-key to return to the
previous menu.
1st Press Of Key Fob Unlocks (for versions/markets, where
provided)
When 1st Press Of Key Fob Unlocks is
selected, only the driver's door will
unlock on the first press of the Remote
Keyless Entry (RKE) transmitter UN-
LOCK button. When 1st Press Of Key
Fob Unlocks is selected, you must
press the RKE transmitter UNLOCK
button twice to unlock the passenger's
173
Page 181 of 316
Engine Off Power Delay (forversions/markets, where
provided)
When this feature is selected, the
power window switches, radio,
Uconnect™ phone system (for
versions/markets, where provided),
DVD video system (for versions/
markets, where provided), power
sunroof (for versions/markets, where
provided), and power outlets will re-
main active for up to 10 minutes after
the ignition is cycled to OFF. Opening
either front door will cancel this fea-
ture. To change the Engine Off Power
Delay status touch the 0 seconds,
45 seconds, 5 minutes or 10 minutes
soft-key. Then touch the arrow back
soft-key. Headlight Off Delay (for
versions/markets, where
provided)
When this feature is selected, the
driver can choose to have the head-
lights remain on for 0, 30, 60, or
90 seconds when exiting the vehicle.
To change the Headlight Off Delay
status touch the + or - soft-key to
select your desired time interval.
Touch the back arrow soft-key to re-
turn to the previous menu.
Compass Settings
After pressing the Compass Settings
soft-key the following settings will be
available.
Variance (for versions/markets, where provided)
Compass Variance is the difference
between Magnetic North and Geo-
graphic North. To compensate for the
differences the variance should be set
for the zone where the vehicle is
driven, per the zone map. Once prop-
erly set, the compass will automati-
cally compensate for the differences,
and provide the most accurate com-
pass heading. NOTE:
Keep magnetic materials away
from the top of the instrument
panel, such as iPod's, Mobile
Phones, Laptops and Radar Detec-
tors. This is where the compass
module is located, and it can cause
interference with the compass sen-
sor, and it may give false readings.
175