fuse Lancia Thema 2012 Owner handbook (in English)
[x] Cancel search | Manufacturer: LANCIA, Model Year: 2012, Model line: Thema, Model: Lancia Thema 2012Pages: 316, PDF Size: 3.85 MB
Page 47 of 316
WARNING!(Continued)
It is dangerous to try to repair any
part of the air bag system your-
self. Be sure to tell anyone who
works on your vehicle that it has
an air bag system.
Do not attempt to modify any part
of your air bag system. The air
bag may inflate accidentally or
may not function properly if
modifications are made. Take
your vehicle to an authorized
dealer for any air bag system ser-
vice. If your seat including your
trim cover and cushion needs to
be serviced in any way (including
removal or loosening/tightening
of seat attachment bolts), take the
vehicle to your authorized dealer.
Only manufacturer approved seat
accessories may be used. If it is
necessary to modify the air bag
system for persons with disabili-
ties, contact your authorized
dealer. Air Bag Warning Light
You will want to have the
air bags ready to inflate for
your protection in a colli-
sion. The Air Bag Warning
Light monitors the internal circuits
and interconnecting wiring associated
with air bag system electrical compo-
nents. While the air bag system is
designed to be maintenance free, if
any of the following occurs, have an
authorized dealer service the air bag
system immediately.
The Air Bag Warning Light does not come on for approximately four
to eight seconds when the ignition
switch is first turned to the ON/
RUN position.
The Air Bag Warning Light remains on after the approximate four to
eight-second interval.
The Air Bag Warning Light comes on intermittently or remains on
while driving.
NOTE:
If the speedometer, tachometer, or
any engine related gauges are not
working, the Occupant Restraint Controller (ORC) may also be dis-
abled. The air bags may not be
ready to inflate for your protec-
tion. Promptly check the fuse
block for blown fuses. Refer to the
label located on the inside of the
fuse block cover for the proper air
bag fuses. See your authorized
dealer if the fuse is good.
EVENT DATA RECORDER
(EDR)
This vehicle is equipped with an event
data recorder (EDR). The main pur-
pose of an EDR is to record, in certain
crash or near crash-like situations,
such as an air bag deployment or hit-
ting a road obstacle, data that will
assist in understanding how a vehi-
cle’s systems performed. The EDR is
designed to record data related to ve-
hicle dynamics and safety systems for
a short period of time, typically
30 seconds or less. The EDR in this
vehicle is designed to record such data
as:
How various systems in your ve-
hicle were operating;
41
Page 146 of 316

dows open, open the front and rear
windows together to minimize the
buffeting. If the buffeting occurs with
the sunroof open, adjust the sunroof
opening to minimize the buffeting or
open any window.
SUNROOF MAINTENANCE
Use only a non-abrasive cleaner and a
soft cloth to clean the glass panel.
IGNITION OFF OPERATION
For vehicles not equipped with the
Electronic Vehicle Information Center
(EVIC), the power sunroof switch will
remain active for 45 seconds after the
ignition switch is turned to the LOCK
position. Opening either front door
will cancel this feature.
NOTE:
For vehicles equipped with theEVIC, the power sunroof switch
will remain active for up to ap-
proximately ten minutes after
the ignition switch is turned to
the LOCK position. Opening ei-
ther front door will cancel this
feature.
The Ignition Off time is pro- grammable using the Uconnect Touch™ System. Refer to
“Uconnect Touch™ Settings” in
“Understanding Your Instru-
ment Panel” for further infor-
mation.
SUNROOF FULLY CLOSED
Press the switch forward and release
to ensure that the sunroof is fully
closed.
ELECTRICAL POWER
OUTLETS
There are three 12 Volt (13 Amp)
electrical power outlets on this ve-
hicle. The power outlets are protected
by a fuse.
Insert cigar lighter or accessory plug
into the power outlets for use to en-
sure proper operation.
CAUTION!
Do not exceed the maximum power of 160 Watts (13 Amps) at
12 Volts. If the 160 Watt
(13 Amp) power rating is ex-
ceeded, the fuse protecting the
system will need to be replaced.
(Continued)
CAUTION!(Continued)
Power outlets are designed for ac-
cessory plugs only. Do not insert
any other object in the power out-
lets as this will damage the outlet
and blow the fuse. Improper use
of the power outlet can cause
damage not covered by your New
Vehicle Limited Warranty.
The front 12 Volt power outlet has
power available only when the igni-
tion is placed in the ACC or RUN
position.
Front Power Outlet
140
Page 147 of 316

WARNING!
Do not place ashes inside the cubby
bin located on the center console on
vehicle's not equipped with the ash
receiver tray. A fire leading to bodily
injury could result.
The center console outlet is powered
directly from the battery (power
available at all times). Items plugged
into this outlet may discharge the bat-
tery and/or prevent the engine from
starting.
There is also a 12 volt power outlet
located on the back of the center con-
sole for rear passengers. This power
outlet has power available only when
the ignition is placed in the ACC or
RUN position.
WARNING!
To avoid serious injury or death:
Only devices designed for use in this type of outlet should be in-
serted into any 12 Volt outlet.
Do not touch with wet hands.
Close the lid when not in use and
while driving the vehicle.
If this outlet is mishandled, it may
cause an electric shock and fail-
ure.CAUTION!
Many accessories that can beplugged in draw power from the
vehicle's battery even when not in
use (i.e., cellular phones, etc.).
Eventually, if plugged in long
enough, the vehicle's battery will
discharge sufficiently to degrade
battery life and/or prevent the en-
gine from starting.
Accessories that draw higher
power (i.e., coolers, vacuum
cleaners, lights, etc.) will degrade
the battery even more quickly.
Only use these intermittently and
with greater caution.
(Continued)
Center Console Power Outlet
Rear Center Console Power Outlet
Power Outlet Fuse Locations
1 — #12 Fuse 20 A Yellow Cigar
Lighter Instrument Panel And
Power Outlet Console Rear
2 — #38 Fuse 20 A Yellow Power
Outlet Inside Arm Rest
141
Page 260 of 316
EXHAUST SYSTEM . . . . . . . . . . . . . . . . . . . . 264
COOLING SYSTEM . . . . . . . . . . . . . . . . . . . . 265
BRAKE SYSTEM . . . . . . . . . . . . . . . . . . . . . . 268
AUTOMATIC TRANSMISSION . . . . . . . . . . . . 270
REAR AXLE . . . . . . . . . . . . . . . . . . . . . . . . . . 271
APPEARANCE CARE AND PROTECTIONFROM CORROSION . . . . . . . . . . . . . . . . . . . . 271
FUSES . . . . . . . . . . . . . . . . . . . . . . . . . . . . . . . . 274 Integrated Power Module . . . . . . . . . . . . . . . . 274
Rear Power Distribution Center . . . . . . . . . . . 276
VEHICLE STORAGE . . . . . . . . . . . . . . . . . . . . . 279
REPLACEMENT BULBS . . . . . . . . . . . . . . . . . . 280
BULB REPLACEMENT . . . . . . . . . . . . . . . . . . . 281 LOW BEAM HEADLAMP, HIGH BEAMHEADLAMP, PARK/TURN LAMP, INNER
PARK LAMP, AND OUTER PARK LAMP . . . . 281
FRONT TURN SIGNAL LAMPS . . . . . . . . . . . 282
REAR TURN SIGNAL AND BACKUP LAMPS . . . . . . . . . . . . . . . . . . . . . . . . . . . . . 282
LICENSE LAMP . . . . . . . . . . . . . . . . . . . . . . . 283
FLUID CAPACITIES . . . . . . . . . . . . . . . . . . . . . . 283
FLUIDS, LUBRICANTS, AND GENUINE PARTS . . . . . . . . . . . . . . . . . . . . . . . . . . . . . . . . 284
ENGINE . . . . . . . . . . . . . . . . . . . . . . . . . . . . . 284
CHASSIS . . . . . . . . . . . . . . . . . . . . . . . . . . . . 285
254
Page 261 of 316
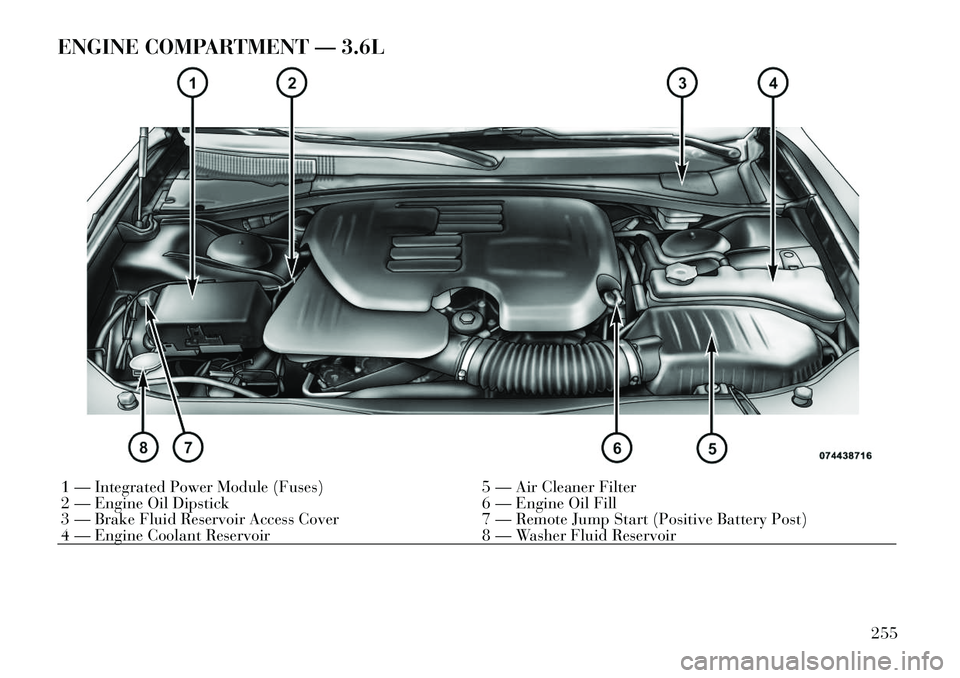
ENGINE COMPARTMENT — 3.6L1 — Integrated Power Module (Fuses)5 — Air Cleaner Filter
2 — Engine Oil Dipstick 6 — Engine Oil Fill
3 — Brake Fluid Reservoir Access Cover 7 — Remote Jump Start (Positive Battery Post)
4 — Engine Coolant Reservoir 8 — Washer Fluid Reservoir
255
Page 262 of 316
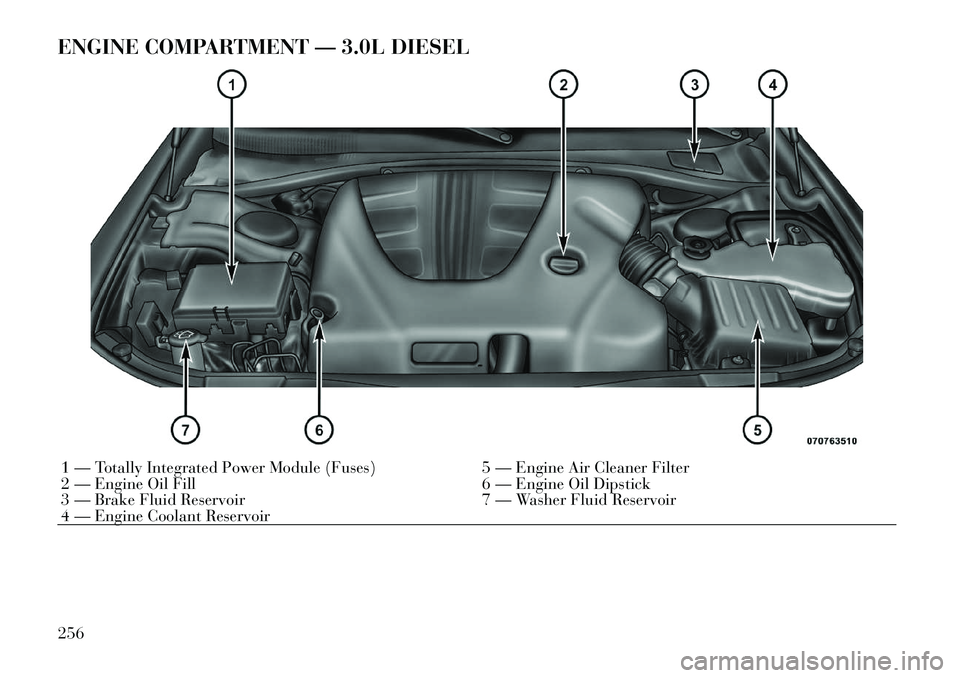
ENGINE COMPARTMENT — 3.0L DIESEL1 — Totally Integrated Power Module (Fuses)5 — Engine Air Cleaner Filter
2 — Engine Oil Fill 6 — Engine Oil Dipstick
3 — Brake Fluid Reservoir 7 — Washer Fluid Reservoir
4 — Engine Coolant Reservoir
256
Page 280 of 316

Seat Belt Maintenance
Do not bleach, dye, or clean the belts
with chemical solvents or abrasive
cleaners. This will weaken the fabric.
Sun damage can also weaken the fab-
ric.
If the belts need cleaning, use a mild
soap solution, or lukewarm water. Do
not remove the belts from the vehicle
to wash them.
Replace the belts if they appear frayed
or worn or if the buckles do not work
properly.
Cleaning The Center Console
Cupholders
Clean with a damp cloth or towel us-
ing a mild detergent with the cup-
holder in the center console.
NOTE:
The cupholder cannot be removed.FUSES
Integrated Power Module
The Integrated Power Module is lo-
cated in the engine compartment.
This module contains fuses and re-
lays.
CAUTION!
When installing the integrated
power module cover, it is impor-
tant to ensure the cover is properly
positioned and fully latched. Fail-
ure to do so may allow water to get
into the integrated power module
and possibly result in an electrical
system failure.
When replacing a blown fuse, it is
important to use only a fuse hav-
ing the correct amperage rating.
The use of a fuse with a rating
other than indicated may result in
a dangerous electrical system
overload. If a properly rated fuse
continues to blow, it indicates a
problem in the circuit that must
be corrected.
Integrated Power Module
274
Page 281 of 316
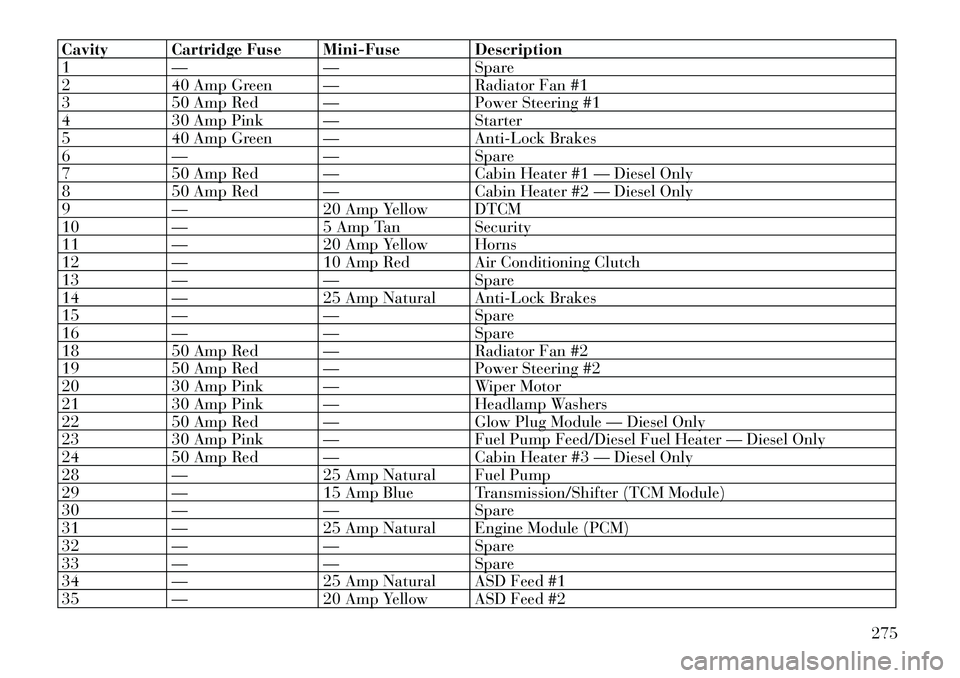
Cavity Cartridge Fuse Mini-Fuse Description
1— —Spare
2 40 Amp Green — Radiator Fan #1
3 50 Amp Red — Power Steering #1
4 30 Amp Pink — Starter
5 40 Amp Green — Anti-Lock Brakes
6 — —Spare
7 50 Amp Red — Cabin Heater #1 — Diesel Only
8 50 Amp Red — Cabin Heater #2 — Diesel Only
9 — 20 Amp Yellow DTCM
10 — 5 Amp Tan Security
11 — 20 Amp Yellow Horns
12 — 10 Amp Red Air Conditioning Clutch
13 — —Spare
14 — 25 Amp Natural Anti-Lock Brakes
15 — —Spare
16 — —Spare
18 50 Amp Red — Radiator Fan #2
19 50 Amp Red — Power Steering #2
20 30 Amp Pink — Wiper Motor
21 30 Amp Pink — Headlamp Washers
22 50 Amp Red — Glow Plug Module — Diesel Only
23 30 Amp Pink — Fuel Pump Feed/Diesel Fuel Heater — Diesel Only
24 50 Amp Red — Cabin Heater #3 — Diesel Only
28 — 25 Amp Natural Fuel Pump
29 — 15 Amp Blue Transmission/Shifter (TCM Module)
30 — —Spare
31 — 25 Amp Natural Engine Module (PCM)
32 — —Spare
33 — —Spare
34 — 25 Amp Natural ASD Feed #1
35 — 20 Amp Yellow ASD Feed #2
275
Page 282 of 316

Cavity Cartridge Fuse Mini-Fuse Description
36— 10 Amp Red Anti-Lock Brake Module (ABS/ESP Module)
37 — 10 Amp Red Engine Controller (PCM)/Rad Fan Relay Coils
38 — 10 Amp Red Airbag Module/Start Feed
39 — 10 Amp Red Power Steering Module/AC Clutch Relay/Cabin Heater Re-
lay Coils — Diesel Only
48 — 10 Amp Red DTCM/Diesel Scr Module — Diesel Only
49 — 15 Amp Blue ASD Feed #3
50 — 15 Amp Blue ASD Feed #4
51 — 20 Amp Yellow Vacuum Pump
52 — —Spare
53 — —Spare
Rear Power Distribution
Center
There is also a power distribution cen-
ter located in the trunk under the
spare tire access panel. This center
contains fuses and relays.
Opening The Access Panel
Rear Power Distribution Center
276
Page 283 of 316

CAUTION!
When installing the power distri-bution center cover, it is impor-
tant to ensure the cover is properly
positioned and fully latched. Fail-
ure to do so may allow water to get
into the power distribution center
and possibly result in an electrical
system failure.
(Continued)
CAUTION!(Continued)
When replacing a blown fuse, it is
important to use only a fuse hav-
ing the correct amperage rating.
The use of a fuse with a rating
other than indicated may result in
a dangerous electrical system
overload. If a properly rated fuse
continues to blow, it indicates a
problem in the circuit that must
be corrected.
Cavity Cartridge Fuse Mini-Fuse Description
2 60 Amp Yellow — Front PDC Feed #1
3 ——Spare
4 60 Amp Yellow — Front PDC Feed #2
5 30 Amp Pink — Sunroof
6 40 Amp Green — Exterior Lighting #1
7 40 Amp Green — Exterior Lighting #2
8 30 Amp Pink — Interior Lighting/Washer Pump
9 30 Amp Pink — Power Locks
10 30 Amp Pink — Driver Door
11 30 Amp Pink — Passenger Door
12 —20 Amp Yellow Selectable Power Outlet #1
15 40 Amp Green — HVAC Blower
16 30 Amp Pink — Power Inverter — 250 Watt
17 ——Spare
18 ——Spare
19 30 Amp Pink — Electric Brake
277