key Lancia Thema 2014 Owner handbook (in English)
[x] Cancel search | Manufacturer: LANCIA, Model Year: 2014, Model line: Thema, Model: Lancia Thema 2014Pages: 332, PDF Size: 3.46 MB
Page 58 of 332
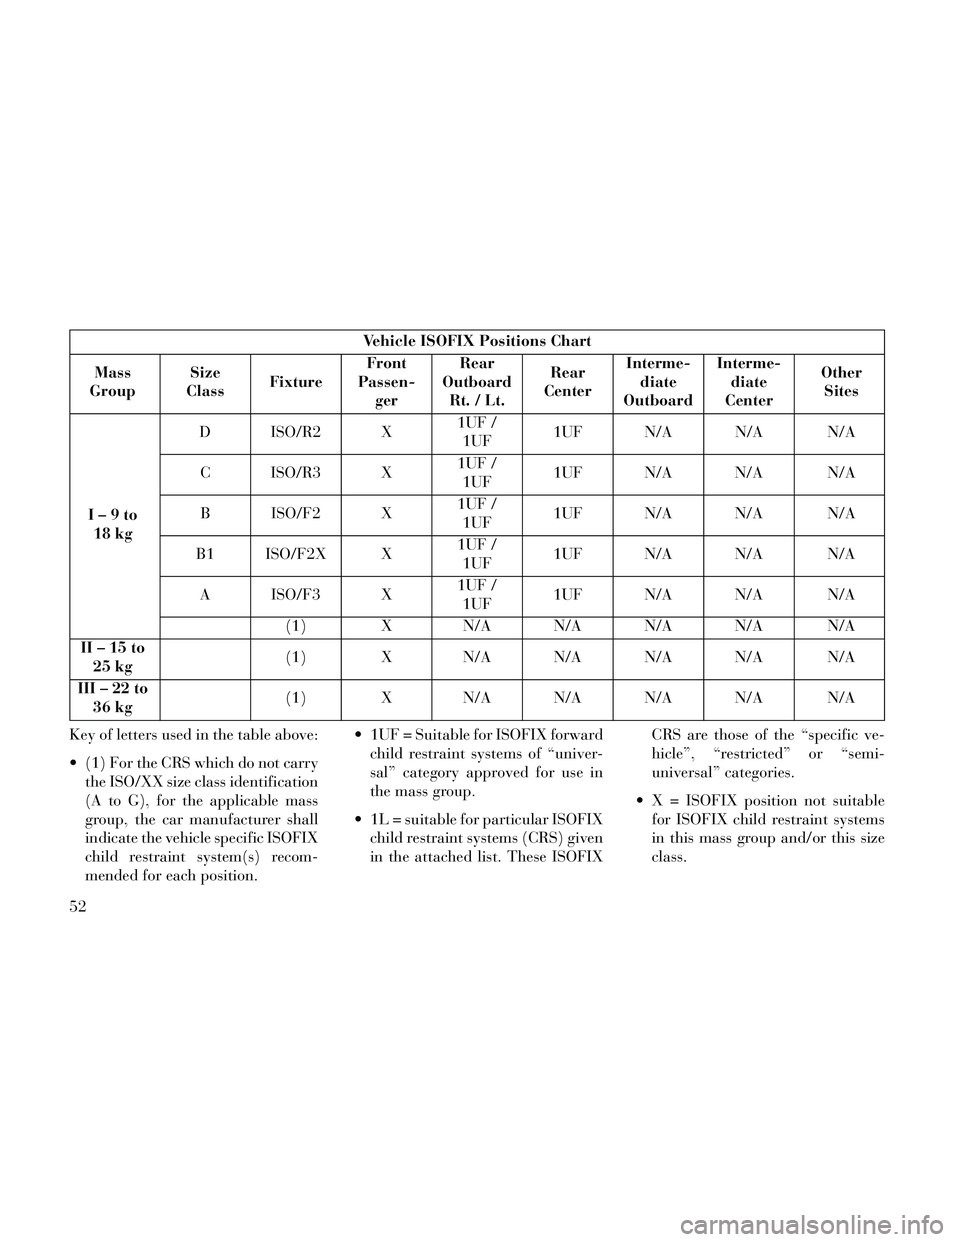
Vehicle ISOFIX Positions Chart
Mass
Group Size
Class Fixture Front
Passen- ger Rear
Outboard Rt./Lt. Rear
Center Interme-
diate
Outboard Interme-
diate
Center Other
Sites
I–9to 18 kg D ISO/R2 X
1UF /
1UF 1UF N/A N/A N/A
C ISO/R3 X 1UF /
1UF 1UF N/A N/A N/A
B ISO/F2 X 1UF /
1UF 1UF N/A N/A N/A
B1 ISO/F2X X 1UF /
1UF 1UF N/A N/A N/A
A ISO/F3 X 1UF /
1UF 1UF N/A N/A N/A
(1) X N/A N/A N/A N/A N/A
II–15to 25 kg (1) X N/A N/A N/A N/A N/A
III–22to 36 kg (1) X N/A N/A N/A N/A N/A
Key of letters used in the table above:
(1) For the CRS which do not carry the ISO/XX size class identification
(A to G), for the applicable mass
group, the car manufacturer shall
indicate the vehicle specific ISOFIX
child restraint system(s) recom-
mended for each position. 1UF = Suitable for ISOFIX forward
child restraint systems of “univer-
sal” category approved for use in
the mass group.
1L = suitable for particular ISOFIX child restraint systems (CRS) given
in the attached list. These ISOFIX CRS are those of the “specific ve-
hicle”, “restricted” or “semi-
universal” categories.
X = ISOFIX position not suitable for ISOFIX child restraint systems
in this mass group and/or this size
class.
52
Page 71 of 332
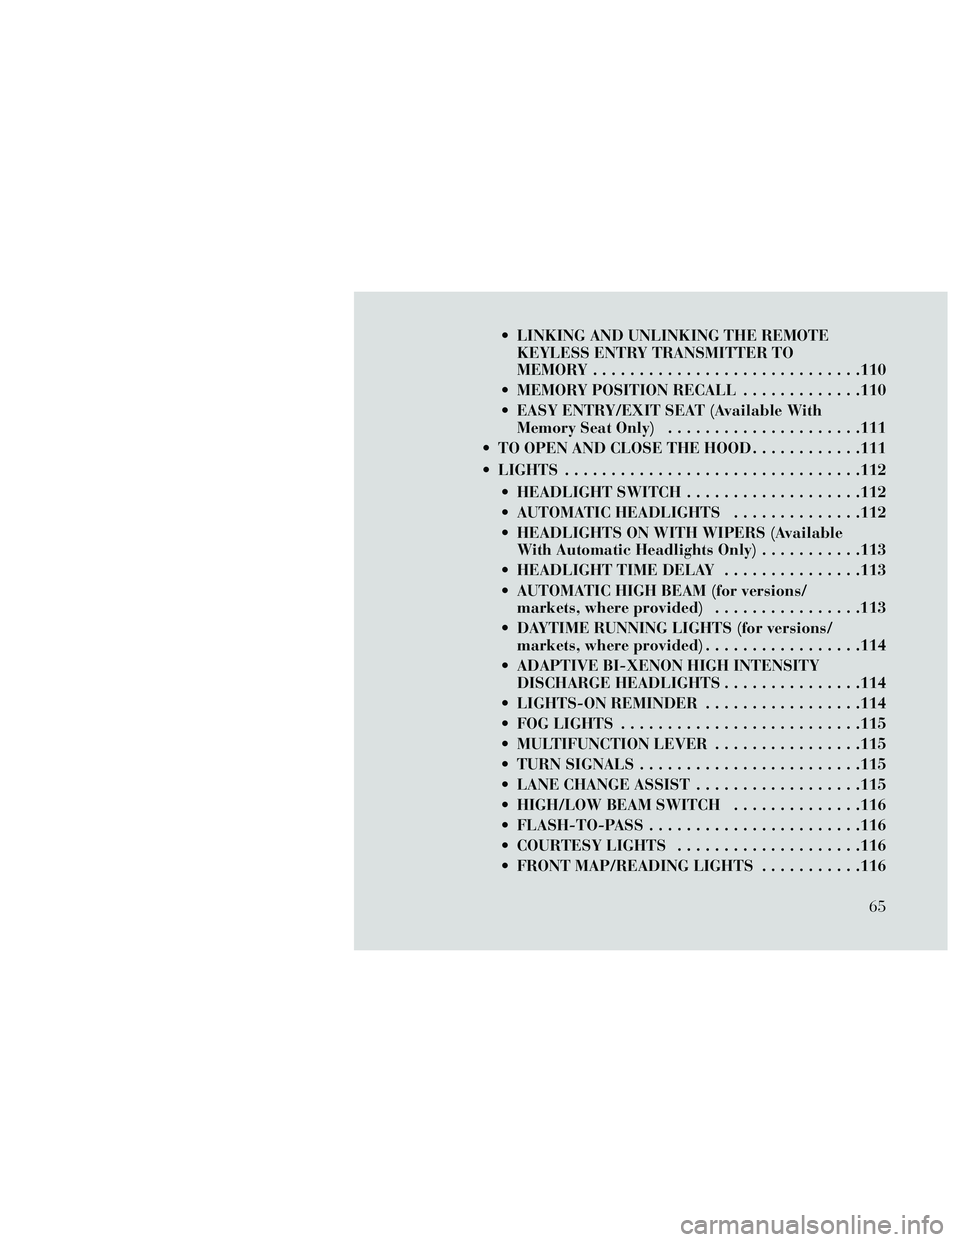
LINKING AND UNLINKING THE REMOTEKEYLESS ENTRY TRANSMITTER TO
MEMORY .............................110
MEMORY POSITION RECALL .............110
EASY ENTRY/EXIT SEAT (Available With Memory Seat Only) .....................111
TO OPEN AND CLOSE THE HOOD ............111
LIGHTS ................................112
HEADLIGHT SWITCH ...................112
AUTOMATIC HEADLIGHTS ..............112
HEADLIGHTS ON WITH WIPERS (Available With Automatic Headlights Only) ...........113
HEADLIGHT TIME DELAY ...............113
AUTOMATIC HIGH BEAM (for versions/ markets, where provided) ................113
DAYTIME RUNNING LIGHTS (for versions/ markets, where provided) .................114
ADAPTIVE BI-XENON HIGH INTENSITY DISCHARGE HEADLIGHTS ...............114
LIGHTS-ON REMINDER .................114
FOG LIGHTS ..........................115
MULTIFUNCTION LEVER ................115
TURN SIGNALS ........................115
LANE CHANGE ASSIST ..................115
HIGH/LOW BEAM SWITCH ..............116
FLASH-TO-PASS.......................116
COURTESY LIGHTS ....................116
FRONT MAP/READING LIGHTS ...........116
65
Page 77 of 332
mirror housing and approach lighting
located within mirror glass contain
five LEDs.
Three of the LEDs are turn signal
indicators, which flash with the corre-
sponding turn signal lights in the
front and rear of the vehicle. Turning
on the Hazard Warning flashers will
also activate these LEDs.
The other two LEDs supply illumi-
nated entry lighting, which turns on
in both mirrors when you use the Re-
mote Keyless Entry (RKE) transmit-
ter or open any door. These LEDs
shine outward to illuminate the front
and rear door handles. They also
shine downward to illuminate the
area in front of the doors.
The Illuminated Entry lighting fades
to off after about 30 seconds or it will
fade to off immediately once the igni-
tion is placed into the RUN position.
NOTE: The approach lighting
will not function when the shift
lever is moved out of the PARK
position.TILT MIRRORS IN
REVERSE (for
versions/markets, where
provided)
Tilt Mirrors in Reverse provides auto-
matic outside mirror positioning
which will aid the driver’s view of the
ground rearward of the front doors.
The outside mirrors will move slightly
downward from the present position
when the vehicle is shifted into RE-
VERSE. The outside mirrors will then
return to the original position when
the vehicle is shifted out of the RE-
VERSE position. Each stored
memory setting will have an associ-
ated Tilt Mirrors in Reverse position.
NOTE:
The Tilt Mirrors in Reverse fea-ture is not turned on when deliv-
ered from the factory. The Tilt
Mirrors in Reverse feature can
be turned on and off using the
Uconnect® System. Refer to “Uconnect® Settings” in
“Understanding Your Instru-
ment Panel” for further
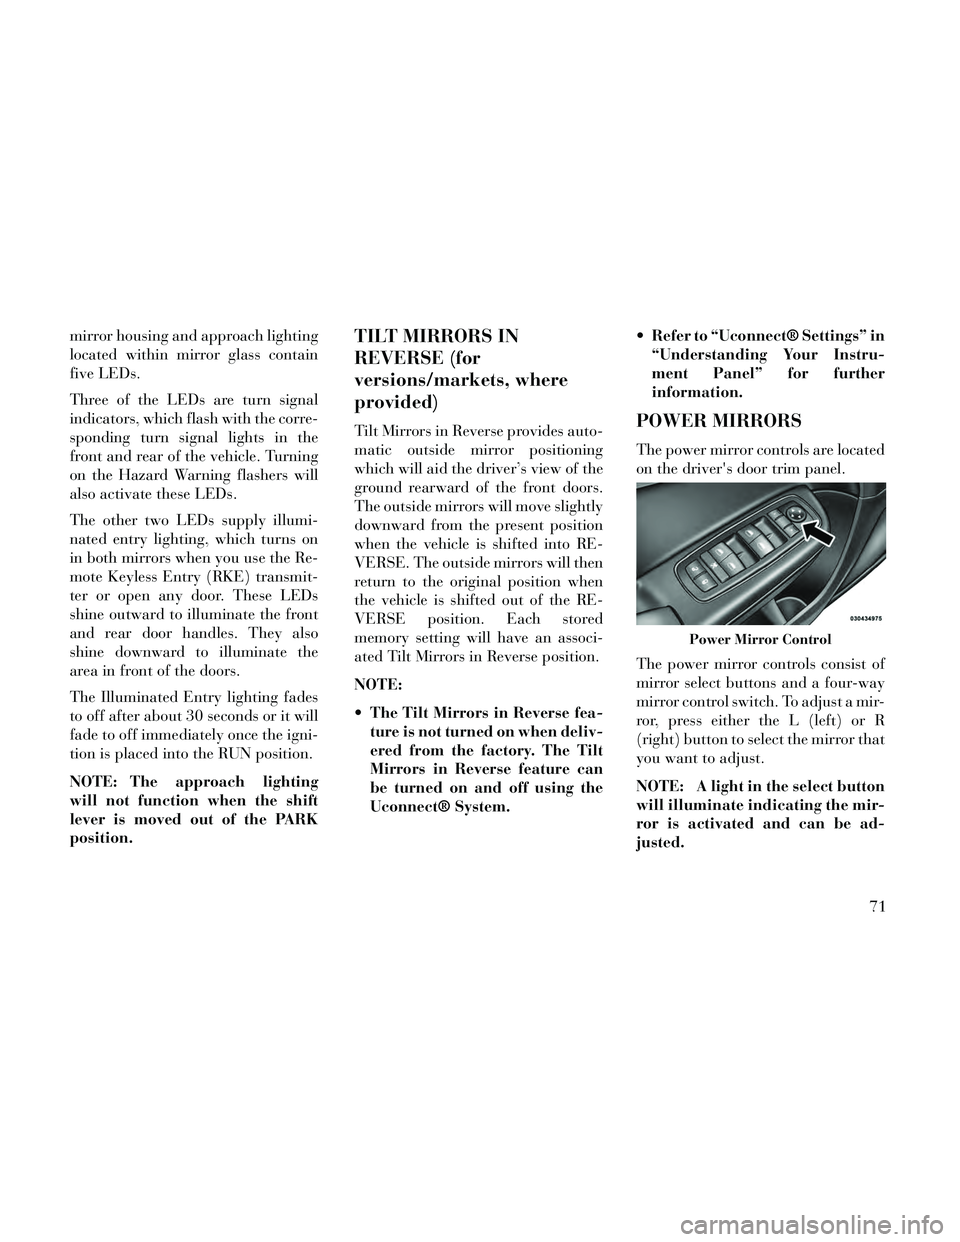
information.POWER MIRRORS
The power mirror controls are located
on the driver's door trim panel.
The power mirror controls consist of
mirror select buttons and a four-way
mirror control switch. To adjust a mir-
ror, press either the L (left) or R
(right) button to select the mirror that
you want to adjust.
NOTE: A light in the select button
will illuminate indicating the mir-
ror is activated and can be ad-
justed.
Power Mirror Control
71
Page 84 of 332
Uconnect® Phone ButtonThe Uconnect® Phone
Button is used to get into
the phone mode and make
calls, show recent, incom-
ing, outgoing calls, view phonebook
etc., When you press the button you
will hear a BEEP. The beep is your
signal to give a command.
Uconnect® Voice Command Button
The Uconnect® Voice Com-
mand
Button is only
used for “barge in” and
when you are already in a
call and you want to send Tones or
make another call.
The
button is also used to access
the Voice Commands for the
Uconnect® Voice Command features
if your vehicle is equipped. Please see
the Uconnect® Voice Command sec-
tion for direction on how to use the
button.
The Uconnect® Phone is fully inte-
grated with the vehicle's audio sys-
tem. The volume of the Uconnect®
Phone can be adjusted either from the radio volume control knob or from the
steering wheel radio control (right
switch), if so equipped.
Voice Activated Features:
Hands Free dialing via Voice (“Call
John Smiths Mobile” or, “Dial 151-
1234 -5555”).
Hands Free text to speech listening of your incoming SMS messages.
Hands Free text messaging (“Send a message to John Smith Mobile”).
Redialing last dialed numbers (“Redial”).
Calling Back the last incoming call number (“Call Back”).
View Call logs on screen (“Show incoming calls,” “Show Outgoing
calls,” “Show missed Calls,” “Show
Recent Calls”).
Searching Contacts phone number (“Search for John Smith Mobile”). Screen Activated Features:
Dialing via Keypad using touch-
screen.
Viewing and Calling contacts from Phonebooks displayed on the
touchscreen.
Setting Favorite Contact Phone numbers so the are easily accessible
on the Main Phone screen.
Viewing and Calling contacts from Recent Call logs.
Reviewing your recent Incoming SMS.
Sending a text message via the touchscreen.
Listen to Music on your Bluetooth® Device via the touchscreen.
Pairing up to 10 phones/audio de- vices for easy access to connect to
them quickly.
78
Page 86 of 332
Help Command
If you need assistance at any prompt,
or if you want to know your options at
any prompt, say “Help” following the
beep.
To activate the Uconnect® Phone
from idle, simply press the
button
on your steering wheel and say a com-
mand or say “help.” All Uconnect®
Phone sessions begin with a press of
the
button on the radio control
head.
Cancel Command
At any prompt, after the beep, you
can say “Cancel” and you will be re-
turned to the main menu.
You can also press the
orbut-
ton on your steering wheel when the
system is listening for a command and
be returned to the main or previous
menu. Pair (Link) Uconnect® Phone To
A Mobile Phone
To begin using your Uconnect®
Phone, you must pair your compat-
ible Bluetooth® enabled mobile
phone.
To complete the pairing process, you
will need to reference your mobile
phone Owner's Manual. The
Uconnect® website may also provide
detailed instructions for pairing.
NOTE:
You must have Bluetooth® en-
abled on your phone to complete
this procedure.
The vehicle must be in PARK.
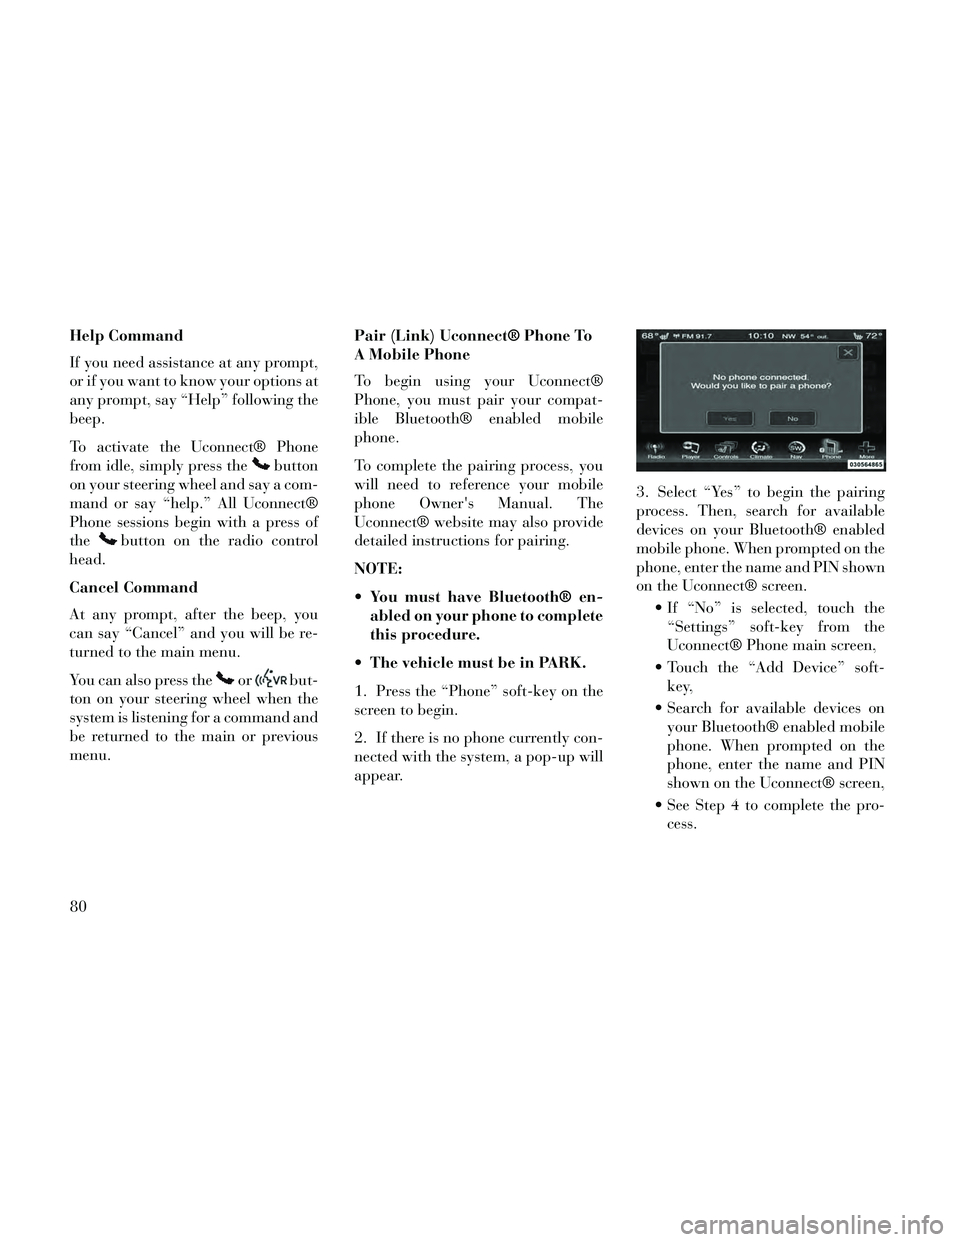
1. Press the “Phone” soft-key on the
screen to begin.
2. If there is no phone currently con-
nected with the system, a pop-up will
appear. 3. Select “Yes” to begin the pairing
process. Then, search for available
devices on your Bluetooth® enabled
mobile phone. When prompted on the
phone, enter the name and PIN shown
on the Uconnect® screen.
If “No” is selected, touch the“Settings” soft-key from the
Uconnect® Phone main screen,
Touch the “Add Device” soft- key,
Search for available devices on your Bluetooth® enabled mobile
phone. When prompted on the
phone, enter the name and PIN
shown on the Uconnect® screen,
See Step 4 to complete the pro- cess.
80
Page 87 of 332
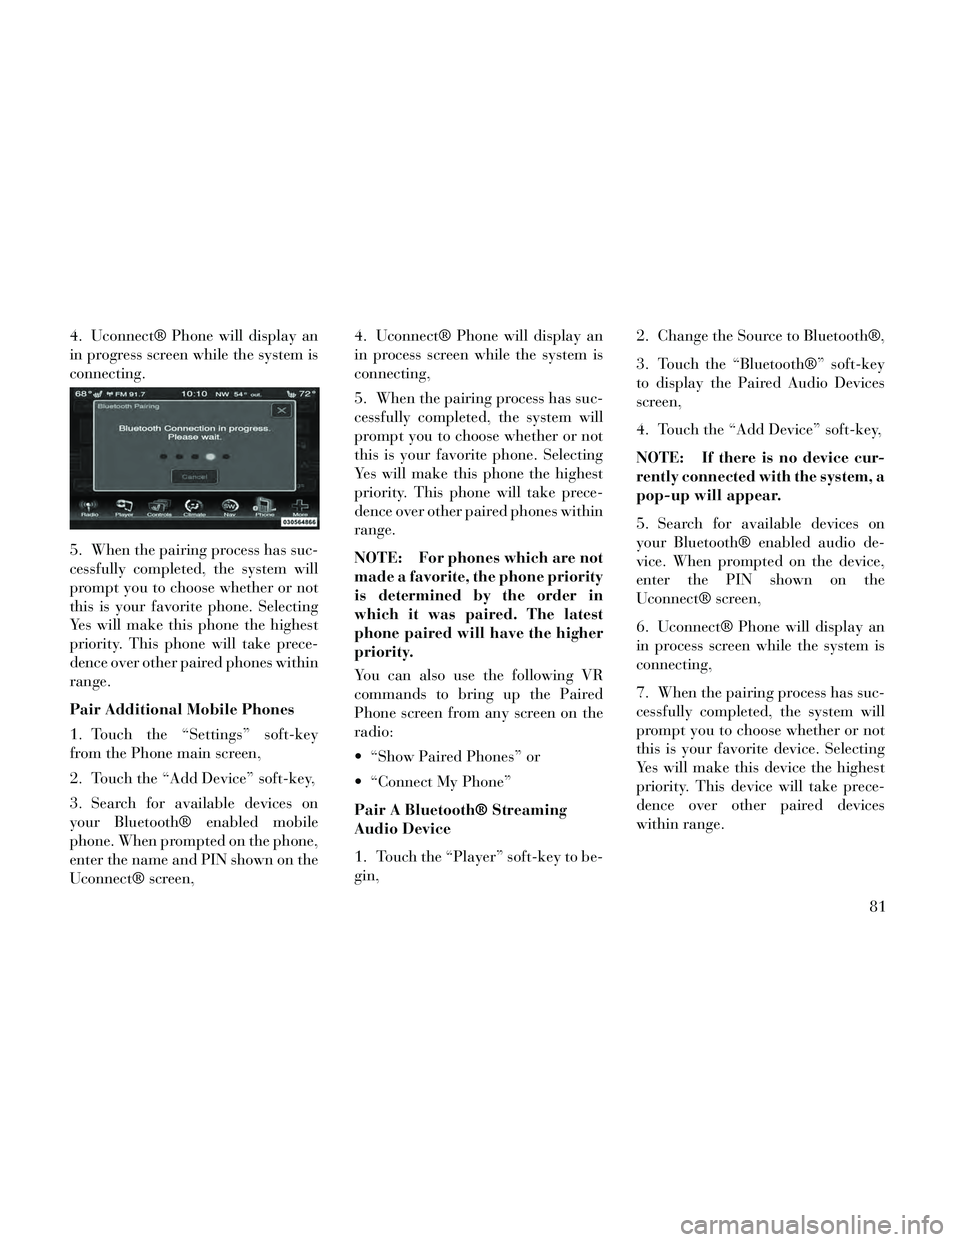
4. Uconnect® Phone will display an
in progress screen while the system is
connecting.
5. When the pairing process has suc-
cessfully completed, the system will
prompt you to choose whether or not
this is your favorite phone. Selecting
Yes will make this phone the highest
priority. This phone will take prece-
dence over other paired phones within
range.
Pair Additional Mobile Phones
1. Touch the “Settings” soft-key
from the Phone main screen,
2. Touch the “Add Device” soft-key,
3. Search for available devices on
your Bluetooth® enabled mobile
phone. When prompted on the phone,
enter the name and PIN shown on the
Uconnect® screen,4. Uconnect® Phone will display an
in process screen while the system is
connecting,
5. When the pairing process has suc-
cessfully completed, the system will
prompt you to choose whether or not
this is your favorite phone. Selecting
Yes will make this phone the highest
priority. This phone will take prece-
dence over other paired phones within
range.
NOTE: For phones which are not
made a favorite, the phone priority
is determined by the order in
which it was paired. The latest
phone paired will have the higher
priority.
You can also use the following VR
commands to bring up the Paired
Phone screen from any screen on the
radio:
“Show Paired Phones” or
“Connect My Phone”
Pair A Bluetooth® Streaming
Audio Device
1. Touch the “Player” soft-key to be-
gin,
2. Change the Source to Bluetooth®,
3. Touch the “Bluetooth®” soft-key
to display the Paired Audio Devices
screen,
4. Touch the “Add Device” soft-key,
NOTE: If there is no device cur-
rently connected with the system, a
pop-up will appear.
5. Search for available devices on
your Bluetooth® enabled audio de-
vice. When prompted on the device,
enter the PIN shown on the
Uconnect® screen,
6. Uconnect® Phone will display an
in process screen while the system is
connecting,
7. When the pairing process has suc-
cessfully completed, the system will
prompt you to choose whether or not
this is your favorite device. Selecting
Yes will make this device the highest
priority. This device will take prece-
dence over other paired devices
within range.
81
Page 88 of 332
NOTE: For devices which are not
made a favorite, the device priority
is determined by the order in
which it was paired. The latest de-
vice paired will have the higher
priority.
You can also use the following VR
command to bring up a list of paired
audio devices:
“Show Paired Phones”
“Connect My Phone”
Connecting To A Particular
Mobile Phone Or Audio Device
After Pairing
Uconnect® Phone will automatically
connect to the highest priority paired
phone and/or Audio Device within
range. If you need to choose a particu-
lar phone or Audio Device follow
these steps:
1. Touch the “Settings” soft-key,
2. Touch the paired phone or audio
device soft-key,
3. Touch to select the particular
Phone or the “Paired Audio Sources”
soft-key and then an Audio Device,4. Touch the X to exit out of the
Settings screen.
Disconnecting A Phone or Audio
Device
1. Touch the “Settings” soft-key,
2. Touch the paired phone or audio
device soft-key,
3. Touch the + soft-key located to the
right of the device name,
4. The options pop-up will be dis-
played,
5. Touch the “Disconnect Device”
soft-key,
6. Touch the X to exit out of the
Settings screen.
Deleting A Phone Or Audio
Device
1. Touch the “Settings” soft-key,
2. Touch the pair phone or audio de-
vice soft-key,
3. Touch the + soft-key located to the
right of the device name for a different
Phone or Audio Device than the cur-
rently connected device,
4. The options pop-up will be dis-
played,
5. Touch the “Delete Device” soft-
key,
6. Touch the X to exit out of the
Settings screen.
Making A Phone Or Audio Device
A Favorite
1. Touch the “Settings” soft-key,
2. Touch the “Phone/Bluetooth®”
soft-key,
3. Touch the + soft-key located to the
right of the device name,
4. The options pop-up will be dis-
played,
5. Touch the “Make Favorite” soft-
key; you will see the chosen device
move to the top of the list,
6. Touch the X to exit out of the
Settings screen.
82
Page 89 of 332
Phonebook Download —
Automatic Phonebook Transfer
From Mobile Phone (for
versions/market, where provided)
If equipped and specifically sup-
ported by your phone, Uconnect®
Phone automatically downloads
names (text names) and number en-
tries from the mobile phone’s phone-
book. Specific Bluetooth® Phones
with Phone Book Access Profile may
support this feature. See Uconnect®
website, www.UconnectPhone.com,
for supported phones.
To call a name from a downloadedmobile phone book, follow the pro-
cedure in the Voice Recognition
Quick Reference section.
Automatic download and update of a phone book, if supported, begins
as soon as the Bluetooth® wireless
phone connection is made to the
Uconnect® Phone, for example, af-
ter you start the vehicle.
A maximum of 1000 entries per phone will be downloaded and up-
dated every time a phone is con-
nected to the Uconnect® Phone. Depending on the maximum num-
ber of entries downloaded, there
may be a short delay before the
latest downloaded names can be
used. Until then, if available, the
previously downloaded phonebook
is available for use.
Only the phonebook of the cur- rently connected mobile phone is
accessible.
This downloaded phonebook can- not be edited or deleted on the
Uconnect® Phone. These can only
be edited on the mobile phone. The
changes are transferred and up-
dated to Uconnect® Phone on the
next phone connection.
Managing Your Favorite
Phonebook
There are three ways you can add an
entry to your Favorite Phonebook.
1. During an active call of a number
to make a favorite, touch and hold a
favorite button on the top of the
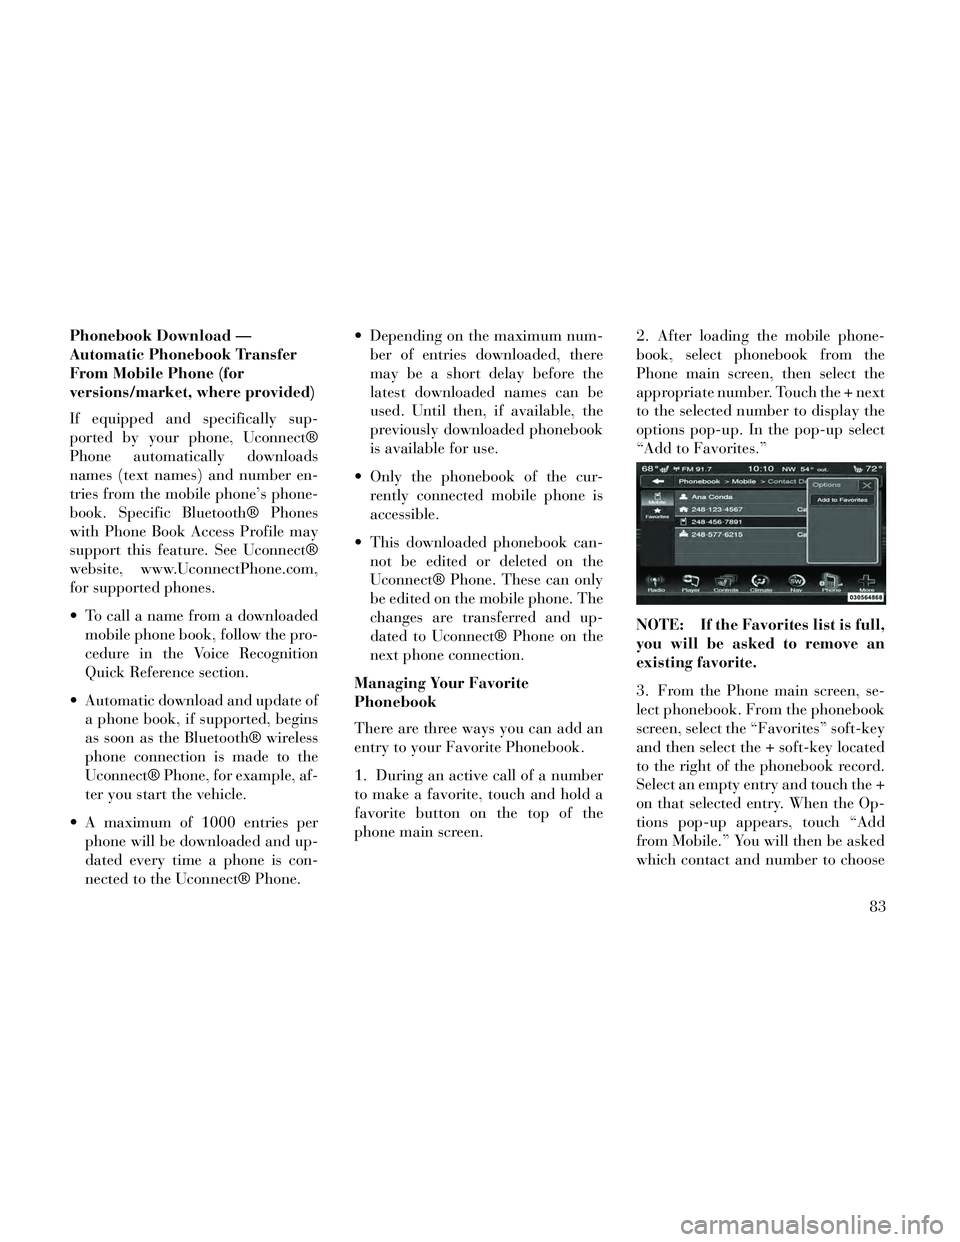
phone main screen. 2. After loading the mobile phone-
book, select phonebook from the
Phone main screen, then select the
appropriate number. Touch the + next
to the selected number to display the
options pop-up. In the pop-up select
“Add to Favorites.”
NOTE: If the Favorites list is full,
you will be asked to remove an
existing favorite.
3. From the Phone main screen, se-
lect phonebook. From the phonebook
screen, select the “Favorites” soft-key
and then select the + soft-key located
to the right of the phonebook record.
Select an empty entry and touch the +
on that selected entry. When the Op-
tions pop-up appears, touch “Add
from Mobile.” You will then be asked
which contact and number to choose
83
Page 90 of 332
from your mobile phonebook. When
complete the new favorite will be
shown.
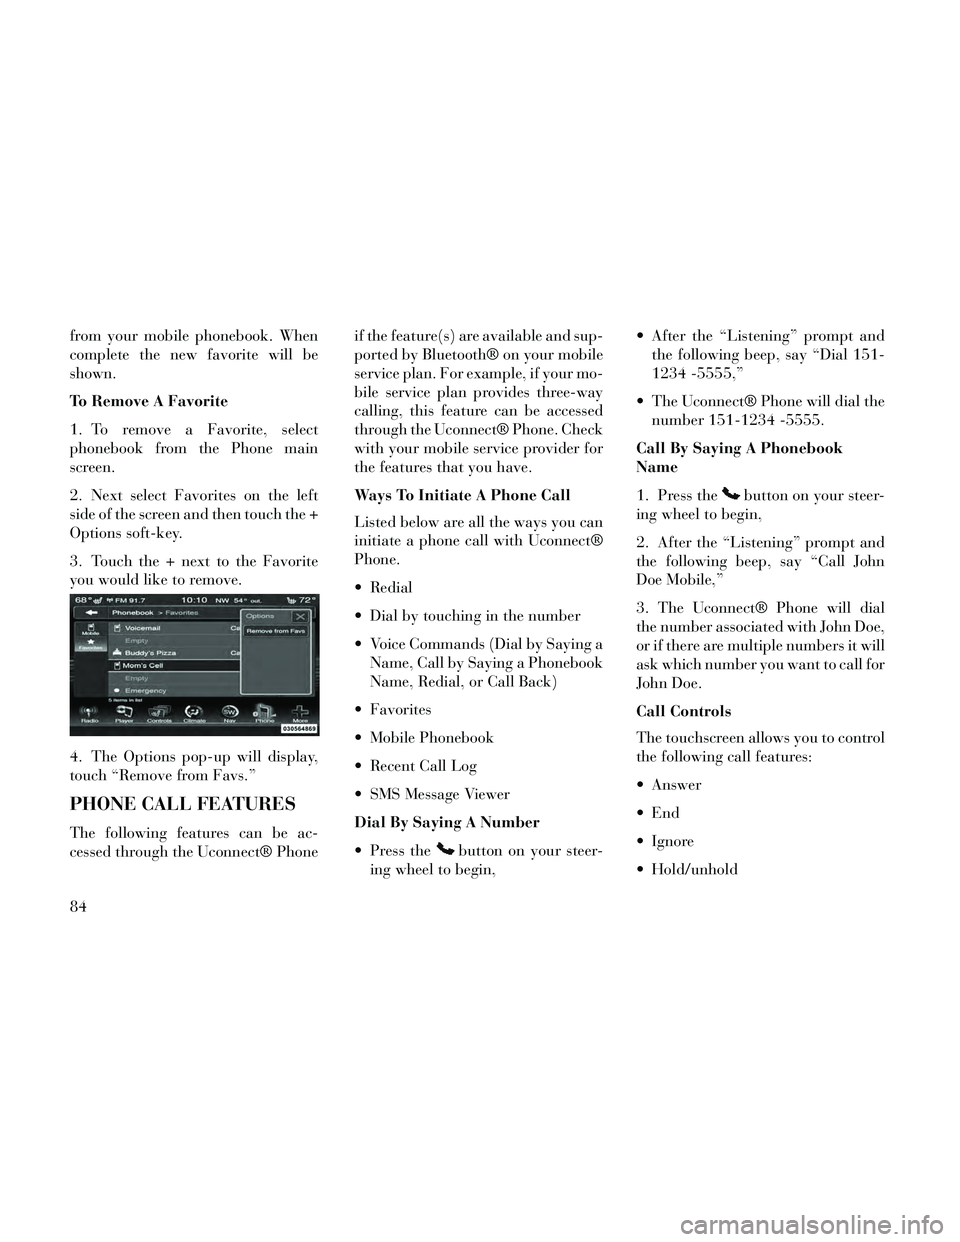
To Remove A Favorite
1. To remove a Favorite, select
phonebook from the Phone main
screen.
2. Next select Favorites on the left
side of the screen and then touch the +
Options soft-key.
3. Touch the + next to the Favorite
you would like to remove.
4. The Options pop-up will display,
touch “Remove from Favs.”
PHONE CALL FEATURES
The following features can be ac-
cessed through the Uconnect® Phoneif the feature(s) are available and sup-
ported by Bluetooth® on your mobile
service plan. For example, if your mo-
bile service plan provides three-way
calling, this feature can be accessed
through the Uconnect® Phone. Check
with your mobile service provider for
the features that you have.
Ways To Initiate A Phone Call
Listed below are all the ways you can
initiate a phone call with Uconnect®
Phone.
Redial
Dial by touching in the number
Voice Commands (Dial by Saying a
Name, Call by Saying a Phonebook
Name, Redial, or Call Back)
Favorites
Mobile Phonebook
Recent Call Log
SMS Message Viewer
Dial By Saying A Number
Press the
button on your steer-
ing wheel to begin, After the “Listening” prompt and
the following beep, say “Dial 151-
1234 -5555,”
The Uconnect® Phone will dial the number 151-1234 -5555.
Call By Saying A Phonebook
Name
1. Press the
button on your steer-
ing wheel to begin,
2. After the “Listening” prompt and
the following beep, say “Call John
Doe Mobile,”
3. The Uconnect® Phone will dial
the number associated with John Doe,
or if there are multiple numbers it will
ask which number you want to call for
John Doe.
Call Controls
The touchscreen allows you to control
the following call features:
Answer
Ignore
Hold/unhold
84
Page 91 of 332
Mute/unmute
Transfer the call to/from the phone
Swap two active calls
Join two active calls together
Touch-Tone Number Entry
1. Touch the “Phone” soft-key,
2. Touch the “Dial” soft-key,
3. The Touch-Tone screen will be dis-
played,
4. Use the numbered soft-keys to en-
ter the number and touch “Call.”
To send a touch tone using Voice Rec-
ognition (VR), press the
button
on your steering wheel while in a call
and say “Send 1234#” or you can say
“Send Voicemail Password” if Voice-
mail password is stored in your mo-
bile phonebook.
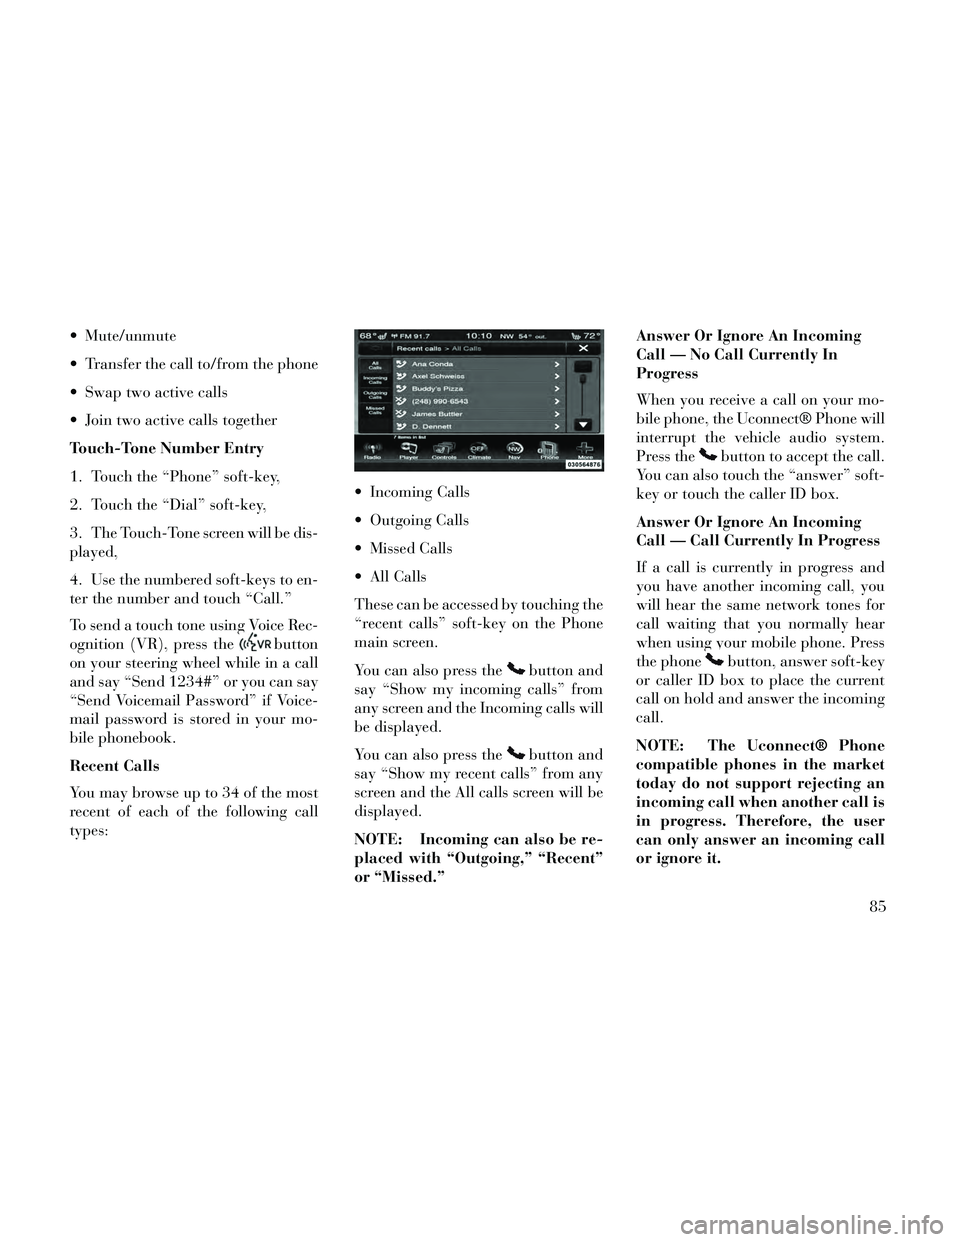
Recent Calls
You may browse up to 34 of the most
recent of each of the following call
types: Incoming Calls
Outgoing Calls
Missed Calls
All Calls
These can be accessed by touching the
“recent calls” soft-key on the Phone
main screen.
You can also press the
button and
say “Show my incoming calls” from
any screen and the Incoming calls will
be displayed.
You can also press the
button and
say “Show my recent calls” from any
screen and the All calls screen will be
displayed.
NOTE: Incoming can also be re-
placed with “Outgoing,” “Recent”
or “Missed.” Answer Or Ignore An Incoming
Call — No Call Currently In
Progress
When you receive a call on your mo-
bile phone, the Uconnect® Phone will
interrupt the vehicle audio system.
Press the
button to accept the call.
You can also touch the “answer” soft-
key or touch the caller ID box.
Answer Or Ignore An Incoming
Call — Call Currently In Progress
If a call is currently in progress and
you have another incoming call, you
will hear the same network tones for
call waiting that you normally hear
when using your mobile phone. Press
the phone
button, answer soft-key
or caller ID box to place the current
call on hold and answer the incoming
call.
NOTE: The Uconnect® Phone
compatible phones in the market
today do not support rejecting an
incoming call when another call is
in progress. Therefore, the user
can only answer an incoming call
or ignore it.
85