alarm Lancia Voyager 2014 Owner handbook (in English)
[x] Cancel search | Manufacturer: LANCIA, Model Year: 2014, Model line: Voyager, Model: Lancia Voyager 2014Pages: 364, PDF Size: 3.49 MB
Page 15 of 364
2
THINGS TO KNOW BEFORE STARTING
YOUR VEHICLE
A WORD ABOUT YOUR KEYS................13
IGNITION NODE MODULE (IGNM) — (for versions/markets where provided) ...........13
KEYFOB ..............................13
REMOVING KEY FOB FROM IGNITION ......14
KEY-IN-IGNITION REMINDER .............14
STEERING WHEEL LOCK — (for versions/markets where provided) ..........................15
TO MANUALLY LOCK THE STEERING WHEEL ...............................15
TO RELEASE THE STEERING WHEEL LOCK . .15
SENTRY KEY® ...........................15
REPLACEMENT KEYS ...................16
CUSTOMER KEY PROGRAMMING ..........16
GENERAL INFORMATION .................16
VEHICLE SECURITY ALARM — (for versions/ markets where provided) ....................16
REARMING OF THE SYSTEM ..............17
TO ARM THE SYSTEM ....................17
TO DISARM THE SYSTEM .................17
ILLUMINATED ENTRY .....................18
9
Page 22 of 364
REPLACEMENT KEYS
NOTE: Only Key Fobs that are
programmed to the vehicle elec-
tronics can be used to start and
operate the vehicle. Once a Key
Fob is programmed to a vehicle, it
cannot be programmed to any
other vehicle.
CAUTION!
Always remove the keys from the
vehicle and lock all doors when
leaving the vehicle unattended.
Duplication of Key Fobs may be per-
formed at an authorized dealer.
NOTE: When having the Sentry
Key® Immobilizer system ser-
viced, bring all vehicle ignition
keys with you to an authorized
dealer.
CUSTOMER KEY
PROGRAMMING
Programming Key Fobs or RKE
transmitters may be performed at an
authorized dealer.
GENERAL INFORMATION
The Sentry Key® operates on a car-
rier frequency of 433.92 MHz. The
Sentry Key® Immobilizer system will
be used in the following European
countries, which apply Directive
1999/5/EC: Austria, Belgium, Czech
Republic, Denmark, Finland, France,
Germany, Greece, Hungary, Ireland,
Italy, Luxembourg, Netherlands, Nor-
way, Poland, Portugal, Romania,
Russian Federation, Slovenia, Croa-
tia, Spain, Sweden, Switzerland, and
United Kingdom.
Operation is subject to the following
conditions:
This device may not cause harmful interference.
This device must accept any inter- ference that may be received, in-
cluding interference that may cause
undesired operation.
VEHICLE SECURITY
ALARM — (for
versions/markets where
provided)
The Vehicle Security Alarm monitors
the vehicle doors, liftgate/power-
liftgate, hood and power sliding doors
for unauthorized entry and the igni-
tion switch for unauthorized opera-
tion. When the alarm is activated, the
interior switches for door locks, power
sliding doors and power liftgate are
disabled. The Vehicle Security Alarm
provides both audible and visual sig-
nals.
CAUTION!
Do not make modifications or al-
terations to the Vehicle Security
Alarm. Modifications or alterations
to the Vehicle Security Alarm may
result in a loss of security protec-
tion.
16
Page 23 of 364
REARMING OF THE
SYSTEM
If something triggers the alarm, and
no action is taken to disarm it, the
Vehicle Security Alarm will turn off
the horn after 29 seconds, and turn off
all of the visual signals after an addi-
tional 31 seconds, then the Vehicle
Security Alarm will rearm itself.
TO ARM THE SYSTEM
Follow these steps to arm the Vehicle
Security Alarm:
1. Remove the key from the ignition
system (refer to "Starting Proce-
dures" in "Starting And Operating"
for further information).
For vehicles equipped with Keyless
Enter-N-Go™, make sure the vehicle
ignition system is "OFF".
For vehicles not equipped with Key-
less Enter-N-Go™, make sure the ve-
hicle ignition system is "OFF" and the
key is physically removed from the
ignition.2. Perform one of the following
methods to lock the vehicle:
Press LOCK on the interior power
door lock switch with the driver
and/or passenger door open.
Press the LOCK button on the exte-
rior Passive Entry Door Handle with a
valid Key Fob available in the same
exterior zone (refer to "Keyless Enter-
N-Go™" in "Things To Know Before
Starting Your Vehicle" for further in-
formation).
Press the LOCK button on the Re-
mote Keyless Entry (RKE) transmit-
ter.
3. If any doors are open, close them.
TO DISARM THE SYSTEM
The Vehicle Security Alarm can be
disarmed using any of the following
methods:
Press the UNLOCK button on the
Remote Keyless Entry (RKE)
transmitter. Grasp the Passive Entry Unlock
Door Handle (for versions/
markets, where provided), refer to
"Keyless Enter-N-Go™" in
"Things To Know Before Starting
Your Vehicle" for further
information).
Cycle the vehicle ignition system out of the OFF position.
For vehicles equipped with Key- less Enter-N-Go™, press the
Keyless Enter-N-Go™ Start/
Stop button (requires at least one
valid Key Fob in the vehicle).
For vehicles not equipped with Keyless Enter-N-Go™, insert a
valid key into the ignition switch
and turn the key to the ON posi-
tion.
NOTE:
The driver's door key cylinder and the liftgate button on the
RKE transmitter cannot arm or
disarm the Vehicle Security
Alarm.
17
Page 24 of 364
The Vehicle Security Alarm re-mains armed during power lift-
gate entry. Pressing the liftgate
button will not disarm the Ve-
hicle Security Alarm. If someone
enters the vehicle through the
liftgate and opens any door the
alarm will sound.
When the Vehicle Security Alarm is armed, the interior
power door lock switches will
not unlock the doors.
The Vehicle Security Alarm is de-
signed to protect your vehicle; how-
ever, you can create conditions where
the system will give you a false alarm.
If one of the previously described
arming sequences has occurred, the
Vehicle Security Alarm will arm re-
gardless of whether you are in the
vehicle or not. If you remain in the
vehicle and open a door, the alarm
will sound. If this occurs, disarm the
Vehicle Security Alarm.
If the Vehicle Security Alarm is armed
and the battery becomes discon-
nected, the Vehicle Security Alarm
will remain armed when the battery is reconnected; the exterior lights will
flash, the horn will sound. If this oc-
curs, disarm the Vehicle Security
Alarm.
ILLUMINATED ENTRY
The courtesy lights will turn on when
you use the Remote Keyless Entry
(RKE) transmitter to unlock the
doors or open any door.
This feature also turns on the ap-
proach lighting in the outside mirrors
(for versions/markets, where pro-
vided). Refer to “Mirrors” in “Under-
standing The Features Of Your Ve-
hicle” for further information.
The lights will fade to off after ap-
proximately 30 seconds, or they will
immediately fade to off once the igni-
tion switch is turned to ON/RUN from
the OFF position.
NOTE:
The front courtesy overhead
console and door courtesy lights
will not turn off if the dimmer
control is in the “Dome ON” po-
sition (extreme top position). The illuminated entry system
will not operate if the dimmer
control is in the “dome defeat”
position (extreme bottom posi-
tion).REMOTE KEYLESS
ENTRY (RKE) (for
versions/markets, where
provided)
This system allows you to lock or un-
lock the doors and liftgate, open both
front windows, open or close the op-
tional power liftgate, left power slid-
ing door, and right power sliding door
from distances up to approximately
20 m using a hand-held RKE trans-
mitter. The RKE transmitter does not
need to be pointed at the vehicle to
activate the system.
NOTE: Inserting the RKE trans-
mitter with Integrated Key into the
ignition switch disables all but-
tons on that transmitter; however,
the buttons on the remaining
transmitters will continue to work.
Driving at speeds 8 km/h and
18
Page 25 of 364
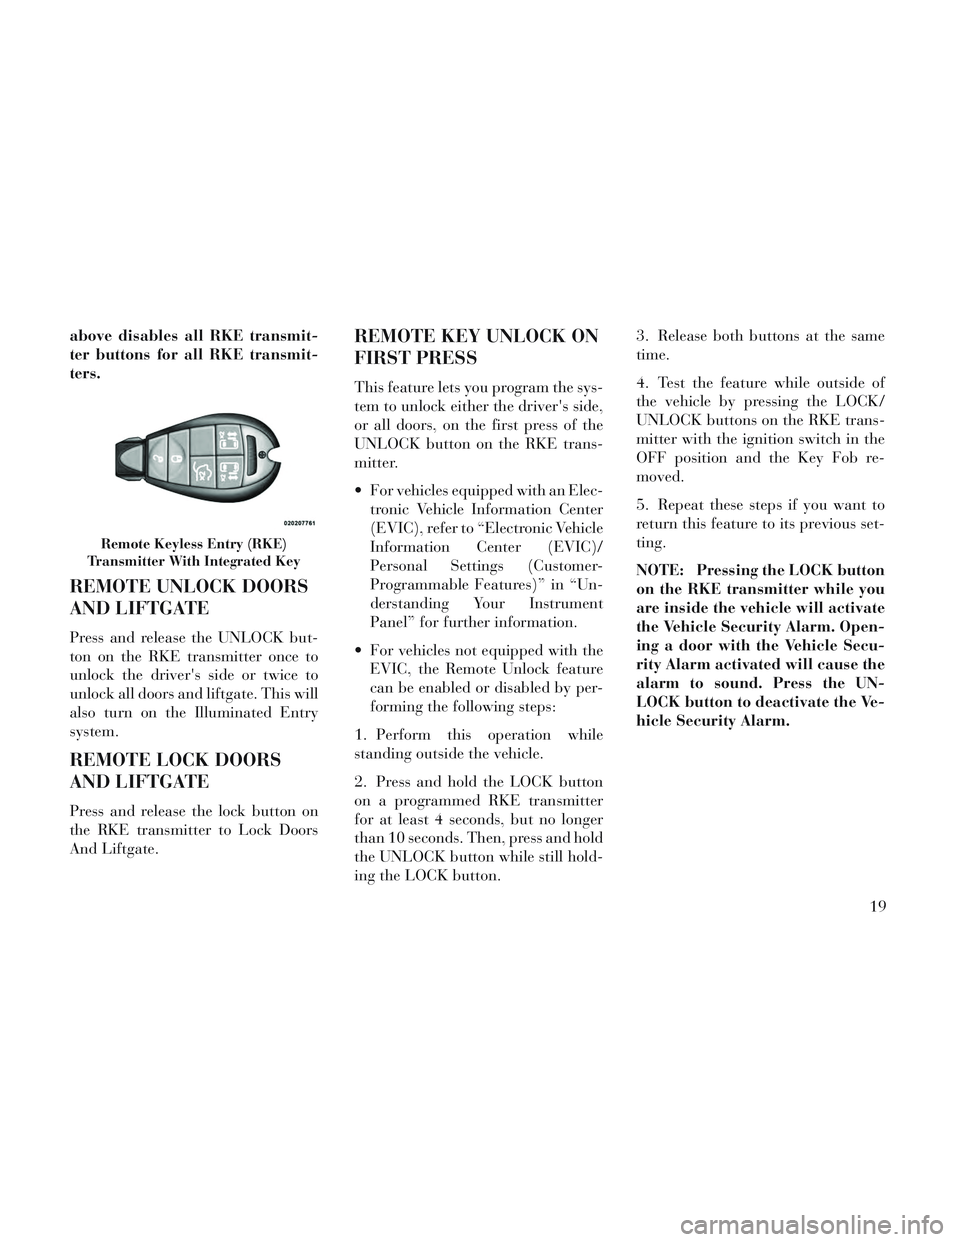
above disables all RKE transmit-
ter buttons for all RKE transmit-
ters.
REMOTE UNLOCK DOORS
AND LIFTGATE
Press and release the UNLOCK but-
ton on the RKE transmitter once to
unlock the driver's side or twice to
unlock all doors and liftgate. This will
also turn on the Illuminated Entry
system.
REMOTE LOCK DOORS
AND LIFTGATE
Press and release the lock button on
the RKE transmitter to Lock Doors
And Liftgate.
REMOTE KEY UNLOCK ON
FIRST PRESS
This feature lets you program the sys-
tem to unlock either the driver's side,
or all doors, on the first press of the
UNLOCK button on the RKE trans-
mitter.
For vehicles equipped with an Elec-tronic Vehicle Information Center
(EVIC), refer to “Electronic Vehicle
Information Center (EVIC)/
Personal Settings (Customer-
Programmable Features)” in “Un-
derstanding Your Instrument
Panel” for further information.
For vehicles not equipped with the EVIC, the Remote Unlock feature
can be enabled or disabled by per-
forming the following steps:
1. Perform this operation while
standing outside the vehicle.
2. Press and hold the LOCK button
on a programmed RKE transmitter
for at least 4 seconds, but no longer
than 10 seconds. Then, press and hold
the UNLOCK button while still hold-
ing the LOCK button. 3. Release both buttons at the same
time.
4. Test the feature while outside of
the vehicle by pressing the LOCK/
UNLOCK buttons on the RKE trans-
mitter with the ignition switch in the
OFF position and the Key Fob re-
moved.
5. Repeat these steps if you want to
return this feature to its previous set-
ting.
NOTE: Pressing the LOCK button
on the RKE transmitter while you
are inside the vehicle will activate
the Vehicle Security Alarm. Open-
ing a door with the Vehicle Secu-
rity Alarm activated will cause the
alarm to sound. Press the UN-
LOCK button to deactivate the Ve-
hicle Security Alarm.
Remote Keyless Entry (RKE)
Transmitter With Integrated Key
19
Page 26 of 364
POWER OPEN/CLOSE
POWER LIFTGATE (for
versions/markets, where
provided)
Press the LIFTGATE button twice on
the RKE transmitter within five sec-
onds to Open/Close the Power Lift-
gate. The liftgate will beep for three
seconds and then open/close. If the
button is pushed while the liftgate is
being power closed, the liftgate will
reverse to the full open position.
The power liftgate may also be
opened and closed by pressing the
LIFTGATE button located on the
overhead console.
For versions/markets, where pro-
vided with a rear interior switch on
the left rear pillar, pushing this switch
once will close the liftgate only. The
liftgate cannot be opened from this
switch.
If the vehicle is locked and Vehicle
Security Alarm is armed, using RKE
transmitter to open the power liftgate
does not unlock the vehicle or disarm
the Vehicle Security Alarm.
POWER OPEN/CLOSE
LEFT POWER SLIDING
DOOR (for versions/
markets, where provided)
Press the LEFT Power Sliding Door
button twice on the RKE transmitter
within five seconds to Power Open/
Close the Left Power Sliding Door. If
the button on the RKE transmitter is
pushed while the door is being power-
closed, the door will reverse to the full
open position.
If the vehicle is locked and the Vehicle
Security Alarm is armed, pressing the
LEFT Power Sliding Door button
twice unlocks the power sliding door
and disarms Vehicle Security Alarm.
POWER OPEN/CLOSE
RIGHT POWER SLIDING
DOOR (for versions/
markets, where provided
Press the RIGHT Power Sliding Door
button twice on the RKE transmitter
within five seconds to Power Open/
Close the Right Power Sliding Door. If
the button on the RKE transmitter ispushed while the door is being power-
closed, the door will reverse to the full
open position.
If the vehicle is locked and the Vehicle
Security Alarm is armed, pressing the
RIGHT Power Sliding Door button
twice unlocks the power sliding door
and disarms Vehicle Security Alarm.
TURN OFF FLASH LIGHTS
WITH RKE LOCK (for
versions/markets, where
provided)
This feature will cause the turn signal
lights to flash when the doors are
locked or unlocked with the RKE
transmitter. This feature can be
turned on or turned off. To change the
current setting, proceed as follows:
For vehicles equipped with the
EVIC, refer to “Electronic Vehicle
Information Center (EVIC)/
Personal Settings (Customer-
Programmable Features)” in “Un-
derstanding Your Instrument
Panel” for further information.
20
Page 27 of 364
For vehicles not equipped with theEVIC, perform the following steps:
1. Perform this operation while
standing outside the vehicle.
2. Press and hold the UNLOCK but-
ton on a programmed RKE transmit-
ter for at least 4 seconds, but no lon-
ger than 10 seconds. Then, press and
hold the LOCK button while still
holding the UNLOCK button.
3. Release both buttons at the same
time.
4. Test the feature while outside of
the vehicle by pressing the LOCK/
UNLOCK buttons on the RKE trans-
mitter with the ignition switch in the
OFF position and the Key Fob re-
moved.
5. Repeat these steps if you want to
return this feature to its previous set-
ting.
NOTE: Pressing the LOCK button
on the RKE transmitter while you are in the vehicle will activate the
Vehicle Security Alarm. Opening a
door with the Vehicle Security
Alarm activated will cause the
alarm to sound. Press the UN-
LOCK button to deactivate the Ve-
hicle Security Alarm.
PROGRAMMING
ADDITIONAL
TRANSMITTERS
Refer to Sentry Key® “Customer Key
Programming.”
If you do not have a programmed
RKE transmitter, contact your autho-
rized dealer for details.
TRANSMITTER BATTERY
REPLACEMENT
The recommended replacement bat-
tery is one CR2032 battery.
NOTE:
Perchlorate Material — special
handling may apply. Batteries could contain dangerous mate-
rials. Please dispose of them ac-
cording to respect for environ-
ment and local laws.
Do not touch the battery termi- nals that are on the back hous-
ing or the printed circuit board.
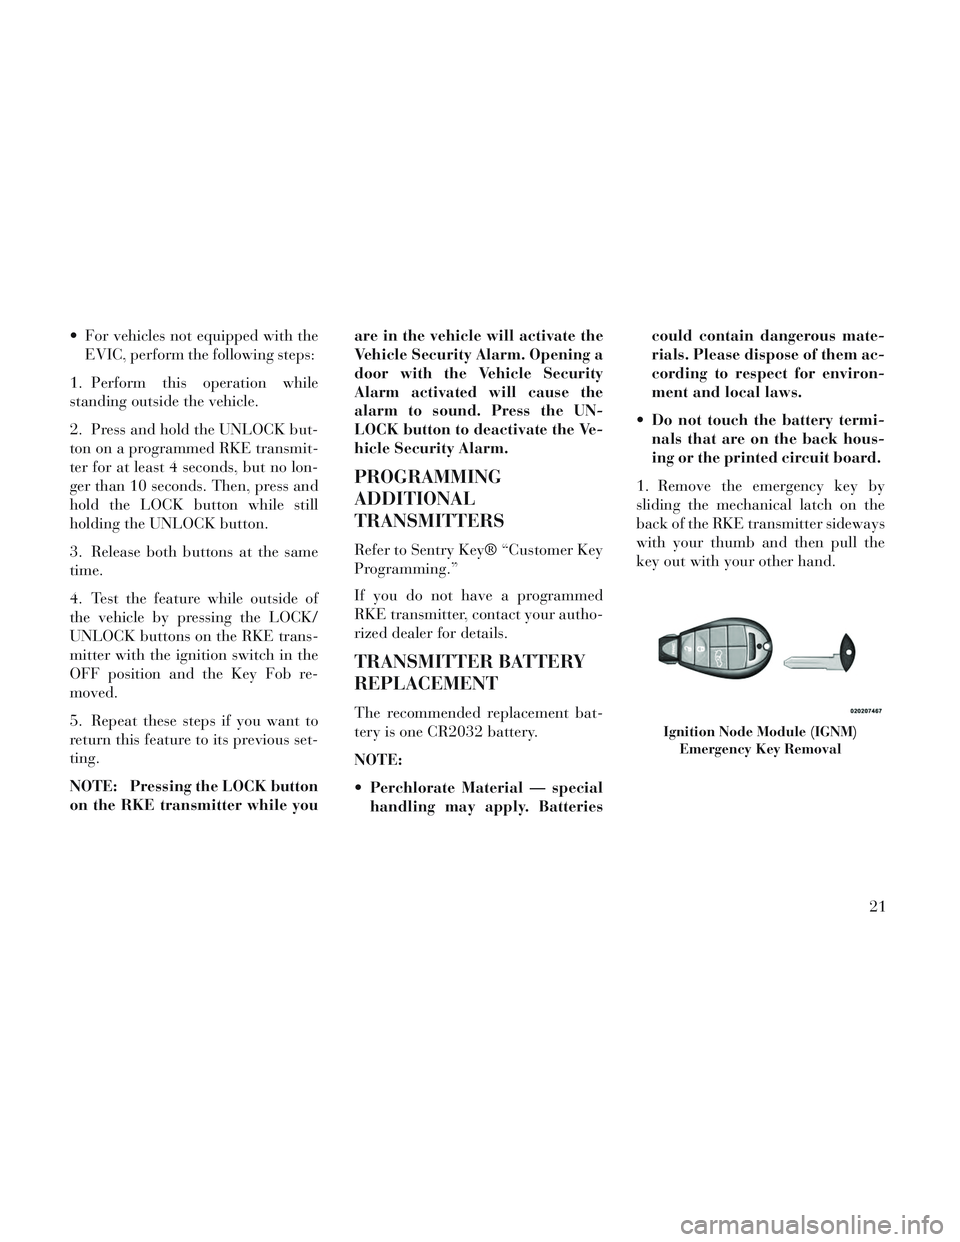
1. Remove the emergency key by
sliding the mechanical latch on the
back of the RKE transmitter sideways
with your thumb and then pull the
key out with your other hand.
Ignition Node Module (IGNM) Emergency Key Removal
21
Page 54 of 364

WARNING!
No objects should be placed overor near the air bag on the instru-
ment panel, because any such ob-
jects could cause harm if the ve-
hicle is in a collision severe
enough to cause the air bag to
inflate.
Do not put anything on or around the air bag covers or attempt to
open them manually. You may
damage the air bags and you
could be injured because the air
bags may no longer be functional.
The protective covers for the air
bag cushions are designed to open
only when the air bags are inflat-
ing.
Do not drill, cut or tamper with the knee bolster in any way.
Do not mount any accessories to the knee bolster such as alarm
lights, stereos, citizen band ra-
dios, etc.
Here are some simple steps you can
take to minimize the risk of harm
from a deploying air bag: Children 12 years old and under
should always ride buckled up in a
rear seat.
WARNING!
Infants in rear-facing child re-
straints should never ride in the
front seat of a vehicle with a Pas-
senger Advanced Front Air Bag. An
air bag deployment can cause se-
vere injury or death to infants in
that position.
You should read the instructions pro-
vided with your child restraint to
make sure that you are using it prop-
erly.
All occupants should always wear
their lap and shoulder belts properly.
Children that are not big enough to
wear the vehicle seat belt properly
(see Section on Child Restraints)
should be secured in the rear seat in
child restraints or belt-positioning
booster seats. Older children who do
not use child restraints or belt-
positioning booster seats should ride
properly buckled up in the rear seat. Never allow children to slide the
shoulder belt behind them or under
their arm.
If the air bag system in this vehicle
needs to be modified to accommodate
a disabled person, contact the Cus-
tomer Center.
The driver and front passenger seats
should be moved back as far as prac-
tical to allow the Advanced Front Air
Bags room to inflate.
Do not lean against the door or win-
dow. If your vehicle has side air bags,
and deployment occurs, the side air
bags will inflate forcefully into the
space between you and the door.
WARNING!
Relying on the air bags alone
could lead to more severe injuries
in a collision. The air bags work
with your seat belt to restrain you
properly. In some collisions, the
air bags won't deploy at all. Al-
ways wear your seat belts even
though you have air bags.
(Continued)
48
Page 93 of 364
WARNING!
The Blind Spot Monitoring system
is only an aid to help detect objects
in the blind spot zones. The BSM
system is not designed to detect pe-
destrians, bicyclists, or animals.
Even if your vehicle is equipped
with the BSM system, always check
your vehicle's mirrors, glance over
your shoulder, and use your turn
signal before changing lanes. Fail-
ure to do so can result in serious
injury or death.
REAR CROSS PATH (for
versions/markets, where
provided)
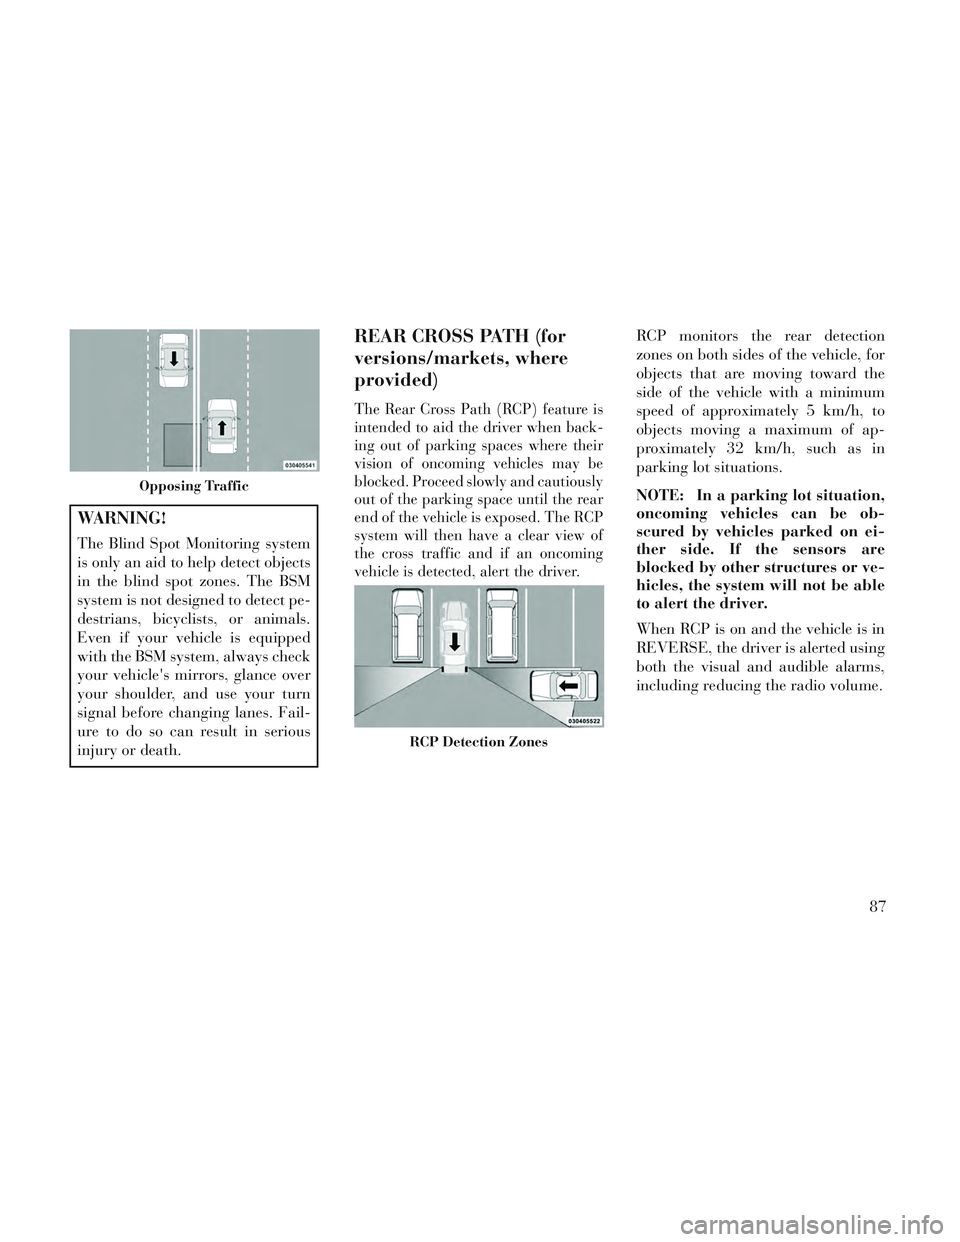
The Rear Cross Path (RCP) feature is
intended to aid the driver when back-
ing out of parking spaces where their
vision of oncoming vehicles may be
blocked. Proceed slowly and cautiously
out of the parking space until the rear
end of the vehicle is exposed. The RCP
system will then have a clear view of
the cross traffic and if an oncoming
vehicle is detected, alert the driver.
RCP monitors the rear detection
zones on both sides of the vehicle, for
objects that are moving toward the
side of the vehicle with a minimum
speed of approximately 5 km/h, to
objects moving a maximum of ap-
proximately 32 km/h, such as in
parking lot situations.
NOTE: In a parking lot situation,
oncoming vehicles can be ob-
scured by vehicles parked on ei-
ther side. If the sensors are
blocked by other structures or ve-
hicles, the system will not be able
to alert the driver.
When RCP is on and the vehicle is in
REVERSE, the driver is alerted using
both the visual and audible alarms,
including reducing the radio volume.
Opposing Traffic
RCP Detection Zones
87
Page 182 of 364
11. Electronic Stability Control
(ESC) OFF Indicator Light (for
versions/markets, where provided)This light indicates the
Electronic Stability Control
(ESC) is off.
12. Speedometer
Indicates vehicle speed.
13. Fuel Door Reminder The arrow in this symbol is
a reminder that the Fuel
Filler Door is located on the
left side of the vehicle.
14. Fuel Gauge
The pointer shows the level of fuel in
the fuel tank when the ignition switch
is in the ON/RUN position.
15. Air Bag Warning Light
This light will turn on for
four to eight seconds as a
bulb check when the igni-
tion switch is first turned to
ON/RUN. If the light is either not on
during starting, stays on, or turns on while driving, have the system in-
spected at an authorized dealer as
soon as possible. Refer to “Occupant
Restraints” in “Things To Know Be-
fore Starting Your Vehicle” for further
information.
16. Shift Lever Indicator
The Shift Lever Indicator is self-
contained within the instrument clus-
ter. It displays the gear position of the
automatic transmission.
NOTE:
You must apply the brakes be-
fore shifting from PARK.
The highest available transmis- sion gear is displayed in the
lower right corner of the Elec-
tronic Vehicle Information Cen-
ter (EVIC) whenever the Elec-
tronic Range Select (ERS)
feature is active. Use the +/- se-
lector on the shift lever to acti-
vate ERS (for versions/markets,
where provided). Refer to “Auto-
matic Transmission” in “Start-
ing And Operating” for further
information. 17. Vehicle Security Light (for
versions/markets, where provided)
This light will flash at a fast
rate for approximately 15
seconds, when the vehicle
security alarm is arming,
and then will flash slowly until the
vehicle is disarmed.
18. Brake Warning Light
This light monitors various
brake functions, including
brake fluid level and parking brake
application. If the brake light turns on
it may indicate that the parking brake
is applied, that the brake fluid level is
low, or that there is a problem with the
anti-lock brake system reservoir.
If the light remains on when the park-
ing brake has been disengaged, and
the fluid level is at the full mark on the
master cylinder reservoir, it indicates
a possible brake hydraulic system
malfunction or that a problem with
the Brake Booster has been detected
by the Anti-Lock Brake System (ABS)
/ Electronic Stability Control (ESC)
system. In this case, the light will re-
main on until the condition has been
176