ECU Lancia Ypsilon 2011 Owner handbook (in English)
[x] Cancel search | Manufacturer: LANCIA, Model Year: 2011, Model line: Ypsilon, Model: Lancia Ypsilon 2011Pages: 299, PDF Size: 13.35 MB
Page 46 of 299

ACTIVATION OF INTERIOR AIR
RECIRCULATION AND ENABLEMENT OF
AQS FUNCTION (Air Quality System)
Press button
.
Internal air recirculation is carried out according
to three possible operating modes:
❒automatic control;
❒forced deactivation (air recirculation always
deactivated, air taken from the outside)
❒forced activation (internal air circulation always
activated).
When the OFF button is pressed, the climate
control system automatically activates internal air
recirculation. External air recirculation can always
be activated by pressing button
and vice
versa.
With the OFF button pressed, it is not possible to
activate the AQS (Air Quality System) function.IMPORTANT Internal air recirculation makes it
possible to reach the required heating or cooling
conditions more quickly depending on the mode
selected. It is not advisable to switch the air
recirculation on when it is rainy/cold to prevent
the windows from misting, especially if the climate
control system has not been activated. It is
advisable to switch the internal air recirculation
on whilst queuing or in tunnels to prevent the
introduction of polluted air. Do not use the
function for a long time, particularly if there are
several passengers on board, to prevent the
windows from misting.
AQS (Air Quality System) function activation
The AQS function automatically activates internal
air recirculation when the outside air is polluted
(e.g. in traffic queues and tunnels).
IMPORTANT With the AQS function active, after
15 consecutive minutes of the internal air
recirculation system functioning, the climate
control system enables the intake of outside air for
approximately 1 minute to freshen the air in the
passenger compartment. This takes place
regardless of the pollution level of the outside air.
CLIMATE CONTROL COMPRESSOR
ACTIVATION/DEACTIVATION
Press button
to switch on the climate control
compressor.
Compressor activation:
symbol appears on
display.
44GETTING TO
KNOW YOUR CAR
SAFETY
STARTING
AND
DRIVING
WARNING LIGHTS
AND MESSAGES
IN AN EMERGENCY
SERVICING AND
MAINTENANCE
TECHNICAL
SPECIFICATIONS
INDEX
Page 71 of 299

Front and rear passenger doors
(for versions/markets, where provided)
On the passenger side front door control panel,
and on some versions also on the rear doors,
buttons are provided to control the associated
windows.
Anti-crush safety device
The car is equipped with an anti-crush function
for the raising of the front and rear windows. This
safety system detects the presence of an obstacle
during the window closing travel and intervenes
by stopping and reversing the window travel,
depending on its position.
This device is also useful if the windows are
activated accidentally by children on board the
car.The anti-crush safety function is active both
during the manual and the automatic operation of
the window. When the anti-crush system is
activated the window travel is immediately
interrupted and then reversed. The window
cannot be operated in any way during this
operation.
IMPORTANT If the anti-crush protection
intervenes 3 consecutive times within 1 minute or
is faulty, the automatic closing operation of the
window is inhibited, only allowing it in steps
of half a second; the button is released for the
subsequent manoeuvre. In order to restore the
correct operation of the system, the relevant
window must be lowered.
IMPORTANT With ignition key at STOP or
removed, the electric windows remain active for
about 3 minutes and are deactivated when a door
is opened.
IMPORTANT Where the anti-crush function is
present, pressing button
on the remote control
for more than 2 seconds opens the windows for as
long as the button is pressed. Pressing button
for more than 2 seconds closes the windows.
The system conforms to the 2000/4/EC
standard concerning the safety of
passengers leaning out of the passenger
compartment.
fig. 55
L0F0162
69GETTING TO
KNOW YOUR CARSAFETY
STARTING
AND
DRIVING
WARNING LIGHTS
AND MESSAGES
IN AN EMERGENCY
SERVICING AND
MAINTENANCE
TECHNICAL
SPECIFICATIONS
INDEX
Page 75 of 299

❒move the seat belts to the side, making sure that
they are correctly extended and not twisted;
❒press release button A fig. 62 to fold the left or
the right backrest section then lay the backrest
on the cushion.Repositioning the rear seat
Move the seat belts to the side, making sure that
they are correctly extended and not twisted. Lift
up the backrest folded previously until a click
is heard for the engagement mechanism.
SECURING YOUR LOAD
The luggage compartment contains two
attachments for the cables that secure the load
transported and another two attachments are
located on the rear crossmember.
IMPORTANT Every attachment has a maximum
load capacity of 100 kg.
WARNING
A heavy load that has not been
secured may cause
serious injuries in
the event of an accident.
A
B
fig. 61
L0F0201
fig. 62
L0F0088
73GETTING TO
KNOW YOUR CARSAFETY
STARTING
AND
DRIVING
WARNING LIGHTS
AND MESSAGES
IN AN EMERGENCY
SERVICING AND
MAINTENANCE
TECHNICAL
SPECIFICATIONS
INDEX
Page 76 of 299

WARNING
If you are travelling in an area with
limited opportunities for
vehicle
refueling and you wish to bring petrol with
you in a petrol can, you must do so in
compliance with current regulations and
using an approved can, appropriately
secured to the load securing attachments.
However, by doing so, you increase the risk
of fire in case of an accident with your
vehicle.
BONNETOPENING
Proceed as follows:
❒pull lever A fig. 63 in the direction indicated by
the arrow;
❒move lever B fig. 64 to the left as shown in the
figure;
❒lift the bonnet and, at the same time, release
the supporting rod C fig. 65 from its catch D,
then insert the end of the rod into housing E in
the bonnet (larger hole) and push to safety
position (smaller hole), as shown in the figure.
fig. 63
L0F0096
74GETTING TO
KNOW YOUR CAR
SAFETY
STARTING
AND
DRIVING
WARNING LIGHTS
AND MESSAGES
IN AN EMERGENCY
SERVICING AND
MAINTENANCE
TECHNICAL
SPECIFICATIONS
INDEX
Page 95 of 299

WARNING
The parking sensors serve to assist
the driver,
but must never allow
his or her attention to lapse during
potentially dangerous manoeuvres, even
those executed at low speeds. The Magic
Parking system does NOT in any way adjust
the speed of the car during the manoeuvre:
the control of the acceleration speed and
braking remain the responsibility of the
driver.
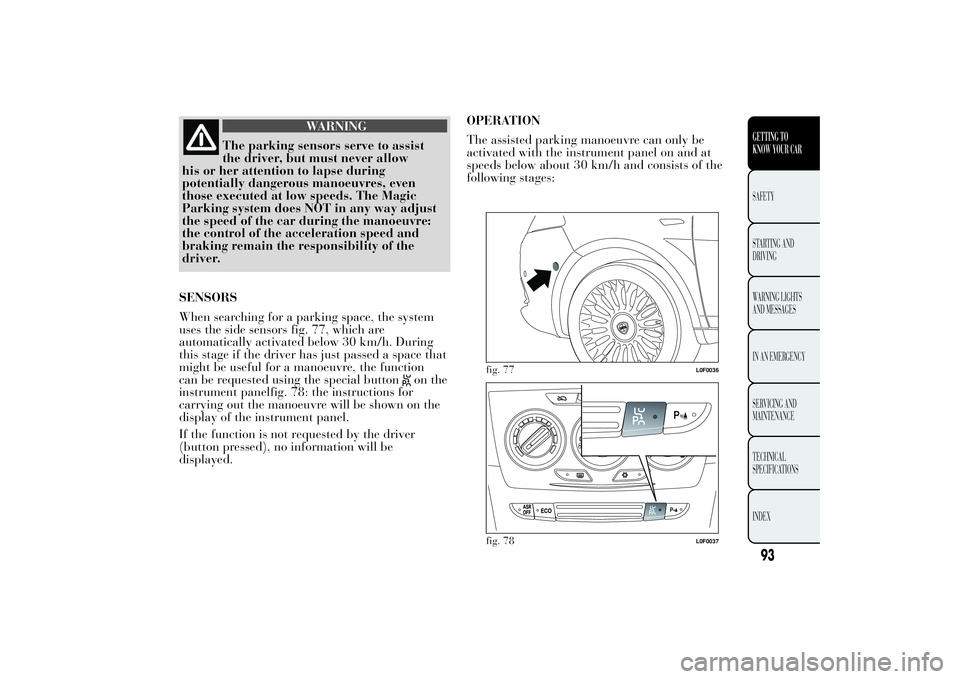
SENSORS
When searching for a parking space, the system
uses the side sensors fig. 77, which are
automatically activated below 30 km/h. During
this stage if the driver has just passed a space that
might be useful for a manoeuvre, the function
can be requested using the special button
on the
instrument panelfig. 78: the instructions for
carrying out the manoeuvre will be shown on the
display of the instrument panel.
If the function is not requested by the driver
(button pressed), no information will be
displayed.OPERATION
The assisted parking manoeuvre can only be
activated with the instrument panel on and at
speeds below about 30 km/h and consists of the
following stages:
fig. 77
L0F0036
fig. 78
L0F0037
93GETTING TO
KNOW YOUR CARSAFETY
STARTING
AND
DRIVING
WARNING LIGHTS
AND MESSAGES
IN AN EMERGENCY
SERVICING AND
MAINTENANCE
TECHNICAL
SPECIFICATIONS
INDEX
Page 104 of 299

WARNING
Parking manoeuvres however are
always the driver’
s responsibility.
When making these manoeuvres, always
make sure that no people (especially
children) or animals are present in your
manoeuvring space. The parking sensors
serve to assist the driver, but must never
allow his or her attention to lapse during
potentially dangerous manoeuvres, even
those executed at low speeds.
WARNING BUZZER
The information concerning the presence and
distance of an obstacle from the car is transmitted
by means of acoustic signals from buzzers
installed in the passenger compartment:
❒in the versions with 4 rear sensors, a buzzer in
the front dashboard area warns of the presence
of rear obstacles;
❒in the versions with 10 sensors, a front buzzer
warns of the presence of obstacles at the front
and a buzzer located at the rear warns of the
presence of rear obstacles.
The acoustic signal:
❒increases as the distance between the car and
the obstacle decreases;❒becomes continuous when the distance between
the car and the obstacle is less than 30 cm and
stops immediately if the distance increases
❒remains constant if the distance remains
unchanged; if this situation concerns the side
sensors, the buzzer will stop after about 3
seconds to avoid, for example, warning
indications in the event of manoeuvres along
walls.
The sensor must be free of mud, dirt,
snow or ice in order for the system
to work. Be careful not to scratch or
damage the sensors while cleaning them.
Avoid using dry, rough or hard cloths. The
sensors should be washed using clean water
with the addition of car shampoo if necessary.
When using special washing equipment such
as high pressure jets or steam cleaning, clean
the sensors very quickly keeping the jet more
than 10 cm away.Only have the bumpers repainted or
any retouches to the paintwork in the
area of the sensors carried out by a
Lancia Dealership. Incorrect paint
application could affect the operation of the
parking sensors.
102GETTING TO
KNOW YOUR CAR
SAFETY
STARTING
AND
DRIVING
WARNING LIGHTS
AND MESSAGES
IN AN EMERGENCY
SERVICING AND
MAINTENANCE
TECHNICAL
SPECIFICATIONS
INDEX
Page 119 of 299

CARRYING CHILDREN SAFELYFor optimal protection in the event of a collision,
all passengers must be seated and wearing
adequate restraint systems.
This prescription is compulsory in all EC countries
according to EC Directive 2003/20/EC.
This is even more important for children.
Compared with adults, a child's head is
proportionally larger and heavier than the rest of
the body, while muscles and bone structure are not
fully developed.
Therefore, correct restraint systems are necessary
which are different from adult seat belts.
The results of research on the best child restraint
systems are contained in the European Standard
ECE-R44, which enforces the use of restraint
systems classified into five groups:Group Weight groups
Group 0 up to 10 kg in weight
Group 0+ up to 13 kg in weight
Group 1 9-18 kg in weight
Group 2 15-25 kg in weight
Group 3 22-36 kg of weight
All restraint devices must bear the type-approval
data along with the control mark on a label firmly
secured to the child seat which must never be
removed. When over 1.50 m in height, from the
point of view of restraint systems, children are
considered as adults and have to wear the
standard seat belts. Lineaccessori Lancia includes
child seats for each weight group. These devices
are recommended having been specifically
designed for Lancia cars.
WARNING
Do not arrange cradle child seats
facing backwards if
the front air bag
on the passenger's side is enabled.
Deployment of the air bag in an accident
could cause fatal injuries to the baby
regardless of the severity of the collision. It
is advisable to always carry children in a
child seat on the rear seat, which is the most
protected position in the event of a collision.
117GETTING TO KNOW
YOUR CARSAFETYSTARTING AND
DRIVING
W
ARNING LIGHTS
ANDMESSAGES
IN AN EMERGENCY
SERVICING AND
MAINTENANCE
TECHNICAL
SPECIFICATIONS
INDEX
Page 125 of 299

INSTALLING A UNIVERSAL ISOFIX CHILD
SEAT
Secure the seat using the special lower metal rings
A fig. 102 positioned between rear backrest and
cushion. The upper belt (provided with the child's
seat) must be secured to the attachments B fig.
103 located in the rear part of the backrest.
“Universal Isofix” Child seats can be fitted
alongside traditional child seats. Remember that
when using a Universal Isofix child seat, you
can only use approved seats with the marking
ECE R44/03 “Universal Isofix”.
The Universal Isofix “Duo Plus” child seat and the
special "G 0/1 S" seat are available from
Lineaccessori Lancia. For any further details on
installation/use, refer to the instruction manual
for the child seat.
WARNING
Fit the child seat when the car is
stationary. The
child seat is correctly
anchored to the brackets when you hear the
click. Follow the instructions for assembly,
disassembly and positioning that the
manufacturer must supply with the child
seat.
fig. 102
L0F0177
fig. 103
L0F0087
123GETTING TO KNOW
YOUR CARSAFETYSTARTING AND
DRIVING
W
ARNING LIGHTS
ANDMESSAGES
IN AN EMERGENCY
SERVICING AND
MAINTENANCE
TECHNICAL
SPECIFICATIONS
INDEX
Page 136 of 299

STOPPING THE ENGINE
Turn the ignition key to STOP while the engine is
idling.
IMPORTANT After a taxing drive, before turning
the engine off you should allow it to idle to allow
the temperature in the engine compartment to fall.
A quick burst on the accelerator before
turning off the engine serves absolutely
no practical purpose, it wastes fuel
and is damaging especially to turbocharged
engines.
PARKINGSwitch off the engine and engage the handbrake.
Engage a gear (first gear if parked uphill or
reverse if facing downhill) and leave the wheels
turned. If the car is parked on a steep slope block
the wheels with a wedge or stone. Always remove
the ignition key when leaving the car.
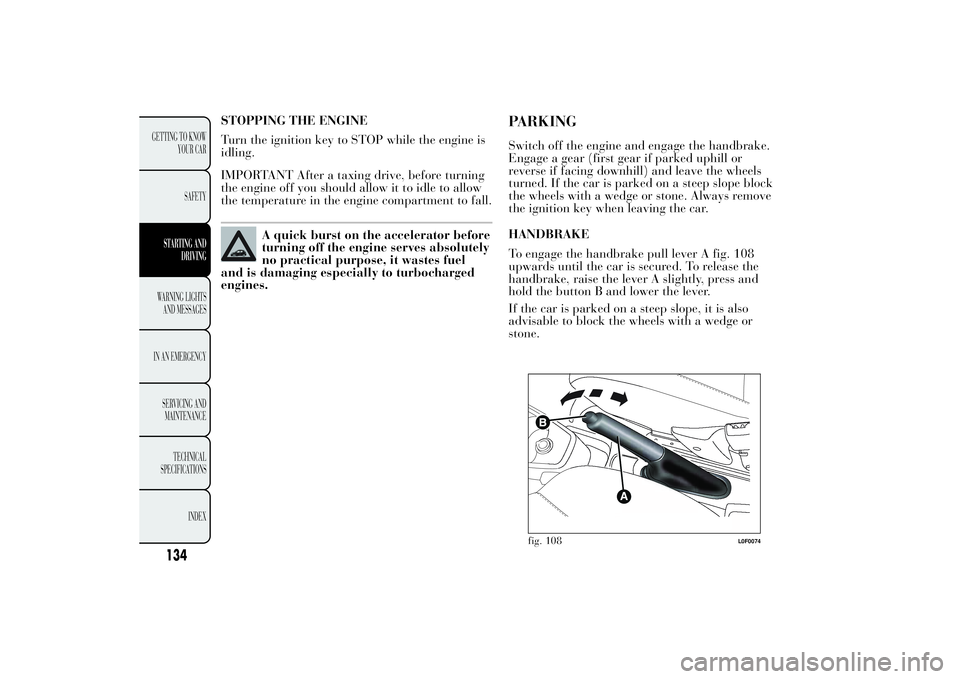
HANDBRAKE
To engage the handbrake pull lever A fig. 108
upwards until the car is secured. To release the
handbrake, raise the lever A slightly, press and
hold the button B and lower the lever.
If the car is parked on a steep slope, it is also
advisable to block the wheels with a wedge or
stone.
fig. 108
L0F0074
134
GETTING TO KNOW
YOUR CAR
SAFETY
STARTING AND
DRIVINGWARNING LIGHTS
AND
MESSAGES
IN AN
EMERGENCY
SERVICING AND
MAINTENANCE
TECHNICAL
SPECIFICATIONS
INDEX
Page 166 of 299

WARNING
Give the instructions brochure to the
technicians who will
be handling
the tyre that was repaired using the tyre
quick repair kit.In the event of a puncture caused by
foreign bodies, the kit may be used to
repair tyres showing damages on the
track or shoulder up to max 4 mm diameter.
WARNING
Holes and damage on the tyre side
walls cannot be
repaired. Do not use
the tyre quick repair kit if the tyre is
damaged as a result of driving with it
deflated.
WARNING
Repairs are not possible in the case of
damage to the
wheel rim (bad groove
distortion causing air loss). Do not remove
the foreign body (screw or nail) from the
tyre.
WARNING
Do not operate the compressor for
longer than 20
consecutive minutes.
Risk of overheating. Tyres repaired with the
quick tyre repair kit must only be used
temporarily.
WARNING
The cylinder contains ethyl glycol.
Contains latex: may
cause an allergic
reaction. Harmful if swallowed. Eye irritant.
May cause irritation if inhaled or on contact.
Avoid contact with eyes, skin and clothes.
In the event of contact, wash immediately
with plenty of water. If ingested, do not
induce vomiting. Rinse out your mouth,
drink large quantities of water and seek
immediate medical attention. Keep away
from children. The product must not be used
by asthmatics. Do not inhale the vapours
during insertion and suction. Call a doctor
immediately if allergic reactions are noted.
Store the canister in its proper
compartment, away from sources of heat.
The sealant fluid has an expiry date.
Replace the bottle containing out-of-date
sealant fluid.
164
GETTING TO KNOW
YOUR CAR
SAFETY
STARTING AND
DRIVING
WARNING LIGHTS
AND MESSAGESIN AN EMERGENCYSERVICING AND
MAINTENANCE
TECHNICAL
SPECIFICA
TIONS
INDEX