buttons Lancia Ypsilon 2011 Owner handbook (in English)
[x] Cancel search | Manufacturer: LANCIA, Model Year: 2011, Model line: Ypsilon, Model: Lancia Ypsilon 2011Pages: 299, PDF Size: 13.35 MB
Page 7 of 299
GETTING TO KNOW YOUR CAR
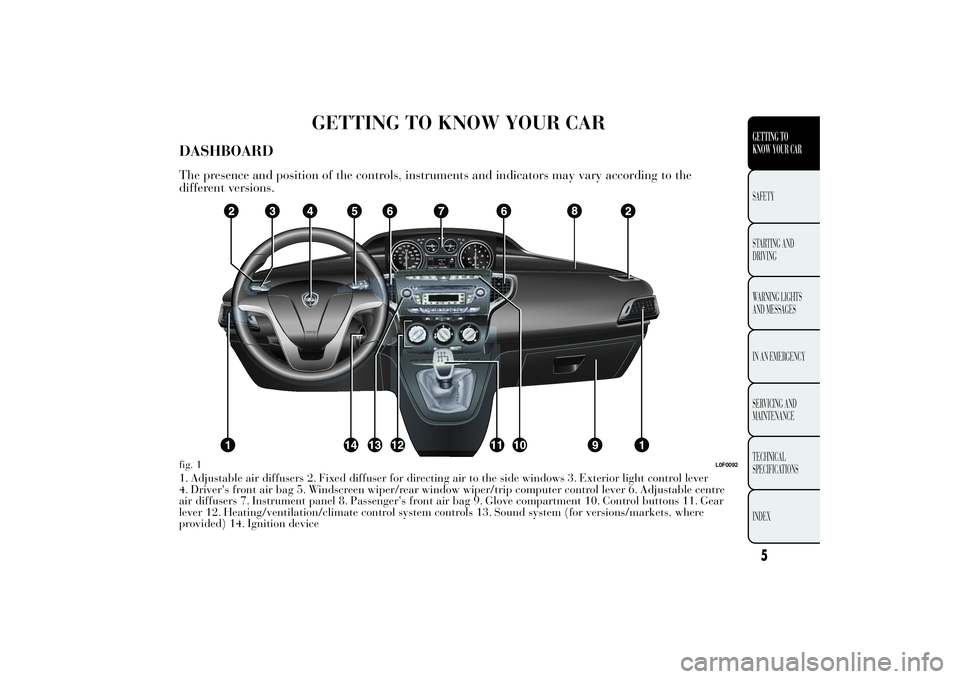
DASHBOARDThe presence and position of the controls, instruments and indicators may vary according to the
different versions.1. Adjustable air diffusers 2. Fixed diffuser for directing air to the side windows 3. Exterior light control lever
4. Driver's front air bag 5. Windscreen wiper/rear window wiper/trip computer control lever 6. Adjustable centre
air diffusers 7. Instrument panel 8. Passenger's front air bag 9. Glove compartment 10. Control buttons 11. Gear
lever 12. Heating/ventilation/climate control system controls 13. Sound system (for versions/markets, where
provided) 14. Ignition devicefig. 1
L0F0092
5GETTING TO
KNOW YOUR CARSAFETY
STARTING
AND
DRIVING
WARNING LIGHTS
AND MESSAGES
IN AN EMERGENCY
SERVICING AND
MAINTENANCE
TECHNICAL
SPECIFICATIONS
INDEX
Page 13 of 299
WELCOME MOVEMENT
On some versions, when the key is turned to MAR,
the following occurs:
❒quick movement (up and down) of the
speedometer and rpm gauge
❒lighting of graphic symbols/display
❒display of the Lancia logo.
Gauge movement
If the key is removed from the ignition switch
whilst the gauges are moving, they immediately
return to their initial position.
Once they have reached the full scale values, the
gauges rest on the value indicated by the car.
The movement of the gauges stops when the
engine is started.
Lighting of graphic symbols/display
A few seconds after the key is inserted, the gauges,
graphic symbols and display light up in sequence.
Lancia logo display
When the key is removed from the ignition switch
(with the doors closed), the display remains lit
and shows the Lancia logo. The display lighting is
then dimmed gradually until it switches off
completely.CONTROL BUTTONS
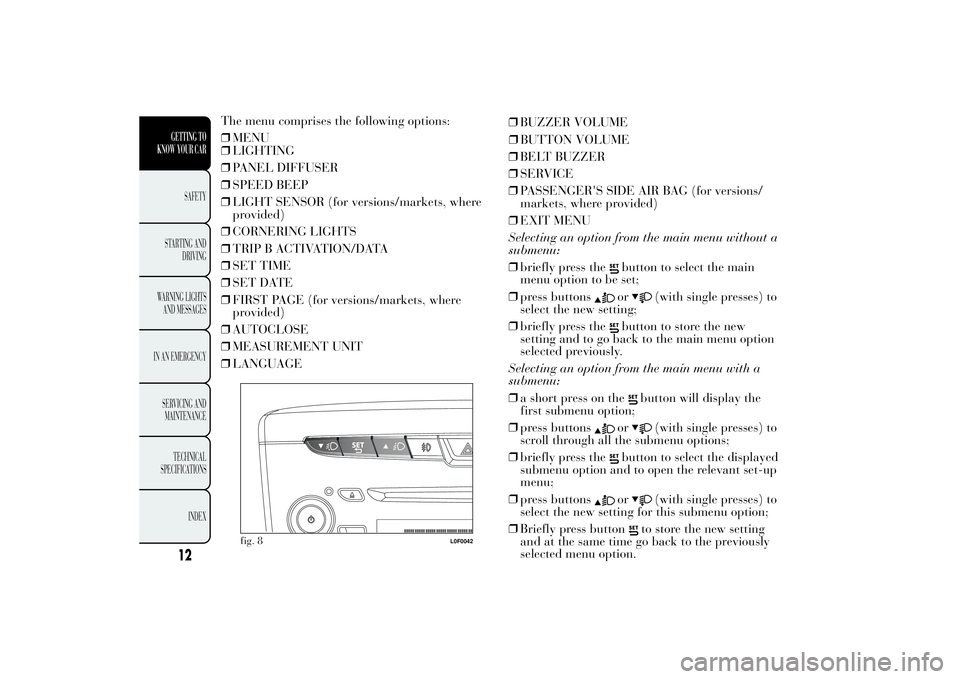
NOTE Buttons
and
are described in the
following pages fig. 8. The buttons are
and
on
some versions.
To scroll up through the screen and the
related options or to increase the displayed
value.Press briefly to access the menu and/or go to
next screen or confirm the desired menu
selection.
Hold down to go back to the standard screen.To scroll down through the screen and the
related options or to decrease the displayed
value.
Buttons
and
activate different functions
according to the following situations:
❒within the menu, they allow you to scroll up and
down;
❒during setting operations, they increase or
decrease values.
SETUP MENU
The menu comprises a series of options which can
be selected using buttons
and
to access
the different selection and setting operations
(Setup) indicated below. Some options have a
submenu. The menu can be activated by briefly
pressing button
.
11GETTING TO
KNOW YOUR CARSAFETY
STARTING
AND
DRIVING
WARNING LIGHTS
AND MESSAGES
IN AN EMERGENCY
SERVICING AND
MAINTENANCE
TECHNICAL
SPECIFICATIONS
INDEX
Page 14 of 299
❒LIGHTING
❒PANEL DIFFUSER
❒SPEED BEEP
❒LIGHT SENSOR (for versions/markets, where
provided)
❒CORNERING LIGHTS
❒TRIP B ACTIVATION/DATA
❒SET TIME
❒SET DATE
❒FIRST PAGE (for versions/markets, where
provided)
❒AUTOCLOSE
❒MEASUREMENT UNIT
❒LANGUAGE❒BUZZER VOLUME
❒BUTTON VOLUME
❒BELT BUZZER
❒SERVICE
❒PASSENGER'S SIDE AIR BAG (for versions/
markets, where provided)
❒EXIT MENU
Selecting an option from the main menu without a
submenu:
❒briefly press the
button to select the main
menu option to be set;
❒press buttonsor
(with single presses) to
select the new setting;
❒briefly press the
button to store the new
setting and to go back to the main menu option
selected previously.
Selecting an option from the main menu with a
submenu:
❒a short press on the
button will display the
first submenu option;
❒press buttons
or
(with single presses) to
scroll through all the submenu options;
❒briefly press the
button to select the displayed
submenu option and to open the relevant set-up
menu;
❒press buttonsor
(with single presses) to
select the new setting for this submenu option;
❒Briefly press button
to store the new setting
and at the same time go back to the previously
selected menu option.
fig. 8
L0F0042
12GETTING TO
KNOW YOUR CAR
SAFETY
STARTING
AND
DRIVING
WARNING LIGHTS
AND MESSAGES
IN AN EMERGENCY
SERVICING AND
MAINTENANCE
TECHNICAL
SPECIFICATIONS
INDEX
The menu comprises the following options:
❒MENU
Page 20 of 299
❒press the button
or
to adjust the
volume; an acoustic signal equal to the volume
level being selected is emitted during this
adjustment;
❒press the
button briefly to return to the menu
screen or give the button a long press to return
to the standard screen without storing.
On versions with reconfigurable multifunction
display, the volume level is represented by bars.
Belt buzzer (Buzzer activation for SBR
indication)(for versions/markets, where
provided)
This function can only be displayed after a Lancia
Dealership has deactivated the SBR system (see
"SBR system" in the "Safety" chapter).
Service (Scheduled servicing)
Using this function you can display information
about the mileage or daily intervals for car
servicing. With the Service function it is also
possible to view the interval (in kilometres or
miles) before the next engine oil change is due.
To consult this display, proceed as follows:
❒briefly press the
button, which makes the
display show the service interval in km or mi
according to the previous setting (see "Distance
units of measurement" paragraph);
❒briefly press button
to return to the menu
screen or hold it down to return to the standard
screen.NoteThe "Scheduled Servicing Plan" requires the
car to be serviced every 30,000 km (or 18,000
miles). This is automatically displayed, when the
ignition key is turned to MAR, from 2,000 km
(or the equivalent in miles) and reappears every
200 km (or the equivalent in miles). Below 200
km servicing indications are more frequent. The
display will be in kilometres or miles depending
on the measurement unit settings. When the next
scheduled service is approaching, the message
"Service" will appear on the display, followed by
the number of kilometres or miles left, when
the key is turned to MAR. Contact a Lancia
Dealership where the operations of the "Scheduled
Servicing Plan" will be performed and the
message will be reset.
Passenger airbag (Passenger front and side
airbag activation/deactivation (Side Bag)
This function allows the passenger airbag to be
activated / deactivated.
Proceed as follows:
❒press the
button and, after the message "Bag
pass: Off" (to deactivate) or "Bag pass: On" (to
activate) is displayed by pressing buttons
and
, press the
button again;
❒a confirmation request message will appear on
the display;
18GETTING TO
KNOW YOUR CAR
SAFETY
STARTING
AND
DRIVING
WARNING LIGHTS
AND MESSAGES
IN AN EMERGENCY
SERVICING AND
MAINTENANCE
TECHNICAL
SPECIFICATIONS
INDEX
Page 21 of 299

❒by pressing the
or
buttons select "Yes"
(to confirm activation/deactivation) or "No"
(to cancel);
❒press the
button briefly; a message confirming
the selection is displayed and you return to the
menu screen; Hold down the button to return to
the standard screen without storing.
Exit menu
This function closes the cycle of settings listed in
the menu screen. Pressing the
button briefly will
return the display to the standard screen without
storing. Press button
to return to the first
menu item (Speed Beep).
TRIP COMPUTERGeneral information
The Trip computer is used to display information
on car operation when the key is turned to
MAR-ON. This function allows you to define two
separate trips, called “Trip A” and “Trip B”,
for monitoring the car's "complete mission"
(journey) in a reciprocally independent manner.
Both functions are resettable (reset - start of a new
journey).
“Trip A” is used to display the figures relating to:
❒Outside temperature (for LPG/Natural Power
versions equipped with multifunction display)
❒Range
❒Distance travelled
❒Average consumption
❒Instantaneous consumption
❒Average speed
❒Trip time (driving time).
“Trip B” may be used to display the figures
relating to:
❒Distance travelled B
❒Average consumption B
❒Average speed B
❒Trip time B (driving time).
19GETTING TO
KNOW YOUR CARSAFETY
STARTING
AND
DRIVING
WARNING LIGHTS
AND MESSAGES
IN AN EMERGENCY
SERVICING AND
MAINTENANCE
TECHNICAL
SPECIFICATIONS
INDEX
Page 34 of 299
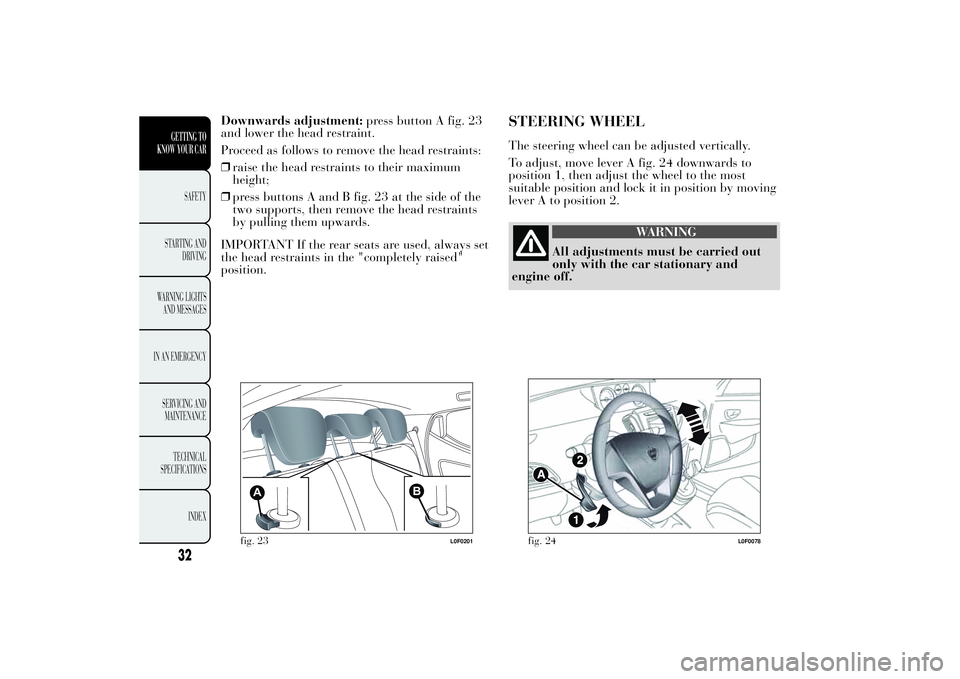
Downwards adjustment:press button A fig. 23
and lower the head restraint.
Proceed as follows to remove the head restraints:
❒raise the head restraints to their maximum
height;
❒press buttons A and B fig. 23 at the side of the
two supports, then remove the head restraints
by pulling them upwards.
IMPORTANT If the rear seats are used, always set
the head restraints in the "completely raised"
position.
STEERING WHEELThe steering wheel can be adjusted vertically.
To adjust, move lever A fig. 24 downwards to
position 1, then adjust the wheel to the most
suitable position and lock it in position by moving
lever A to position 2.
WARNING
All adjustments must be carried out
only with the
car stationary and
engine off.
A
B
fig. 23
L0F0201
fig. 24
L0F0078
32GETTING TO
KNOW YOUR CAR
SAFETY
STARTING
AND
DRIVING
WARNING LIGHTS
AND MESSAGES
IN AN EMERGENCY
SERVICING AND
MAINTENANCE
TECHNICAL
SPECIFICATIONS
INDEX
Page 41 of 299

AUTOMATIC CLIMATE
CONTROL(for versions/markets, where provided)
CONTROLS
Buttons A - Manual air distribution selection
By pressing the buttons, one of the five possible
air flow distribution modes can be selected:
to the windscreen and front side window
diffusers to demist or defrost them.
to the central and side dashboard vents to
ventilate the chest and the face during the hot
season.towards the front seat feet area diffusers. Due
to the natural tendency of heat to rise, this
type of distribution warms the passenger
compartment up as quickly as possible,
providing an immediate feeling of warmth.
fig. 33
L0F0129
39GETTING TO
KNOW YOUR CARSAFETY
STARTING
AND
DRIVING
WARNING LIGHTS
AND MESSAGES
IN AN EMERGENCY
SERVICING AND
MAINTENANCE
TECHNICAL
SPECIFICATIONS
INDEX
Page 43 of 299

Button F
- Heated rear window activation/
deactivation
When button
is pressed, the LED on the button
switches on.
Buttons G
- Fan speed adjustment
Button H (OFF) - Climate control activation/
deactivation
When the OFF button is pressed, the system is
deactivated.
With the system off, the climate control system
conditions are as follows:
❒all LEDs are off;
❒set temperature display is off;
❒air recirculation is off;
❒compressor is off;
❒fan is off.
Button I - Air temperature increase
When the button is pressed, the passenger
compartment air temperature increases.
Button L - Air temperature decrease
When the button is pressed, the passenger
compartment air temperature decreases.DESCRIPTION
The automatic climate control allows
the driver side air temperature and passenger side
air temperature to be adjusted separately.
The system has an AQS function (Air Quality
System), which automatically activates internal
air recirculation when the outside air is polluted
(e.g. in traffic queues and tunnels).
The automatically controlled parameters and
functions are:
❒air temperature at the driver/front passenger
side vents
❒air distribution at the driver/front passenger
side vents
❒fan speed (continuous variation of the air flow)
❒compressor activation (for cooling/
dehumidifying the air)
❒air recirculation.
All functions may be changed manually. In other
words, you may select one or more functions
and change the parameters as required. Automatic
control of the manually changed functions will
be suspended: the system will only override your
settings for safety-related reasons (e.g. risk of
misting).
41GETTING TO
KNOW YOUR CARSAFETY
STARTING
AND
DRIVING
WARNING LIGHTS
AND MESSAGES
IN AN EMERGENCY
SERVICING AND
MAINTENANCE
TECHNICAL
SPECIFICATIONS
INDEX
Page 47 of 299

Compressor deactivation
❒
symbol on display disappears;
❒internal air recirculation excluded;
❒AQS function disabled.
With the climate control compressor switched off,
air cannot be introduced into the passenger
compartment that has a lower temperature than
the outside air; in this case the
symbol in the
display will flash.
The deactivation of the climate control compressor
is memorised even after the engine has stopped.
To reactivate the climate control compressor, press
button
or AUTO again: if you press AUTO,
the other manual settings will be cancelled.
AIR DISTRIBUTION SELECTION
Press one or more of buttons A fig. to manually
select one of the possible air distribution settings
for the passenger compartment:
Air flow to the windscreen and front side
window diffusers to demist/defrost them.Air flow to the front and rear footwell
diffusers. This air distribution allows the
passenger compartment to be warmed up
quickly.+
+
Air flow distribution between
front and rear diffusers,
centre/side dashboard diffusers,
rear diffuser and windscreen
and front side window
demisting/defrosting diffusers.
Air flow distribution to centre/side dashboard
diffusers (passenger's body).+
Air flow distributed between footwell
diffusers and windscreen and front side
window defrosting/demisting diffusers.
This distribution setting allows the
passenger compartment to be warmed
effectively and prevents the windows
from misting.
+
Air flow distribution between footwell
diffusers (hotter air) and centre/side
dashboard diffusers and rear diffuser
(cooler air).
+
Air flow distribution between
centre/side dashboard vents, rear
diffuser and windscreen and front side
window demisting/defrosting diffusers.
This distribution setting ventilates
the passenger compartment well and
prevents the windows from misting up.
IMPORTANT For the climate control system to
function, at least one of the buttons A must be
operated fig. . The system does not allow the
deactivation of all the buttons A.
IMPORTANT Push the OFF button to turn the
climate control system back on: in this way, all
operating conditions memorised before switching
off are restored.
To restore automatic control of the air distribution
after a manual selection, press the AUTO button.
45GETTING TO
KNOW YOUR CARSAFETY
STARTING
AND
DRIVING
WARNING LIGHTS
AND MESSAGES
IN AN EMERGENCY
SERVICING AND
MAINTENANCE
TECHNICAL
SPECIFICATIONS
INDEX
33 33
Page 70 of 299

ELECTRIC WINDOWSThese operate when the ignition key is turned to
MAR and for about three minutes after turning
the key to STOP or removing it if one of the front
doors is open.
The control buttons are located in the door panels
(for versions/markets, where provided) (the driver
side door panel can be used to operate all the
windows).
An anti-crush device operates when the front and
rear windows are raised (for versions/markets,
where provided).
WARNING
Improper use of the electric windows
can be dangerous.
Before and during
operation, always check that passengers are
not exposed to the risk of being injured
either directly by the moving windows or
through objects getting caught or struck by
them. When leaving the car, always remove
the ignition key to avoid the risk of injury
of people still on board due to accidental
operation of the electric windows.CONTROLS
Driver side front doorfig. 55
A: opening/closing front left window; "continuous
automatic" operation during window opening/
closing stage
B: opening/closing front right window;
"continuous automatic" operation during window
opening/closing stage (for versions/markets,
where provided)
C: enabling/disabling of rear door electric window
controls
D: opening/closing rear left window (for
versions/markets, where provided); "continuous
automatic" operation during window opening/
closing stage
E: opening/closing rear right window (for
versions/markets, where provided); "continuous
automatic" operation during window opening/
closing stage.
Push the buttons to open/close the desired
window. When one of the two buttons is pressed
briefly, the window moves in stages; if the button
is held down, "continuous automatic" operation
is activated both for closing and opening.
If the control button is pressed again, the window
will stop in the desired position. If the button is
held down for several seconds, the window raises
or lowers automatically (only with ignition key
in MAR position).
68GETTING TO
KNOW YOUR CAR
SAFETY
STARTING
AND
DRIVING
WARNING LIGHTS
AND MESSAGES
IN AN EMERGENCY
SERVICING AND
MAINTENANCE
TECHNICAL
SPECIFICATIONS
INDEX