low beam Lancia Ypsilon 2011 Owner handbook (in English)
[x] Cancel search | Manufacturer: LANCIA, Model Year: 2011, Model line: Ypsilon, Model: Lancia Ypsilon 2011Pages: 299, PDF Size: 13.35 MB
Page 50 of 299
When the ignition key is turned to STOP or
removed and the ring nut is turned from O to
,
all the side lights and number plate lights switch
on. The
warning light will come on in the
instrument panel.
PARKING LIGHTS
These lights can only be turned on with ignition
key in STOP position or removed, by moving
the ring nut A first to positionOand then to
position.
The warning light
switches on on the
instrument panel. When the direction indicator
stalk is activated the side for the lights (left or
right) can be selected.
AUTOMATIC LIGHTING CONTROL
(AUTOLIGHT) (Dusk sensor)
(for versions/markets,
where provided)
This infrared LED sensor, combined with the rain
sensor and located on the windscreen, detects
the variations in outside brightness depending on
the light sensitivity set with the Setup Menu:
the greater the sensitivity, the less external light is
required to activate the exterior lights.
Activation
The dusk sensor activates when ring nut A fig. 34
is turned to
. In this way the side lights and
dipped headlights are activated automatically
according to the external light level.When the lights are turned on by the sensor, the
fog lights (for versions/markets, where provided)
and the rear fog lights may be turned on. When
the lights are automatically switched off, the front
and rear fog lights (if activated) are also switched
off. The next time the lights are switched on
automatically, the fog lights must be reactivated
manually (if required).
With the sensor active, it is possible to flash the
headlights but the main beam headlights cannot
be switched on. To activate these lights, turn
the ring nut A to
and activate the fixed dipped
beam headlights.
When the lights have been activated automatically
and are then switched off by the sensor, the
dipped beam headlights are switched off first,
followed by the side lights a few seconds later. If
the sensor is activated but is malfunctioning,
the side lights and dipped beam headlights are
switched on irrespective of the outside light level
and the sensor failure is indicated on the
instrument panel display. It is also possible to
deactivate the sensor and switch on the side lights
and dipped beam headlights.
IMPORTANT The sensor is unable to detect the
presence of fog. Under these circumstances, these
lights are therefore turned on manually.
48GETTING TO
KNOW YOUR CAR
SAFETY
STARTING
AND
DRIVING
WARNING LIGHTS
AND MESSAGES
IN AN EMERGENCY
SERVICING AND
MAINTENANCE
TECHNICAL
SPECIFICATIONS
INDEX
Page 51 of 299

MAIN BEAM HEADLIGHTS
To switch on the main beam headlights, with ring
nut in position
, push the stalk forward toward
the dashboard (unstable position). The
warning light will come on in the instrument
panel.
When the stalk is released, the lights deactivate,
the main beam headlights reactivate and thewarning light switches off.
It is not possible to switch on the main beam
headlights in fixed mode if the automatic lighting
control system is active.
FLASHING
You can flash the headlights by pulling the stalk
towards the wheel (unstable position). Thewarning light will come on in the instrument
panel.
DIRECTION INDICATORS
Bring the stalk to the (stable) position:
upwards:right-hand direction indicator
activation;
downwards:left-hand direction indicator
activation.
Warning light
or
should flash in the
instrument panel. The indicators switch off
automatically when the steering wheel is
straightened.Lane change function
If you wish to signal a lane change, put the left
stalk in the unstable position for less than half a
second. The direction indicator on the selected
side flashes three times and then switches off
automatically.
“FOLLOW ME HOME” DEVICE
This allows the space in front of the car to be lit
up for a certain period of time.
Activation:with the ignition key on STOP or
removed, pull the stalk towards the steering wheel
within 2 minutes from when the engine is turned
off.
At each single movement of the stalk, the lights
will remain on for an extra 30 seconds up to a
maximum of 210 seconds; then the lights are
switched off automatically.
Each time the stalk is operated, the
warning
light on the instrument panel switches on and the
display also shows a message and how long the
function will remain active.
The
warning light switches on when the stalk
is first moved and stays on until the function is
automatically deactivated. Each time the stalk is
activated it increases the time that the lights
remain on.
Deactivation:keep the stalk pulled towards the
steering wheel for more than two seconds.
49GETTING TO
KNOW YOUR CARSAFETY
STARTING
AND
DRIVING
WARNING LIGHTS
AND MESSAGES
IN AN EMERGENCY
SERVICING AND
MAINTENANCE
TECHNICAL
SPECIFICATIONS
INDEX
Page 52 of 299

EXTERNAL COURTESY LIGHTS
This function lights up the car and the space
around it when the doors are unlocked.
Activation:when the car is parked and the doors
are unlocked by pressing the
button on the
remote control (or the luggage compartment is
unlocked by pressing
), the dipped beam
headlights, side lights and number plate lights are
activated.
The lights remain lit for approximately 25 seconds
unless the doors and boot are locked again with
the remote control or the doors or boot are opened
and reclosed. In these cases they go out after 5
seconds.
The exterior courtesy lights can be enabled/
disabled using the Setup Menu (see the paragraph
“Menu Items” in this chapter).
WINDOW CLEANINGThe right stalk controls windscreen wiper/washer
and heated rear window wiper/washer operation.
WINDSCREEN WASHER/WIPER
They can be operated only with the ignition key
turned to MAR.
The ring nut A fig. 35 can be moved to four
different positions:
windscreen wiper off.intermittent operation.continuous slow operation.continuous fast operation.
fig. 35
L0F0126
50GETTING TO
KNOW YOUR CAR
SAFETY
STARTING
AND
DRIVING
WARNING LIGHTS
AND MESSAGES
IN AN EMERGENCY
SERVICING AND
MAINTENANCE
TECHNICAL
SPECIFICATIONS
INDEX
Page 100 of 299
❒If the sensors are dirty, covered by snow, ice or
mud or are repainted compared to the original
conditions, the system operation could be
strongly degraded. It is vital that the sensors are
always clean in order for the system to work
properly. During cleaning make sure not to
scratch or damage them; avoid using dry or
rough cloths. The sensors should be washed
using clean water with the addition of car
shampoo if necessary. In washing stations, clean
the sensors quickly, keeping the steam jet/high
pressure washing nozzles at least 10 cm away
from the sensors.
❒Ultrasonic sound sources (e.g. pneumatic brakes
of trucks or air drills) nearby could negatively
influence the sensor performance.
❒Sensors may detect a non-existent obstacle
(echo noise) due to mechanical noises, for
example while washing the car, in the case of
rain, strong wind, hail.
❒The sensors might not detect objects of a
particular shape or made from particular
materials (very thin poles, trailer beams, panels,
nets, bushes, parking deterrents, rubbish bins,
motor vehicles, etc.). Always take great care
to check that the car and its path are actually
compatible with the parking area identified
by the system.
❒The use of (one or more) tyres or wheels of a
different size to those at the time the car was
purchased could affect the operation of the
system.❒If the battery is disconnected or is nearly flat,
the Magic Parking system will not be available
until the vehicle is driven for a few hundred
metres on a curved path to initialise the system.
❒If a trailer is fitted (with the plug correctly
inserted) the Magic Parking system will
automatically be disabled.
❒If the Magic Parking system is in "search in
progress" mode, the system could incorrectly
identify a parking space and carry out the
manoeuvre (e.g. by a junction, carriage track,
roads crossing the direction of travel, etc.)
❒In the case of parking manoeuvres on roads on a
gradient, the performance of the system could
be inferior and it may deactivate.
❒If a parking manoeuvre is being carried out
between two parked vehicles alongside the
pavement, the Magic Parking system may cause
the car to mount the pavement.
❒Some manoeuvres at very tight bends may not
be carried out.
❒Take great care to ensure that conditions do not
change during the parking manoeuvre (e.g. if
there are persons and/or animals in the parking
area, moving cars, etc.) and intervene
immediately if necessary.
❒During parking manoeuvres, pay special
attention to cars approaching from the opposite
direction. Always follow the Highway Code.
98GETTING TO
KNOW YOUR CAR
SAFETY
STARTING
AND
DRIVING
WARNING LIGHTS
AND MESSAGES
IN AN EMERGENCY
SERVICING AND
MAINTENANCE
TECHNICAL
SPECIFICATIONS
INDEX
Page 155 of 299
SIDE LIGHTS AND DIPPED
HEADLAMPS (green)/FOLLOW ME
HOME (green)
SIDE LIGHTS AND DIPPED HEADLAMPS
The warning light comes on when side/tail lights
or dipped headlamps are turned on.
FOLLOW ME HOME
This warning light switches on (on some versions
together with a message and a symbol in the
display) when this device is used (see the
paragraph "Follow me home" in the chapter
"Knowing your car").MAIN BEAMS (blue)
The warning light switches on when the main
beams are turned on.LEFT-HAND DIRECTION
INDICATOR (green) (intermittent)
The light comes on when the direction indicator
control stalk is moved downwards or, together
with the right-hand indicator, when the hazard
warning light button is pressed.
RIGHT-HAND DIRECTION
INDICATOR (green) (intermittent)
The warning light turns on when the direction
indicator control lever is moved upwards or,
together with the left indicator, when the hazard
warning light button is pressed.“DUALDRIVE” ELECTRIC POWER
STEERING ON (green)
The CITY indication appears (an icon appears on
the display on some versions ) when "Dualdrive"
electric power steering is activated by pressing
the corresponding button (see the paragraph
"Dualdrive electric power steering" in the chapter
"Knowing your car"). Press the button again to
switch off the CITY indication (or the icon on the
display).DOORS/BONNET/LUGGAGE
COMPARTMENT OPEN
The warning light switches on (on some versions
together with a message and a symbol in the
display) when one or more doors, the boot or the
bonnet or the tailgate are not properly closed.
An acoustic signal is activated with the doors open
and the car moving.
153GETTING TO KNOW
YOUR CAR
SAFETY
STARTING AND
DRIVINGWARNING LIGHTS
AND
MESSAGESIN AN
EMERGENCY
SERVICING AND
MAINTENANCE
TECHNICAL
SPECIFICA
TIONS
INDEX
Page 174 of 299

REPLACING EXTERIOR BULBSFor the type of bulb and power rating, see
“Changing a bulb".
FRONT LIGHT UNITS
These contain the bulbs for the side lights/day
lights (DRL), dipped beams, main beams and
direction indicators. The bulbs are arranged
as follows fig. 125:ASide lights/day lights and main beam headlightsBDipped beam headlightsCDirection indicatorsSIDE LIGHTS/DAY LIGHTS (DRL)
To change the bulb, proceed as follows:
❒remove cover A fig. 125;
❒remove snap-fitted bulb holder B fig. 126,
remove the bulb C and replace it;
❒refit the new bulb then reinsert the bulb holder
B in its housing;
❒then refit the cover A fig. 125.fig. 125
L0F0033
fig. 126
L0F0069
172
GETTING TO KNOW
YOUR CAR
SAFETY
STARTING AND
DRIVING
WARNING LIGHTS
AND MESSAGESIN AN EMERGENCYSERVICING AND
MAINTENANCE
TECHNICAL
SPECIFICA
TIONS
INDEX
Page 175 of 299
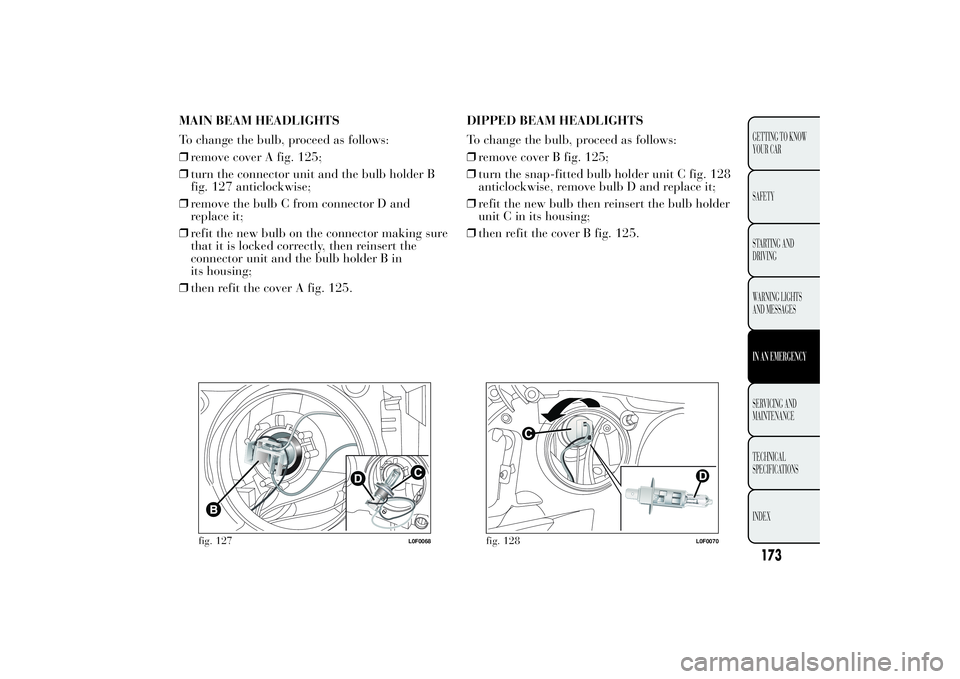
MAIN BEAM HEADLIGHTS
To change the bulb, proceed as follows:
❒remove cover A fig. 125;
❒turn the connector unit and the bulb holder B
fig. 127 anticlockwise;
❒remove the bulb C from connector D and
replace it;
❒refit the new bulb on the connector making sure
that it is locked correctly, then reinsert the
connector unit and the bulb holder B in
its housing;
❒then refit the cover A fig. 125.DIPPED BEAM HEADLIGHTS
To change the bulb, proceed as follows:
❒remove cover B fig. 125;
❒turn the snap-fitted bulb holder unit C fig. 128
anticlockwise, remove bulb D and replace it;
❒refit the new bulb then reinsert the bulb holder
unit C in its housing;
❒then refit the cover B fig. 125.
fig. 127
L0F0068
fig. 128
L0F0070
173GETTING TO KNOW
YOUR CAR
SAFETY
STARTING AND
DRIVING
WARNING LIGHTS
AND MESSAGESIN AN EMERGENCYSERVICING AND
MAINTENANCE
TECHNICAL
SPECIFICA
TIONS
INDEX
Page 190 of 299

FUSE SUMMARY TABLEEngine compartment fuse box FUSE AMPS
BCM F01 60
RDU F02 50
Ignition switch F03 20
BSM1 (pump) F04 40
EPS F05 70
Engine single speed cooling fan (heated engines) F06 20
Engine dual speed cooling fan solenoid valve/Engine
cooling fan low speed (conditioned engines)F06 30
Engine cooling electric fan high speed F07 40
Fog lights F08 30
Headlamp washer pump F09 20
Horns F10 15
Engine management system (secondary loads) F11 10
Main beam headlights F14 15
Sunroof motor F15 20
+15 ECM/coil T10 F16 7,5
ECM main loads (versions 0.9 TwinAir 85 HP/
F17 10
'+30 ECM/coil T09 F18 5
Fuel pump F19 15
188
GETTING TO KNOW
YOUR CAR
SAFETY
STARTING AND
DRIVING
WARNING LIGHTS
AND MESSAGESIN AN EMERGENCYSERVICING AND
MAINTENANCE
TECHNICAL
SPECIFICA
TIONS
INDEX
1.2 8V 69 HP)
Page 228 of 299

SUSPENSIONVersions Front Rear
0.9 TwinAir 85 HP
Independent, MacPherson type with
lower transversal wishbones secured to
an auxiliary crossmemberInterconnected wheels by means of
sion beam 1.2 8V 69 HP
1.3 16V MultiJetSTEERINGVersions Turning circle (m) Type
0.9 TwinAir 85 HP9,4
Rack and pinion with electric power
steering 1.2 8V 69 HP9,4
9,4
1.3 16v MultiJet
226
GETTING TO KNOW
YOUR CAR
SAFETY
STARTING AND
DRIVING
WARNING LIGHTS
AND MESSAGES
IN AN EMERGENCY
SERVICING AND
MAINTENANCE
TECHNICAL
SPECIFICA
TIONS
INDEX
tor
Page 294 of 299
Control panel and
instruments ........................ 6
Controls .......................... 59-68
Cruise control....................... 54D
ashboard........................... 5
Daytime Running Lights
(DRL)
– "Daytime Running
Lights" ............................ 47
Diesel filter ......................... 209
Dipped beam headlights
– bulb replacement............ 173
– control ............................. 47
Dipped headlights
– bulb replacement............ 173
– control ............................. 47
Direction indicators
– bulb replacement............ 174
– control ............................. 49
Display................................. 9
– Control buttons................ 11
Doors ................................... 65
– Door lock/unlock ............. 65
DPF (Diesel Particulate
Filter) ............................... 108
DPF filter ........................... 108Driving style ....................... 137
D.R.L. (Daytime Running
Lights) ............................... 47
Dualdrive (electric power
steering) ............................. 88
Dualdrive electric power
steering .............................. 88
Dualdrive (electric power
steering) ............................. 88
Dusk sensor.......................... 48
Electric windows ................. 68
Engine codes....................... 222
Engine compartment
– checking fluid levels ....... 203
– opening/closing ............... 74
– washing .......................... 217
Engine coolant
temperature indicator ......... 8
Engine
– Engine cooling system
fluid level ....................... 207
– identification codes......... 222
– marking ......................... 221
– technical data ................. 223
Engine oil
– consumption................... 207
– level check...................... 207– specifications .................. 238
Environment protection ...... 108
EOBD system ....................... 88
EOBD (system) .................... 88
ESC system .......................... 80
ESC (system) ....................... 80
External courtesy lights ........ 50
External lights...................... 47
Extinguisher......................... 63
Fitting "Universal" child
seat ................................... 118
Fix&Go Automatic Kit ........ 163
Fluids and lubricants
(specifications) .................. 238
Fog lights............................ 175
Follow me home (device) ..... 49
Front roof light
– bulb replacement............ 178
– control ............................. 56
Fuel level gauge ................... 8
Fuel reserve ........................ 236
Fuel savings ........................ 136
Fuse boxes (location) .......... 183
Fuses
– Dashboard fuse box ........ 185
292
GETTING TO KNOW
YOUR CAR
SAFETY
STARTING AND
DRIVING
WARNING LIGHTS
AND MESSAGES
IN AN EMERGENCY
SERVICING AND
MAINTENANCE
TECHNICAL
SPECIFICATIONS
INDEX