Lancia Ypsilon 2018 Owner handbook (in English)
Manufacturer: LANCIA, Model Year: 2018, Model line: Ypsilon, Model: Lancia Ypsilon 2018Pages: 200, PDF Size: 4.53 MB
Page 121 of 200
fit the standard wheel inserting the 4
bolts into the holes;
using the wrench provided, tighten
the fastening bolts;
lower the vehicle and remove the
jack;
using the wrench provided, fully
tighten the bolts in the sequence
shown previously.
press-fit the wheel cap, aligning the
special splining (on the cap) with the
inflation valve;
place the inner part of the hub cap
on the wheel rim;
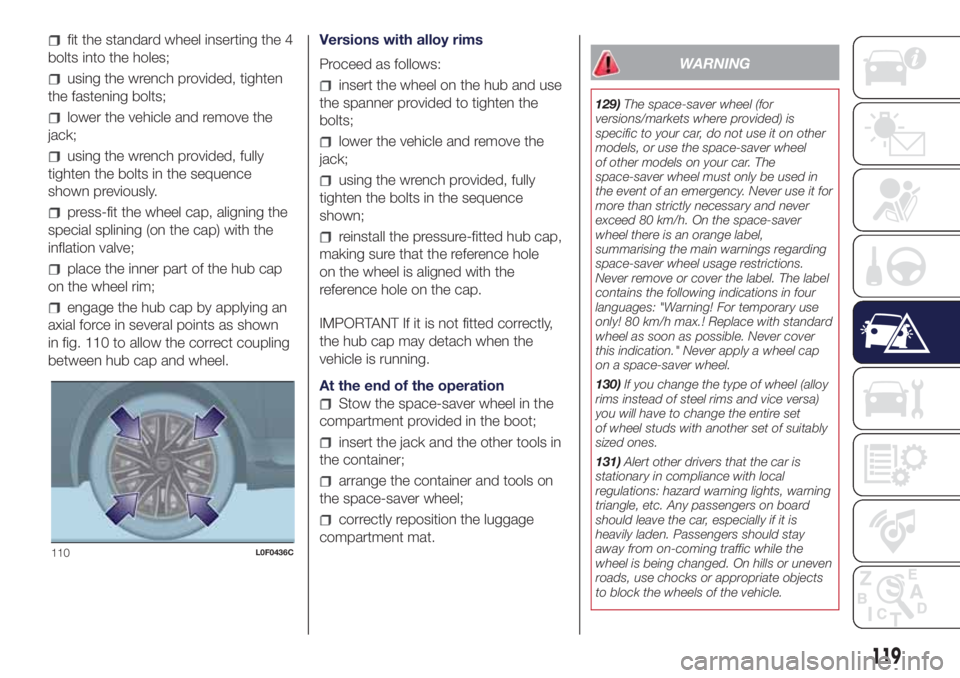
engage the hub cap by applying an
axial force in several points as shown
in fig. 110 to allow the correct coupling
between hub cap and wheel.Versions with alloy rims
Proceed as follows:
insert the wheel on the hub and use
the spanner provided to tighten the
bolts;
lower the vehicle and remove the
jack;
using the wrench provided, fully
tighten the bolts in the sequence
shown;
reinstall the pressure-fitted hub cap,
making sure that the reference hole
on the wheel is aligned with the
reference hole on the cap.
IMPORTANT If it is not fitted correctly,
the hub cap may detach when the
vehicle is running.
At the end of the operation
Stow the space-saver wheel in the
compartment provided in the boot;
insert the jack and the other tools in
the container;
arrange the container and tools on
the space-saver wheel;
correctly reposition the luggage
compartment mat.
WARNING
129)The space-saver wheel (for
versions/markets where provided) is
specific to your car, do not use it on other
models, or use the space-saver wheel
of other models on your car. The
space-saver wheel must only be used in
the event of an emergency. Never use it for
more than strictly necessary and never
exceed 80 km/h. On the space-saver
wheel there is an orange label,
summarising the main warnings regarding
space-saver wheel usage restrictions.
Never remove or cover the label. The label
contains the following indications in four
languages: "Warning! For temporary use
only! 80 km/h max.! Replace with standard
wheel as soon as possible. Never cover
this indication." Never apply a wheel cap
on a space-saver wheel.
130)If you change the type of wheel (alloy
rims instead of steel rims and vice versa)
you will have to change the entire set
of wheel studs with another set of suitably
sized ones.
131)Alert other drivers that the car is
stationary in compliance with local
regulations: hazard warning lights, warning
triangle, etc. Any passengers on board
should leave the car, especially if it is
heavily laden. Passengers should stay
away from on-coming traffic while the
wheel is being changed. On hills or uneven
roads, use chocks or appropriate objects
to block the wheels of the vehicle.
110L0F0436C
119
Page 122 of 200
132)The vehicle's driving characteristics
will be modified with the space-saver wheel
fitted. Avoid violent acceleration and
braking, abrupt steering and fast cornering.
The overall duration of the space-saver
wheel is of about 3000 km, after which the
relevant tyre must be replaced with another
one of the same type. Never install a
standard tyre on a rim that is designed for
use with a space-saver wheel. Have the
wheel repaired and refitted as soon as
possible. Using two or more space-saver
wheels at the same time is forbidden.
Do not apply grease to the bolt threads
before fitting: they could come unscrewed.
133)The jack shall only be used for raising
the car model it has been supplied with.
Never use the jack for other purposes,
such as raising other car models. Never
use the jack for repair operations under the
vehicle. Incorrect positioning of the jack
may cause the vehicle to fall. Do not use
the jack for loads higher than the one
shown on its label. The space-saver wheel
cannot be fitted with snow chains. If a
front (drive) tyre is punctured and chains
are needed, use a standard wheel from the
rear axle and install the space-saver wheel
on the rear axle. In this way, with two
normal drive wheels at the front axle, it is
possible to use snow chains.
134)If the hub cap is not fitted correctly, it
may come off when the car is travelling.
Never tamper with the inflation valve. Never
introduce tools of any kind between rim
and tyre. Check tyre and space-saver
wheel pressures regularly, complying with
the values given in the "Technical
specifications" chapter.135)Be very careful when removing/
refitting the hub cap due to the proximity of
the brake disc. We recommend using
heat protection gloves.
WARNING
54)When turning the jack handle make
sure that it can turn freely without scraping
your hand against the ground. The moving
components of the jack ("worm screw"
and joints) can also cause injuries: avoid
touching them. If you come into contact
with lubricating grease, clean yourself
thoroughly.
55)Contact a Lancia Dealership as soon
as possible to have the correct tightening
of the wheel bolts checked.
"Fix&Go Automatic"
KIT
136) 137) 138) 139) 140)
56)3)
DESCRIPTION
It is located in a special container in the
luggage compartment. The container
also includes a screwdriver and the tow
hook.
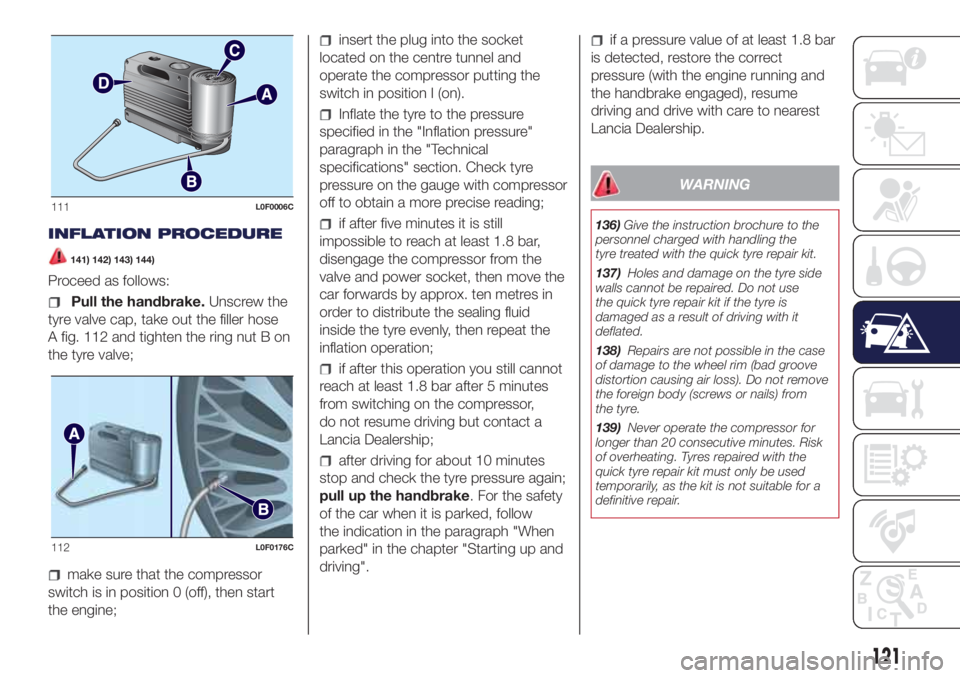
The kit fig. 111 also contains:
a spray bottle A with the sealant,
equipped with filling pipe B;
sticker C bearing the notice “max.
80 km/h”, to be placed in a position
visible to the driver (on the instrument
panel) after fixing the tyre;
a compressor D including a pressure
gauge and connections, found in the
compartment;
instruction brochure, to be used for
prompt and correct use of the quick
tyre repair kit and then to be handed to
the personnel charged with handling
the treated tyre;
a pair of protective gloves located in
the side compartment of the
compressor;
adapters for inflating different
elements.
120
IN AN EMERGENCY
Page 123 of 200
INFLATION PROCEDURE
141) 142) 143) 144)
Proceed as follows:
Pull the handbrake.Unscrew the
tyre valve cap, take out the filler hose
A fig. 112 and tighten the ring nut B on
the tyre valve;
make sure that the compressor
switch is in position 0 (off), then start
the engine;
insert the plug into the socket
located on the centre tunnel and
operate the compressor putting the
switch in position I (on).
Inflate the tyre to the pressure
specified in the "Inflation pressure"
paragraph in the "Technical
specifications" section. Check tyre
pressure on the gauge with compressor
off to obtain a more precise reading;
if after five minutes it is still
impossible to reach at least 1.8 bar,
disengage the compressor from the
valve and power socket, then move the
car forwards by approx. ten metres in
order to distribute the sealing fluid
inside the tyre evenly, then repeat the
inflation operation;
if after this operation you still cannot
reach at least 1.8 bar after 5 minutes
from switching on the compressor,
do not resume driving but contact a
Lancia Dealership;
after driving for about 10 minutes
stop and check the tyre pressure again;
pull up the handbrake. For the safety
of the car when it is parked, follow
the indication in the paragraph "When
parked" in the chapter "Starting up and
driving".
if a pressure value of at least 1.8 bar
is detected, restore the correct
pressure (with the engine running and
the handbrake engaged), resume
driving and drive with care to nearest
Lancia Dealership.
WARNING
136)Give the instruction brochure to the
personnel charged with handling the
tyre treated with the quick tyre repair kit.
137)Holes and damage on the tyre side
walls cannot be repaired. Do not use
the quick tyre repair kit if the tyre is
damaged as a result of driving with it
deflated.
138)Repairs are not possible in the case
of damage to the wheel rim (bad groove
distortion causing air loss). Do not remove
the foreign body (screws or nails) from
the tyre.
139)Never operate the compressor for
longer than 20 consecutive minutes. Risk
of overheating. Tyres repaired with the
quick tyre repair kit must only be used
temporarily, as the kit is not suitable for a
definitive repair.
111L0F0006C
112L0F0176C
121
Page 124 of 200

140)The information required by the
applicable law on chemicals for men's
health and environment protection and the
safe use of the sealing fluid is reported
on the packaging label. The respect of all
indications included on the label is
essential to ensure product safety and
effectiveness. Please be reminded to
carefully read the label before use. The
product user is responsible for any
damages caused by an improper use. The
sealing fluid has an expiry date. Replace
the bottle if the sealant has expired.
141)Put on the protective gloves provided
together with the quick tyre repair kit.
142)Apply the adhesive label where it can
be easily seen by the driver as a reminder
that the tyre has been treated with the
quick repair kit. Drive carefully, particularly
on bends. Do not exceed 80 km/h. Avoid
sudden acceleration or braking.
143)If the pressure has fallen below 1.8
bar, do not drive any further: the quick tyre
repair kit cannot guarantee the correct
hold because the tyre is too damaged.
Contact a Lancia Dealership.
144)Always indicate that the tyre was
repaired using the quick tyre repair kit. Give
the leaflet to the personnel charged with
handling the tyre treated with the tyre
repair kit.
WARNING
56)In the event of a puncture caused by
foreign bodies, the kit may be used to
repair tyres showing damage on the track
or shoulder up to max 4 mm diameter.
WARNING
3)Dispose of the bottle and the sealant
liquid properly. Have them disposed of in
compliance with national and local
regulations.
4)Apply the adhesive label where it can be
easily seen by the driver as a reminder
that the tyre has been treated with the
quick repair kit. Drive carefully, particularly
on bends. Do not exceed 80 km/h. Avoid
sudden acceleration or braking.
EMERGENCY
STARTING
If the battery is flat, a jump starting can
be performed using the battery and
the cables of another vehicle, or using a
booster battery.
IMPORTANT NOTES
Do not use an auxiliary battery or any
other source of external supply with
a voltage above 12 V: the battery, the
starter, the alternator and the electrical
system of the vehicle could be
damaged.
Do not attempt jump starting if the
battery is frozen. The battery could
break and explode!
JUMP STARTING
145) 146)57) 58)
If the battery is flat, it is possible to start
the engine using an auxiliary battery
with the same capacity or a little higher
than the flat one.
Proceed as follows to start the engine
fig. 113:
connect the positive terminals (+
near the terminal) of the two batteries
with a jump lead;
122
IN AN EMERGENCY
Page 125 of 200

with a second lead, connect the
negative terminal–of the auxiliary
battery to an earth point
on
the engine or the gearbox of the car to
be started;
start the engine;
when the engine has been started,
remove the leads reversing the order
above.
For versions with Start&Stop system, to
carry out the jump starting procedure,
refer to paragraph “Start&Stop system”
in the “Knowing your vehicle” section.
If after a few attempts the engine does
not start, do not persist but contact
a Lancia Dealership.IMPORTANT Do not directly connect
the negative terminals of the two
batteries: sparks could ignite explosive
gas released from the battery. If the
auxiliary battery is installed on another
car, prevent accidental contact
between metallic parts of the two cars.
WARNING
145)This starting procedure must be
performed by expert personnel because
incorrect actions could cause electrical
discharge of considerable intensity.
Furthermore, battery fluid is poisonous and
corrosive: avoid contact with skin and
eyes. Keep naked flames and lighted
cigarettes away from the battery and do
not cause sparks.
146)Remove any metal objects (e.g. rings,
watches, bracelets), that might cause an
accidental electrical contact and cause
serious injury.
WARNING
57)Never use a fast battery-charger to
start the engine as this could damage the
electronic systems of your vehicle,
particularly the ignition and engine fuel
supply control units.58)Do not connect the cable to the
negative terminal (–) of the flat battery. The
following spark could lead to battery
explosion and cause serious harm. Only
use the specific earth point; do not use any
other exposed metallic part.
113L0F0084C
123
Page 126 of 200
FUEL CUT-OFF
SYSTEM
147)
FUEL CUT-OFF SYSTEM
This intervenes in the case of an impact
causing:
the interruption of the fuel supply
with the engine consequently cutting
out;
the automatic unlocking of the
doors;
turning on of the lights inside the
vehicle;
the switching on of the hazard
warning lights.
On some versions, the intervention of
the system is indicated by a message
shown on the display.
IMPORTANT Carefully check the vehicle
for fuel leaks, for instance in the engine
compartment, under the vehicle or
near the tank area. After an impact, turn
the ignition key to STOP to prevent the
battery from running down.
To restore the correct operation of the
vehicle, proceed as follows:
turn the ignition key to the MAR
position;
activate the right direction indicator;
deactivate the right direction
indicator;
activate the left direction indicator;
deactivate the left direction indicator;
activate the right direction indicator;
deactivate the right direction
indicator;
activate the left direction indicator;
deactivate the left direction indicator;
ignition key turned to the OFF
position;
turn the ignition key to the MAR-ON
position.
LPG / Natural Power versions:inthe
event of an impact, petrol supply is
immediately cut-off, the LPG safety
valves are closed and the injection is
interrupted, switching off the engine.
WARNING
147)If, after an impact, you smell fuel or
notice leaks from the fuel system, do
not reactivate the system to avoid the risk
of fire.
TOWING THE
VEHICLE
148) 149) 150) 151)
The tow hook, which is supplied with
the vehicle, is housed in the tool box,
under the carpet in the luggage
compartment.
ATTACHING THE TOW
RING
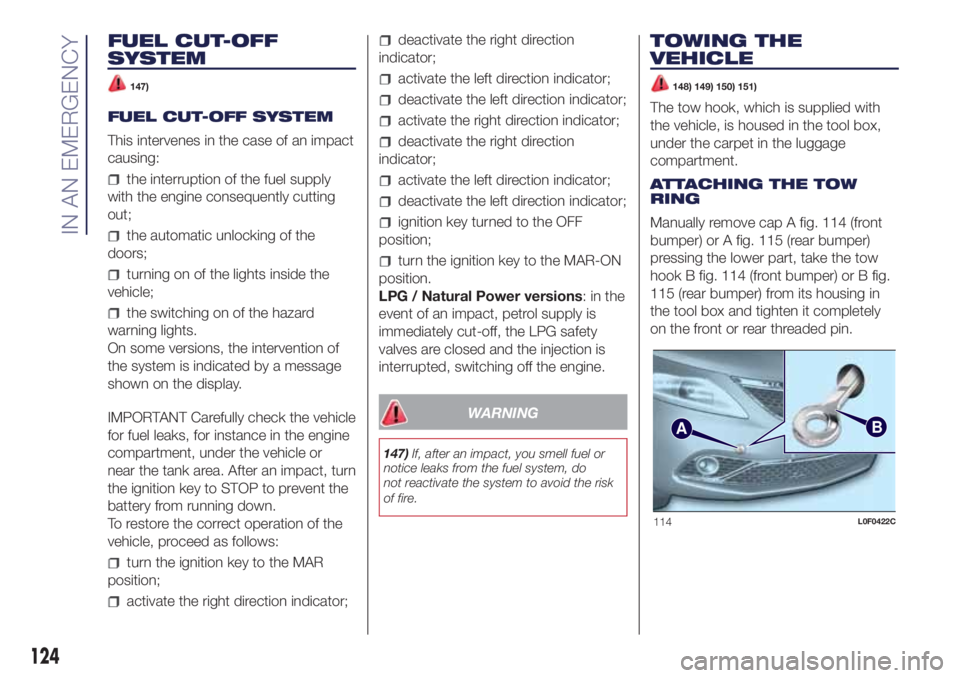
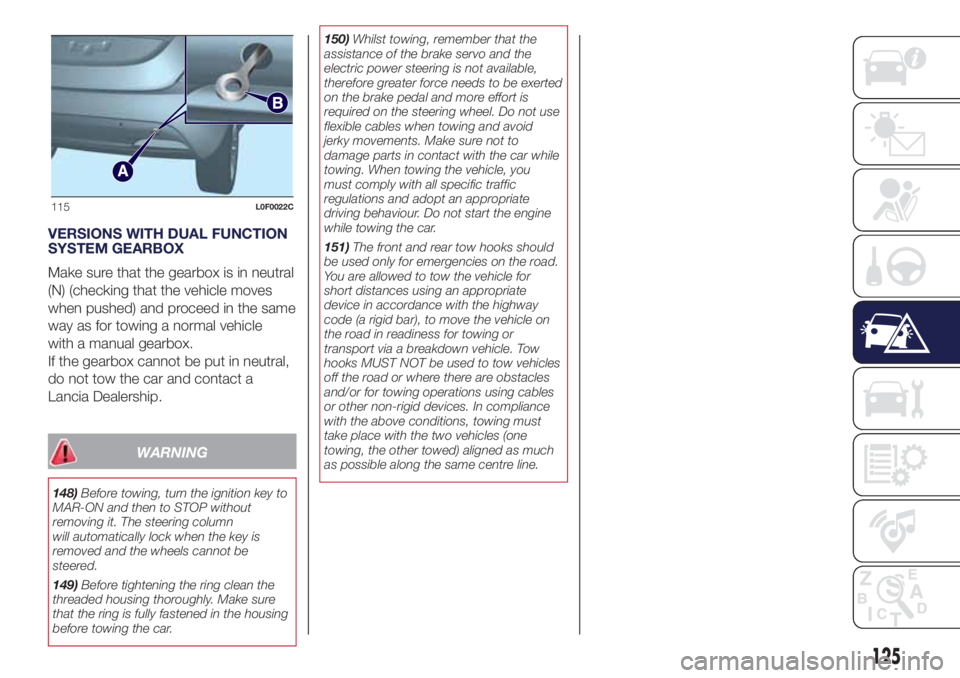
Manually remove cap A fig. 114 (front
bumper) or A fig. 115 (rear bumper)
pressing the lower part, take the tow
hook B fig. 114 (front bumper) or B fig.
115 (rear bumper) from its housing in
the tool box and tighten it completely
on the front or rear threaded pin.
AB
114L0F0422C
124
IN AN EMERGENCY
Page 127 of 200
VERSIONS WITH DUAL FUNCTION
SYSTEM GEARBOX
Make sure that the gearbox is in neutral
(N) (checking that the vehicle moves
when pushed) and proceed in the same
way as for towing a normal vehicle
with a manual gearbox.
If the gearbox cannot be put in neutral,
do not tow the car and contact a
Lancia Dealership.
WARNING
148)Before towing, turn the ignition key to
MAR-ON and then to STOP without
removing it. The steering column
will automatically lock when the key is
removed and the wheels cannot be
steered.
149)Before tightening the ring clean the
threaded housing thoroughly. Make sure
that the ring is fully fastened in the housing
before towing the car.150)Whilst towing, remember that the
assistance of the brake servo and the
electric power steering is not available,
therefore greater force needs to be exerted
on the brake pedal and more effort is
required on the steering wheel. Do not use
flexible cables when towing and avoid
jerky movements. Make sure not to
damage parts in contact with the car while
towing. When towing the vehicle, you
must comply with all specific traffic
regulations and adopt an appropriate
driving behaviour. Do not start the engine
while towing the car.
151)The front and rear tow hooks should
be used only for emergencies on the road.
You are allowed to tow the vehicle for
short distances using an appropriate
device in accordance with the highway
code (a rigid bar), to move the vehicle on
the road in readiness for towing or
transport via a breakdown vehicle. Tow
hooks MUST NOT be used to tow vehicles
off the road or where there are obstacles
and/or for towing operations using cables
or other non-rigid devices. In compliance
with the above conditions, towing must
take place with the two vehicles (one
towing, the other towed) aligned as much
as possible along the same centre line.
115L0F0022C
125
Page 128 of 200

SERVICING AND CARE
Correct servicing permits the
performance of the vehicle to be
maintained over time, as well as limited
running costs and safeguarding the
efficiency of the safety systems.
This chapter explains how.SCHEDULED SERVICING ...............127
ENGINE COMPARTMENT ...............137
BATTERY RECHARGING ................142
WINDSCREEN / REAR WINDOW
WIPERS ..........................................143
LIFTING THE CAR...........................144
BRAKES .........................................144
WHEELS AND TYRES.....................145
BODY .............................................145
126
SERVICING AND CARE
Page 129 of 200
SCHEDULED
SERVICING
Correct servicing is crucial for
guaranteeing a long life for the car
under the best conditions.
For this reason, Lancia has planned a
series of checks and services at fixed
distance intervals and, for versions/
markets, where provided, at fixed time
intervals, as described in the Scheduled
Servicing Plan.
Scheduled Services are offered by all
Lancia Dealerships according to a
set time schedule. If, during each
operation, in addition to the ones
scheduled, the need arises for further
replacements or repairs, these may
be carried out only with the explicit
agreement of the Customer. If your car
is used frequently for towing, the
interval between one service operation
and the next should be reduced.
IMPORTANT NOTES
Scheduled Servicing interventions are
set out by the Manufacturer. Failure
to carry them out can cause the
guarantee to decline.
It is advisable to inform a Lancia
Dealership of any small operating
irregularities without waiting for the next
service.
127
Page 130 of 200
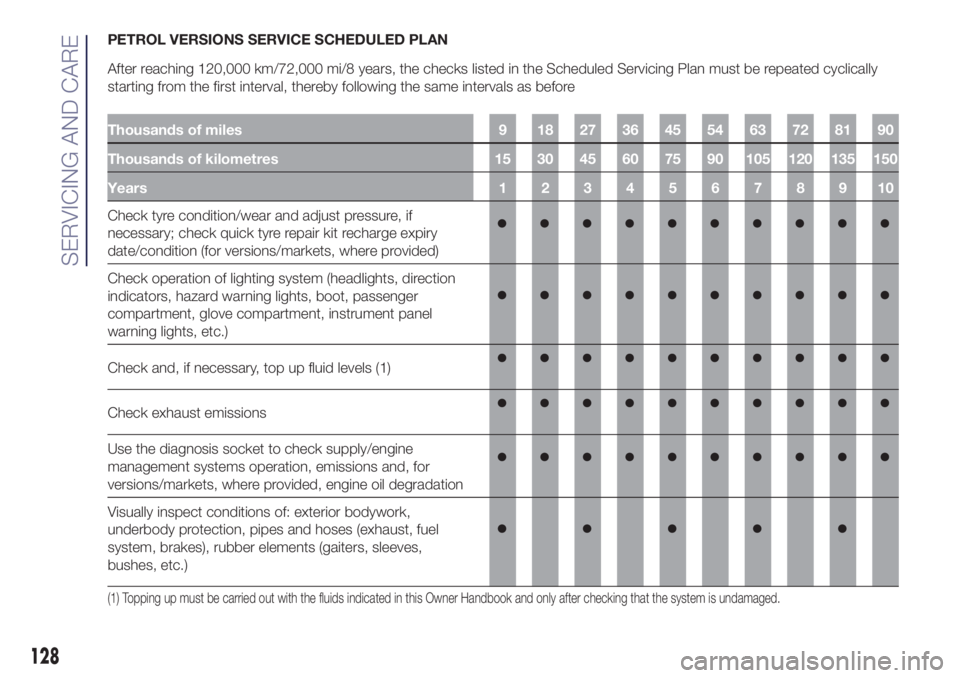
PETROL VERSIONS SERVICE SCHEDULED PLAN
After reaching 120,000 km/72,000 mi/8 years, the checks listed in the Scheduled Servicing Plan must be repeated cyclically
starting from the first interval, thereby following the same intervals as before
Thousands of miles 9 18 27 36 45 54 63 72 81 90
Thousands of kilometres 15 30 45 60 75 90 105 120 135 150
Years12345678910
Check tyre condition/wear and adjust pressure, if
necessary; check quick tyre repair kit recharge expiry
date/condition (for versions/markets, where provided)
Check operation of lighting system (headlights, direction
indicators, hazard warning lights, boot, passenger
compartment, glove compartment, instrument panel
warning lights, etc.)
Check and, if necessary, top up fluid levels (1)
Check exhaust emissions
Use the diagnosis socket to check supply/engine
management systems operation, emissions and, for
versions/markets, where provided, engine oil degradation
Visually inspect conditions of: exterior bodywork,
underbody protection, pipes and hoses (exhaust, fuel
system, brakes), rubber elements (gaiters, sleeves,
bushes, etc.)
(1) Topping up must be carried out with the fluids indicated in this Owner Handbook and only after checking that the system is undamaged.
128
SERVICING AND CARE