fuse box LAND ROVER DISCOVERY 1999 Owner's Guide
[x] Cancel search | Manufacturer: LAND ROVER, Model Year: 1999, Model line: DISCOVERY, Model: LAND ROVER DISCOVERY 1999Pages: 1529, PDF Size: 34.8 MB
Page 976 of 1529

INTERIOR TRIM COMPONENTS
REPAIRS 76-3-11
13.Remove fascia access panel.
+ INTERIOR TRIM COMPONENTS,
REPAIRS, Panel - fascia access - driver's
side.
14.Remove 4 nuts securing fascia to steering
column bracket.
15.Disconnect 3 multiplugs connecting main body
harness to fascia harness.
16.Disconnect fascia harness multiplug from fuse
box.
17.Remove 4 bolts securing glove box and remove
glove box.18. Models with A/C: Disconnect multiplug from
heater controls.
19. Models without A/C: Release temperature
and air distribution control outer cables from
clips on heater casing and disconnect inner
cables from levers.
Page 977 of 1529

INTERIOR TRIM COMPONENTS
76-3-12 REPAIRS
20.Separate blue section from ICE multiplug.
21.Release coaxial cables from fascia panel.
22.Disconnect multiplug from passenger air bag.
23.Disconnect multiplug from blower motor.
24.Working through glove box aperture remove 2
bolts, or 4 bolts if passenger airbag module is
fitted, securing fascia to body.25.Remove 4 bolts securing lower edge of fascia
to mounting brackets on transmission tunnel.
26.Remove 4 bolts securing lower edge of fascia
to brackets on 'A' post.
27.With assistance carefully remove fascia from
vehicle.
28.If renewing fascia, transfer components to new
fascia as necessary.
Refit
1.With assistance carefully fit fascia and tighten
bolts securing lower edge of fascia to 26 Nm
(19 lbf.ft).
2.Tighten bolts securing fascia to body to 26 Nm
(19 lbf.ft).
3.Fit nuts securingfascia to steering column
bracket to 11 Nm (8 lbf.ft).
4.Secure coaxial cables to fascia and secure blue
multiplug to main ICE multiplug.
5. Models with A/C: Connect heater control
multiplug.
6. Models without A/C: Connect temperature
and air distribution inner cables to heater
control levers. Set temperature control knobs to
fully hot, distribution knob to demist position
and, with flap levers fully closed, secure outer
cables to clips on heater casing.
7.Connect multiplugs to blower motor and
passenger air bag (where fitted).
8.Fit glove box and secure with bolts.
9.Connect fascia harness multiplugs to main
harness and fuse box.
10.Position instrument pack and connect
multiplugs.
Page 998 of 1529

SEATS
DESCRIPTION AND OPERATION 76-5-1
SEATS DESCRIPTION AND OPERAT ION
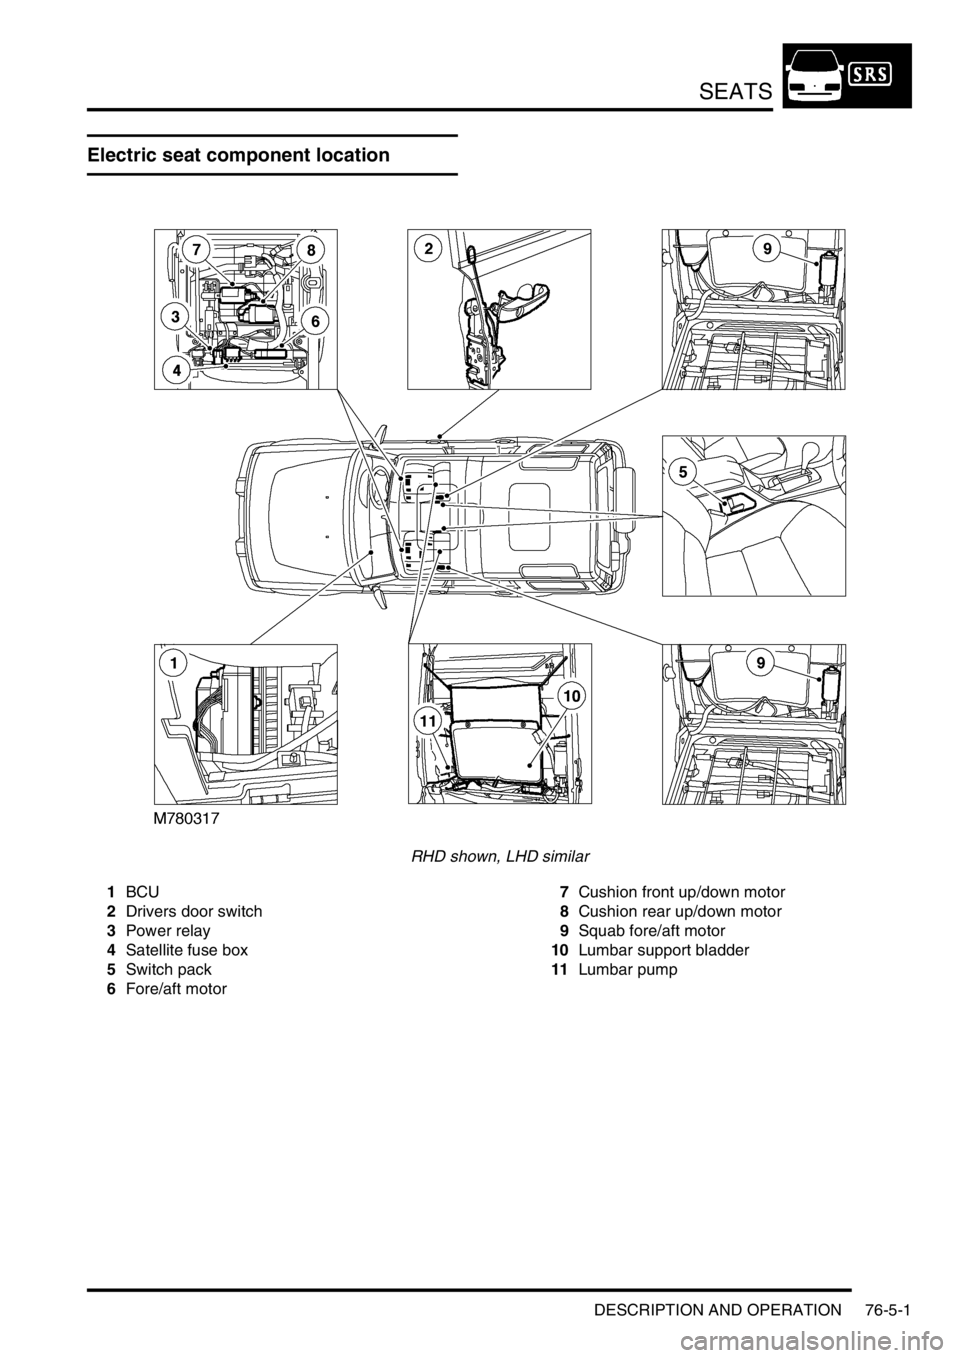
Electric seat component location
RHD shown, LHD similar
1BCU
2Drivers door switch
3Power relay
4Satellite fuse box
5Switch pack
6Fore/aft motor7Cushion front up/down motor
8Cushion rear up/down motor
9Squab fore/aft motor
10Lumbar support bladder
11Lumbar pump
Page 1000 of 1529

SEATS
DESCRIPTION AND OPERATION 76-5-3
1Ignition switch
2BCU
3Driver door switch
4Left seat power relay
5Left seat satellite fuse box
6Left seat switch pack
7Left seat fore/ aft motor
8Left seat cushion front up/ down motor
9Left seat cushion rear up/ down motor
10Left seat squab fore/ aft motor
11Left seat lumbar pump12Left seat lumbar deflate solenoid
13Right seat power relay
14Right seat satellite fuse box
15Right seat switch pack
16Right seat fore/ aft motor
17Right seat cushion front up/ down motor
18Right seat cushion rear up/ down motor
19Right seat squab fore/ aft motor
20Right seat lumbar pump
21Right seat lumbar deflate solenoid
22Passenger front door switch
Page 1001 of 1529

SEATS
76-5-4 DESCRIPTION AND OPERATION
Description - electric seats
General
All markets use the same electric seat system. Electically operated lumbar support is optional. The system consists
of an electrical sub-system and a mechanical sub-system.
The electrical sub-system consists of the following components:
lBCU.
lSeat power relays.
lSeat switch packs.
lSeat fore/ aft motors.
lSeat cushion front up/ down motors.
lSeat cushion rear up/ down motors.
lSeat squab motor.
lLumbar pump.
lLumbar deflate solenoid.
The mechanical sub-system consist of the following components:
lGear wheels.
lRack and pinion assemblies.
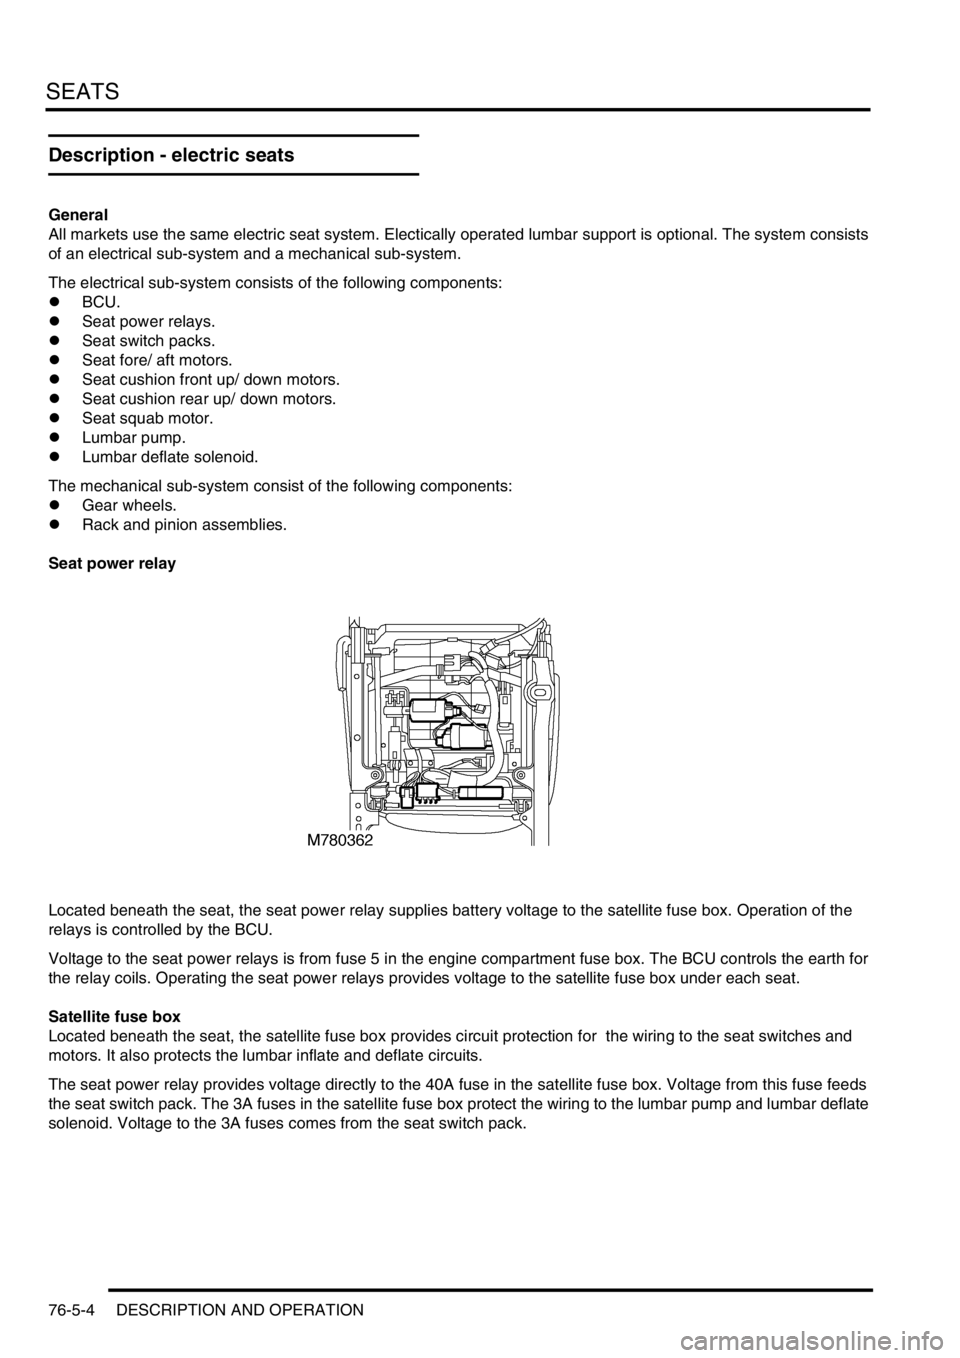
Seat power relay
Located beneath the seat, the seat power relay supplies battery voltage to the satellite fuse box. Operation of the
relays is controlled by the BCU.
Voltage to the seat power relays is from fuse 5 in the engine compartment fuse box. The BCU controls the earth for
the relay coils. Operating the seat power relays provides voltage to the satellite fuse box under each seat.
Satellite fuse box
Located beneath the seat, the satellite fuse box provides circuit protection for the wiring to the seat switches and
motors. It also protects the lumbar inflate and deflate circuits.
The seat power relay provides voltage directly to the 40A fuse in the satellite fuse box. Voltage from this fuse feeds
the seat switch pack. The 3A fuses in the satellite fuse box protect the wiring to the lumbar pump and lumbar deflate
solenoid. Voltage to the 3A fuses comes from the seat switch pack.
Page 1002 of 1529

SEATS
DESCRIPTION AND OPERATION 76-5-5
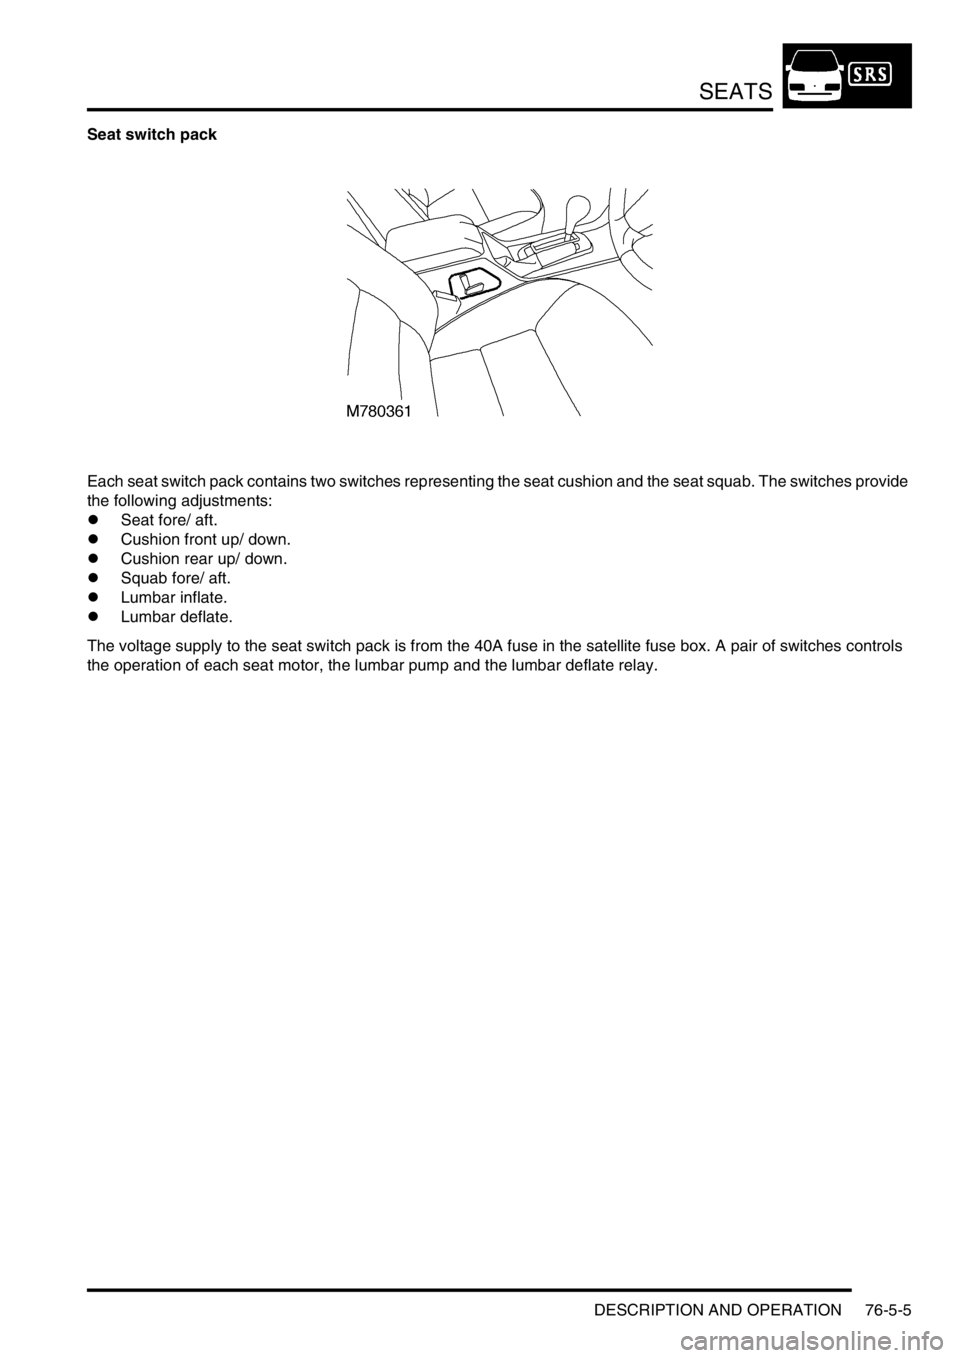
Seat switch pack
Each seat switch pack contains two switches representing the seat cushion and the seat squab. The switches provide
the following adjustments:
lSeat fore/ aft.
lCushion front up/ down.
lCushion rear up/ down.
lSquab fore/ aft.
lLumbar inflate.
lLumbar deflate.
The voltage supply to the seat switch pack is from the 40A fuse in the satellite fuse box. A pair of switches controls
the operation of each seat motor, the lumbar pump and the lumbar deflate relay.
Page 1004 of 1529

SEATS
DESCRIPTION AND OPERATION 76-5-7
Lumbar pump
The lumbar pump inflates a bladder in the squab which provides extra support for the seat occupant. With no load on
the seat it takes approximately 10 seconds to completely inflate the bladder. With a load of 25 kg (55 lb) it takes
approximately 15 seconds to inflate the bladder. A pressure cut off switch in the system will operate at 0.12 to 1.93
bar (1.8 to 28 lbf.in
2). If a problem occurs with the lumbar bladder, e.g. a rupture, the whole lumbar system must be
replaced. The components are not serviceable.
Power comes from the seat switch pack through a 3A fuse in the satellite fuse box. The lumbar pump and the lumbar
deflate solenoid share an earth.
Lumbar deflate solenoid
The lumbar deflate solenoid vents the lumbar bladder to atmosphere to allow air to evacuate the bladder. The average
time to evacuate the bladder with a load of 25 kg (55 lb) is 9 seconds.
Power comes from the seat switch pack through a 3A fuse in the satellite fuse box. The lumbar deflate solenoid and
the lumbar pump share an earth.
Page 1007 of 1529

SEATS
76-5-10 DESCRIPTION AND OPERATION
Heated seat block diagram (electric
seats)
1Passenger compartment fuse box
2Left seat heater switch
3Left seat heater module
4Left seat cushion heater element
5Left seat squab heater element 6Right seat heater switch
7Right seat heater module
8Right seat cushion heater element
9Right seat squab heater element
Page 1008 of 1529

SEATS
DESCRIPTION AND OPERATION 76-5-11
Description - heated seats
Heated seats
The heated seat system is available on both manual seats and electric seats. The electrical sub-system consists of
the following components:
lSeat heater switches.
lSeat heater elements.
lTemperature control unit (if electric seats are fitted).
lTemperature sensor (if electric seats are fitted).
lThermostat (if manual seats are fitted).
Seat heater switches
The seat heater switches supply an ignition feed to either the temperature control unit (vehicles with electric seats) or
directly to the seat heater elements (vehicles with manual seats). When a seat heater switch is operated, current flows
to the seat heater elements causing them to heat the seat.
The ignition feed comes from fuse 15 in the passenger compartment fuse box.
Seat heater elements
The seat heater elements are located in the seat cushion and squab. The cushion and squab heater elements are
wired in series. Total power consumption at 13.5 volts is approximately 115 Watts.
The cushion heater element has an input feed from the temperature control unit or heater switch and an output to the
squab heater element, which outputs to earth.
Page 1035 of 1529

SUNROOF
76-6-4 DESCRIPTION AND OPERATION
System block diagram
1Passenger compartment fuse box
2BCU
3Sunroof ECU
4Front sunroof switch
5Front sunroof motor and microswitch6Rear sunroof - front switch
7Rear sunroof isolation switch
8Rear sunroof - rear switch
9Rear sunroof motor and microswitch